The Complete Chess Course From Beginning To Winning Chess! (2016)
Book Four
How to Play the Black Pieces
Chapter Four
How to Defend Against a Powerful Attack
A famous English philosopher once wrote, “He is happy whose circumstances suit his temper; but he is more excellent who can suit his temper to any circumstance.”
So it is with chessplayers. They love to attack above all; they want to attack at all times, and at all costs. But this kind of chess is akin to an exclusive diet of nesselrode pie.
Chess positions are of all kinds, and we cannot always choose what kind of game we are going to have. If we dislike certain types of positions, our gleeful opponents will be sure to inflict them on us.
Defensive ability is an important quality in chessplayers, and one that will give satisfaction and win many points. Besides, though some of us may flinch from defensive tasks, we really have the determination and perseverance to fight through to victory in a defensive position.
Of course, at some point or other a well-conducted defense must take the form of dynamic counterattack, or even outright attack. This is the reward and even the duty of good defensive play. The following examples show you how it’s done.
Maneuvering in a Crowded Position
Crowded positions are undesirable because your pieces cannot operate to the best advantage. A great master was fond of saying that “crowded positions carry within themselves the germ of defeat.” By this he meant that a player afflicted with a cramped position would gradually be pushed to the wall.
The best way to handle a crowded position is to avoid it. But all the best principles and maxims in the world cannot save us from sometimes getting into unfavorable or difficult situations.
If your pieces are in a crowded position, you must always be on the lookout for opportunities to free yourself. This is easier said than done, for you may look and look for many moves, while the opportunity for freedom may come at only one point and may be rather hidden at that.
Nevertheless the advice is valuable: watch for a chance to free yourself. To be aware of the difficulty and to be determined to solve it, is often half the battle. If you can figure out the freeing method in advance, that is a great help.
Here is a useful hint, illustrated in the following game: the thrust for freedom will generally come in the center.
Old Indian Defense
White - Black
1.d4 Nf6 2.c4 d6 3.Nf3 Nbd7 4.Nc3 e5 5.e4 Be7 6.Bd3 0-0 7.0-0 exd4!? 8.Nxd4 Re8
Black “surrendered the center” on move 7. He now has no pawn on the fifth rank, while White has two pawns on the fourth rank.
The result is White’s pawns control more center squares than Black’s pawns do. Black’s pieces have less maneuvering space in the center than White’s pieces do.
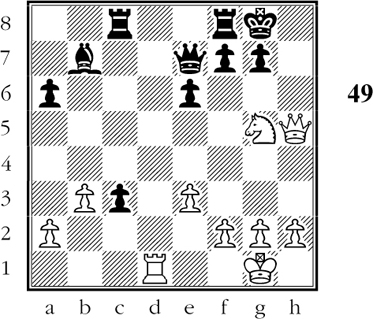
9.b3 Ne5 10.Bc2 a6 11.Bb2 Bd7 12.h3 Bf8 13.f4 Ng6 (D)
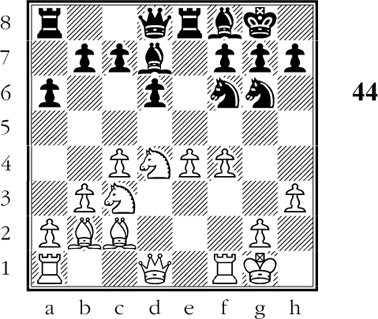
Black must now maneuver ingeniously in the center.
Black’s position looks uncomfortably cramped, but he has his compensations. By attacking White’s e-pawn, he limits White’s freedom of action. Also, Black is well posted to prevent the aggressive advance e4-e5.
But Black has other ideas. His main idea is to free himself some time later by …d5. First he must play …c6 to make that move possible. Second, he must play …d5 at a time when the powerful reply e4-e5 is not feasible. The latter course of the game will show how Black carries out his idea.
14.Qf3 c6! 15.Rae1 b5! 16.Qd3 Qc7 17.Kh1
Black’s judgment has been vindicated. White’s development looks very impressive, but with e4-e5 or f4-f5 ruled out, Black has little to fear.
(Why is f4-f5 ruled out? Because the move allows …Ne5, giving one of the black knights a magnificent and unassailable center post.)
17…Rad8 18.Bb1 b4! (D)
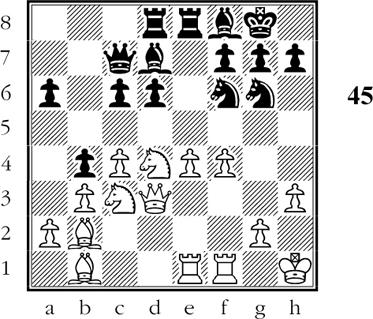
Black is gradually freeing his position. Black has made considerable progress. By driving off White’s queen knight, he brings himself an important step nearer to playing …d5. (White will now have one piece less bearing down on the important d5-square.)
Black has scored another point as well. By making White’s b3-b4 impossible, he is able to establish a black knight on the c5-square. From that point the knight will bear down strongly on the center.
19.Nd1 Bc8! 20.Qf3 Nd7! 21.Nf5 Nc5! 22.g4? Ne6!
Already taking advantage of White’s weakening 22nd move, Black attacks the f-pawn and prepares for the final freeing maneuver.
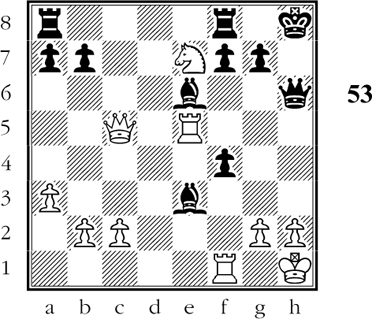
23.Qg3 Bb7! 24.h4 d5!! (D)

Black has freed his game!
At just the idea moment, and with the maximum amount of impact, Black has freed his game.
Note that 24…d5!! is very strong because it opens up the diagonal leading to White’s king. Consequently this brings Black’s cooped-up bishop at b7 into powerful play.
Note also that Black gains time by playing 24…d5!! since he is attacking White’s f-pawn. Note, finally, that White’s reaction of 25.e5 loses all impact because of Black’s grip on the long diagonal.
25.e5 c5! 26.cxd5 Rxd5
Now that the diagonal of his bishop at b7 is fully open, Black threatens all sorts of brutal discovered checks, such as …Rxd1+ or …Rd3+.
Black has arranged matters so cunningly that he can answer 27.Be4 with 27…Rxd1! and wins.
27.Kg1 Rd2! 28.Nfe3
Something had to be done about the threat of …Rg2+. (In the event of 28.Rf2, Black has a winning reply in 28…Red8.)
But Black’s next move (menacing …Qh1#!) forces White’s surrender.
28…Qc6! 29.Rf3 Qxf3 White resigns.
Black’s skillful maneuvering in his crowded position was extremely impressive. He knew he had to free his game and he knew how to go about it.
Defense by Counterattack
When you play the black pieces, you are frequently called upon to make a sharp, accurate appraisal of what your opponent is aiming for.
We more or less take it for granted that White has the birthright of the attack, and that he is entitled to the initiative. However, there is no guarantee that White’s judgment is always sound, and that his execution of the attack is always impeccable.
As player of the black pieces, it is your job to assess the position; decide how much stress it can afford; coolly weigh the likely success or failure of White’s efforts. If you conclude that the attack will be insufficient, you can look for counterattack.
Should you decide that White’s efforts on the kingside are unlikely to succeed, you can counterattack on the other side of the board. Such queenside counterattacks are quite common. In the following game Black carries out this plan with commendable skill.
Queen’s Gambit Declined
White - Black
1.d4 d5 2.c4 e6 3.Nf3 Nf6 4.Nc3 c6 5.e3 Nbd7 6.Bd3 dxc4 7.Bxc4 b5 8.Bd3 a6
Black’s light-square bishop is blocked by his pawn at e6. His last three moves have been directed toward opening a new, clear diagonal for the bishop. Black needs one more move (…c5!) to achieve this objective.
9.Ne4
White’s most forceful line is 9.e4 c5 10.e5 cxd4 11.Nxb5 with a complicated game.
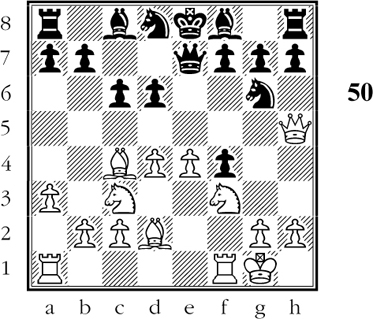
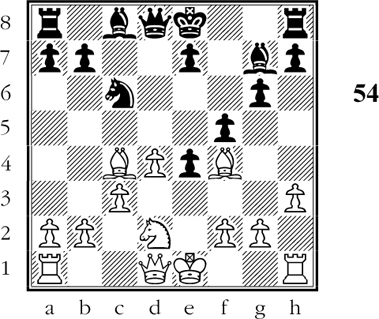
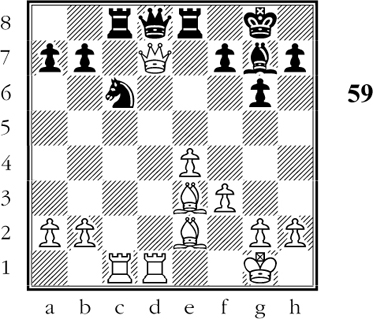
9…c5! 10.dxc5? Nxc5 11.Nxc5 Bxc5 12.0-0 Bb7 (D)
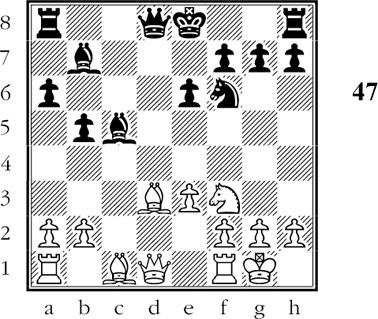
Black is ahead in development!
How did Black obtain his lead in development? He took advantage of White’s faulty maneuver in moving his queen knight three times - only to exchange it off.
White’s tenth move was another time waster, aiding Black’s development.
White ought to take a very modest view of this situation. Instead, he strives for attack.
Is Black impressed? Not at all. With his lead in development and perfectly solid king-side position, he need not fear any coming attack.
13.b3 0-0 14.Bb2 Qe7 15.Rc1 Rac8 16.Qe2 Ba3!
Black intends to concentrate on the queenside. By removing White’s protective dark-square bishop he will be able to play …Nd5 and …Nc3, planting the knight with great effect in White’s position.
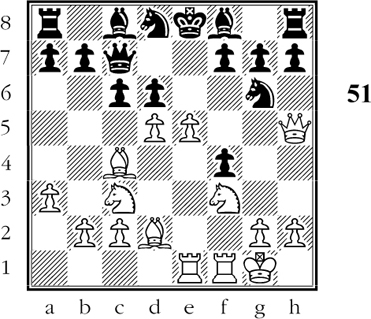
17.Rfd1 Nd5! 18.Bb1 Bxb2 19.Qxb2 b4! 20.Qe5 Nc3! (D)
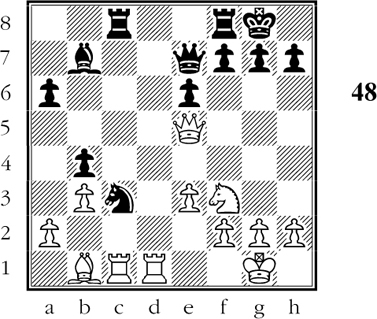
Black has achieved his objective on the queenside.
Black has a won game, for if now 21.Rd2 or 21.Re1, he plays 21…Ne2+! with decisive effect. White must therefore carry out the attack he has been plotting for some time.
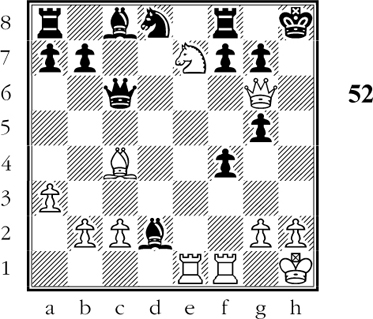
21.Rxc3 bxc3! 22.Bxh7+ Kxh7 23.Qh5+ Kg8 24.Ng5 (D)
Black is threatened with mate on the move.
Black must do something about the threat of 25.Qh7#.
24…Be4!!
This nonsensical-looking move is actually a brilliant resource that gains a priceless tempo. (After White’s reply he will no longer threaten mate!)
25.Nxe4 c2 26.Rc1 Rfd8!
Black avoids a sly trap here: if 26…Qa3?? 27.Nf6+! gxf6 28.Qg4+ and White forces a perpetual check.
27.h3
On 27.h4 Black planned 27…Qa3 28.Ng5 Qxc1+ 29.Kh2 Rc7 and White has nothing: 30.Qh7+ Kf8 31.Qh8+ Ke7. Black is then safe, with an overwhelming material advantage.
(Black could win by the same line after the move actually played by White; but he prefers a different, prettier line.)
27…f5 28.Ng5 Qxg5! 29.Qxg5 Rd1+ 30.Kh2
Here we have the point of Black’s queen sacrifice. If 30.Rxd1 cxd1Q+ and Black is a rook ahead.
30…Rxc1 White resigns.
A masterly effort by Black. He appraised the situation correctly; this led him to start a queenside demonstration which soon showed up the futility of White’s efforts.
Note that Black’s queenside demonstration resulted in the passed pawn which eventually won the game for Black.
Defending Against a Violent Attack
Very often a chessplayer is called upon to defend himself against a violent attack. In the nature of things, Black is generally the player who has to do the defending.
For most of us, defense is an irksome chore. It requires lasting attention; it puts you under great strain; it gives you the double task of not only foreseeing your future defensive resources, but also foreseeing your opponent’s future attacking resources!
However, good defensive play is highly rewarding. So few players have mastered it that possessing this skill puts you ahead of your opponents. Good defensive play salvages many a game that is really lost or one that only looks lost.
Too many players forget that attack is only a part of chess, and that we cannot always have the kind of positions we like. If you have patience and faith in the resisting power of defensive positions, you will win many more games.
The following example shows what can be done to hold the fort against an attack which is persistent, forceful, and inventive.
Bishop’s Gambit
White - Black
1.e4 e5 2.f4 exf4 3.Bc4 Ne7 4.Qh5 Ng6 5.Nc3 Qe7 6.d4 Nc6 7.Nf3 Qb4 8.Qd5 Nd8
As you can see, Black is very tenacious. He has captured the gambit pawn on move 2, and he means to hold on to it no matter what difficulties may arise to plague him.
This type of defense against a gambit is not recommended in Chapter 3; but it is precisely this kind of stubbornness that will lead to a very cramped game for Black - the kind of position we want to study at this point.
9.a3 Qe7 10.0-0 d6 11.Qh5 c6 12.Bd2 (D)
Black plans to castle on the queenside.
Black is far behind in development, and he must plan to get his king into safety before White finds some violent method to open up the center lines.
Black therefore gets the idea of preparing for queenside castling. However, White spoils this plan.
12…Ne6 13.Rae1! Qc7!
Black realizes that his plan won’t work: if 13…Bd7 14.d5! Nc7 15.dxc6 bxc6 and his queenside is too exposed for castling there.
14.d5 Nd8 15.e5 (D)
Black’s position looks lost!
It would seem that Black cannot defend his king against White’s vigorous onslaught in the center. Most players would give up hope here, but Black has just begun to fight.
15…dxe5! 16.Nxe5 Bc5+! 17.Kh1 0-0 18.dxc6
The way Black saved himself from disaster by finding a way to castle verges on the miraculous!
But he is by no means out of danger. For example, if now 18…bxc6? 19.Nxg6 hxg6 20.Qxc5 and White has won a piece. However, Black finds a magnificent counterstroke in this critical situation:
18…Be3!!
Attacking White’s undefended bishop. If now 19.Bxe3 (the natural reply) 19…Qxe5! and no matter how White plays, he loses a piece! For example, 20.Qxe5 Nxe5 and both white bishops are attacked.
The consequence is that White decides to sacrifice a piece to keep the attack boiling at full force. True, Black’s position is still full of hazard, but now White has to take chances too.
19.Nf3 Bxd2!
With this move Black gives his opponent an unpleasant choice. If now 20.Nxd2 bxc6 and White’s attack has petered out ingloriously, with Black triumphantly clutching his extra (gambit) pawn.
So, White decides to sacrifice a piece - a psychological victory for Black.
20.Ng5! h6
The only reply to White’s threat of mate on the move.
21.Qxg6 hxg5 22.Nd5!
Attacking Black’s queen and also threatening 23.Nf6+ Kh8 24.Qh7#. But even in this crisis Black finds a way out. Black can escape by 22…fxg6 23.Nxc7+ Kh7 24.Nxa8 Bxe1, but he prefers to fight it out in the hardest variation.
22…Qxc6!
Black is not afraid of the following forking check!
23.Ne7+ Kh8 (D)
Black is still holding his own!
Black’s resourceful defense holds in every line.
Thus if 24.Nxc6 fxg6 and he remains a piece ahead. Or 24.Qh5+ Qh6 with the same result. Finally - and this was the crucial variation calculated by Black - if 24.Bxf7 Nxf7! 25.Nxc6 Bxe1 26.Ne7! Bd2 27.Qh5+ Nh6 28.Ng6+ Kg8 29.Nxf8 Kxf8 and Black’s material advantage of three minor pieces against the queen should win the game for him.*
24.Qxg5 Qh6! 25.Qc5 Ne6
Directed against the threat of 26.Ng6+. White is still making attacking gestures, but Black has the game well in hand.
26.Bxe6 Bxe6 27.Re5 Be3!
White was threatening to win Black’s queen with Rh5. But now Black is ready to seize the attack. (D)
Black has survived the storm of attacking threats.
28.Qb5 g6! 29.Qxb7 Kg7
Now the initiative is in Black’s hands. He threatens 30…Qxh2+!! 31.Kxh2 Rh8+ and mate next move.
30.Qf3 Rad8 31.h3 Qh4 32.Nc6 Bg4! 33.Qxg4 Qxg4 34.hxg4 Rh8+ 35.Rh5 gxh5 White resigns.
This game, a masterpiece of superb defensive play, shows what can be accomplished by tenacious and ingenious defense. Few games will ever call for such difficult maneuvering in the face of so powerful an attack.
The King as a Fighting Piece
The most important of all our defensive jobs is protecting the king from harm. Though most players err on the side of neglecting this task, they sometimes go to the other extreme and become too cautious.
There are times when firmness and daring are called for - times when routine caution is not good enough. In the following extraordinary game, Black is well aware of the need for bold handling of his king.
Caro-Kann Defense
White - Black
1.e4 c6 2.d4 d5 3.exd5 cxd5 4.c3 Nc6 5.Bf4 Nf6 6.Nd2 g6 7.Ngf3 Bg7 8.h3 Ne4
An adventurous move which leads to a very difficult game for Black.
9.Nxe4 dxe4 10.Nd2 f5
The only practicable way to guard the e-pawn; but after White’s reply Black will be unable to castle.
11.Bc4! (D)
Black is unable to castle.
As the position now stands, Black cannot get his king into a safe position and he cannot post his rooks for rapid action.
True, Black has a makeshift solution in 11…e6, which makes castling possible. But then the pawn at e6 is a lasting weakness - always under attack by White’s bishop. Worse yet, Black’s light-square bishop is then a permanent prisoner.
Black therefore comes to a courageous and highly unconventional decision:
11…e5!! 12.dxe5 Nxe5
This knight has to be captured, as Black threatens …Nxc4 or …Nd3+ with a fine game in either case.
13.Bxe5 Bxe5 14.Qb3 Qb6!
Naturally Black offers the exchange of queens, for then all danger to his king will vanish. (D)

Black’s king is ready to embark on a long tour.
15.Bb5+ Ke7! 16.Nc4 Qc5 17.Nxe5 Qxe5 18.0-0-0 Be6 19.Bc4 Bxc4 20.Qxc4 Rhd8! (D)
Black’s king is about to advance fearlessly. Black’s last move is a daring one; his king is about to end up in the opponent’s camp. The brilliant originality of Black’s plan is that he foresees that his king, paradoxically enough, will be quite safe.
21.Qb4+ Kf6!!
The only correct move. Black realizes that if his king goes to f7, his b-pawn is lost with check. If his king goes to e8, White plays Qxb7 threatening Qxh7 followed by Qxg6+.
22.Qxb7 Qf4+ 23.Kb1 Qxf2
As a result of this capture Black has a passed e-pawn which is ready to march down to the queening square as soon as the storm has passed. This means, in technical language, that White has a lost game in prospect unless he can win by attack. Consequently, the safety of Black’s king is the key factor in the following play.
Black does not fear 24.Qxh7, for his g-pawn is guarded thanks to his 21st move. Furthermore, if 24.Qxh7, Black replies 24…Qxg2 with two connected passed pawns - an overwhelming positional advantage. So White tries a different way.
24.Qc6+ Kg5! 25.h4+ Kg4!
Black’s king, as a fighting piece, heads for White’s kingside pawns. There is now a possibility that Black’s king will be able later on to attack White’s pawns (…Kg3 etc.). (D)
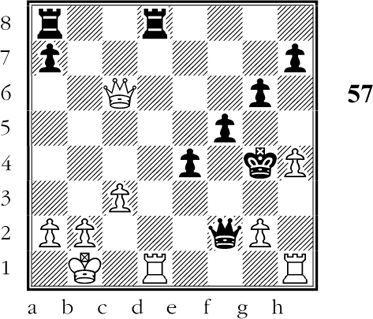
Black’s king is attacking!
26.Rdf1 Qb6!
Offering the exchange of queens; this is about the same as inviting White to commit suicide. White’s reply threatens 28.Qe2+ and 29.Rh3#!
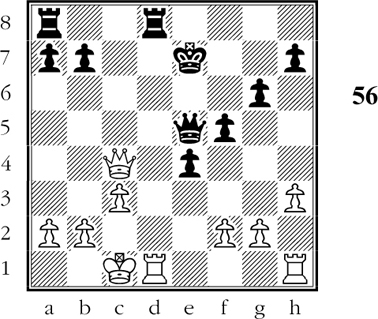
27.Qc4 Rd2!
Black parries the mating threat and menaces mate on his own. Black now wins easily by stepping up the pressure.
28.b4 Qe3 29.Rh3 Qb6 30.Rhf3 Rxg2 31.Rf4+ Kg3! 32.Qd5 Rc8 33.Qd7 Qa6
White resigns. (If 34.a4 Qc4.) One of the most original games ever played, and one of the finest examples of cool, resourceful chess under very trying circumstances.
Recovery from a Lost Position
So far we have seen some very fine play by Black. In actual practice, of course, his play is not always so fine. Often, indeed, he plays badly and finds himself with a lost game. Yet he must not give up in despair after such poor play, for there is often a possibility of redeeming the most disastrous situations. And, as far as the score table is concerned, a botched game that is resourcefully salvaged is worth just as much as a masterpiece.
King’s Indian Defense
White - Black
1.d4 Nf6 2.c4 g6 3.Nc3 Bg7 4.e4 d6 5.Nf3 0-0 6.Be2 e5 7.0-0 exd4 8.Nxd4
Black has exchanged pawns early in order to provide a long, free diagonal for his fianchettoed bishop. This exchange is questionable, however, as White’s pieces obtain great freedom of action.
With his tenth move (…c6) Black weakens his d-pawn. His intentions, to be sure, are of the best: he wants to make room for the queen so that he can assure communication between his rooks.
8…Re8 9.f3 Nbd7 10.Bg5 c6 11.Qd2 Qb6 12.Be3 Qc7 13.Rac1 Nb6 14.Rfd1 Nfd7
As we anticipated, Black finds his position cramped. He is not clear about what he wants or what he can achieve, and his maneuvering and regrouping is not getting him very far. His last move gives White the opportunity for a very promising attack. (D)

Black has overlooked White’s combination.
15.Ndb5!
This is the move that Black failed to foresee.
15…cxb5 16.Nxb5 Qd8
Black is on the run now.
17.Nxd6 Ne5
To retreat 17…Rf8 allows White to recover his piece (with a pawn plus) by 18.Nxc8 Rxc8 19.c5 etc.
18.c5! Nbd7 19.c6?
The correct course - the one that Black feared - was 19.f4 Nc6 20.Bc4. In that case Black has a knight for two pawns but he can hardly move a piece. This course would have been fatal for him.
In playing as he does, White seeks to regain the sacrificed piece. He succeeds - but only on Black’s terms.
19…Nxc6!
Black finds the best move. Note that 19…bxc6?? would be ruinous after 20.Nxe8 Qxe8 21.f4 etc.
20.Nxc8 Rxc8 21.Qxd7
White has regained his piece, but now comes Black’s stunning refutation. (D)
How does Black save the game?
21…Bd4!!
A masterstroke. If 22.Qxd8 Bxe3+ wins a piece for Black. And if 22.Bxd4? White loses his queen.
22.Rxd4 Nxd4 23.Bb5?
Now White’s best is 23.Qxd8 Nxe2+ 24.Kf2 Rexd8 when Black will win nevertheless with the exchange for a pawn. However, White goes to pieces:
23…Rxc1+ 24.Bxc1 Qxd7 25.Bxd7 Rd8 White resigns.
For after the bishop leaves the d7-square, Black wins the other bishop by …Ne2+.
Black’s resilience in a very difficult situation is in striking contrast to White’s tragic collapse.
The games in this chapter have highlighted the cold-blooded resourcefulness that Black must bring to difficult defensive situations. Such positions are very trying; but, by virtue of their very difficulty, they present a challenge that is worth meeting and worth surmounting.