The Complete Chess Course From Beginning To Winning Chess! (2016)
Book Four
How to Play the Black Pieces
Chapter Five
How to Seize the Attack
So far we have seen how Black defends, how he reacts to gambits, how he seizes the initiative, how he counterattacks. Now we want to see situations in which a serious flaw in White’s game gives Black a chance for a slashing all-out attack.
One word of warning: when playing the black pieces, do not embark lightly on an attacking policy. Note in each of the following games that White compromises his game in some fashion, while Black maintains an impeccable position.
Exploiting White’s Faulty Development
Vienna Game
White - Black
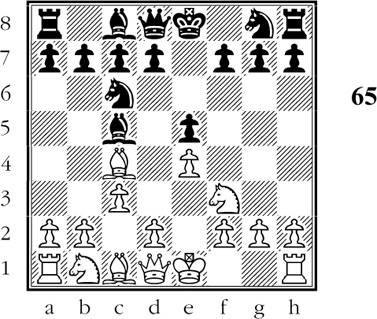
1.e4 e5 2.Nc3 Nf6 3.f4 d5 4.fxe5 Nxe4 (D)
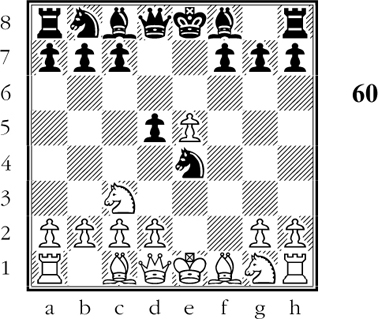
Black’s knight is splendidly centralized.
5.Nf3 Nc6 6.Bd3? f5 7.exf6
White cannot very well play 7.Bxe4 now, as he would lose further time - and his e-pawn as well. He therefore captures Black’s f-pawn in passing. This returns Black’s king knight to the f6-square. But meanwhile White’s d-pawn cannot advance. The result: at the end of the game, White’s queen bishop and queen rook are still on their original squares.
7…Nxf6 8.0-0 Bc5+
Development with gain of time. Note that White is unable to reply d2-d4.
9.Kh1 0-0 10.Bb5 Ng4!
Threatening to win the exchange by …Nf2+. If White tries 11.d4, then 11…Nxd4 12.Nxd4 Rxf1+ 13.Qxf1 Bxd4 and Black is a pawn ahead.
Thus Black wrests another concession from White: giving up his developed bishop, White increases Black’s lead in development and his attacking prospects.
11.Bxc6 bxc6 12.d4 Bd6
Black’s attack has become very powerful; he threatens to win the exchange by …Ba6.
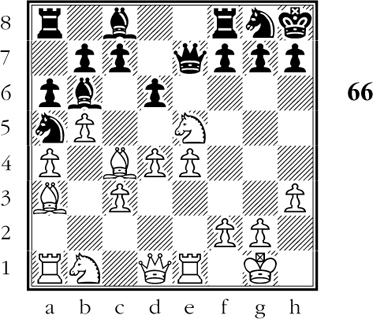
13.h3 Ba6!! (D)
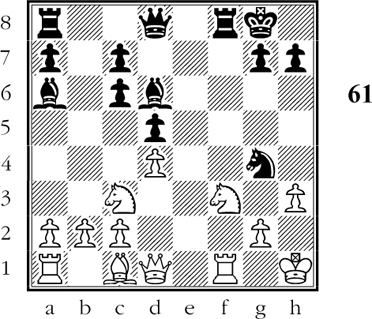
Can Black afford to ignore the attack on his knight?
14.hxg4 Bxf1 15.Qxf1 Rxf3!!
With this sacrifice, Black establishes the soundness of his previous sacrifice. First point: if 16.gxf3, Black has a quick mate with 16…Qh4+ etc. Second point: if 16.Qxf3 Qh4+ - and now if 17.Qh3 Qe1#. Or 17.Kg1 Qe1+ 18.Qf1 Bh2+ winning White’s queen.
But the best is yet to come.
16.Qe1 Qh4+!! 17.Qxh4 Rf1#
Thus we see that Black’s brilliant attack succeeded because White’s dark-square bishop remained at home.
Exploiting White’s Neglected Development
This game is a joy to play over because Black never misses a chance to find an energetic move. His play is forceful but not brash. White, on the other hand, dawdles. First he hits out aimlessly - and then strikes at the wrong target.
Two Knights’ Defense
White - Black
1.e4 e5 2.Nf3 Nc6 3.d4 exd4 4.Bc4 Nf6
Ignoring the defense of his d-pawn, Black strikes at White’s e-pawn.
5.e5
White, too, intends to attack. (D)
How does Black save his knight?
5…d5!
Instead of defending, Black attacks! - and opens up the diagonal of his light-square bishop at the same time.
6.Bb5 Ne4 7.Nxd4 Bd7 8.Nxc6 bxc6 9.Bd3 Bc5
Black’s obvious eagerness to attack is perfectly well grounded in the fact that he has two extra pieces in play.
10.Bxe4 (D)
Should Black recapture?
10…Qh4!
The alternative 10…dxe4 is quite satisfactory, but Black’s queen move brings still another piece into play - threatening mate, by the way.
11.Qe2 dxe4 12.Be3 Bg4!
Forcing a crisis, for if 13.Qd2 Black leaves his opponent without an adequate reply by playing 13…Rd8.
13.Qc4
Apparently crushing: if Black moves his attacked bishop, the queen fork 14.Qxc6+ seems deadly.
13…Bxe3! (D)

Black has started a crisp winning combination.
On 14.Qxc6+ Black intends 14…Bd7!! 15.Qxa8+ Ke7!! 16.Qxh8 and Black forces mate beginning with 16…Qxf2+.
Suppose, however, White interposes 16.g3 in this variation? Then Black wins with 16…Bxf2+! 17.Kxf2 e3+!. If now 18.Kxe3 Qg5+ wins White’s queen, and if 18.Kg1 e2! decides.
Finally, if 18.Ke1 Qb4+ 19.c3 Qxb2 20.Qxh8 Bg4! and Black forces mate.
14.g3 Qd8!! 15.fxe3 Qd1+ 16.Kf2 Qf3+ 17.Kg1
On 17.Ke1 Black had 17…Qxe3+ 18.Kf1 Bh3#.
17…Bh3! 18.Qxc6+ Kf8 19.Qxa8+ Ke7 White resigns.
White’s queen is en prise and he cannot stop mate. Beautiful play by Black.
Exploiting White’s Faulty Plan
Sometimes White gets a good development and then embarks on a faulty plan. It takes a sharp eye to see the flaw in White’s procedure. In the following delightful game Black takes admirable advantage of White’s shortcomings.
Giuoco Piano
White - Black
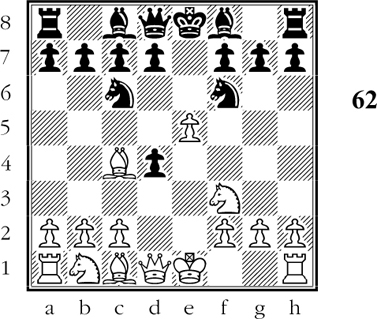
1.e4 e5 2.Nf3 Nc6 3.Bc4 Bc5 4.c3 (D)
Black must decide on his policy in the center.
White intends to play d2-d4. Then, if Black exchanges pawns, White gets a powerful pawn center and an ideal development. Black therefore determines to avoid the exchange of pawns.
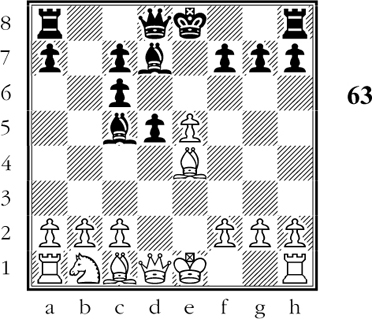
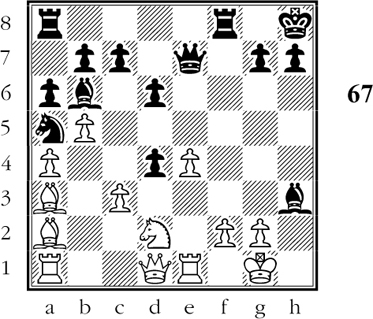
4…d6 5.0-0 Bb6! 6.d4 Qe7 7.a4 a6 8.h3 Nf6 9.Re1 0-0 10.b4 Kh8! 11.Ba3 Ng8! 12.b5 Na5! 13.Nxe5
Since 13…dxe5??? would lose the queen, Black seems to have blundered. How does he regain his pawn? (D)
Black seizes the attack.
13…f6!
With this powerful reply Black completely turns the tables. If the attacked knight moves, Black wins a piece. Thus he forces White’s reply.
14.Bxg8 fxe5! 15.Ba2 exd4 16.Nd2
If now 16.cxd4 Qf6 is much in Black’s favor.
16…Bxh3! (D)
Black’s surprise sacrifice is only the beginning.
17.Nf3
On 17.gxh3 Black intends 17…Qg5+ 18.Kf1 Rxf2+!! 19.Kxf2 d3+ with a crushing attack.
17…Bg4 18.cxd4 axb5! 19.Qd3
For on 19.axb5 Black continues 19…Bxf3 20.gxf3 Qg5+ 21.Kf1 Qxb5+ and is ahead in material.
19…Bxf3 20.gxf3 Qg5+ 21.Kf1 Nc4! 22.Bc1 Qh5 23.axb5 Rxf3!! (D)
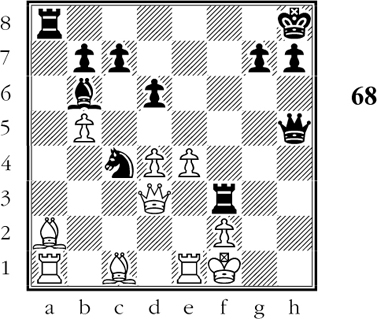
Black has given his opponent another unpleasant surprise.
The point of Black’s last sacrifice is that if 24.Qxc4, Black wins with 24…Rh3!.
24.Bxc4 Rxa1! 25.Qd1 Rxc1!
White resigns, for if 26.Qxc1 Rh3! Wins.