The Complete Chess Course From Beginning To Winning Chess! (2016)
Book Four
How to Play the Black Pieces
Chapter Three
How to Play Against Gambits
To know how to refute a gambit is one of the most important qualifications for playing the black pieces skillfully.
Gambits are among the most critical tests that confront you as a chessplayer.
Gambits are those openings in which Black quickly receives some material “on spec” because White hopes to bewilder or terrify him.
Some players, when they meet a gambit, put up only token resistance. Others fight back sturdily. What produces defeat in one case, and victory in another?
To succeed against a gambit, you must keep two valuable principles in mind:
(1) In a gambit, the initiative is much more important than material advantage. Aim cold-bloodedly and consistently for the initiative.
(2) Remember this: You can use the material advantage you have received as an excellent means of seizing the initiative. Very often the best use you can make of this material advantage is to give back the extra material to your opponent!
Why? Because your opponent needs a move or two to pick up the sacrificed material. If you are alert, you can make use of that time to further your development, your plans, your attack. In short, watch out for a chance to size the initiative!
Psychological Warfare
You can learn a great deal from the way Black handles this game. He produces a finish which is among the most artistic ever seen in a game of chess.
That alone is a broad hint that he seized the initiative at a fairly early stage.
But what is even more important is the mood in which he plays a gambit. “I’m not afraid of your gambit,” he seems to tell White, “and at the same time I don’t intend to put myself to a lot of trouble holding on to the pawn. In fact, you can have it back any time you please - it’s a matter of indifference to me.”
To force my pieces into a twisted, cramped position for the sake of holding onto a pawn-that’s not for me! I want to draw the sting our of your gambit and play the game my way.
“If you want to exchange pieces, O.K. If you want to exchange queens, that’s O.K. And if you want to get a bad game by sticking stubbornly to your so-called ‘gambit attack,’ that’s surely O.K.”
Bishop’s Opening
White - Black
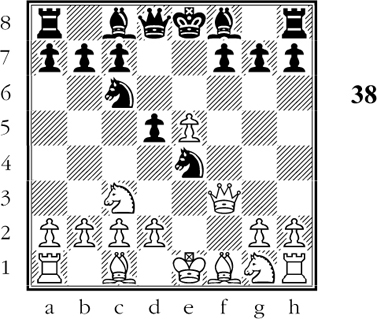
1.e4 e5 2.Bc4 Bc5 3.b4 Bxb4 4.c3 Bc5 5.d4 exd4 6.cxd4 Bb4+! (D)
Black plays to exchange pieces and ease his defensive problems.
Black has little fear from White’s gambit, which aims at a powerful center and rapid development. By offering to exchange pieces Black hopes to save time.
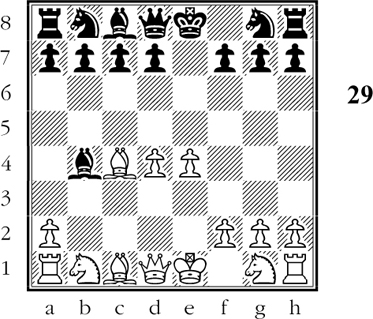
Of course, White can avoid the exchange by 7.Kf1. But in that case he loses the castling privilege - surely a plus for Black.
7.Kf1?! Ba5
Black does not mind 8.Bxf7+ Kxf7 9.Qh5+ g6 10.Qxa5 Nc6 whereby Black gains plenty of time in exchange for the returned pawn.
8.Qh5 d5! 9.Bxd5 Qe7 10.Ba3 Nf6!
A long-foreseen resource, without which things might be critical for Black.
Black well knows that 11.Bxe7 Nxh5 12.Ba3 is now White’s best course. But Black also knows that a gambit player never contents himself with such picayune lines. The aggressor dreams of the grand attack!
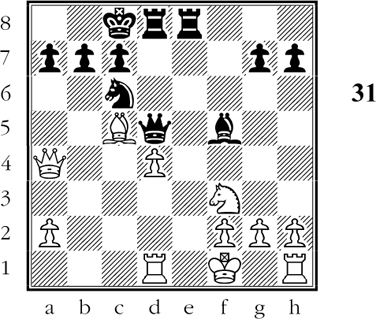
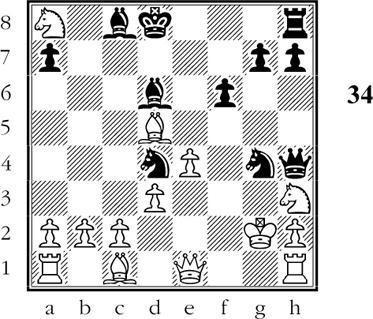
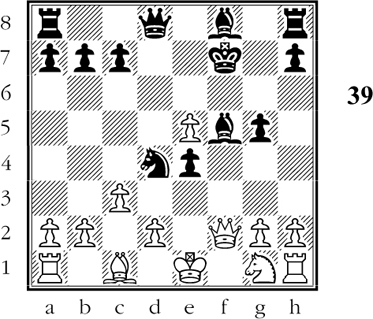
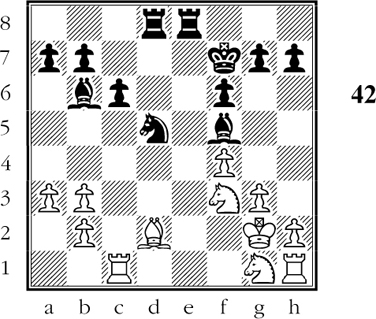
11.Bxf7+? Qxf7 12.Qxa5 Nc6 13.Qa4 Nxe4 14.Nf3 Bd7 15.Nbd2 Nxd2+ 16.Nxd2 0-0-0 (D)

Black has a vastly superior position; he has smashed White’s flimsy gambit attack.
Black has a splendid development. His king is perfectly safe. White’s forces are disorganized and he cannot castle his king into safety.
Black’s play has been first class, psychologically as well as technically. With moves 6, 8, and 10 he has turned White’s jaunty gambit into a miserable failure. From now on, Black has it all his own way.
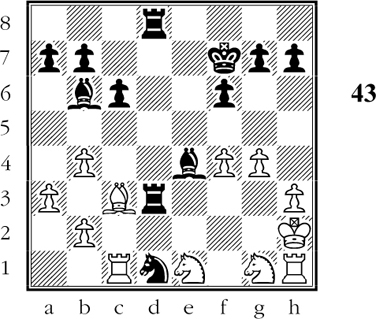
17.Rb1 Qd5! 18.Nf3 Bf5 19.Rd1 Rhe8! 20.Bc5
Black’s initiative is now so powerful that he can allow himself a beautiful queen sacrifice. (D)
Black’s queen sacrifice will leave White defenseless.
20…Qxf3!! 21.gxf3 Bh3+ 22.Kg1 Re6 23.Qc2 Rxd4!
Another winning way is 23…Ne5!.
24.Bxd4 Nxd4
White resigns because after 25.Qd3 Black mates by 25…Rg6+ etc. or by 25…Ne2+ etc.
Aggressive Counterattack
In the next game, too, the defender proclaims very quickly that he is not interested in defending. He captures the gambit pawn on move 2, returns a pawn on move 4.
Black’s paradoxical theory is that White’s gambit move 2.f4 is precisely the move that is to give Black a powerful attack. And that is the way Black executes his attack, helped by White’s greediness.
To appreciate the game to the full, you must bear in mind that Black is a very powerful player, while White is comparatively weak. Consequently, Black is not impressed by his adversary’s choice of an aggressive opening.
From the start, Black reveals his disrespect for his opponent. The cocky 4…b5! tells the story. It proclaims that Black is not interested in any measly gambit pawns.
The mere moves of this game do not tell the whole story. Black plays energetically, joyously, aggressively: he is out to win. He has no trouble crashing through White’s mediocre defense.
Bishop’s Gambit
White - Black
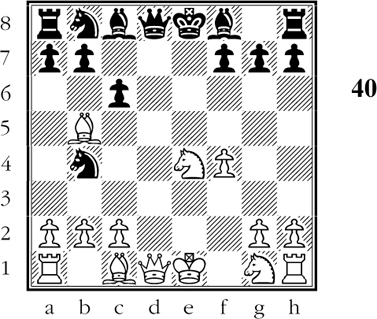
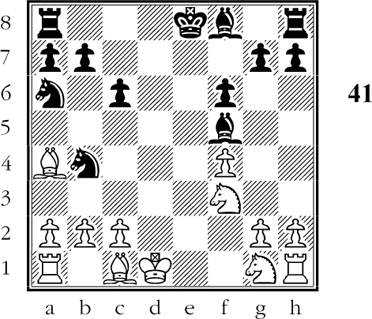
1.e4 e5 2.f4 exf4 3.Bc4 Qh4+ 4.Kf1 b5!? 5.Bxb5 Nf6 6.Nc3 (D)
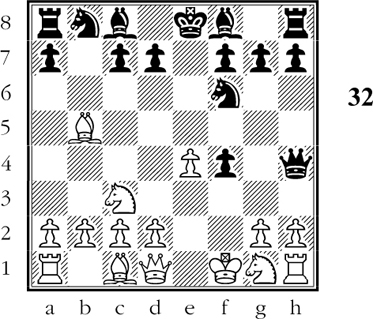
Black plays for a brisk attack against White’s king, which has lost the castling privilege.
Black has already given notice that nothing less than monopolizing the attack will suit him. This has the psychological effect of scaring White out of the resourceful attitude he needs for coping with the attack.
6…Ng4 7.Nh3 Nc6 8.Nd5 Nd4! 9.Nxc7+?
Here White misses his last chance to hold the game by 9.Be2. Earlier, he had better moves in 6.Nf3, driving off Black’s queen by attack, and in 7.Qe1 or 8.Qe1, disconcerting Black by offering the exchange of queens.
Black’s policy has succeeded. White is so confused that he misses his last chance of a proper defense.
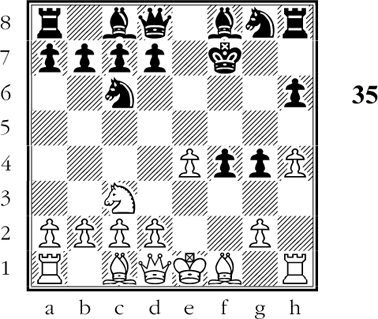
9…Kd8 10.Nxa8 (D)
Black can win material or continue the attack. White should he choose?
The simplest course for Black is 10…Nxb5 and in due course he will pick up the white knight in the corner. This would give Black a winning material advantage, and most players would choose this safe and sane course. But Black reasons differently: he wants to win quickly and elegantly; and so he does.
10…f3! 11.d3 f6
Black’s play here is an object lesson for the student. His tenth move was a real battering ram, breaking up White’s kingside formation no matter how White plays. Black realizes full well that White’s inability to castle is an important asset for the black attack.
Now, most are apt to get overconfident in such situations. Not so Black. Though he is concentrating on a brilliant attack, he does not fail to provide against the threatened 12.Bg5+, winning his queen.
12.Bc4 d5! 13.Bxd5 Bd6!
Black is weaving a diabolical plot. With his sly 12th move he opened the diagonal for his light-square bishop. With his 13th move he got his other bishop into the attack. Can you see why Black played these moves? If not, you will find them explained in the note to Black’s 16th move.
14.Qe1 fxg2+ 15.Kxg2 (D)
Black has set the stage for a very beautiful queen sacrifice.
15…Qxh3+!!
The move that Black has been angling for.
16.Kxh3 Ne3+
Now we see that Black’s 12th move made this discovered check possible.
Note also that White’s Kg3 is ruled out because of Black’s 13th move.
17.Kh4 Nf3+ 18.Kh5 Bg4#
Black played with true artistry and wound up with a brilliant finish.
Here is how the game would have ended after 14.c3: 14…fxg2+ 15.Kxg2 Qxh3+!! 16.Kxh3 Ne3+ 17.Kh4. Now Black has to choose a different course from the one used in the actual game: 17…Ng2+ 18.Kh5 g6+ 19.Kh6 Bf8#!.
Parrying a Surprise Gambit
The following game is one that needs to be studied in terms of personalities. Black is a 12-year-old youngster who grew up to become world champion. His opponent is an experienced, mature player who hopes to outwit the boy by adopting a complicated gambit attack.
Hamppe-Allgaier Gambit
White - Black
1.e4 e5 2.Nc3 Nc6 3.f4 exf4 4.Nf3 g5 5.h4 g4 6.Ng5?! h6 7.Nxf7!? Kxf7
Black’s situation is one that might well trouble a sophisticated master. His king is exposed to attack and he can never castle. True, he is a piece ahead, but White can pick up some pawns in the following play, leaving him almost equal in material.
The real difficulty for Black is that he is likely to fall badly behind in development. Apparently White has done well in choosing this tricky, complicated opening. (D)
Black must evolve a resourceful plan.
8.d4 d5! 9.exd5 Qe7+! 10.Kf2 g3+ 11.Kg1 (D)
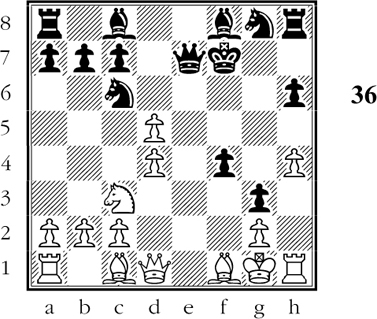
Black is about to spring a clever surprise.
A glance at Diagram 36 gives the impression that Black has virtually committed suicide. He has already lost two pawns for the sacrificed piece, and after his attacked knight moves he will lose a third and fourth pawn. Worse yet, Black will be hopelessly behind in development.
11…Nxd4!!
With this magnificent resource Black reveals that he understands very well how to free himself from an uncomfortable bind. The move is hard to see, if only because it leaves Black behind in material - though not for long.
12.Qxd4 Qc5!!
Now we see the point of Black’s sly counter-sacrifice: if 13.Qxc5?? Bxc5+ and mate next move!
13.Ne2 Qb6! 14.Qxb6 axb6
Black still threatens mate!
15.Nd4 Bc5 16.c3 Ra4
Black plays with remarkable ingenuity. He now threatens 17…Rxd4! 18.cxd4 Bxd4+ and mate follows.
If White tries 17.b4, then 17…Rxb4! smashes his defense.
Aside from these tactical details, Black has buried White’s king rook for the rest of the game.
17.Be2 Bxd4+ 18.cxd4 Rxd4 19.b3 Nf6 20.Bb2 Rd2!
Of course not 20…Rxd5? 21.Bc4 and Black loses the exchange because of the pin.
In this situation White can avoid loss of a piece with 21.Bxf6 Kxf6 22.Bf3. But then, with a pawn down, he has no counterchances in the cut-and-dried endgame that would follow. So he tries a different way, but Black is ready for him.
21.Bh5+ Nxh5! 22.Bxh8 f3! 23.gxf3 Nf4! (D)
The concentrated attack of Black’s pieces must be decisive.
If now 24.Re1, Black has a lovely finish with 24…Bh3! 25.Be5 Rg2+ 26.Kf1 Rf2+ 27.Kg1 Rf1+! 28.Rxf1 Ne2#!.
24.Be5 Rg2+ 25.Kf1 Rf2+ 26.Ke1 Nd3+ White resigns.
Black wins the bishop, leaving White in a hopeless situation.
A fascinating game because of the way that Black spiked the unfamiliar gambit attack and seized the initiative. (The Black pieces were played by Jose Raul Capablanca.)
Diverting the Gambit Attack
Though artless greed proves White’s undoing in this game, Black deserves lots of credit for leading him astray. On move 3 Black is offered material, which he respectfully declines. Then, only two moves later, he is offering material!
Soon Black has a surprisingly powerful initiative which results in a convincing win. Above all, note how he refuses to be appeased by material gain, and always searches for the most incisive move.
Vienna Game
White - Black
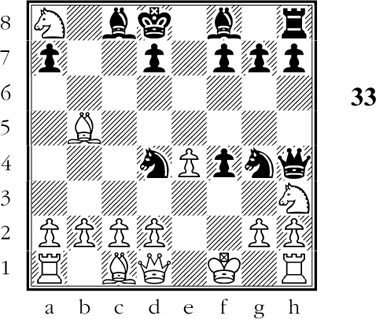
1.e4 e5 2.Nc3 Nf6 3.f4 d5 4.fxe5 Nxe4 5.Qf3 Nc6! (D)
Black plays boldly for counterattack, instead of being concerned about his doubly attacked knight at e4.
Black knows, to be sure, that 6.Bb5 is White’s best reply - but he hopes that White will play 6.Nxe4? expecting 6…Nxe5?? when 7.Qg3! wins a piece!
6.Nxe4? Nd4! 7.Qf4 dxe4
If now 8.Qxe4?? Bf5 when Black wins.
8.Bc4 Bf5 9.c3!? g5!
Black is too crafty to snap at 9…Nc2+ 10.Kd1 Nxa1 11.Qxf5, for in that case White threatens mate, with plenty of time to pick up the wandering black knight afterwards.
10.Bxf7+
In the event of 10.Qf1 (in reply to Black’s last move), Black has the delightful line 10…Nc2+ 11.Kd1??? Ne3+ winning White’s queen.
10…Kxf7 11.Qf2 (D)
Should Black play to win more material?
Again, Black has the tempting 11…Nc2+ within his reach. But after 12.Kd1 Nxa1 13.Qxf5+ Kg7 he is bound to lose his wandering knight and his king is somewhat exposed.
So, Black correctly reasons, he is not going to part with his initiative for such a doubtful gain. Instead, he hits hard with:
11…e3!!
The first point of Black’s sly idea is this: 12.Qxe3??? Nc2+ winning White’s queen! Another fine point of Black’s plan is that though he must apparently lose a piece when his knight moves, he manages to hold on to his material advantage.
12.Qf1 exd2+!
Black continues to find the strongest moves. If now 13.Bxd2, Black replies now 13…Nc2+ with a decisive gain of material - or even a mate in some cases.
13.Kd1 dxc1Q+ 14.Kxc1 g4! 15.b4
Black would not mind 15.cxd4, for then he could force mate by 15…Bh6+ 16.Kd1 Qxd4+ etc.
15…Qg5+ 16.Kd1 Rd8!
White resigns in this hopeless situation, 17.cxd4 Rxd4+ being obviously disastrous for him.
Black’s brisk counterattack made mincemeat out of White’s slovenly set-up.
Neutralizing White’s Initiative
In this game, as in the previous one, Black’s initiative is the deciding factor. But the mechanics of victory are different. In the previous game Black tempted White to succumb to fatal greed; while in this game White fails because he loses time in the opening.
Note, too, that Black’s play here is just as consistent, just as grimly efficient, as in the previous game. But instead of spectacular play we have here Black’s smooth, logical, irresistible piling up of pressure that leaves White helpless.
Falkbeer Counter Gambit
White - Black
1.e4 e5 2.f4 d5 3.exd5 e4 4.d3 Nf6 5.Nd2 exd3 6.Bxd3 Nxd5 7.Ne4 Nb4! 8.Bb5+ c6!
Black’s shrewd thrust at move 7 has given him the initiative, which cannot be taken away from him even by the simplifying exchange of queens. (D)
Despite the coming exchange of queens, Black already has his opponent on the defensive.
White’s game is already in need of vitamins. Certainly there is no chance for the dashing kind of play White seeks when he plays such a gambit.
9.Qxd8+ Kxd8 10.Ba4 Bf5 11.Ng5 Ke8 12.Kd1 f6 13.N5f3 N8a6! (D)
Black’s position gathers power from move to move.
Thanks to Black’s forceful play, White’s original lead in development has evaporated and his pieces are awkwardly placed.
With skillful change of pace Black has alternated between attacking and developing moves. He is now ready for …Nc5 and also …Rd8. These moves will increase his positional advantage.
14.a3 Rd8+ 15.Bd2 Nd5 16.Ke2 Nc5 17.Bb3 Nxb3 18.cxb3 Bd6
Black keeps hammering away at White’s game. Now that Black has two bishops against bishop and knight, he proceeds to use the bishops to press down all the harder on White’s position.
19.g3 Kf7 20.Rc1 Bc7 21.Kf2 Bb6+ 22.Kg2 Rhe8 (D)
Note how Black’s bishops have become stronger.
Black has all his pieces in magnificent play and continues to pile on the pressure relentlessly. White, on the other hand, is still unable to develop his king knight and king rook at this late date.
Now Black continues in the same forceful style to wind up with a crushing finish.
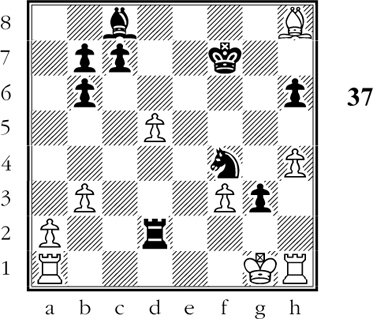
23.h3 Ne3+ 24.Kh2 Rd3 25.b4 Red8 26.Bc3 Nd1 27.g4 Be4 28.Ne1 (D)
Black must come out at least a piece ahead.
28…Rd2+! Black resigns.
After 29.Bxd2 Rxd2+ Black wins pretty much as he pleases.
The moral we derive from all these games is that in gambits, the initiative matters most of all. What we have seen in this chapter is that Black is most likely to succeed when he spots the factors that will give him the initiative; when he fights consistently for these advantages; and when he hits hard, once he has achieved those advantages.
These are the ways in which Black successfully hammers away at gambits.