The Complete Chess Course From Beginning To Winning Chess! (2016)
Book Four
How to Play the Black Pieces
Chapter Two
How to Seize the Initiative
If you accept the view that White has some initiative by reason of his first move, you will doubtless agree that in actual practice White often loses the initiative with great rapidity.
And, furthermore, if you realize just what is happening, you will be in a position to snatch up White’s lost initiative and become the aggressor.
Now, assuming that White does not lose material and does not create weaknesses, just what should Black look for in order to seize the initiative?
There are several ways White can go wrong. He may, for example, play an opening so poor that his theoretical advantage disappears at once. This gives Black his chance.
Or White may play an excellent opening and then ruin his development by a series of foolish, time-wasting queen moves. Here again Black must be alert to the possibilities.
If Black discovers that White is wasting valuable time chasing a relatively unimportant pawn, he can use the opportunity to get far ahead in development.
Sometimes White may avoid the sin of greed only to succumb to another fault - bad judgment. Sheer thoughtlessness, inattention, negligence, or happy-go-lucky innocence of a positional trap may ruin White’s development. In every case Black should be alert to seize the initiative.
So you see there are many ways for White to go wrong, and it pays Black to keep a sharp lookout for such cases of poor judgment. Now let’s see some examples of the kinds of mistakes White may make.
Lost Initiative from a Poor Opening
In this game Black gives us a classic example of slashing attacking play. His play is magnificent, and yet - it all stems from White’s faulty opening. Black immediately pounces on the opportunities offered by White’s faulty play.
White - Black
Polish Opening
1.b4 e6 2.Bb2 Nf6
Even at this early stage we can see the faulty character of White’s first move. Black is attacking, White is defending! Black’s development will proceed rapidly, while White’s will be laborious.
3.a3 c5 4.b5 d5
Black’s pawns already have a substantial foothold on the center, while White has no pawns in the center at all. His attempt to improve the situation leads to disaster.
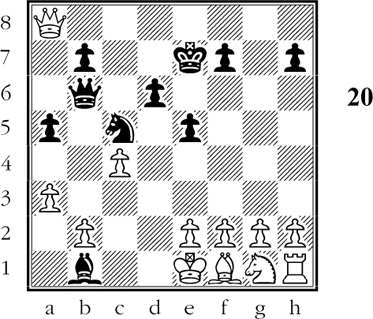
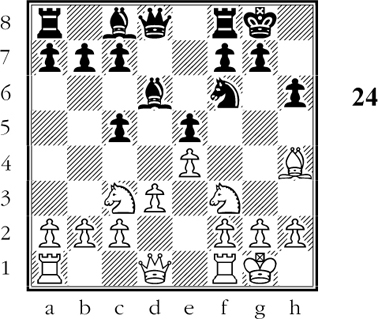
5.d4?
Plausible but weak, as Black promptly proves. (D)
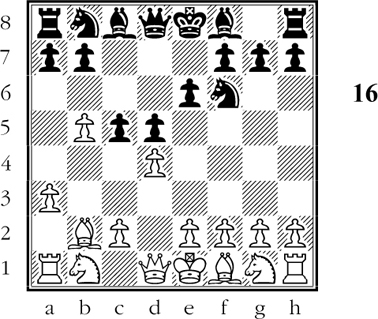
Black now seizes the initiative.
5…Qa5+!
This forceful move starts a chain reaction. It forces White to play Nc3 in order to protect his unfortunate b-pawn. Then, to protect this knight, White is forced to develop his queen in a risky manner. These factors give Black his chance for a brilliant attack.
6.Nc3 Ne4 7.Qd3 cxd4 8.Qxd4 Bc5! 9.Qxg7 Bxf2+
Black’s brisk attacking play has shunted White’s queen far from the scene of action and has deprived White’s king of the castling privilege. Even at this early stage White’s position is shattered.
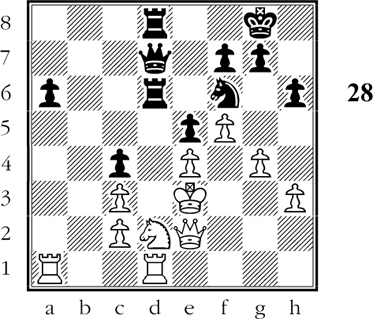
10.Kd1 (D)
How does Black guard his menaced rook?
10…d4!!
Black ignores the attack on his rook because he has decided on an all-out attack on the white king. Note, by the way, that 11.Nxe4?? allows 11…Qe1#.
11.Qxh8+ Ke7! 12.Qxc8 dxc3
In the event of 13.Bxc3 Black intends 13…Nxc3+ 14.Kd2 Ne4+ 15.Kd3 Qd2+ 16.Kxe4 Qe3#.
13.Bc1 Nd7!! (D)
Black offers another rook!
Black has calculated the play very closely. Thus, if now 14.Qc4 Rd8 15.Qb4+ Ndc5+ 16.Bd2 Rxd2+ 17.Kc1 Rd1+!! 18.Kxd1 Qd8+ followed by mate.
What now follows is a foregone conclusion, despite White’s enormous material advantage. With four powerful attacking pieces at his disposal, Black engineers a sparkling mating attack.
14.Qxa8 Qxb5 15.Bf4 Qd5+ 16.Kc1 Be3+!! 17.Bxe3 Nf2!!
White resigns, for after 18.Bxf2 Black replies 18…Qd2+ forcing mate in two more moves.
Black has forcefully punished White for losing the initiative by choosing an inferior opening line.
Lost Initiative from Too Many Queen Moves
In the next game White starts out with an excellent opening; but then, animated by some perverse suicidal impulse, he lets his queen drift out of play. Black develops rapidly and forcefully, sacrifices a rook and wins handsomely.
Nimzo-Indian Defense
White - Black
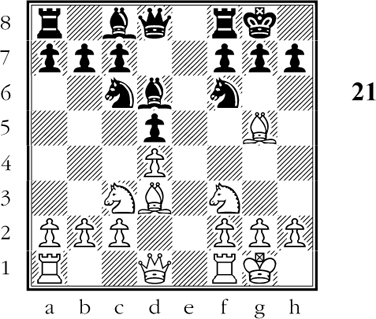
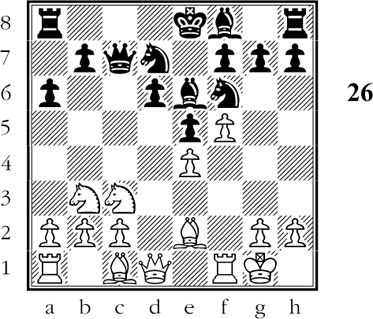
1.d4 Nf6 2.c4 e6 3.Nc3 Bb4 4.Qc2 c5 5.dxc5 Na6 6.a3 Bxc3+ 7.Qxc3 Nxc5 8.Bg5 a5 (D)
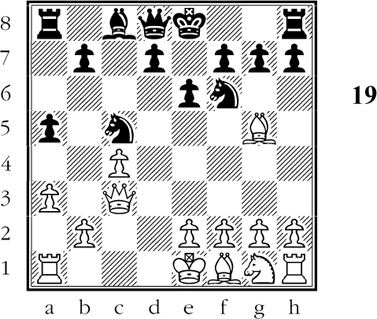
A typical situation in the Nimzo-Indian Defense.
This position is typical of the opening because Black has developed rapidly but has to give up one of his bishops in the process.
White should now play 9.f3 a4 10.e4 d6 leading to a position with chances for both sides. Instead, his weak play enables Black to seize the initiative.
9.Qe5? d6 10.Bxf6 gxf6 11.Qf4? e5 12.Qh6 Qb6!
Black has gained two moves for developing his bishop and has also brought his queen into active play. White belatedly returns to rational moves, but as Black demonstrates, it is already too late for that.
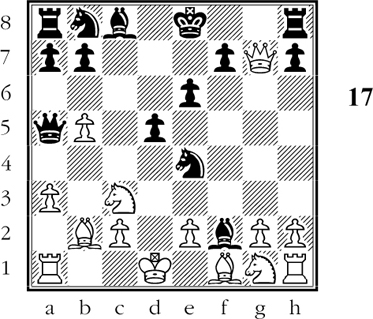
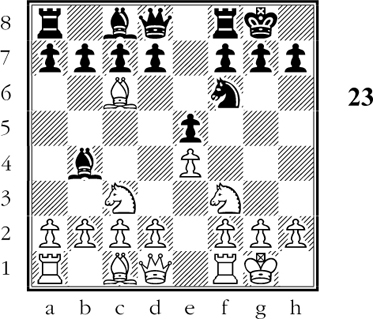
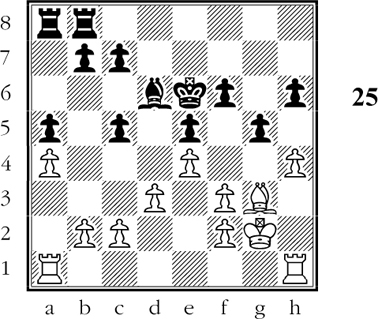
13.Rb1 Bf5!! 14.Qxf6 Bxb1 15.Qxh8+ Ke7 16.Qxa8 (D)
Black has a mating attack.
This is the position Black has played for: White’s queen is far afield, and his other pieces are still on their home squares.
16…Ne4!
Threatens mate in two.
17.e3 Qxb2
Threatening mate on the move.
18.Qxa5 Qxf2+
White resigns, for if 19.Kd1 Qxf1+ 20.Qe1 Qd3+ and mate next move. Black has played with superb energy to exploit White’s nerveless loss of the initiative.
Lost Initiative from Greedy Play
In the next game, also, White plays the opening not too badly but Black maneuvers ingeniously to obtain the advantage when White becomes greedy.
French Defense
White - Black
1.e4 e6 2.d4 d5 3.exd5 exd5 4.Nf3 Nf6 5.Bd3 Bd6 6.0-0 0-0 7.Nc3 Nc6 8.Bg5
White has already forfeited part of his initiative by playing 3.exd5 and thereby opening the diagonal of Black’s imprisoned light-square bishop. Nevertheless, Black is still under some pressure, mainly because his king knight is pinned and his d-pawn is under attack. (D)
How is Black to defend his d-pawn?
Black’s daring conclusion is that he need not defend his d-pawn altogether! In the Third Book of Chess (page 74) Black played the timid 8…Ne7? 9.Bxf6 gxf6 10.Nh4! and was roundly trounced a few moves later. Therefore he plays:
8…Bg4!
The first point of Black’s play is that if 9.Nxd5 Bxh2+ 10.Kxh2 Qxd5 and he has recovered the pawn with a good game.
9.Bxf6 Qxf6! 10.Nxd5 Qh6!
Now Black threatens …Bxf6 and …Qxh2#.
Nor can White defend with 11.g3?, for then 11…Qh5! wins. True, White can play 11.Qc1, but after 11…Qxc1 12.Raxc1 Bxf3 13.gxf3 Nxd4 Black has regained his pawn and has a very promising endgame. White therefore selects what seems to be the least evil:
11.h3 (D)
Black has seized the initiative.
11…Nxd4!
Black offers a piece that cannot be accepted, for if 12.hxg4??? Nxf3+ 13.Qxf3 Qh2#.
12.Be2 Nxf3+ 13.Bxf3 Bxh3!
Black, who gave up a pawn a few moves ago, is now actually a pawn ahead. White cannot play 14.gxh3 because of 14…Qxh3 15.Re1 Bh2+ 16.Kh1 Bg3+ 17.Kg1 Qh2+ and mate next move.
14.Re1 Be6 15.g3 Rad8 16.Qe2 Bxd5 17.Bxd5 Bxg3!
A neat thrust. If 18.fxg3 Rxd5 with a second pawn to the good.
18.Be4 Rd2 19.Qxd2 Bh2+!
White resigns, for if 20.Kg2 Qxd2 21.Kxh2 Qxf2+ with a tremendous advantage in material for Black.
It was fascinating to see how cleverly Black snatched the initiative and the attack in this bright little game.
Lost Initiative from Blocked Development
In the next game all is tranquil throughout, but the game is if anything even more instructive.
Four Knights’ Game
White - Black
1.e4 e5 2.Nf3 Nc6 3.Nc3 Nf6 4.Bb5 Bb4 5.0-0 0-0 6.Bxc6
In a game in the Third Book of Chess (page 74) Black played 6…bxc6?. This led to lasting difficulties for him because of the light-square bishop’s inability to develop. Here Black recaptures with his d-pawn, making it possible for the bishop to develop effectively. (D)
How should Black retake?
6…dxc6! 7.d3 Bd6 8.Bg5 h6 9.Bh4 c5! (D)
Black has set a subtle trap.
Black’s last move not only prevents d2-d4, it also sets a trap into which White falls headlong.
10.Nd5? g5! 11.Nxf6+
Likewise after 11.Bg3 Nxd5 12.exd5 Bg4 Black has all the play.
11…Qxf6 12.Bg3 Bg4! 13.h3 Bxf3 14.Qxf3 Qxf3 15.gxf3 f6 16.Kg2
The result of Black’s positional trap is that he is in effect a piece to the good. White’s bishop is a dead piece, and can play no effective role in the game.
16…a5 17.a4 Kf7 18.Rh1 Ke6 19.h4 Rfb8 (D)
Black is a piece ahead!
Black’s strategy is delightfully simple. He plays to open a file on the queenside, by advancing …b5 and …c4. Then his “extra” piece is bound to win for him.
20.hxg5 hxg5 21.b3 c6 22.Ra2 b5 23.Rha1 c4 24.axb5
If now 24.bxc4 Black wins easily after 24…bxc4 25.dxc4 Rb4 etc.
24…cxb3 25.cxb3 Rxb5 26.Ra4 Rxb3 27.d4 Rb5 28.Rc4 Rb4 29.Rxc6 Rxd4
White resigns, as he is powerless against Black’s “extra” piece. There is a great deal to be learned from the way Black seized the initiative by taking advantage of White’s careless tenth move.
Lost Initiative by an Error of Judgment
In the following game Black sees his opportunity to seize the initiative when White condemns his light-square bishop to lasting inactivity. Then Black continues to exercise cumulative pressure on White’s weakened position.
Sicilian Defense
White - Black
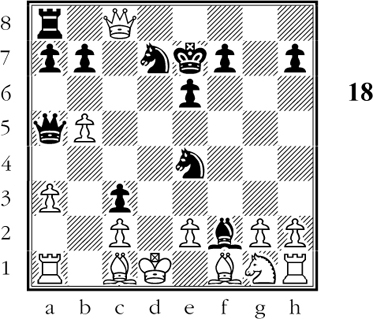
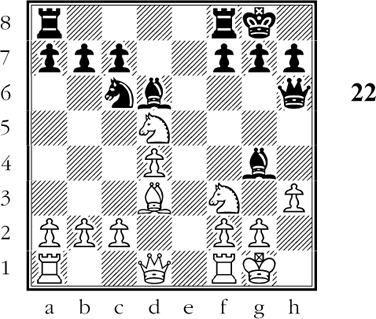
1.e4 c5 2.Nf3 d6 3.d4 cxd4 4.Nxd4 Nf6 5.Nc3 a6 6.Be2 e5 7.Nb3 Be6 8.0-0 Nbd7 9.f4 Qc7 10.f5? (D)
Black can now take the initiative.
With pawns on the light squares e4 and f5, White has reduced the mobility of his light-square bishop to an alarming extent. If this piece is not “dead,” it is certainly “half-dead.” Another drawback to White’s last move is that it releases pressure on the center, thereby enabling Black to react eventually with …d5!.
10…Bc4 11.Bd3 b5! 12.Be3 Be7 13.Qe2 Rc8 14.Rac1 0-0 15.Nd2 d5!
Declaration of independence. As in the previous game, White’s colorless opening has been the first step in Black’s seizure of the initiative.
True, Black permits White to get rid of the useless bishop and cancel Black’s pressure on the half-open c-file. But Black exacts a heavy price: the opening of the d-file for Black’s forces.
16.Bxc4 dxc4 17.a3 b4! 18.axb4 Bxb4 19.g4
A gesture toward attack on the kingside. But Black is well prepared for it. The permanent result is a weakness that Black will exploit later on.
19…Bxc3 20.bxc3 Qc6! 21.Qg2 Nc5! 22.Bxc5 Qxc5+ 23.Kh1 Rfd8 24.Qe2 h6 25.Ra1 Qd6 26.Rfd1 (D)
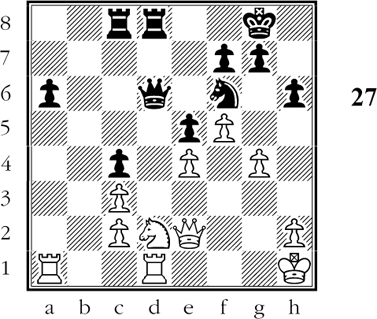
Black is ready for the final blow.
26…Qc6!
Black threatens 27…Rxd2! 28.Rxd2 Nxe4 and wins because of a murderous discovered check.; If now 27.Rg1 Rxd2! 28.Qxd2 Nxe4 29.Qg2 Nf2#. Or if 27.Re1 Nxg4! winning a pawn.
27.Kg2 Rd6! 28.h3 Rcd8! 29.Kf3 Qd7! 30.Ke3 (D)
How does Black add the last bit of pressure that topples White’s position?
White has rushed in his king to the center to bolster his position. But Black’s mighty pin on the d-file leaves White helpless while the black knight makes a lengthy trip to b5.
30…Ne8! 31.Ra5 Nc7! 32.Rxe5 Nb5! 33.Rd5
Losing the exchange by 33.Rxb5 is even worse.
33…Rxd5 34.exd5 Nxc3 35.Qf3 Nxd1+ White resigns.
White has no compensation for the loss of the exchange. Having seized the initiative at an early stage, Black made admirable use of it thereafter.
Thus, in all the games in this chapter, we have seen the various ways that Black can seize the initiative in consequence of faulty play by White.