The Complete Chess Course From Beginning To Winning Chess! (2016)
Book Two
The Nine Bad Moves
Number Five
Weakening Your Castled Position
As you have seen in Number Two, leaving the king in the center means exposing the king to a dangerous, very possibly fatal, attack. This led us to the conclusion that castling is the best way to safeguard the king.
The castled position, then, is the king’s fortress. But, though the king is safer castled than in the center, that does not mean that castling alone assures you complete immunity from attack. If you opponent has an overwhelmingly superior development, he can concentrate more forces for attack than you can supply for defense. Sometimes brilliant sacrifices are available to smash down a defender’s barriers.
But in this chapter we are mainly concerned with pawn weaknesses in the castled position. In the case of castling on the kingside, three pawns are involved: the h-pawn, the g-pawn, and the f-pawn. As long as all three pawns are still on their original squares, the castled position remains sturdy and difficult to take by storm.
Yet once a single member of the trio advances, the defender is headed for trouble. For example, suppose the g-pawn advances one square. Then immediately the squares it formerly protected - h6 and f6 (h3 and f3) - must receive protection from pieces. Worse yet, these squares become targets for enemy occupation. Let a hostile queen and knight, or queen and bishop, occupy these squares, and you will see the castled position totter and crumble.
The advance of the h-pawn is also dangerously weakening. Very often the attacker is able to sacrifice a piece for the pawn on h6 (h3), in this way ripping up the castled position and leaving it wide open for large scale invasion. The advance of the f-pawn creates similar problems, and very often opens up a vital diagonal for the hostile bishop.
Another serious consequence of any of these pawn advances is that they enable the attacker to open lines by advancing his own pawns and forcing pawn exchanges. Thus, after Black plays …g6. White may reply h2-h4 and h4-h5, exchanging pawns and thus opening the h-file for attack.
Or, after White plays h2-h3, Black may react with …g5 and …g4, likewise obtaining an open file for attack.
Once the attacker succeeds in forcing open a line leading to the castled position, he has enormously improved his prospects of taking the hostile king by storm. As long as the pawns remain on their original squares, they form a roadblock for the attacking pieces. After one of the pawns has advanced, the barrier is much more likely to be breached - by exchanges, by sacrifices, or by violent line opening.
To sum up: you have seen that pawn advances in front of the castled king can be weakening - even dangerous. You should therefore avoid such advances. Sometimes you are forced to make such advances - but at least you can avoid making them needlessly. Avoid such pawn moves if it is at all possible to avoid them!
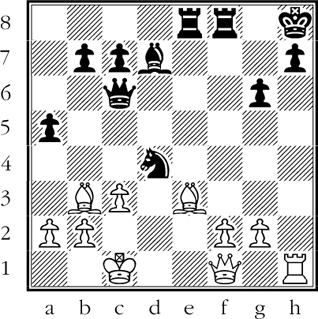
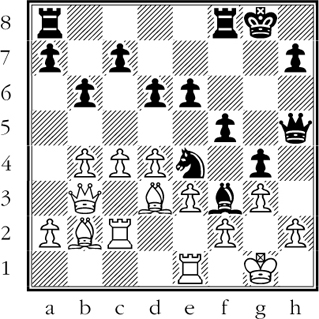
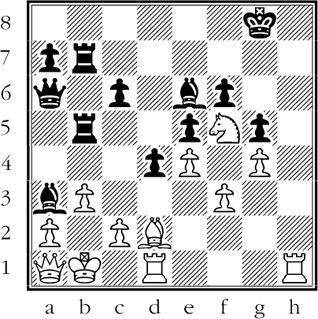
Queenside castling, which we rarely encounter, presents difficulties for the inexperienced player. The castled king has a wider area to guard than on the kingside. Hence the temptation to meet threats with pawn advances is much stronger in the case of queenside castling. This makes it more likely for the defense on this broader front to be upset by violent sacrifices. (D)
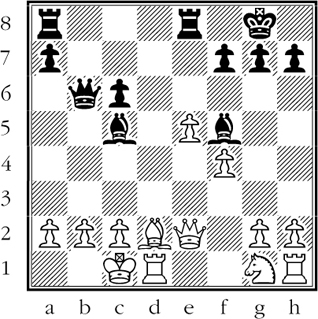
Black to move
White’s queenside castled position is shaky, menaced as it is by Black’s bishops and the open b-file. Right now the castled pawn position is intact, but Black’s masterly probing soon creates weaknesses that pave the way for brilliant sacrifices.
1…Bd4! 2.c3 Rab8! 3.b3 Red8! 4.Nf3
For if 4.cxd4 then 4…Qxd4 wins at once. White’s weakened castled position is now riddled with weaknesses.
4…Qxb3!!!
Beautiful play, made possible by the pawn weaknesses.
5.axb3 Rxb3
Threatens mate.
6.Be1 Be3+!! White resigns.
Black mates next move. A convincing demonstration of the disastrous effect of weakening pawn moves.
How Pawn Advances Weaken the Castled Position
Ruy Lopez
White - Black
1.e4 e5 2.Nf3 Nc6 3.Bb5 a6 4.Ba4 Nf6 5.d3 d6 6.c3 Be7 7.h3 0-0 8.Qe2 Ne8 9.g4
This advance is not weakening as White intends to castle on the queenside.
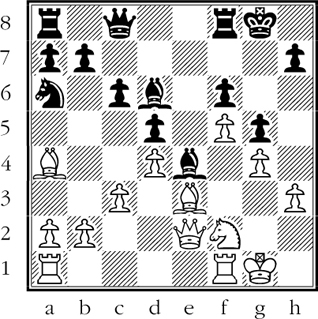
9…b5 10.Bc2 Bb7 11.Nbd2 Qd7 12.Nf1 Nd8 13.Ne3 Ne6 14.Nf5 g6? (D)
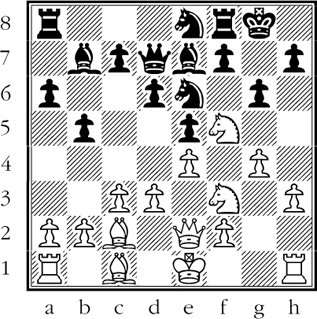
Impatiently brushing off the powerfully posted knight. But now his castled positioned is weakened.
15.Nxe7+ Qxe7 16.Be3 N8g7 17.0-0-0 c5 18.d4 exd4 19.cxd4 c4 20.d5 Nc7 21.Qd2 a5 22.Bd4! f6 23.Qh6! b4 24.g5! f5 25.Bf6! Qf7
Thanks to Black’s weakening 14th move, White’s pieces have infiltrated powerfully at h6 and f6.
26.exf5! gxf5 (D)
27.g6!! Qxg6
If 27…Qxf6 28.Qxh7#!.
28.Bxg7 Black resigns.
Black loses a piece, as 28…Qxg7 is refuted by 29.Rhg1, winning the queen by a pin. White took advantage of the pawn weakening in superb style.
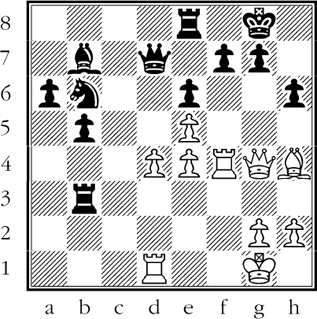
How Pawn Advances Allow Line-Opening
Ruy Lopez
White - Black
1.e4 e5 2.Nf3 Nc6 3.Bb5 Nf6 4.d3 d6 5.c3 g6
Played in order to develop his dark-square bishop, but it creates the possibility of a later h2-h4 and h4-h5, opening up the h-file by hxg6.
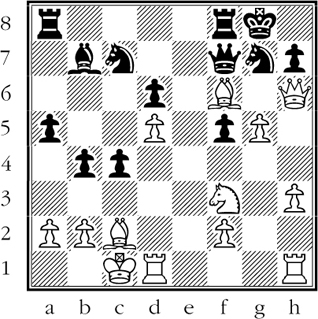
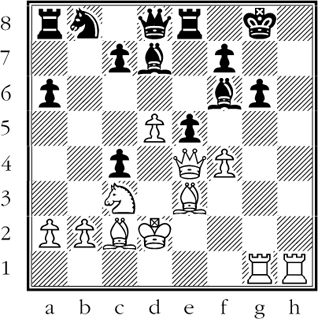
6.Nbd2 Bg7 7.Nf1 0-0 8.Ba4 Nd7 9.Ne3 Nc5 10.Bc2 Ne6 11.h4! Ne7 12.h5 d5 13.hxg6 fxg6 (D)
As predicted. Now White has a formidable attacking weapon in the h-file.
14.exd5 Nxd5 15.Nxd5 Qxd5 16.Bb3 Qc6 17.Qe2 Bd7 18.Be3 Kh8 19.0-0-0 Rae8 20.Qf1! a5 21.d4! exd4 22.Nxd4 Bxd4 23.Rxd4! Nxd4 (D)
Now White’s carefully prepared attack is ready to roll.
24.Rxh7+!! Kxh7 25.Qh1+ Kg7 26.Bh6+ Kf6 27.Qh4+ Ke5 28.Qxd4+ Black resigns.
White mates next move. Note the connection between Black’s weakening fifth move, White’s line-opening 11th, 12th, and 13th moves, and the brilliant sacrifice on move 24. (D)
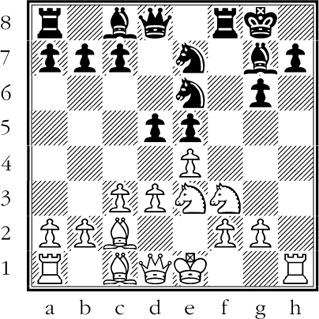
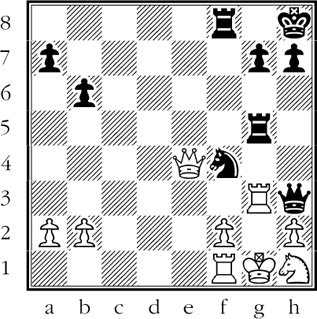
Black to move
Imagine that White’s kingside pawns are still on their original squares. Even if they were, Black’s bishops would still be powerful. But with White’s pawns advanced, his castled position is wide open to attack. The deadly bishops penetrate into the castled position with irresistible force.
Before we see Black’s winning procedure, there is one other aspect of the position that we must study. Note that Black has advanced two of his kingside pawns without exposing his king to danger. Why is the advance of White’s kingside pawns a serious mistake; why is the advance of Black’s kingside advance of no importance?
What influences our reply is the placement of each player’s pieces. White’s forces are not posted for attack, so that Black has nothing to fear! Black’s bishops, on the other hand, are trained menacingly on the kingside.
Thus, White’s advanced pawns give Black the opportunity for devastating attack. Black’s bishops give him the means for carrying out such an attack. Here is how it is done:
1…Bh2+! 2.Kxh2 Qc7+ 3.Bf4 Qxf4+ 4.Kg1 Qg3#!
Observe how Black’s pieces have infiltrated into the squares weakened by the advance of White’s pawns. Observe, too, that White’s pieces can contribute nothing to the defense. (D)
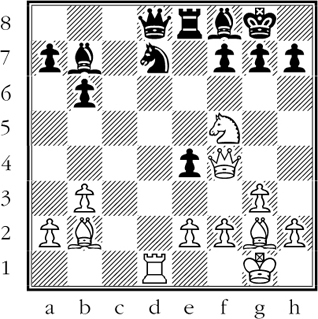
White to move
Black has the same kind of weakness as in the previous example - his h-pawn is gone, his advanced g-pawn is a target. As for White, his rooks have a powerful sweep on open files leading to the black king. Note also that White’s bishops are aggressively posted.
1.Rxg6+!
You can always expect such startling explosions when one player has weaknesses and his opponent has powerfully posted pieces.
1…fxg6
Declining the rook doesn’t help, for after 1…Kf8 2.Bc5+ is decisive.
2.Qxg6+ Kf8
A pretty alternative finish is 2…Bg7 3.Rh8+! Kxh8 4.Qh7#!.
3.Bc5+ Re7
Or 3…Be7 4.Rh8#.
4.Qxf6+ Black resigns.
No matter how Black plays, White ends it all with 5.Rh8#. You will find it worthwhile to study this extremely instructive example. A weakening pawn move opened the h-file, which is bound to serve as White’s highway to victory. The advanced g-pawn serves as a further target which is sure to be demolished by White. Result: a decisive sacrificial attack. (D)
Black to move
The absence of even one pawn from the castled position often exposes the king to a dangerous attack. The reason is that hostile pieces may gain a foothold on squares that are not guarded by the missing pawn. Here, for example, a spectacular mate is possible.
White’s kingside suffers from the disappearance of his g-pawn from g2. His h3-and f3-squares are weakened by the absence of their natural pawn protector and need to be guarded by pieces. Such defensive needs are wasteful and also have an additional drawback - there is no telling when some startling tactical surprise may crush the defense.
On the surface it seems that White has covered up the gap fairly well. He has swung around his queen rook to the defense of the castled position and his knight gives added support, though at the cost of dangerously crowding the king’s position.
Nevertheless, the organic weakness of the castled position - the absence of the g-pawn - has allowed a threatening rush of Black pieces to the kingside. And here is the result:
1…Qg2+!!! 2.Rxg2
Or 2.Qxg2 Ne2# - an equally delightful smothered mate.
2…Nh3#! (D)
Black to move
White has weakened his kingside by playing g2-g3. Worse yet, he played his king bishop to d3 instead of g2. On the latter square, this bishop would have guarded the long diagonal against inroads by Black’s bishop. As matters stand, Black can win by means of an effective sacrifice!
Has White developed his pieces effectively? What are the facts? White’s queen is cut off from the kingside and can barely move. The white rooks stand on closed files; the white bishops aim along closed diagonals!
So badly jumbled are White’s pieces that they can contribute virtually nothing to the defense of the white king.
What of Black’s development? His bishop has an unshakable grip on the kingside. Black’s queen is aggressively poised for attack. The king rook can come into action by …Rf6.
To sum up: White has weakened his kingside by playing g2-g3. He has failed to neutralize this weakness by striving for a good defensive formation. What happens now?
1…Qxh2+!!! 2.Kxh2 Rf6! White resigns!
White is helpless against the threat of …Rh6+ followed by …Rh1#. (See the power of Black’s bishop on the diagonal!) (D)
White to move
Black’s extra piece is of little value, for his kingside is denuded of protection, and it is on the kingside that the game will be decided. For White can force a fatal weakness in Black’s castled position. Black’s king will succumb quickly, deprived of any aid from the other black pieces.
1.Bf6!
The key to the situation. Black’s only answer to the threatened mate is to advance still another pawn in front of his king.
1…g6 2.Qh4
Whereas White has three powerful pieces cooperating in the attack, Black’s king is on his own - no help from his forces. So Black must rely on king moves or on weakening pawn moves - feeble resources against White’s murderous attack.
2…Kh7
Or 2…h5 3.Qg5 Kh7 4.Rh4 and Black has no defense against 5.Rxh5+ etc.
3.Qxh6+!! Kxh6 4.Rh4#
Right to the bitter end Black’s king had no support from the other black pieces. Note how quickly White triumphed after forcing a weakening in the castled position with 1.Bf6!. (D)
White to move
The first thing you notice here is that White’s pieces are posted very aggressively. His bishop at b2 hits right at the heart of Black’s castled position; his queen and knight support the attack; his rook commands the open d-file. How does White proceed to force the game?
What use can White make of his superior development? To answer this question, we must first note that Black’s pieces are in extremely passive positions. The black pieces are either defensive or useless.
In one sense, though, Black is lucky. He has no weaknesses on the kingside. Therefore, no matter how formidable White’s attacking formation looks, he has no real target. What White must do, then, is to create weaknesses in Black’s castled position.
1.Nh6+!!
This impudent knight must be captured. If 1…Kh8 2.Nxf7+ forks king and queen. Even stronger (after 1…Kh8) is 2.Qxf7! with the irresistible threat of 3.Qg8#.
1…gxh6
Now that Black’s castled position is breached, White wins quickly.
2.Rxd7! Qxd7 3.Qf6 Black resigns.
He is helpless against the threat of 4.Qh8#, which has been made possible by the smashing of Black’s kingside. (D)
White to move
Black’s castled position has been sadly weakened. His h-pawn is gone, his g-pawn has had to advance. Meanwhile White has established a menacing pawn wedge at f6, and all his pieces are admirably poised for an assault on Black’s king. In fact, White forces mate in three moves!
1.Qxg6+!!
A rude shock for Black. But what interests us is this thought: if White can afford to sacrifice his most valuable piece, then Black has indeed damaged his kingside fatally by weakening pawn moves.
1…fxg6 2.f7+!
The real point of the sacrifice. The long diagonal becomes completely clear, allowing White to set up a familiar mating pattern. The rook on h3, supported by the bishop, forms this mating pattern.
2…Qxf7 3.Rh8#
One of those combinations that are so distinguished in their artistry that we can play them over again and again and still enjoy them. And again, observe that what makes the artistry possible is the weakening of Black’s castled position.
Why do players weaken their castled position? Some do not realize the weakening effect of the moves; others cannot help themselves. In this case, it was White’s earlier threats that cleverly forced Black to weaken his castled position. (D)
Black to move
White has made a serious mistake by castling on the queenside. Black has concentrated his rooks for a heavy attack on the open b-file. White imagines that he has removed all danger by playing b3. But, as so often happens, the moved pawn is a target rather than a barricade.
That White has a target at b3 is bad enough. What makes matters even worse is that his queen is paralyzed and his other pieces contribute little to the defense.
This makes Black bold - he looks for a radical solution. Here it is:
1…Rxb3+!!
Sacrificing a whole rook to remove the feeble barrier at b3.
2.axb3 Rxb3+!!
Encore!
3.cxb3 Qd3+
Now everything becomes clear. By smashing up White’s flimsy pawn position, Black has been able to strip the white king of all defensive resources.
4.Ka2 Qxb3#
A beautiful combination, but if we ask, what made it possible? - the answer is: the weakening of White’s castled position. White castled into an open file, and he had a pawn target that attracted brilliant sacrifices. (D)
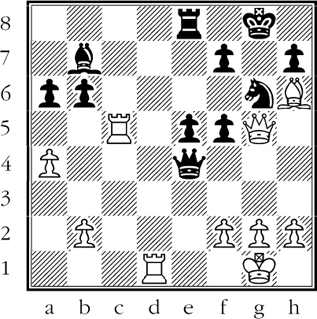
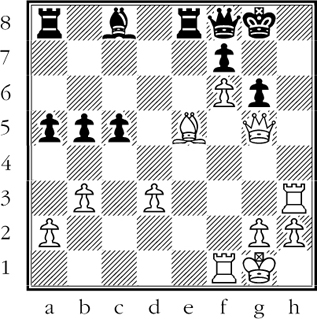
White to move
White is the exchange ahead - he has a rook for knight and pawn. Hence he seems to have a winning game, with victory not too far away.
Is his immediate task to save his attacked rook on c5? Or is there more involved in the position?
What really matters is that Black has fatally weakened his kingside by the removal of his g-pawn from its original square. This has created infiltration points at his h6 and f6 squares for the white pieces.
So serious are these weaknesses that one’s first impression is that White can force checkmate by 1.Qf6. Unfortunately, if White moves his queen from the g-file, Black has the reply 1…Qxg2#.
Thus the real problem is: how can White execute his mating threat without being exposed to Black’s mating threat? White’s solution is subtle and effective.
1.Rc8!! Rxc8
The main point is that after 1…Bxc8 Black no longer threatens mate on the long diagonal but allows 2.Qf6 - followed by 3.Qg7#.
2.Rd8+ Rxd8 3.Qxd8+ Nf8 4.Qxf8# (D)

White to move
White has sacrificed a rook to force a fatal breach in Black’s castled position. The disappearance of Black’s g-pawn has allowed White’s menacing queen to occupy the far-advanced outpost h6.
White has a sparkling winning method based on the absence of Black’s g-pawn from its normal square.
1.Bf6!!
Threat: 2.Qg7#. There is only one reply.
1…Bxf6
Now it seems White has shot his bolt. But…
2.e5!!
Threatens 3.Qxh7#.
2…Nxd3 3.exf6 Black resigns.
Now we are back to the first threat of Qg7#, and there is nothing that Black can do about it. Note that throughout his queen had no defensive value whatever.
By parting with his g-pawn, Black created a fatal breach in his castled position. White took pitiless advantage of the black king’s exposed state.