The Complete Chess Course From Beginning To Winning Chess! (2016)
Book Two
The Nine Bad Moves
Number Six
Getting Pinned
The best advice about getting pinned is: Don’t!
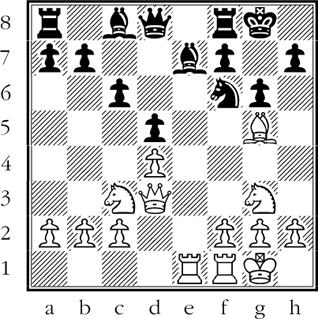
Pins occur more frequently on the chessboard than any other type of attack. Yet, strangely enough, pins are rarely defined or explained. A pin is an attack on a piece which screens another piece from attack. A piece that is pinned is tied down. (D)
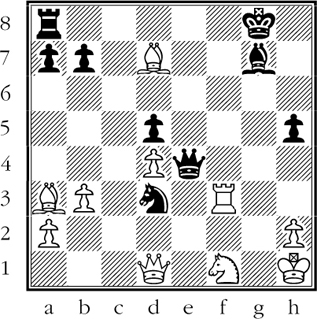
In the above diagram, Black’s queen pins White’s rook. The queen attacks the rook, which in turn screens the white king from attack. The rook is pinned (tied down to its present square) because a move of the rook would expose the white king to attack by the black queen. (As you know, the laws of chess forbid your making any move that exposes your king to attack by a hostile piece.)
To emphasize the helplessness of White’s pinned rook, let us suppose that it is Black’s move, and that he plays 1…Nf2+ forking White’s king and queen. Ones first thought is to reply 2.Rxf2 in order to save the menaced queen. But the pinned rook is helpless; it cannot move. White, in check, must move his king, losing his queen by …Nxd1.
The pathetic helplessness of White’s rook in the previous diagram is typical of pins where the screened piece is the king.
Where the screened piece is any other piece but the king, the player subject to the pin has greater freedom of action. If the screened piece is a queen, rook, bishop, or knight, the pinned piece can legally move. But though such a move is legal, it is not necessarily advisable. The move of a pinned piece will generally involve a serious loss of material. This is brought out in the following position: (D)
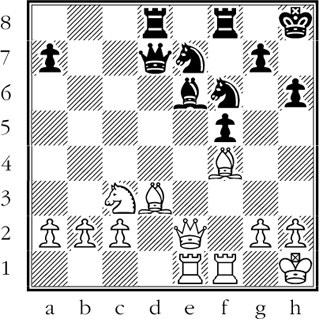
White’s queen, supported by a white rook, pins Black’s bishop, which is protected only once and cannot be protected additionally. If the bishop remains on e6, it is lost; if the bishop moves, the knight at e7, which it screens, is lost. Black can try 1…Ne4, blocking the pin. But after 2.Nxe4 fxe4 3.Qxe4 the pin is renewed and White also threatens 4.Qh7#.
The most bearable pins, as far as the defender is concerned, are those where the pinned piece is guarded by a pawn. In such cases, protection is automatic - and cheap. Where the pinned piece has to be guarded by another piece, you can expect trouble. The pinned piece is tied down, the protecting piece is tied down to the defense of the pinned piece. Thus two units are deprived of much of their mobility and therefore of much of their power.
Another point to remember about the pin is its psychological value. The restraining effect of the pin has a depressing effect on the defender. Pinning and restraining are attacking functions and assure a player the initiative. He has a positive goal - to weaken the pinned piece, to pile up pressure on it, to take advantage of its immobility. The player whose piece is pinned is at a disadvantage. He is at his opponent’s mercy, and must often look on helplessly while his pinned piece is being undermined.
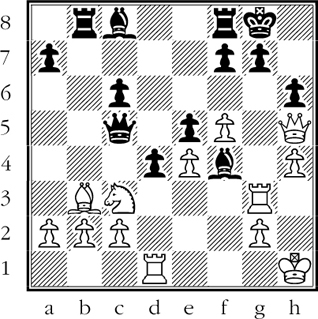
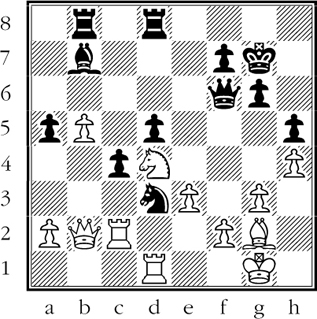
It follows, therefore, that you should avoid the pinning of your pieces. Once you are pinned, your freedom of action is restricted, and you are exposed to threats that may cost you the game. Just as it is important not to neglect your development in the opening stage, it is equally vital not to allow your pieces to be pinned later on. (D)
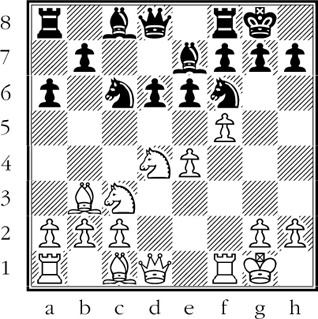
Black to move
When the f-pawn is advanced after castling, it often happens that a serious weakness is created on the diagonal leading to the king. In this case, it is White who has weakened his position, so that his knight on this diagonal is in danger. How is Black to exploit this?
Black has a powerful move in:
1…Qb6!
This pins White’s knight on d4. The knight, which screens White’s king from attack, is of course unable to move out of the line of attack.
In addition, since the knight is attacked twice and defended only once, it needs additional protection. But how? If 2.Nce2 e5 cruelly exploits the exposed position of the attacked knight. As it cannot leave its post at d4, it is lost in return for a mere pawn.
So White tries a different way:
2.Be3
True, this masks the diagonal, but Black can still win a piece!
2…e5
It is White’s misfortune that he cannot retreat the attacked knight to a square from which it will defend the bishop at e3. And if 3.Nxc6, Black first plays 3…Qxe3+ and then 4…bxc6.
3.Na4 Qa7!
By keeping his queen on the diagonal, Black maintains his pin on the knight at d4. White resigns, as he can no longer stave off the loss of a piece. (D)
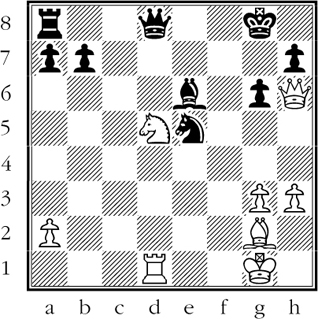
White to move
White’s course is readily suggested by the uncomfortable position of Black’s bishop and knight on the e-file. Neither piece can protect the other; neither is protected by a pawn; both are vulnerable to an attack along the e-file. This is an ideal setup for a pinning attack.
With Black’s knight and bishop established as the vulnerable targets, your only problem is: should White continue with 1.Re1 or 1.Qe3.
As the white rook is needed at d1 to guard White’s knight, the queen move remains the only feasible one:
1.Qe3
Now Black’s knight must not move, for then the bishop is lost.
Nor will 1…Qd6 do, for then 2.Nf6+ wins the black queen.
As for 1…Bxd5, this exposes Black to a new pin: 2.Rxd5 Nd7 (forced) 3.Qd4 and the pinned knight is lost.
1…Qb8 2.Re1
The rook (no longer needed at d1) intensifies the pin. Black’s next two moves are forced.
2…Bxd5
Getting out of the pin but running into a worse one.
3.Bxd5+ Nf7 4.Rf1 Black resigns.
The pinned knight is lost. (D)
White to move
White menaces the black king with his rook at g3 and his bishop at b3. This creates pins on Black’s g-pawn and f-pawn. However, White’s knight is attacked, and so is his rook at g3; his bishop can be removed by …Rxb3. White’s timing must be hair-sharp.
White’s first move makes use of both pins and prepares to set up a new pin:
1.Qg6!
Threatens 2.Qxg7#. The queen is immune from capture, of course, as Black’s f-pawn is pinned.
1…Bxg3
The obvious reply.
Blocking the g-file with 1…Bg5 does not help: 2.Rxg5 hxg5 3.f6! (a new pin!) and Black cannot prevent 4.Qxg7#.
2.f6! Black resigns.
Both Black’s f-pawn and g-pawn are pinned. Black cannot stop 3.Qxg7#. (D)
White to move
White’s queen, f-rook, and bishop make up a powerful attacking unit. Balked by the protective black rook at f7, White - almost! - threatens Qg7# or Qf8#. But this black rook is under too much pressure and, worse yet, it gets no help from the black queen.
Black has weakened his kingside by advancing the g-pawn. It is this loosening move that has enabled white’s queen and bishop to take up their invasion posts at f6 and h6.
Momentarily, Black’s f-rook valiantly holds the fort. But Black’s queen is far off to one side. This leaves Black helpless against the brilliant pinning attack that follows.
1.Qe7!!
Beautiful. If 1…Rxe7 2.Rf8#; If 1…Rxf3 2.Qg7# Thus the crucial black rook is pinned two ways, as it screens White’s access to two vital squares.
1…Qc7
Too late. But Black dare not move his bishop (to stop the following mate), for then the vital rook at f7 falls, with mate the following move.
2.Qf8+! Rxf8 3.Rxf8#
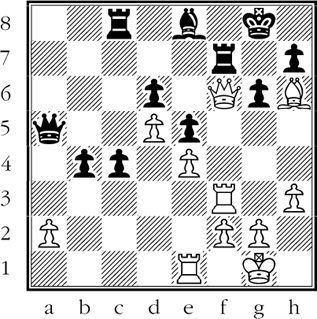
Black lost because (a) he weakened his castled position; (b) he gave one rook too heavy a defensive burden; (c) he thus exposed himself to a deadly pin. (D)

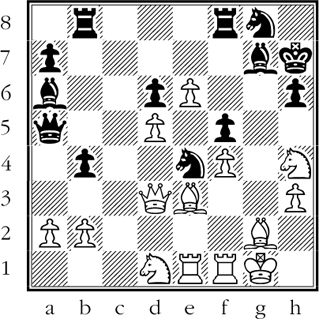
Black to move
Material is fairly even - Black has two minor pieces for rook and two pawns. But what really counts is the fact that Black’s bishop on the light squares exerts enormous power on the long diagonal. Black unmasks this power with a deadly pin.
1…Ng3+!
A terrible surprise for White. The unexpected check opens up the long diagonal, and brings Black’s queen into action. The effectiveness of Black’s attack depends on two pins.
2.hxg3
As the knight check forks king and queen, White has no choice: he must capture.
2…Qh3+
White’s g2-pawn, pinned by Black’s bishop on the long diagonal, cannot capture the black queen. It is this pin that assures the success of Black’s attack.
3.Kg1 Bxe3+ White resigns.
If 4.Qxe3 Qxg2#. And if 4.Rf2 or 4.Qf2 Qxg2# mate as well. (the pinned piece has no protective value.) (D)
Black to move
What determines the choice of Black’s next move? It is the fact that he controls the open c-file. White is on the point of playing Bd4, which will menace the kingside and also prevent any inroad by a black rook at c3.
1…Rcc3!
By playing this move at once Black creates a powerful pin. White’s bishop on d3, attacked twice, cannot move because that would lose the screened bishop at e3.
Had Black postponed the rook invasion by one move, he would have given White time for Bd4, consolidating White’s position against the rook invasion.
2.Qe2
Forced; but now Black steps up the pinning pressure.
2…Bb5!
Adding to White’s troubles - if 3.Bxb5? Rxe3 wins a piece for Black.
3.Rfd1
Another forced move.
3…Qc7!
Based on a plan that is revealed by his next move. White desperately tries to break the pin, but it is too late.
4.Bd4 Rxd3!
Creating a different kind of pin.
5.Rxd3 Qc4 White resigns.
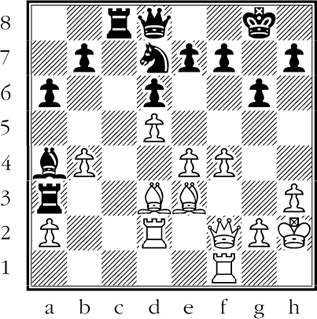
White has no defense against the coming 6…Rxd3, which leaves Black a clear piece ahead. (D)
White to move
Sometimes the utilization of a pin can be exceptionally subtle. Here we see at a glance that White’s pin on the f-pawn is extremely threatening. But how is it to be exploited? The decisive method selected by White is remarkably imaginative, though dependent on technical factors.
White’s generally more aggressive position justifies his seeking an immediate decision. We have already concluded that the pin on Black’s f-pawn will be the winning factor.
1.Bxf6!
First he removes the valuable defensive knight.
1…Bxf6
After 1…gxf6 the breakup of Black’s castled pawn position would lose for him in a number of ways. The most obvious is 2.Qg4+ Kh8 3.Nxf7+ etc.
2.Qxh7+!!!
The surprise sacrifice that will take advantage of the pin on Black’s pinned pawn.
2…Kxh7 3.Rh5+ Kg8 4.Ng6! Black resigns.
He has no way of parrying the coming Rh8#. (The f-pawn is pinned, so that …fxg6 is impossible.) (D)
White to move
Black’s position seems quite secure - until you observe that he has badly weakened his kingside with …g6. White’s problem is - how is he to take advantage of the weakness? He solves the problem by means of a brilliant combination.
1.Rxe7!! Qxe7
Now Black’s knight is pinned - in a particularly dangerous way, too. For this knight is not protected by a pawn - thanks to the earlier …g6. Therefore the pinned knight must be guarded by pieces - always a dangerous and costly procedure.
2.Qf3 Kg7
The only other way to protect the pinned knight is 2…Bf5. But then, after 3.Nxf5 gxf5 4.Qg3 Kg7 5.Bxf6+ Kxf6 6.Qh4+! Ke6 7.Re1+, Black can resign.
3.Nce4!!
Beautiful play. By sacrificing another piece White crushes Black’s resistance to the pin.
3…dxe4 4.Nxe4 Qe6
If 4…Qxe4 5.Qxf6+ Kg8 6.Bh6 forcing checkmate. Again the weakening of Black’s kingside tells against him.
5.Bxf6+ Kg8 6.Qf4 Black resigns.
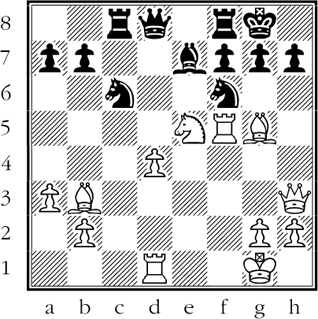
There is no defense to the threatened Qh6. White’s pin was the weapon that smashed Black’s kingside. (D)

White to move
Black seems to have a solid defense against the pin on his g-pawn. But this pin is only the beginning of his difficulties; he has placed all his pieces very awkwardly for defensive purposes. Soon the first pin leads to others even more troublesome.
1.Nb4!! axb4 2.Qxd6!!
If now 2…cxd6 3.Re8+ Rf8 4.Rxg7+ Kh8 5.Rxf8#.
2…Qd7
The only way to meet the threat of Re8+.
3.Qd5!!!
Beautiful play. He pins Black’s rook on f7 in order to threaten Rxg7+.
If 3…Qxd5 4.Re8+ forces mate.
3…Kf8
He must get out of the pin. If 3…g6 4.Rge3! is the winning move.
4.Rxg7!!
Another superb move.
4…Qxd5
If now 4…Rxg7 5.Qxd7 and the pinned rook cannot capture White’s queen!
5.Rg8+ Kxg8 6.Re8+ Rf8 7.Rxf8# (D)
White to move
Black’s position seems solid as the Rock of Gibraltar. Especially powerful is his far-advanced knight at d3, well guarded by his passed c-pawn. Yet this position is quite deceptive. Relying on pinning technique, White can smash the setup of Black’s forces.
How White can act incisively is not clear, especially since his queen is attacked. Nor is there a single white piece, with the possible exception of the knight, which even has the appearance of harboring aggressive notions.
1.Rxd3!!
This move is mysterious; yet it will soon expose Black to a winning attack that is based on a pin.
1…cxd3 2.Ne6+!!!
The point of the previous sacrifice. Black cannot play 2…Qxe6 because his queen is pinned.
2…fxe6
Any move of the black king would lose the black queen.
3.Rc7+ Black resigns.
Now everything becomes clear. Black’s queen, being pinned, cannot interpose 3…Qf7. Consequently he must move his king, allowing 4.Qxf6 followed by a quick mate. (D)
White to move
Here we have one of the rare cases of a pin that does not work. White’s queen is attacked by a pinning bishop at a6. When the queen retreats, White will lose the exchange by …Bxf1 etc. This seems a good example of the power of the pin, but there is much more to the position!
1.Qxe4!!
An amazing move, predicated on the weakness of Black’s kingside. If now 1…Bxf1 2.Rxf1 and White has won two pieces for the rook (a material advantage for him). Of course, Black could still go ahead and win the queen, getting mated as in the actual play.
1…fxe4
Black is skeptical. Mate is now forced.
2.Bxe4+ Kh8 3.Ng6+ Kh7 4.Nxf8++ Kh8 5.Ng6+ Kh7
One forced move after another.
6.Ne5+! Kh8 7.Nf7#!
Throughout, Black’s queen remained a passive onlooker. Again and again, we find that this is the key to a startling combination. As far as the success of White’s combination was concerned, Black’s queen might just as well have been off the board.