The Complete Chess Course From Beginning To Winning Chess! (2016)
Book Two
The Nine Bad Moves
Number Four
Grabbing Pawns Thoughtlessly
Advantage in material is the deciding factor in most games of chess. Consequently, you must always be on the lookout to capture material without yielding up the same amount of material to your opponent.
But the opportunity to capture material is not always a blessing. The capture may have serious drawbacks attached to it. Sometimes an innocent-looking pawn may turn out to be protected indirectly, and capturing the pawn may involve you in heavy losses. So the first caution about capturing is to examine the position for any trace of hidden protection.
Even where no such protection is available, the capture may be unfavorable in other ways. Perhaps your king is in need of defense, and a slyly offered pawn will lure your queen far away from the defense. You may find that you are capturing a pawn which is trifling in comparison to the harm caused by leaving your king defenseless.
Such faraway captures by the queen remind us of the dangers to which that powerful piece is exposed in making repeated moves early in the game. To play the queen out early, have her capture a distant pawn or two, expose her to attack by hostile pieces, and then spend more time in getting her back in active play - this big mistake has lost many a game. In the worst of these cases, you may find that a far-ranging capture of a remote pawn will actually result in your queen being trapped - lost for a hostile piece of far less value.
In your own games, then, you will avoid pawn-grabbing moves that either neglect development in the opening stage or spoil vitally important defensive formations in the middle game.
But thoughtless pawn grabbing can take other forms. Sometimes a player will deliberately offer pawns for the sake of opening lines he obtains when these pawns are cleared out of the way. To capture such pawns is a double mistake - not only is valuable time wasted in capturing them, but the very capture opens up attacking lines for the opponent.
This is particularly dangerous when you capture center pawns at a stage when your own king is still in the center. But the outcome can be just as disastrous if you are castled and snatch a pawn or two on the files leading to your castled position. You may be able to make up for the time lost; whether you can defend yourself against the assault on the open lines is much more doubtful.
The moral of this chapter is, don’t grab pawns thoughtlessly! But if, after taking due precautions, you feel you can safely capture, then act on your convictions.
The Poisoned b-pawn
Queen’s Gambit Declined
White - Black
1.d4 d5 2.Bf4 Nf6 3.Nf3 e6 4.e3 c5 5.c4 Nc6 6.Nc3 a6 7.Qa4?
Up to this point White has developed along sound lines. The early queen move, however, is sheer waste of time.
7…Bd7
A typical reply to premature development of the queen. Black threatens 8…Nxd4 winning a pawn because of the attack on White’s queen.
8.Qd1 Qa5
This move has a point because it threatens a pin with …Ne4.
9.Qb3?
Another time-wasting queen move. Note that White has taken three moves to get his queen to b3 - which normally should take a single move.
9…dxc4
This looks like a careless move. Oughtn’t Black to be defending his unguarded b-pawn?
Not when White is about to commit a flagrantly ill-judged pawn grab. Chess literature abounds in games where the queen has been lost after capturing a harmless-looking b-pawn which turned out to be quite securely (though indirectly) guarded after all. That is what happens here.
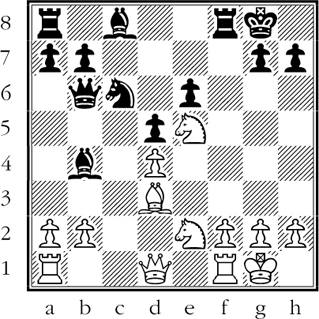
10.Qxb7?? Ra7! (D)
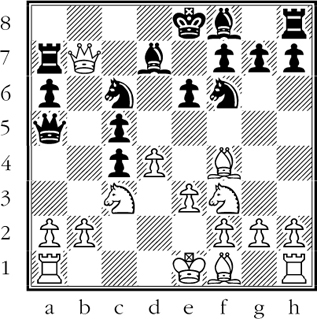
White resigns. A ludicrous tableau. White’s queen is trapped!
Pawn Grabbing Based on Miscalculation
Sicilian Defense
White - Black
1.e4 c5 2.Nf3 d6 3.d4 cxd4 4.Nxd4 g6 5.c4 Nf6 6.Nc3 Nc6 7.f3
Black should now continue his development with 7…Bg7 and 8…0-0. Instead, he commits an error of judgment by developing his queen prematurely.
7…Qb6
This looks promising, as White’s knight at d4 is now doubly attacked. True, White can defend the knight with the developing move Be3 - but in that case his b-pawn will be deprived of protection. Black is therefore well content with the queen move, which seems to create a puzzling problem for White.
8.Be3!
A surprise! White makes the “impossible” move, and leaves his unprotected b-pawn in the lurch.
Now Black is confronted with a difficult choice. He can carry out his original intention and capture the b-pawn; or he can beat a shame-faced retreat with 8…Qd8. But if he refuses the pawn, he loses valuable time, and also confesses that his whole plan was wrong. If he leaves his queen at b6, White continues Qd2 (protecting the b-pawn and the bishop at e3), with the formidable threat of Ne6, attacking Black’s queen.
So, if only as a matter of pride, Black captures the pawn.
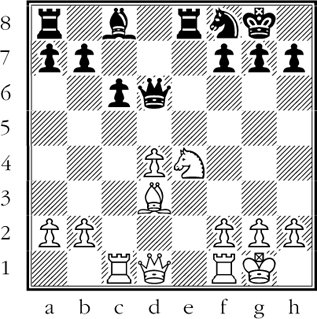
8…Qxb2??? (D)
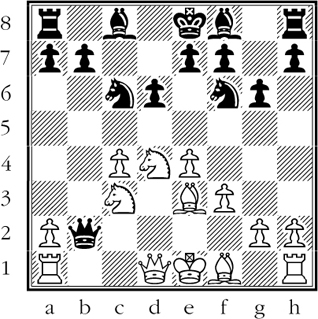
But this is a ruinous blunder, for now the queen is trapped!
9.Na4 Qa3
After 9…Qb4+ 10.Bd2 Black loses his queen as in the actual play.
10.Bc1! Qb4+ 11.Bd2 Qa3 12.Nb5 Black resigns.
The black queen is left without a single flight square - proper punishment for an impetuous pawn-grabbing expedition.
Black’s Pawn Grabbing Opens the Center Files
Vienna Game
White - Black
1.e4 e5 2.Nc3 Nf6 3.f4 d5 4.fxe5 Nxe4 5.Nf3 Bg4 6.Qe2 Nc5?
He wastes time with the knight to put it on a worse square. Instead of this third move with the knight, a simple 6…Nxc3 was in order.
7.d4 Bxf3 8.Qxf3 Qh4+
Black looks forward to 9.Qf2 (protecting the d-pawn) 9…Qxf2+ 10.Kxf2 Ne4+ with an easy game.*
9.g3!
An unpleasant surprise. Black hadn’t expected to grab a pawn, but he captures the d-pawn to “save face.”*
9…Qxd4 10.Be3! Qxe5
More pawn grabbing and more loss of time.
11.0-0-0 c6 (D)
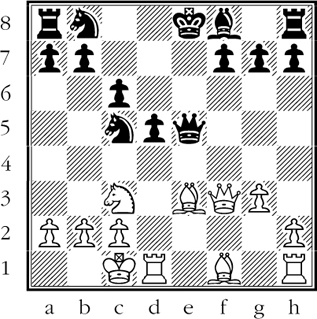
White has a considerable lead in development, both center files are open, and Black’s king is still in the center. The position is perfect for further sacrifices by White, relying on the use of the open files and the gains of time made possible by Black’s pawn grabbing.
12.Nxd5! cxd5 13.Rxd5
Now Black’s queen must lose more time. The most interesting line is 13…Qe4 14.Bb5+ Nc6 15.Bxc5!! Qxf3 16.Bxc6+ bxc6 17.Re1+ Be7 18.Rxe7+ Kf8 19.Rxa7+ Kg8 20.Rxa8#. A long variation, but once Black captures the queen he has no choice.
13…Qe6 14.Bc4 Qe4 15.Bxc5!! Qxf3 16.Re1+ Be7 17.Rxe7+ Kf8 18.Rd8#
White made splendid use of the two open files resulting from Black’s immoderate pawn grabbing.
Catastrophe on the Open Center Files
French Defense
White - Black
1.e4 e6 2.d4 d5 3.Nc3 Nf6 4.exd5 Nxd5
Repeated moves with the same piece should be avoided in opening play. Hence 4…exd5 would be correct.
5.Nf3 c5 6.Nxd5 Qxd5
Bringing out the queen at a very early stage - another faulty move, as she will be exposed to attack.
7.Be3 cxd4 8.Nxd4 a6 9.Be2! Qxg2
The black queen goes far afield to grab an unimportant pawn. Black loses time, his queen gets out of play, and White gets an important open line on the g-file. It all adds up to a very unfavorable deal for Black.
10.Bf3 Qg6 11.Qd2 e5
Black is far behind in development, and he sees that after the quiet continuation 11…Be7 12.0-0-0 0-0 13.Rhg1 White has a winning attack on the open g-file.
12.0-0-0! exd4 13.Bxd4 Nc6 (D)
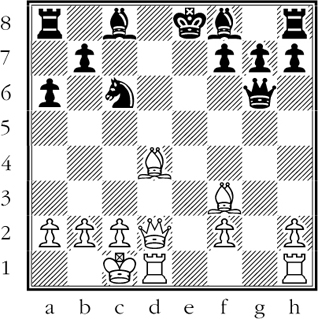
White’s sacrifice of the knight allows him to carry out a swift and merciless attack on the open center files.
14.Bf6!! Qxf6
If 14…gxf6 15.Bxc6+ forces mate.
15.Rhe1+ Be7
After 15…Be6 the pinned bishop is useless against 16.Qd7#.
16.Bxc6+ Kf8
Or 16…Qxc6 and White relies on another pin for 17.Qd8#!.
17.Qd8+!! Bxd8 18.Re8#
A beautifully engineered attack by White, but Black’s disastrous pawn grabbing gave White his chance.
Pawn-Grabbing Endangers Black’s Castled Position
King’s Gambit Declined
White - Black
1.e4 e5 2.f4 Bc5 3.Nf3 d6 4.Bc4 Nf6 5.Nc3 0-0 6.d3 Ng4?
After some excellent opening play featuring sensible developing moves, Black goes wrong by moving the already developed knight a second time.
7.Rf1 Nxh2?
Wrong again. True, if 8.Nxh2? Qh4+ recovers the piece advantageously for Black. But White has a powerful alternative - to make use of the murderous open h-file thus presented to him.
8.Rh1! Ng4
Of Black’s eight moves, four have been with this knight!
9.Qe2 Bf2+ 10.Kf1 Nc6 11.f5! Bc5 12.Ng5!
Beginning a quickly decisive attack on the open h-file - for example 12…Nf6 13.Nxh7! Nxh7 14.Qh5, and mate follows.
12…Nh6 13.Qh5
Now it is clear that Black’s senseless pawn grabbing has allowed White to mount a ferocious attack. A delightful possibility here is 13…Qf6 14.Nxh7! Kxh7 15.Bg5 and Black’s queen is trapped.
13…Qe8 (D)

14.Nxh7! Kxh7 15.Bxh6 g6 16.Qxg6+!! fxg6 17.Bxf8#!
Thus White triumphs on the file kindly opened for him by Black’s pawn grabbing expedition. (D)
Black to move
By playing 1…Nxe5 2.dxe5 Bc5 Black can obtain a definite advantage because of his pressure on White’s f-pawn. Instead of going into this line, however, Black observes that he can win White’s d-pawn. He attacks the pawn twice, and it is defended only once.
This position is important because it is typical - its basic idea appears and reappears again and again. While the white d-pawn seems vulnerable, it is actually guarded sufficiently. But, because this protection is indirect, many a player is unable to resist capturing the tempting pawn.
1…Nxd4?
The best that Black can hope for after this thoughtless capture is to lose “only” the knight.
2.Nxd4 Qxd4???
After this Black loses his queen.
3.Bxh7+!
This is the finesse that Black overlooked! His king is attacked; consequently, he cannot stop to save his unguarded queen, which is also under attack.
3…Kxh7 4.Qxd4 Black resigns.
Having lost his queen in return for a mere bishop, Black is left with a crushing material disadvantage.
The questions Black should have asked himself, and failed to ask, are, “What happens after I capture the pawn”; “Why has he left it unguarded?”; and “Is it really unguarded?” (D)
Black to move
Here the same theme appears in a more subtle form. Black’s queen is attacked, and 1…Qxd4 seems a thoroughly satisfactory reply, as there is no possibility of Bxh7+. And yet it would be a mistake to capture the lose pawn. How does White prove that the d-pawn cannot be captured with impunity?
Black’s attacked queen should retreat to a place of safety, 1…Qd8, for example, or 1…Qh6. Instead, Black captures the d-pawn.
1…Qxd4
To refute this capture, White plays a move which at first sight looks nonsensical:
2.Nd6!!
There seems to be no rhyme or reason to this move, as Black can reply 2…Qxd6. But in that event, the unprotected queen is lost after 3.Bxh7+.
Nor is this all. In addition, the advanced knight attacks the black rook at e8. Against these two threats Black has only one resource:
2…Qe5
Black makes the best of it.
3.Nxe8 Qxe8
White has won the exchange in return for a pawn - a material advantage that will win the game for him. (D)
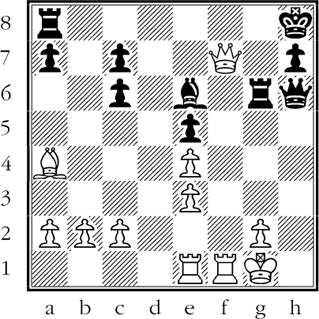
White to move
White’s choice of a move for his attacked queen should be influenced by the fact that Black has a powerful attacking position. Black is all set up to double rooks on the open g-file, or to proceed even more violently, depending on White’s next move.
Even after 1.Qf3 Rag8 the concentration of force against White’s kingside would eventually be too much for White. Failing to appreciate the power of Black’s formation, White completely neglects the defense by playing:
1.Qxc7??
This impetuous pawn grab is immediately fatal.
1…Rxg2+! 2.Kxg2 Rg8+
Battered by the crossfire of three enemy pieces, the lone white king cannot hold out very long. Thus if 3.Kf2 Qh2+ and mate next move.
3.Kf3 Bg4+ White resigns.
For if 4.Kg3 Qh3+ 5.Kf2 Qh2#. (Black can also force mate with; 3…Qh5+ etc. The absence of the white queen allows Black to win in a variety of ways.)