How to Bake Everything: Simple Recipes for the Best Baking - Mark Bittman (2016)
Cakes
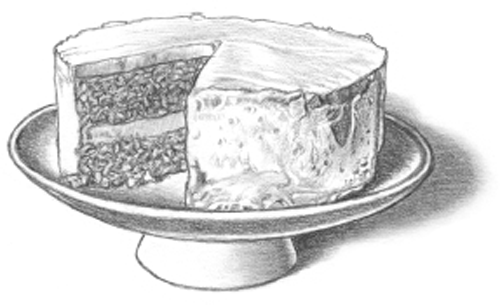
Cake is the iconic American dessert, all but expected at birthdays, weddings, and other happy occasions. Cakes can be as simple or as complex as you like, and are easy to vary or build on, limited only by your patience and imagination. For most Americans, they are associated with what’s essentially an extra-sweet and rich quick bread batter and a soft flour crumb, layered and frosted. That’s your quintessential cake, but the genre is way broader than that.
BUTTER CAKE
This is the classic layer cake, no matter what form it takes—from cupcakes to pound cake—and what I mean when I say “cake.” A high ratio of fat (usually butter but sometimes oil) to flour inhibits gluten formation, making for a tender and flavorful crumb. If I’m talking about another type of cake, I’ll let you know.
FOAM CAKE
These have little to no fat, and their lift comes from whipped eggs. Angel food has no fat at all; sponge and jelly-roll cakes get their only fat from egg yolks; genoise and chiffon have a little extra fat from oil or butter, but not much. They’re not rich on their own, but they’re porous and fantastic for layering or soaking.
CUSTARD CAKE
Cheesecakes are the prime example. These have a thick, egg-enriched base and may have no flour at all.
YEASTED CAKE
A cousin to bread and pastry; yeast is used for leavening instead of baking powder, baking soda, or eggs.
The difference between a basic cake and an extravagant one usually comes down to assembly and decoration. Elaborate cakes are typically composed of several simple parts, and making one well comes down to good planning.
DIY Cake Flour
Unless you’re cranking out cakes on a regular basis, it isn’t practical to keep cake flour in your pantry, and it may not even be at the grocery in your time of need. There’s a simple fix. For every cup of flour, mix ⅞ cup all-purpose flour with ⅛ cup cornstarch. (An easy way is to fill and level a cup of flour, then remove 2 tablespoons of the flour and top it off with cornstarch.) If you want to be extra-careful, sift the mixture once to be sure there are no rogue lumps. Do this as needed or make a big batch to stockpile if you’re a big baker. You’ll notice the difference.
The upshot is that all cakes are mix-and-match friendly, offering endless options for customizing. Choose a shape you like: layer, cupcakes, babycakes, sheet cake. Choose your frosting. Add a cake soak or glaze if you like or top with something simple like a dusting of confectioners’ sugar or a dollop of whipped cream. You can bake from this chapter for a year and never make the same cake twice.
The Basics of Cake Baking
Cakes are more forgiving than they’re reputed to be. The important thing is to nail the basics: good ingredients, the right pans, and a little attention to technique. Give yourself enough time to follow each step, don’t cut corners, and you’re halfway there.
INGREDIENTS
Homemade cake is meltingly tender, tasting of butter, eggs, and simple flavorings. It’s difficult to argue that there’s a single component that is of paramount importance, but cakes have a way of showcasing “off” flavors: if an ingredient is stale or even second-rate, you’ll notice it. Use the highest-quality butter, chocolate, eggs, extracts, and nuts for the best cakes.
Flour is the base of most cakes, and all-purpose is usually a good option, but if you want a tender cake with a fine crumb, you’re better off using cake flour in the recipes that give it as the first option. It has less protein than all-purpose, so it doesn’t produce as much gluten. (Gluten makes foods chewy—think bread—and cakes should be tender, not chewy.) If you don’t have it, see the sidebar to the left for a quick and easy substitution.
Some lighter cakes call for superfine sugar, which is somewhere between granulated and confectioners’ sugar. It’s ideal because the fine crystals dissolve quickly in batters that you may not want to overwork. If you can’t find it, you can make your own by grinding granulated sugar in a food processor for a few seconds.
The temperature of your ingredients makes a difference: Softened butter behaves differently than melted or ice-cold when you mix it with the other ingredients, so use only what the recipe tells you to do (see page 20 for a faster way to get soft butter). Anytime you’re making a foam cake, the temperature of your eggs is equally important—room-temperature egg whites are more relaxed so you can beat more air into them. You can stick cold eggs in a bowl of warm (not hot) water for 5 to 10 minutes to prep them.
EQUIPMENT
Most cake pans are made of lightweight, light-colored metal, like aluminum or stainless steel, which is ideal for even browning. Those are the pans I use. Darker metal pans attract more heat, and glass pans take longer to heat up but hold on to heat longer. If you’re using either, decrease the oven temperature by 25 degrees to make sure your cakes don’t burn. Less common are silicone pans, which never stick but are good only for very light-colored cakes—they’ll hardly brown.
Most of the recipes in this chapter call for standard bakeware, but if you’re missing the right pans, you can substitute mindfully. If my high school math is serving me correctly, the difference between an 8-inch and a 9-inch cake pan is around 13 square inches—that’s a large extra space over which to spread a batter and will change the cooking time. See Substituting Cake Pans (below) for more info on changing pan sizes and adjusting your cook time accordingly.
A decent pan is all the special equipment you need to make a cake, but if you get into cake baking, you may want to boost your arsenal—see The Cake-Making Tool Kit for extra gear.
TECHNIQUES
PREPARING AND FILLING CAKE PANS
There’s nothing more disappointing than taking a cake out of the oven only to find that it won’t budge from the pan. A good cake is delicate, so you’re better safe than sorry—especially if you’re baking a cake to serve to other people—so it’s worth taking the extra steps to ensure a clean release. Do this before you start on the batter, because batter that sits may start to break down. Here’s how:
Grease the bottom and sides of the pans with butter. Add a tablespoon or so of flour (or cocoa powder if the cake is chocolate) to each pan, then rotate and tap to make a thin, even layer. Give the pan a few good thumps over the sink or trash can to get rid of any excess. For cakes that are more likely to stick, I grease the bottom and sides of the pan and then cover the bottom of the pan with parchment or wax paper. Cutting the paper to size can be a bit of a pain, but you can use the bottom of the pan as a stencil, or buy precut sheets for standard-size pans. Grease and flour the parchment paper.
ADAPTING RECIPES
Substituting Cake Pans
You have several pan options for baking most cakes; the most common are mentioned in each recipe. Some, like springform pans, don’t have easy substitutes, but for the rest, if you find yourself with the “wrong” size or shape, you can easily adjust. The following pan options are roughly interchangeable:
- Two 9-inch round layer cake pans
- Three 8-inch round layer cake pans
- Two 9 × 5-inch loaf pans
- Three 8 × 4-inch loaf pans
- Two standard (12-cup) muffin tins
- 13 × 9-inch baking pan
- 15 × 10-inch or 17 × 12-inch jelly-roll pan (since these cakes are meant to be thin, either size will work)
- 8- or 9-inch tube pan
- 10-inch bundt pan
Of course, switching pans means the baking time will vary. Pans with greater surface area—like jelly-roll pans or rectangular baking dishes—will have shorter cook times. Take the density of the batter into account too. Pound cakes, for example, are dense and will take longer than airy angel food cakes. Use your oven light to get a sense for whether your cake is cooking quickly, and if you think you are getting close to done, open the door and test it. Better to have opened the door once or twice during cooking than to risk overcooking your cake.
When adding batter to layer cakes, pans should be equally full to ensure even baking. If you’re worried about eyeballing it, you can weigh each pan or—less fussy—use a toothpick to check the level of batter in each pan. Once you’ve poured the batter, use a spatula to smooth it out, lift the pan a few inches from the counter, and let it drop to force out any large air bubbles; this helps it rise more evenly.
Note that there’s a slightly different process for preparing springform pans, which are used specifically for more delicate cakes, like cheesecake or flourless chocolate, that can’t be inverted. See page 223 for more info.
It can be tricky to remove bundt cakes from their pans, especially those with complex patterns. Your best bet for greasing every nook and cranny is a pastry brush and melted butter.
MIXING
Creaming butter and sugar together is not just a mixing technique; it plays a role in leavening and giving structure to cakes. The quick beating (done most easily with an electric mixer or stand mixer, although it can be done by hand) breaks up the fat with the sugar crystals, forcing air into the mixture that adds lift as the desserts bake. The eggs or egg yolks, usually added at the last stage of creaming, enrich and lighten the batter even further.
Most cake recipes call for you to combine the dry ingredients separately, then to gently and gradually combine them by hand with the creamed butter mixture, along with any other wet ingredients, like milk, if they haven’t already been incorporated. This helps prevent overworking the batter, and since the success of many cakes is in the tenderness of their crumb, you shouldn’t hurry through this step. Rubber spatulas are best for the job since they’re flexible but firm.
One traditional step you usually can skip is sifting. Flour, once an inconsistent product, is now so fine that sifting is usually unnecessary; most of the time, you can just whisk it to eliminate any lumps. The same goes for cocoa powder and other dry ingredients. When a recipe calls for sifting, though, don’t skip it; those cakes are more delicate, and sifting aerates the ingredients for the lightest possible crumb. A fine- or medium-mesh sieve is great for this, and it’s also what you should use to dust anything with confectioners’ sugar or cocoa powder.
BAKING
Place your pan(s) in a fully preheated oven, as close to the center as you can, so that the air circulates evenly. As with cookies, rotate the pans once, about halfway through baking, so that different sections cook in different parts of the oven for equal times. Resist the urge to open and close the oven any more than you need to, though: doing so makes the temperature fluctuate and can keep cakes from rising as much as they should.
Test doneness of any cake with a toothpick or fork inserted into the center; when it comes out dry or with a few moist crumbs, the cake is ready. Once it’s out of the oven, let it cool in the pan on a rack for 5 minutes or so; richer, moister cakes should cool in their pans a bit longer. To remove a cake, gently loosen the edges with a dull knife, put the rack over the top of the pan, get a steady grip on both, hold your breath, and … flip. For most people, this is the scariest step, but well-greased pans won’t give you any problems.
Cakes that will be slathered with frosting can cool with their bottoms facing up. Bundt cakes should always cool top up to preserve their appearances. They also require careful removal from their pans. Instead of inverting the cake onto a rack, put the rack over the opening of the pan, pinch the rack and the bundt pan together, and invert them as a unit. After you feel the cake fall out, remove the pan and let the cake finish cooling.
Any other kind of cake that you are not going to frost should cool top up so you won’t see the marks of the cooling rack. Invert the cake onto a plate first, and then invert again from the plate onto the rack so the top side is up.
FROSTING
For some people (and most kids), cake is an excuse to eat frosting. In addition to being creamy and sweet, frosting is a way to add other flavors and textures to your cake (and preserve it a bit longer). There are very few rules here—flavor combinations are limited largely by your imagination. The only nonnegotiable is to let the cake cool completely first so the frosting doesn’t melt. Frosting sheet cakes, cupcakes, and single-layer cakes is straightforward, but if you’re making two- or three-layer cakes, follow the directions on page 198. See Frosting for Pros for the lowdown on crumb coats, which are never necessary but can win you some style points and ensure a perfect presentation.
STORAGE
Wrapped tightly in plastic wrap, unfrosted cakes can hold for a couple days at room temperature, as can covered, frosted cakes. But no cake—iced or not—is ever as tender and moist as it is the day you make it. Frosted layer cakes look gorgeous in a cake stand with a cover. If you don’t have one (I don’t), just keep the frosted cake on a plate at room temperature and either tent it with foil or cover it with an extra-large mixing bowl, making sure the bowl doesn’t touch the cake.
The Cake-Making Tool Kit
If you have a cake pan, you have all the special equipment you really need to bake a cake, but if you’re serious about making cakes, the following things can really help.
Revolving cake stand Not just a pretty way to display frosted cake. You can easily rotate it while you’re working with the cake, whether you’re leveling it, cutting it into thinner layers (page 198), or applying even layers of frosting.
Offset spatula The best, smoothest way to spread frostings or sauces. You can lightly grease the blade with oil to keep thicker sauces, like Chocolate Ganache or Caramel Sauce, from clinging.
Cake boards and boxes Essential for transporting decorated layer cakes. Get a box that’s a couple inches bigger than your cake on both sides and a board that fits perfectly inside the box; this way, the edges of the box don’t rub against the frosting.
Pastry bags and tips For decorating with frosting (among other uses)—use the star tips for borders and the small round tips for writing words. See page 566 for how to use these.
That said, cakes freeze beautifully, making them one of the best make-ahead desserts. Bake and let cool completely at room temperature before wrapping each layer very tightly in a few sheets of plastic wrap and then foil; freeze for up to a few months. Let thaw at room temperature before unwrapping and frosting. If you plan to level the cakes or split the layers (page 198), do it while the cakes are still frozen, when they’re easiest to manipulate, then rewrap and thaw at room temperature for the best consistency.
Frosting, too, can be made ahead, refrigerated for a day or two, and brought to room temperature before assembling the cake; whip it for a minute or so to bring it back to life and make it light and spreadable.
Once you’ve cut into a cake, keep it fresh by pressing a piece of plastic wrap or wax paper up against the sliced part and covering as usual.
The Cake Pan Lexicon
There are many more sizes and shapes of cake pans, but these are the essentials. It’s obvious, but it bears mentioning: The size and shape of a cake can have a significant effect on its presentation.
TYPE OF PAN: Round pan
ESSENTIAL SIZES: 9 inches round (buy 2) or 8 inches round (buy 3)
TYPES OF CAKE: Single- and multiple-layer cakes
RECOMMENDED RECIPES: Any butter cake, such as Yellow, White, Chocolate, or Red Velvet
TYPE OF PAN: Rectangular pan
ESSENTIAL SIZES: 13 × 9 inches
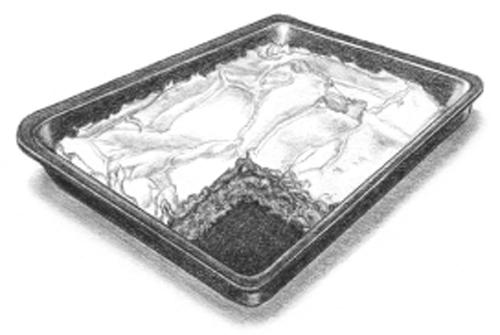
TYPES OF CAKE: Sheet cakes, served in a single large layer
RECOMMENDED RECIPES: Same as above
TYPE OF PAN: Muffin tin
ESSENTIAL SIZES: Standard cup size is 3½ ounces; you want at least 1 pan with 12 cups
TYPES OF CAKE: Muffins or cupcakes; great for feeding a crowd, easy transportation, and any occasion with kids
RECOMMENDED RECIPES: Any butter cake
TYPE OF PAN: Jelly-roll pan
ESSENTIAL SIZES: 15 × 10-inch or 17 × 12-inch shallow rectangular pans, like rimmed baking sheets
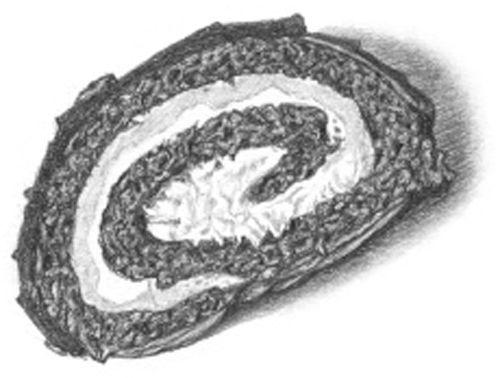
TYPES OF CAKE: Thin layers of cake to fill and roll into jelly rolls or Bûche de Noël or frosted and served as a sheet for a crowd
RECOMMENDED RECIPES: Sponge Cake or Genoise
TYPE OF PAN: Loaf pan
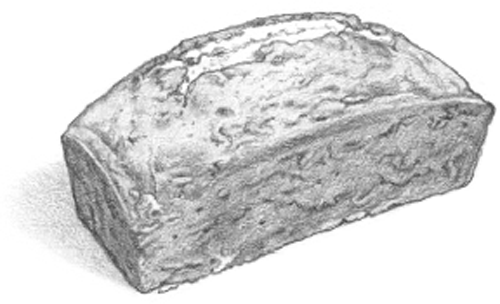
ESSENTIAL SIZES: 9 × 5 inches (buy 2) or 8 × 4 inches (buy 3)
TYPES OF CAKE: Dense cakes that don’t need to be frosted or embellished
RECOMMENDED RECIPES: Classic Pound Cake, Chocolate-Sour Cream Pound Cake, Pumpkin Spice Cake, or Honey-Spice Cake
TYPE OF PAN: Bundt (tube) pan

ESSENTIAL SIZES: 12 cups
TYPES OF CAKE: Elegant cakes for entertaining; top with glaze or dust with confectioners’ sugar. Tube pan is a close relative
RECOMMENDED RECIPES: Angel Food Cake, Caribbean Rum Cake, or Pumpkin Spice Cake
TYPE OF PAN: Springform pan
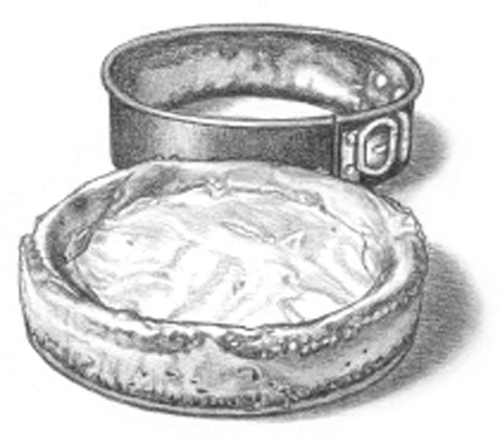
ESSENTIAL SIZES: 9 inches round
TYPES OF CAKE: Ideal for custard and other delicate cakes
RECOMMENDED RECIPES: Cheesecake, Dense Flourless Chocolate Cake, Lemon Cornmeal Cake
Chocolate Cakes
Chocolate cake may be the ultimate crowd pleaser, appropriate for all ages and occasions. Chocolate is such a versatile ingredient that the genre ranges from your most basic layer cake (below) to five-star desserts like Molten Chocolate Cake and Death-by-Chocolate Torte. Chocolate complements nearly every flavor or ingredient you might want to pair it with, which makes it endlessly versatile.
It should go without saying that better chocolate yields vastly better results. Read up on the many varieties of chocolate on page 23 before you get started.
Recipes
Chocolate Cake
Devil’s Food Cake
Red Velvet Cake
Crazy Cake
Chocolate-Sour Cream Pound Cake
Molten Chocolate Cake
Dense Flourless Chocolate Cake
Chocolate Stout Cake
German Chocolate Cake
Black Forest Cake
Death-by-Chocolate Torte
Chocolate-Hazelnut Torte
Chocolate Icebox Cake
Chocolate Whoopie Pies
Chocolate Cake
Makes: At least 10 servings
Time: About 1 hour
Even a basic chocolate cake makes an occasion seem special. This cake is made extra-light with whipped egg whites and cake flour. You can top it with anything from frosting to just a dusting of confectioners’ sugar. Use Chocolate Ganache or Chocolate Buttercream for all chocolate; or for contrast, try Coconut Seven-Minute Frosting or Jam Glaze. Hide a layer of Caramel Sauce or Peanut Buttercream between the layers for a special treat.
- 1 stick butter, softened, plus more for greasing
- 2 cups cake or all-purpose flour, plus more for dusting
- 3 ounces unsweetened chocolate, coarsely chopped
- 2 teaspoons baking powder
- ½ teaspoon baking soda
- ½ teaspoon salt
- ¾ cup sugar
- 2 eggs, separated
- 1 teaspoon vanilla extract
- 1¼ cups milk
1. Heat the oven to 350°F. Grease and flour the bottom and sides of two 9-inch or three 8-inch layer cake pans, or a 13 × 9-inch sheet cake pan.
2. Melt the chocolate in a small saucepan over very low heat or in a double boiler over hot—not boiling—water, stirring occasionally. When the chocolate is just about melted, remove from the heat and continue to stir until smooth.
3. Whisk together the flour, baking powder, baking soda, and salt and set aside. Use an electric mixer to cream the butter until smooth, then gradually add the sugar. Beat until light in color and fluffy, 3 or 4 minutes. Beat in the egg yolks, one at a time, then the vanilla, and finally the chocolate. Stir the dry ingredients into the chocolate mixture a little at a time, alternating with the milk. Stir just until smooth.
4. Wash and dry the beaters thoroughly, then beat the egg whites until they hold soft peaks. Use a rubber spatula to fold them gently but thoroughly into the batter. Turn it into the pans and bake until a toothpick inserted into the center of the cakes comes out clean, about 30 minutes for layers or 20 minutes for a sheet cake. Let the cake cool in the pan for 5 minutes, then invert onto a rack to finish cooling.
5. Frost or glaze if you like and store at room temperature. If you’re not frosting right away, you can wrap each layer tightly with plastic wrap and store at room temperature for up to 2 days or with plastic wrap and foil and store in the freezer for up to a few months.
CHOCOLATE-ORANGE CAKE This cake is especially decadent with rich ganache: Beat 2 tablespoons grated orange zest into the butter and sugar mixture. To assemble the cake, spread a thin layer of Orange Glaze on the first layer of the cake. Frost the remaining cake with Chocolate Ganache or Chocolate Buttercream flavored with 1 tablespoon orange zest. Garnish with additional zest or Candied Orange Peel if you like.
CHOCOLATE-ESPRESSO CAKE Add a little zing to your cake; plus, espresso is a flavor enhancer for chocolate: Beat 3 tablespoons instant espresso powder into the butter and sugar mixture. Frost the cake with Chocolate Ganache or Espresso Buttercream. If you like, decorate the cake with chopped chocolate-covered espresso beans.
CHOCOLATE-CINNAMON CAKE Grind a cinnamon stick for the best results: Substitute 2 teaspoons cinnamon for the vanilla. Frost with Cinnamon Buttercream.
CHOCOLATE-HAZELNUT CAKE Frost with 1 recipe Chocolate-Hazelnut Spread folded into 1 recipe Chocolate Ganache. Top with chopped toasted hazelnuts.
VEGAN CHOCOLATE CAKE Use ½ cup cocoa powder instead of chopped chocolate; whisk it with the other dry ingredients. Swap the butter for ½ cup neutral oil, like grapeseed or corn, or olive oil and the sugar for 1 cup maple syrup. Omit the eggs. Substitute 1½ cups almond or soy milk for the dairy milk; add 1 tablespoon apple cider vinegar to the milk and let the mixture sit for 10 minutes before using.
How to Make a Layer Cake
Any good cake is delicious, but it’s hard to beat a layer cake in terms of looks. These steps ensure success with any cake recipe.
STEP 1
Bake the batter in round or square layer cake pans as directed and let cool completely.
STEP 2
Make any frosting you like. Buttercream and Cream Cheese Frosting are classics that are creamy but stiff enough to stay put.
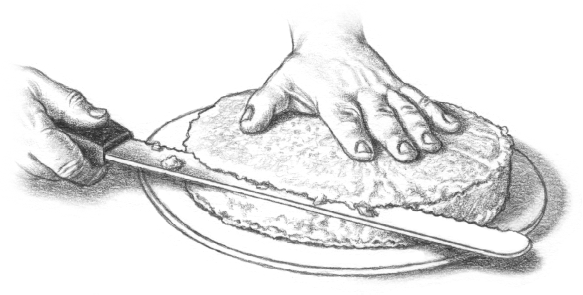
STEP 3
A good refinement is to use a serrated knife to level off the top of the cake: Press one palm on top of the cake to hold it steady, then gently and carefully trim the top with a sawing motion, rotating the cake as you go to ensure that it’s level. (See the list on page 232 for ways to use your scraps.) Use this same method to cut a single layer into two thinner layers.
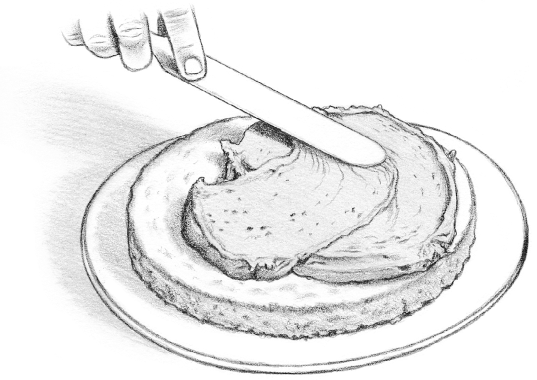
STEP 4
Put the first layer of cake, top side down, on a plate or cake stand. For a two-layer cake, use an offset spatula or a butter knife to spread about one-third of the frosting on top, all the way to the edges.
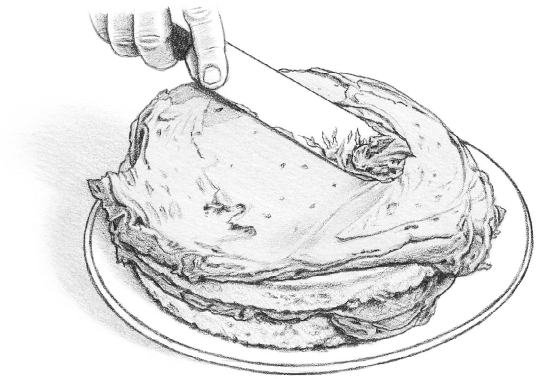
STEP 5
Put the second layer on top, bottom side down, and spread another third of the frosting on top.
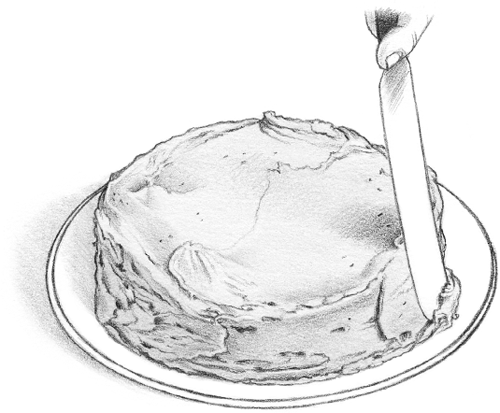
STEP 6
Use the remaining frosting to cover the sides of the cake. Smooth if you like, or wiggle your hand a bit to make little peaks and swirls. For a three-layer (8-inch) cake, figure about one-third for the sides and divide the remaining two-thirds of the frosting among the three layers.
Frosting for Pros
For a polished, professional-looking frosting job, follow these few tricks.
- Line the perimeter of the plate with four large strips of wax paper so that the edge of the cake will sit on the paper. This will keep the plate clean.
- Put a small smear of frosting in the center of the plate and place the first layer on it. The frosting will keep the cake from moving too much while you work.
- Use a crumb coat, which is a very thin layer of frosting that acts as a primer, trapping loose crumbs. After the crumb coat is on and has had a few minutes to set, frost as you normally would.
When you’ve finished frosting, pull away the papers.
Devil’s Food Cake
Makes: At least 10 servings
Time: About 1 hour
An airy alternative to dense chocolate cake, devil’s food cake is impossibly moist and dark. If you do frost, choose something light, like Mocha Glaze, Not-Too-Sweet Vanilla Buttercream, Coconut Seven-Minute Frosting, or just plain Whipped Cream.
- 1 stick butter, softened, plus more for greasing
- 2 cups cake or all-purpose flour, plus more for dusting
- ¾ cup cocoa powder
- 1½ teaspoons baking soda
- ¾ teaspoon salt
- ¾ cup sugar
- 2 eggs, separated
- 1 teaspoon vanilla extract
- 1 cup sour cream or buttermilk
1. Heat the oven to 350°F. Grease and flour the bottom and sides of two 9-inch or three 8-inch layer cake pans.
2. Whisk together the flour, cocoa powder, baking soda, and salt and set aside. Use an electric mixer to cream the butter until smooth, then gradually add the sugar. Beat until light in color and fluffy, 3 minutes. Beat in the egg yolks, then add the vanilla. Using a spoon or spatula, add the dry ingredients a little at a time, alternating with the sour cream. Stir just until smooth.
3. Wash and dry the beaters thoroughly, then beat the egg whites until they hold soft peaks. Use a rubber spatula to fold them gently but thoroughly into the batter. Turn it into the pans and bake until a toothpick inserted into the center of the cakes comes out clean, about 25 minutes. Let the cakes cool in the pans for 5 minutes, then run a knife around the edges of the cakes and invert onto a rack to finish cooling.
4. Frost or glaze if you like and store at room temperature. If you’re not frosting right away, you can wrap each layer with plastic wrap and store at room temperature for up to two days or wrap in plastic wrap and foil and store in the freezer for up to a few months.
DOUBLE DEVIL’S FOOD CAKE Use even more cayenne for a really spicy kick: Whisk ½ teaspoon cayenne and 1½ teaspoons cinnamon into the dry ingredients.
Red Velvet Cake
Makes: At least 10 servings
Time: About 1 hour
The brilliant red layers and unique cocoa flavor of this southern staple can’t help but stand out. The classic accompaniment for this cake is Cream Cheese Frosting.
- 1½ sticks butter, softened, plus more for greasing
- 2¼ cups cake flour or sifted all-purpose flour, plus more for dusting
- 1 teaspoon baking soda
- ¾ teaspoon salt
- ¼ cup cocoa powder, plus more for dusting
- 1 tablespoon vanilla extract
- 2 tablespoons red food coloring
- 2 cups sugar
- 3 eggs
- 1½ cups buttermilk
1. Heat the oven to 350°F. Grease and flour the bottom and sides of two 9-inch or three 8-inch layer cake pans.
2. Whisk together the flour, baking soda, and salt in a medium bowl and set aside. In a separate bowl, make a paste with the cocoa powder, vanilla, and red food coloring.
3. Use an electric mixer to cream the butter and sugar, then gradually add the eggs. Beat until light in color and fluffy, 4 or 5 minutes, then beat in the cocoa powder mixture. At this point, the mixture should have a distinct red color. If it’s dingy, add a few more drops of food coloring. Add the flour mixture to the egg mixture by hand, a little at a time, alternating with the buttermilk. Stir just until smooth.
4. Divide the batter evenly between the pans and bake until a toothpick inserted into the center of the cakes comes out clean or with a few moist crumbs, 20 to 25 minutes. Let the cakes cool in the pan for 5 minutes, then invert onto a rack to finish cooling.
5. Frost or glaze if you like and store at room temperature. If you’re not frosting right away, you can wrap each layer tightly with plastic wrap and store at room temperature for up to 2 days or wrap in plastic wrap and foil and store in the freezer for up to a few months.
NATURALLY RED VELVET CAKE This version isn’t so vividly red, but it’s dye-free and the beets give it a lovely texture: Heat the oven to 400°F. Wash 3 medium-sized beets and place them on a baking sheet; roast for 40 to 60 minutes, or until they’re easy to prick with a fork. Remove them from the oven and let cool, then peel off the skins. Chop and purée in a food processor or blender; let cool completely. Omit the red food coloring. Decrease the buttermilk to 1 cup and combine it with 1 cup beet purée before folding it into the batter.
Crazy Cake
Makes: About 8 servings
Time: 45 minutes
This cake has no eggs, milk, or butter; the crazy part is that it still tastes so good and is so easy to make. Developed during the Depression due to a shortage of dairy products, the cake is now a godsend for vegans and anyone who loves a good shortcut. It can be topped with anything you’d like (pages 556-588), can easily be doubled, works just as well as an 8- or 9-inch round layer cake as it does as a square or sheet cake, and is also a perfect option for whipping up a batch of cupcakes. You can mix the batter directly in the baking pan if you want, but it’s easier in a bowl.
- 2 cups flour
- ⅓ cup cocoa powder
- 1½ cups sugar
- 2 teaspoons baking soda
- ¾ teaspoon salt
- ½ cup vegetable oil
- 1 tablespoon distilled white vinegar
- 1½ teaspoons vanilla extract
1. Heat the oven to 350°F. Whisk together the flour, cocoa powder, sugar, baking soda, and salt in a large bowl.
2. Make 3 small wells in the flour mixture; pour the oil into the first, vinegar into the second, and vanilla into the third. Pour 1½ cups cold water over everything and whisk to combine. Pour into an ungreased 8-inch square pan.
3. Bake until a toothpick inserted into the center of the cake comes out clean, about 50 minutes. Let the cake cool before frosting it in the pan. Store at room temperature wrapped in plastic wrap for up to 3 days.
COFFEE CRAZY CAKE Coffee intensifies the cocoa flavor: Substitute brewed coffee for the water; let cool before pouring it over the cake. Top with Espresso Buttercream.
WHITE CHOCOLATE-ALMOND CRAZY CAKE Indulge a little with this humble cake: Stir ½ cup chopped white chocolate and ½ cup chopped almonds into the batter before baking.
CINNAMON-SPICE CRAZY CAKE Crazy cakes aren’t limited to chocolate: Omit the cocoa powder and increase the flour to 2¼ cups. Whisk 2 teaspoons cinnamon, 1 teaspoon ginger, and ½ teaspoon nutmeg into the flour mixture.
COCONUT CRAZY CAKE Coconut adds texture and nuttiness: Stir ½ cup shredded unsweetened coconut into the batter before baking. Top with Coconut Seven-Minute Frosting.
VANILLA CRAZY CAKE Omit the cocoa powder and increase the flour to 2¼ cups. Increase the vanilla to 1 tablespoon. Frost with Vanilla Buttercream.
BAILEY’S CRAZY CAKE A treat for grown-ups: Substitute 3 tablespoons Bailey’s Irish Cream for the vanilla extract.
Chocolate-Sour Cream Pound Cake
Makes: At least 8 servings
Time: About 1½ hours
Chocolate pound cake is an irresistible snacking cake. The sour cream lends moisture and a bit of tang to the chocolate’s bitter bite. Dutch-processed cocoa powder is a must here. Chocolate lovers will want to fold ½ cup chopped dark chocolate into the batter before baking.
Just like classic pound cake, chocolate pound cake is a blank slate for add-ins and frostings. Try the recipe with anything from the list on page 202, or other additions like nuts, dried fruit, or a swirl of jam.
- 1¾ sticks butter, softened, plus more for greasing
- 1⅔ cups flour
- ⅓ cup Dutch-processed cocoa powder
- 1½ teaspoons baking powder
- ¼ teaspoon salt
- ¾ cup sugar
- 3 eggs
- 1 cup sour cream
- 2 teaspoons vanilla extract
1. Heat the oven to 325°F. Grease a 9 × 5-inch loaf pan. If you prefer, double the recipe and grease a bundt or tube pan instead. Whisk together the flour, cocoa powder, baking powder, and salt in a medium bowl.
2. Use an electric mixer to cream the butter in a large bowl until it’s smooth. Add the sugar and beat until the mixture is light and fluffy. Beat in the eggs, one at a time. Add the sour cream and vanilla and beat until blended.
3. Stir in the dry ingredients by hand just until the mixture is smooth; don’t mix it too much and don’t use the electric mixer.
4. Transfer the batter to the loaf pan and smooth out the top. Bake until a toothpick inserted into the center comes out clean, 1 to 1¼ hours. The time is the same for a double batch of batter baked in a bundt or tube pan. Let the cake rest in the pan for 5 to 10 minutes before inverting onto a rack with a towel. Remove the pan, then turn the cake right side up. Cool before slicing. Serve warm or store at room temperature. Keep wrapped in plastic wrap at room temperature for up to 3 days, or wrap in plastic wrap and foil and store in the freezer for up to a few months.
CHOCOLATE-RICOTTA POUND CAKE WITH ORANGE The soft citrus flavor of orange is a wonderful complement to dark chocolate: Beat 1 tablespoon grated orange zest into the butter and sugar mixture. Substitute ricotta for the sour cream. If you like, stir ⅓ cup chopped Candied Orange Peel into the batter.
CHOCOLATE-ALMOND POUND CAKE Almond meal gives a great texture and nuttiness to this rich loaf; see page 15 if you’re making your own: Substitute almond meal for ⅓ cup of the all-purpose flour.
CHOCOLATE-CREAM CHEESE SWIRL CAKE Cream cheese filling adds tang to the chocolate loaf; plus, the white swirl looks great against the dark chocolate: Beat ¼ cup sugar with 6 ounces cream cheese until smooth. Whip 1 egg into the mixture until fluffy, then stir in ½ teaspoon vanilla. Pour the prepared cake batter into the pan, then dollop the cream cheese mixture in evenly spaced drops over the batter. Using the end of a wooden spoon or spatula, move across the pan lengthwise, swirling the mixtures together with large strokes; repeat the movement in the opposite direction. Be careful not to overmix or the marbling effect will be lost.
DOUBLE CHOCOLATE-HAZELNUT SWIRL CAKE A classic combination, kicked up a notch: Dollop ½ cup Chocolate-Hazelnut Spread in evenly spaced drops over the batter. Using the end of a wooden spoon or spatula, move across the pan lengthwise, swirling the mixtures together with large strokes; repeat the movement in the opposite direction. Sprinkle ¼ cup chopped toasted hazelnuts over the batter before baking.
7 Ways to Vary Pound Cake
Combine any of these ideas for flavoring Chocolate-Sour Cream Pound Cake, Classic Pound Cake, or any of their variations. One of my favorites is almond flour with orange zest; lemon with poppy seeds is classic.
Real vanilla Use vanilla beans in place of vanilla extract (see page 29). One bean equals 1 teaspoon of extract.
Lemon, orange, lime, or grapefruit Add 1 tablespoon grated or minced citrus zest (see page 36) and 1 tablespoon citrus juice. Omit the vanilla extract.
Spices Add up to 1 teaspoon cinnamon or ginger or ½ teaspoon cardamom, nutmeg, allspice, or cloves. For a spice pound cake, use 1 teaspoon cinnamon, ½ teaspoon nutmeg, ¼ teaspoon ginger, and ¼ teaspoon ground cloves.
Nut flour Substitute 1 cup any nut meal or flour for half of the flour; use all-purpose flour for the remaining cup.
Candied ginger Add 1 to 2 tablespoons minced candied ginger.
Poppy and other seeds Add ¼ cup poppy or sesame seeds and replace ½ teaspoon of vanilla extract with almond extract.
Cake soak Use a knife, skewer, or toothpick to poke holes over the top of the cake and drizzle any flavor cake soak (page 570) evenly over the top.
Molten Chocolate Cake
Makes: 4 cakes
Time: 30 minutes
Molten chocolate cake is a classic restaurant dessert, but it’s a winner at home too—super-easy and fast, dramatic, and loved by all. This is a simplified adaptation of my friend Jean-Georges Vongerichten’s recipe, and it’s hard to beat. Cut into the cake and allow its molten center to ooze onto a scoop of ice cream or sorbet (pages 309-321) or Whipped Cream.
- 1 stick unsalted butter, plus more for greasing
- 4 ounces dark chocolate, finely chopped
- 4 eggs
- ¼ cup sugar
- 2 teaspoons flour
- ¼ teaspoon salt
1. Liberally butter four 4-ounce molds or ramekins (make sure not to miss any spots, or the cakes will stick).
2. Put the butter in a medium bowl and melt it in the microwave or over a double boiler. Add the chocolate to the hot melted butter and stir until it’s melted. Set aside.
3. Crack 2 eggs into a large bowl and add 2 more yolks (save the extra whites for another time). Add the sugar and beat with an electric mixer until light and thick, about 1 minute. Whisk the egg mixture, flour, and salt into the melted chocolate until combined.
4. Divide the batter among the molds. (At this point you can refrigerate them for up to 3 hours; just bring them back to room temperature before baking.)
5. When you’re ready to bake, heat the oven to 450°F. Put the molds on a rimmed baking sheet and bake until the cakes have puffed up a bit, the tops are barely set and the cakes still jiggle slightly when shaken, 7 to 9 minutes (better underbaked than overbaked). Let sit for 1 minute.
6. Put a plate on top of each mold and (with a pot holder to protect your hand) carefully invert the cake onto the plate. Let it sit for 10 seconds, then lift up the mold. Serve immediately.
MOLTEN CHOCOLATE-RASPBERRY CAKE A classic: Mash ¼ cup raspberry preserves with ½ cup fresh raspberries. Spoon two-thirds of the cake batter into the ramekins, then divide the raspberry filling evenly among them. Cover the filling with the remaining chocolate batter. Bake as directed.
MOLTEN CHOCOLATE-PEANUT BUTTER CAKE Like a high-end, molten peanut butter cup: Combine 1 tablespoon melted butter with ¼ cup peanut butter. Stir in ¼ cup confectioners’ sugar to combine. Spoon two-thirds of the cake batter into the ramekins, then divide the peanut butter filling evenly among them. Cover the filling with the remaining chocolate batter. Bake as directed.
MOLTEN DULCE DE LECHE CAKE For an intense caramel cake: Omit the chocolate. Add the butter to the egg and sugar mixture, then stir in 1½ cups Dulce de Leche until combined. Add the flour and salt and bake as directed.
Dense Flourless Chocolate Cake
Makes: 8 to 10 servings
Time: 1½ hours
A cake for company. Use any dark chocolate you love; try a Belgian 72% for a rich but not at all bitter cake. The cake will be set but still wobbly when it’s done, with a thin, crackly crust on top. Err on the side of caution with baking times; better to underbake this one than risk a dry result. Serve the cake as it is or with Whipped Cream and a strong cup of coffee. This cake keeps very well and can be eaten for up to a week after it’s made.
- 2 sticks butter, plus more for greasing
- Cocoa powder, for dusting
- 14 ounces dark chocolate, finely chopped
- ¾ cup plus 1 tablespoon sugar
- 10 eggs, separated
- ½ teaspoon salt
- 1 teaspoon vanilla extract
- Confectioners’ sugar, for dusting
1. Heat the oven to 350°F. Grease a 9-inch springform pan and dust it with cocoa powder.
2. Melt the butter in a small bowl over a double boiler or in a small microwave-safe bowl. Remove from the heat or microwave, add the chocolate, and stir continuously until smooth. Use an electric mixer to beat together the granulated sugar and egg yolks until light and fluffy, 3 to 5 minutes, then add the salt and vanilla. Gently stir in the chocolate mixture. Wash and dry the beaters thoroughly. In a separate bowl, beat the egg whites until they form soft peaks. Fold gently into the chocolate mixture, one-third at a time.
3. Pour the batter into the prepared pan. Bake for 25 minutes; the cake will have risen and will be set, with a cracked top, but should still jiggle. Remove the cake from the oven and place a small, heavy plate over the top to squish it down to uniform height and let it cool for at least 30 minutes before removing the plate. Unmold and dust with confectioners’ sugar. Store at room temperature, covered with plastic wrap; it will keep for up to a week.
FLOURLESS CHOCOLATE-ESPRESSO CAKE The perfect dinner party dessert: Beat ¼ cup instant espresso powder into the egg yolk mixture.
Chocolate Stout Cake
Makes: 8 to 10 servings
Time: About 1 hour
Creamy, malty stout is the base of this dark, serious cake. The beer contributes tangy undertones and rich moisture, while a touch of espresso highlights the dark chocolate that’s laced throughout. Double up on the chocolate flavor by using a chocolate stout and serve with a dusting of confectioners’ sugar, lightly sweetened Whipped Cream, or Vanilla Ice Cream.
- 1 stick butter, plus more for greasing
- ½ cup cocoa powder, plus more for dusting
- 1½ cups flour
- 1½ teaspoons baking soda
- ½ teaspoon salt
- 1 cup stout (like Guinness)
- 1 cup sugar
- 2 eggs
- 2 teaspoons instant espresso powder
- 1 teaspoon vanilla extract
- ½ cup sour cream
- 1 cup chocolate, chopped
1. Heat the oven to 350°F. Grease an 8- or 9-inch tube pan and dust it with cocoa powder.
2. In a large bowl, whisk together the flour, baking soda, and salt; set aside. Combine the butter and stout in a small bowl and heat it over a double boiler until the butter is melted. Add the sugar and cocoa powder to the butter mixture and stir to combine.
3. In a small bowl, whisk together the eggs, espresso powder, and vanilla. Stir in the sour cream, then add the mixture to the butter mixture. Fold in the flour mixture until just combined, then gently stir in the chocolate chunks.
4. Pour the batter into the prepared pan. Bake until a toothpick inserted into the center of the cake comes out with a few moist crumbs, 40 to 45 minutes. You will also see a few oozy chocolate spots. Remove the cake from the oven and let it cool completely. Run a knife between the cake and the pan and then invert the cake onto a rack. Store at room temperature, covered with plastic wrap, for up to a week or wrap in plastic wrap and foil and store in the freezer for up to a few months.
CHOCOLATE-GINGER STOUT CAKE Spicy ginger and molasses play perfectly off the stout base: Omit the espresso powder. Substitute ¾ cup packed dark brown sugar for the granulated sugar. Add ½ cup molasses to the butter mixture. Whisk 1 tablespoon ginger, ½ teaspoon cinnamon, and ¼ teaspoon ground cloves into the flour mixture. If you like, fold ⅓ cup chopped Candied Ginger into the batter. For extra oomph, top with Ginger Buttercream.
CHOCOLATE-CHILE STOUT CAKE A little heat goes a long way in this cake: Omit the espresso powder. Whisk 2½ tablespoons ground chile into the flour mixture.
CARAMEL-PECAN CHOCOLATE STOUT CAKE Stir 2/3 cup chopped pecans into the batter. Top the cake with Caramel Glaze.
MINT-CHOCOLATE STOUT CAKE St. Patrick’s Day approved: Substitute peppermint extract for the vanilla. For a topping, add 1 teaspoon peppermint extract to Chocolate Ganache or Vanilla Glaze.
German Chocolate Cake
Makes: 10 to 12 servings
Time: About 1 hour
German chocolate cake is named for American chocolate maker Sam German, who developed a dark baking chocolate used in the original recipe. I use cocoa powder instead of a chocolate bar because it’s easier and tastes the same. The layers of this cake are traditionally filled with a sweet Coconut-Pecan Filling, so the cake itself doesn’t need too much sugar. The sides and top can be coated in a chocolate icing of your choice or be left bare to reveal the filling.
- 1 stick butter, plus more for greasing
- ½ cup Dutch-processed cocoa powder, plus more for dusting
- 1½ cups flour
- 1 teaspoon baking soda
- ¾ teaspoon baking powder
- ¾ teaspoon salt
- 1¼ cups sugar
- 2 eggs
- 1 egg yolk
- 1 teaspoon vanilla extract
- 1 cup buttermilk
- Coconut-Pecan Filling
- Chocolate Buttercream or Chocolate Ganache
1. Heat the oven to 350°F. Grease the bottom and sides of two 9-inch or three 8-inch layer cake pans and dust with cocoa powder.
2. Whisk together the flour, cocoa powder, baking soda, baking powder, and salt in a medium bowl and set aside. In a large bowl, use an electric mixer to cream the butter until smooth, then gradually add the sugar. Beat until light in color and fluffy, about 3 minutes. Beat in the eggs and yolk, one at a time, then add the vanilla. Add the flour mixture to the egg mixture by hand, a little at a time, alternating with the buttermilk. Stir just until smooth.
3. Divide the batter evenly between the pans and bake until a toothpick inserted into the center of the cakes comes out clean or with a few moist crumbs, 35 to 40 minutes. Let the cakes cool in the pans for 5 minutes, then run a knife around the edges of each cake and invert onto a rack to finish cooling.
4. To assemble, cut each layer horizontally in half with a serrated knife. Put the first layer of cake, top side down, on a plate or cake stand. Spread an even layer of the Coconut-Pecan Filling on top, all the way to the edges. Use a knife if you don’t have a frosting spreader or long spatula—it’s okay if it’s a little messy; you’ll smooth things out at the end. Put the other layer on top, flat side down, and spread with a layer of filling. Repeat the same process with the remaining layers. If you like, frost the top and sides of the cake with buttercream or ganache. Store at room temperature, covered with plastic wrap, for up to a few days.
GERMAN CHOCOLATE BABYCAKES Fill 2 cupcake tins with paper or foil liners. Fill each cup two-thirds full and bake for 20 to 25 minutes. When the cupcakes have cooled, spoon the Coconut-Pecan Filling evenly over each one. Press gently with your fingers to bind the filling to the cake, but not so much that the filling loses its fluff.
ADAPTING RECIPES
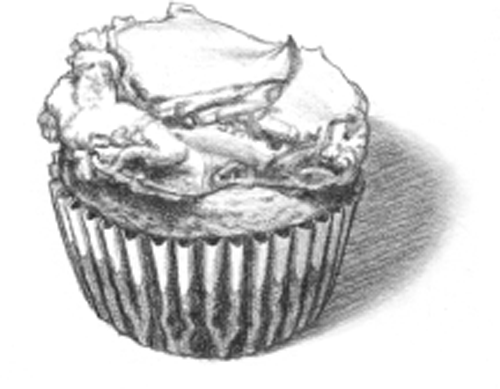
Making Cupcakes and Babycakes
Cupcakes turn cake into a portable, fun food that always elicits a smile, while larger babycakes are elegant dinner party fare. (The major difference between the two is size: Cupcakes are baked in muffin tins, while babycakes are baked in greased ramekins.) Almost any butter cake can also be baked in these small sizes, as individual servings. Glaze, soak, coat, or frost and garnish as you would their larger counterparts.
To make cupcakes, either set a paper cup into each well of a standard muffin tin or generously grease the inside; fill each cup two-thirds full. Since the cakes are small, start checking about halfway through the recipe’s bake time. Figure you’ll get between 24 and 36 cupcakes if you’re using a layer cake recipe and half that if your recipe yields a single layer or loaf. You can also find mini muffin tins, which produce two-bite cakes that many people find irresistible. Prep them exactly the same way, although of course bake time will be significantly shorter.
For babycakes, grease 4- or 6-ounce ramekins and dust each with flour or cocoa powder, thoroughly tapping out any excess. Fill them two-thirds full and check for doneness halfway through the suggested bake time. Unless you have plenty of ramekins on hand, you’ll need to make these in batches, always cleaning and cooling the dishes completely before you grease and refill. Most recipes will give you 1 to 2 dozen. Allow babycakes to cool in their ramekins and serve as is (if you have enough of them) or invert onto a plate, as you would a cake. Frost and garnish like any cake.
Black Forest Cake
Makes: 10 to 12 servings
Time: About 1½ hours, plus time for the cherries to soak
Black Forest cake is a German classic, and its cherry-soaked layers taste better with every passing hour. The base of this cake is a buttery sponge cake that gets all its lightness from eggs. It’s essential to whip the eggs long enough to develop the cake’s structure—you will need a full 10 minutes. If you like, swap in other fruits and fruit liqueurs for the classic cherry flavor. For a lighter take, top with Whipped Cream and a cherry garnish, but I prefer the intensity of rich Chocolate Ganache.
- 2 cups fresh black cherries
- ½ cup kirsch (cherry brandy)
- 6 eggs
- 6 tablespoons (¾ stick) butter, melted, plus more for greasing
- ½ cup Dutch-processed cocoa powder, plus more for dusting
- 1½ cups flour
- 1 teaspoon salt
- 1 cup sugar
- 1 teaspoon vanilla extract
1. Pit the cherries and soak about two-thirds of them in the kirsch overnight.
2. Heat the oven to 350°F. Place the eggs in a bowl of warm water for 5 minutes; being slightly warm will make them fluffier when you beat them. Grease two 9-inch or three 8-inch cake pans. Cover the bottoms with a circle of wax paper or parchment and butter the paper. Sift cocoa powder over the pans; invert and tap to remove the excess.
3. Sift together the flour, cocoa powder, and salt in a medium bowl and set aside. In a large bowl, use an electric mixer to beat the eggs, sugar, and vanilla at medium-high speed until tripled in volume, about 10 minutes. It will be pale yellow. If you pour a spoonful of the mixture back on itself, it should form a defined ribbon. Gently fold the flour mixture into the egg mixture by hand. When it is mostly incorporated, spoon 1 cup of the mixture into a small bowl. Add the melted butter to this mixture and blend gently but thoroughly, then fold this butter mixture back into the rest of the cake batter.
4. Pour the batter into the prepared pans and smooth the tops with a rubber spatula. Bake until a toothpick inserted into the center of the cakes comes out clean or with a few moist crumbs, 25 to 30 minutes. Let the cakes cool in the pan for 5 minutes, then run a knife around the edge of the pans and invert onto a rack to finish cooling.
5. Put the first layer of cake, top side down, on a plate or cake stand. Poke it all over with a fork. Drain the cherries and reserve the kirsch; pour half the kirsch evenly over the first layer, then top with the soaked cherries. Place the second layer of cake on top, repeating the poking with a fork and drizzling with kirsch. (If you have 3 cake layers, divide the cherries among the layers and sprinkle the kirsch over all 3 layers.) Frost the top and sides of the assembled cake with Whipped Cream or Chocolate Ganache if you like (see headnote) and garnish with the remaining fresh cherries.
6. Store at room temperature (or in the fridge if using whipped cream), covered or wrapped in plastic wrap, for a few days.
FAST BLACK FOREST CAKE For last-minute cake preparation, skip soaking the cherries overnight: Stir together two-thirds of the cherries and the kirsch in a bowl and let sit for at least 30 minutes. Meanwhile, bring ½ cup sugar and ½ cup water to a boil in a small saucepan until the sugar dissolves; remove it from the heat. Drain the cherries and set aside, saving the kirsch. Pour the kirsch into the sugar-water and stir to combine.
CHOCOLATE-RASPBERRY CAKE It’s easy to swap in other fruits for a different taste altogether: Substitute raspberries for the cherries and raspberry liqueur for the kirsch.
CHOCOLATE-PEACH CAKE Substitute peaches for cherries and peach schnapps for kirsch.
BLACK FOREST AMARETTO CAKE For a nutty twist: Substitute ½ teaspoon almond extract for the vanilla and amaretto for the kirsch. Garnish the cake with cherries and chopped almonds.
Death-by-Chocolate Torte
Makes: 10 to 12 servings
Time: About 1 hour
This is the stuff chocolate lovers’ dreams are made of—a triple hit of light yet rich chocolate cake, fluffy Chocolate Buttercream, and dense Chocolate Ganache, with so much texture that you don’t need much to be utterly satisfied. Serve small slices with a dollop of Whipped Cream and enjoy its simple pleasure. This cake keeps incredibly well, so take your time to enjoy it—it will last for a few days at least.
- Butter for greasing
- 1 cup flour, plus more for dusting the pan
- Cocoa powder (optional)
- ½ teaspoon salt
- 3 ounces unsweetened chocolate
- 5 eggs
- 2 teaspoons vanilla extract
- 1 cup sugar
- Chocolate Buttercream
- Chocolate Ganache
1. Heat the oven to 350°F. Butter a 9-inch layer cake pan; cover the bottom with a circle of wax or parchment paper; butter the paper; and flour the pan (or use cocoa powder if you have some), tapping to remove any excess.
2. Whisk together the flour and salt in a medium bowl and set aside. Melt the chocolate with ½ cup water in a double boiler and set aside to cool.
3. In a large bowl, use an electric mixer to beat the eggs and vanilla until light. Gradually add the sugar, continuing to beat until the mixture is very thick, about 7 minutes. Gently sift half the flour over the egg mixture and stir in, followed by the melted chocolate mixture, then sift in the remaining flour, being careful not to overmix and deflate the eggs.
4. Pour the batter into the prepared pan and bake until a toothpick inserted into the center of the cake comes out clean or with a few moist crumbs, 25 to 30 minutes. Let the cake cool in the pan for 5 minutes, then invert onto a rack to finish cooling.
5. To assemble, cut the cake layer horizontally in half with a serrated knife. Spread the buttercream in between the two layers and chill for about an hour before coating the top and sides of the cake with the ganache. Cover and refrigerate for up to a few days.
DEATH-BY-CHOCOLATE-COCONUT TORTE Hide a hint of the tropics inside the cake: Substitute Coconut Seven-Minute Frosting for the buttercream. Sprinkle ⅓ cup toasted shredded unsweetened coconut over the top of the cake for garnish and added crunch.
4 Other Great Fillings for Death-By-Chocolate Torte
- Fruit Jam or Preserves, like apricot or raspberry
- Orange Marmalade
- Not-Too-Sweet Coffee Buttercream
Chocolate-Hazelnut Torte
Makes: At least 10 servings
Time: About 3 hours
This is the type of cake you usually eat only at restaurants, but there’s no reason not to make it at home. Yes, it’s time consuming, but the end result—a smooth, rich torte, like Nutella in cake form—is totally worth the effort. Plus, its dense layers keep the cake impossibly moist; you’ll reap the rewards for the better part of a week. If you like, top it with Chocolate Ganache or Chocolate Ganache Glaze or just top the slices with Whipped Cream.
- 1 stick butter, softened, plus more for greasing
- ¾ cup flour, plus more for dusting
- 3 ounces unsweetened chocolate
- ¼ cup hazelnuts, ground, plus ½ cup hazelnuts, lightly toasted
- ½ teaspoon salt
- 5 eggs
- ¾ cup plus 2 tablespoons sugar
- 2 teaspoons vanilla extract
- 2 egg yolks
- 2 tablespoons cocoa powder
1. Heat the oven to 350°F. Butter the bottom and sides of a 9-inch round cake pan; cover the bottom with a circle of wax paper or parchment, butter the paper, and flour the pan.
2. Melt the chocolate with ½ cup water over low heat and set aside to cool. Whisk together the flour, ground hazelnuts, and salt in a medium bowl.
3. Use an electric mixer to beat the whole eggs until light; gradually add ¾ cup sugar, continuing to beat until the mixture is very thick. Gently stir in the flour mixture, then the melted chocolate, and finally 1 teaspoon of the vanilla. Gently fold in the toasted hazelnuts.
4. Turn the batter into the prepared cake pan and bake until the cake is firm and a toothpick inserted into the center comes out dry or with a few moist crumbs, 40 to 50 minutes. Cool for 5 minutes before turning out onto a rack to finish cooling.
5. To make the filling, put the egg yolks in a blender. Add the remaining 2 tablespoons sugar and 1 teaspoon vanilla and the cocoa powder. Turn on the blender and add the butter, a little at a time. After the butter is blended in, refrigerate until the filling is spreadable, at least an hour.
6. When the cake is completely cool, cut it in half horizontally with a serrated knife. Spread the bottom layer with the chilled filling, then put the top layer in place. Chill for an hour or so and then, if you like, frost or glaze. Cover with plastic wrap and refrigerate for at least a couple of days.
CHOCOLATE-CHOCOLATE TORTE For chocolate purists: Substitute an additional ¼ cup all-purpose flour for the ground hazelnuts. Swap out the toasted hazelnuts for ½ cup chopped dark chocolate.
CHOCOLATE-PEANUT BUTTER TORTE Omit the ground hazelnuts and increase the flour to 1 cup. Omit the toasted hazelnuts. Melt ¼ cup smooth peanut butter with the unsweetened chocolate mixture, stirring to combine. If you like, spread Peanut Buttercream over the bottom layer of cake instead of the chocolate filling.
SACHERTORTE A classic Viennese cake, invented in 1832: Increase the flour to 1 cup; omit the ground hazelnuts, toasted hazelnuts, and chocolate filling. Using a serrated knife, cut the cake evenly into 3 layers if you like. Heat ⅓ cup apricot preserves and 3 tablespoons water over low heat until combined; let cool. Spread the apricot glaze over the bottom and middle layers of the cake and assemble as directed, topped with Chocolate Ganache or Chocolate Glaze.
CHOCOLATE-RASPBERRY TORTE A fantastic chocolate-fruit combination: Follow the preceding variation, swapping raspberry jam for the apricot preserves.
CHOCOLATE-GINGER TORTE For a bit of unexpected spice: Omit the ground hazelnuts and increase the flour to 1 cup. Whisk ½ teaspoon ground ginger into the flour mixture. Swap out the toasted hazelnuts for chopped candied ginger. Fill with a thin layer of Ginger Buttercream instead of the filling.
Chocolate Icebox Cake
Makes: 8 to 10 servings
Time: 45 minutes, plus time to chill
With just four ingredients, an assembly you could do with your eyes closed, and no bake time, this retro American cake has a lot going for it. It’s a great project for kids and ideal to make ahead—the extra time in the fridge makes it better. There are endless fun flavor combinations for this cake (see page 210), and you can easily scale it up or down.
- 4 cups cream
- ½ cup sugar
- 1 teaspoon vanilla extract
- Chocolate Wafer Cookies
1. In a large metal bowl or in the bowl of a stand mixer fitted with the whisk attachment, whip the cream until it forms soft peaks. Add the sugar and vanilla and continue whipping just until semistiff peaks start to form.
2. For a round cake, place a layer of cookies on the bottom of a 9-inch springform pan (you may have to break a few to fit), making sure there are no significant gaps. Cover the cookies with a thick layer of whipped cream, then top with another layer of cookies. Continue this pattern until you’ve run out of cookies, finishing with a final layer of whipped cream on top.
3. For a log cake, take one cookie, top it with a generous layer of whipped cream, and then place a second cookie on top of it. Once you have 4 or 5 cookies layered this way, lay the stack down on its side on a plate; make another stack and connect it to the first to make a row of 8 to 10 cookies. Now layer and lay down another row of 8 to 10 cookies alongside the first one. Continue to do this until you have formed a log. When you’ve run out of cookies, use the remaining whipped cream to coat the tops and sides of the log. Or, for “cupcakes,” put a spoonful of whipped cream in the bottom of a ramekin or a muffin tin filled with liners. Top the whipped cream with a cookie, then continue to layer them this way vertically until the ramekin or muffin tin is full.
4. Place your cake in the refrigerator to chill overnight. To serve, run a sharp knife between the cake and the springform pan and remove the cake from the pan. If your cake is log shaped, be sure to cut on the diagonal for the best presentation. (Icebox cakes made in ramekins can be eaten right out of the dish with a fork.) Store refrigerated for up to a week.
Endlessly Adaptable Icebox Cakes
All you really need for an icebox cake are cookies and something creamy to hold them together; from there, you can add a thin layer of extras in between the layers, like fruit and sauces, or serve them alongside the cake. Below are some classic combos, but treat the components like A-B-C and pick and choose with reckless abandon. Follow Step 3 in the recipe for Chocolate Icebox Cake to assemble.
Lemon or Lime
COOKIE: Graham Crackers
CREAM: Whipped Cream with 2 tablespoons grated lemon or lime zest
EXTRAS: Lemon Curd or Lime Curd
Berry
COOKIE: Vanilla Wafer Cookies
CREAM: Berry Fool
EXTRAS: Sliced fresh berries, bananas, peaches, or cherries
Ginger-Caramel
COOKIE: Gingersnaps or Speculaas
CREAM: Coffee Whipped Cream
EXTRAS: Caramel Sauce
PB&J
COOKIE: Peanut Butter Cookies
CREAM: Chocolate Mousse
EXTRAS: Fruit Jam or Orange Marmalade
Tiramisu
COOKIE: Ladyfingers
CREAM: Equal parts Whipped Cream and mascarpone, mixed together with sugar and Kahlúa
EXTRAS: Finely chopped or shaved dark chocolate and espresso powder
Chocolate Chip
COOKIE: Thin and Crisp Chocolate Chunk Cookies
CREAM: Vanilla Pudding or Chocolate Pudding
EXTRAS: Rich Chocolate Sauce
Butterscotch Oatmeal
COOKIE: Lacy Oatmeal Cookies
CREAM: Vanilla Pastry Cream
EXTRAS: Butterscotch Sauce
Chocolate-Hazelnut
COOKIE: Tuiles
CREAM: Chocolate Whipped Cream
EXTRAS: Chocolate-Hazelnut Spread
Chocolate Whoopie Pies
Makes: About 12 medium whoopie pies
Time: About 1 hour
Part cookie, part cake, these “pies” are a New England classic and a great alternative to cupcakes at birthday parties and other celebrations. Traditionally, the handheld treats are made with Fluffy Marshmallow Filling sandwiched between two disks of chocolate cake. Other frostings, like Buttercream or Coconut Seven-Minute Frosting, pair wonderfully, but you can even add Chocolate Ganache or Chocolate-Hazelnut Spread for fabulous—albeit less fluffy—results.
- 1½ sticks butter, softened, plus more for greasing
- 1¾ cups flour
- ¾ cup Dutch-processed cocoa powder, sifted
- 1 teaspoon baking powder
- ¼ teaspoon baking soda
- ¼ teaspoon salt
- ½ cup packed light brown sugar
- ¼ cup granulated sugar
- 1 egg
- ½ cup water
- ¼ cup buttermilk
- 1 teaspoon vanilla extract
- Fluffy Marshmallow Filling
1. Heat the oven to 375°F. Lightly grease 2 cookie sheets. Whisk together the flour, cocoa powder, baking powder, baking soda, and salt in a medium bowl and set aside.
2. Use an electric mixer to cream the butter and sugars until smooth, 3 to 4 minutes. Add the egg and beat until light and fluffy, another 3 minutes. Fold in half of the flour mixture, then the water, buttermilk, and vanilla, then the remaining flour.
3. Drop neat tablespoons of dough onto the cookie sheets, about 2 inches apart, and flatten slightly. Bake until the whoopie pies are set and the cake springs back when you touch it with your finger, about 8 minutes. Let the cakes cool on the sheets for 5 minutes, then transfer them to a rack to finish cooling.
4. Frost the flat side of half the whoopie pies with marshmallow filling and top each with another pie, flat side down. Store at room temperature, covered with plastic wrap or in an airtight container, for up to 3 days.
VANILLA WHOOPIE PIES Omit the cocoa powder and increase the flour to 2½ cups. Substitute an additional ½ cup granulated sugar for the brown sugar. Increase the vanilla extract to 1 tablespoon. Fill with Vanilla or Chocolate Buttercream.
GINGERBREAD WHOOPIE PIES The perfect treat for the holidays: Omit the cocoa powder and increase the all-purpose flour to 2½ cups. Whisk 1 tablespoon ginger, 1 teaspoon cinnamon, ½ teaspoon nutmeg, and ½ teaspoon ground cloves into the flour mixture. Omit the granulated sugar and use ¾ cup brown sugar. Add ¼ cup molasses with the egg. Fill with Cream Cheese Frosting.
ADAPTING RECIPES
Converting Cakes to Whoopie Pies
If you simply drop cake batter onto baking sheets, it will bake into thin disks rather than the plump cakes you need for whoopie pies. To adapt a butter cake recipe for whoopie pies, you’ll need a thicker batter—aim for about 1 egg and ¾ cup liquid for any recipe that calls for around 2 cups flour, and swap brown sugar for up to half the granulated sugar. If the batter seems a bit too stiff, add a little more liquid, a tablespoon at a time.
Yellow and White Cakes
Yellow and white cakes may look more ordinary than their chocolate counterparts, but don’t be fooled by their simple appearances. These are some of the most mellow, tender, buttery, and versatile offerings in this book. Treat them as blank canvases and build on them with your pick of sauces, glazes, or frostings; use them as the bases for special-occasion cakes; or eat them quite simply with a basic frosting or a side of fruit. There are cornmeal cakes, olive oil cakes, cakes with lemon, almond, and buttermilk. If you’ve never made a yellow cake, or it’s been a while, you’re in for a revelation.
Recipes
Yellow Cake
White Cake
Classic Pound Cake
Homemade Yellow Snack Cakes
Olive Oil Cake
Lemon Cornmeal Cake
Yellow Cake
Makes: At least 10 servings
Time: About 1 hour
This is my go-to cake for birthdays and special occasions. It’s a great base for lots of frosting and filling combinations, although it is perhaps best loved with Chocolate Buttercream. Plus, it’s easy to convert this recipe into babycakes or cupcakes. For an interesting twist, try substituting orange zest for vanilla extract.
- 1¼ sticks butter, softened, plus more for greasing
- 2 cups cake or all-purpose flour, plus more for dusting
- 2½ teaspoons baking powder
- ¼ teaspoon salt
- 1¼ cups sugar
- 8 egg yolks
- 2 teaspoons vanilla extract or 1 tablespoon grated or minced orange zest
- ¼ teaspoon almond extract (optional)
- ¾ cup milk
1. Heat the oven to 350°F. Grease and flour the bottom and sides of two 9-inch or three 8-inch layer cake pans or a 13 × 9-inch sheet cake pan.
2. Whisk together the flour, baking powder, and salt in a medium bowl and set aside. Use an electric mixer to cream the butter until smooth, then gradually add the sugar. Beat until light in color and fluffy, 3 or 4 minutes. Beat in the yolks, one at a time, then add the vanilla or orange zest and the almond extract if you’re using it. Add the flour mixture to the egg mixture by hand, a little at a time, alternating with the milk. Stir just until smooth.
3. Divide the batter evenly between the pans and bake until a toothpick inserted into the center of the cakes comes out clean or with a few moist crumbs, about 35 minutes for layers or about 25 minutes for a sheet cake. Let the cake cool in the pan for 5 minutes, run a knife around the edge of the cake to loosen it, then invert onto a rack to finish cooling.
4. Frost or glaze if you like and store at room temperature. If you’re not frosting right away, you can wrap each layer tightly with plastic wrap and store at room temperature for up to 2 days or wrap in plastic wrap and foil and store in the freezer for up to a few months.
VEGAN YELLOW CAKE Substitute 1 cup soy or almond milk for the milk; stir in 1 tablespoon apple cider vinegar and let the mixture sit for 10 minutes. Substitute baking soda for ½ teaspoon of the baking powder. Omit the eggs and replace the butter with ¾ cup canola oil. Optional: whisk ¼ teaspoon turmeric into the flour mixture for the cake’s signature yellow color.
PISTACHIO-SAFFRON CAKE Try it with Orange Glaze or Whipped Cream infused with rose water: Heat the milk to steaming and steep ½ teaspoon crumbled saffron threads in it until it’s cool, at least 20 minutes. Substitute finely ground pistachios for 1 cup of the flour.
BANANA CAKE Moist banana bread meets indulgent layer cake: Omit the almond extract. Substitute ¼ cup buttermilk for the milk and mix it with 1 cup mashed very ripe bananas. Substitute baking soda for ½ teaspoon of the baking powder. Frost the cake with Cream Cheese Frosting or Chocolate Ganache. If you like, spread or pipe a layer of cooled Banana Pudding or Peanut Buttercream between the layers.
CARAMEL CAKE A southern classic: Omit the almond extract and use 2 teaspoons vanilla extract. Substitute buttermilk for milk. Reduce the baking powder to 2 teaspoons and add ½ teaspoon baking soda. Frost with Caramel Buttercream.
VANILLA LATTE CAKE Omit the almond extract and use 2 teaspoons vanilla extract. Frost with Espresso Buttercream; decorate with chocolate-covered espresso beans.
White Cake
Makes: At least 10 servings
Time: About 1 hour
White cake is all about texture. Using only egg whites creates a light, moist, spongy cake that complements many flavors. This cake is the ultimate blank canvas, so it’s a natural choice for weddings, celebrations, and holidays (see Frostings and Glazes).
- 1½ sticks butter, softened, plus more for greasing
- 2 cups cake or all-purpose flour, plus more for dusting
- 1 tablespoon baking powder
- ¾ teaspoon salt
- 1 cup sugar
- 6 egg whites
- 2 teaspoons vanilla extract
- 1 drop almond extract
- 1 cup whole milk
1. Heat the oven to 350°F. Grease and flour the bottom and sides of two 9-inch or three 8-inch layer cake pans.
2. Whisk together the flour, baking powder, and salt in a medium bowl and set aside. Use an electric mixer to cream the butter until smooth, then gradually add the sugar. Beat until light in color and fluffy, 4 or 5 minutes. Beat in the egg whites, one at a time, then add the vanilla and almond extracts. Add the flour mixture to the egg mixture by hand, a little at a time, alternating with the milk. Stir just until smooth.
3. Divide the batter evenly between the pans and bake until a toothpick inserted into the center of the cakes comes out clean or with a few moist crumbs, about 25 minutes. Let the cakes cool in the pans for 5 minutes, then run a knife around the edge of the cakes and invert onto a rack to finish cooling.
4. Frost or glaze if you like and store at room temperature. If you’re not frosting right away, you can wrap each layer tightly with plastic wrap and store at room temperature for up to 2 days or wrap in plastic wrap and foil and store in the freezer for up to a few months.
Frost or glaze if you like and store at room temperature. If you’re not frosting right away, you can wrap each layer tightly with plastic wrap and store at room temperature for up to 2 days or wrap in plastic wrap and foil and store in the freezer for up to a few months.
BUTTERMILK WHITE CAKE For an extra-tender cake and a little tang: Substitute buttermilk for the milk and baking soda for ½ teaspoon of the baking powder.
COCONUT LAYER CAKE For the most devoted coconut lovers: Substitute coconut milk for ¼ cup of the milk. Stir ½ cup shredded sweetened coconut into the batter along with the dry ingredients and the milk. Frost the cake with Vanilla Buttercream, sprinkling about ¼ cup shredded sweetened coconut over each frosted layer as you assemble the cake. After frosting the assembled cake, press another 2 cups or more of shredded sweetened coconut onto the top and sides. For a twist, spread or pipe a layer of cooled Vanilla Pudding between the layers instead of the buttercream.
STRAWBERRY-VANILLA CAKE A beautiful, fragrant light-pink cake for summer: Omit the almond extract. Chop and drain 2 cups strawberries; save the juice and add it to the milk (if you collect a lot of juice, decrease the milk in equal measure). Fold the strawberries into the batter. Frost with Vanilla Buttercream and garnish with strawberry slices.
GREEN TEA CAKE Green tea is a refreshing and unexpected cake flavor: Whisk 1 tablespoon matcha (green tea powder) into the flour. For the frosting, make Vanilla Buttercream, mixing 2 teaspoons matcha powder into the confectioners’ sugar before proceeding.
LEMON-VANILLA CAKE Omit the almond extract. Cream 2 tablespoons grated or minced lemon zest with the butter. Frost the cake with Citrus Buttercream or spread or pipe a layer of cooled Lemon Pudding or Lemon Curd between the layers and top with Vanilla Buttercream.
RASPBERRY-ALMOND CAKE Increase the almond extract to 1 teaspoon. For the frosting, mix 1 teaspoon almond extract into Cream Cheese Frosting. Spread one layer of the cake with raspberry jam and garnish the cake with sliced almonds.
PEPPERMINT CAKE Substitute a drop of peppermint extract for the almond extract. For the frosting, add ½ teaspoon peppermint extract to Vanilla Buttercream; if you like, top the bottom layer with Chocolate Ganache and frost only the top and sides with the buttercream. Garnish the cake with crumbled candy canes.
10 Alternative Fillings for Layer Cakes
If you’re making a layer cake, you need a frosting with a bit of structure for the outside, but all these are wonderful between the layers:
- Vanilla, Butterscotch, Banana, or Lemon Pudding
- Chocolate, Caramel, or Peanut Butter Pudding
- Vanilla Pastry Cream
- Chocolate Ganache
- Caramel Sauce or Dulce de Leche
- Fruit Compote
- Fruit Jam or Orange Marmalade
- Sliced fresh fruit
- Lemon Curd
- Chocolate-Hazelnut Spread
Classic Pound Cake
Makes: At least 8 servings
Time: About 1½ hours
Pound cake usually calls for a pound each of butter, flour, sugar, and eggs. I’m forsaking tradition and cutting the recipe by roughly half to fit into a manageable-sized loaf pan instead. This simple cake is a showcase for butter, so go ahead and splurge on something lovely. If you’re looking for extra sweetness, top the loaf with Vanilla Cake Soak, Creamy Lemon Glaze, or Caramel Sauce.
- 2 sticks butter, softened, plus more for greasing
- 2 cups cake or all-purpose flour
- 1½ teaspoons baking powder
- ½ teaspoon salt
- 1 cup sugar
- 5 eggs
- 2 teaspoons vanilla extract
1. Heat the oven to 325°F. Grease a 9 × 5-inch loaf pan. Whisk together the flour, baking powder, and salt in a medium bowl.
2. Use an electric mixer to cream the butter in a large bowl until it’s smooth. Add ¾ cup of the sugar and beat until it’s well blended, then add the remaining sugar; beat until the mixture is light and fluffy. Beat in the eggs, one at a time. Add the vanilla and beat until blended.
3. Stir in the dry ingredients by hand just until the mixture is smooth and everything is incorporated; don’t mix it too much and don’t use the electric mixer.
4. Transfer the batter to the loaf pan and smooth out the top. Bake until a toothpick inserted into the center comes out clean, about 1 hour. Let the cake rest in the pan for 5 to 10 minutes before gently running a knife around the edges and removing the cake from the pan. Set upright on a rack to finish cooling. Serve warm or at room temperature. When completely cool, store at room temperature wrapped in plastic for 3 days.
YOGURT POUND CAKE Lighter, tangier, and even more moist, if possible: Substitute ¾ cup yogurt for half the butter.
POLENTA POUND CAKE A subtle nod to corn bread: Substitute 1 cup polenta or cornmeal for a cup of the flour.
BROWN SUGAR PECAN POUND CAKE Substitute brown sugar for the granulated sugar. Fold ¾ cup chopped pecans into the batter.
LEMON-GINGER POUND CAKE Skip the vanilla. Before adding the eggs, beat 1 tablespoon fresh lemon juice and 1 tablespoon grated lemon zest into the butter mixture. Whisk 2 teaspoons ground ginger into the dry ingredients. Fold 2 tablespoons minced candied ginger into the batter.
COCONUT-LIME POUND CAKE Skip the vanilla. Before adding the eggs, beat 1 tablespoon fresh lime juice and 1 tablespoon grated lime zest into the butter mixture. Fold 1 cup shredded unsweetened coconut into the batter.
BUTTERED RUM POUND CAKE For a more adult cake: Bring 4 tablespoons (½ stick) butter, 2 tablespoons rum, ½ cup packed brown sugar, and 2 tablespoons water to a boil in a small saucepan. Stir frequently until combined, about 3 minutes; remove from the heat. While the cake is still warm, use a toothpick to prick holes in its surface, about every 1 inch or so. Pour the buttered rum glaze over the cake and let sit for a few hours or overnight before serving.
MARBLED POUND CAKE A pound cake that’s sure to impress: In a separate bowl, combine 3 tablespoons cocoa powder with 5 tablespoons sugar and blend this mixture with about 1 cup of the batter. Put half the plain batter into the bottom of the loaf pan; top with the chocolate mixture, then with the remaining batter. Using the end of a wooden spoon or a spatula, move across the pan lengthwise, swirling the mixtures together with large strokes; repeat the movement in the opposite direction. Be careful not to overmix or the marbling effect will be lost.
Homemade Yellow Snack Cakes
Makes: 12 individual cakes
Time: About 1 hour
There are few snack cakes as iconic as the Twinkie, which is nothing more than a frosting-filled cake. Cupcake Twinkies? The best of both worlds.
Stick with the classic seven-minute frosting or mix it up with your favorite frosting flavor (pages 560-567).
- 6 tablespoons (¾ stick) butter, softened, plus more for greasing
- 1 cup flour
- ¼ teaspoon salt
- 2 teaspoons baking powder
- ⅔ cup sugar
- 2 eggs
- 1 teaspoon vanilla extract
- ½ cup milk, at room temperature
- Seven-Minute Frosting
1. Heat the oven to 350°F. Grease a 12-cup cupcake tin and set aside.
2. Whisk together the flour, salt, and baking powder in a medium bowl. Set aside.
3. Use an electric mixer to cream the butter and sugar until smooth. Add the eggs and vanilla and beat until light and fluffy, about 3 minutes. Add the flour mixture to the egg mixture by hand, a little at a time, alternating with the milk. Stir until just smooth, with no big lumps of flour. Do not overbeat.
4. Pour the mixture into the prepared pan and bake until a toothpick inserted into the center of the cakes comes out clean or with a few moist crumbs, about 15 minutes. Let the cakes cool in the pan for 5 minutes, then invert onto a rack to finish cooling.
5. To fill the cakes, fit a piping bag or zipper bag with a small tip and add the frosting. Poke the tip directly into the bottom middle of the cupcake and pipe in some frosting. Try not to overfill the cakes or they will crack. If you can pipe with one hand and hold the cupcake upside down in your other, you can feel the icing filing up the cake and more easily gauge when to stop.
6. Eat the filled cakes the same day or the day after. If you want to extend their lives, keep the unfilled cakes for as long as 3 days, well wrapped, and fill with frosting just before serving.
BANANA SNACK CAKES The original Twinkies were filled with Banana Cream: Substitute Banana Pudding for the Seven-Minute Frosting.
CHOCOLATE SNACK CAKES Substitute Dutch-processed cocoa powder for ⅓ cup of the flour.
ALMOND-RASPBERRY SNACK CAKES Linzer cookie meets Twinkie: Substitute almond extract for ½ teaspoon of the vanilla. Replace the Seven-Minute Frosting with a seedless raspberry jam.
Stuffed Cupcakes
Here’s a fun alternative or addition to the frosting on top: Once the cakes have cooled, poke a skewer or paring knife into the center. Wiggle it around a bit to make a small cavity, but don’t push it all the way through the other side. Fit a pastry bag with a round tip and put in your filling—like Fruit Jam, Caramel Sauce, or Chocolate Ganache—then stick the tip inside the cake. Pipe a couple teaspoons of filling inside each cake, taking care not to overfill. Add frosting if you like or skip it for snack cakes.
Olive Oil Cake
Makes: 12 to 16 servings
Time: 45 minutes
Olive oil cake is rich and dense, but the flavor is nuanced and light. It’s a simple but sophisticated dessert to serve for company; plus it’s incredibly easy to make: Dump the dry ingredients into the wet ingredients and you’re good to go. Use good olive oil—its floral, grassy, or citrus notes will shine through in every bite. Top the cake with fruit purée, Orange Marmalade, or Creamy Lemon Glaze.
Cupcakes made from olive oil batter, which take only 15 minutes to bake, are a refreshing change from the usual.
- 1 cup extra virgin olive oil, plus more for greasing
- 2 cups flour
- 1 teaspoon baking powder
- ½ teaspoon baking soda
- ¾ teaspoon salt
- 1 cup sugar
- 4 eggs
- 2 teaspoons grated lemon zest
- ¼ cup fresh lemon juice
- ½ cup milk
1. Heat the oven to 350°F. Lightly grease a 9- or 10-inch springform pan with a little of the olive oil you will be using in the cake. Add a parchment circle and oil it. In a medium bowl, combine the flour, baking powder, baking soda, and salt and set aside.
2. In a large bowl, whisk the olive oil, sugar, eggs, lemon zest, lemon juice, and milk and beat until well combined. With a rubber spatula or wooden spoon, fold in the dry ingredients and stir until smooth with no large lumps of flour.
3. Pour the batter into the prepared pan and bake until a toothpick inserted into the center comes out clean, 30 to 35 minutes. Let the cake cool in the pan for 15 minutes before removing the outer ring and letting it finish cooling on a rack.
4. Glaze if you like (see the headnote for suggestions). Store at room temperature, covered with plastic wrap, for up to 4 days.
COCONUT OIL CAKE A rich, dense cake that’s part fruit, part nutty: Substitute coconut oil for the olive oil and coconut milk for the milk. Add 1 cup shredded unsweetened coconut and omit the lemon zest. Fold the coconut in with the dry ingredients. Bake for up to 45 minutes.
LIME-SESAME OIL CAKE The intense, roasted flavor of sesame oil is brightened with a hint of lime: Substitute ⅓ cup sesame oil and 2/3 cup neutral oil, like grapeseed or corn, for the olive oil. Substitute lime zest for the lemon zest.
RASPBERRY-OLIVE OIL TORTE Fruity olive oil is the perfect base for a berry add-in: Use 3 eggs instead of 4. Omit the lemon juice and increase the milk to ¾ cup. Add 4 tablespoons (½ stick) melted butter to the wet ingredients. Fold 2 cups raspberries (frozen are fine) into the finished batter.
ALMOND-ANISE-OLIVE OIL CAKE A classic biscotti combination translated into cake: Omit the lemon zest and juice. Increase the milk to ¾ cup. Add ½ teaspoon almond extract to the wet ingredients and fold 1 tablespoon aniseeds into the finished batter.
GRAPEFRUIT-OLIVE OIL CAKE Substitute 1 tablespoon grapefruit zest for the lemon zest and grapefruit juice for the lemon juice.
BOOZY OLIVE OIL CAKE A citrus liqueur is a sophisticated substitution for lemon juice: Substitute Cointreau or Grand Marnier for the lemon juice.
ADAPTING RECIPES
Making Petits Fours
Imagine a three-layer cake that fits in your hand: that’s a petit four (literally “small oven” but you get the idea). Because petits fours are so small, they’re a great way to use cake scraps but are easy to make in big batches too. Start with a cake that’s tender but not too soft—Classic Pound Cake, Chocolate-Sour Cream Pound Cake, Sponge Cake, and Genoise are all good bets. You want three layers, each about ½ inch thick, which you can get by baking in jelly-roll pans or halving cooled layer cakes. Spread a thin, even coat of Fruit Jam, Orange Marmalade, Caramel Sauce, or Chocolate Ganache over the first layer of cake, add the next layer and another coat of filling, and leave the topmost layer bare. Wrap or cover the whole thing with plastic wrap and chill it for at least 1 hour before cutting into 1- to 2-inch squares, then coat each completely in a glaze and let set at room temperature. If you like, decorate with more frosting.
Lemon Cornmeal Cake
Makes: 8 to 10 servings
Time: About 1 hour
Corn bread lovers, this cake is for you. It’s as suitable for snacking as it is for dessert. The ricotta and hint of lemon keep the cake fresh and light; the cornmeal contributes wonderful texture and crumb. It’s ideal with cake flour, but all-purpose is fine too. To highlight the citrus and perfect the texture, top with Creamy Lemon Glaze, or leave it out for a lighter, more crumbly cake.
- 1½ sticks butter, melted, plus more for greasing
- 1¼ cups cake flour or all-purpose flour
- ¾ cup yellow cornmeal
- 2 teaspoons baking powder
- ½ teaspoon baking soda
- ½ teaspoon salt
- 1 cup sugar
- 4 eggs, lightly beaten
- 1 teaspoon vanilla extract
- 2 tablespoons grated lemon zest
- ¼ cup fresh lemon juice
- 1¼ cups ricotta cheese
1. Heat the oven to 350°F. Grease the bottom and sides of a 9- or 10-inch springform pan and add a parchment circle.
2. Whisk together the flour, cornmeal, baking powder, baking soda, and salt in a medium bowl and set aside. In another bowl, whisk together the sugar, eggs, vanilla, lemon zest, and lemon juice until combined. Stir in the melted butter.
3. Fold the dry mixture into the wet, but do not fully combine; there should still be some lumps of flour. Add the ricotta and stir until the mixture is combined.
4. Pour the batter into the prepared pan and bake until a toothpick inserted into the center of the cake comes out clean or with a few moist crumbs, 30 to 40 minutes. Let the cake cool in the pan for 5 minutes, then transfer to a plate and remove the outer ring of the springform pan. If you like, top with Creamy Lemon Glaze while still slightly warm. Cover with plastic wrap and store at room temperature for up to few days.
LEMON-THYME CORNMEAL CAKE Add 1 tablespoon chopped fresh thyme to the wet ingredients with the zest.
CRANBERRY CORNMEAL CAKE Layer a tart surprise throughout the cake: Substitute orange juice and zest for the lemon juice and zest. Pour half the batter into the prepared pan and sprinkle 1 cup fresh or frozen cranberries over it. Spoon the remaining batter over the cranberries and cover that with 1 more cup of cranberries. Sprinkle 1 tablespoon sugar over the cake before baking.
BLUEBERRY BUTTERMILK CORNMEAL CAKE A great summer cake with a hint of tang: Substitute buttermilk for the ricotta. Pour half the batter into the prepared pan and sprinkle 1 cup fresh or frozen blueberries over it. Spoon the remaining batter over the blueberries and cover that with 1 more cup of blueberries. Sprinkle 1 tablespoon sugar over the cake before baking.
ALMOND-CHERRY CORNMEAL CAKE Omit the lemon juice and zest. Substitute almond extract for ½ teaspoon of the vanilla. Fold 1 cup slivered almonds into the batter. Pour half the batter into the prepared pan and sprinkle 1 cup chopped fresh cherries over it. Spoon the remaining batter over the cherries and cover that with 1 more cup of chopped fresh cherries. Sprinkle 1 tablespoon sugar over the cake before baking.
Foam Cakes
For most people, tender, American-style, fat-rich cakes—called butter (or shortened) cakes—are the paradigm of the genre. But foam cakes, equally noteworthy and delicious, are often overlooked, which is a pity given how versatile they are. These get most of their lift and structure from whipped eggs; what they lack in buttery flavor, they make up for with a wonderfully airy texture.
The classic example is angel food cake: white and billowy as a cloud, it has no fat at all. Sponge cake gets fat and a bit of extra heft from the addition of egg yolks; genoise and chiffon cakes have egg yolks as well as a bit of butter or oil. Rarely will you see any of them served unadorned. True to their name, foam cakes are porous and best suited for layering, soaking, and/or saucing—if anything, the addition of a sauce serves to highlight the cake’s simplicity. Try them also in Jelly-Roll Cakes or Petits Fours or see Dressing Up Cakes for your own creative spin.
Recipes
Sponge Cake
Genoise
Angel Food Cake
Sponge Cake
Makes: At least 10 servings
Time: About 50 minutes
This cake’s texture is created entirely from whipped egg whites—no leavening needed. With its only fat coming from the egg yolks, it’s light and airy. And as its name suggests, it’s perfect with sauces and glazes of all kinds, which it soaks up. You may use granulated sugar and sifted all-purpose flour, but the combination of superfine sugar and cake flour (see page 192 to make your own versions of either) ensures extra-delicate results. For a light dessert, fill the layers with Whipped Cream and sliced strawberries. This is also ideal for Jelly-Roll Cakes, and the leftovers make excellent Trifles.
- Butter for greasing
- 1 cup cake flour, plus more for dusting
- 6 large eggs, separated
- 1 cup superfine sugar
- 2 teaspoons vanilla extract
- ¼ teaspoon salt
1. Heat the oven to 350°F. Grease the bottom and sides of two 9-inch or three 8-inch layer cake pans, line the bottoms with a circle of wax paper or parchment, butter the paper, and flour the pans.
2. Combine the egg yolks and ¾ cup of the sugar in a large bowl. Using an electric mixer, beat on medium-high speed until the mixture becomes pale and thick, 3 to 5 minutes. Stir in the vanilla and salt.
3. Wash and dry the beaters thoroughly. In a large bowl, beat the egg whites until soft peaks form. Add the remaining ¼ cup sugar gradually, beating on medium-high speed until the whites form stiff, glossy peaks, about 2 minutes. Fold the yolk mixture, one-third at a time, into the whites. Sift the flour over the mixture and fold gently until nearly incorporated.
4. Divide the batter evenly between the pans and bake until a toothpick inserted into the center of the cakes comes out clean or with a few moist crumbs, 20 to 25 minutes. Let the cakes cool in the pans for 5 minutes, then invert onto a rack to finish cooling; remove the paper and turn over to cool right side up.
5. Frost or glaze if you like and store at room temperature. If you’re not frosting right away, you can wrap each layer tightly with plastic wrap and store at room temperature for up to 2 days or wrap in plastic wrap and foil and store in the freezer for up to a few months.
GLUTEN-FREE SPONGE CAKE Substitute potato starch or cornstarch for the cake flour; if using the latter, sift it twice before using.
CHOCOLATE SPONGE CAKE Substitute cocoa powder for ½ cup of the cake flour. Top the cake with Chocolate Buttercream or Chocolate Ganache.
Genoise
Makes: At least 10 servings
Time: About 50 minutes
This butter-enriched sponge is a building block of many French cakes. Instead of separating the eggs, you cook them as you would Zabaglione and use that custard as the base. The result is just as versatile as the preceding sponge, with a slightly more complex flavor and texture.
- 2 tablespoons butter, melted and cooled, plus more for greasing
- 1 cup cake flour, plus more for dusting
- 6 large eggs
- 1 cup superfine sugar
- 2 teaspoons vanilla extract
- ¼ teaspoon salt
1. Heat the oven to 350°F. Grease the bottom and sides of two 9-inch or three 8-inch layer cake pans, line the bottoms with a circle of wax paper or parchment, grease the paper, and flour the pans.
2. Bring a medium saucepan of water to a simmer over medium heat. Whisk together the eggs, sugar, vanilla, and salt in a large heatproof bowl, then place the bowl over the saucepan; it should rest in the rim without falling inside. Cook, stirring occasionally, until the mixture is warm. Remove from the heat and beat with an electric mixer until it’s cool and tripled in volume. Be patient; even with a mixer this could take 5 to 10 minutes. Sift the flour over the egg mixture and gently fold it in until nearly incorporated, then add the melted butter and stir until smooth.
3. Divide the batter evenly between the pans and bake until a toothpick inserted into the center of the cakes comes out clean or with a few moist crumbs, about 25 minutes. Let the cakes cool in the pans for 5 minutes, then invert onto a rack; remove the paper and turn over to finish cooling right side up.
4. Frost or glaze if you like and store at room temperature. If you’re not frosting right away, you can wrap each layer tightly with plastic wrap and store at room temperature for up to 2 days or wrap in plastic wrap and foil and store in the freezer for up to a few months.
ALMOND GENOISE Substitute 1 teaspoon almond extract for the vanilla.
BROWN BUTTER GENOISE For a richer, nuttier base: In a saucepan, cook the butter over medium heat until the butter solids begin to turn a deep amber, about 5 minutes; swirl the pan frequently so it doesn’t burn.
LEMON OR ORANGE GENOISE Add 1 tablespoon grated or minced lemon or orange zest to the batter. Top the cake with Whipped Cream, Citrus Buttercream, Italian Meringue Frosting, or Creamy Lemon Glaze.
ICE CREAM GENOISE Spread softened ice cream between the layers, then freeze the cake until the ice cream freezes. Top the cake with a glaze or frosting of your choice (pages 556-568).
Angel Food Cake
Makes: At least 10 servings
Time: About 1½ hours
Angel food cake is made only with egg whites and without butter, which makes it incredibly light and spongy. In this cake, the repeated sifting is essential to ensure the lightest possible result.
With hints of vanilla and almond, it pairs perfectly with Lemon Glaze or Chocolate Sauce. Use any leftovers to make a delicious trifle, and turn the neglected yolks into Lord Baltimore Cake, Crème Brûlée, or Créme Anglaise.
- 1 cup cake flour
- ½ cup confectioners’ sugar
- ¼ teaspoon salt
- 9 egg whites, at room temperature
- 1 teaspoon cream of tartar
- ½ cup granulated sugar
- 1 teaspoon vanilla extract
- ¼ teaspoon almond extract
1. Heat the oven to 325°F. Sift the flour, confectioners’ sugar, and salt together into a medium bowl. Repeat.
2. Beat the egg whites until foamy. Add the cream of tartar and continue to beat until they hold soft peaks. Beat in the granulated sugar and the extracts and continue to beat until the peaks become stiffer.
3. Sift one-third of the flour mixture over the egg whites and gradually and gently fold it in using a rubber spatula. Repeat with the rest of the flour, adding it in 2 more increments, until it’s incorporated. Turn the batter into an ungreased 9- or 10-inch tube pan (not one with ridged sides) and bake for 45 to 55 minutes, until the cake is firm, resilient, and nicely browned.
4. Remove from the oven, invert the cake in the pan, and place over the neck of a wine bottle to cool. This prevents the angel food cake from falling and getting dense as it cools, and ensures the lightest, fluffiest texture. When completely cooled, run a dull knife carefully around the sides of the cake and remove. Cool completely before slicing with a serrated knife or pulling apart with 2 Forks. Eat plain or top with a glaze or sauce. Angel food cake is best the day it’s made; it becomes stale quickly (although it is wonderful toasted).
CHOCOLATE ANGEL FOOD CAKE Substitute ¼ cup cocoa powder for ¼ cup of the cake flour.
Ginger-Cardamom Angel Food Cake A lighter take on a spice cake: Add 1 tablespoon ginger and 1 teaspoon cardamom to the flour mixture. Omit the almond extract.
LEMON CHIFFON CAKE The addition of oil and egg yolks makes this a much richer cake: Increase the cake flour to 2 cups. Omit the almond extract. Separate 9 eggs. In a medium bowl, whisk together the egg yolks, ½ cup neutral oil, ⅓ cup fresh lemon juice, and 1 tablespoon grated lemon zest; add the egg yolk mixture to the dry ingredients. Follow Step 2 as directed. Fold a quarter of the egg white mixture into the egg yolk batter, then fold in the remaining mixture. Bake as directed and top with Creamy Lemon Glaze.
Serving Angel Food Cake
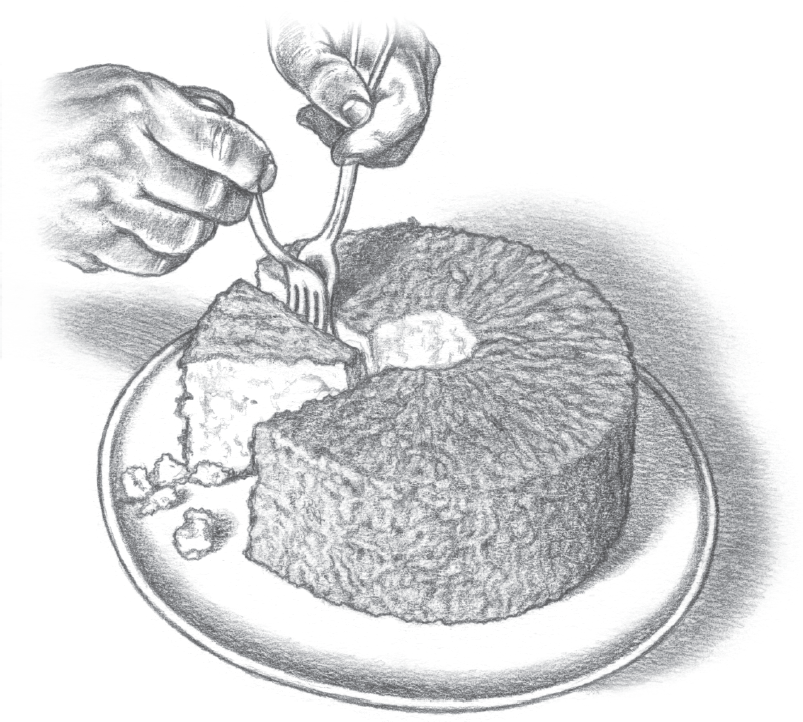
Slicing angel food cake with a knife can compress the soft interior; instead, try this technique: Insert two forks, back to back, then use them to gently pull apart the cake into slices.
Cream, Pudding, and Cheese Cakes
Any good cake is moist, but these are distinctly, deliciously creamy and tender whether they’re syrup soaked, custard filled, or cream cheese based. Some are so soft you can eat them with a spoon; many are practically puddings. All are delicious, especially the American icon, cheesecake.
Recipes
Cheesecake
Ricotta Cheesecake
Chocolate Cheesecake
Tres Leches
Caribbean Rum Cake
Baba au Rhum
Hot Milk Cake
Blueberry Pudding Cake
Gooey Butter Cake
Boston Cream Pie
Cheesecake
Makes: At least 12 servings
Time: About 1½ hours
Everyone has a favorite cheesecake recipe, and this one is mine. If you can’t live without crust (I can), see the variation. Some consider sour cream topping optional. I don’t.
- Butter for greasing
- 4 eggs
- 3 8-ounce packages cream cheese, softened
- 1¼ cups sugar
- 2 teaspoons vanilla extract
- 1 cup sour cream
1. Heat the oven to 325°F and grease the bottom and sides of a 9-inch springform pan. Line with a circle of parchment paper.
2. Use an electric mixer to beat the eggs until light. Add the cream cheese, 1 cup of the sugar, and 1 teaspoon of the vanilla; beat until smooth.
3. Turn the batter into the prepared pan and put the pan into a larger baking pan that will hold it comfortably. Add enough warm water to the baking pan to come to within an inch of the top of the springform pan (for more information about water baths, see page 337). Transfer carefully to the oven and bake until the cake is just set and very lightly browned, about 1 hour. Remove the pan from the water bath.
4. Turn the oven up to 450°F. In a small bowl, combine the sour cream with the remaining ¼ cup sugar and 1 teaspoon vanilla; spread on the top of the cake. Return the cake to the oven for 10 minutes without the water bath; turn off the oven and let it cool inside for 30 minutes before removing it, running a knife around the edge of the cake to prevent sticking to the pan, and letting it cool completely on a rack. Cover with plastic wrap and refrigerate until well chilled before removing from the pan, slicing, and serving. This will keep in good shape, refrigerated, for several days.
CHEESECAKE WITH CRUST Press a double recipe of Cookie Crumb Crust made with graham crackers into the bottom of the greased pan. Prick it all over with a fork and bake at 350°F for 10 to 12 minutes, until it’s fragrant and set. Cool completely before filling with the cheesecake batter and baking as directed.
VEGAN CHEESECAKE Cashews make this version as creamy as the original: Grease the pan with melted coconut oil. Put 3 cups raw cashews in a large bowl, cover with water, and soak for at least 4 hours or overnight. Drain the nuts and add to a blender or food processor with ⅓ cup fresh lemon juice, ⅔ cup maple syrup, ⅓ cup melted coconut oil, ⅓ cup nondairy milk, 2 teaspoons vanilla extract, and ½ teaspoon salt. Blend until very smooth, as long as a few minutes, scraping down the sides occasionally. Pour into the pan and freeze until set. Serve frozen or thawed at room temperature for 15 minutes. Store in the freezer or refrigerator.
BERRY CHEESECAKE You can pair cheesecake with whichever seasonal fruit you prefer: To serve, pour macerated berries (see Macerated Fruit) or a fruit sauce of your choice over each slice of cake.
PUMPKIN CHEESECAKE A great alternative to pumpkin pie: Substitute ½ cup unsweetened pumpkin purée for ½ cup (4 ounces) of the cream cheese. Add 1 teaspoon cinnamon, 1 teaspoon nutmeg, and ½ teaspoon ground cloves to the cream cheese mixture along with the vanilla extract.
CARAMEL SWIRL CHEESECAKE An indulgent addition to the classic cake; it looks great too: When the batter is in the springform pan, distribute tablespoon-sized dollops of Caramel Sauce evenly over the top, about 1 inch apart. Use a wooden skewer or the wooden handle of a spatula to swirl the caramel sauce through the cake in a figure-eight motion; do not overswirl or the pattern will be lost. To show off your handiwork, serve without the sour cream topping.
Ricotta Cheesecake
Makes: At least 12 servings
Time: About 1½ hours
Substituting ricotta for cream cheese is easy, light, and flavorful. The more delicate base pairs wonderfully with citrus. For something special, try your hand at a nut-based alternative piecrust instead of the graham cracker crust. A topping on this one would only detract from the airy texture of the cake, although macerated berries (see Macerated Fruit) or Fruit Compote served alongside certainly tastes wonderful with the citrus. The outcome of this recipe depends on the quality of the ricotta; buy the freshest variety you can find.
- Butter for greasing
- 2 recipes Cookie Crumb Crust made with graham crackers
- 4 eggs, separated
- 1½ pounds fresh ricotta cheese
- 1 cup sugar
- 1 tablespoon grated orange zest (optional)
- 1 tablespoon flour
1. Liberally grease a 9-inch springform pan, then press the crust into the bottom. Heat the oven to 325°F.
2. Use an electric mixer to beat the egg yolks until light; add the ricotta, sugar, and orange zest if you’re using it and beat until smooth. Stir in the flour.
3. Wash and dry the beaters thoroughly. Beat the egg whites until they hold soft peaks; use a rubber spatula to fold them into the yolk and cheese mixture gently but thoroughly.
4. Turn the batter into the prepared pan and put the pan into a larger baking pan that will hold it comfortably. Add enough warm water to the baking pan to come to within an inch of the top of the springform pan (for more information about water baths, see page 337). Transfer carefully to the oven and bake until the cake is just set and very lightly browned, about 1 hour.
5. Cool the cake completely on a rack, cover with plastic wrap, then refrigerate until well chilled before slicing and serving. This will keep in good shape, refrigerated, for several days.
LEMON-RICOTTA CHEESECAKE Switch up your citrus to brighten the cake: Substitute the zest and juice of 1 lemon for the orange zest.
MASCARPONE-RICOTTA CHEESECAKE For a hint of tang: Substitute mascarpone cheese for ½ pound of the ricotta.
Chocolate Cheesecake
Makes: At least 12 servings
Time: About 1½ hours
This cake is not for the faint of heart—every component is laced with rich, dark chocolate. A sliver of this is enough on its own, but fresh berries and Whipped Cream are always welcome.
- 4 tablespoons (½ stick) butter, melted, plus more for greasing
- 2 dozen Chocolate Wafer Cookies
- 8 ounces dark chocolate, chopped
- 4 eggs, separated
- 3 8-ounce packages cream cheese, softened
- ¾ cup sugar
- 3 tablespoons cocoa powder
- Chocolate Ganache Glaze
1. Liberally grease a 9-inch springform pan. Heat the oven to 350°F. To make the crust, use a food processor to crush the chocolate wafer cookies until finely ground. Stir in the melted butter. Press the crust evenly into the pan and bake until set, about 5 minutes. Remove from the oven. Reduce the oven temperature to 325°F.
2. Melt the chocolate in a double boiler or the microwave; set aside to cool slightly. Use an electric mixer to beat the egg yolks until light; add the cream cheese and sugar and beat until smooth. Stir in the cocoa powder.
3. Wash and dry the beaters thoroughly. Beat the egg whites until they hold soft peaks; use a rubber spatula to fold them into the yolk and cheese mixture gently but thoroughly. Stir in the melted chocolate until smooth.
4. Turn the batter into the prepared pan and put the pan into a larger baking pan that will hold it comfortably. Add enough warm water to the baking pan to come to within an inch of the top of the springform pan (for more information about water baths, see page 337). Transfer carefully to the oven and bake until the cake is just set and very lightly browned, about 1 hour.
5. Cool the cake on a rack. After the cake cools a bit, pour the glaze over the top and refrigerate until well chilled before removing from the pan, slicing, and serving. This will keep in good shape, refrigerated, for several days.
CHOCOLATE-CHERRY CHEESECAKE For chocolate-covered-cherry lovers: Fold 1 cup coarsely chopped maraschino or sour cherries into the batter. If you like, serve each slice with macerated cherries (see Macerated Fruit) and Whipped Cream.
CHOCOLATE-PEANUT BUTTER CHEESECAKE An incredibly rich cake fit for a serious sweet tooth: Substitute 1 cup smooth peanut butter for 8 ounces of the cream cheese; combine the cream cheese, peanut butter, and sugar as directed. Omit the melted chocolate and substitute 1 tablespoon flour for the cocoa powder. Top the cooled cake with the glaze as directed.
Tres Leches
Makes: 10 to 12 servings
Time: About 1 hour
Tres Leches, the popular Latin American yellow cake, calls for three different types of milk: evaporated, condensed, and whole. This recipe is actually cuatro leches, thanks to the addition of half-and-half. Despite so much liquid, the cake is moist but never soggy. It’s easy to change the flavor by tweaking the glaze that soaks the cake. See the suggestions that follow or experiment with your own combinations.
- Yellow Cake
- 1 12-ounce can evaporated milk
- 1 14-ounce can sweetened condensed milk
- 1 cup whole milk
- ¾ cup half-and-half
- 1½ teaspoons vanilla extract
- ¼ teaspoon salt
1. Bake the yellow cake in a greased 13 × 9-inch pan as directed.
2. While the cake is baking, make the glaze: Whisk together the evaporated milk, condensed milk, whole milk, half-and-half, vanilla, and salt in a small bowl.
3. When the cake is done, let it cool for 15 minutes, then use a skewer or a fork to poke small holes over the top of the cake. Pour the milk glaze evenly over the top of the cake, cover loosely with plastic wrap, and refrigerate overnight. Serve as is or smooth a layer of Whipped Cream evenly over the top of the cake. Store refrigerated for up to a week.
About Springforms
Most cake pans are interchangeable—the box on page 194 walks you through how to substitute them—but when a recipe calls for a springform pan, it’s usually nonnegotiable. Consisting of a round collar that latches tightly around an interlocking flat base, these pans give structure to moister batters while they bake and set. When you’re ready to serve, you just unbuckle the collar and slice straight from the base. There’s no need to invert, so they’re indispensable for cakes that would fall apart if flipped.
Make sure the connection between the collar and base seems secure before you buy. Before you bake, you can check for leaks by pouring water into the pan. Replace your pan if it develops a leak. Even if it doesn’t leak, many people wrap the outside of the pan in aluminum foil just in case.
As with any other cake pan, err on the side of caution when it comes to prep; even if yours is nonstick, grease it with butter before you fill. As an extra precaution, cut a circle of parchment slightly bigger than the base, grease it, and clasp the collar over it, so you can then use the ends to lift the finished cake off the base. Before you release the cake, let it cool completely—even refrigerate it if you can—and loosen the edges with a butter knife dipped in hot water.
COFFEE TRES LECHES CAKE Latte, in cake form: For the glaze, reduce the whole milk to ½ cup and add ½ cup brewed espresso or strong coffee to the milk mixture.
COCONUT TRES LECHES CAKE Creamy cake meets fragrant, nutty coconut: Substitute coconut milk for the whole milk. To serve, toast ½ cup shredded unsweetened coconut in a 350°F oven until golden brown, just a couple of minutes, and sprinkle it over the top.
ALMOND TRES LECHES CAKE If you’re tripling the milk, why not triple the almond? Substitute almond meal for ½ cup of the all-purpose flour in the Yellow Cake recipe. For the glaze, substitute almond milk for the whole milk. If you like, add 2 tablespoons amaretto to the whipped cream.
ORANGE TRES LECHES CAKE Any citrus flavor will do well here: Add 2 tablespoons grated orange zest to the flour mixture for the Yellow Cake. For the glaze, substitute fresh orange juice for ½ cup of the whole milk. If you like, add 2 tablespoons Cointreau to the whipped cream.
CINNAMON-SPICE TRES LECHES CAKE Add 1 teaspoon cinnamon, ½ teaspoon nutmeg, and ½ teaspoon cardamom to the glaze mixture.
Caribbean Rum Cake
Makes: At least 10 servings
Time: About 1½ hours
A potent cake, for adults only. The bold flavors of dark rum and vanilla go perfectly with strong coffee or a scoop of Vanilla Ice Cream. Because pastry cream is folded into the batter and the cake is soaked in syrup, it stays moist for a long time; and it freezes beautifully. The addition of spices or different liquors adds an interesting twist to this cake (see page 226 for ideas).
- For the cake:
- 1 stick butter, softened, plus more for greasing
- ½ cup almond meal, plus more for dusting
- 1½ cups flour
- 1 tablespoon baking powder
- ½ teaspoon salt
- 1 cup packed light brown sugar
- 4 eggs
- ⅔ cup dark rum
- ½ cup neutral oil (such as grapeseed or corn)
- ½ cup milk
- 1 tablespoon vanilla extract
- ½ cup Vanilla Pastry Cream
- For the rum syrup:
- 1¼ sticks butter
- ¾ cup granulated sugar
- ½ cup dark rum
- ¼ teaspoon salt
1. Heat the oven to 325°F. Lightly grease an 8- or 9-inch tube pan and sprinkle it with almond meal. Whisk together the flour, almond meal, baking powder, and salt in a medium bowl and set aside.
2. Use an electric mixer to cream the butter and brown sugar until smooth, 3 to 4 minutes. In a separate bowl, whisk together the eggs, rum, oil, milk, and vanilla. Add the egg mixture to the butter and sugar and beat for another 3 minutes; the mixture will be loose and liquidy. Fold in half the flour mixture, then the pastry cream, then the remaining flour.
3. Pour the batter into the prepared pan and bake until a toothpick inserted into the center of the cake comes out clean or with a few moist crumbs, 50 to 60 minutes.
4. Meanwhile, make the rum syrup: Combine all of the ingredients along with ¼ cup water in a saucepan and bring to a boil, stirring constantly. Let the mixture simmer for 5 to 10 minutes, until it thickens into a syrup. Remove from heat.
5. When the cake is done, remove it from the oven and use a knife or a skewer to poke holes evenly over its surface. With the cake still in the pan, pour one-quarter of the syrup over it and let it soak. Repeat until you’ve used all the syrup. Cover the cake loosely with wax paper or plastic wrap and let it rest overnight. When it’s ready, loosen the edges of the cake from the pan with a knife and turn it out onto a plate to serve. Store at room temperature, covered in wax paper, for up to a few days; cover it tightly in plastic wrap and it will last up to a week.
BOURBON CAKE Pick your poison: Substitute bourbon for the rum in both the cake and the syrup. Use light brown sugar rather than granulated in the syrup.
KAHLÚA ALMOND CAKE Don’t bother making coffee—this coffee-flavored rum liqueur will do the trick: Substitute Kahlúa for the rum in the cake and the syrup. Fold ½ cup chopped almonds into the batter with the pastry cream.
ORANGE GRAND MARNIER CAKE A beautifully boozy citrus cake: Substitute Grand Marnier (or other orange liqueur) for the rum in the cake and the syrup. Beat 2 tablespoons grated orange zest into the butter and sugar mixture. For the syrup, substitute fresh orange juice for the water.
Dressing Up Cakes
You can garnish a cake as simply as this: Put some confectioners’ sugar in a sieve and tap it over the top (use a stencil if you want to get fancy). Beyond that, you have endless options to add flavor and moisture—just about any cake can benefit from more of both.
CAKE SOAK
The ultimate—and arguably simplest—dressing, which you can use to completely saturate any cake or lightly glaze it, with or without the other sauces in this list. There are lots of ways to flavor it; let it match or contrast the cake, or let it fade to the background while adding a boost of moisture.
CHOCOLATE GLAZE, LEMON GLAZE, OR JAM GLAZE
Thinner than frosting and with lots of ways to tweak the flavor, these are great on denser recipes like Classic Pound Cake or Chocolate-Sour Cream Pound Cake.
CARAMEL SAUCE, BUTTERSCOTCH SAUCE, OR DULCE DE LECHE
These make rich fillings for layer cakes, as the sole addition to cakes that you don’t want to embellish too much, or drizzled over slices to take them over the top.
Whipped Cream or lightly sweetened sour cream or crème fraÎche
Great and simple. It’s best to put these over individual cake slices since leftovers won’t hold up very well.
Vanilla Pastry Cream or Lemon Curd
Too heavy to use as frosting, but a luxurious filling for the center of a layer cake; alternatively, dollop over slices just before serving.
FRUIT SAUCE, TWO WAYS, OR FRUIT COMPOTE
A great garnish on otherwise unadorned cakes. Flour-based cakes will act like sponges and soak them up; add in advance to let them sink in, or add just before serving to keep the topping distinct.
BUTTERCREAM, COCONUT SEVEN-MINUTE FROSTING, OR CREAM CHEESE FROSTING
The classic topping for layer cakes (page 198). These have a way of making anything feel fancy and celebratory. For some people, the cake is just a vehicle for the frosting.
CHOCOLATE GANACHE OR CHOCOLATE-HAZELNUT SPREAD
Fancy. A little goes a long way.
FRUIT JAM OR ORANGE MARMALADE
Light and bright—perfect at the center of a layer cake or Jelly-Roll Cake.
Baba au Rhum
Makes: 8 to 10 servings
Time: About 2 hours
Baba au rhum is in the same family as babka, kugelhopf, and panettone, which straddle the line between bread and cake. It’s soaked in a Vanilla-Rum Syrup, which makes it a great festive recipe for the holidays. For a proper rise, make sure that the water is between 100°F and 110°F and that the dough rises in the warmest spot in your house.
- 1 cup dark rum
- ½ cup raisins or currants
- 2⅓ cups flour
- ½ teaspoon salt
- ½ cup water, warm
- 1 package instant yeast (2¼ teaspoons)
- 4 eggs, room temperature
- ¼ cup sugar
- 2 sticks butter, cut into cubes and softened, plus more for greasing
- 2 recipes Vanilla-Rum Syrup
1. Combine the rum and raisins in a small bowl and set aside. Whisk together the flour and salt in a small bowl and set aside.
2. Combine the water and yeast in a large mixing bowl. Add the eggs, one at a time, and use an electric mixer to beat them in. Then beat in the sugar and then the flour mixture until combined. Add the butter and beat until smooth and elastic, about 5 minutes. Place the dough in a large mixing bowl greased with butter. Cover the bowl loosely with plastic wrap or a damp kitchen towel and put it in a warm place to rise until doubled in size, about 1 hour.
3. Butter an 8- or 9-inch tube pan. Drain the raisins, reserving the rum to use in the syrup. Spoon half of the dough into the prepared pan and sprinkle the raisins on top. Cover with the remaining batter, smooth the top, and cover again with plastic wrap or a damp towel. Set aside to allow the dough to rise to the top of the pan, about 1 hour.
4. Heat the oven to 375°F. Bake the cake until a toothpick inserted into the center comes out clean or with a few moist crumbs, 30 to 40 minutes. Meanwhile, make the Vanilla-Rum Syrup, adding the reserved rum to it.
5. Allow the cake to cool for 10 to 15 minutes, then turn it out onto a cake plate with a lip. Pour all the syrup slowly over the cake. To serve, top each slice with any syrup that may have pooled onto the plate and a dollop of Whipped Cream.
SPICED BABA AU RHUM Add 1 teaspoon cinnamon, 1 teaspoon ginger, and ½ teaspoon nutmeg to the flour mixture.
CHOCOLATE CHUNK BABA AU RHUM Substitute chopped dark chocolate for the raisins.
CRANBERRY BABA AU RHUM Substitute fresh or frozen cranberries for the raisins. Stir 1 tablespoon grated orange zest into the flour mixture.
Hot Milk Cake
Makes: 8 to 10 servings
Time: About 1½ hours
This old-fashioned kid pleaser uses scalded milk for added flavor and better texture. It stays moist longer than an average cake and is flavorful enough on its own to warrant only a dollop of Whipped Cream and a sprinkle of confectioners’ sugar in the way of toppings, although it also tastes great with a simple glaze. For an extra-rich cake, instead of the milk use half-and-half.
- 1 stick butter, cut into pieces, plus more for greasing
- 2 cups flour, plus more for dusting
- 2 teaspoons baking powder
- ½ teaspoon salt
- 3 eggs
- 1 teaspoon vanilla extract
- 1 cup sugar
- 1 cup whole milk
1. Heat the oven to 325°F. Grease and flour a 13 × 9-inch pan. In a medium bowl, whisk together the flour, baking powder, and salt; set aside.
2. Use an electric mixer to beat the eggs on high speed until fluffy, about 3 minutes. Stir in the vanilla, then gradually beat in the sugar until combined.
3. Heat the milk and butter in a small saucepan until the butter is melted. Bring to a simmer, then remove from the heat. Allow to cool for about 5 minutes before pouring the milk mixture slowly into the egg mixture, constantly beating them together as you do. Fold in the flour mixture until just combined.
4. Turn the batter into the prepared baking pan and bake for 45 to 55 minutes, until the cake is golden brown and pulls away from the sides of the pan.
5. Serve cooled, straight from the pan. Top each slice with confectioners’ sugar or whipped cream. Store covered at room temperature for up to a week.
HOT COFFEE MILK CAKE For a little buzz: Substitute ½ cup of the whole milk with strong, hot brewed coffee.
Blueberry Pudding Cake
Makes: At least 6 servings
Time: About 1¼ hours
Underneath the crust of this cake lies a soft, gooey berry center. It’s the perfect summer comfort cake, but you can substitute other seasonal fruit for the blueberries as well. Serve it with fresh Whipped Cream.
- 4 tablespoons (½ stick) unsalted butter, melted, plus butter for greasing
- 1 cup buttermilk
- ¾ cup sugar
- 3 eggs, separated
- ⅓ cup flour
- Pinch of salt
- 1½ cups blueberries
- 1 tablespoon grated lemon zest
1. Heat the oven to 325°F. Grease an 8- or 9-inch ceramic or glass baking dish or a deep-dish pie plate.
2. Put the butter, buttermilk, ½ cup of the sugar, the egg yolks, flour, and salt in a blender or food processor and purée until smooth. Pour the batter into a bowl. Stir in the blueberries and zest and set aside.
3. In a separate bowl, beat the egg whites with an electric mixer until they hold soft peaks. Sprinkle in the remaining ¼ cup sugar while beating until the whites hold stiff peaks; fold them into the batter gently but thoroughly.
4. Turn the batter into the prepared dish and put the dish in a baking pan large enough to hold it comfortably. Add enough warm water to the baking pan to come to within an inch or so of the top of the dish (for more information about water baths, see page 337). Transfer carefully to the oven and bake until the top is golden brown and the center is just set but slightly jiggly, about 50 minutes.
5. Remove the cake from the oven and cool the dish completely on a rack, cover with plastic wrap, then refrigerate until chilled, at least 3 hours, before serving. This will keep in the refrigerator for 2 or 3 days.
GINGER-CARDAMOM PUDDING CAKE Trade in berries for spices: Substitute 1 tablespoon freshly grated ginger and 2 teaspoons cardamom for the blueberries.
BLUEBERRY-CORN PUDDING CAKE Combine summer’s best ingredients for one heck of a cake: Reduce the blueberries to 1 cup and shave the kernels off 1 corn cob; combine the kernels and blueberries. Substitute whole milk for buttermilk. Cut the bare cob into pieces and steep them in the milk; chill the milk and cobs in the refrigerator for at least 1 hour. Strain the milk and proceed with the recipe as directed.
Gooey Butter Cake
Makes: One 13 × 9-inch cake, at least 12 servings
Time: 1¼ hours, plus time to rise
This labor of love is ideal for snow days and slumber parties. It looks like a lemon bar, but it tastes like nothing else—an oozing toffee-ish topping over a sturdy, bready crumb. Eat the day (or night) that it’s baked to enjoy maximum gooeyness.
- For the cake:
- 4 tablespoons (½ stick) butter, softened, plus more for greasing
- ⅓ cup milk, warm
- 2 teaspoons instant yeast
- 2 cups flour, plus more for kneading
- ¾ teaspoon salt
- ¼ cup granulated sugar
- 1 egg, at room temperature
- 1 teaspoon vanilla extract
- For the topping:
- 1¾ sticks butter, softened
- 1½ cups superfine sugar
- 2 eggs
- 2 teaspoons vanilla extract
- ⅔ cup flour
- ½ teaspoon salt
- ¼ cup milk
1. To make the cake layer: Grease a 13 × 9-inch pan. In a small bowl, mix together the warm milk and yeast. Let stand for 5 to 10 minutes, until the mixture begins to foam slightly. Set aside.
2. Whisk together the flour and salt in a medium bowl and set aside. In a separate bowl, use an electric mixer to cream the butter and granulated sugar until smooth. Add the egg and vanilla and beat until light and fluffy, 4 to 5 minutes. Add the flour to the egg mixture, combining by hand and alternating with the milk. Stir until just smooth. This will be a dense, slightly elastic dough.
3. Turn the dough out into the prepared pan. Press the dough evenly into the pan to fill it. Cover the pan loosely with a dish towel or plastic wrap and place in a warm spot to rise, about 3 hours. The cake should double in size and look bubbly and irregular.
4. To make the topping: Use an electric mixer to cream the butter and sugar until smooth. Add the eggs and vanilla and beat until combined. Whisk together the flour and salt, then gradually add it to the butter mixture, alternating with the milk; the mixture should be spreadable but not too runny. Set aside.
5. Heat the oven to 350°F. Use a fork to prick a few holes into the dough so that it doesn’t bubble too much. Spoon the topping in generous dollops over the surface of the cake, then gently connect the dollops, spreading the topping evenly over the dough. Bake until the cake is a light golden brown on top, 35 to 45 minutes. The cake will still be liquid in the center. Serve slightly warm or cool.
GOOEY BUTTER CAKE WITH CHOCOLATE TOPPING Offset the buttery cake with a bitter chocolate topping: Melt 2 ounces dark chocolate in the microwave or a double boiler. After adding the eggs, stir the melted dark chocolate into the topping. Add just enough milk so that the mixture is spreadable but not too runny.
LEMON GOOEY BUTTER CAKE The cake version of a classic lemon bar: Stir 1 tablespoon lemon zest into the dry ingredients. For the topping, add 3 tablespoons lemon juice to the batter with the eggs.
TOASTED COCONUT GOOEY BUTTER CAKE Toasted coconut adds nuttiness and texture to the cake: Substitute coconut milk for the milk in both the cake and the topping. Sprinkle ⅓ cup shredded unsweetened coconut over the topping before baking. If the coconut becomes too dark while baking, tent the cake loosely with a piece of aluminum foil.
MAPLE SPICE GOOEY BUTTER CAKE For the cake, whisk 1 teaspoon cinnamon, ½ teaspoon cardamom, and ¼ teaspoon ground cloves into the dry ingredients. For the topping, substitute maple syrup for ½ cup of the superfine sugar.
BLUEBERRY GOOEY BUTTER CAKE A touch of tart fruit will brighten this dense cake: For the topping, beat 1 tablespoon grated orange zest into the batter with the eggs. Sprinkle ⅓ cup fresh blueberries over the topping before baking.
BROWN SUGAR GOOEY BUTTER CAKE For a hint of molasses: Substitute brown sugar for the granulated sugar in the cake.
Boston Cream Pie
Makes: At least 10 servings
Time: About 2 hours
Boston Cream Pie was invented by a pastry chef over a century ago, and it’s still popular, especially in Massachusetts. There’s no question why people love it: Underneath a coating of chocolate glaze lie moist yellow cake and rich vanilla pudding. The only question is why this cake is called pie. Sponge Cake also makes a suitable base for this recipe.
- Yellow Cake
- ½ recipe Vanilla Pudding
- Chocolate Ganache Glaze
1. Bake the yellow cake in a 9- or 10-inch greased and floured cake or springform pan as directed for 35 to 45 minutes, then make the vanilla pudding and chocolate glaze. Let all cool completely.
2. To assemble, use a serrated knife to cut the cake in half horizontally, leaving the top layer slightly smaller than the bottom. Spread the pudding evenly over the bottom layer of the cake and cover it with the top layer of cake. Drizzle the chocolate glaze over the top of the cake, letting it drip down the sides.
3. Refrigerate the cake for about 30 minutes, until the glaze is set. Store covered in the refrigerator for up to a few days.
BOSTON BANANA CREAM PIE An easy way to vary this cake is to switch up the pudding filling: Substitute Banana Pudding for the vanilla pudding. Garnish the cake with banana slices.
Fruit, Vegetable, Nut, and Spice Cakes
Don’t be fooled by the title: Some of these cakes are as indulgent and satisfying as their chocolate or vanilla counterparts, although others do have a lighter touch and mellower sweetness. But there’s something uniquely comforting about the warm, familiar spices and bursts of fresh fruit flavor that are spotlighted here. Fruit, vegetables, and nuts also create inimitable texture, from Carrot Cake to velvety-moist Orange-Almond Cake and Applesauce Cake.
Recipes
Almond Financiers
Carrot Cake
Cinnamon Cake
Pumpkin Spice Cake
Honey-Spice Cake
Applesauce Cake
Claudia Roden’fs Middle Eastern Orange-Almond Cake
Blackberry Buckle
Sticky Toffee Pudding
Cranberry-Walnut Torte
Pineapple Upside-Down Cake
Sweet Rice and Coconut Cake (Bibingka)
Almond Financiers
Makes: About 1 dozen
Time: About 30 minutes
These moist, lightly sweet little rectangular cakes are said to have gotten their name because the main ingredients—brown butter and almonds—are rich. But with a simple ingredient list and straightforward prep, you don’t have to be rich to enjoy them. A stint in a very hot oven creates a crisp, buttery crust with a tender middle. These are easy and just super.
- 1 stick butter, plus more for greasing
- 1 cup confectioners’ sugar
- ¼ cup all-purpose flour
- ⅔ cup almond flour
- 4 egg whites
- 1 teaspoon vanilla extract
1. Heat the oven to 400°F. Generously grease a muffin tin or, if you have it, a financier tin.
2. Melt the butter in a skillet over medium heat. Cook the butter, stirring frequently, until it becomes a light golden brown, about 5 minutes. Transfer to a bowl and let cool.
3. Combine the sugar, flour, and almond flour in a mixing bowl. Beat the egg whites until frothy, then add to the flour mixture and mix until the batter is smooth, about 3 minutes. Stir in the brown butter and vanilla until fully incorporated.
4. Fill the muffin cups about three-quarters full. Bake until the cakes have just started to rise, about 7 minutes. Reduce the heat to 375°F and bake for another 5 to 7 minutes, until golden brown. Cool in the pan for 5 minutes before transferring to a rack.
GINGER LEMON FINANCIERS Fold the grated zest of 1 large lemon into the finished batter and substitute 1 teaspoon grated fresh ginger for the vanilla.
CHOCOLATE FINANCIERS Especially good with a chunk of dark chocolate pressed into the batter before baking: Decrease the all-purpose flour to 2 tablespoons and add 2 tablespoons cocoa powder along with the almond flour and sugar.
CORNMEAL LIME FINANCIERS Substitute fine cornmeal (it won’t work with coarse) for the almond flour and add the grated zest of 2 limes. Omit the vanilla.
COCONUT ORANGE FINANCIERS Substitute coconut flour for the almond flour. Add the zest of 1 orange to the batter before baking. For a stronger coconut flavor, add ⅓ cup shredded unsweetened coconut to the batter.
FRUIT FINANCIERS Like an extra-buttery muffin: Prepare ¾ cup fruit, either fresh or frozen and thawed, coarsely chopped if necessary. Once you’ve filled the tins, top each with 1 tablespoon of the fruit and gently press the fruit into the batter.
GLUTEN-FREE FINANCIERS It’s easy to make these gluten-free since there’s only a small amount of flour to begin with: Replace the all-purpose flour with 2 tablespoons each sweet rice flour and cornstarch.
Carrot Cake
Makes: 12 servings
Time: About 1 hour
A great carrot cake bursts with spices, nuts, and coconut. This one also features pineapple, which lends a tropical note and ensures a tender crumb. Slather it with cream cheese frosting or leave unfrosted for a good snack cake.
- Butter for greasing
- 2 cups flour, plus more for dusting
- 2 teaspoons baking soda
- 1 teaspoon baking powder
- 1 teaspoon salt
- 1 teaspoon cinnamon
- 1 teaspoon ginger
- ½ teaspoon nutmeg
- 1 cup neutral oil (like grapeseed or corn)
- 1¾ cups sugar
- 4 eggs
- 2 teaspoons vanilla extract
- 2 cups grated carrots
- 1 cup canned crushed pineapple, drained
- 1 cup chopped walnuts or pecans
- ½ cup shredded unsweetened coconut
- Cream Cheese Frosting (optional)
1. Heat the oven to 350°F. Grease and flour the bottom and sides of two 9-inch or three 8-inch layer cake pans or a 13 × 9-inch baking pan.
2. Whisk together the flour, baking soda, baking powder, salt, cinnamon, ginger, and nutmeg in a large bowl and set aside. In a separate bowl, whisk together the oil, sugar, eggs, and vanilla. Stir the wet ingredients into the dry ingredients, then fold in the carrots, pineapple, nuts, and coconut until just combined.
3. Divide the batter evenly between the pans and bake until a toothpick inserted into the center of the cakes comes out clean or with a few moist crumbs, about 40 minutes. Let the cakes cool in the pans for 5 minutes, then invert onto a rack to finish cooling. If the cake is in a rectangular baking dish, leave it in the pan.
4. Frost if you like. Store at room temperature, covered or wrapped well in plastic wrap, for no more than a few days.
BROWN BUTTER CARROT CAKE Brown butter adds oomph and nuttiness to the classic cake: Substitute brown butter for ½ cup of the vegetable oil: Melt 1 stick butter on the stove over medium-high heat. Watch it closely, stirring occasionally, until it turns a light amber color, about 5 minutes.
PECAN CARROT CAKE Toast the nuts to add flavor, not just crunch: Toast 1 cup pecans until golden brown and fragrant. Fold them into the batter with the carrots.
SWEET POTATO COCONUT CAKE Substitute grated sweet potato for the carrots and swap out the nuts for an additional ½ cup shredded unsweetened coconut.
BEET CAKE For beautiful color and subtle flavor: Substitute peeled and grated beets for the carrots. Omit the raisins.
Cinnamon Cake
Makes: 8 to 10 servings
Time: About 45 minutes
There’s no more comforting cake than this—fabulous at breakfast and a treat for dessert with a dollop of Whipped Cream or Lemon Curd. The crunchy cinnamon-sugar topping is an irresistible complement to the sweet, moist cake below. It makes for great leftovers as well, since it keeps its moist texture for up to four days.
- For the cake:
- 6 tablespoons (¾ stick) butter, melted, plus butter for greasing
- 2 cups flour
- 1 teaspoon baking soda
- ¼ teaspoon salt
- ½ teaspoon cinnamon
- ¾ cup granulated sugar
- 2 eggs
- ¾ cup buttermilk
- 2 teaspoons vanilla extract
- For the streusel topping:
- ¼ cup granulated sugar
- ¼ cup packed light brown sugar
- 2 teaspoons cinnamon
- 3 tablespoons butter, melted
1. Heat the oven to 375°F. Grease the bottom and sides of a 9- or 10-inch pie dish. Whisk together the flour, baking soda, salt, and cinnamon in a large bowl and set aside. In a medium bowl, use an electric mixer to beat together the granulated sugar and eggs. Whisk in the buttermilk and vanilla, then stir in the melted butter. Add the wet ingredients to the dry ingredients and mix until combined.
2. In a small bowl, prepare the streusel topping. Combine the sugars and cinnamon. Add the melted butter to the mixture and mix until combined and crumbly.
3. Pour the batter into the prepared pan and sprinkle the streusel evenly over the top. Bake until a toothpick inserted into the center of the cake comes out clean or with a few moist crumbs, 20 to 25 minutes. Let the cake cool a bit before serving straight out of the pie dish. Cover with plastic wrap and store at room temperature for up to few days.
CARDAMOM CAKE Cardamom isn’t as ubiquitous as cinnamon, but it makes for a wonderful alternative spice cake: Substitute cardamom for the cinnamon.
PEAR-GINGER CAKE A classic combination: For the cake, substitute ginger for the cinnamon. Peel and chop 2 medium pears and fold them into the prepared batter. For the streusel, substitute ginger for the cinnamon.
CINNAMON-SPICE CAKE Amp up the spices for a more intense cake: Reduce the ground cinnamon to 1 teaspoon. Whisk an additional ½ teaspoon cinnamon, ½ teaspoon nutmeg, and ¼ teaspoon ground cloves into the dry ingredients.
7 Ways to Use Cake Scraps
Don’t throw away stale leftovers or the scraps you get from leveling cakes (page 198):
Trifle (page 332) Cut into cubes and layer them in a serving dish with fillings like Whipped Cream, Vanilla Pudding, Chocolate Mousse, drizzled booze, or sliced fresh fruit.
Cake truffles Crumble the scraps; mix with just enough frosting and, if you like, other flavors like rum or almond extract until you can shape them into balls. Refrigerate until set. Eat as is or dip in tempered chocolate (page 353).
Bread Pudding This works especially well with denser recipes like Classic Pound Cake, Chocolate-Sour Cream Pound Cake, and Lemon Cornmeal Cake.
Streusel Topping Streusel is versatile and forgiving, so you can easily switch in crumbled cake scraps for some of the flour—a unique treat.
Cake crumbs Finely crumble the cake; if you like, slowly toast in a 250°F oven, tossing occasionally, to crisp them up a bit. Sprinkle over ice cream or pudding, use as a garnish for frosted cakes, or add to a milkshake.
Petits Fours (page 216) Layered with filling and coated with glaze, these elegant, bite-sized cakes are great for entertaining.
Piecrust Swap toasted cake crumbs for cookies in Cookie Crumb Crust and decrease the melted butter to 3 tablespoons.
Pumpkin Spice Cake
Makes: At least 10 servings
Time: About 1 hour
Move over pumpkin pie; there’s a new favorite on the Thanksgiving table. Pumpkin Spice Cake is very low maintenance, requiring only two bowls and minimal mixing, but the results suggest you slaved over it. For extra zing, replace the ground ginger with ¼ teaspoon grated fresh ginger. The spices taste wonderful against tart Cream Cheese Frosting, but try Maple Buttercream for a real treat.
This is also a model for using other puréed vegetables and fruits in cake, as the variations show.
- ⅔ cup neutral oil (like grapeseed or corn), plus more for greasing
- 2 cups flour, plus more for dusting
- 2 teaspoons baking powder
- ½ teaspoon baking soda
- ½ teaspoon salt
- 1 teaspoon cinnamon
- ½ teaspoon ginger
- ½ teaspoon nutmeg
- 3 eggs
- 1 cup packed light brown sugar
- 1 cup granulated sugar
- 1 cup canned pumpkin
- ⅓ cup buttermilk
- 2 teaspoons vanilla extract
1. Heat the oven to 350°F. Grease and flour the bottom and sides of two 9-inch or three 8-inch cake pans. To make in a bundt pan, double the recipe.
2. In a medium bowl, whisk together the flour, baking powder, baking soda, salt, and spices. In a separate large bowl, mix together the oil, eggs, sugars, pumpkin, buttermilk, and vanilla. Beat until smooth. Fold the flour mixture into the wet ingredients until just combined with no large lumps.
3. Pour the batter into the prepared pans and bake until a toothpick inserted into the center of the cakes comes out clean, 30 to 40 minutes, or about an hour for a bundt cake. Let cool for 10 minutes, then turn the cakes out of the pans onto a rack to finish cooling.
4. Frost or glaze if you like (see the suggestions on page 232). Store at room temperature, covered or wrapped well in plastic wrap, for no more than a few days, or wrap the unfrosted cake in plastic wrap and aluminum foil and store in the freezer for up to a few months.
PUMPKIN-GINGER CAKE For an extra-spicy cake: Increase the ground ginger to 1 teaspoon and decrease the cinnamon to ½ teaspoon. Fold ½ cup chopped candied ginger into the batter with the flour. If you like, frost the cake with Ginger Buttercream.
MAPLE-BUTTERNUT SPICE CAKE The perfect use for all that autumn squash: Substitute puréed butternut squash (see page 39) for the pumpkin. Substitute maple syrup for ¼ cup of the brown sugar. If you like, frost the cake with Maple Buttercream.
SWEET POTATO SPICE CAKE This cake is perfect with Cinnamon Buttercream: Substitute puréed sweet potatoes (see page 39) for the pumpkin purée.
PARSNIP-VANILLA CAKE Unusual, but it works: Substitute puréed parsnips (purée as you would sweet potatoes; see page 39) for the pumpkin. Omit the ginger and nutmeg and increase the vanilla to 1 tablespoon.
APPLESAUCE SPICE CAKE Substitute applesauce for the pumpkin. Increase the cinnamon to 2 teaspoons.
PRUNE POPPY SEED CAKE Based on the Austrian specialty, Mohnkuchen: Substitute puréed prunes for the pumpkin. Omit the spices and add 1 tablespoon grated orange zest to the dry ingredients. Fold ⅓ cup poppy seeds into the batter with the flour.
BANANA CAKE Like banana bread but way more impressive; this is excellent with Caramel Glaze or Butterscotch Sauce: Substitute mashed bananas for the pumpkin. Increase the cinnamon to 2 teaspoons and omit the nutmeg.
Making Cake for a Crowd
Cake is one of the most symbolic celebratory desserts, but there are a few things you need to know before you try to bake one for a big event. Engineering big cakes often requires equipment—large pans, specialized ovens, and dowels—the likes of which I prefer to leave to professionals. If you’re doing it yourself, here are some better options.
If you plan to double a recipe, make sure you do so precisely so that the ratios don’t change. I never double recipes.
NO-ASSEMBLY CAKES
Sheet cakes and Jelly-Roll Cakes are an easy way to boost a cake’s yield. Use any recipe you’d bake in round cake pans and be aware that sheet cakes tend to bake faster than layer cakes, so don’t wander too far from the oven.
LAYERED SHEET CAKES
Bake according to recipe directions, wrap tightly, and freeze if possible (frozen cakes are much easier to handle), then use a serrated knife to level both layers (this makes the top layer less likely to crack). Frost the bottom layer on your serving dish and invert the top layer, bottom side up, over it. Frost the top and sides too.
PETITS FOURS
Petits Fours are a clever option to stretch a cake recipe, and they have an unbeatable elegance that’s perfect for special occasions.
DENSE, MOIST CAKES
These keep their flavor and texture longer than those with an airier, more delicate crumb. Classic Pound Cake, Chocolate-Sour Cream Pound Cake, Olive Oil Cake, Black Forest Cake, Dense Flourless Chocolate Cake, and Chocolate-Hazelnut Torte are safe bets.
FREEZING CAKES
Most cakes—including the more delicate ones that get stale at room temperature—freeze beautifully, buying you up to several weeks to work ahead. See the notes on storing cakes.
CAKE SOAK
Use a cake soak to instantly breathe life back into staling cakes before you assemble and decorate them.
CHEESECAKE
Cheesecake is impressive, decadent, and keeps well in the fridge for several days; you can top with Fruit Compote or sliced fresh fruit to make it look professionally done. Make one of each to feed an army: Cheesecake, Ricotta Cheesecake, and Chocolate Cheesecake.
TRES LECHES, CARIBBEAN RUM CAKE, AND STICKY TOFFEE PUDDING
They aren’t exactly elegant, but they’re naturally incredibly moist, making them great candidates to prepare in big sheet pans a few days before you’re hosting.
CUPCAKES
Make these in bulk using any butter cake recipe (see page 205) and freeze if need be. Wait to frost until just before serving. Arrange on tiered serving stands or stack in pyramids—messy but adorable.
Honey-Spice Cake
Makes: 1 loaf
Time: About 1 hour
This is a dark, rich, gingerbreadlike cake from Eastern Europe (my grandmother made it). Hearty rye flour, honey, and coffee create a wonderful and intense flavor combination. It’s a great cake for dried fruit and nut add-ins or a wide range of sauces, glazes, and frostings. I like it drizzled with Mocha Glaze, topped with Not-Too-Sweet Honey Buttercream, or served with bitter Orange Marmalade and drizzled with Ginger Butterscotch Sauce.
- 2 tablespoons butter, plus more for greasing
- 1 tablespoon grated or minced orange zest
- 1½ cups all-purpose flour, plus more for dusting
- ½ cup rye or whole wheat flour
- 1 teaspoon baking soda
- ½ teaspoon cinnamon
- ¼ teaspoon salt
- ¼ teaspoon each allspice, nutmeg, cloves, and ginger
- 2 eggs
- ½ cup sugar
- ½ cup honey
- ½ cup freshly brewed coffee
1. Preheat the oven to 350°F. Grease and flour a 9 × 5-inch loaf pan (if you double the recipe, you can use a tube pan). Combine the butter and orange zest in a small saucepan over medium heat; cook until the butter sizzles, then turn off the heat. Whisk together the flours, baking soda, salt, and spices in a large bowl.
2. Use an electric mixer to beat the eggs and sugar together until the mixture is light and thick; beat in the honey and coffee, followed by the butter and zest mixture. Add the dry ingredients by hand, stirring just to combine; do not beat. Pour into the prepared loaf pan and bake until a toothpick inserted into the center of the loaf comes out clean or with a few moist crumbs, 40 to 50 minutes for a loaf or 1 to 1¼ hours for a tube pan. Let the cake rest in the pan for 5 minutes before inverting it onto a rack. Remove the pan, then turn the cake right side up. Let cool before slicing.
3. Frost or glaze if you like (see the suggestions in the headnote), then store at room temperature covered in plastic wrap for up to a week or freeze, unfrosted, for up to a month.
MOLASSES-SPICE CAKE Molasses gives the cake a pleasant bittersweet kick: Substitute molasses for the honey. Increase the spices to ½ teaspoon each.
DATE OR RAISIN CAKE The dried fruit is soaked and puréed, which creates an even deeper color and flavor: Soak 1 cup raisins or chopped dates in the coffee and honey until they soften a bit, then purée until smooth. Beat into the egg mixture in Step 2.
MAPLE-CRANBERRY-SPICE CAKE Very sweet, very autumnal: Substitute maple syrup for the honey. Add 1 cup dried cranberries to the batter. Or, if you prefer, use ½ cup dried cranberries and ½ cup chopped walnuts or pecans.
Applesauce Cake
Makes: 12 to 16 servings
Time: About 1 hour
Applesauce creates a gooey, fruity, comforting dessert that’s ideal for serving a crowd. It’s easy to swap in other puréed fruit and even vegetables, like beets or turnips, for the apples. Pair the cake with Caramel Sauce or let the cake steep in a Vanilla Cake Soak for an especially moist texture.
- 1½ sticks butter, softened, plus more for greasing
- 2½ cups flour, plus more for dusting
- 2 teaspoons baking powder
- ½ teaspoon salt
- ¾ cup sugar
- 4 eggs
- 1 cup unsweetened applesauce
- ½ cup whole milk
1. Preheat the oven to 350°F. Grease and flour a 13 × 9-inch rectangular pan with a little butter, then line thoroughly with parchment paper so that it overhangs on each side, and grease the parchment paper.
2. Combine the flour, baking powder, and salt in a large bowl. In a separate bowl, use an electric mixer to beat the butter and sugar until creamy. Add the eggs one at a time and beat until light and smooth. Beat in the applesauce. Mix in about a third of the flour mixture, followed by about half the milk; add another third of the flour, followed by the rest of the milk, then finally the last of the flour. Stir gently until the batter just evens out.
3. Turn the batter into the prepared pan and bake until the middle is set (your fingers should leave only a small indentation when you gently press the cake), 45 to 50 minutes. If you plan to serve within a few hours, you don’t need to turn it out of the pan. Just cut into squares and serve. If you plan to serve later, place a rack on top of the pan, pinch the sides of the pan and the rack so they stay together, and flip them over. Remove the pan, then remove the parchment paper from the cake. Store at room temperature, covered with plastic wrap, for up to 3 days.
BROWN SUGAR APPLESAUCE CAKE For a more intense caramel flavor: Substitute dark brown sugar for the granulated sugar.
BOOZY APPLESAUCE CAKE A sophisticated, ultra-moist cake infused with bourbon: When the cake is finished baking, let it cool in the pan for about 10 minutes. Make Boozy Cake Soak with bourbon. Leave the cake in the pan, or turn it out onto a large serving dish. Poke holes in the top of the cake with a fork, and pour the cake soak all over it; let it sit for at least an hour before serving.
PEAR-CARDAMOM CAKE A great way to use overripe pears: Substitute 1 cup pear purée (see page 572) for the applesauce. Whisk 2 teaspoons cardamom into the flour mixture.
Claudia Roden’s Middle Eastern Orange-Almond Cake
Makes: 8 to 10 servings
Time: About 3 hours, largely unattended
Try this unusual recipe once and you’ll keep returning to it; I have. It’s naturally gluten-free, with a mercifully short ingredient list and wonderfully tender results. Since you’re using the whole orange, you get citrusy sweetness and tang in equal measure. It needs nothing for garnish but goes well with all kinds of fresh fruit or unsweetened Whipped Cream. The batter comes together in a blender; the only time-consuming part is simmering the oranges, but that much is hands-off, and it’s the magic of this cake.
- 2 large oranges, preferably seedless
- Butter for greasing
- 6 eggs
- 2 cups almond flour, plus more for dusting
- 1 cup sugar
- 1 teaspoon baking powder
1. Wash the oranges and put them in a saucepan. Cover completely with water and simmer for about 2 hours, until they are very soft. Drain. If the oranges aren’t seedless, quarter them and remove the seeds.
2. Heat the oven to 400°F and liberally grease a 9-inch round cake pan or springform pan.
3. In a food processor or blender, purée the oranges with the eggs, almond flour, sugar, and baking powder; don’t worry too much about completely breaking down the skin, which will be neither tough nor bitter after baking.
4. Pour the batter into the prepared pan and bake for about 1 hour, until it’s set. Cool completely in the pan before removing.
CARDAMOM-ROSE CAKE Add 1 tablespoon rose water and ½ teaspoon cardamom to the batter. Garnish with finely chopped pistachios.
Blackberry Buckle
Makes: 8 to 10 servings
Time: About 1 hour, 15 minutes
Buckle is where cake meets pie. It’s a great way to highlight summer fruit in a cake without sacrificing the best part of pie: streusel topping. The cake will fall a bit while cooling, but don’t be alarmed. This is normal.
- 6 tablespoons (¾ stick) butter, softened, plus more for greasing
- 2 cups flour, plus more for dusting
- 2 teaspoons baking powder
- ½ teaspoon salt
- ½ teaspoon cinnamon (optional)
- ⅔ cup sugar
- 1 egg
- ½ cup whole milk
- 2½ cups fresh blackberries
- ½ recipe Streusel Topping
1. Heat the oven to 350°F. Grease and flour the bottom and sides of an 8- or 9-inch cake pan or springform cake pan, or a 13 × 9-inch sheet pan.
2. Whisk together the flour, baking powder, salt, and cinnamon if you’re using it in a medium bowl and set aside. In a large bowl, use an electric mixer to cream the butter and sugar until smooth. Add the egg and beat until light and fluffy.
3. Stir about half the flour mixture into the batter by hand, then add the milk, then the rest of the flour. Stir gently until combined. Fold in the blackberries.
4. Turn the batter into the prepared pan and sprinkle with the streusel topping. Bake until the cake is golden brown and a toothpick inserted into the center comes out clean or with a few moist crumbs, about 1 hour. Let cool for about 15 minutes, then turn the cake out onto a rack to finish cooling. You can also slice and serve the cake straight from the pan. Store at room temperature, covered with plastic wrap, for up to a few days.
CHERRY-VANILLA BUCKLE You can use sweet or sour cherries, as you prefer: Substitute pitted and chopped cherries for the blackberries. Stir 1 tablespoon vanilla extract into the batter after you add the eggs.
PEACH-GINGER BUCKLE Sweet and spicy: Substitute 3 to 4 chopped peaches for the blackberries and 1 teaspoon ground ginger for the cinnamon. Fold in ¼ cup chopped candied ginger with the peaches.
PLUM-THYME BUCKLE The delicate flavor of plums pairs well with the savory herb: Substitute 4 or 5 chopped plums for the blackberries. Toss 2 tablespoons chopped fresh thyme into the streusel topping.
BLUEBERRY-CARDAMOM BUCKLE Substitute blueberries for the blackberries and 2 teaspoons cardamom for the cinnamon.
Sticky Toffee Pudding
Makes: About 8 servings
Time: About 1 hour
In England, moist dense cakes like this are called puddings and are served up for winter holidays. Sticky toffee pudding is great fun to make, with lots of foaming; by the time it goes in the oven, it has the texture of fluffy lava. Gooey and drenched in a warm treacly sauce, its secret ingredient is dates; they give it substance. Serve it with Vanilla Ice Cream or Whipped Cream, and swap out the simple sauce for Bourbon Butterscotch Sauce if you like.
- 1 cup dates, pitted and chopped
- 12 tablespoons (1½ sticks) butter, plus more for greasing
- 1¼ cups flour, plus more for dusting
- 1¾ cups packed dark brown sugar
- 2 eggs
- 1 teaspoon vanilla extract
- 1 teaspoon baking soda
- ¼ teaspoon salt
- 1½ cups heavy cream
1. Bring some water to a boil. Put the dates in a bowl, then pour in 1 cup boiling water and set aside for 5 minutes or so. Heat the oven to 325°F. Grease and flour a 13 × 9-inch baking dish.
2. Put 4 tablespoons (½ stick) of the butter, ¾ cup of the brown sugar, the eggs, vanilla, flour, baking soda, and salt in a food processor. Pulse until just combined, then pulse in the dates along with their water until nearly smooth; some tiny chunks of dates are fine.
3. Pour the pudding into the prepared pan and bake until it’s puffed up and springs back when you touch it, 20 to 25 minutes. While it bakes, make the topping. Melt the remaining 1 stick butter in a saucepan over medium heat, then carefully add the remaining 1 cup brown sugar and the cream. Bring to a simmer, whisking until the mixture is smooth. Remove from the heat.
4. When the pudding is done, take it out of the oven and use a skewer, chopstick, or knife to poke holes all over. Pour half the sauce evenly over it and set aside to soak for 20 minutes or so; the sauce will sit on top of the cake and harden slightly into a thick layer. Cut into slices and serve warm or room temperature, topped with a big ladleful of the remaining sauce and a scoop of vanilla ice cream alongside. You can reheat leftover slices in a 300°F oven or in the microwave. Wrapped in plastic wrap, this will keep for up to a week in the refrigerator.
STICKY TOFFEE BANANA PUDDING Banana and toffee are perfect complements: Omit the soaked dates and boiling water. Instead, mash 2 or 3 bananas (the riper, the better) to make 1 cup and blend that into the mixture at the end of Step 2. If you like, stir 2 tablespoons dark rum into the sauce after removing from the heat.
CHOCOLATE STICKY TOFFEE PUDDING Decrease the flour to 1 cup and add ¼ cup cocoa powder. Chop 4 ounces dark chocolate and stir into the toffee sauce until all the pieces are melted.
INDIVIDUAL STICKY TOFFEE PUDDINGS Single servings are just as sticky but a little less messy: Butter or line a 12-cup muffin tin. Divide the pudding evenly among the cups and bake until just set, about 15 minutes.
STICKY TOFFEE PECAN CAKE This gooey cake could benefit from a bit of crunch: Fold ⅓ cup chopped toasted pecans into the batter just before baking. Right before serving, pour the remaining glaze on top of the cake and sprinkle with an additional ¼ cup chopped toasted pecans. Serve warm or at room temperature.
Cranberry-Walnut Torte
Makes: 10 to 12 servings
Time: About 1½ hours
A not-too-sweet dessert for grown-up tastes. Ground dried fruit and nuts replace flour and keep the cake moist and gluten-free. The key is to not rush the whipping, since all the structure comes from the egg whites and yolks. You can make this with any fruit-nut combination—see the examples that follow—but if you’re not a fan of dried fruit, simply swap it out for 1 cup whole wheat flour.
- Butter for greasing
- 2 cups dried cranberries
- 3 tablespoons fresh orange juice
- 2 cups walnut halves
- ¾ cup granulated sugar
- 1 tablespoon grated orange zest
- ½ teaspoon cinnamon
- ½ teaspoon cardamom
- ¼ teaspoon allspice
- 7 eggs, separated
- ½ teaspoon salt
- Confectioners’ sugar for dusting
1. Preheat the oven to 325°F. Grease a 9- or 10-inch springform pan with butter and line the bottom with parchment (see About Springforms on page 223). Combine the cranberries and orange juice in a bowl and let soak. Meanwhile, spread the walnuts on a baking sheet and toast in the oven until fragrant and golden brown, about 10 minutes, shaking the pan halfway through to mix up the nuts. Set aside and let cool.
2. Drain the cranberries, reserving any excess juice. Place the nuts, ¼ cup of the granulated sugar, and the cranberries in a food processor and pulse until all are finely chopped. Place the mixture in a medium bowl and stir in the orange zest and spices. Set aside.
3. In a large bowl, use an electric mixer to beat the egg yolks with another ¼ cup granulated sugar until light and fluffy, about 4 minutes; set aside. Wash and dry the beaters thoroughly. In another bowl, beat together the egg whites, salt, and reserved orange juice until foamy. Slowly add the last ¼ cup granulated sugar and beat until semistiff peaks form. Fold the egg whites into the egg yolks, then stir in the cranberry-walnut mixture until combined.
4. Turn the batter into the prepared pan and bake until a toothpick inserted into the center of the cake comes out clean or with a few moist crumbs, about 45 minutes to an hour. If the cake is getting too brown on top, tent it loosely with a piece of aluminum foil. Let the cake cool for 15 minutes before removing the ring and letting it finish cooling on a rack. To serve, dust with confectioners’ sugar. Store at room temperature, covered with wax paper, for up to few days; wrap tightly with plastic wrap and it will last a little longer.
RAISIN-PECAN TORTE Here’s what to do with that big box of raisins in your pantry: Substitute raisins for the cranberries and pecans for the walnuts. Swap out orange juice and zest for lemon juice and zest. Use nutmeg instead of cardamom.
APRICOT-ALMOND TORTE Substitute dried apricots for the cranberries and almonds for the walnuts. Swap out cardamom for nutmeg.
CHERRY-PISTACHIO TORTE Pistachios are a nutty contrast for sweet dried cherries: Substitute dried cherries for the cranberries and shelled pistachios for the walnuts. If you like, substitute cherry liqueur, like kirsch, for the orange juice.
WHOLE WHEAT THYME-PINE NUT TORTE A classic Italian torte, kicked up a notch with whole wheat and savory herbs: Omit the cranberries and substitute pine nuts for the walnuts. Add 1 cup whole wheat flour and 1 tablespoon chopped fresh thyme to the ground pine nut mixture. Omit the spices.
Pineapple Upside-Down Cake
Makes: At least 8 servings
Time: About 1 hour
It’s important to use sweet, ripe pineapple for this recipe to create a delicious, caramelized bottom crust when the cake bakes. When the cake is inverted, the top will be a little crunchy and ooze juicy pineapple—think of it as an American Tarte Tatin. To maximize the browning effect of the upside-down cake, use a skillet instead of a cake pan.
- 1 stick butter
- ½ cup packed brown sugar
- 6½-inch-thick slices peeled and cored fresh pineapple or as many as will fit in the pan
- 1 cup buttermilk
- 2 eggs
- ½ cup granulated sugar
- 2 cups flour
- 1 teaspoon baking soda
- ¼ teaspoon salt
1. Heat the oven to 350°F. Over low heat, gently melt 4 tablespoons (½ stick) butter in a 9- or 10-inch ovenproof skillet, then remove from the heat; or liberally grease a 9-inch round cake pan with 4 tablespoons (½ stick) of the butter. Sprinkle the brown sugar evenly over the bottom of the pan and arrange the pineapple slices in a single layer in the pan; set aside.
2. Melt the remaining 4 tablespoons (½ stick) butter and whisk with the buttermilk, eggs, and granulated sugar until foamy in a medium bowl. In a large bowl, whisk the flour, baking soda, and salt; gradually add the egg mixture to the flour mixture and stir until well incorporated.
3. Carefully spread the batter over the pineapple, using a spatula to make sure it’s evenly distributed. Bake until the top of the cake is golden brown and a toothpick inserted into the center comes out clean, 50 to 60 minutes. Let the cake cool in the pan for just 5 minutes.
4. Run a knife around the edge of the pan or skillet. Put a serving plate on top of the cake pan and flip so that the serving plate is on the bottom and the cake pan or skillet is on top. The cake should fall out onto the serving plate. If the cake sticks, turn it back right side up and run the knife along the edge again, then use a spatula to gently lift around the edge. Invert the cake again onto the plate and tap on the bottom of the pan. If any of the fruit sticks to the pan, don’t worry; simply use a knife to remove the pieces and fill in any gaps on the top of the cake. Serve warm with ice cream.
PLUM-ROSEMARY UPSIDE-DOWN CAKE The sweet and savory pairing is an unusual twist on the classic. For the pineapple, substitute 4 or 5 ripe, sweet plums, pitted and cut into slices or chunks, and sprinkle 1½ tablespoons finely chopped fresh rosemary leaves over the bottom of the greased cake pan with the brown sugar.
APPLE UPSIDE-DOWN CAKE Substitute 3 or 4 medium peeled, cored, and sliced apples for the pineapple. Add 1 teaspoon cinnamon to the flour mixture if you like.
BERRY UPSIDE-DOWN CAKE Use 3 to 4 cups fresh berries, like blackberries, blueberries, raspberries, or gooseberries, in place of the pineapple, enough to cover the bottom of the pan in a single even layer. If you use strawberries, quarter them first.
PEAR-ALMOND UPSIDE-DOWN CAKE Add a nutty crunch to the gooey cake; small Seckel pears look elegant, but full-size pears work too: Sprinkle ¼ cup chopped almonds over the bottom of the greased cake pan with the brown sugar. Substitute 3 or 4 small peeled, cored, and halved ripe pears for the pineapple and ground almonds for ½ cup of the flour. Mix 3 tablespoons almond paste in with the butter.
GINGERY PEACH UPSIDE-DOWN CAKE Sweet meets spicy: Substitute 3 or 4 medium pitted and sliced ripe peaches for the pineapple. Sprinkle finely chopped candied ginger over the bottom of the greased cake pan with the brown sugar. Whisk 1 teaspoon ground ginger into the flour mixture.
Sweet Rice and Coconut Cake (Bibingka)
Makes: 8 to 10 servings
Time: 1¼ hours
This easy, gluten-free Filipino cake is traditionally baked in a clay pot lined with a banana leaf and sold at Christmas markets. The banana leaf adds a subtle and unusual earthiness to the flavor and makes for a knockout presentation (you can find them frozen at Mexican grocers) but is certainly not necessary; the parchment paper version is delicious too.
- 4 tablespoons (½ stick) butter, melted, plus butter for greasing and brushing
- 1½ cups rice flour
- 2 teaspoons baking powder
- ¼ teaspoon salt
- ¾ cup packed light brown sugar
- 3 eggs
- 1½ cups coconut milk
- ¼ cup shredded unsweetened coconut
- Additional brown sugar or coconut for sprinkling
1. Heat the oven to 350°F. Line the bottom and sides of a 9-inch cake pan with banana leaves cut to fit the pan. If you can’t find banana leaves, use parchment paper.
2. Whisk together the flour, baking powder, and salt in a large bowl and set aside. In a medium bowl, whisk together the brown sugar, eggs, melted butter, and coconut milk until combined. Add the wet ingredients to the dry ingredients and mix until combined; stir in the shredded coconut.
3. Pour the batter into the prepared pan and bake until a toothpick inserted into the center of the cake comes out clean or with a few moist crumbs, about 1 hour. Let the cake cool in the pan for 5 minutes, then invert onto a rack to finish cooling. While the cake is still warm, paint it with melted butter and sprinkle additional sugar or shredded coconut on top. This is best eaten the day it’s made, but covered with plastic wrap, it will keep at room temperature for up to 3 days.
SWEET RICE AND COCONUT-LIME CAKE Lime is a classic complement for coconut: Add 1 tablespoon grated lime zest to the wet ingredients.
SWEET RICE AND COCONUT-SPICE CAKE Play around with your own blend of spices: Whisk 1 teaspoon cinnamon, ½ teaspoon ginger, and ¼ teaspoon nutmeg into the flour mixture.
INDIVIDUAL SWEET RICE AND COCONUT CAKES For a handheld treat and the rich flavor of toasted coconut: Line a muffin tin with foil liners. Fill each cup about two-thirds full with batter, then top with a tablespoon of shredded unsweetened coconut. Bake for 20 to 25 minutes; if the coconut gets too dark, tent the muffin tin loosely with aluminum foil.
Special-Occasion Cakes
These cakes are the stunners—impressive, exciting, festive, and perfect for any celebration or just expanding your repertoire. The best part: Though they ask more in terms of time and prep, they require no special expertise. In fact, most are made from simpler recipes from elsewhere in this book. The trick is to do what the professionals do and prepare what you can in advance (a day or two ahead is usually fine), then assemble the dessert closer to serving.
Recipes
Jelly-Roll Cake
Lady Baltimore Cake
Fruitcake
King Cake
Chocolate-Mocha Dacquoise
Baked Alaska
Mille Crêpe Cake
Hungarian Seven-Layer Dobos Torte
Jelly-Roll Cake
Makes: About 10 servings
Time: About 1¼ hour
A rolled cake always inspires awe. It seems tricky, but the cake is surprisingly malleable while warm. Any variation for Sponge Cake or Genoise will work here. Leave the outside garnished simply with confectioners’ sugar or frost it—and cover any mistakes—with Whipped Cream or the frosting of your choice. Tweak the flavor by switching up the filling (see suggestions below).
- Butter for greasing
- Flour for dusting
- Sponge Cake or Genoise
- Confectioners’ sugar, for dusting
- 1 cup Fruit Jam
- Whipped Cream
1. Make the cake batter. Heat the oven to 350°F. Grease and line the bottom of a jelly-roll pan with parchment paper, butter the paper, and dust lightly with flour. Pour the cake batter into the pan, even it out as much as possible, and bake until set, 15 to 20 minutes.
2. When the cake is done, dust it with confectioners’ sugar (see illustrations, page 242). Lay a clean kitchen towel over it and a large baking sheet or rack on top of the towel. Pinch the jelly-roll pan and the baking sheet together and invert them. Remove the jelly-roll pan and parchment paper.
3. Gently and slowly roll up both the cake and the towel lengthwise or widthwise as you like to form a log; set the cake aside, seam side down, to cool completely, wrapped in the towel. This will help prevent it from tearing when you reroll it with the filling inside.
4. Unroll the cooled cake, leaving it on the towel, and spread the jam evenly over it, then top with an equal quantity of whipped cream. Reroll the cake. Use the towel to place it seam side down on your serving plate (it’s okay if there are some minor tears). To serve, sprinkle with confectioners’ sugar or frost with more whipped cream. Cut slices with a serrated knife. Refrigerate, covered or wrapped in plastic wrap, for up to a few days.
BûCHE DE NOëL Bake Chocolate Sponge Cake (page 219) in a jelly-roll pan and roll it as directed. Fill with Chocolate Mousse or Chocolate Whipped Cream instead of jam and whipped cream. Reroll the cake and cut a 2- to 3-inch piece from one end (see illustrations, page 243). Coat the outside of the log and the separate piece with Chocolate Ganache, then place the separate piece atop the log like a tree stump. To garnish, sift cocoa powder and confectioners’ sugar over the whole thing.
CHAMP DE NOëL The easy way to make Bûche de Noël is to skip the log rolling and make the cake a field (champ in French) instead: Bake Chocolate Sponge Cake in a jelly-roll pan but don’t roll it. Cover the cooled cake in an even layer of Chocolate Ganache, then refrigerate for 30 minutes, or until the ganache is firm. Spread Chocolate Mousse or Chocolate Whipped Cream over the ganache in an even layer, then top with sifted cocoa powder and confectioners’ sugar. Serve straight out of the pan.
5 Other Combinations for Jelly Rolls
Jelly-roll cakes are made of three simple components: sponge cake, jam, and whipped cream. Mix and match to your heart’s content, and feel free to swap other fillings for the jam and other frostings for the whipped cream; these are some tried-and-true combinations. You can use the cream for both the inside and outside of the cake, depending on your preference.
CAKE: Chocolate Sponge Cake
JAM: Chocolate Ganache
CREAM: Coffee Whipped Cream or Not-Too-Sweet Coffee Buttercream
CAKE: Lemon Genoise
JAM: Strawberry Jam
CREAM: Whipped Cream combined with 1 cup Lemon Curd or Lemon Swiss Meringue Buttercream
CAKE: Orange Genoise
JAM: Orange Marmalade
CREAM: Maple Whipped Cream or Grand Marnier Whipped Cream or Maple Buttercream
CAKE: Brown Butter Genoise
JAM: Dulce de Leche
CREAM: Whipped Cream or Caramel Buttercream
CAKE: Chocolate Sponge Cake
JAM: Raspberry Jam
CREAM: Chocolate Whipped Cream or Chocolate Buttercream
Making a Jelly-Roll Cake
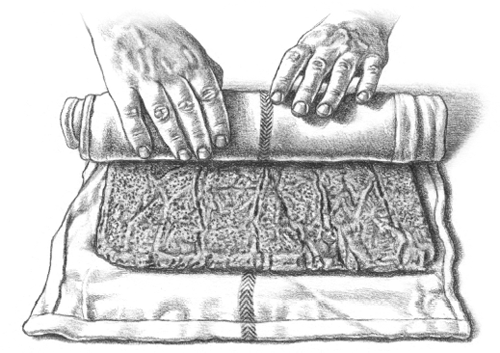
STEP 1
Roll the warm cake in a towel and let cool; this will help it keep its shape.
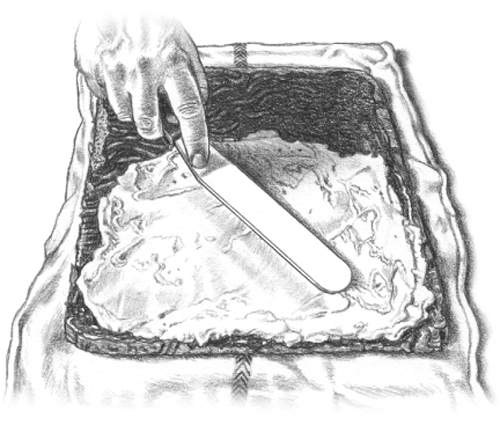
STEP 2
Unroll the cooled cake and spread it with filling.
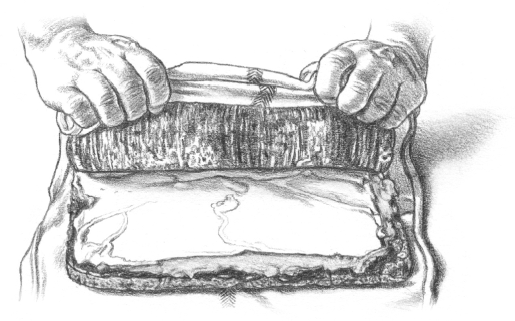
STEP 3
Reroll the cake without the towel.
Making a Bûche de Noël

STEP 1
Slice a short piece from one end of the rolled cake. Frost both pieces.
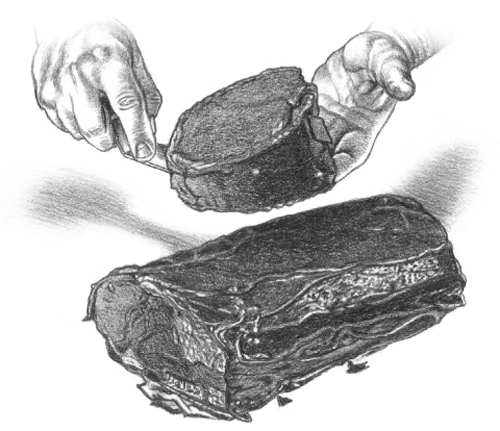
STEP 2
Set the smaller piece on top like a stump.

STEP 3
Cut a jelly-roll cake or bûche de Noël with a serrated knife for clean slices.
Lady Baltimore Cake
Makes: At least 10 servings
Time: About 1 hour
This white layer cake’s fruit and nut filling and soft, billowy Italian Meringue Frosting make it a thing of legend. And as happens with legends, the origin of this famous cake is widely disputed: Some enthusiasts trace it back to a café in Charleston, South Carolina, at the turn of the nineteenth century; others believe the recipe first appeared in a Pennsylvania newspaper around the same time. In any case, it’s a classic.
- For the cake:
- 1½ sticks butter, softened, plus more for greasing
- 2⅔ cups cake flour, plus more for dusting
- 1 tablespoon baking powder
- ½ teaspoon salt
- 1¼ cups sugar
- 1 tablespoon vanilla extract
- ¼ teaspoon almond extract
- 1¼ cups milk
- 6 egg whites
- For the filling:
- Italian Meringue Frosting
- ½ cup pecans, finely chopped
- ¼ cup fresh figs, finely chopped
- ¼ cup raisins, finely chopped
- 1 tablespoon grated lemon zest
1. Heat the oven to 350°F. Grease the bottom and sides of two 9-inch layer cake pans; cover the bottom with a circle of wax or parchment paper, butter the paper, and flour the pans.
2. Whisk together the flour, baking powder, and salt in a medium bowl and set aside. In a separate bowl, use an electric mixer to cream the butter until smooth, then gradually add 1 cup of the sugar. Beat until light in color and fluffy, 4 or 5 minutes, then add the vanilla and almond extracts. Add the flour mixture to the butter mixture by hand, a little at a time, alternating with the milk. Set aside.
3. Wash and dry the beaters thoroughly. In a medium bowl, beat the egg whites on low speed, gradually adding the last ¼ cup sugar. Beat this mixture on high speed until stiff peaks form, then fold a third of the egg whites into the batter until combined; stir in the remaining egg whites.
4. Divide the batter evenly between the pans and bake until a toothpick inserted into the center of the cakes comes out clean or with a few moist crumbs, about 25 minutes. Let the cakes cool in the pans for 5 minutes, then invert onto a rack to finish cooling. Wrap in plastic wrap and aluminum foil and freeze for up to a few months before frosting.
5. To make the filling, combine ½ cup of the Italian Meringue Frosting with the pecans, figs, raisins, and lemon zest. Put the first layer of cake, top side down, on a plate or cake stand. Spread the filling evenly over the cake, all the way to the edges. Use a knife if you don’t have a frosting spreader or long spatula; it’s okay if it’s a little messy. Put the other layer on top, flat side down. Use the remaining Italian Meringue Frosting to cover the sides and top of the cake, scooping up any extra to add to the top. Smooth if you like, or wiggle your hand a little bit to make little peaks and swirls.
LORD BALTIMORE CAKE To use up your leftover yolks: Substitute 6 egg yolks for the egg whites and beat them with ¼ cup sugar until light and fluffy. Add them to the creamed butter-sugar mixture with the vanilla. For the filling, swap the pecans, figs, and raisins for ¼ cup each of crushed cookies (Macarons, if you have them), finely chopped blanched almonds, and chopped candied cherries.
LADY BALTIMORE CUPCAKES Fill a cupcake pan with liners. Spoon a tablespoon of the filling into each cup and top with the cake batter until the cup is about two-thirds full. Bake for 15 to 20 minutes and let cool before frosting.
CHERRY-WALNUT LADY BALTIMORE CAKE For the filling, substitute finely chopped candied cherries for the raisins and finely chopped walnuts for the pecans.
Fruitcake
Makes: About 8 servings
Time: About 2 weeks total
People love to hate fruitcake, but that’s only because they haven’t had a good one—dense and moist with a deep, spicy flavor that’s perfectly balanced with tart, booze-soaked fruit. There’s no denying that the process is a commitment, but the cake lasts for months, making it a good candidate for making ahead or sending as a gift. (You can always make Fruitcake Bars, for a fun shortcut, or see the first variation on page 246.)
Quality dried fruit makes the difference between a great cake and a mediocre one, and whatever you don’t use will keep forever in the fridge.
- 4 cups coarsely chopped mixed dried fruit (cherries, citron, pineapple, apricots, raisins, dates, apples, etc.)
- ¼ cup candied ginger
- 1 tablespoon grated lemon zest
- 1 tablespoon grated orange zest
- 1 cup dark rum
- 1 cup orange liqueur (like Grand Marnier) or fresh orange juice
- 1 stick butter, plus more for greasing
- 1½ cups flour
- ¼ teaspoon ground cloves
- ¼ teaspoon allspice
- ½ teaspoon nutmeg
- 1 teaspoon cinnamon
- 1 teaspoon ginger
- ½ teaspoon salt
- 1 teaspoon baking powder
- ½ teaspoon baking soda
- 1 cup packed light brown sugar
- 2 eggs
- ½ cup chopped toasted pecans
1. Combine the dried fruit, candied ginger, citrus zests, ½ cup of the rum, and ½ cup of the orange liqueur and refrigerate for a week to allow the flavors to develop.
2. Heat the oven to 325°F and grease a 9 × 5-inch loaf pan with butter. Whisk together the flour, spices, salt, baking powder, and baking soda in a medium bowl. In a large bowl, use an electric mixer to cream the butter and brown sugar until smooth. Add the eggs one at a time, beating until light and fluffy.
3. Fold the flour mixture into the butter mixture by hand until just combined; the batter will be stiff and dry. Stir in the soaked dried fruit (juices and all) and the pecans. Turn the batter into the prepared pan and bake until a toothpick inserted into the center of the cake comes out clean, about 1¼ hours. Combine the remaining ½ cup rum and ½ cup orange liqueur in a jar with a lid. Remove the cake from the oven and baste it with 1 tablespoon of the alcohol mixture. Allow the cake to cool completely before turning it out of the pan.
4. Seal the cake in an airtight container. Every day, baste the cake with an additional couple of tablespoons of the alcohol mixture. Continue this for a week to develop the flavor of the cake. When it’s done, wrap it tightly in plastic wrap and store it at room temperature for up to a month or for several months in the fridge.
INSTANT FRUITCAKE Less time and effort but still good: Place the fruit, candied ginger, zests, ½ cup rum, and ½ cup orange liqueur in a large saucepan over medium-high heat. Bring to a boil, then reduce the heat and simmer the mixture for 5 minutes. Let cool. Drain the fruit from the liquid and stir it into the batter as directed with ¼ cup of the reserved juices. Skip the week-long basting step, but be aware that this cake keeps for just a week or so.
PANFORTE A nut-heavy and eggless Tuscan take on fruitGrease a 9-inch springform pan with butter and line with parchment paper. Omit the dried fruit, alcohols, eggs, and pecans. Add 3 cups chopped almonds or hazelnuts and 1 cup chopped candied lemon or orange peels. Reduce the flour to 1 cup and combine it with ½ cup cocoa powder, the spices, nuts, candied citrus, salt, baking powder, and baking soda. Melt 4 ounces dark chocolate and add it to the flour mixture. Substitute granulated sugar for the light brown sugar; combine it with ⅔ cup honey in a saucepan and bring it to a boil over medium heat. Cook until it reaches about 245°F on a candy thermometer. Pour the honey syrup over the flour mixture and stir to combine. Pour the batter into the prepared pan and bake for 40 to 45 minutes.
DUNDEE CAKE A Scottish fruitcake with cherries and almonds: Grease a deep 8- or 9-inch round cake pan or springform pan with butter and line with parchment paper. Omit the alcohols and reduce the dried fruit to 3 cups. Combine the dried fruit with 1 cup candied cherries. Substitute ground almonds for 1 cup of the flour and 1 cup blanched almonds for the pecans. Pour boiling water over the blanched almonds just to cover and let sit for 10 minutes. Drain and set aside to dry. Prepare the batter as directed; fold in the dried fruit and candied cherries with 2 tablespoons milk. Arrange ⅓ cup whole blanched almonds on top of the cake batter in concentric circles and bake for 1 to 1½ hours. If the almonds get dark while in the oven, loosely tent the cake with aluminum foil while it finishes baking. When the cake is finished baking, brush it with 1 tablespoon milk combined with 2 tablespoons superfine sugar; return it to the oven to bake uncovered for a few more minutes. Cool the cake completely in the pan, then wrap it tightly with plastic wrap and let sit for at least 2 days before serving.
Favorite Cake Combos, Just Mix and Match
You can make original, impressive, restaurant-quality desserts by just combining several smaller components. Start with great cake and the rest is just simple addition; cherry-pick from each category to make your perfect dessert. You’ll want to choose either a frosting or a glaze, not both. For extra brownie points, serve with a scoop of homemade ice cream:
CAKE
Chocolate Cake
Chocolate-Sour Cream Pound Cake
Yellow Cake or White Cake
Sponge Cake or Genoise Cake
Classic Pound Cake
Olive Oil Cake
Pumpkin Spice Cake
FILLING
Chocolate Ganache
Citrus Buttercream
Lime Curd
Fruit Jam
Cream Cheese Caramel Frosting
FROSTING
Chocolate Swiss Meringue Buttercream
Not-Too-Sweet Coffee Buttercream
Swiss Meringue Buttercream
Vegan Whipped Cream
Maple Buttercream
Whipped mascarpone
Ginger Buttercream
GLAZE
Orange Butter Sauce
Mocha Glaze
Apricot-Vanilla Jam Glaze
Coconut Glaze
Boozy Cake Soak
Balsamic Syrup
Brandy-Spice Hard Sauce
King Cake
Makes: 10 to 12 servings
Time: About 3½ hours
There’s no Mardi Gras without king cake. The yeasted cake is traditionally garnished with flamboyant green, purple, and gold sugar, and a plastic baby is hidden within the dough. Legend has it that whoever finds it is blessed with good luck (and has to buy the next year’s king cake for the group). If the dough doesn’t lose its stickiness as you knead it, add another tablespoon or so of flour.
- 2 tablespoons instant yeast
- ½ cup sugar
- 4 cups flour, plus more for as needed
- 1 teaspoon cinnamon
- ½ teaspoon nutmeg
- 2 teaspoons grated lemon zest
- 1 teaspoon salt
- 1 stick butter, melted, plus more for greasing
- 5 egg yolks, room temperature
- ½ cup warm milk
- Vanilla Glaze
- Purple, green, and gold sugars, for decorating
1. Combine the yeast, 1 tablespoon of the sugar, and ½ cup warm water (about 110°F) in a small bowl.
2. In the bowl of a stand mixer, whisk together the flour, spices, lemon zest, and salt. Add the butter, egg yolks, warm milk, and yeast mixture and mix until smooth. Switch to a dough hook and knead until the dough is smooth and elastic, about 6 minutes, adding more flour at a time if the dough is still sticky. (Alternatively, use an electric mixer to mix the ingredients, then knead by hand.)
3. Use more butter to grease a bowl and put the dough inside, turning it to coat with butter. Cover the bowl loosely with plastic wrap or a clean kitchen towel and put it in a warm place to rise for about 1½ hours, until it’s doubled in size.
4. Heat the oven to 375°F and grease a baking sheet. Turn the dough out onto a lightly floured surface, punch it down, and divide it into 3 equal pieces. Roll each piece into a rope about 16 inches long. Braid the ropes together, then form the braided loaf into a circle (see illustrations). Pinch the ends to seal the circle, then lay the dough onto the prepared baking sheet. Place a heatproof empty can in the middle of the dough circle to keep its shape. Cover and let rise for another 30 minutes, or until doubled in size.
5. Bake the cake until it’s golden brown, 20 to 30 minutes. Allow to cool completely before glazing. While the glaze is still wet, dust the cake with the sugars for Mardi Gras. If you’d like, stick a plastic baby, hard bean, or pecan half into the cake from the bottom.
6. This is best eaten fresh on the day it’s made. Store the cake, tightly wrapped, at room temperature for up to 2 days.
Shaping King Cake
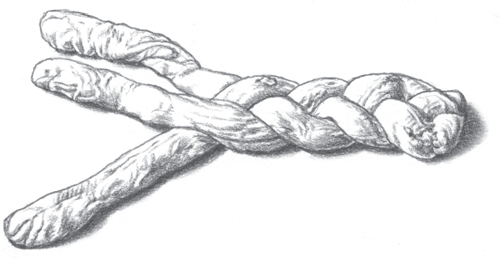
STEP 1
Shape the dough into three long ropes and then braid them together.
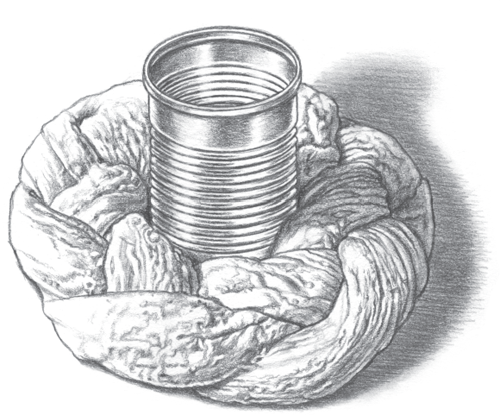
STEP 2
Form the braid into a circle, set a can in the middle, and let the dough rise.
Chocolate-Mocha Dacquoise
Makes: About 8 servings
Time: 17 hours, largely unattended
A French classic where meringue disks sub for cake layers. Here they’re sandwiched between buttercream and ganache, yielding a cake that’s both airy and intensely rich. Make this when you want an elegant finish to a meal. The process is involved but amounts to constructing a sophisticated icebox cake.
You can make the meringues in advance and refrigerate them in an airtight container for up to a week. Feel free to switch the flavor of the meringue or frosting, infuse the ganache, or use Caramel Sauce or Fruit Jam in place of the ganache.
- 4 recipes Chocolate or Nut Meringue
- Not-Too-Sweet Coffee Buttercream
- Chocolate Ganache
- Confectioners’ sugar or cocoa powder (optional)
1. Line 2 baking sheets with parchment paper. On each sheet of parchment, trace a 12-inch circle with a pencil or marker, then place the parchment tracing side down on the baking sheet.
2. Heat the oven to 250°F. Make 2 batches of meringue, then transfer it to a large pastry bag fitted with a large round tip or a large zipper bag with the corner snipped off. Pipe the meringue onto the parchment paper, tracing the outside of the marked circle and moving inward in a spiral to form solid disks. Bake the meringues for about 2 hours, rotating their positions hourly, then turn off the oven. Keep the meringues in the oven to cool for at least 4 hours or overnight.
3. Refrigerate the meringues in an airtight container in the refrigerator and repeat Steps 1 and 2 to make the second two batches of meringues.
4. To assemble the dacquoise, place one of the meringues on a serving platter and spread an even layer of the buttercream on top of it. Repeat for the second and third meringues, then place the last one on top and frost the whole thing with the ganache. Refrigerate the cake for at least 4 hours before serving. Dust with confectioners’ sugar or cocoa if you like. Store covered in plastic wrap in the refrigerator for up to a week.
Using Meringue in Cakes
In addition to being the best way to use up lots of egg whites, Meringue is one of the most versatile batters in baking, whether you’re turning it into cookies, a billowy topping for pie, or Pavlova. In Dacquoise, it takes the place of cake, piled high with layers of frosting and topped with ganache. The texture is unbeatable, and it begs the question: Why don’t we do this more often?
Do this with as little as one egg white’s worth of batter: Bake the disk (or disks) according to the dacquoise directions. Use right away or wrap tightly with a few layers of plastic wrap, place in an airtight container, and freeze for up to a few months. (Don’t worry if it gets a little soft; this is one use where you want the meringue to soften a bit to meld with the other cake components.) Add to your next layer cake for a new twist.
LEMONY DACQUOISE Light, airy, and luscious: Use Vanilla Meringue and Lemon Swiss Meringue Buttercream; top with a layer of Lemon Curd instead of ganache, leaving the sides bare.
MAPLE-PECAN DACQUOISE Nuts add great texture and depth to the meringue flavor: Use Nut Meringue made with pecans (page 175) and Maple Buttercream for the coffee buttercream. Garnish the assembled cake with whole pecans if you like.
MATCHA DACQUOISE Make Vanilla Meringue and add 1 tablespoon matcha (green tea powder) with the sugar. For the filling, make Vanilla Buttercream, mixing 2 teaspoons matcha powder into the confectioners’ sugar before proceeding. Top with Chocolate Ganache.
Baked Alaska
Makes: 10 to 12 servings
Time: About 4 hours
Baked Alaska was invented at Delmonico’s Restaurant in 1867 to celebrate the United States’ acquisition of Alaska. Cake is stacked with ice cream and meringue, then quickly blasted in the oven so that the meringue gets toasted while the ice cream inside stays miraculously cold. It’s a novelty dessert you rarely see anymore, but it still impresses.
Of course, there are as many possibilities for this as there are flavors of ice cream, so use your favorite (or layer several) and pick any variation of Genoise or Sponge Cake to complement it.
- ½ recipe Genoise
- 3 pints Strawberry Ice Cream, slightly softened
- Vanilla Meringue
1. Bake the genoise cake batter in one greased and floured 9-inch cake pan as directed.
2. To make the filling, line a 1½-quart bowl (about 8 inches in diameter) with enough plastic wrap to hang over the rim by several inches. Turn the ice cream out into the bowl, press it into the bottom, and smooth it so that the top is even. Freeze the ice cream until solid, about 4 hours.
3. Meanwhile, make the meringue, but don’t bake it. Transfer the meringue to a large piping bag fitted with a star tip.
4. Heat the oven to 450°F. Place the cake on a parchment-lined baking sheet, then turn the frozen ice cream out onto the cake, removing the plastic wrap. Cover the cake and ice cream entirely in meringue by first piping the meringue in a circle around the edge of the cake, up to where it meets the ice cream. Then pipe the meringue from the top of the ice cream down the sides in a series of vertical stripes, rotating the cake as you go to cover it all the way around. Work quickly so the ice cream does not melt.
5. Bake the cake until the meringue turns a deep golden brown, about 5 minutes (you may also achieve this by using a kitchen blowtorch). Use a couple of sturdy metal spatulas to transfer the cake to a serving plate. Serve immediately or put the cake into the freezer until you’re ready to serve.
BAKED ALASKA WITH SORBET Sorbet is a bit lighter and less creamy than ice cream, but it still pairs well with the cake and meringue: Use Lemon Genoise as the base and substitute any flavor sorbet of your choice for the ice cream.
Mille Crêpe Cake
Makes: At least 10 servings
Time: About 2 hours
There might not be a cake as beautiful as this one: a towering presentation of dozens of crêpes layered with pastry cream. Both components can be made in advance, so this comes together quickly at the last minute, and you can easily adapt the filling to your tastes—see the list below for some leads.
- Crêpes
- Vanilla Pastry Cream
- Butter for the pan
- Granulated or confectioners’ sugar, for dusting
1. Cook the crêpes as instructed, placing them on a parchment-lined baking sheet to cool completely before assembling the cake. If you make them more than a few hours in advance of serving, store the cooled crêpes tightly wrapped in the fridge.
2. Make the pastry cream up to 2 days in advance and refrigerate.
3. To assemble the cake, bring the crêpes and pastry cream to room temperature. Place the first crêpe on a serving platter. Use a spatula to spread a thin layer of pastry cream over it, then cover with another crêpe. Repeat this process, saving your best-looking crêpe for the top layer. Chill the cake for at least a few hours or overnight.
4. Let the cake come to room temperature, about 30 minutes, before serving. If you have a kitchen blowtorch, sprinkle the cake with a couple tablespoons of granulated sugar and torch to caramelize. Otherwise, dust the cake with confectioners’ sugar. Slice and serve immediately. Store refrigerated, covered in wax paper, for up to a week.
7 More Ways to Vary Mille Crêpe Cake
- Flavor the pastry cream. I like to fold in a couple teaspoons of citrus zest or a few pinches of spices like cinnamon, ginger, or nutmeg. Or swap out the Vanilla Pastry Cream for one of its variations, like chocolate, coffee, or almond (pages 578).
- For a very rich cake, spread each layer with Chocolate-Hazelnut Spread, Chocolate Ganache, Caramel Sauce or Dulce de Leche.
- Use Lemon Curd in place of the pastry cream for something tangier.
- Whipped Cream and scattered fresh berries are light and fresh.
- Flavor the crêpe batter. Use any of the great flavor variations for the classic crêpe recipe; my favorite way is to brown the butter for the batter.
- Sprinkle something extra between the crêpe layers like finely chopped nuts or dark chocolate, shredded unsweetened coconut, or grated citrus zest.
- Drizzle the cake with something sweet. Garnish each slice of cake with Honey Cake Soak, Bourbon Butterscotch Sauce, or your favorite glaze before serving.
What About Wedding Cake?
There are lots of reasons to make your own wedding cake: sentimental, economic, or just because you think you can make something tastier than a large bakery. But to say it’s a project is an understatement. If you’re up for the challenge of a traditional tiered wedding cake, you’ll want to look elsewhere for guidance, but here are a few alternatives—all are festive, impressive, and unique. No one will miss the towering cake.
TIERED STANDS
Practical and attractive ways to present smaller treats like cupcakes (page 205), tartlets, or miniature pies (page 293), and petits fours (page 216). Plus, you can fit a small layer cake on the top tier.
FRENCH MACARONS
Like truffles, these are ideal if you just want a little something sweet; also like truffles, there are so many ways to vary them. Attach them to a foam tower with toothpicks or stack them in a pyramid, using Chocolate Ganache to hold them in place.
SUNDAES
This is fun and memorable: Make a slew of flavors of ice cream, your favorite sauces (pages 572), and any extra toppings like Toffee (page 352) or Chocolate Wafer Cookies. Set everything out in bowls and have your guests go to town.
CROQUEMBOUCHE
The traditional wedding confection in France.
PANNA COTTA, CHOCOLATE MOUSSE, TIRAMISU, OR POTS DE CRÉME
Served in individual ramekins—they’re easy to make ahead and require no additional servingware.
PIES
A pie table featuring multiple flavors of fruit and custard pies (pages 266-297) will be beloved by everyone and looks wonderful. And they are easy to transport.
CHOCOLATE TRUFFLES
A rich but not-too-sweet dessert, and endlessly adaptable so you can make as many flavors as you like. For something like this, use the best chocolate you can find. Serve in any beautiful serving dish or use toothpicks to attach them to a tall, conical foam tower.
DOUGHNUTS
For a casual, unique dessert, stack them in a pyramid on a large platter and let guests grab their own.
PUFF PASTRY DESSERTS
Buttery, from-scratch Puff Pastry is its own cause for celebration. Berry Jalousie and Galette des Rois are impressive cakes that serve many, while Puff Pastry Cups (page 477) and Napoleon make elegant individual servings. If you’re feeling ambitious, try the Gateau St. Honoré: a towering confection of puff pastry, Cream Puffs, and caramel that’s as visually stunning as any traditional wedding cake, and serve additional cream puffs or éclairs alongside.
Hungarian Seven-Layer Dobos Torte
Makes: 12 servings
Time: About 4 hours
There’s a lot of bang for your buck here: two simple components, fun assembly, great-looking slices, and delicious results. A real winner.
- Chocolate Ganache
- Butter, for greasing
- 8 eggs, separated
- 3 cups confectioners’ sugar, plus more for dusting
- 2 teaspoons vanilla extract
- 2 teaspoons grated orange zest
- ¼ teaspoon salt
- 2 egg yolks
- 2 tablespoons milk
- ¾ cup flour
1. Prepare the ganache in advance. Heat the oven to 350°F, with the racks in the lower and middle positions. Grease 2 jelly-roll pans, line them with parchment paper, and butter the parchment. If you don’t have 2 jelly-roll pans, you’ll have to bake in batches.
2. Use an electric mixer to beat the egg whites with 1½ cups of the confectioners’ sugar, the vanilla, orange zest, and salt. Beat until the whites form stiff peaks, about 4 minutes. In a clean bowl, beat the 10 yolks, remaining 1½ cups confectioners’ sugar, the milk, and the flour on medium speed until smooth. Fold the egg whites into the yolk mixture in 3 parts until combined.
3. Divide the batter evenly between the prepared pans, spread into neat rectangles, and bake until the cakes are light golden brown, 10 to 15 minutes. Cool the cakes completely, then turn the cakes out onto a clean work surface dusted with confectioners’ sugar. Peel off the bottom sheets of parchment paper.
4. Trim the cakes to square off the corners, then cut each cake layer crosswise into four equal strips. Line a flat serving plate with a layer of parchment and place the first layer on top. Spread with an even layer of chocolate ganache, a bit less thick than the cake itself (see illustrations below). Start by placing tablespoons of ganache down the center of the cake slice and spreading outward, leaving about a ½-inch border since the ganache will spread slightly when the layers are added. Top it with a second layer of cake and repeat until you’ve topped the cake with its seventh layer; save the eighth layer for snacking, or make it an 8-layer cake.
5. At this point, use a serrated knife to trim as necessary to even out the edges and sides and tidy up your cake into a uniform brick. Frost the top and sides of the cake with the remaining chocolate ganache. Refrigerate the cake for at least 2 hours or overnight. Store refrigerated, covered with plastic wrap, for up to a week.
Assembling Dobos Torte
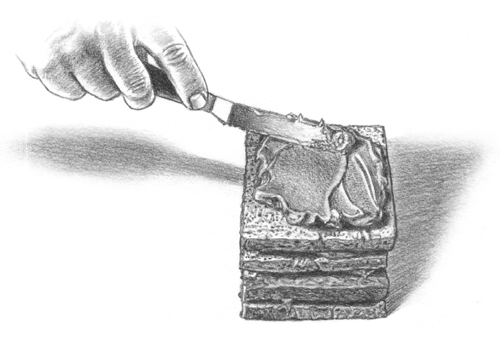
STEP 1
Spread ganache over the first cake layer, then continue to stack and frost the layers.
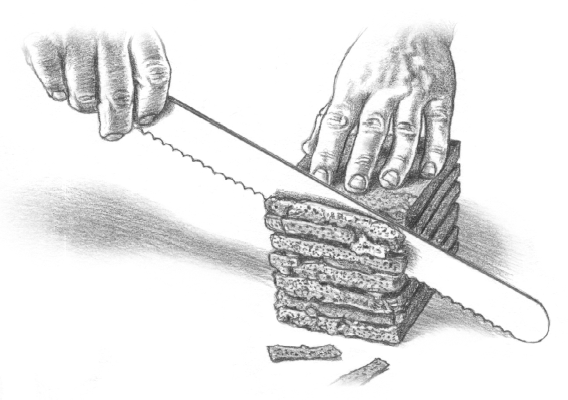
STEP 2
Trim the sides to even them out.
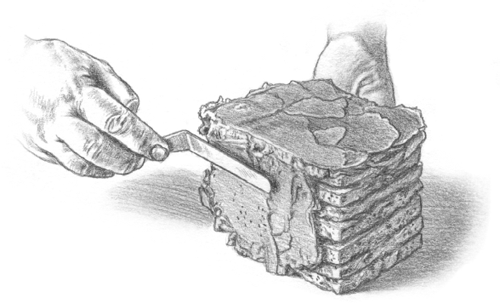
STEP 3
Frost the cake with the remaining ganache.
FANCY HUNGARIAN SEVEN-LAYER DOBOS TORTE This is a seriously impressive way to make a Dobos Torte: Make a half batch of Caramelized Sugar. Spread the extra layer of cake with a thick layer of the caramel. Let the caramel set until it is semihard, then use a cookie cutter or a knife to cut the caramel and the cake layer underneath into shapes. Set aside to harden and assemble the rest of the cake as directed. Once the cake is assembled, decorate the top with the caramel shapes.
TRIPLE CARAMEL SEVEN-LAYER DOBOS TORTE Triple the indulgence; you can also pick and choose which substitutions to make: Beat the egg yolks with 1 cup dark brown sugar instead of the remaining confectioners’ sugar and substitute Caramel Buttercream for the chocolate ganache. Drizzle Caramel Sauce over the entire cake, or over each slice before serving.