The Complete Chess Course From Beginning To Winning Chess! (2016)
Book Six
How to Fight Back
Chapter Five
How to Fight Back: Practical Examples
It’s one thing to know how to fight back, it’s another thing to be able to do it yourself in you own games!
So, for the balance of this book let’s look at complete games. We’ll see how mistakes are made early in the play. We’ll observe how these mistakes lead to mounting difficulties. We’ll watch the critical position arrive, and we’ll be able to judge whether or not the player who is under pressure is able to solve his problem successfully.
After studying these models of complete games, you’ll be able to counterattack a great deal more competently in your own games.
Faulty Defense
First, let’s see what happens when a player gets himself into a lot of trouble and can’t get out of it. If this player hits back, it’s with nothing stronger than cream puffs.
Irregular Opening
White - Black
1.e4 e6 2.d4 g6?
With the game barely started, Black has committed a mistake which should lose the game for him.
Why this move is wrong can best be understood if we ask this question: What is Black’s best second move?
The right way was 2…d5!. In that case Black fights for control of the center squares. By disputing control of the center squares, he struggles to get just as good a foothold in the center for his pieces as White has for his pieces.
So, by playing 2…g6?, Black has ignored the fight for control of the center. His pieces will therefore lack mobility; they will have little scope; they will be forced into a crowded, defensive formation.
As the play unfolds, you will see how the violation of these guiding principles causes Black’s game to fall apart.
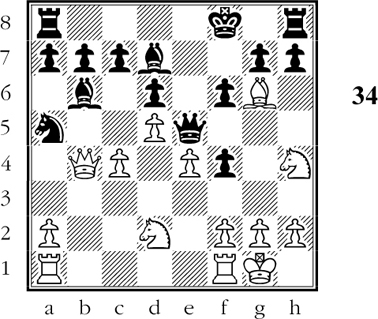
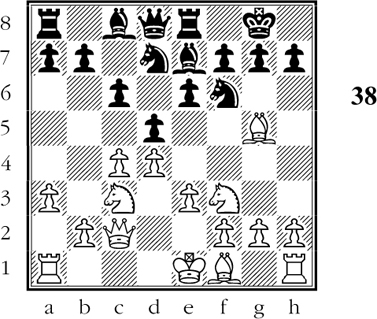
3.Bd3 Bg7 4.Be3 Ne7 5.Ne2 b6 6.Nd2 Bb7 (D)
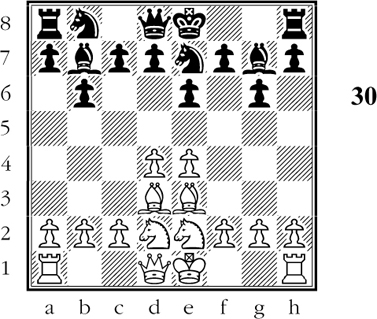
White to move
Black’s pieces have a cramped position with no prospects of active play.
The game is proceeding according to our diagnosis. Black’s position is very cramped, and he has no positive plan available. Even at this early stage he has nothing to look forward to but pure defense; not a very heartening prospect.
But White, as you will see, has a much freer game and a choice of possible initiatives.
7.0-0 d5
This comes late in the day. White responds with an aggressive advance.
8.e5 0-0 9.f4 f5
The right strategy for Black. Since his mobility is limited, he plays to barricade the position. Then, when White tries to attack, he may not be able to get through the barriers Black has set up.
This is a plausible defensive notion. Unfortunately, the weight of experience is against it. In chess, it’s generally true that where there’s a will, there’s a way. White has more mobility; he has the initiative; he has the future. If he proceeds aggressively, he can break through.
Even against a solid defense? Yes, even then. For in a defensive position where the defender’s pieces are crowded together - as they are here - his pieces aren’t worth very much. Consequently, a sacrifice of material on the attacker’s part involves no great risk.
The defender’s trouble, you see, is that he cannot rally his cramped and ineffectual pieces very rapidly to the scene of action. Consequently, his king’s position is likely to be overrun while his useless pieces straggle idly, far from the scene of battle.
10.h3 Nd7 11.Kh2 c5 12.c3 c4 13.Bc2 a6
Black is dallying with a slight attempt at counterplay. He wants to advance his b-pawn and a-pawn and force open a file on the queenside by a pawn exchange. (for example, …b5, …a5, …b4, and …bxc3.)
He hopes in this way to distract White’s attention from the kingside. But of course this is a futile hope, for White’s corresponding advance on the kingside is intended to smoke out the black king.
So here you have a valuable maxim of defensive play: don’t expect to entice your opponent from maximum goals by tempting him with low-grade bait.
14.Nf3 h6?
And this move gives aid and comfort to the enemy. By moving another pawn on the kingside, Black weakens his castled position. With his last move, he has undermined the support of his g-pawn. This will eventually make possible White’s winning sacrifice against the weakened point.
Another objection to Black’s last move is that it is inconsistent. Since he has announced his intention of counterattacking on the queenside, he should have played 14…b5. Instead, Black vacillates. He doesn’t know what he’s doing; he doesn’t know what he ought to do. In his ignorance, he is pulling down the pillars of his own defensive structure.
15.g4! Kh7 16.Rg1!
White, on the other hand, is well aware of what his position calls for. He is prepared to open up a file on the kingside, and he has placed heavy artillery on the file that he intends to open - the g-file.
16…Rg8 17.Qe1 Nc6?
Granting that Black’s position should be lost in any event, he makes it too easy for his opponent. You’ve already seen from the note to his 14th move that his g-pawn has been weakened. In its present state it is no longer guarded by a pawn. Therefore it must be guarded by pieces.
Consequently Black’s knight at e7 was doing a useful job guarding his g-pawn. But now Black has moved the knight away, so that his weak pawn has lost one of its main supports.
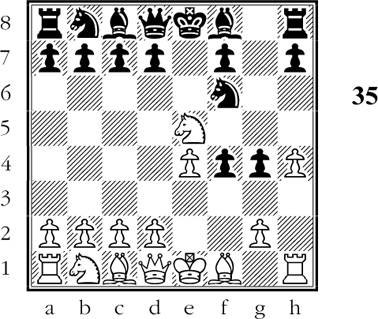
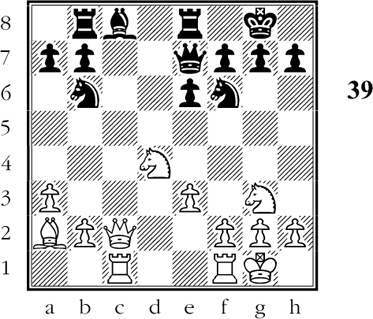
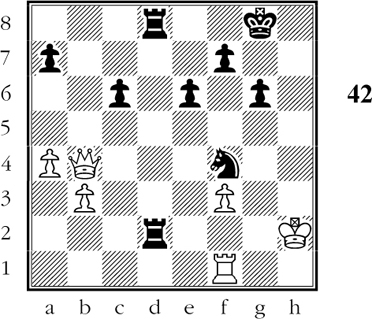
18.Nh4! Qf8?
Wrong. White’s last move menaces the weak g-pawn, which needs more protection. Thus 18…Nf8 was indicated. (D)
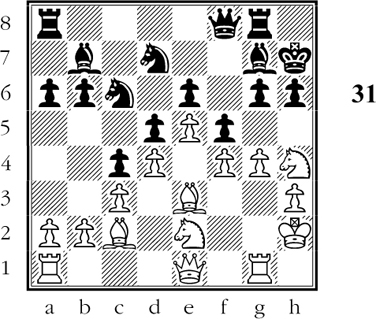
White to move
Black has weakened his position irretrievably and he will now succumb to a crushing attack.
Black has created a weakness (the unprotected g-pawn) in his position. He has removed a piece that guarded the pawn, and he has neglected to bring additional support to the pawn.
Now he pays the penalty for his faulty defense as White breaks through with a sacrifice:
19.Nxg6!!
Black cannot very well decline the knight. If for example 19…Qf7 20.gxf5 exf5 21.Nh4 Ne7 22.Nxf5! Nxf5 23.Ng3. In that case White wins the pinned knight, remaining with a material advantage and a crushing attack against the black king.
19…Kxg6 20.gxf5++
Now White smashes through by opening up the g-file. (He prepared for this with his 11th, 15th, and 16th moves.)
Black has little choice here, for if he tries 20…Kh7 then 21.fxe6+ shatters his position.
20…Kf7 21.fxe6+ Kxe6 22.f5+ Ke7 23.Qh4+ Ke8
Black’s king is being driven around brutally. Black is still ahead materially with a piece for two pawns. However, this means little in a situation where White’s forces are all-powerful, whereas Black’s pieces are cramped, crowded, and ineffectual. (Re-read the note to Black’s ninth move, in which the likelihood of such a situation was prophesied.)
24.f6
White’s onrushing pawns have irresistible dynamic power.
Thus, if Black tries 24…Bh8 White simply continues with 25.Rxg8 Qxg8 26.Rg1 Qf8 27.Bxh6. In that case, White has a third pawn for the sacrificed piece, and his attack rolls right on.
24…Bxf6
Black gives back the piece in order to break the force of the advancing pawn rush. However, this fails to improve Black’s position appreciably, as his king remains exposed to attack by White’s splendidly posted pieces.
25.exf6 Rxg1 26.Rxg1 Nxf6
Black’s return of the extra piece hasn’t pacified White. The black king still finds himself in the crossfire of the white pieces.
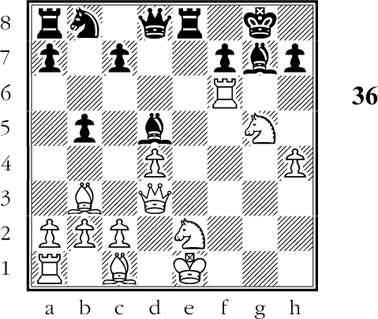
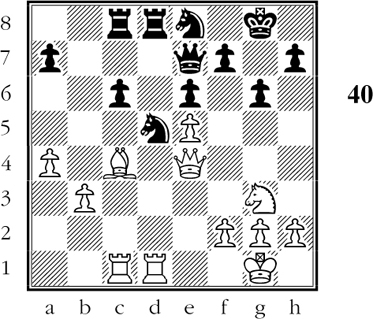
27.Bg6+ Kd7 28.Bf5+ Ke8 29.Bxh6 Qh8 30.Rg7 Ng8 (D)
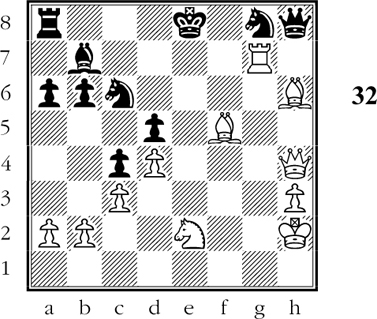
White to move
As a result of his faulty development and faulty defense, Black now succumbs to a forced checkmate.
Black has come to the end of the road. White now announces mate in three moves by 31.Bg6+ Kf8 32.Qf4+ Nf6 33.Qxf6#. Note the concentration of four white pieces - queen, rook, and two bishops - against Black’s wretched king.
Black relied on the pawn barrier to protect his king from harm. This reliance was based on a faulty notion - that once the position was barricaded it would stay that way. This is the essence of bad defensive thinking. If the attacker is alert and aggressive enough, he will always find a way to break through.
When you’re on the defensive, then, it’s your chief job to watch for that deadly moment, and prepare for it. How? One way is to try to give your pieces the utmost mobility, so that you will be able to counterattack.
If the position is not suitable for counterattack, then mobility is still something you want to aim for. As long as your pieces have freedom of action, you can bring them quickly to the threatened zone. Above all, avoid the kind of position Black gets in Diagram 31, where his queen is stuck in the mud and the three queenside pieces have nothing whatever to say about the fate of their king.
But this game is not a typical creditable defensive effort. Black made every conceivable defensive mistake, and thoroughly earned his disastrous defeat. In the remaining games we’ll see what happens when the defender does a good job.
Gradual Counterplay
The next game is one of my favorites in this field. Black starts off with a cramped position by the very nature of the opening. But, as you will see, he is well aware of the danger. He concentrates on developing his pieces effectively, and tries constantly to put them on the best squares.
Having accepted a gambit in the opening, Black is a pawn ahead to begin with. But he doesn’t clutch this pawn like a miser: as early as the sixth move, he’s ready to return it. This is important; for many a defender has ruined his position beyond redemption by greedily clinging to material.
Even when Black loses the castling privilege, he is not dismayed. The danger is minimal because his development is satisfactory. Consequently White cannot exploit the lack of castling.
In due time Black’s counterattack sets in. It will come to you as a complete surprise. But, after you’ve played over the whole game, you’ll do well to return to the position of Diagram 34, and arrive at a clear understanding of what Black did and why he succeeded in doing it.
This is a game which will repay your playing over many times. It is a very deceptive-looking game, for Black plays so well that he makes the job of defense and counterattack look easy. It isn’t!
Evans Gambit
White - Black
1.e4 e5 2.Nf3 Nc6 3.Bc4 Bc5 4.b4
This is one of the most interesting of all the gambits. White offers a pawn in order to build up a strong pawn center and to gain time to get a big lead in development. If Black does not look sharp, he may find himself overwhelmed by a powerful White initiative.
4…Bxb4
In the light of the previous comment, this is a momentous decision. Black is taking on a big responsibility, but, as we shall see from his following moves, he knows how to hold his own.
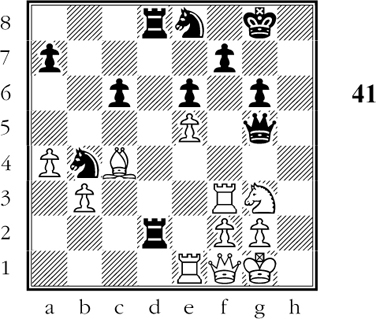
5.c3 Ba5 6.d4 d6! (D)
White to move
With his last move (6…d6!) Black has set his opponent a very difficult problem.
Black’s 6…d6! is a good move in the technical sense. Its psychological impact is even greater. By playing this move Black keeps a pawn in the center and prepares for the development of his light-square bishop. So far, so good.
But the move has a deeper meaning. It indicates that Black is prepared, even at this early stage, to return the extra pawn. White can win back his pawn with 7.dxe5 dxe5 8.Qxd8+ Nxd8 9.Nxe5. But in that case the queens are gone and so are White’s chances of attack. Black simply continues 9…Be6 with a prosaic endgame that understandably has no attraction for White.
White naturally avoids this simplifying possibility, but he is undoubtedly shaken by the revelation that Black is less interested in material than he is in breaking the attack.
7.Bg5 f6 8.Qb3
Typical play in a gambit; try to upset your opponent with surprise moves. If Black plays 8…fxg5 then 9.Bxg8 (threatening mate) with a wide open position and chances for both sides.
8…Nge7
Black meets the threat in the most economical way - by developing a piece.
9.Bf7+
White wastes a move in order to force Black’s king to move and thereby render castling impossible for Black. Ordinarily this would be a very serious defect in the defender’s position. Not so here, as Black continues to defend with great care.
9…Kf8 10.Bh5
Threatening 11.Qf7#.
But Black parries the threat easily enough, at the same time making room for the development of his queen.
10…Ng6 11.Be3 Qe7
Notice how Black is concentrating on development of his forces.
12.0-0 Bb6 13.Nbd2 Be6!
Well played. Either White’s queen must move off her aggressive diagonal, or White must seal up the center with 14.d5. If he advances the pawn, then there is no chance for him to get an open file for attack.
14.d5
Contrary to appearances, this advance does not cost Black a piece. Counterattack is the answer!
14…Na5 15.Qb4 Bd7 16.c4 Nf4!
This represents further progress for Black.
White is now compelled to play the following exchange, which gives Black two bishops against a bishop and knight. As you’ll see, the black bishops will become magnificently active, while White’s minor pieces will scurry around in search of something to do.
17.Bxf4 exf4 18.Nh4
Black was threatening to win a piece by …g6. Bit by bit we see Black switching from defense to attack.
18…Qe5!
A further improvement in Black’s position: strong centralization of his queen, attack on White’s bishop, and threats on other lines as well.
Black is really forcing the pace now, for if 19.Bf3 Qg5! 20.g3 fxg3 21.hxg3 Qxg3+ and White can resign with a clear conscience.
Hard pressed, White resorts to a “swindle.”
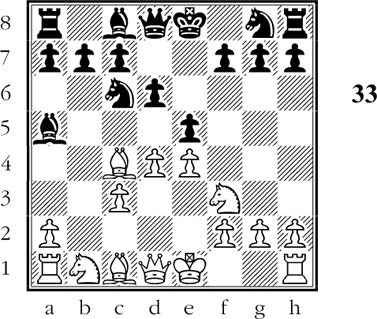
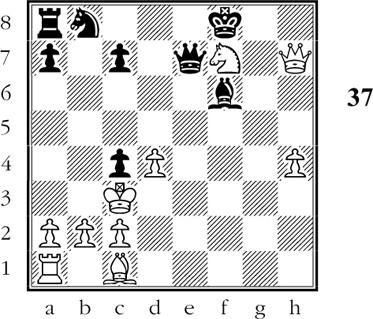
19.Bg6!? (D)
Black to move
If 19…hxg6?? 20.Nxg6+ wins White’s queen. But Black has a much better move, namely?
Of course, Black has no trouble seeing through White’s flimsy trap.
But the real danger facing Black is that he will play the attractive 19…Qg5. In that event there follows 20.Ndf3 Qh6 21.Bf5 and - with the decentralization of Black’s queen - White’s game has improved considerably.
Instead, Black starts a remarkable combination.
19…Bxf2+!!
Forcing White to capture, as he cannot allow 20…Bxh4. Nor can he play 20.Rxf2? as this would lose his queen rook.
20.Kxf2 Qd4+ 21.Ke2
Again Black has forced White’s reply. For if 21.Kf3 Qe3# or 21.Ke1 Qxa1+.
21…Bg4+
Remember that Black has to be very sure of what he’s doing! For he’s sacrificed a piece, and his knight is under attack.
If White tries 22.Ndf3, Black replies 22…Nxc4 maintaining winning pressure. One remarkable possibility is 23.Bf5 g6! (not 23…Bxf5?? 24.Nxd4) 24.Bxg4 Qxe4+ 25.Kd1 (forced) 25…Ne3+ winning White’s queen.
22.Nhf3 hxg6 23.Qxa5
Black is still a piece down for several pawns, but his queen is in the thick of the fray, whereas White’s queen is useless.
23…Rxh2
A remarkable situation in which the pin by the black bishop prevents White from playing 24.Nxd4 or 24.Nxh2.
24.Rg1 f5!
Beautiful play. If now 25.exf5 Re8+ 26.Kd1 and Black can capture either rook with his queen!
Or 26.Kf1 Qd3+ 27.Kf2 Qe2#.
25.Qxc7 Qe3+
Forcing White’s reply, as 26.Kd1 allows 26…Qxg1+.
26.Kf1 fxe4!
For if 27.Nxh2 Qe2#. All this is calculated by Black with a rare combination of verve and accuracy.
27.Qxd6+ Kg8 28.Nxe4 Qd3+! White resigns.
If he plays 29.Kf2 Black winds up with 29…Qxf3+ 30.Ke1 Qe2#.
Or 29.Ke1 Re8! and White’s helplessness is pathetic. (Thus, on 30.Nxh2 or 30.Nfd2 Black has 30…Qe2#.)
A masterly example of how the defender brings out his pieces, consolidates his position, and gradually switches to counterattack. Even Black’s final attack is a tribute to his earlier maneuvering; for his careful early play is what has made it possible for each Black piece to be on the right square at the right time.
The Precious Half-point
In this game, too, we see wonderfully alert defense and counterattack by Black. True, he “only” draws, but his defensive task is more difficult. This is a case where drawing a game is a creditable achievement, one that you can be proud of.
King’s Gambit
White - Black
1.e4 e5 2.f4 exf4
Black accepts the gambit. He knows he’s in for trouble, and he means to fight back as hard as he can.
Right here you can see how important a player’s opening attitude is. If he begins in a mood of indifference or ignorance, he may be smashed by the gambit before he ever find out what’s happening to him. On the other hand, if he knows the score, he’s prepared from the very start to fight hard. Consequently, the resulting difficult positions don’t come as a great shock to him.
As you study the further play, you will see how important a role this attitude plays.
3.Nf3 g5
And this move too is a calculated risk. Black defends his advanced f-pawn, which will soon be under attack. However, in providing this protection, Black is weakening his kingside: he has created a breach in his kingside pawn formation.
Later on White will take advantage of his weakness to start a powerful attack in that sector. But Black is well prepared for it.
4.h4
Now the game is already in a critical stage. White breaks up Black’s pawn chain so that both advanced black pawns will be liable to capture - and meanwhile Black’s weakness on the kingside persists. (If Black ever castles kingside, his king will be sadly exposed to attack.)
4…g4 5.Ne5
Now Black can defend his g-pawn with 5…h5. But after 6.Bc4 Nh6 7.d4 White would have a lead in development, a strong center, and the certainty of winning the gambit pawn. Black would have a lasting defensive and the inferior position.
So Black realizes that passive, witless defense will not do. What he wants is: systematic development and counterattack. So…
5…Nf6! (D)
White to move
Black must strive for counterattack.
By developing his king knight, Black announces that counterattack will be the keystone of his policy from now on. The game gets very involved as both players fight for the attack.
6.Bc4 d5
Thus he parries the attack against his f7-pawn.
7.exd5 Bg7!
More development!
8.d4
White is ready to play Bxf4.
8…Nh5!
Black guards the threatened pawn and at the same time sets a trap.
If White plays 9.Nxg4? then 9…Ng3! gives Black a winning game. For after 10.Rh2 (necessary to prevent …Qxh4) 10…Qe7+ White is at a loss for a good move.
For instance: 11.Kf2 Bxg4 12.Qxg4 Bxd4+ and mate next move. Or 11.Be2 Bxg4 winning. Or 11.Kd2 Ne4+! 12.Kd3 Bxg4 13.Qxg4 Nf2+ winning the queen.
This whole sequence, you observe, is based on counterattack.
9.Nc3 0-0
Black cannot leave his king in the center, so he castles. But, with his kingside pawns so far advanced, he may easily find himself in a very dangerous position.
10.Ne2
This at last wins back the gambit pawn, opening files on the kingside at the same time. Move by move the situation becomes more critical for Black.
10…f3 11.gxf3 gxf3 12.Nxf3 b5!
This is the kind of move we like to see when we’re playing over a game. Such a move comes as a complete surprise; there is a great deal of thought behind it; and for good measure, it’s a strong move.
In this case, the idea behind 12…b5! is to give Black strong play on the diagonal leading from a8 to h1. Thus, if 13.Bxb5 Qxd5 with a promising position for Black - quite in line with his ambitions to counterattack.
White, being a very aggressive player, prefers to aim for attack.
13.Bb3 Bb7! 14.Qd3 Bxd5 15.Ng5! Nf6 16.Rf1
White builds up the attack very skillfully. His immediate threat is 17.Rxf6 followed by 18.Qxh7#. But Black finds ingenious counterplay.
16…Re8!
This creates a flight square for Black’s king and consequently lifts the mating threat. In addition, Black’s rook at e8 has menacing intentions along the open e-file.
17.Rxf6!? (D)
Black to move
Although Black is no longer subjected to a mate threat, he must nevertheless play very resourcefully to hold the game.
Black’s reply is forced, as 17…Qxf6? will not do because of 18.Bxd5.
17…Bxf6 18.Qxh7+ Kf8 19.Nxf7!
A brutal move. If Black replies 19…Bxf7?? then 20.Qxf7#. If he tries 19…Qe7?? (threatening mate) White has 20.Bh6+ and mate next move.
Even; 19…Qd7? will not do, for then comes 20.Bh6+ Ke7 21.Ne5+ and Black loses his queen.
Despite the desperate appearance of his position, Black finds a way out: he resorts to a counter-sacrifice of the exchange!
19…Rxe2+!
One must marvel at Black’s calmness in the face of so many dangers.
20.Kxe2 Qe7+
Here is a subtle point of Black’s defense: if now 21.Kf1? Qxf7 22.Bh6+ Bg7+! and Black remains a piece ahead!
21.Kd3!?
An ingenious move which leads Black astray. Black now sees that after 21…Bxf7? 22.Bh6+ Ke8 23.Re1! Qxe1 24.Qxf7+ followed by 25.Qxf6+ White has a winning attack.
But what Black misses is that after 21…Qxf7! 22.Bh6+ Ke8 23.Re1+ Be7 he has a satisfactory defense as well as a material advantage.
In his search for active counterplay Black misses this fairly obvious point in favor of a subtle defensive resource.
21…Bc4+?! 22.Bxc4 bxc4+
If now 23.Kxc4 Qxf7+ forcing the exchange of queens and leaving Black with a won ending.
23.Kc3! (D)
Black to move
Should Black play 23…Qxf7 winning a piece?
It would be very poor judgment on Black’s part now to win a piece by 23…Qxf7 for after 24.Bh6+ White would regain the piece with a winning game: 24…Bg7 25.Qh8+ etc. or 24…K moves 25.Qe4+ winning the black rook.
23…Bxd4+!
Black figures on 24.Kxd4? Nc6+ 25.Kxc4 Ne5+ and the concentrated attack of Black’s pieces is decisive. For example: 26.Kd4 Rd8+! - or 26.Kc3 Qc5+ 27.Kd2 Nxf7 and White is helpless.
24.Kxc4
Now it would be suicide for Black to play 24…Qxf7+? 25.Qxf7+ Kxf7 26.Kxd4, leaving White with two pawns ahead in an easily won ending.
24…Bg7
After this prudent retreat, Black’s position looks solid, while White’s looks flimsy. However, Black is two pawns down, so both players are satisfied with a draw.
25.Ng5 Nc6 26.Qf5+ Ke8
If now 26…Qf6?? 27.Nh7+ wins the queen.
27.Qg6+
Attacking Black’s knight and therefore forcing his reply.
27…Kd7 28.Qf5+ Ke8
At this point the game was abandoned as a draw, for both players realized that discretion is the better part of valor in this position.*
Despite the fact that Black missed a win at move 21, this is a very valuable game to study. In fact, Black’s lapse gives the game a more realistic flavor, and makes it more true to life.
The main impression we get from such a game is that a hard-fought draw is in many ways more creditable than an easy win achieved over flabby opposition. Black had to be alert from start to finish; time and again it seemed that he could no longer avoid disaster.
From a game such as this one you can learn how much patience and sheer stubbornness are required to hold out in a difficult defensive position.
Passive Defense Becomes Active
This is the hardest of all defensive achievements: to switch from passive defense, when you are subject to every whim and choice of your opponent. Few problems in chess are more trying; few require more ingenuity, more sheer fighting spirit, than the often arduous job of freeing yourself and asserting your own will. A difficult job, but not an impossible one. The main requirement is to know the score, and know what you want to do. Some players are so overwhelmed by the routine of being on the defensive that they never even think of trying to fight their way out.
In the following game the defense is handled by a great master. Though his position is originally very constricted, he works energetically to achieve a position in which he is attacking instead of defending. The switch comes so suddenly that the opponent is caught off balance.
Queen’s Gambit Declined
White - Black
1.d4 d5 2.c4 e6
This move is so conventional that we may too easily forget its consequences.
By playing 2…e6 Black makes sure of having a pawn in the center. In this way he prevents White form gaining too much ground in that all-important sector of the board.
On the other hand, 2…e6 has a very serious drawback. It blocks the development of Black’s light-square bishop. So, even at this early stage Black must keep his wits about him and realize that the restricted mobility of this bishop may cause him a lot of trouble in the future.
To recognize your problems this early in the game is a valuable asset. If you know what your problem is, you can be on the lookout for ways to solve it. Many a player has lost games on the black side of this opening, precisely because he was unaware of the defect in his position. Being unaware of this handicap, he simply drifted along placidly without making any effort to free the imprisoned bishop.
3.Nc3 Nf6 4.Bg5 Nbd7
Now the imprisonment of Black’s light-square bishop seems worse than ever. However, this is only a temporary state of affairs.
5.e3 c6 6.Nf3 Be7 7.Qc2 0-0 8.a3 Re8 (D)
White to move
Black’s position is extremely constricted.
One look at this diagram shows us the difficulties confronting Black. White’s pieces have freedom and scope. Black’s forces have developed modestly and are huddled together with very little mobility.
9.Rc1 dxc4
And now, by removing his main center pawn, Black allows his opponent a free hand in the center. (For example, he makes possible such moves as 12.Ne4! and 17.e4, whereby White gains ground in the center and emphasizes the superior aggressiveness of his own formation.)
Does this mean that 9…dxc4 is a blunder? Not at all. Black has a very good reason for this move: it is the necessary preliminary to an exchange of pieces. The value of such an exchange will soon become clear to you.
10.Bxc4 Nd5 11.Bxe7 Qxe7
What has happened as a result of the foregoing exchange of pieces? Black has exchanged his rather poorly posted dark-square bishop for White’s actively posted bishop. That certainly represents an improvement in Black’s game.
Furthermore, as a result of the exchange, Black’s queen is now developed at e7. That too is an improvement. This specific example shows why players with constricted positions are advised to seek simplifying exchanges. In this way they get rid of fairly inactive pieces in return for the opponent’s active pieces. That’s just what has happened here.
12.Ne4!
Following the above reasoning, White purposely avoids another exchange.
12…N5f6 13.Ng3
Black is of course still thinking of how to develop his bishop. At first sight, 13…e5 looks like the answer to all of Black’s difficulties, as it opens up the diagonal of his imprisoned bishop. However, after 14.Nf5 Black finds that he is still under pressure in a characterless, backward position that holds out no possibilities for him.
Hence Black bides his time about playing …e5.
13…c5!
An excellent move which holds out a vague promise of freedom for the bishop some day - by an eventual …Bd7 and …Bc6. But the day of liberation is still distant.
14.0-0 cxd4 15.Nxd4 Nb6 16.Ba2 Rb8
A strange-looking move, but Black does not want to commit himself with …e5. We criticize aimless drifting, but purposeful waiting moves of this kind are commendable. (D)
White to move
Black has not yet managed to free his game, but his position shows no weak points.
17.e4
This advance in the center has the effect of limiting Black’s mobility, as …Nd5 is impossible. However, Black maneuvers calmly in the small amount of terrain left to him.
17…Rd8 18.Rfd1 Bd7
At last the bishop is developed! But Black still has far to go before he can free himself.
19.e5
Despite its aggressive appearance, this move opens up possibilities which Black is not slow to seize. However, the advance of the pawn sets a subtle positional trap: if now 19…Nfd5 - which looks so natural - White replies 20.Ne4 followed by Nd6 with a very powerful game. With the white knight posted firmly in the heart of Black’s position, Black would be in serious trouble.
19…Ne8!
This move, which few players would find, guards against the danger of Ne4 followed by Nd6.
20.Bb1
Threatening checkmate. Black is forced to weaken his kingside castled position.
20…g6
One must admire the patience with which Black meets every new difficulty!
21.Qe4 Ba4!
At last Black’s vigilance is rewarded. The bishop comes into play aggressively.
Of course White could simply reply 22.Rd2, but psychologically the liberation of the bishop is distasteful to him. He therefore drives the bishop back. However, in order to do this, he has to advance pawns, with the result that he creates points of invasion for Black’s forces. This will be explained in the following note.
22.b3 Bd7 23.a4
White has had his way. But meanwhile, by advancing his pawns, he has opened up his queenside to possible invasion by the black knights. Later on, when Black’s counterattack is at floodtide, he will be able to post his knights aggressively on the b4- and c3-squares. And all this thanks to pawn moves that Black has slyly provoked!
23…Nd5
And note this: as a result of White’s aggressive-looking e4-e5, Black is able to post his knight on the “eternal square” d5. Things are beginning to look up for Black.
24.Bd3 Rbc8
Now he threatens to win the exchange with 25…Nc3. (See note to White’s 23rd move.)
25.Bc4 Bc6! 26.Nxc6 bxc6 (D)
White to move
Black has made headway. He is at last rid of his worrisome bishop, and his knight at d5 is a tower of strength.
27.Rd3 Nb4! 28.Rf3 Rc7!
Preparing to double rooks on the open d-file. The knight has left the excellent square at d5 for an even more aggressive one at b4. But just as Black is at last asserting himself, a new danger looms up:
29.h4
White will advance this pawn in order to weaken Black’s castled position. So Black still has a hard fight on his hands.
29…Rcd7 30.h5 Qg5!
Counterattack! He threatens Qxc1+.
31.Re1 Rd4!
Counterplay in the open file.
32.hxg6!
Offering his queen. The idea is: 32…Rxe4? 33.gxf7+ Kf8 (forced) 34.fxe8Q++ Kxe8 35.Nxe4 Qg6 36.Nd6+ Ke7 37.Rf7+. Now Black must give up his queen, and after 37…Qxf7 38.Nxf7 Kxf7 he is a pawn down with a lost ending.
32…hxg6!
Black is not taken in by the queen sacrifice. In fact, he’s preparing a queen sacrifice of his own.
33.Qe2 Rd2! 34.Qf1?
The most judicious line was 34.Qe3, with an even ending after the exchange of queens. But White, who has had the initiative throughout, cannot reconcile himself to equality. This is the turning point of the game. (D)
Black to move
White threatens to win the exchange by Ne4. How does Black meet the threat?
34…Nc2!
Black ignores the threat because he intends to sacrifice his queen.
35.Ne4 Qxe5!!
Now at last Black has shed the role of defender and has seized the initiative. If now 36.Nxd2 Qxe1 and Black is a pawn up in the endgame.
36.Nf6+ Qxf6 37.Rxf6 Nxf6
What are the consequences of Black’s combination? He has ample compensation for his queen, having won rook, knight, and pawn in return.
But the main point is that Black is now the attacker and no longer the defender.
38.Rc1 Ne4!
Black’s knights dominate the board. The immediate threat is 39…Rxf2, forcing an endgame in which Black is two pawns ahead. White avoids this hopeless ending, but the black knights continue on their merry way.
39.Be2 Nd4! 40.Bf3 Nxf2!
Now the threat is 41…Nxf3+ 42.gxf3 Rd1! forcing an ending in which Black is two pawns ahead.
White escapes this, but the black knights force a decisive penetration into the white king’s position:
41.Qc4 Nd3! 42.Rf1 Ne5!
Black forces a decisive breach in the white king’s position. Black is not only ahead in material; his forces are more active and he has a winning attack.
43.Qb4 Nexf3+ 44.gxf3 Ne2+ 45.Kh2 Nf4+ (D)
White to move
Black now forces the white king back to the first rank.
Now White doesn’t like the idea of having his king trapped on the first rank, and hemmed in by Black’s powerful rook on the second rank. However, in the event of 46.Kg3, Black has a pretty win with 46…g5! threatening 47…Rg2#.
And no matter how White squirms in this variation, Black has a forced win. Thus if 47.Rf2 Rxf2 48.Kxf2 Nd3+ winning the queen. Nor can White escape with 47.Rg1, for in that case Black plays 47…R8d4! 48.Qb8+ Kg7 49.Qe5+ f6 50.Qc7+ Kg6. Now White is out of checks, and Black winds up relentlessly with …Nh5+ and …Rh4#.
These variations are enjoyable to play over, but there is a moral to them. Black’s pieces are making use of the counterattacking resources he developed earlier in the game when his prospects looked much less attractive. That is to say, Black is benefiting by his policy of finding good squares for his knights and setting up his rooks on the d-file. Thanks to those laborious preparations, Black is now master of the whole board.
46.Kh1 R2d4!
It comes as a surprise that Black is giving up the rook’s powerful post on the second rank. But his control of the d-file is the compelling factor leading to victory.
47.Qe7 Kg7!
This innocent-looking move suddenly highlights the fact that Black has still another open file at the disposal of his rambunctious rooks - the h-file. And there’s a cruel irony in the fact that it was White himself who opened that file while he was following up what he was sure was a winning attack! (See White’s 29th, 30th, and 32nd moves.)
Black’s threat in this position is 48…Rh8+ 49.Kg1 Rd2 50.Rf2 Nh3+ with disaster for White.
48.Qc7
By keeping the knight under attack, White prevents the variation just shown - for Black cannot play …Rd2.
However, since Black’s pieces are so magnificently posted, he has no trouble in finding a different way.
48…R8d5!
Notice that Black’s admirable attacking play continues to pivot around the open d-file. He has in mind a combined operation with his three pieces which will crush White.
49.Re1 Rg5!
With the nasty threat of winning the white queen by 50…Nd5!. This would attack the queen and also threaten 51…Rh4+ winning the queen in any event. For example, 50…Nd5 51.Qh2 Rh5, pinning the queen.
Nor is 50.Re5 of any use to White, for then comes 50…Rd1+ 51.Kh2 Rg2#.
50.Qxc6 Rd8! White resigns.
Black’s last, very quiet move left White no defense. The immediate threat was 51…Rh8#. If White tries 51.Qc3+ e5! 52.Rxe5 then Black has 52…Rh8#.
What a change there has been from Black’s laborious defensive maneuvering in the early part of the game to his crisp, forceful attacking thrusts in the second part! This game is one of the most instructive examples I know of this change from the defensive to the offensive.
I have treated this game in great detail because I think it is important for the student to see what he’s up against, and how he ought to go about solving the problems of practical play. You may not be able to play the defense and counterattack this well, but the game sets a worthwhile goal for you to achieve: how to fight back in a position where your opponent has greater mobility and better prospects.