The Complete Chess Course From Beginning To Winning Chess! (2016)
Book Six
How to Fight Back
Chapter Four
The Defense Fumbles
So far we have seen the triumphs that alert and accurate defense can achieve. But, as you know from your own experience, defense can be a spotty affair. A superb move may be followed by one that brings down the whole position with a crash.
It is heartening and instructive to study examples of good defense. It’s even more instructive to study examples of faulty defense, so that we know what to avoid. And such instances of faulty defense give us a sobering realization of what we must do in our own games to avoid disaster.
The Right Way and the Wrong Way
Most catastrophes of defense come about because a player chooses the wrong move. One move spells salvation, the other means defeat. So, one bad choice and the game is lost.
Diagram 23 shows us such a position. Black’s snap judgment loses for him very quickly. (D)
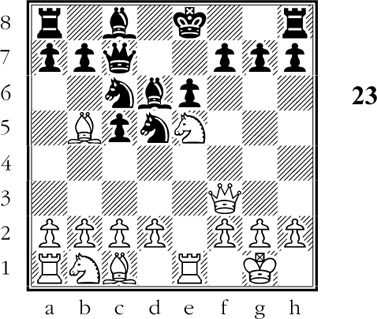
White to move
White’s next move is obvious, while Black’s reply is far from obvious!
Relying on a multiplicity of pins, White slyly played:
1.Nxc6!
Black, without much thought, replied:
1…bxc6?
This loses, as White now convincingly proves.
2.Qxd5
Now Black is shocked into the realization that his is stymied by no less than three pins. Thus 2…exd5 or 2…cxd5 are altogether impossible. And 2…cxb5 is possible though not desirable, because of the reply 3.Qxa8.
Will 2…Bd7 save the day for Black? No; White simply retreats 3.Qe4 or 3.Qf3 and his attacked bishop is still immune.
And so Black, with a piece down and no way of regaining it, is hopelessly lost.
Let’s go back to Diagram 23, and see how Black should have played. After 1.Nxc6 the right reply was 1…0-0!. In that case, with Black’s king removed from the e-file, White can no longer play Qxd5. Another feature is that White’s knight at c6 has no escape! Black must therefore regain the piece.
It is true that White can play 2.Nxa7 coming out a pawn ahead. However, Black can still fight on; there is a great deal of play left in the game. Consequently 1…0-0! was the right defensive move.
In Diagram 24 Black goes wrong in very much the same way. (D)
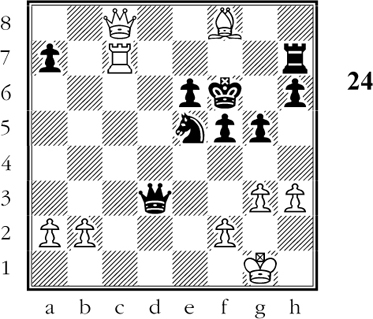
White to move
Black’s king is hard pressed; nevertheless he can hold out with best play.
Though Black’s king is in hot water, we must admit that Black has set up his defense very cleverly. If for example 1.Rxh7 Black plays 1…Nf3+. If then 2.Kh1?? 2…Qf1#. White must therefore play 2.Kg2, whereupon 2…Ne1+ forces a draw by perpetual check (3.Kg1 Nf3+ 4.Kg2 Ne1+ etc.).
White therefore tries a swindle:
1.Be7+!? Kg6??
And Black succumbs! The rest is agony.
2.Qxe6+ Kh5 3.Qxe5 f4 4.Bd6 fxg3 5.Qe8+ Black resigns.
For if 5…Kh4 6.fxg3+ Kxh3 7.Qh5# and if 5…Qg6 6.Qe2+ wins.
Now let’s go back to Diagram 24 and see how Black should have played.
After 1.Be7+!? Black’s proper reply is the seeming dangerous 1…Rxe7! In that case 2.Qf8+? fails after 2…Rf7.
Consequently White must play 2.Qh8+. Then Black has nothing to worry about after 2…Kg6.
For if 3.Qxe5 Rxc7 4.Qxc7 Qb1+ and Black’s game is perfectly satisfactory. And if 3.Rxe7 Nf3+ 4.Kg2 Ne1+ when Black draws by the perpetual check already shown.
But, as we’ve seen, Black made the wrong choice and lost the game.
In the position of Diagram 25, the contrast between the right way and the wrong way is even more glaring. (D)
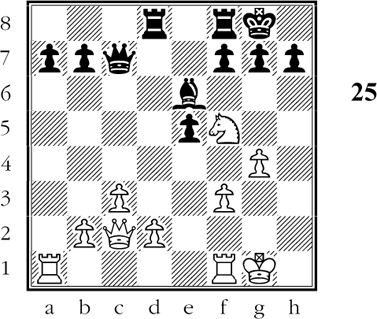
White to move
By playing 1.Rxa7??!, White sets a trap which Black can refute in the most incisive manner. But Black also has a chance to go wrong!
Here is what happened:
1.Rxa7??!
A baleful trap.
1…Qb6+
Good enough, though not the most direct course.
2.Kg2 Qxa7???
Of all the defensive blunders I have ever seen, this one is undoubtedly the worst!
3.Ne7+ Kh8 4.Qxh7+!! Kxh7 5.Rh1#
A spectacular finish, and perhaps we can forgive Black for missing it. Here is how he should have played:
1…Bxf5!
Black allows the queen to keep the threat …Qb6+ in reserve. Thus he must win at least a piece and the flashy checkmate is ruled out.
There was still another way for Black to handle this situation correctly:
1.Rxa7??! Qb6+ 2.Kg2 Bxf5!.
Again Black wins a piece and eliminates the flamboyant checkmate.
Walking into It
One of the worst types of defensive blunders comes about when a player walks into a trap that has been deliberately set for him. Nothing, in fact, is so conducive to blundering as the belief that your opponent has blundered. Our powerful sense of elation blinds us to the possibility that there is more to the position than meets the eye.
Thus, in Diagram 26 Black sees that he can win a piece. Before going any further, he grabs the loose knight - to his sorrow. (D)
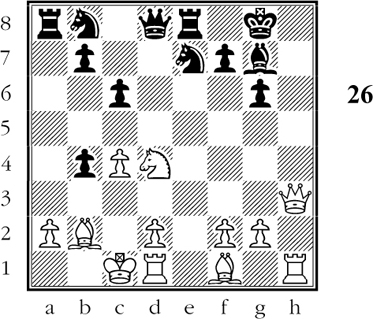
Black to move
What is White’s threat, and how can Black guard against it? Should Black accept or decline the knight?
In the position of Diagram 26 White threatens 1.Ne6!. If then 1…fxe6 2.Qh7+ and 3.Qxg7#. Or if 1…Bxb2+ 2.Kxb2 fxe6 3.Qh8+ Kf7 4.Rh7#.*
The best way for Black to guard against the threat seems to be 1…Nc8. If then 2.Ne6?* Bxb2+ 3.Kxb2 Qf6+ and Black prevents the mate and wins a piece as well.
Instead of all this, Black plays very naively. He sees that he can capture the knight; he goes right ahead without asking himself why this opportunity has been made to order for him.
1…Bxd4?? 2.Qh8+!!
This will hurt a bit.
2…Bxh8 3.Rxh8#
Now it is all clear. The white knight was merely bait.
In Diagram 27 the bait is even more valuable, so that you would expect Black to be correspondingly more careful. This time White has obligingly left his queen on a square where she can be captured. (D)
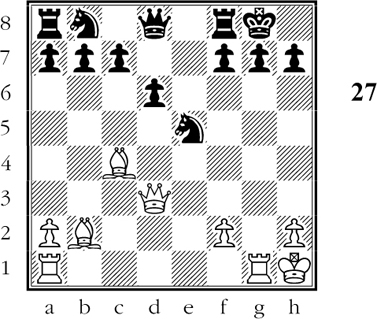
Black to move
Should Black capture the queen?
Black’s decision to capture the queen is, as we shall see, a blunder. However, it is to some extent an excusable blunder. He sees White’s second move, but overlooks his third. And this third move, you will have to admit, is not an easy move to foresee.
1…Nxd3? 2.Rxg7+ Kh8
This much Black foresaw. He knows there is no good discovered check, because White’s bishop at b2 is under attack.
But what about a double check?
3.Rg8++!
This is the move that Black overlooked.
3…Kxg8 4.Rg1+ Qg5 5.Rxg5#
In Diagram 28, too, the defender’s failure to fathom the point of White’s attack is pardonable. Few combinations have ever been played to equal this one in subtlety. (D)
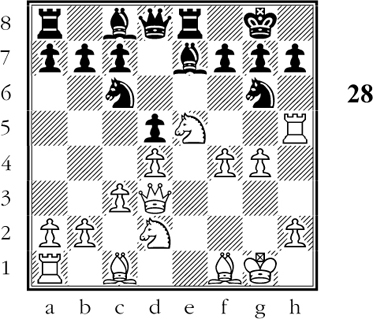
White to move
Black does not dream that White is planning a very brilliant attack.
White’s opening move is well calculated to confuse his unsuspecting opponent:
1.Ndc4!!
This fantastic move is probably best answered by 1…Bf6 creating an escape hatch for the black king. Why the king needs an escape will soon become clear.
Instead of weighing the possibilities, Black grabs the offered knight.
1…dxc4
And now what?
2.Qxg6!!
Threatening 3.Qxh7+ Kf8 4.Qh8#. (This explains why Black should have made room for his king’s escape.)
2…hxg6
Black sees that after 2…fxg6 White forces mate by 3.Bxc4+ Kh8 4.Nxg6# or 3…Kf8 4.Nxg6+! hxg6 5.Rh8#. (Another indication of the black king’s need for fresh air.)
3.Nxg6!
Threatens 4.Rh8#.
3…fxg6 4.Bxc4+ Kf8
Such moves as 4…Qd5 and 4…Be6 would only delay the mate without stopping it.
5.Rh8#
If Black’s failure to foresee this glorious combination was forgivable, we can hardly say the same for Black’s lapse in the position of Diagram 29. There he has a solid defensive position; but he fails to realize that the blockade on f7 is necessary to hold his position together. (D)
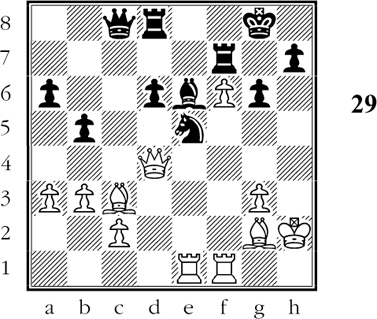
Black to move
What would happen if Black moved his rook from f7?
White’s position is generally more aggressive, but Black seems safe as long as he keeps up the barricade at f7. But Black does not realize the importance of this blockade, for he plays:
1…Rfd7?
This allows White to open the long diagonal leading to g7 and h8. It also makes it worthwhile for him to sacrifice the exchange in order to operate on the long diagonal.
2.Rxe5! dxe5 3.f7+!
Very fine. He forces the opening of the diagonal. (On the other hand, after 3.Qxe5?, Black would resume the blockade with 3…Rf7 or 3…Bf7.)
3…Rxf7 4.Qxe5
White threatens Qh8#. And if 4…Rxf1 5.Qg7#. Now we can appreciate the power of White’s attack along the diagonal.
4…Kf8 5.Qg7+!
With this pretty move, White forces the game. If now 5…Ke8 6.Qg8+ Ke7 7.Bb4+ Kd7 8.Rxf7+ and Black gets mated.
5…Ke7 6.Bb4+ Black resigns.
Black is helpless. If he tries 6…Rd6 then 7.Rxf7+ Bxf7 8.Qe5+ Qe6 9.Bxd6+ is crushing.
Or if 6…Kd7 7.Rxf7+ Bxf7 8.Qxf7#.
Black’s swift collapse came about after he opened the gates to the enemy by giving up the blockade at f7.
In this chapter you have seen some of the ways in which the defense can go wrong. It is lack of awareness, lack of aggressive spirit, that leads a player to surrender so readily to his opponent’s intentions. So be warned: the defense does not play itself. Eternal vigilance is the price of successful resistance.