The Complete Chess Course From Beginning To Winning Chess! (2016)
Book Three
How to Play the White Pieces
Chapter Seven
How to Exploit Black’s Errors of Judgment
Errors of judgment, like weakening moves, enable you to train your forces on a target. Errors of judgment on Black’s part provide you with a ready-made plan of attack.
However, you have to be alert to note these errors of judgment. If the lapse is ignored, Black may possibly escape without serious damage. In each of the following games White is well aware of the lapse as soon as it happens, and vigorously turns it to his advantage.
In the first game, Black makes a plausible move that ruins his chances of achieving a normal development. White’s method of exploiting this error of judgment is simple but highly effective.
The simplifying variation White adopts in the game is rather deceptive. Black is set for an easy game, but White knows how to create unexpected difficulties.
Four Knights’ Game
White - Black
1.e4 e5 2.Nf3 Nc6 3.Nc3 Nf6 4.Bb5 Bb4 5.0-0 0-0 6.Bxc6 (D)
White will get his big opportunity as Black proceeds to make an error of judgment.
6…bxc6
By capturing with the d-pawn, Black opens up a line of development for his light-square bishop.
The text, on the contrary, block’s the bishop’s development.
Here White sees his chance - to make use of the superiority in development that he is bound to obtain because Black’s light-square bishop is immobilized.
7.Nxe5 Re8 8.d4 Bxc3 9.bxc3 Nxe4 10.Re1!
Very powerful. White’s rook move creates serious difficulties for Black. If 10…Nf6 11.Bg5 gives White a lasting and annoying pin. If 10…Nxc3 11.Qf3 and White attacks the knight and also threatens Qxf7+.
10…Nd6
Now Black’s d-pawn cannot move, and it is not clear how his bishop is to be developed. Credit this to White’s pressing rook move. White has made important progress by ruining Black’s prospects of development.
In the following stage White builds up strong pressure on the kingside, which lacks proper protection.
11.Qg4! Qf6
If 11…f6 12.Bh6 g6 13.Nxg6! and White wins.
12.Ba3 Rd8 13.Re3!
While Black works hard to unscramble his pieces, White increases his pressure on the kingside. Note the helplessness of Black’s bishop.
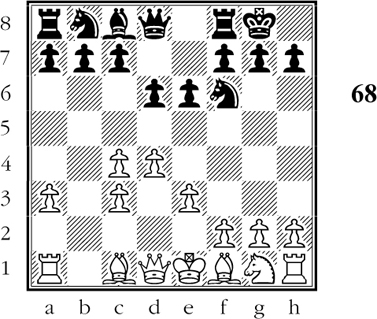
13…Nf5 14.Rf3 d5 15.Qh5 g6 16.Ng4! Qh8
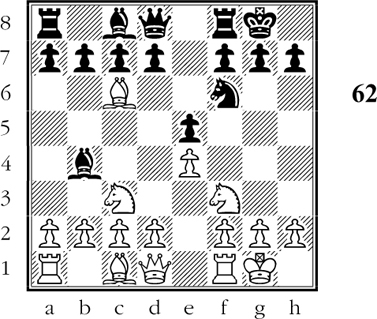
A queer-looking move, but White has the whip-hand in any event because of his powerful accumulation of forces on the kingside. (D)
White’s lead in development is now decisive.
17.Qg5 Be6 18.Rxf5! Black resigns.
For if 18…Bxf5 19.Nh6+ Kg7 20.Nxf5+ Kg8 21.Be7 threatening to win the queen with 22.Bf6 or to win a rook with 22.Bxd8.
White timed his play perfectly to take advantage of Black’s error of judgment on move 6. By continuing to pile on pressure relentlessly on the kingside, White emphasized the backwardness of Black’s development.
In the next game White deals with a somewhat different kind of error on Black’s part. Starting out with a reasonably satisfactory development, Black undermines the position of his most effective piece.
White must ask himself such questions as: Where is Black’s error of judgment? How can I take advantage of that error?
Vienna Game
White - Black
1.e4 e5 2.Nc3 Nf6 3.f4 d5 4.fxe5 Nxe4 (D)

White must contend with a powerfully centralized black knight.
At a very early stage in the game, White has a serious problem: what is he to do about the effectively posted black knight in the center? Exchanging knights is not aggressive enough, so White spars for time.
5.Nf3 Bb4 6.Qe2 Bxc3 7.bxc3 0-0 8.Qe3 Nc6 9.Bd3 f5 10.0-0 f4
A critical move which unhinges the support of Black’s well-posted knight.
11.Qe2 Ng5?
This is the mistake White has been waiting for. The centralized knight leaves his powerful post. At the same time Black’s far advanced f-pawn becomes an exposed weakness. 11…Bf5 supports the well-posted knight.
12.Ba3! Nxf3+ 13.Qxf3! Rf7
White is playing with superb tactical skill. In reply to 13…Nxe5 he plays 14.Qh5, attacking the knight, threatening Bxh7+ with a mating menace, and keeping Black’s rook under attack.
14.Rae1
White’s alert play has brought all his pieces into powerful play. His bishops are magnificently trained for attack. Thus, if now 14…Be6 (to hold back the threatening e-pawn) White continues 15.Qh5 g6 16.Bxg6! hxg6 17.Qxg6+ winning the bishop with two pawns to the good.
14…g5
To guard the advanced f-pawn and to defend the h-pawn against Qh5. But White has all the play and now forces the game in a few moves.
15.e6 Rg7 16.Qh5!
Now White has the brutal threat of 17.e7! Nxe7 18.Bxe7 Rxe7 19.Qxg5+ Kf8 20.Rxf4+ Ke8 21.Qg8+ Kd7 22.Qxd5+ Ke8 23.Rf8+!.
16…Ne7 17.Bc5! Nc6
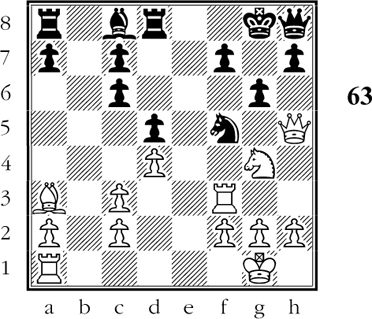
He cannot allow White to play Bd4. (D)
White crowns his masterly attack by breaking up Black’s position.
18.e7! Nxe7 19.Bxe7 Black resigns.
If 19…Rxe7 20.Qxg5+ and White wins as in the note to White’s 16th move.
This game is extremely impressive because of the way that White worked up a devastating attack after Black’s error of judgment. The removal of Black’s knight from the center opened up the lines that White needed for the effective cooperation of his forces.
In the next game, a wrong opening choice by Black leaves him exposed to White’s tactical threats. White maneuvers very cleverly to take advantage of the opportunities offered.
French Defense
White - Black
1.e4 e6 2.d4 d5 3.Nc3 Nf6 4.Bg5 Bb4 5.exd5 Qxd5 6.Bxf6 Bxc3+ 7.bxc3 gxf6 8.Nf3 (D)
In order to drive away Black’s queen from an effective centralized post, White plans to play g3 followed by Bg2 with threats against the black queen.
8…b6 9.g3 Bb7 10.Bg2 Qh5?
White threatened 11.Nh4 with decisive effect. Black has avoided this threat, but he has put his queen out of play. White will make good use of the queen’s inactive role.
Black gets an equal game with 10…Qe4+, which practically forces White to agree to the exchange of queens by 11.Qe2 etc.
11.0-0 Nd7 12.Qe2 Rc8 13.Qe3! c5 14.Nh4! Bxg2 15.Nxg2 cxd4 16.cxd4
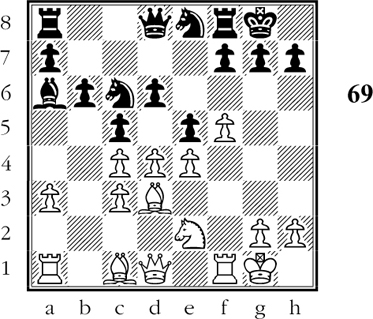
White’s pawn sacrifice is neatly calculated. After 16…Rxc2 17.Qa3!! a5 18.Rac1 Rxc1 19.Rxc1 White has reduced his opponent to helplessness. (White would then threaten Rc8#, and Black would be unable to castle out of danger.)
In offering this variation, White relies on the inactive role of Black’s queen.
16…0-0 17.Qe4 Rc7 18.Nf4 Qg4 19.f3! Qg5 20.Rf2 Rd8 21.h4! Qh6
If 21…Qxg3+ 22.Rg2 pins and wins the queen.
White now begins a very ingenious maneuver to harry the black queen and at the same time to exploit the lack of harmony among Black’s forces.
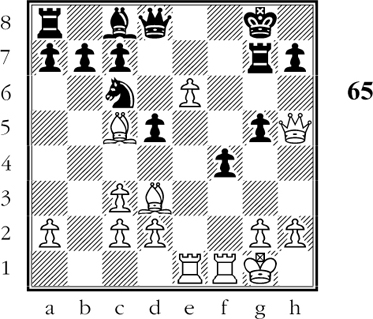
22.g4! Qxh4 23.Rh2 Qg5 (D)

After 23…Qg3+ 24.Kh1 White can confidently look forward to trapping the black queen.
White can capture the h-pawn, but he has an even stronger move.
24.Nxe6!! fxe6 25.Qxe6+
Now you can see how White’s unexpected combination takes advantage of the lack of communication among Black’s forces. If 25…Kf8 26.Qd6+ wins a rook. The same is true of 25…Kg7 26.Qe7+. Black tries a different defense, but White’s superior mobility still tells in his favor.
25…Kh8 26.Qe7 Qg8 27.Rxh7+! Qxh7 28.Qxd8+ Nf8 29.Qxf8+ Qg8 30.Qxf6+ Black resigns.
White has succeeded admirably in carrying out his original aim of exploiting the lack of cooperation between Black’s queen and his other pieces. Black’s loss of material makes further resistance hopeless.
In the following game it is up to White to punish his opponent for a slight transposition of moves toward the beginning of the middle game. It is very instructive to see how White carries out this idea.
Nimzo-Indian Defense
White - Black
1.d4 Nf6 2.c4 e6 3.Nc3 Bb4 4.e3 0-0 5.a3 Bxc3+ 6.bxc3 d6
Here White faces the same kind of problem as in the play following Diagram 38. He wants open lines for his pieces - particularly the bishops - while Black’s interests are best served by a closed position. (D)
White needs open lines for his coming attack.
7.Bd3 c5 8.Ne2 Nc6 9.e4 Ne8! 10.0-0 b6 11.f4 Ba6?
By playing 11…f5! Black would have avoided the terrific attack that follows.
12.f5! e5
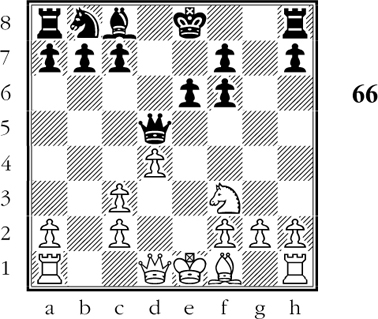
White has just the kind of position he was aiming for, thanks to Black’s carelessness at move 11. White can now force a breach in Black’s kingside position and just keep on piling up pressure against Black’s game. In this way he takes advantage of the fact that Black’s pieces are poorly placed for defensive purposes. (D)
White can force a weakness in Black’s kingside by a very surprising move.
13.f6!!
This amazing move breaks up Black’s kingside no matter how he plays.
13…Kh8
After 13…gxf6 14.Bh6 White has achieved his objective. Black’s kingside formation is then similar to the one in Diagram 51. The black king is exposed to attack, and White simply continues to bring additional pressure to bear. (The actual continuation of the game proceeds along similar lines.) If Black tries 13…Nxf6 White can still inflict the unwieldy doubled pawn on him by playing 14.Bg5. White would then have lasting pressure by means of the pin supported by his rook on the open f-file.
14.d5 Na5 15.Ng3!
White’s knight now comes into play very strongly. He is indifferent to the loss of a pawn by 15…Bxc4 16.Bxc4 Nxc4 for after 17.fxg7+ Nxg7 18.Bh6 his attack rolls on undiminished.
15…gxf6 16.Nf5 Bc8 17.Qh5 Bxf5 18.exf5 Rg8
To force a clearly winning position White only needs to bring his king rook into the attack.
This he now proceeds to do, applying the formula which has been used so often by White in these games. First he determines where the weakness lies; then he concentrates his forces on the weak spot; finally, he attacks in overwhelmingly superior strength.
In this case the weakness is Black’s exposed kingside, created by White’s brilliant 13th move.
19.Rf3!
Threatening mate in four moves beginning with 20.Qxh7+!!.
19…Rg7 20.Bh6 Rg8 21.Rh3 Ng7 22.Qh4! Black resigns.
Black is helpless against the coming 23.Bg5 h5 24.Qxh5+!! Nxh5 25.Rxh5+ Kg7 26.Bh6+ and mate next move.
The power of White’s concluding attack has amply proved the correctness of White’s judgment in making the surprising pawn advance on move 13.
In this last game, as in all the games in this chapter, we have seen how White takes advantage of Black’s error of judgment. The important requirement, as far as White is concerned, is alertness. If White is watchful enough to see how Black’s plans are spoiled by a hasty move, then that observation is half the battle.
Nor can White afford to be dogmatic. He applies whatever attacking methods are needed to refute Black’s play, and he does not mind changing his plans as the occasion requires.
Thus, in this game, White wanted originally to get good attacking diagonals for both bishops. Yet after his 12th move White had to reconcile himself to the fact that that his light-square bishop was destined to play a minor role. There were two reasons why White accepted this philosophy.
In the first place, the pawn moves that shut in this bishop (9.e4 and 13.f6!!), opened the diagonal for White’s dark-square bishop. Secondly, Black had so many inactive pieces that the blocking of the king bishop was of minor importance.
This kind of elasticity is an important quality in a chessplayer. We’re often told that a plan is important; unfortunately, we hear less often that a plan needs modifying as the original conditions are modified. In all the games in this chapter, White is very sensitive to the changes in Black’s policy that are the results of errors of judgment. The result, as you have seen, is effective attack and quick victory.