The Complete Chess Course From Beginning To Winning Chess! (2016)
Book Three
How to Play the White Pieces
Chapter Six
How to Exploit Black’s Weakening Pawn Moves
This is a very profitable subject. Familiarity with it will yield you many victories. This is why:
When your opponent weakens his position with ill-judged pawn moves, he obviously does not know such moves are weakening. If he had that knowledge, he would of course avoid the pawn moves.
Hence it follows that once Black has weakened his position, he has left himself wide open to powerful moves by which you can take advantage of his weakness. The following games tell you what you need to know in order to take advantage of weakening pawn moves.
French Defense
White - Black
1.e4 e6 2.d4 d5 3.Nc3 Nf6 4.exd5 Nxd5 5.Ne4 f5? 6.Ng5! Be7 7.N5f3 c6 8.Ne5
Black’s weakening pawn advance at move 5 has ruined his position. This move has left a backward pawn on the e-file: the black e-pawn cannot be defended by pawns.
White exploits this by posting his queen or a rook - or both - on the e-file.
Equally disastrous for Black is the fact that Black’s fifth move has left his e5-square a “hole” - a square that Black can no longer protect by pawn moves.
This makes it possible for White to occupy the “hole” with a knight. Posting a knight on a vital center square in this fashion is one of the strongest possible moves on the chessboard.
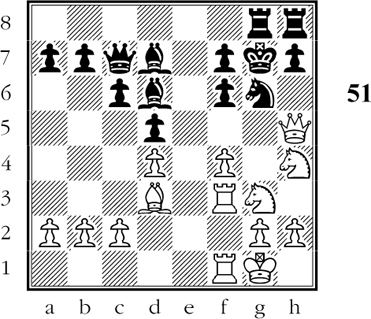
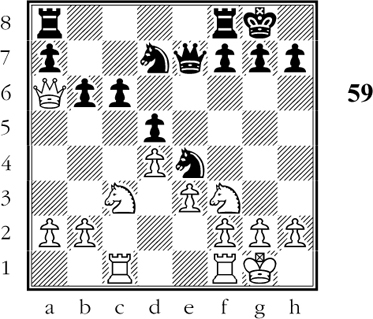
In this first part of the game, White has succeeded in bringing a knight to the important square. The second part of the game will show you what happens as the result of White’s aggressive placement of the knight. (D)
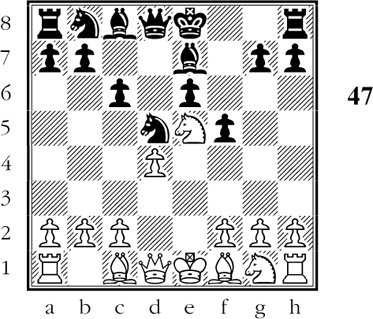
White controls the center as a result of Black’s faulty fifth move.
8…0-0 9.Ngf3 b6 10.Bd3 Bb7 11.0-0 Re8 12.c4 Nf6 13.Bf4 Nbd7
White’s ninth and 13th moves have both strengthened his powerful hold on the center. He continues that policy with his next move - a very important one, as we shall see.
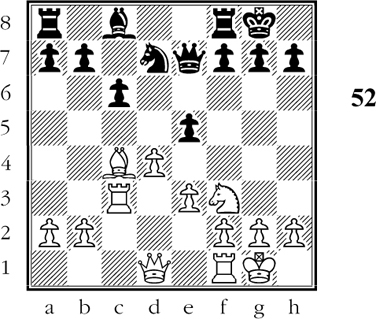
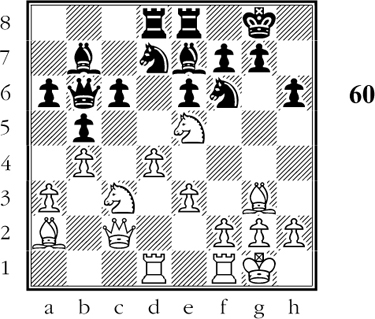
14.Qe2 c5 (D)
White now plays one of the most surprising moves ever made on the chessboard.
15.Nf7!!!
White has not left Black much choice in replying to this amazing move. If he removes his queen from attack by playing 15…Qc8, White replies 16.Qxe6, confiscating the e-pawn. (This is the pawn weakened by Black’s feeble fifth move.)
After this capture, White is threatening a murderous double check. If Black tries 16…Kf8 17.N7g5 is decisive.
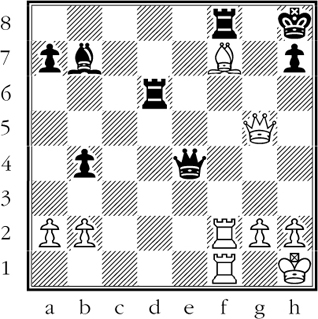
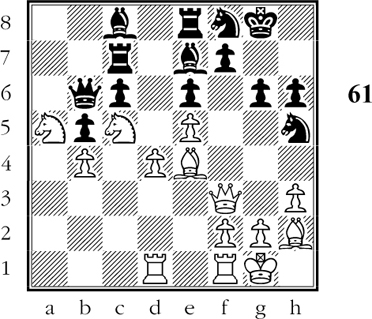
15…Kxf7 16.Qxe6+!!! (D)
White has captured the weak e-pawn in spectacular fashion.
Black’s weakening move now leads to his downfall. If 16…Kxe6 17.Ng5#!. This possibility vividly illustrates White’s powerful control of the center. Refusing the queen by 16…Kf8 is futile, for then White plays 17.Ng5 with crushing effect.
Black tries another way, but White forces mate in two moves.
16…Kg6 17.g4! Be4 18.Nh4#
The way in which White exploited the weakening of Black’s pawn position was very instructive. In the next game White does an equally good job of taking advantage of a pawn weakness created by Black.
French Defense
White - Black
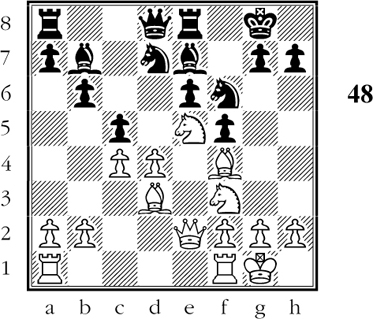
1.e4 e6 2.d4 d5 3.Nc3 Nf6 4.exd5 exd5 5.Nf3 Bd6 6.Bd3 0-0 7.0-0 Nc6 8.Bg5
By pinning Black’s king knight, White threatens Nxd5. (D)
White has given Black a troublesome problem: how is he to defend his d-pawn?
8…Ne7??
Black’s best way to meet the threat is 8…Bg4, counterattacking against White’s d-pawn.
9.Bxf6 gxf6 10.Nh4! Kg7 11.Qh5!
Black’s faulty eighth move has breached his kingside pawn position. White naturally trains his guns on the gap in Black’s castled position.
It is clear that White is taking admirable advantage of the opportunities offered. He has brought a knight and the queen into aggressive play. From now on, White keeps bringing more and more pieces to the kingside. In this way White builds up an imposing concentration of force against the black king.
11…Rh8 12.f4 c6 13.Rf3 Ng6 14.Raf1 Qc7 15.Ne2! Bd7 16.Ng3 Rag8 (D)
White’s concentration of force on the king-side is so overwhelming that he can afford to sacrifice his queen.
To appreciate White’s brilliant combination, bear in mind that it is based on Black’s weakening of his pawn position.
17.Qh6+!!! Kxh6 18.Nhf5+ Bxf5 19.Nxf5+ Kh5 20.g4+! Kxg4 21.Rg3+ Kh5 22.Be2#
Striking as this combination is, what really interests us is that White did a masterly job in taking advantage of the gap in Black’s kingside.
In the next game, White shows equal skill in exploiting the same kind of weakness in Black’s kingside.
Queen’s Gambit Declined
White - Black
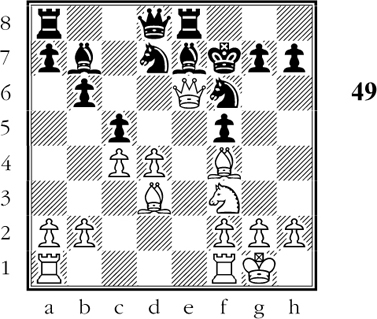
1.d4 d5 2.c4 e6 3.Nc3 Nf6 4.Bg5 Be7 5.e3 Nbd7 6.Nf3 0-0 7.Rc1 c6 8.Bd3 dxc4 9.Bxc4 Nd5 10.Bxe7 Qxe7 11.0-0 Nxc3 12.Rxc3 e5
Starting out with a cramped position - the kind we have studied in Chapter Three - Black has worked hard to free himself. (D)
White must be extremely alert now to maintain some initiative.
13.Nxe5 Nxe5 14.dxe5 Qxe5 15.f4 Qe7?
Black should have played 15…Qf6.
16.f5 b5 17.Bb3 b4 18.f6! (D)
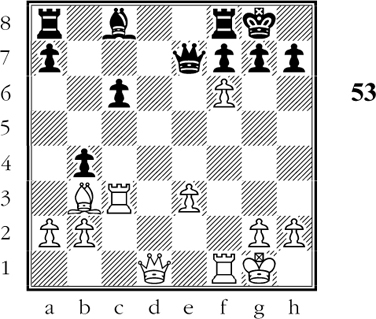
White has put his finger on the weakness created by Black’s faulty 15th move. White’s advance of the f-pawn opens up a dangerous gap on the kingside. From now on, White concentrates his forces more and more powerfully against Black’s king.
Note that this process of gathering concentration is typical. First, you pinpoint the weakness. Second, you switch your forces to bear on the weakened point. Third, you deploy your superior forces to crush Black’s weakened resistance.
18…gxf6 19.Rxc6 Qxe3+ 20.Kh1 Bb7 21.Rcxf6 Qe4 22.Qd2 Kh8 23.Bxf7 Rac8 24.R6f2 Rcd8 25.Qg5! Rd6
White has skillfully brought his pieces to bear on the exposed black king. His last move threatened 26.Qf6#. (D)
White’s magnificently posted pieces are poised for the final attack.
26.Bd5!! Black resigns.
A brilliant final move. White offers his bishop three ways and attacks three pieces. Black cannot guard his attacked rook and attacked queen at the same time and he must therefore resign.
An interesting possibility is 26…Rxf2 so that if 27.Rxf2??? Qe1+ leads to mate. However, on 26…Rxf2 White plays 27.Qg8#
In the next game Black weakens his light squares. White’s exploitation of this weakness is a masterpiece of positional maneuvering.
Ruy Lopez
White - Black
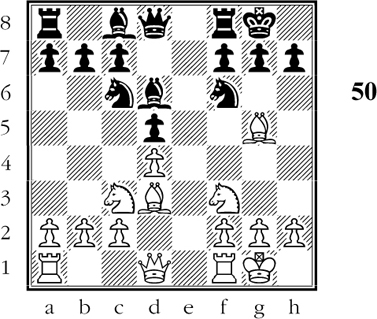
1.e4 e5 2.Nf3 Nc6 3.Bb5 a6 4.Ba4 Nf6 5.0-0 Be7 6.Re1 b5 7.Bb3 d6 8.c3 0-0 9.d3 Be6 10.Nbd2 Nh5 11.d4! Bxb3 12.axb3
Black’s game is somewhat cramped but it is free from weaknesses. As in the previous game, White must be alert for opportunities to preserve some initiative.
12…Nf4 13.Nf1 Qc8? 14.Ng3 g6 15.d5! Nd8 16.Bxf4! exf4 17.Ne2 g5
One glance at Diagram 55 shows that White’s 16th move was a masterpiece. (D)
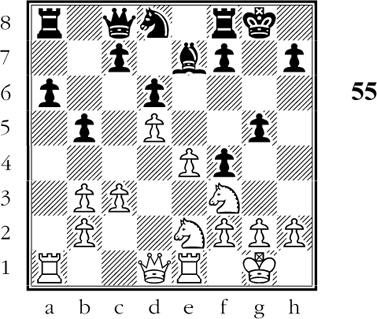
White has his strategic goal clearly laid out for him: Black is now very weak on the light squares.
Black made a mistake in allowing his knight to be exchanged. White showed masterly judgment in making this exchange, which compels 17…g5 on the following move.
What White has achieved is that a number of light squares in Black’s position are no longer protected by black pawns. White’s success is particularly notable because of his control and coming occupation of the f5-square.
White’s interpolation of 15.d5!! was another admirable stroke. He drove back Black’s knight at a time when the knight had to retreat to d8. At this post the knight is badly out of play, which will handicap Black in the coming phase.
As we know from previous games, White’s next step is to concentrate his forces for attack. He devotes his next three moves to posting his knights aggressively and unassailably.
18.Nfd4 Re8 19.Nf5 Bf8 20.Ned4 (D)
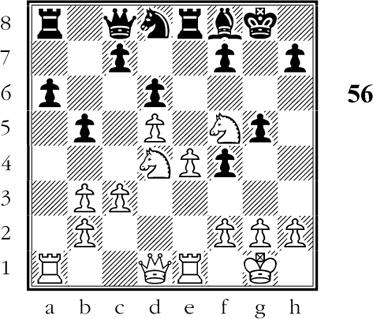
Neither of White’s powerfully posted knights can be driven away.
Now that White has established his knights firmly, his next step is to open the h-file. This will enormously increase the attacking potential of his position.
20…f6 21.g3! fxg3 22.hxg3 c5 23.Nf3 Nf7
White has purposely retreated his knight because he intends to use it for his kingside attack. The next stage in White’s build-up of pressure is to attack on the newly opened h-file.
24.Nh2! Ra7 25.Qh5 Bg7 26.Ng4 Qd7 27.Kg2 Ne5 28.Nxd6! Rd8 29.Nxe5 fxe5 30.Nf5 Bf6 31.Rh1 Rf8 (D)
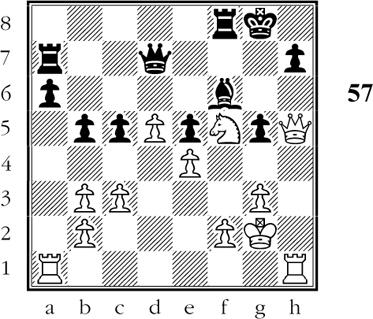
White is now ready for the final attack.
32.Qg4!
White proceeds with the final regrouping of his forces. The immediate threat is 33.Rxa6! Rxa6 34.Nh6+, winning Black’s queen!
32…Kh8 33.Rh6 a5 34.Ne3! Qe8 35.Rah1 Rff7 36.Qf5 Qf8 37.Ng4 Bd8
White now announced mate in three moves: 38.Rxh7+ Kg8 and now 39.Qg6+ and 40.Rh8#.
The way that White broke through on the open h-file from the position of Diagram 57 is most instructive. Looking back over the earlier part of the game, you can appreciate the importance of his opening of the h-file by 21.g3!. You can also see how useful it was for White to force the weakening of the light squares by 16.Bxf4!.
This game is particularly valuable because White has done such a convincing job in exploiting the weaknesses in Black’s position. Unlike most of the games in this book, the game had very little in the way of brilliancy. Yet White was in full command of the situation; he pushed his advantage to the utmost.
So far in this chapter we have been studying White’s procedure against weaknesses on Black’s kingside or in the neighborhood of his king. But weaknesses on the queenside, far away from the king, can also be disastrous. Here is an impressive example.
Queen’s Gambit Declined
White - Black
1.d4 d5 2.c4 e6 3.Nc3 Nf6 4.Nf3 Be7 5.Bg5 Nbd7 6.e3 0-0 7.Rc1 b6 (D)
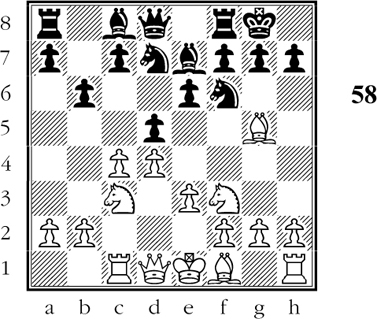
White has a marked positional advantage because Black has created a “hole” at c6, which can no longer be protected by a pawn.
White now sets himself to take advantage of the weakness at c6. Here is White’s plan of campaign:
First he plays cxd5 in order to clear the c-file for pressure by his queen rook against the weakened point. (Later on you will be able to appreciate the power of this pressure.)
White’s next step will be to exchange the light-square bishops. In this way he will eliminate the black bishop which would have been able to protect the weakened point.
8.cxd5! exd5 9.Qa4! Bb7 10.Ba6! Bxa6 11.Qxa6 c6 12.0-0 Ne4 13.Bxe7 Qxe7
White’s plans have proceeded according to schedule. Black’s weakened c6 has been replaced by a weak c-pawn, and White now turns his attention to this pawn. (D)
White is now ready to pounce on the weak pawn.
14.Qb7! Rfc8 15.Nxd5! Qd6
After 15…cxd5 16.Rxc8+ White is the exchange and a pawn ahead, with an easy win.
16.Rxc6!! Black resigns.
White’s last move is a brilliant stroke which wins more material than Black can afford to part with. For if 16…Qxd5? 17.Rxc8+ wins the queen.
And if 16…Rxc6 17.Qxa8+ Nf8 18.Qxc6!! Qxc6 19.Ne7+ followed by 20.Nxc6 leaves White a rook ahead.
Finally, if 16…Qxc6? 17.Ne7+ wins the queen.
In this game White carried out his strategical ideas with attacking moves. In the final game of the chapter he operates with strictly strategic methods. While less spectacular, this policy is equally effective.
Queen’s Gambit Declined
White - Black
1.d4 d5 2.c4 e6 3.Nc3 Nf6 4.Nf3 Be7 5.Bg5 0-0 6.Qc2 Nbd7
Even at this early stage White has an inkling of what course the game may take. Black’s light square bishop is badly hemmed in. White must keep a sharp eye on that bishop in the hope of keeping the bishop tied up permanently.
7.Rd1 c6 8.e3 h6 9.Bh4 a6 10.a3 Re8 11.Bg3 dxc4 12.Bxc4 b5 13.Ba2 Qb6 14.0-0 Bb7 15.Ne5 Rad8? 16.b4!!
White takes advantage of Black’s faulty 15th move. Black should have freed his lightsquare bishop with 15…c5. (D)
White now has a winning positional advantage.
With his last move White has established a lasting bind on the position. By preventing …c5 for good, he has stamped Black’s c-pawn as a backward pawn on an open file. In all the intricate maneuvering that follows, White keeps his eye on this pawn and finally piles up enough force to capture it.
But White enjoys still another advantage after 16.b4!!. He keeps Black’s light-square bishop hemmed in for good. This means that to all intents and purposes White is playing with a piece ahead.
16…a5 17.Nd3! axb4 18.axb4 Ra8 19.Nc5 Nf8 20.Bb1 Bc8 21.h3 Nd5
Now that White has pinpointed the weakness, he goes on to the next phase: piling up on the weakness. First comes a very fine knight maneuver aimed at transferring his knight from c3 to a5. At this latter post the white knight will bear down on the weak c-pawn.
22.Na2! Ra7 23.e4 Nf6 24.Nc1 N6d7 25.N1b3 Nf6 26.Na5 Nh5 27.Bh2 g6
White has posted his knights to the best advantage. His next four moves lead to the capture of the weak pawn.
28.Qc3! Bf6 29.e5! Be7 30.Be4! Rc7 31.Qf3! (D)
White must now win the weak c-pawn.
31…Bd7 32.Nxd7 Nxd7 33.Nxc6 Bf8 34.d5! Nb8 35.dxe6! Nxc6 36.Bxc6 Rxe6
If Black captures the bishop, the reply 37.exf7+ is deadly. White has achieved his aim. He now goes on to make use of his superior mobility.
37.Bd5! Ng7 38.Bxe6 Nxe6 39.Rd6! Bxd6 40.exd6 Rd7 41.Rd1 Kh7 42.Be5 Qa6 43.Ra1 Qc8 44.Ra8 Qc1+ 45.Kh2 f6 46.Qxf6 Ng7 47.Qf8 g5 48.Bxg7! Black resigns.
After 48…Rxg7 White mates by 49.Qf5+ Rg6 50.Ra7+ Kh8 51.Qf8+! etc.
The games in this chapter give us a very clear and thorough method for White’s procedure against weaknesses. The earlier White recognizes these weaknesses, the better for him. Even at a very early stage of the game, they give him a target to aim at; they provide a complete plan of the game. Once the target is created, White need not drift or guess; by concentrating on the target, he is playing the strongest and most logical moves.