How to Bake Everything: Simple Recipes for the Best Baking - Mark Bittman (2016)
Crackers and Flatbreads
If you can make a cookie, you can make a cracker, but while most home cooks have baked the former, few have given much (if any) thought to making the latter. I get it: People love dessert, store-bought crackers are ubiquitous, and almost no one knows how easy they are to make. But homemade crackers are fresher, tastier, and way cheaper than what you can buy, not to mention impressive. Crackers and flatbreads—the difference is negligible—are made from easy-to-mix, easy-to-handle doughs that you shape by rolling thin or pressing flat. Most of the recipes here are unleavened, meaning they have no yeast, baking powder, or baking soda to make them rise. (yeasted flatbreads, from pita to lavash.)
The hardest part is getting the dough thin, but there are tips here for mastering that, as well as for creating perfectly shaped crackers (if you care; I don’t). The recipes in this chapter cover the pantheon of crackers—graham crackers, fruit and nut crisps, even a butter-laden homage to Ritz—as well as some less common specimens like sesame wafers and olive oil matzo. If they don’t make you swear off store-bought crackers for good, they’ll at least make you think twice about reaching for the boxed version.
Flatbreads are truly global—these recipes traverse India and Ethiopia, Italy and Norway, Mexico and Afghanistan, and beyond. And they’re even easier than crackers. Generally, the shaping is less exacting, and the cooking process faster and more forgiving; they’re essentially free-form crackers. In fact, I can’t think of many other foods with as high a return on investment (of time, effort, and money) as these. If you don’t believe me, go make some tortillas (pages 382 and 383) and see what you’ve been missing.
The Basics of Crackers
Homemade crackers are a snap to make, with lots of room for improvising. In any of these recipes, you can blend pretty much whatever you’d like—cheese, nuts, garlic, herbs, and spices, for starters—directly into the dough or replace up to half of the all-purpose flour with whole wheat, rye, or cornmeal. Or, just before baking, dust the tops with coarse salt, poppy seeds, or your favorite spice blend. See page 365 for a full rundown of the many ways you can vary your homemade crackers.
When you make crackers, it’s fine to work the dough a bit—you’re going for a substantial bite, and developing the gluten will help you get that. But don’t manhandle it, or the crackers will be leathery and not crisp. And remember that it’s almost impossible to roll the dough too thin.
MIXING THE DOUGH
You don’t need any special equipment to do this, although a food processor will make the job faster and tidier. For most recipes, you’ll start by combining the dry ingredients with any fats (like butter, oil, or cheese), then gradually adding liquid (typically water, sometimes milk) and blending until the dough comes together but isn’t sticky. From there, you might knead the dough—in the food processor or by hand—just a few times to make a ball. And then you’re ready to roll.
ROLLING THE DOUGH
The success of a cracker depends on your ability to roll out the dough until it’s quite thin: ⅛ inch or even less.
Letting the dough rest isn’t essential, but it helps. After making the dough, wrap it in plastic wrap and let it rest on the counter for 15 to 30 minutes; this gives the flour a chance to hydrate a bit more, making the dough more pliable (less crumbly) and easier to roll out.
Use a counter for rolling out the dough—most cutting boards are too small—and dust it lightly with flour, or lay out parchment paper and then dust with (a little less) flour. Split the dough in half to get extra-thin layers that can fit comfortably on baking sheets.
Parchment paper makes this step—and the rest of the process—much easier. Since you won’t have to worry about sticking, you can use less flour for rolling, and you can pick up the parchment and transfer the dough directly to the baking sheet (or sheets).
Flour is your friend, but in moderation. Use it to dust the counter, dough, and your rolling pin frequently, but lightly. Use only as much as you need to keep the dough from sticking (the flour works its way into the dough, so the more you use, the more the texture of the crackers will change). Flip the dough over a few times as you roll, using a thin spatula or bench scraper to help you lift it; this will help ensure that you never roll it so much on one side that it sticks to the counter.
In all cases, a rolling pin does its job well, but a pasta roller (electric or hand-cranked) is a good tool for getting the dough really thin. Before you commit to it, run a small piece of dough through the machine to make sure it’s moist enough (drier doughs crumble as they work their way through the roller). Then, just use the roller as you do when you’re making pasta, gradually switching to narrower settings until the dough is supple and translucent but doesn’t tear (about a 5 on most rollers).
SCORING AND DOCKING
Some people are sticklers for perfectly shaped crackers. I, almost needless to say, am not. If you’re going for “rustic” (haphazardly shaped) crackers, you can bake the dough as soon as it’s rolled, then break it apart into irregular pieces once it’s cooled. Otherwise, you’ll want to score, or mark, the dough before baking to create uniform shapes.
With a sharp knife, razor blade, pastry wheel, or pizza cutter, cut the dough in a grid pattern, as large or small as you want and in any shape you like—squares and rectangles are easy and customary but there’s nothing stopping you from making triangles, trapezoids, or whatever if that’s your thing. There’s no need to cut all the way through the dough (although it’s fine if you do); simply indenting it lightly will help you break the crackers along the cut lines once they’re cool. If you want, you can get one step closer to perfection by trimming off the edges of the dough so that it’s perfectly square. For round crackers, cut out the dough with a cookie cutter; you can reroll the scraps once or twice before it gets too tough.
Docking the dough—pricking it all over with a fork before baking—is another useful refinement, and not only for aesthetic reasons. It helps prevent large air pockets from forming, for more evenly baked crackers. It’s not specified in all of the recipes here, but it’s good practice and takes just a few extra seconds.
BAKING (BUT NOT BURNING)
It can take only a minute for crackers to go from perfectly golden to dishearteningly burned, especially around the edges. And depending on a slew of factors—how moist the dough is, how thin you roll it, what type of oven you have, whether it’s a particularly humid day—they sometimes get brown before they can finish crisping up. With a watchful eye and the following tips, though, they’ll turn out spectacularly.
Start all crackers baking in a relatively hot oven (usually 400°F); the high heat will quickly pull the moisture out of the dough, and the crackers will begin to darken and crisp. A baking stone is helpful here since it conducts the heat so well; you stick it in the oven as it heats, then drop the parchment paper with the rolled-out dough directly onto it. Otherwise, your heaviest metal baking sheet works fine.
It’s not an exact science, but here’s my trick for achieving crispness while avoiding burning: If it looks like the crackers may burn before they finish in the oven, reduce the heat to 200°F and leave the door cracked until they’re done (if it won’t stay open on its own, you can use the handle of a wooden spoon to hold it ajar). This causes the temperature to plummet, essentially acting as a dehydrator.
If the edges are done before the middle, pull the crackers out of the oven, trim or snap off the edges to prevent them from burning, and then let the rest finish baking. Bear in mind that crackers will harden as they cool, so it’s better to err on the side of slightly underbaking; you can always put them back in the oven for a few minutes if needed.
STORING
Because their success rides on their crispness, moisture is crackers’ biggest enemy. If it’s humid where you live, they may start to soften after just a couple of days. If you live in a dry place, they’ll keep almost indefinitely. Regardless, storing them in an airtight container prolongs their life; you can also freeze them, tightly wrapped and separated with layers of parchment or foil. If the crackers get stale, spread them on a baking sheet and let them dry out in a 200°F oven for about 10 minutes.
Scoring and Docking Crackers
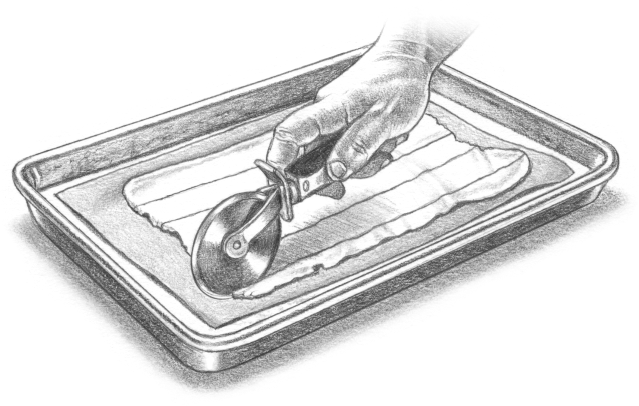
STEP 1
Cut the dough in a grid pattern before baking.
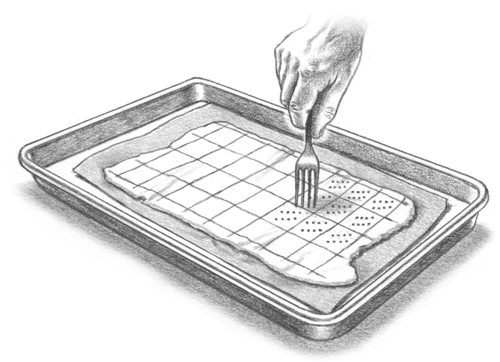
STEP 2
Prick the dough with the tines of a fork to keep the dough from puffing as it bakes.
Recipes
Simplest Crackers
Cheese Crackers
Cheese Straws
Parmesan Frico
Fastest Fennel Crackers
Jalapeño-Cornmeal Crackers
Rich, Buttery Crackers
Graham Crackers
Nut Crackers
Oatmeal Crackers
Irish Oatcakes
Fruit and Nut Crisps
Seeded Lavash Crackers
Black Pepper Hardtack
Sesame Wafers
Simplest Crackers
Makes: About 3 dozen
Time: About 15 minutes
Crisp and simple, these are a blank canvas for anything you want to add to either the dough (see this list) or the finished crackers: herbs, coarse salt, cheeses, jams, and more.
- 1 cup flour, plus more for rolling
- ½ teaspoon salt
- 2 tablespoons cold butter
1. Heat the oven to 400°F with a large baking stone on the center rack if you have one.
2. Put the flour, salt, and butter in a food processor and pulse until combined or cut them together in a bowl with 2 knives or your fingertips. Add about ¼ cup water and continue to mix until the dough holds together but is not sticky, adding water 1 tablespoon at a time as needed.
3. Put a large piece of parchment paper on a clean work surface and dust lightly with flour. Turn out the dough onto the parchment and knead it a few times to make a smooth ball. Divide the dough in half and roll out each piece to ⅛ inch thick or even thinner—it can’t be bigger than your baking sheet, but aim to get it about that size—flipping a few times to prevent sticking and sprinkling with more flour as needed. If it sticks, sweep a bench scraper under the dough to help you lift it. If at any point the dough shrinks back, set it aside to rest, uncovered, for a few minutes. Score lightly with a sharp knife or pizza cutter if you want to break the crackers into neat squares or rectangles after baking and dock the dough if you like (see page 363). Repeat with the other half to bake both pieces at once or set it aside if you’re baking in batches.
4. Transfer the parchment with the dough directly to a baking sheet or the baking stone. Bake for about 10 minutes, checking periodically to make sure the edges don’t burn. Depending on your oven, the crackers may brown unevenly; you may want to trim or break off any darker parts along the edges and then let the rest finish. If the crackers brown before they’ve fully crisped up, crack the oven door, decrease the heat to 200°F, and continue baking until completely dried out and crisp, another 5 minutes or so. Cool on a rack, then carefully break the crackers apart. Serve at room temperature or store in an airtight container for up to a couple of days.
CREAM CRACKERS Rich and delicious, they need nothing on top but a little salt: Increase the butter to 4 tablespoons (½ stick). Substitute cream or milk for the water.
VEGAN CRACKERS Substitute neutral oil (like grapeseed or corn) for the butter.
SODA CRACKERS Flakier and puffier. Supermarket versions use vegetable shortening, and I use butter, so do as you like: Add 1½ teaspoons instant yeast and ½ teaspoon baking soda to the food processor along with the flour. Once the dough comes together, knead it until it’s smooth and elastic, a few minutes; put it in an oiled (or buttered) bowl, cover, and refrigerate for at least 1 hour or overnight if you have time. Before baking, prick each cracker once or twice with a fork and sprinkle them with salt.
Easy Ways to Customize Any Cracker or Flatbread
Go wild with these ideas, which can flavor virtually any cracker or unyeasted flatbread: for starters, Simplest Crackers, Olive Oil Matzo, Chapati and Paratha, or Piadine.
12 Mix-Ins for Cracker and Flatbread Dough
Add these along with the flour when you’re mixing the dough:
▪ Roasted garlic or caramelized onions: up to ⅓ cup
▪ Minced fresh chiles (like jalapeño or Thai) or hot red pepper flakes to taste
▪ Finely chopped nuts, up to ½ cup
▪ Finely chopped dried fruit, up to ½ cup
▪ Dried herbs, like thyme, marjoram, rosemary, or oregano: up to 1 teaspoon
▪ Minced fresh herbs, like rosemary, thyme, sage, oregano, dill, parsley, cilantro, tarragon, or chives: up to ¼ cup soft, mild herbs; no more than 1 tablespoon stronger ones
▪ Cooked greens, like spinach or kale, squeezed dry and chopped: up to 1 cup
▪ Grated hard cheese, like Parmesan, Manchego, or ricotta salata: up to 1 cup
▪ Grated medium-hard cheese, like cheddar, Asiago, or pepper Jack: up to ½ cup
▪ Bits of soft cheese, like goat, blue or Gorgonzola, feta, or cream cheese: up to ½ cup
▪ Ground spices, like cumin, cayenne, coriander, cayenne, or paprika, lightly toasted first in a dry pan if you like: 1 to 2 tablespoons, depending on their pungency
▪ Chopped olives or dried tomatoes: up to ½ cup; if the tomatoes are very dry and tough, rehydrate in warm water for 10 minutes or so, then drain
7 Toppings for Cracker and Flatbread Dough
Cracker dough isn’t always moist enough (especially after rolling it out with flour) for toppings to stick to it. Before you add them, brush the dough lightly with water, olive oil, melted butter, or a beaten egg, then sprinkle any of the toppings below in a thin, even layer; score the dough if you like. Water, obviously, won’t add any flavor, while the other options (all containing fat) will both add flavor and facilitate browning.
▪ Coarse salt or freshly ground black pepper
▪ Chopped nori
▪ Sesame, poppy, fennel, caraway, or mustard seeds
▪ Chopped fresh herbs, like rosemary, thyme, sage, oregano, or dill (or dried herbs)
▪ Ground spice blends like za’atar or garam masala
▪ Toasted whole seeds like cumin, caraway, mustard, sunflower, or pumpkin, chopped first if they’re big
▪ Minced fresh garlic or onion
Cheese Crackers
Makes: About 3 dozen
Time: About 15 minutes
The same basic dough as Simplest Crackers with the classic additions of Parmesan and lots of black pepper. The cheese disappears into the dough as the crackers bake but adds an unmistakable richness and toasty flavor. And Parmesan is just the gateway cheese; see the variations, which even include a version of the ever-popular fish-shaped crackers.
- 1 cup flour, plus more for rolling
- ½ teaspoon salt
- ½ cup freshly grated Parmesan cheese
- 1 teaspoon black pepper
- 2 tablespoons cold butter or neutral oil (like grapeseed or corn)
1. Heat the oven to 400°F with a baking stone on the center rack if you have one.
2. Put the flour, salt, Parmesan, pepper, and butter in a food processor and pulse until combined or use 2 knives or your fingers to blend them in a bowl. Add about ¼ cup water and continue to mix until the dough holds together but is not sticky, adding water 1 tablespoon at a time as needed.
3. Put a large piece of parchment paper on your work surface and dust it lightly with flour. Turn out the dough onto the parchment and knead a few times to make a smooth ball, then divide it in half. Roll out each half ⅛ inch thick or even thinner and nearly as big as your baking sheet, flipping occasionally to keep the dough from sticking and adding flour sparingly as needed. If the dough shrinks back on itself as you roll, set it aside to rest for a few minutes. Score lightly with a sharp knife or pizza cutter if you want to break the crackers into neat squares or rectangles after baking, and dock the dough if you like (see page 363). Repeat with the other half to bake all the crackers at once or set it aside to rest if you’re baking in batches.
4. Transfer the parchment with the dough directly to a baking sheet or the stone. Bake until lightly browned, about 10 minutes. If the crackers get too dark along the edges, simply trim or snap off the edge and then let the rest finish baking. If the crackers brown before they’ve fully crisped up, crack the oven door, decrease the heat to 200°F, and continue baking until completely dried out and crisp, another 5 minutes or so. Cool on a rack, then carefully break the crackers apart. Serve warm or at room temperature or store in an airtight container for up to a couple of days.
CHEDDAR-DILL CRACKERS Substitute cheddar for the Parmesan and ¼ cup chopped fresh dill for the pepper.
GRUYÈRE-THYME CRACKERS Substitute Gruyère for the Parmesan and 1 tablespoon chopped fresh thyme (or rosemary) for the pepper.
BLUE CHEESE AND OLIVE CRACKERS Pulse ¼ cup pitted oil-cured olives in a food processor until finely chopped or chop by hand. Add the remaining ingredients, substituting ⅓ cup crumbled blue cheese for the Parmesan.
“GOLDFISH” CRACKERS Of course you could probably find a small, fish-shaped cookie cutter, but don’t bother hunting one down: Substitute sharp orange cheddar for the Parmesan and 1 teaspoon onion powder (the secret ingredient) for the pepper. Score the rolled dough into 1-inch squares.
Cheese Straws
Makes: About 2 pounds, or approximately 4 dozen depending on size and shape
Time: 20 minutes
Put a platter or tall glass of these out for guests and they will disappear quickly. This recipe makes a big batch, so there will be plenty for everyone.
- 8 ounces cheddar or other medium-hard, flavorful cheese (GruyÈre is also good)
- 5 ounces Parmesan cheese
- 2 cups flour
- Pinch of cayenne (optional)
- 1 stick cold butter, cut into chunks
- Few drops ice water if necessary
- Coarse salt (optional)
1. Heat the oven to 450°F. Grate the cheeses by hand or in a food processor and transfer them to a bowl. Put the flour, cayenne if you’re using it, and butter in the food processor and pulse until combined or use your fingertips to mix it gently until it resembles a coarse meal. Add the cheese and pulse or mix until combined.
2. Turn the dough out onto the counter or a cutting board and knead a few times by hand, just until it comes together, adding a few drops of ice water at a time if it’s crumbly. (At this point you can wrap the dough in plastic and refrigerate for 2 days; take it out about a half hour before proceeding.)
3. Cut a piece of parchment paper about the size of your baking sheet and lightly flour it on your work surface. Roll the dough on the parchment into a rectangle about ¼ inch thick, then cut it into ½-inch-wide strips as long as you like. Transfer the parchment with the straws to a baking sheet and sprinkle with salt if you’re using it. Bake until golden brown, 5 to 8 minutes. Serve hot, warm, or at room temperature.
SAGE CHEESE STRAWS Serve these before Thanksgiving and your guests will barely care what the turkey tastes like; they’re especially good with Gruyère: In Step 1, add 2 tablespoons chopped fresh sage to the food processor.
CHEESE TWISTS Fancier looking but just as easy. Grab the ends of each strip of dough and twist it into a spiral before baking.
Parmesan Frico
Makes: 1 dozen
Time: About 20 minutes
Imagine the cheese that oozes out of your grilled cheese sandwiches and toasts to a crisp in the pan and you have a good picture of these “crackers.” Were it not for the sprinkling of black pepper, they would be 100 percent cheese. Any hard or semihard cheese works well here—I’m partial to super-sharp cheddar, but you can also try aged Gouda, Manchego, or Asiago—as do seasonings like chopped rosemary, thyme, or sage, minced garlic, or cayenne. What doesn’t work is the kind of Parmesan that’s sold ground into a fine powder; buy a chunk and grate your own using the large holes of the grater.
For an extra treat, crack an egg over the cheese as soon as you add it to the pan or make a grilled cheese sandwich over the layer of cheese. Whatever you cook gets the same toasty, cheesy crust.
- 3 cups freshly grated Parmesan cheese
- Black pepper
1. Put a large skillet (preferably nonstick) over medium-low heat. Mix together the Parmesan and plenty of black pepper.
2. Mound ¼ cup of the Parmesan in the skillet. Flatten it into a 3- to 4-inch circle and cook (a few at a time if you have room) until the cheese is fully melted and browning around the edges, about a minute.
3. Flip the crisp over with a metal spatula and cook on the other side, adjusting the heat as necessary to prevent burning, until golden brown on the bottom, another minute or so. Transfer to a paper towel and repeat the process with the rest of the cheese. Serve at room temperature (they’ll crisp as they cool).
Fastest Fennel Crackers
Makes: About 3 dozen
Time: About 30 minutes
Here’s a shortcut for when you want to make crackers but don’t want to deal with dough: Packaged wonton skins bake up crackly and crisp in a matter of minutes and can be sprinkled with pretty much any seasoning you can think of. Serve this fennel seed version with some prosciutto and you’ll have an hors d’oeuvre worthy of a cocktail party, or check out the variations for further inspiration.
- 18 square wonton wrappers
- 2 teaspoons olive oil
- 2 teaspoons fennel seeds, lightly crushed
- 1 teaspoon hot red pepper flakes
- Salt and pepper
1. Heat the oven to 350°F and line baking sheets with parchment paper.
2. Stack the wonton wrappers and cut them in half to make rectangles or triangles. Arrange them on the prepared baking sheets and brush both sides very lightly with oil. Sprinkle with the fennel seeds, red pepper flakes, salt, and pepper, lightly pressing the toppings into the wrappers with your fingers so they stick.
3. Bake until light golden and crisp, 6 to 8 minutes. Cool completely on racks and serve as soon as possible (these don’t keep well).
SESAME WONTON CRACKERS A great vehicle for thin slices of sushi-grade fish or scallops: Substitute a mixture of 1 teaspoon vegetable oil and 1 teaspoon sesame oil for the olive oil. Use 1 tablespoon sesame seeds instead of the fennel seeds and red pepper flakes.
CINNAMON-SUGAR WONTON CRACKERS These barely sweet “crackers” are a perfect, light way to satisfy a sweet tooth: Substitute 1 tablespoon melted butter for the oil. For the topping, use a mixture of 1½ teaspoons sugar and ½ teaspoon cinnamon.
SPICY CAJUN WONTON CRACKERS For the topping, use ½ teaspoon each dried oregano, cayenne, garlic powder, and salt. (Or if you don’t have those things, feel free to just use Old Bay.)
7 Naturally Gluten-Free Crackers and Flatbreads
Since crackers and flatbreads don’t require the chew that so often comes from wheat flour, they’re the perfect savory snack for anyone who needs to stay away from gluten:
- Parmesan Frico
- Nut Crackers
- Irish Oatcakes
- Socca
- Injera
- Corn Tortillas
- Dosas
Jalapeño-Cornmeal Crackers
Makes: About 3 dozen
Time: About 15 minutes
Spicy jalapeños and smoky cumin pair perfectly with nutty cornmeal in these flavor-packed crackers. For more flavors that go particularly well with cornmeal (like bacon and ginger), see the variations.
- ½ cup flour, plus more for dusting
- ½ cup cornmeal
- 1 teaspoon cumin
- ½ teaspoon salt
- 2 tablespoons cold butter
- 1 tablespoon minced jalapeño
1. Heat the oven to 400°F with a baking stone on the center rack if you have one.
2. Combine the flour, cornmeal, cumin, salt, and butter in a food processor and pulse until combined or cut them together in a bowl with your fingers or 2 knives until the mixture resembles coarse meal. Add the jalapeño and about ¼ cup water and continue to mix until the dough comes together but isn’t sticky; add more water 1 tablespoon at a time if necessary.
3. Divide the dough in half and lightly flour a piece of parchment about as big as your baking sheet or stone. Transfer one half of the dough to the parchment and knead it a few times to form a ball. Roll it out into a large rectangle, almost as large as your baking sheet and ⅛ inch thick or even thinner; sprinkle on more flour as needed to prevent sticking. If the dough starts to pull back on itself, set it aside to rest for a few minutes. Score lightly with a sharp knife or pizza cutter if you want to break the crackers into precise shapes after they bake and dock the dough if you like (see page 363). Repeat with the other half right away or set aside if you’re baking in batches.
4. Transfer the parchment with the dough directly to a baking sheet or the stone. Bake until lightly browned all over, about 10 minutes. If the crackers get too dark along the edges, simply trim or snap off the edge and then let the rest finish baking. If the crackers brown before they’ve fully crisped up, crack the oven door open, decrease the heat to 200°F, and continue baking until completely dried out and crisp, another 5 minutes or so. Cool on a rack, then carefully break the crackers apart. Serve warm or at room temperature or store in an airtight container for up to a couple of days.
BACON-CORNMEAL CRACKERS Omit the cumin; keep the jalapeño if you want some heat. Substitute 2 tablespoons rendered bacon fat for the butter. If you cooked bacon just for this purpose, finely chop 1 or 2 strips and add them to the food processor along with the fat.
CHEDDAR-CHIVE CORNMEAL CRACKERS Omit the cumin. In Step 1, add ½ cup grated cheddar to the food processor along with the butter. Substitute ¼ cup chopped fresh chives for the jalapeño.
CRANBERRY-GINGER CORNMEAL CRACKERS Omit the cumin and jalapeño. In Step 1, add ¼ cup dried cranberries and 2 tablespoons chopped crystallized ginger to the food processor along with the butter. If you like, add 1 teaspoon grated orange zest as well.
Rich, Buttery Crackers
Makes: About 4½ dozen
Time: About 30 minutes
These aren’t exactly like Ritz crackers; they’re better—buttery, flaky, and nicely salted. Use these as you would any other cracker, but they are especially good sandwiched around some peanut butter.
- 2 cups flour
- 1 tablespoon baking powder
- ½ teaspoon salt, plus more for sprinkling
- 1 stick cold butter, cut into cubes, plus 2 tablespoons melted butter
- 1 egg yolk
1. Heat the oven to 400°F.
2. Line 2 baking sheets with parchment paper (if you only have one, you can bake this dough in batches). Put the flour, baking powder, salt, and cold butter in a food processor and pulse until combined or cut them together by hand until the mixture resembles coarse meal; take care not to let the butter get too warm. Add the egg yolk and about ⅓ cup water and continue to mix; add more water 1 tablespoon at a time until the mixture holds together. Set it aside to rest, uncovered, for 10 or 15 minutes.
3. On a lightly floured surface, roll the dough as thin as possible, aiming for 1/16 inch; sprinkle on more flour as needed to keep it from sticking (or use a pasta roller; see page 362). Cut out the dough with cookie cutters (circles are classic) or simply cut it into squares or rectangles with a paring knife. Use a thin spatula to transfer the crackers to the prepared baking sheets, leaving an inch or so between them. Press any scraps together into a ball and repeat this process once or twice, taking care not to overhandle the dough. Dock the crackers with a fork or skewer—this is important since the dough can really puff up.
4. Bake until lightly browned, about 8 minutes; as soon as you take the crackers out of the oven, brush with the melted butter and sprinkle with some salt. Cool on a rack; serve at room temperature or store in an airtight container for up to a couple days.
HERB RITZ Sorry, the pun was too good to pass up. In Step 1, add 1 tablespoon chopped fresh (or 1 teaspoon dried) rosemary, sage, or thyme to the food processor along with the butter. Some freshly ground black pepper is good here too.
RICH OLIVE OIL CRACKERS You can’t omit all the butter or else the crackers won’t be flaky. Use 4 tablespoons butter and 4 tablespoons olive oil; in Step 3, brush the crackers with olive oil instead of melted butter.
HOT BUTTERY CRACKERS Spicy, with a pretty reddish hue. In Step 1, add 1 teaspoon cayenne to the food processor along with the salt.
From Crackers to Canapés
Turning plain crackers into stunning hors d’oeuvres is easy and fun. Here are some of my favorite ingredient combinations for topping crackers:
- Cream cheese, smoked salmon, and capers
- Pesto and dried tomatoes
- Mustard and cornichons (with or without pâté)
- Hummus and za’atar
- Chicken liver mousse and cherry jam (see Fruit Jam, to make your own)
- Smoked Spanish chorizo and manchego cheese
- White beans mashed with olive oil, rosemary, and Parmesan
- Crème fraîche and caviar
- Prosciutto, mozzarella, and basil
- Egg salad (or tuna) with a sliced pickle on top
Graham Crackers
Makes: About eighteen 3 × 5-inch crackers
Time: About 1 hour
You wouldn’t know it based on the processed versions you find at the store, but graham crackers were originally invented in the 1800s as a health food and made with graham flour, which includes the super-nutritious wheat bran and germ. Think of these, which feature just a bit of whole wheat flour, as a happy medium—nutty, warm, and subtly sweet.
- 2 cups all-purpose flour, plus more for dusting
- ½ cup whole wheat flour
- ¾ cup light brown sugar
- ½ teaspoon salt
- 1 teaspoon baking soda
- 1 stick cold butter, cut into cubes
- ¼ cup milk
- 3 tablespoons honey
- 1 tablespoons molasses
- 1 teaspoon vanilla extract
1. Put the flours, sugar, salt, baking soda, and butter in a food processor and pulse to combine or combine by hand or with a fork, being careful not to let the butter get too warm or greasy, until the dough resembles coarse meal. In a small bowl, whisk together the milk, honey, molasses, and vanilla. Add the milk mixture to the flour mixture and pulse or knead until the dough just comes together.
2. Divide the dough in half. Roll each piece between lightly floured sheets of parchment paper into a rectangle ⅛ inch thick, rotating as you work to keep the thickness even. Carefully peel off the top sheets of parchment; using a pizza cutter or sharp knife, trim the outer edges of the rectangles so they are nice and even. Cut the dough into whatever size rectangles you want (the classic graham cracker dimensions are about 3 × 5 inches). Reroll any scraps to repeat.
3. Transfer each of the parchment sheets with the cut dough to a large baking sheet. Cover the top with parchment and chill in the freezer until firm, 15 to 20 minutes.
4. Meanwhile, heat the oven to 350°F. When the dough has chilled, dock each cracker with a fork or skewer. Using a thin spatula, shift the crackers around as necessary so they aren’t touching each other. If they won’t comfortably fit on 2 baking sheets, bake them in batches, keeping the unused dough chilled until you’re ready to bake.
5. Bake, rotating the baking sheets halfway through, until the crackers are deep golden brown and just firm to the touch, 10 to 12 minutes. Cool on a rack; serve at room temperature or store in an airtight container for up to a couple of days.
CINNAMON GRAHAM CRACKERS In Step 1, add 1 teaspoon cinnamon to the food processor. Before baking, lightly sprinkle a mixture of cinnamon and sugar on top of the crackers.
CHOCOLATE GRAHAM CRACKERS In Step 1, add ¼ cup cocoa powder to the food processor. For even more chocolate, dip the baked and cooled crackers in melted chocolate (see page 353).
Nut Crackers
Makes: About 1½ dozen
Time: About 30 minutes
Nut flour is a fine alternative to grinding your own nuts, but I prefer the rustic quality of these crackers when you do it yourself. In the absence of any wheat flour, the dough is crumbly, but if you roll and bake it on parchment paper, it’s not too hard to handle. A teaspoon or so of chopped fresh rosemary or thyme is an excellent addition to these tender, delicate crackers.
- 1½ cups almonds (preferably blanched) or 1 cup almond flour
- ½ teaspoon salt
- 1 tablespoon olive oil
1. Heat the oven to 350°F. If you’re using whole almonds, put them in a food processor and grind as finely as possible, watching closely so they don’t turn into nut butter. Add the salt and olive oil and pulse to combine; if you’re working by hand or with almond flour, pulse or stir until thoroughly combined. Add cold water a tablespoon at a time (you’ll likely need 2 to 3 tablespoons), pulsing until the dough looks like wet sand, just cohesive enough that you can form it into a ball.
2. Dump the dough onto a sheet of parchment and pack it together with your hands. Top with another sheet of parchment and roll it into a rectangle ⅛ inch thick. Peel off the top sheet of parchment and use a pizza cutter or knife to square off the edges (you can reroll the scraps into more crackers). If you like, score the dough into small rectangles or squares. Transfer the parchment with the dough to a baking sheet.
3. Bake, rotating the sheet halfway through, until golden, 12 to 15 minutes. If the crackers brown before they’ve fully crisped up, crack the oven door open, decrease the heat to 200°F, and continue baking until completely dried out and crisp, another 5 minutes or so. Cool on a rack, then carefully break the crackers apart. Serve at room temperature or store in an airtight container for up to a couple of days.
Oatmeal Crackers
Makes: About 3 dozen
Time: About 1½ hours
Rolled oats steeped in hot milk form the base of this hearty dough. Wheat flour adds a wonderful nuttiness, but rye flour is just as good (see the variation).
- 1¼ cups whole milk
- 1 cup rolled oats
- 2 cups all-purpose flour, plus more for dusting
- ¾ cup whole wheat flour
- 3 tablespoons dark brown sugar
- 3 tablespoons butter, softened
- 1 tablespoon baking powder
- ½ teaspoon salt
- 1 teaspoon vanilla extract
1. Bring the milk just to a boil and pour it into a large bowl. Stir in the oats and let the mixture cool completely (if you like, put the bowl in the fridge or freezer to hurry things along). When it’s cool, stir in the flours, brown sugar, butter, baking powder, salt, and vanilla. Keep stirring until the dough comes together (it should be fairly stiff). Knead the dough a few times on a lightly floured counter.
2. Divide the dough in half; set one half aside and roll the other on a lightly floured work surface into a rectangle ⅛ inch thick, dusting with flour as needed. If you like, square off the edges (you can roll and shape the scraps into more crackers); cut the dough into small rectangles or squares. Dock the dough with a fork. Transfer the crackers to a parchment-lined baking sheet. Repeat with the other dough half or set it aside if you’re baking in batches.
3. Bake for about 15 minutes, until the crackers are fragrant and their bottoms are golden. Flip each cracker and bake for another 5 minutes. If the crackers brown before they’ve fully crisped up, crack the oven door, decrease the heat to 200°F, and continue baking until completely dried out and crisp. Cool on a rack. Serve at room temperature or store in an airtight container for up to a couple of days.
OATMEAL-RYE CRACKERS Substitute rye flour for the whole wheat flour and add 1 tablespoon lightly crushed caraway seeds to the dough in Step 1.
Irish Oatcakes
Makes: About 1½ dozen
Time: About 4 hours, largely unattended
Three hours seems like a long time to bake what amounts to a thick oatmeal cracker, but doing it low and slow like this develops incredible flavor and is entirely hands off. If you happen to have lard lying around, feel free to substitute it for the butter. Serve with butter and jam or cheddar cheese for a hearty snack or rustic appetizer.
- 2 cups rolled oats
- 2 tablespoons cold butter
- 1 tablespoon honey
- ½ teaspoon salt
- ¾ cup boiling water
- Flour for rolling
1. Line a large baking sheet with parchment paper. Put the oats in a food processor and pulse a few times until they turn into a coarse powder; transfer to a large bowl. Add the butter, honey, salt, and ½ cup of the boiling water. Stir, adding the remaining ¼ cup water slowly, only as needed, until the dough comes together (it should be sticky but pliable).
2. Lightly dust a work surface with flour and roll the dough into a rectangle that’s about ⅛ inch thick, sprinkling on more flour as needed. For traditional crackers, cut circles (2½ or 3 inches across) with a cookie cutter or drinking glass; you can reroll and cut any scraps. Otherwise, trim any uneven edges and cut the dough into squares or rectangles. Let them sit on the counter for an hour to dry out a bit.
3. Heat the oven to 250°F. Use a thin spatula to transfer the crackers to your prepared baking sheet and bake until deep golden brown and firm, about 3 hours. Serve with butter and jam or store in an airtight container for up to a month.
Fruit and Nut Crisps
Makes: 3 to 4 dozen, depending on thickness
Time: About 2 hours
Loaded with nuts, seeds, and dried fruit, these super-thin crackers are perfect for serving with soft cheeses such as Brie or chèvre. They’re cooked twice (sort of like biscotti), baked first as a loaf, then sliced thin and baked again until golden and crackly crisp. The nuts and fruit add a ton of flavor, which you can customize based on the list opposite; the seeds contribute primarily texture, so vary or decrease them as you like.
- Butter for greasing
- 1 cup flour
- 1 teaspoon baking soda
- ¼ teaspoon salt
- ¼ teaspoon black pepper
- 1 tablespoon sugar
- 1 cup whole milk
- 1 tablespoon honey
- ½ cup chopped walnuts
- ½ cup dried cranberries
- ⅓ cup sunflower, sesame, and/or pumpkin seeds
1. Heat the oven to 350°F. Grease a loaf pan with a little butter. Mix together the flour, baking soda, salt, pepper, and sugar in a large bowl. Stir in the milk and honey, then the walnuts, dried cranberries, and sunflower seeds. Stir until just combined.
2. Pour the batter into the prepared loaf pan and bake until golden, 30 to 40 minutes. Cool on a rack. If you have time, put the loaf in the freezer for about an hour to make it easier to slice. When you’re ready to cut it, turn it out onto the counter and slice it crosswise as thin as you can (a bread knife makes this easier).
3. Heat the oven to 300°F and transfer the slices to parchment-lined baking sheets. Bake, turning once a little more than halfway through, until dark golden and crisp, about 25 minutes total. If the crackers brown before they’ve fully crisped up, crack the oven door, decrease the heat to 200°F, and continue baking until completely dried out and crisp, another 5 minutes or so. Cool on a rack; serve at room temperature or store in an airtight container for up to a couple of days.
FRUIT AND NUT CRISPS WITH PARMESAN AND ROSE-MARY In Step 1, add ½ cup freshly grated Parmesan and 1 tablespoon minced fresh rosemary along with the nuts and seeds.
5 More Combinations for Fruit and Nut Crisps
Make these your own with all your favorite flavors. Mix and match these combos as you please, using whatever seeds you would use in the main recipe:
- ½ cup chopped pistachios, ½ cup dried figs, and 2 tablespoons grated lemon zest
- ½ cup golden raisins, ½ cup pine nuts, and 2 tablespoons fennel seeds
- ½ cup chopped dried figs, ½ cup chopped olives, and 1 tablespoon minced fresh rosemary
- ½ cup chopped hazelnuts, ½ cup chopped dried apricots, and 1 tablespoon minced fresh thyme
- ½ cup chopped pecans, ½ cup dried cherries, and 2 tablespoons grated orange zest
Seeded Lavash Crackers
Makes: 2 very large crackers, enough to serve 6 to 8
Time: About 2 hours
Most people know lavash as a soft flatbread (for that, see page 438), but it can also be baked into a gorgeous, light, crisp cracker. Yeast adds the faint fermented tang that’s usually reserved for breads, but the best part about these crackers is the colorful and incredibly aromatic array of seeds and other spices that you sprinkle on top.
- 2 cups flour, plus more for rolling
- ¾ teaspoon instant yeast
- 1 teaspoon salt, plus more for sprinkling
- 1 tablespoon honey
- 2 tablespoons olive oil, plus more for greasing and brushing
- ½ teaspoon each sesame seeds, poppy seeds, cumin seeds, paprika, and za’atar (or any combination), for sprinkling
1. Put the flour, yeast, salt, honey, and olive oil in a food processor or large bowl. With the machine running, stream in ⅔ cup warm water and continue to process until the dough forms a firm ball, rides around on the blade, and is not at all sticky; if you’re working by hand, gradually stir in the water with a wooden spoon, then dump the dough onto a lightly floured surface and knead until it’s smooth and elastic. Transfer it to a lightly oiled bowl, cover, and let it sit at room temperature for 1 hour or until nearly doubled in size.
2. Heat the oven to 350°F with a baking stone on the center rack if you have one. If you don’t, brush some oil on the undersides of 2 large rimmed baking sheets (don’t put them in the oven).
3. Divide the dough in half. On a lightly floured surface, roll each piece into a rectangle ⅛ inch thick just slightly larger than the baking sheets (or stone), flipping or rotating it occasionally and sprinkling on more flour as needed to prevent sticking.
4. If you’re using a baking stone, you’ll need to bake in batches: Lightly brush one piece of dough with more olive oil and sprinkle with half the seeds or seasonings and some salt. Carefully lay it over the stone (which will be extremely hot). Set the other piece aside.
5. Otherwise, lay each piece of dough on the oiled underside of a baking sheet, pulling and draping the edges slightly over the sides of the pan if possible (this helps keep the dough from springing back and shrinking, ensuring thin and crisp crackers).
6. Bake until golden and crisp, 15 to 20 minutes, rotating the sheets about halfway through. The crackers will puff up a lot as they bake. If at any point the ends start to get too dark, crack the oven door, decrease the temperature to 200°F, and continue baking until crisp. Cool on racks and then break the lavash into pieces; serve at room temperature or store in an airtight container for up to a couple of days.
Black Pepper Hardtack
Makes: About 4 dozen
Time: About 1¼ hours
Hardtack is best (or worst) known for its impressive shelf life: These thick, crunchy crackers were used as rations on long sea voyages or in battle. They get a bad rap because, back then, they were typically little more than flour and water baked until hard. With a defter touch (and some olive oil and seasoning), they make a hearty snack to dunk in coffee, tea, beer, or wine. Or put them at the bottom of a bowl of chili, soup, or stew; they’ll absorb the flavors but stay intact. You can bake these in big batches and store them for a few weeks.
- ¼ cup olive oil, plus more for greasing
- 2 cups rye flour
- 2 cups whole wheat flour
- 2 teaspoons salt
- 2 teaspoons black peppercorns, coarsely ground
- All-purpose flour, for shaping
1. Heat the oven to 325°F and lightly oil 2 baking sheets.
2. Combine the flours, salt, and pepper in a medium bowl. Add 1⅓ cups water and ¼ cup olive oil and stir until a thick dough forms.
3. With floured hands, divide the dough into 4 pieces and roll each into a rope about 1 inch thick. Cut each rope into 1-inch pieces. Use the palm of your hand or a floured glass to press each piece into a thick round; it’s okay if they’re shaped unevenly, but you want them to be ¼ to ½ inch thick. Prick each cracker all over with a fork.
4. Transfer the crackers to the prepared baking sheets. Bake until they begin to brown, about 30 minutes; flip them and continue to bake until the other side is browned, another 30 minutes or so. Cool and store in a tightly covered container for up to a few weeks.
BACON HARDTACK Reduce the oil to 2 tablespoons. Before starting the recipe, heat the oil in a skillet and crisp ½ cup chopped bacon in it. Add the bacon (including any rendered fat) to the dough along with the water. Store the finished crackers in the fridge or freezer and let come to room temperature before serving.
OLIVE-ROSEMARY HARDTACK Use all whole wheat flour. In Step 1, add ½ cup finely chopped olives and 2 tablespoons chopped fresh rosemary to the dough along with the salt and pepper.
HARDTACK WITH NUTS AND SEEDS Reduce the black pepper to 1 teaspoon. In Step 1, add ½ cup chopped walnuts, pecans, or pistachios and 2 tablespoons sesame seeds or flaxseeds to the dough along with the salt and pepper.
PARMESAN AND DRIED TOMATO HARDTACK Use all whole wheat flour. In Step 1, add ½ cup freshly grated Parmesan and ½ cup dried tomatoes (reconstituted, well drained, and chopped) to the dough along with the salt and pepper.
Sesame Wafers
Makes: About 3½ dozen
Time: About 30 minutes
Sesame seeds (also known as benne seeds) were first grown in Africa and brought to the American South during the slave trade. These airy, crisp crackers originate in the South Carolina lowcountry and are absolutely loaded with sesame seeds (I also sprinkle some on top for good measure).
- 2 tablespoons butter, melted
- 1 teaspoon sugar
- ¼ teaspoon salt
- ½ teaspoon baking powder
- 3 large eggs
- 1 cup flour, plus more for dusting
- 1 cup toasted sesame seeds (see page 57), plus more for sprinkling
1. Heat the oven to 350°F and line 2 baking sheets with parchment paper.
2. Beat together the butter, sugar, salt, baking powder, and 2 of the eggs with an electric mixer or in a food processor until frothy. (You can do this by hand, beating with a fork, but it’ll take a little longer.) Add the flour and sesame seeds and mix until you get a smooth, stiff dough.
3. Transfer the dough to a lightly floured surface and roll it out until it’s as thin as you can make it—⅛ inch is good, but even thinner is better for that crackly texture—rotating it occasionally as you work and sprinkling on more flour as needed to keep it from sticking. Cut out the dough with cookie cutters (3-inch circles are classic) and use a thin metal spatula or bench scraper to transfer the crackers to the prepared baking sheets (don’t worry about spacing them too far apart). Gather any scraps, reroll, and repeat, taking care not to overwork the dough. Beat the remaining egg with 2 tablespoons water and brush it all over the crackers. Dock the crackers with a fork, then lightly sprinkle with more sesame seeds.
4. Bake until the crackers are lightly browned around the edges, 8 to 10 minutes, then flip and bake until golden and crisp all over, another 3 to 5 minutes. If the crackers brown before they’ve fully crisped up, crack the oven door, decrease the heat to 200°F, and continue baking until completely dried out and crisp, another 5 minutes or so. Cool on a rack; serve at room temperature or store in an airtight container for up to a couple of days.
Unyeasted Flatbreads
These are among the simplest and most satisfying foods to prepare and to eat. People have been making flatbread for as long as they could prepare grains—as far back as ancient Egypt—baking the dough on hot stones or clay ovens.
Some— like pillowy Pita or buttery Naan—are leavened with yeast, which contributes flavor and a little chewy bite. The flatbreads in this chapter are even easier to make since they cut out that step. Yet pulling them out of the oven is impressive and thrilling: You can’t beat this effort-to-payoff ratio.
Don’t mistake the straightforward technique as a lack of versatility. Of the recipes that follow, some are essentially free-form crackers, crisp and wafer thin: see Olive Oil Matzo or Norwegian Flatbrød. Others, like their yeasted counterparts, are soft and perfect for wrapping around savory fillings, from Flour Tortillas and Corn Tortillas to lesser-known ones like Injera and Lefse. All are easy to tweak: See Easy Ways to Customize Any Cracker or Flatbread as a springboard.
REHEATING FLATBREAD
Of course flatbread is at its best when eaten immediately after cooking, but that’s not always possible. The crisp ones will keep just like crackers, but many others are meant to be soft; if you reheat these in a hot oven without wrapping them in anything, they’ll dry out and become tough and brittle, so you have to take care.
The best method for reheating soft flatbreads is to stack them on top of each other, wrap the whole package tightly in aluminum foil, and put it in a 400°F oven for 10 minutes or so, until they’re hot. If you’re at all worried that they’re going to dry out (or if they weren’t that moist to begin with), soak a paper towel in water, wring out any excess, then drape it over the stack of breads before wrapping in foil. If you only want to reheat one piece at a time, a quick spin in the microwave (15 to 20 seconds) gets it soft and steamy in no time, especially if you cover it with a paper towel.
Another way to reheat flatbread is to grill it, which also adds a wonderfully smoky flavor. Flatbreads that are already cooked aren’t in danger of sticking (see the Chapati variation on page 378 for instructions on grilling raw dough), but to add flavor and encourage browning, you can brush the bread with a little oil. Don’t walk away from the grill; these go from browned to charred in a matter of seconds. Once they come off the grill, stack them (wrapped in aluminum foil if you like) to keep them warm before serving.
Recipes
Olive Oil Matzo
Norwegian Flatbrød
Chapati
Paratha
Aloo Paratha
Socca or Farinata
Injera
Flour Tortillas
Corn Tortillas
Bolani
Piadine
Dosas
Lefse
Olive Oil Matzo
Makes: 1 dozen
Time: 30 minutes
I love the crunch of matzo, but I’ve always wished it had more taste. That’s where the olive oil comes in, giving richness and flavor to this classic flatbread.
- 2 cups flour, plus more for dusting
- ½ teaspoon salt
- ⅓ cup olive oil
- Coarse sea salt (optional)
1. Heat the oven to 500°F, with a large baking stone on the center rack if you have one.
2. Put the flour, salt, and olive oil in a food processor or large bowl and mix until just combined. With the machine running, stream in ½ cup water and process until the dough forms a firm ball, rides around on the blade, and is not at all sticky. If you’re working by hand, mix in the bowl until the dough comes together.
3. Put a piece of parchment paper as large as your baking sheet or stone on a work surface and lightly dust with flour (use 2 pieces if you plan to bake 2 sheets at a time). Turn out the dough onto the parchment; if you’re working by hand, knead it for a few minutes. Divide it into 12 small balls—this is easiest if you cut it in half, then in half again, then into thirds.
4. Working in batches, rolling only enough as can comfortably fit on the parchment without overlapping, flatten each ball into a 3- to 4-inch patty, then use a rolling pin to roll each patty into a 6- to 8-inch circle; sprinkle on more flour as needed and rotate the dough to prevent sticking. If the dough pulls back on itself, set it aside to rest, uncovered, for 5 or 10 minutes; this will help you roll it thinner. The shapes can be irregular, but the dough should be so thin you can almost see through it. Dock with a fork and, if you like, sprinkle with sea salt.
5. Use the parchment to transfer the dough directly to the preheated baking stone or a baking sheet. Bake, keeping a close eye on the matzos to make sure they don’t burn, until they begin to puff up and brown, 3 to 4 minutes. Flip the matzos and bake for another minute or so. Repeat with all the dough and let cool completely. Serve at room temperature or store in an airtight container for up to a couple of days.
GARLIC-ROSEMARY MATZO Before starting, put the oil in a small saucepan over low heat. Add 3 crushed garlic cloves and 2 rosemary sprigs; warm gently until the mixture sizzles, then continue to cook until the oil is very fragrant, another minute or 2. Turn off the heat and cool the oil completely, then discard the garlic and rosemary. Proceed with the recipe, using the flavored oil in the dough.
PLAIN MATZO Omit the olive oil and increase the water to ⅔ cup, adding 1 to 2 tablespoons as needed if the dough is too dry.
Norwegian Flatbrød
Makes: 16 flatbreads
Time: 45 minutes
Traditionally served around Christmas in Norway, this unleavened flatbread is excellent at any time of year: rolled thin, with a distinctively hearty flavor from the rye and whole wheat, and cooked in a dry skillet until crunchy. If the bread is still a little chewy after it comes out of the skillet, you can finish it in a low oven until it’s as dry and crisp as you like. These are excellent with salted butter, jam, or semihard cheeses like Gouda. If you can find it, try Gjetost, a beloved Norwegian cheese that tastes almost caramelized and is fabulous with sliced apples.
- 1 cup whole wheat flour
- 1 cup rye flour
- 1 cup all-purpose flour, plus more for dusting
- ¼ teaspoon salt
1. Put the flours and salt in a food processor or stir them together in a large bowl. Slowly pour in ¾ cup water, pulsing the processor or stirring with a spoon until the dough forms a firm ball and rides around the blade. If you’re working by hand, you may need to finish kneading on a lightly floured surface.
2. Divide the dough evenly into 16 balls and flatten each into a 4- to 5-inch patty. On a lightly floured surface, roll out each patty into a circle as thin as possible, ⅛ inch thick if not thinner, about the same diameter as your biggest skillet. Add flour as needed and stack the pieces between sheets of plastic wrap or parchment paper. (To save space and time, you may want to roll out one piece, cook it, and roll out the next piece while the first one cooks.)
3. Put a large skillet or griddle over medium heat. When it’s hot, lay a piece of dough in the skillet and cook, flipping once with a thin spatula, until it’s golden and crisp on both sides, 2 to 4 minutes total (don’t worry if it’s not as crisp as you’d like; you can finish it in the oven later). Transfer to a rack and repeat with the remaining dough.
4. Cool completely and serve at room temperature or store in an airtight container for up to several weeks. To dry and crisp any pieces of bread further, put them on racks on baking sheets in a 200°F oven and leave them there until they’re as crunchy as you like.
FLAKIER FLATBRØD Slightly richer and flakier: Cut 1 stick cold butter into large chunks; in Step 1, add them to the food processor along with the flours and salt. Or, if you’re working by hand, cut the butter into smaller cubes and work it in with your fingertips or 2 knives, taking care not to let it get too warm and greasy.
The Rhythm of Making Flatbread
The process of rolling and cooking griddled flatbread can be quite fluid, even relaxing. If you like, you can roll out all of the rounds of dough at once, stack them between sheets of plastic wrap or parchment, then cook them one after the other. But I find it much faster and more satisfying to get into a nice rhythm of rolling and cooking simultaneously. Heat up your pan, then start rolling out the first piece of bread. When the pan is hot, start cooking the bread, then turn your attention to rolling out the next piece. By the time you’re done rolling (more or less), the previous piece of bread will be cooked. Keep going back and forth like this and you’ll be done before you know it.
Chapati
Makes: 8 to 12
Time: At least 1 hour
True chapatis are twice cooked—first on a dry griddle and then over an open flame—so that the dough traps steam and puffs up dramatically. This version is much simpler but makes a bread that is still delicious, with a savory whole wheat flavor that’s subtle enough to be the perfect accompaniment for all kinds of things, from a simple slathering of butter or ghee to curries, soups, and stews, Indian or not.
You can mix the dough in advance, but chapatis must be eaten immediately after a batch is cooked, when they’re irresistibly warm and soft. Line a basket or plate with a cloth napkin before you start to cook; as the chapatis come off the griddle, pile them up and wrap loosely. This will keep them warm and moist while you cook the rest.
- 2¼ cups whole wheat flour
- 1 cup all-purpose flour, plus more for dusting
- 1 teaspoon salt
1. Use a fine-mesh sieve or sifter to sift the flours and salt into the bowl of a food processor or a large bowl. Discard any coarse bran that’s left in the sieve or save for another use.
2. With the machine running, pour in 1 cup warm water and process for about 30 seconds, then remove the cover. The dough should be in a well-defined, barely sticky, easy-to-handle ball. If it’s too dry, add more water 1 tablespoon at a time and process for 5 or 10 seconds after each addition. If too wet, which is unlikely, add a tablespoon or two of flour and process briefly. If you’re working by hand, add the water in intervals, stirring after each addition until combined, and continue to work the dough in the bowl until it starts to pull together.
3. Turn the dough out onto a lightly floured surface; knead a few times if you mixed it by hand until it smooths out. Cover and let rest at room temperature for at least 30 minutes or up to 2 hours. (At this point the dough can be wrapped tightly in plastic and refrigerated for up to a day; bring to room temperature before proceeding.)
4. Divide the dough into 8 to 12 evenly sized pieces (depending on how thick you’d like the chapatis). Using flour as necessary, pat each piece into a 4-inch disk. Dust lightly with flour to keep them from sticking and cover them with plastic wrap or a damp cloth or paper towel while you pat out the others. (It’s okay to overlap them a bit, but don’t stack them.)
5. Line a basket with cloth and set it aside. Put a griddle or heavy skillet over medium heat. When it’s hot, roll out a disk until it’s about ⅛ inch thick, dusting lightly with flour as necessary; the shape doesn’t matter as long as it fits in the pan. Pat off any excess flour and put the chapati in the pan, count to 15 or so, then use a spatula to flip it and cook the other side until it starts to blister, char, and puff up a bit, about a minute. (You can use this time to roll out the next disk.) Turn and cook the first side again, until it’s dark and smells toasty. Transfer to the prepared basket and repeat with the rest of the dough. Serve immediately.
GRILLED CHAPATI Smoky and puffy, these are perfect for when you’ve already got a fire going and have some room on the grill: Heat a charcoal or gas grill until moderately hot and put the rack about 4 inches from the heat source. If you have the space, take the disks outside for the final rolling. If not, roll all the chapatis out, flour them well, and stack between layers of wax paper or parchment. Cook the chapatis, several at a time, as described in Step 5, only directly on the grill grates instead of the griddle.
6 Ways to Vary Chapati Dough
- Replace up to ½ cup of the whole wheat flour with cornmeal, brown rice flour, or chickpea flour.
- Replace the all-purpose flour with whole wheat; the dough will be slightly more difficult to handle, but the results are delicious.
- Reduce the water to ½ to ¾ cup and add ½ cup yogurt to the flour at the same time.
- Brush the chapati with oil, coconut milk, or melted butter during cooking.
- Add 1 teaspoon cumin, curry powder, or other spices or 2 teaspoons chopped fresh rosemary, thyme, or other strong herbs to the food processor along with the salt.
- Add up to 1 tablespoon minced garlic or ginger to the food processor in Step 1.
Paratha
Makes: 8 to 12
Time: At least 1 hour
Unlike chapati, this dough is enriched with butter or oil, which gives it a lovely flaky texture. (Use oil if you want the parathas to be vegan.) Like chapatis, though, these must be eaten immediately after being cooked: Line a basket or plate with a cloth napkin before starting and, as they finish, pile them up and wrap loosely.
You can also grill these; follow the directions in the variation for Grilled Chapati.
- 1½ cups whole wheat flour, or more as needed
- 1½ cups all-purpose flour, plus more for dusting
- 1 teaspoon salt
- About 4 tablespoons (½ stick) melted butter or about ¼ cup neutral oil (like grapeseed or corn)
1. Combine the flours and salt in a food processor. Turn the machine on and add ¾ cup water through the feed tube. Process for about 30 seconds, until the mixture forms a ball and is slightly sticky to the touch. If it’s dry, add another tablespoon or two of water and process for another 10 seconds. (In the unlikely event that the mixture is too sticky, add flour 1 tablespoon at a time.) Remove the dough and, using flour as necessary, shape into a ball; wrap in plastic and let rest for at least 20 minutes or up to several hours at room temperature. (Or refrigerate for up to a day or freeze for up to a week.)
2. Divide the dough into 8 to 12 evenly sized pieces (depending on how thick you’d like the parathas). Using flour as necessary, roll each piece into a 4-inch disk. Brush with melted butter or oil. Roll up like a cigar, then into a coil not unlike a cinnamon bun; set aside until you finish all the pieces.
3. Put a griddle or cast-iron skillet over medium heat. When it’s hot, press one of the coils flat, then roll it out into a thin disk (about the size of a tortilla). Add to the pan and cook until lightly browned on one side, 3 to 5 minutes; brush the top with butter or oil, flip, and brown on the second side, another few minutes. Continue until all the breads are done, then serve right away.
SPINACH PARATHA Almost as easy but with a great twist: Cook 1 pound fresh spinach and squeeze well to dry. In Step 1, add the spinach, a squeeze of fresh lemon juice, and 2 teaspoons neutral oil and process as directed, adding more water or flour as needed.
Aloo Paratha
Makes: About 1 dozen
Time: At least 1 hour
I adore these breads and was fortunate enough to learn how to make them from an expert, the great Indian cook and cookbook writer Julie Sahni. (This is a modification of her recipe.) You can cook these ahead and keep them at room temperature for up to 24 hours; serve without reheating or warm briefly in a dry skillet or even a microwave. But there is nothing like one fresh from the skillet. Ajwain, often used in Indian cooking, has a strong flavor with traces of thyme and oregano; if you can find it, use it.
- 1½ cups whole wheat flour
- 1½ cups all-purpose flour, plus more for dusting
- 2 teaspoons salt
- 1 teaspoon ajwain, dried thyme, or ground cumin
- 2 tablespoons neutral oil (like grapeseed or corn), plus more for brushing
- 1½ pounds baking potatoes, peeled and cut in half
- 1 jalapeño or other hot chile, seeded and minced
- 1½ tablespoons fresh lemon juice
- 2 teaspoons coriander
- Black pepper
- Melted butter for serving (optional)
1. Combine the flours with 1 teaspoon salt and the ajwain in a food processor; with the machine on, add the oil and ¾ cup water through the feed tube. Process for about 30 seconds, adding more water, a little at a time, until the mixture forms a ball and is slightly sticky to the touch. To do this by hand, mix the ingredients in a large bowl, stirring until the dough comes together and then transferring it to a lightly floured work surface to finish kneading it. (If you add too much water, add more all-purpose flour, 1 tablespoon at a time.) Remove the dough and, using flour as necessary, shape into a ball; wrap in plastic and let rest while you make the potato mixture. (Or refrigerate for up to a day or freeze for up to a week.)
2. Put the potatoes in a large saucepan and add water to cover and ½ teaspoon salt. Bring to a boil over high heat, then turn the heat down so the mixture simmers steadily; cook until the potatoes are tender, 15 to 20 minutes, then drain. Mash with the jalapeño, lemon juice, coriander, the remaining ½ teaspoon salt, and some pepper. Taste and adjust the seasoning (you may prefer more chile; sometimes aloo paratha is quite hot).
3. Set out a bowl of flour and a small bowl of the same oil you used in the dough, along with a spoon or brush. Lightly flour your work surface and your rolling pin. Break off a piece of dough about the size of a golf ball and toss it in the bowl of flour, then roll it in your hands to make a ball. Flatten it into a 2-inch disk, then use a floured rolling pin to roll it into a thin round, about 5 inches in diameter, dusting with flour as necessary.
4. Mound about 2 tablespoons of the potato filling in the center of one of the rounds of dough. Bring the edges of the round up over the top of the filling and press them together to make a pouch (see illustrations). Press down on the “neck” of the pouch with the palm of one hand to make a slightly rounded disk. Turn the disk in the bowl of flour and roll it out again into a round, 6 to 7 inches in diameter. Pat it between your hands to brush off the excess flour. Put the paratha on a plate and cover with a sheet of plastic wrap. Continue to roll all the remaining dough into parathas and stack them on the plate with plastic wrap between them. You can keep the parathas stacked like this for an hour or two in the refrigerator before cooking them if necessary.
5. Heat a griddle or cast-iron skillet over medium-high heat for a minute or two, then add a paratha (or 2 if they’ll fit) and cook until it darkens slightly, usually less than a minute. Flip the paratha with a spatula and cook for another 30 seconds on the second side. Use the back of a spoon or a brush to lightly coat the top with oil, then flip and repeat on the other side. Continue cooking until the bottom of the bread starts browning, flip, and repeat. Do this a few times until both sides of the paratha are golden brown and very crisp, 2 to 3 minutes total for each piece. As they finish, remove from the pan and brush with melted butter if you’re going to serve hot; otherwise, wait until you’ve reheated them before brushing with butter.
CAULIFLOWER PARATHA Traditional and similar, but with that distinctive cauliflower flavor: Instead of the potatoes, use 1 small head cauliflower. Use mustard seeds instead of the coriander.
SWEET POTATO PARATHA Substitute 1 large sweet potato for the baking potatoes; it will likely need to simmer for 5 to 10 minutes longer to become tender.
Shaping Aloo Paratha
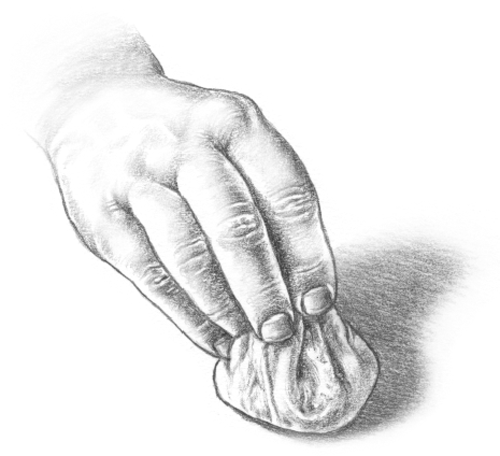
STEP 1
Bring the edges of the dough up around the filling and pinch shut.
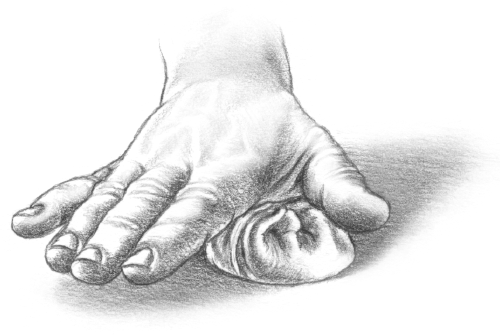
STEP 2
Press down on the filled dough pouch to flatten.
Socca or Farinata
Makes: 4 to 6 servings
Time: 1 hour, plus time for the batter to rest
Large chickpea pancakes are classic throughout Provence and Liguria, where they are called socca and farinata, respectively, and have been made for hundreds of years. Traditionally cooked in wood- or coal-burning ovens, they are simple, rustic, everyday dishes that are sold piping hot, wrapped in paper as snacks in shops and by vendors on the streets. Wonderful plain, also good dressed up with anything from cheese to rosemary, this is one of those dishes you can whip up in the morning and forget about until dinner.
- 1½ cups lukewarm water
- 1 cup chickpea flour
- 4 tablespoons extra virgin olive oil, plus more as needed
- 1 teaspoon salt
- 1 teaspoon black pepper, or more to taste
- ½ small yellow onion, thinly sliced (¼ to ½ cup, loosely packed; optional)
- 1 tablespoon fresh rosemary leaves (optional)
1. Pour the warm water into a mixing bowl and sift the chickpea flour into it to eliminate any lumps, which are ubiquitous. Add 2 tablespoons of the olive oil with the salt and pepper and whisk it all together, then cover the bowl with a towel and let it sit at room temperature for at least a few minutes and as long as 12 hours.
2. Heat the oven to 450°F. Put the remaining 2 tablespoons olive oil in a large well-seasoned or nonstick ovenproof skillet. If you’re using the sliced onion and rosemary, stir them into the batter—it will be a little thicker than it was originally—and pour it into the greased pan. Bake for about 15 minutes or until the pancake is firm and the edges set. Remove from the oven, but leave the bread in the skillet.
3. Just before serving, heat the broiler and brush the top of the socca with a little more oil if you like. Set the pan a few inches away from the broiler for a minute or two, just long enough to brown it spottily but not long enough that it would color evenly or burn. Cut it into wedges and serve hot or at least warm.
SOCCA WITH GARLIC AND CUMIN Omit the rosemary. After you put the oil in the skillet in Step 2, add 1 tablespoon minced garlic and 2 teaspoons cumin seeds and cook over medium heat until fragrant. Spoon the garlic and cumin into the batter, stir to combine, then pour the batter back into the pan and cook as directed.
OLIVE SOCCA Use the rosemary (and onion if you want) and reduce the salt to ½ teaspoon. Stir ¼ cup chopped pitted olives into the batter along with the rosemary and onion.
SOCCA WITH MEAT If you called this socca in front of people from Provence, they might laugh. Who cares; it’s good. Omit the onion, but use the rosemary. After you put the oil in the skillet in Step 2, add 4 ounces ground lamb or pork and cook until it just loses its red color and season lightly with salt and pepper. Spoon it into the batter, stir to combine, then pour the batter back into the pan and cook as directed.
Injera
Makes: About 6 large rounds
Time: About 1 day, mostly unattended
In Ethiopian cuisine, this spongy, sour bread is used to pick up and sop up all sorts of fragrant, saucy stews. The main ingredient is teff flour, which is ground from a tiny ancient grain (and just so happens to be gluten-free). It’s mixed with water and fermented overnight (or longer) to produce a distinctly tangy batter that you cook in a skillet much like a pancake.
- 2 cups teff flour
- ¾ teaspoon salt
- Neutral oil (like grapeseed or corn) for coating the pan, if necessary
1. Put the flour in a large bowl and whisk in 2½ cups water until smooth. Cover with plastic or a kitchen towel and let the batter sit at room temperature at least overnight, but ideally 24 hours (the longer the batter ferments, the more it develops its trademark sourness).
2. After the batter has fermented, gently stir in the salt. Put a large pan over medium-high heat. If it’s nonstick, you don’t need any oil; if not, drizzle a little oil into the pan and spread it around with a crumpled paper towel (this helps cover the entire surface of the pan and soak up excess oil).
3. Ladle about ¾ cup of the batter into the pan and swirl it around to coat the bottom. Cook, undisturbed, until bubbles appear on the surface (like a pancake), just a minute or two. Cover the pan and continue to cook until the top of the injera is dried out and slightly glossy, the edges begin to curl, and the middle is cooked through, another minute or 2. Invert the pan so the injera falls onto a platter or cutting board (use a rubber spatula to help it out if necessary). Repeat with the remaining batter. Serve warm or at room temperature.
Flour Tortillas
Makes: 8 to 12
Time: About 1½ hours, partially unattended
There are plenty of halfway decent flour tortillas available at supermarkets these days, but eating a freshly rolled one right out of the skillet is a pleasure reserved for the home cook. Nothing about the process is difficult. You don’t even need a tortilla press, although if you have one, here’s a chance to use it.
- 1½ cups flour, plus more for dusting
- ¼ teaspoon salt
- 2 tablespoons neutral oil (like grapeseed or corn), olive oil, softened butter, or lard
- About ½ cup boiling water, or more as needed
1. In a bowl or food processor, mix together the flour and salt. Stir or pulse in the oil. Add the water slowly—a tablespoon or two at a time if you’re mixing by hand or in a thin stream with the food processor running—until the dough holds together in a ball.
2. Turn the dough out onto a lightly floured surface and knead until it becomes smooth and elastic: 4 to 5 minutes if you’re mixing by hand and about 1 minute if you’re using a food processor. Wrap the dough in plastic and let it rest at room temperature for at least 30 minutes or up to a couple hours (or in the fridge for up to a few days; bring it back to room temperature before proceeding).
3. Divide the dough into 8 pieces if you’re rolling by hand. On a lightly floured surface, slightly flatten each piece into a disk, then cover and let rest for a few minutes. When you’re ready to cook the tortillas, use a heavy rolling pin to roll each disk as thin as possible into a circle at least 8 inches in diameter, stacking them between sheets of plastic wrap or wax paper as you work. To save time, you can continue to roll out the dough while the first pieces cook.
4. If you’re using a tortilla press, divide the dough into 12 pieces (you need less dough because it will get thinner). Shape each into a slightly flattened disk and let rest for a few minutes. Put a piece of plastic wrap or parchment paper on the inside of the press, add the dough, top with another piece of plastic, and close the press. Squeeze the clamp as hard as you can; if you’d like it thinner, rotate the dough and repeat.
5. Put a large skillet or griddle (preferably cast iron) over medium-high heat for 4 to 5 minutes. Cook the tortillas one at a time until brown spots begin to appear on the bottom, about a minute; turn and cook the other side for a minute. Wrap the finished tortillas in a towel to keep them warm while you cook the rest. Serve immediately or let them cool, wrap tightly, and store in the fridge for a few days or in the freezer for up to a few months.
MOSTLY WHOLE WHEAT TORTILLAS Substitute 1 cup whole wheat flour for 1 cup of the all-purpose flour.
SPINACH TORTILLAS Boil 8 ounces spinach until wilted, shock in ice water (or rinse in cold water) to stop the cooking, and squeeze dry. Chop the spinach as finely as you can (or purée it) and add it to the dough along with the oil. Start with less water here, adding only as much as you need for the dough to pull together.
DRIED TOMATO AND GARLIC TORTILLAS Cover ⅓ cup dried tomatoes with boiling water and set aside to rehydrate for 10 minutes or so. Drain and then mince (or purée) them with 1 tablespoon garlic. Add the mixture to the dough along with the oil; you’ll need less than the full ½ cup additional boiling water.
TORTILLA BOWLS All you need is a baking sheet and some jam jars or cups that can go in the oven (of course, you can also make these with store-bought tortillas); fill with rice, black beans, salsa, and your other favorite taco additions: Space out the cups on a baking sheet so there is enough room to drape the tortillas over them. Brush some oil on both sides of the tortillas and drape one over each cup. Bake at 400°F until lightly browned and crisp (they’ll crisp a bit more as they cool), 10 to 12 minutes.
Corn Tortillas
Makes: 12 to 16
Time: 1 hour
An especially worthwhile DIY project given that supermarket corn tortillas are chalky and dry. A tortilla press lets you bypass rolling or hand-pressing but isn’t necessary to ensure delicious results—see When to Use a Tortilla Press (below). Cooked tortillas can be turned into unbeatable chips, and the raw dough can be stuffed and griddled to make Salvadoran pupusas. And if you substitute a particular kind of dehydrated cornmeal called masarepa (available in Latin markets and online) for the masa harina, you can just as easily make the wonderful Venezuelan corncakes, arepas. Recipes for all are in the variations that follow.
- 1½ cups masa harina
- ¼ teaspoon salt
- 2 tablespoons neutral oil (like grapeseed or corn), lard, or butter
- Flour or cornmeal for kneading
1. Combine the masa and salt in a bowl; stir in the oil. Slowly stream in about 1 cup very hot water (or more as needed) while mixing with a wooden spoon or, after it’s cooled down a bit, your hand, until the dough comes together into a ball.
2. Turn the dough onto a lightly floured surface and knead until it is smooth and elastic, just a minute or two. Wrap in plastic and let it rest at room temperature for at least 30 minutes or up to a few hours.
3. Break off pieces of the dough (16 if you’re using a press or about 12 if you’re hand-rolling), roll each piece into a slightly flattened disk and lightly flour them. Place a piece of dough between 2 pieces of plastic wrap or parchment paper. Shape it into a circle 4 to 6 inches in diameter, using either a heavy rolling pin, tortilla press, or heavy skillet as described below. If you’d like thinner tortillas, rotate the dough and repeat. Stack finished tortillas between sheets of plastic wrap or parchment or, to save time, start cooking the first pieces as you finish rolling the rest.
4. Put a large skillet or griddle (preferably cast iron) over medium-high heat for 4 to 5 minutes. Cook the tortillas, 1 or 2 at a time, until brown spots appear on the bottom, about a minute. Flip and repeat on the other side. Wrap the cooked tortillas in a towel to keep them warm; serve immediately or cool and store tightly wrapped in the fridge for a few days.
BLACK BEAN AND CHEESE PUPUSAS Basically a thick, stuffed corn tortilla; for a meat version, replace the beans with shredded cooked meat: Proceed with the recipe through Step 2. Divide it into 6 pieces and roll it into balls about 2 inches in diameter. With lightly oiled hands, hold a ball in one palm and use your other thumb to make an indentation. Flatten the edges to create a small bowl. Put about 1 tablespoon each cooked black beans and shredded Jack (or any mild Mexican cheese) into each bowl. Wrap the dough around the filling and pinch to seal the edge. Pat it gently into a ¼-inch-thick disk, taking care that the filling doesn’t leak. Cook in an oiled skillet over medium-high heat until browned and slightly puffy, 3 to 4 minutes per side. Serve immediately.
AREPAS You can serve these flatbreads as is, with just a little butter or hot sauce, but the best thing is to split them in half like a bun and fill them with braised meats, beans, vegetables, cheese, avocado, or anything else you like: Substitute masarepa (see the headnote) for the masa harina and make the dough as directed; you may need up to ¼ cup more water, but add just enough to make a stiff dough. Divide the dough into 6 pieces and flatten each one into a disk about 4 inches in diameter and ½ inch thick. If cracks appear around the edges, smooth them over with moistened fingers. Cook the arepas in butter in a large skillet over medium-low heat until lightly charred and crusty on both sides, 4 or 5 minutes per side. Transfer them to a baking sheet and finish cooking in a 325°F oven until the middles are cooked through, about 10 minutes. Let cool for a few minutes, then split, fill, and serve.
FRIED TORTILLA CHIPS A million times better than anything you can get in the store: Put at least 1 inch of neutral oil (like grapeseed or corn) in a deep pan on the stove and turn the heat to medium-high; bring to 350°F. Stack the tortillas and cut them, pielike, into 4 to 8 wedges. Fry as many at once as will fit without crowding, turning if necessary. Total cooking time will be about 2 minutes; the chips should just begin to darken in color but shouldn’t totally brown. Remove with tongs or a slotted spoon and drain on paper-towel-lined plates or racks. Sprinkle with salt and serve hot or at room temperature.
BAKED TORTILLA CHIPS Heat the oven to 400°F. Lightly brush or spray each tortilla on both sides with peanut or neutral oil (like grapeseed or corn). Stack the tortillas and cut them, pielike, into 4 to 8 wedges. Bake on ungreased baking sheets, shaking once or twice, until they just begin to color, 6 to 10 minutes. Sprinkle with salt and serve hot or at room temperature.
When to Use a Tortilla Press
Most gadgets that are hauled out only once or twice in their lifetime, for just a small handful of recipes, are a waste of money (and counter space). Likewise, you shouldn’t hurry to buy a tortilla press for your first attempt at homemade tortillas. But it’s not a one-trick pony either: Because it flattens dough with firm, even pressure, it’s a useful tool for any cracker or flatbread, particularly Chapati, Seeded Lavash Crackers, and Naan, or homemade pasta, pizza dough, round dumpling wrappers, and pie dough for tartlets. And, of course, it’s a smart time-saver if you make a lot of tortillas.
You can also approximate a press by putting the dough balls between 2 sheets of plastic wrap or parchment paper and smashing them down with a heavy skillet or pot. Rotate the dough and repeat a few times to apply even pressure. Finish, if necessary, by using the heels of your hands to spread the dough gently from its edges.
Bolani
Makes: 4
Time: About 1½ hours, partially unattended
Quesadilla meets Aloo Paratha by way of Afghanistan. To make this Afghani snack, you stuff a tortillalike dough with a mixture of mashed potatoes, scallions, and cilantro (chile is optional; I use it), fold it in half, and cook until crisp. Serve it with a simple yogurt sauce flavored with garlic, coriander, and salt.
- 1¾ cups flour, plus more for dusting
- Salt
- 5 tablespoons olive oil
- 1 large or 2 small baking potatoes (12 ounces), peeled and cut in half
- ¼ cup chopped scallion
- ¼ cup chopped fresh cilantro
- 1 small fresh hot chile (like serrano), minced
- Black pepper
1. In a bowl or food processor, mix together the flour and ½ teaspoon salt. Stir or pulse in 1 tablespoon of the oil, then slowly add ½ cup water—all at once if you’re mixing by hand or in a thin stream with the food processor running—and stir or process until the dough holds together in a ball. If the dough is too dry, add more water a tablespoon at a time until you have a stiff, workable dough.
2. Turn the dough out onto a lightly floured surface and knead until it becomes smooth and elastic, 4 to 5 minutes if you mixed the dough by hand and about 1 minute if you used a food processor. Wrap the dough in plastic and let it rest at room temperature for at least 30 minutes or up to a couple hours (or in the fridge for up to a few days; bring back to room temperature before proceeding).
3. Meanwhile, put the potatoes in a saucepan and add water to cover along with a large pinch of salt. Bring to a boil over high heat, then turn the heat down so the mixture simmers steadily; cook until the potatoes are tender, 15 to 20 minutes, then drain. Mash with the scallion, cilantro, chile, 1 tablespoon olive oil, and a sprinkle of salt and pepper. Taste and adjust the seasoning.
4. Divide the dough into 4 pieces. Working with one piece of dough at a time, on a lightly floured surface, flatten into a disk, then cover and let rest for a few minutes. Roll out the disk as thin as possible into a circle 8 or 9 inches in diameter.
5. Spread a generous ⅓ cup of the potato mixture on one half of the circle, leaving a narrow border around the edge. Fold the dough over the filling to create a half-moon; gently press down to eliminate any air pockets, then press the edges to seal. Repeat with the remaining dough and filling.
6. When you’re ready to cook, put 3 tablespoons oil in a large skillet over medium-high heat. When it’s hot, add the bolani 2 at a time and cook, turning once, until golden and crisp on both sides, 2 or 3 minutes per side. Transfer to paper towels to drain while you cook the second batch. Serve warm.
SMOKY SWEET POTATO BOLANI A faintly Mexican twist. Substitute sweet potatoes for regular potatoes and 2 teaspoons chopped chipotles in adobo for the fresh chile. If you like, add a sprinkling of grated or crumbled Jack or other Mexican cheese on top of the filling before folding over the dough.
Piadine
Makes: 8
Time: About 1½ hours, partially unattended
Like an Italian tortilla made with lard instead of oil or butter. Leaf lard (fat that comes from near the kidneys of the pig) is best because it has a subtle, not very porky flavor, but any type is fine. Just stay away from hyperprocessed vegetable shortening if you can help it. Piadine are used primarily as sandwich bread, folded around anything from ham and mozzarella (traditional) to peanut butter and jelly (not). For an even richer bread, replace half the water with whole milk or try the prosciutto variation.
- 3 cups flour, plus more for dusting
- 1 teaspoon salt
- 2 teaspoons baking powder
- ¼ cup lard (preferably leaf lard)
1. In a bowl or food processor, mix together the flour, salt, and baking powder. If you’re mixing by hand, add the lard and break it up into the flour with your fingers; if you’re using a food processor, pulse it in. Add 1 cup warm water slowly—a few tablespoons at a time if you’re mixing by hand or in a thin stream with the food processor running—until the dough holds together in a ball. If the dough is very dry, add more water 1 tablespoon at a time to make a stiff, workable dough, being careful not to let it get too loose or wet.
2. Turn the dough out onto a lightly floured surface and knead until it becomes smooth and elastic, 6 to 8 minutes if you mixed the dough by hand, 2 or 3 minutes if you used a food processor. Wrap the dough in plastic and let it rest at room temperature for at least 30 minutes or up to a couple hours (or in the fridge for up to a few days; bring back to room temperature before using).
3. Divide the dough into 8 pieces. On a lightly floured surface, flatten each piece into a disk, then cover and let rest for a few minutes. Roll each disk into a circle 8 or 9 inches in diameter and about ⅛ inch thick, stacking them between sheets of plastic or wax paper as you work.
4. Put a large skillet or griddle (preferably cast iron) over medium-high heat for 4 to 5 minutes. Prick the piadine all over with a fork to prevent them from puffing up. Cook one at a time, turning once, until dark brown spots appear on both sides, about 2 minutes per side. Wrap the finished piadine in a towel to keep warm while you cook the rest. Serve immediately or let them cool, wrap tightly, and store in the fridge for a few days or the freezer for up to a few months.
PIADINE PEPE E PROSCIUTTO There’s already lard in there, so why not add some more pork? In Step 1, stir ½ cup thinly slivered prosciutto and 1 teaspoon black pepper into the dough along with the lard.
Dosas
Makes: About 1 dozen
Time: About 1 day, mostly unattended
Some dosas served at restaurants are a sight to behold: paper-thin, golden-brown crêpes rolled into tubes as long as the table is wide. While it’s hard to duplicate that show-stopping size in your own kitchen, the rest is totally doable as long as you’re up for a bit of a project (soaking and grinding lentils and rice and leaving the batter to ferment overnight). Serve these alongside chutneys, stews, or your favorite Indian vegetable dish or fill them with any of the fillings for Aloo Paratha. I’ve included a recipe below for simple curried potatoes, which is a perfect match.
- 2 cups long-grain rice or 1½ cups rice flour
- 2 cups split black lentils (urad dal) or split yellow lentils
- 1 teaspoon fenugreek seeds
- 1 teaspoon cumin seeds
- 2 teaspoons salt
- Neutral oil (like grapeseed or corn) for cooking
1. Put the rice in one large bowl and the lentils, fenugreek, and cumin seeds in another. Cover each with a few inches of water and soak for 6 to 8 hours (overnight is fine). Drain and rinse, keeping the rice and lentils separate.
2. Drain any excess water from the lentil mixture and grind it in a food processor, adding water a few tablespoons at a time to get the machine going, until it’s smooth and a bit fluffy. Transfer to a large bowl, being careful not to deflate the mixture too much. Drain the rice and purée it in the food processor, once again adding water a few tablespoons at a time to get the machine going. Add the rice to the bowl with the ground lentils, again trying not to deflate the mixture. Add the salt and carefully stir to combine. Cover with a kitchen towel or plastic wrap and let the batter ferment in a warm place overnight.
3. Once the batter has fermented (it should have increased in volume and appear slightly frothy), stir in enough water to make it pourable, about the consistency of thin pancake batter.
4. Heat the oven to 200°F. Put a large skillet or griddle (preferably cast iron) over medium-high heat. When the pan is hot, add a drizzle of oil and spread it around (a halved onion is an effective and tasty tool for this if you plan to use onion for the dosa filling). Ladle about ⅓ cup batter into the center of the pan; with the ladle, swirl the batter in concentric circles so that it covers the pan in a very thin layer, as if you were making a crêpe. Add a few drips of oil around the edges of the dosa and a few more right on top. Cook until the bottom is golden brown, about 1 minute; for a crisper dosa, flip and cook on the second side for another minute.
5. Fold the dosa in half with a spatula or carefully roll it into a loose tube with your finger (this is easier and less dangerous once it’s out of the pan). Transfer the dosa to the oven on a baking sheet to keep it warm while you cook the rest, adding a drizzle of oil to the skillet before you pour the batter each time. Serve with chutney, curried vegetables, or any condiment or filling that you like.
SHORTCUT DOSAS These have a less complex flavor than the real thing but are still delicious and infinitely faster: For the batter, combine 1 cup chickpea flour, 1 cup lentil flour, ½ cup all-purpose flour, ¾ teaspoon baking soda, 2 teaspoons salt, 1 teaspoon fenugreek seeds, and 1 teaspoon cumin seeds. (If you can’t find lentil flour, use 1½ cups chickpea flour and 1 cup all-purpose.) Stir in enough water to make a loose and pourable batter; cook as directed.
POTATO MASALA DOSAS A traditional filling with great flavor and texture: Before you make the dosas, cube 2 pounds waxy yellow potatoes, like Yukon Gold or fingerling, and boil until tender. Drain and set aside. In a large skillet over medium heat, melt 3 tablespoons butter or ghee and use it to toast 1 teaspoon each of mustard seeds and cumin seeds until fragrant. Add 1 tablespoon finely grated or minced fresh ginger to the pan along with 1 thinly sliced onion, 1 to 2 minced jalapeños, and ½ teaspoon salt. Sauté until the vegetables are soft, then add the potatoes and ½ teaspoon turmeric. Cook, stirring and mashing gently to incorporate into a thick stew; if you like, add up to ½ cup hot water, 2 tablespoons at a time, and simmer until it reaches the desired consistency. Serve alongside the dosas or use it to fill the dosas.
Lefse
Makes: About 8 large or 16 small flatbreads
Time: About 24 hours, mostly unattended
These Norwegian flatbreads, which are also popular among Scandinavian families in the Midwest, are made from little more than cold mashed potatoes and flour, rolled incredibly thin (typically with a grooved rolling pin, but a regular one is fine) and cooked in a dry skillet. The real fun is in deciding how to top them: Popular options range from simple butter and sugar or jam to more elaborate toppings that include gravlax, sliced meats, and cheeses. Whatever you choose, just add it in a thin layer all over the lefse, roll it up like a crepe, and enjoy.
- 2 large or 4 small baking potatoes (1½ pounds), peeled and cut into large chunks
- Salt
- ¼ cup heavy cream
- 3 tablespoons butter
- 1 cup flour, plus more for dusting
1. Put the potatoes in a large saucepan and add water to cover and a large pinch of salt. Bring to a boil over high heat, then turn the heat down so the mixture simmers steadily and cook until the potatoes are tender, 15 to 20 minutes. Drain and mash the potatoes until they’re as smooth as you can make them (use a ricer if you have one). Add the cream, butter, and a sprinkle of salt and mix until they’re fully absorbed. Refrigerate overnight (or for up to a few days).
2. When you’re ready to cook the lefse, add the flour to the chilled potatoes. Mix in the flour with your hand or 2 knives until the dough comes together. It’ll be crumbly at first, but be patient. Turn the dough out onto a lightly floured surface and knead it a few times until smooth. Roll the dough into a log, cut it into 8 or 16 pieces, and roll each piece into a ball. Flatten each ball into a disk, then cover and let rest for a few minutes.
3. Put a large skillet or griddle (preferably cast iron) over medium-high heat. While it heats, on a lightly floured surface, roll out your first lefse into a circle as thin as possible (10 to 12 inches for large; 6 to 8 inches for small). Add more flour to the work surface and rolling pin as needed.
4. Carefully transfer the dough to the hot pan; if the dough is very thin and fragile (as it should be), roll it up loosely onto the rolling pin, then unroll it into the skillet as you would with pie dough. Cook, turning once, until golden spots appear on both sides, about 2 minutes per side. Transfer to a clean work surface or dish towel and repeat with the remaining dough.
5. Top and serve as you like (see headnote) or stack between sheets of parchment or wax paper and refrigerate for up to a few days or freeze for up to a few months.
Shaping Dosas
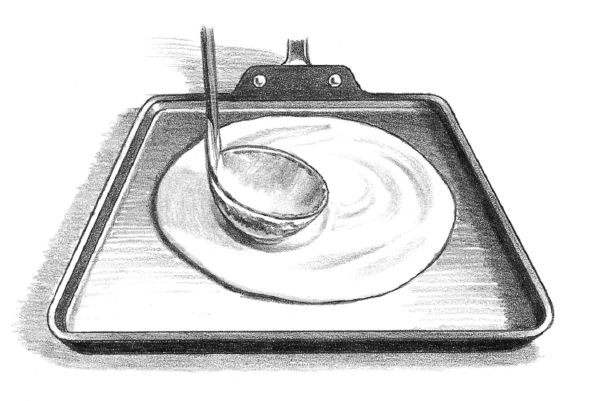
Ladle the batter onto the hot griddle or skillet; use the bottom of the ladle to spread it thin.