How to Bake Everything: Simple Recipes for the Best Baking - Mark Bittman (2016)
Yeast Breads
Warm and slathered with butter or peanut butter, dipped into olive oil or soup, served with cheese or charcuterie, or a wide variety of dishes from all over the world, few foods are as important as bread. And making bread is home cooking, although some people shy away from it. It has a reputation for being too messy, too time-consuming, and—absurdly enough, since at its most basic it’s almost literally child’s play—too difficult or particular. Like everything else, making bread requires a little cleanup; but it’s truly easy, and hardly messier than any other baking project. Perhaps the biggest surprise for most novices is that making bread can be bent to your schedule (see Making Time to Make Bread). For bread lovers, there are few reasons not to bake your own, if not routinely (and it is easy to work into your routine), then at least a few times a year.
Although innovations in bread baking are rare—the six-thousand-year-old process hasn’t changed much since Pasteur made the commercial production of standardized yeast possible in the 1800s—a stove, electric mixer, and/or food processor all make the process easier, faster, and more reliable. And sometimes people have strokes of genius that renew and improve on this oldest of foods; Jim Lahey’s method (see page 404) reintroduces a straightforward technique that an eight-year-old could follow.
When it comes to making bread, there’s a method for everyone—from novice to expert—that will work, and work well. And whatever you make, regardless of your skill level, will be good, very good, better than what is served to you in most restaurants and leagues ahead of what you can get at the store. Once you see for yourself how adaptable and versatile bread is, you might just join the leagues of borderline-obsessed home bread bakers.
The Basics of Yeast Bread
Yeast is a living thing, and it’s what gives each of the following recipes their unmatchable flavor, rise, and texture. Some loaves have nothing more than flour, yeast, salt, and water; those four ingredients alone spin off into so many things, from rustic French loaves (page 402) to flatbreads. But additions of butter, oil, eggs, and/or sugar—your basic baking heavy hitters—make for rich, lightly sweet versions that are as much of a treat as cakes or pies.
EQUIPMENT
Breads require very little in the way of equipment: all you need is a bowl, a wooden spoon, an oven, and something on which to bake the dough. (What you don’t want or need is a bread machine—see page 392.) That said, here are some items that can expand or improve on your world of homemade bread.
FOOD PROCESSOR
If you cook regularly, you want one anyway; after the refrigerator, and maybe the dishwasher, it’s the most useful kitchen appliance invented during the twentieth century. What it does for bread making is remarkable; it turns the process of making dough from a laborious chore (which has its benefits, especially if you’re a Zen type, but nevertheless discourages many people from even getting started) into a task that can take less than a minute of work. Literally. The hardest part is washing the work bowl afterward (use your dishwasher). While none of the recipes in this chapter absolutely require a food processor, many are written with it in mind.
BAKING STONE
It’s ideal for pizza, but it’s also a good thing to have if you’re remotely serious about baking bread—use it for any free-form loaf. You buy one, shove it into your oven on the lowest rack, and forget about it; it can stay there forever, and won’t detract from anything else you cook in there (the even heat it provides might even improve some things). Think of it as you do a stand mixer: Buying one won’t magically transform you into an expert baker, but if you plan to bake bread somewhat regularly, the payoff will quickly merit the investment. Plus, you can find pretty affordable ones or use an unglazed quarry tile, which is very cheap and sold at hardware stores. If you’re going to be baking a lot on the stone, invest in a pizza peel as well; it’s by far the easiest (and safest) way to slide dough into the hot oven.
INGREDIENTS
One of the many joys of baking bread is that you don’t need many ingredients, and all are inexpensive. The four most important components of nearly every yeasted bread are flour, yeast, water, and salt. There is also a multitude of optional add-ins that you may choose to use for flavor and variation.
FLOUR
I mentioned the difference between all-purpose and bread flour in the Introduction (see page 12), but it bears repeating here, since they’re used interchangeably in this chapter and you have a choice. All-purpose will always do the job; if that’s all you have, or if you make bread only occasionally and don’t want to waste pantry real estate on a special flour, you can use it to make a very good loaf.
But especially for rustic loaves, bread flour is ideal because it contains more protein (14 to 16 percent) than all-purpose (10 to 12 percent), which translates to greater gluten strength. As a result, it tends to produce elastic, easier-to-handle doughs and breads with a chewy crumb and sturdy crust. If you have bread flour on hand, use it, and consider buying it if you plan to bake bread habitually—it’s widely available, inexpensive, and easy to store in the freezer.
There are other flours too. A bit of rye or whole wheat flour adds flavor, variety, and some fiber; be aware that whole wheat flour has about as much protein as bread flour and absorbs more liquid than all-purpose, so don’t sub it for more than half of the total flour without expecting different results. For more details on all different types of flours and how to successfully combine them, see page 16.
Locally milled or so-called “artisanal” flours, made with specialized blends of wheat, are increasingly available; as with most other things, buying locally gives you more control over the quality and can be an opportunity to support small-scale farmers and producers. These will often be darker in color and have a more robust flavor that translates well to bread loaves. Feel free to experiment if that sounds like fun, but don’t agonize if it’s expensive or unavailable. Regular store-bought flour does the trick.
YEAST
Like the chemical leaveners (baking soda and baking powder) used in most quick doughs and batters, yeast lightens and lifts baked goods by producing carbon dioxide bubbles that are trapped by the dough’s structure and, in turn, make the dough rise. But it’s different in many ways, primarily because it’s actually alive. Yeasts are single-cell fungi that digest the simple sugars in the dough and produce carbon dioxide. This fermentation process happens outside of the oven, which is why you give bread dough time to rise.
You can buy yeast in various forms, including fresh, active dry, and instant. Instant—also called fast-acting, fast-rising, or rapid-rise—is the kind I use. It’s by far the most convenient: It’s a fine enough powder that you can add it directly to the dough at almost any point and it gives you a fast, reliable rise. It has ascorbic acid added (and sometimes traces of other ingredients too); this helps the dough stretch easily and increases loaf volumes.
Active dry yeast was used by most home bakers until instant yeast came along, and you may come across it in other recipes because some people are still in the habit of using it. It has bigger granules than instant yeast and must be rehydrated and dissolved (or “proofed”) in 110°F water (or other liquid) before you incorporate it into the flour. Below 105°F it will remain inert and may not even dissolve; above 115°F it will die.
It’s easy to substitute: Use 20 to 25 percent less instant yeast than active dry and add the liquid you would’ve used for proofing to the rest of the liquid. So for 1¼ teaspoons active dry yeast, you would use only 1 teaspoon instant, and if it’s proofed in ¼ cup warm water, increase the total water by an extra ¼ cup. On the other hand, if all you have is active dry yeast, use 20 to 25 percent more of it than the amount of instant.
Fresh yeast—also known as cake or compressed yeast—is usually sold in foil-wrapped cakes of about ⅔ ounce, although you probably won’t come across it unless you’re looking. It should be yellowish, soft, moist, and fresh smelling, with no dark or dried areas. It must be refrigerated (or frozen, if you prefer) since it has an expiration date and will die within 10 days of opening. As with active dry yeast, you must proof it in warm water before it’s added to a dough; when you do, it will foam and smell yeasty (if it doesn’t, it’s dead). Many bakers contend that fresh yeast tastes better than dry, but the difference, if any, is subtle. Fresh yeast is fun for experimenting, but for me instant yeast is the way to go.
And then there are sourdough starters and sponges, some of which begin with packaged yeast and others that use only wild yeasts. For more info, see page 408.
WATER
Of course water isn’t usually treated as an ingredient, and if you’re reading this, you probably have access to unlimited water from a tap. But it’s so important in bread making that it bears a quick word.
Many bread recipes specify a temperature range for the water; like us, yeast is happiest in warm water and doesn’t like to be scalded. (Water that’s too hot will actually kill it.) Active dry yeast is more finicky than instant, which is another reason I prefer the latter. To proof active dry yeast, your water should be around 110°F, which is warm enough to dissolve the granules but not so warm that it will hurt the yeast since they’re in direct contact. Instant yeast is mixed with flour before the water is added, so you can start with water straight from the tap; room temperature is fine.
Bear in mind that if you’re using a food processor, its blades will further warm the dough, so whichever yeast you’re using, the water you add to the flour mixture should be on the cooler side.
FATS AND FLAVORINGS
You might add olive oil, butter, eggs, or milk to some loaves to enrich the dough and add flavor and moisture. Fat inhibits gluten formation, so the bread will be softer and less chewy. Olive oil is particularly excellent in flatbreads, like Pita, Lavash, Fougasse, and of course Pizza (page 544), while butter, eggs, and/or milk give you favorites like Rich Golden Bread, Brioche, and Parker House Rolls.
For many, the most irresistible loaves are those with treats scattered throughout: raisins or figs, walnuts or pecans, olives, spices, cheese, whole grains…the possibilities are endless. And because you’re folding most of them into finished dough, you don’t have to worry about disrupting the chemistry or ratios of ingredients. See the lists and chart on pages 394-395 for plenty of jumping-off points.
Why I Don’t Use a Bread Machine
The appeal of a bread machine is that it does everything for you: mixing, kneading, rising, and baking. For busy people with minimal time to cook, let alone bake bread, this is an undeniably attractive proposition. The problem is that, while bread machines are perfectly acceptable at mixing and kneading dough (although no better than your own two hands), they are inept when it comes to baking it. The loaves often come out unevenly shaped and the crust thick and uneven. Plus, bread machines leave you with too little control at every step of the way. Their set-it-and-forget-it “charm” means the machines start baking the dough after a set period of time whether the dough has risen enough or not. At the end of the day, if I wanted convenience and a mediocre loaf of bread, I’d go to the supermarket. Baking in a real oven is not that much more work, and the results more than justify the extra effort.
The Magic of Gluten
You can’t talk about baking bread without mentioning gluten, the magical compound that allows yeast dough to rise and gives breads their characteristic “chew.” To make gluten, it takes water and two proteins, glutenin and gliadin, both of which are abundant in wheat and present (usually in much lesser quantities) in many other grains. And since these proteins are even more accessible when the grains are ground, wheat flour is extremely high in gluten.
As you mix and knead wheat-based batters or doughs—or simply allow them to rest, as in No-Knead Bread—the gluten develops into a weblike structure that supports the flour’s starch and other components, which in turn traps the carbon dioxide bubbles produced by yeast during fermentation (or by other leaveners, like baking powder; see page 25). This structure becomes permanent as the bread, cake, muffin, or cookie bakes and moisture evaporates to create the nooks, crannies, and air pockets that form the crumb.
Significant gluten development is really desirable only in making crusty, chewy breads, where you can use high-protein bread flour and work the dough vigorously. When you want a tender bread crumb, as in White Sandwich Bread or Brioche, it’s better to start with all-purpose, which is relatively low-protein, and be aware that there is such a thing as overkneading, even with yeasted bread.
Your Bread, Your Way
Even the simplest home-baked bread is exquisite, but there are so many quick add-ins that let you customize flavor and add texture to virtually any basic recipe. The ideas here will get you started making specialty loaves on a par with those of the best bakeries—start with any one addition from the lists, below; or see the chart opposite for some knockout combinations.
5 Add-Ins for Breads
Add any of these to the flour and yeast (before the water) if you’re making a dough that doesn’t call for a starter; if you’re following a sourdough recipe, add them along with the last addition of flour and salt:
▪ Ground spices, like black pepper, cayenne, cumin, coriander, chili powder, or cinnamon, lightly toasted first in a dry pan if you like, or spice or herb blends like za’atar, garam masala, or herbes de Provence: 1 to 2 tablespoons, depending on their pungency
▪ Whole spice seeds, like fennel, caraway, or cumin, lightly toasted first in a dry pan if you like, up to 1 tablespoon
▪ Cooked or sprouted whole grains, up to ½ cup
▪ Finely ground coffee beans or tea leaves, up to ¼ cup
▪ Wheat germ, lightly toasted first in a dry pan if you like, up to ¼ cup
13 More Add-Ins for Breads
Knead any of these ingredients into the dough during the final shaping:
▪ Chopped nuts or seeds, toasted if you like (see page 57), up to 1 cup
▪ Chopped dried fruit (including dried tomatoes) or raisins, up to ¾ cup
▪ Chopped bean or seed sprouts, up to 1 cup
▪ Chopped pitted green or black olives, up to ½ cup
▪ Chopped or crumbled ham, bacon, sausage, pancetta, or prosciutto, up to ½ cup
▪ Grated hard cheese, like Parmesan, manchego, or ricotta salata, up to 1 cup
▪ Grated medium-hard cheese, like cheddar, Asiago, or pepper Jack, up to ½ cup
▪ Bits of soft cheese, like goat, blue cheese or Gorgonzola, or cream cheese, up to ½ cup
▪ Minced mild fresh herbs, like parsley, mint, cilantro, dill, or chives, up to ¼ cup, or strong herbs like rosemary, sage, or oregano, 1 to 2 tablespoons
▪ Minced fresh chile (like jalapeño or Thai) or hot red pepper flakes or cayenne to taste
▪ Drained cooked beans, lightly mashed, up to 1 cup
▪ Roasted garlic, lightly mashed or coarsely chopped, up to ½ cup
▪ Caramelized onions, up to ½ cup
Fancy Breads for Every Day
These are as impressive and exquisite as what you’d find at the best bakeries. Try them with any rustic dough, like No-Knead Bread, Rustic French Bread, Rosemary Olive Oil Bread, Basic Sourdough, or Wild Yeast Peasant Bread, or a basic sandwich loaf such as White Sandwich Bread or 100-Percent Whole Wheat Bread.
BREAD: Fig-Walnut Bread
ADD TO DRY INGREDIENTS: 1 teaspoon cinnamon (optional)
KNEAD INTO DOUGH: ½ cup chopped dried figs and ½ cup chopped walnuts
BREAD: Fennel-Raisin Bread
ADD TO DRY INGREDIENTS: 1 teaspoon cinnamon (optional)
KNEAD INTO DOUGH: ¾ cup raisins and ¼ cup fennel seeds
BREAD: Cranberry-Pumpkin Seed Bread
ADD TO DRY INGREDIENTS: 1 teaspoon cinnamon (optional)
KNEAD INTO DOUGH: ¾ cup pumpkin seeds and ¾ cup dried cranberries
BREAD: Currant-Oatmeal Bread
ADD TO DRY INGREDIENTS: ¾ cup rolled oats, in place of ¾ cup flour, and ½ cup cooked plain oatmeal
KNEAD INTO DOUGH: ¾ cup dried currants
BREAD: Feta-Olive Bread
ADD TO DRY INGREDIENTS: 2 teaspoons cumin seeds
KNEAD INTO DOUGH: ½ cup chopped olives, preferably oily black olives, and ½ cup crumbled feta
BREAD: Extra-Cheesy Bread
ADD TO DRY INGREDIENTS: 2 teaspoons cumin seeds
KNEAD INTO DOUGH: ½ cup each shredded sharp cheddar and Gruyère; 2 teaspoons minced fresh thyme if you like
BREAD: Southwestern-Style Breakfast Bread
ADD TO DRY INGREDIENTS: 1½ teaspoons ground chile and ½ teaspoon ground cumin
KNEAD INTO DOUGH: ½ cup cooked bulk breakfast sausage and ½ cup shredded cheddar cheese
BREAD: Gorgonzola, Salami, and Caramelized Onion Bread
ADD TO DRY INGREDIENTS: 1 teaspoon black pepper
KNEAD INTO DOUGH: ⅓ cup crumbled Gorgonzola cheese, ⅓ cup sliced salami, and ⅓ cup caramelized onions
BREAD: Dried Tomato, Garlic, and Goat Cheese Bread
ADD TO DRY INGREDIENTS: 1 teaspoon black pepper
KNEAD INTO DOUGH: ½ cup chopped dried tomatoes, ½ cup crumbled goat cheese, ¼ cup roasted garlic, and 1 tablespoon minced fresh oregano
Yeast Breads Family Tree
Flour, water, yeast, and salt are all you need to make delicious bread. But that basic formula can be tweaked to expand your bread-making exponentially. Use wild yeast or commercial; replace white flour with whole grain; mix in seeds, nuts, fruits; add fats. Change the shape or oven temperature; knead the dough or don’t bother. The world of breads is infinite and surprisingly flexible, and the choice of what to make is yours.
YEAST BREADS
RICH BREADS: Milk, butter, oil, and/or eggs make a softer, richer dough.
- ✵ Challah
- ✵ Parker House Rolls
- ✵ Potato Bread
- ✵ Fougasse
- ✵ Brioche
- ✵ Rich Golden Bread
- ✵ Ciabatta
- ✵ Rosemary Olive Oil Bread
- ✵ Prosciutto Bread
FLAT BREADS: The global favorites.
- ✵ Naan
- ✵ Lavash
- ✵ Pita
- ✵ Persian Flatbread
- ✵ Grilled Lebanese Flatbread
- ✵ Afghan Snowshoe Naan
- ✵ Stuffed Pita
LEAN BREADS: The classics from Europe, with little to no fat.
- PACKAGED YEAST:
- ✵ Onion Rye
- ✵ Black Bread
- ✵ White Sandwich Bread
- ✵ Deli Rye
- ✵ No-Knead Bread
- ✵ Rustic French Bread
- ✵ Pumpernickel
- ✵ 100% Whole Wheat Bread
- WILD YEAST:
- ✵ Basic Sourdough
- ✵ Sourdough Rye
- ✵ Wild Yeast Peasant Bread
BAGELS AND BEYOND: Individually portioned. Run the gamut from soft to crisp.
- ✵ Bialys
- ✵ Soft Pretzels
- ✵ Bagels
- ✵ Crumpets
- ✵ David Chang’s Bao Buns
- ✵ Breadsticks
SWEET BREADS: Fat and sugar add flavor and moisture.
- ✵ Chocolate Babka
- ✵ Panettone
- ✵ Swedish Saffron Buns
- ✵ Monkey Bread
- ✵ Stollen
- ✵ Cinnamon Rolls
- ✵ Old-Fashioned Coffee Cake

A Walk Through the Bread-Making Process
Mixing and kneading are, quite simply, what make bread what it is. For something with so few simple ingredients, the way you combine them can mean all the difference between a deeply gratifying finished product and a flop. Eventually you will learn to do this by sight and feel alone (really), as seasoned bread bakers know well. For now the detail in these recipes is plenty. Anyone can make very good dough on the first try by following these directions.
Kneading—which can often be accelerated with the help of a food processor or stand mixer—allows dough to develop gluten, the protein that gives bread its structure and chewiness—essentially the character you’re looking for. But not all bread requires kneading; in No-Knead Bread and Wild Yeast Peasant Bread, time takes its place.
The no-knead method and food processor methods are both ideal because they allow you to maximize the water-to-flour ratio. Good yeast dough is typically wet, sometimes so wet that you can’t easily work it with your hands, so hand-kneaded doughs are sometimes necessarily less moist than they could be (this is why no-knead doughs are not only easier but better). That said, use whatever machine you’ve got, or none. Here are my thoughts on the three different methods you can use.
MAKING THE DOUGH
Almost invariably, I make yeast bread dough in a food processor and have for years, largely because I find that to be the easiest and fastest method. Most of the recipes in this chapter are written with that appliance in mind, but a handful of them also benefit, for one reason or another, from being made in a stand mixer (not to be confused with a handheld electric mixer, whose motor can’t handle bread dough). This method is even more hands-off, but it may not be practical unless you already own a stand mixer, since they can be pricy. (A food processor, on the other hand, is worth the investment for this alone, not to mention for piecrusts, cookies, and biscuits.)
And, of course, you can use the original bread machine: your hands and a bowl. For virtually every bread in this chapter, these three main methods are interchangeable based on your preference; I’ll let you know when they’re not.
WITH A FOOD PROCESSOR
Put the dry ingredients in the work bowl and, with the normal metal blade, pulse them once or twice to combine. If you’re adding butter, eggs, honey, molasses, or any other semiwet ingredients, add them to the bowl and pulse a few more times. With the machine running, pour in your liquid (usually water, sometimes milk) and let the machine run until the dough comes together in a doughy mass. If it looks too dry, add liquid a tablespoon at a time and continue processing; if it looks too wet or loose, add flour a tablespoon at a time. Once the dough has come together, let the machine run for another 30 seconds or so. This brief buzz takes the place of some (or all) of the kneading. Just take care not to overprocess; the sharp blades that develop the gluten can also break it apart, and friction can overheat the processor and the dough. Total processing time should be less than a minute.
WITH A STAND MIXER
If you make bread often, you’ll appreciate that the stand mixer does all the work for you, from mixing to kneading. This is especially useful for very wet doughs that are difficult to work by hand, and because it’s gentler than a food processor, you can let it work without worrying about overmixing.
Put all ingredients—including stir-ins like raisins and nuts—in the mixer bowl. If your machine is not very powerful, you may want to add the flour a little bit at a time so it doesn’t stall. For wet doughs like Ciabatta, start with the paddle attachment just until the ingredients are incorporated. Then, using the dough hook, start mixing on low speed and gradually increase the speed to medium, scraping the sides of the bowl as needed, until the dough is smooth and elastic. This takes 8 to 10 minutes, and afterward you can place the dough directly in a bowl to rise or seal the deal with a few kneads by hand (not always necessary but good for getting a feel for finished dough).
Some things to be aware of while you’re mixing: Sometimes the dough rides up onto the base of the hook and sort of flops around without really being kneaded. If this happens, stop the machine, pull the dough off the hook, and put it back in the bottom of the bowl. Plunge the hook back into the dough and continue mixing. Also, stand mixers have been known to jiggle and move on the counter a bit as the dough thumps against the side of the bowl, so keep an eye out.
BY HAND
Combine half the flour with the salt and yeast (and sugar if it’s included) in a large bowl and stir to blend. Add all the water, any butter, oil, eggs, or other liquids, and stir with a wooden spoon until smooth. Add the remaining flour a bit at a time. When the mixture becomes too stiff to stir with a spoon, begin kneading right in the bowl, adding as little flour as possible—just enough to keep the dough from being a sticky mess that clings to your hands and won’t stay in the bowl. When the dough comes together into a ball, transfer it to the counter and knead until smooth but still quite moist, about 10 minutes, before proceeding with the recipe. Note that No-Knead Bread and Wild Yeast Peasant Bread are always mixed by hand and don’t need to be kneaded.
LETTING THE DOUGH RISE
The next step is to place the dough in a bowl and wait for time to do its work—technically, for the yeast to metabolize the natural sugars in the dough, which is what makes it rise. All bread dough is sticky to an extent, so it may cling to the sides of the bowl as it expands; this is usually no big deal, since you’ll scrape it all out to shape it after it rises. If this really bothers you, or for any wetter dough, you can grease the bowl with a bit of oil, then roll the dough to coat. I’ve noted this in recipes where it’s absolutely necessary.
Exactly how long you wait depends primarily on temperature, and “room temperature” is vague; your kitchen probably feels different in June than it does in December. As a rule, if a room is comfortable for you, it will be great for the bread. A cozy room is ideal, giving you a steady rise with enough time for subtle flavors to develop. Unless otherwise noted, the rise times in these recipes assume warm room temperature.
But it’s a common misconception that you have to be a slave to your bread’s schedule. As food writer Laurie Colwin wrote, “Bread baking without agony is about arranging matters so that the dough suits your timetable rather than the other way around.” This part of the process is surprisingly flexible for those who like to work ahead: You can prolong or delay rising by leaving the dough in a cooler place or even refrigerating it. Of course, when you adjust the temperature, the rise time will vary, so you’ll need to judge doneness based on visual cues (for instance, the dough doubles in size).
Consider a schedule like this: Mix the dough in the morning, then let it rise at room temperature until noon or early afternoon. If the recipe directs, deflate the dough and allow it to rise again (usually for about half the time of the first rising); then shape it and let it rest for another hour or more before baking. If you need to delay any stage and return to it later, store the dough in the fridge, where it will rise much more slowly.
It’s worth mentioning that the opposite is not true; you shouldn’t rush through the rising process by leaving the dough in a hotter room or increasing the yeast. Although it works sometimes, the results are much harder to control.
SHAPING THE DOUGH
This is the trickiest part, although it’s also the most fun.
You can make any shape you like with most basic bread doughs. Just remember to lightly flour all your work surfaces (you can use semolina or cornmeal if you prefer, which will add a little crunch to the bread). Here’s how to make the most popular shapes, and see the illustrations on pages 399-401.
BOULE A boule (ball) or free-form loaf is the simplest shape. Use your hands to shape the risen dough into a round ball (you can make an oval if you prefer). Continually tuck the dough toward the center of the bottom, stretching the top slightly and creating surface tension. Pinch the seam at the bottom to smooth it over as much as possible. (Note that this process is different for No-Knead Bread and Wild Yeast Peasant Bread.) For the final rise, line a medium bowl or colander with a clean towel and sprinkle a bit of flour evenly over it. Put the dough ball, seam side down, in the towel; sprinkle with a little more flour and fold the towel over the top or loosely cover with another towel. Let rise, following the time range in the recipe.
ROLLS Divide the dough into six to twelve pieces and shape each as you would a boule by rolling on a lightly floured surface. Use your hands to smooth them over. Sprinkle a towel with flour and leave the rolls directly on the towel to rise. The baking time will obviously be shorter.
BAGUETTES Shaping baguettes is a little more complicated than the others, but easy enough with practice. I don’t recommend baguette pans; the old way, without them, gives better results. Divide the dough into two to four pieces, depending on what size you want; figure that the loaves will be about one and a half times their original size after the final rise. Roll each piece into a long, thin log and use your fingers to press the resulting seam together tightly. If you like, you can then shape the loaf into a ring just by pinching the ends together. Create a couche—a bed, essentially—for your baguettes to rise, using a piece of heavy canvas, a towel, or a large tablecloth folded into quarters to give it extra stiffness. Sprinkle it lightly with flour and arrange the baguettes on top, pulling the cloth between the loaves to hold them in place. Cover if necessary and let rise at room temperature.
LOAF A loaf pan helps keep the crust tender for softer loaves like sandwich bread. Beginners may find these a tad tricky to shape, but you’ll get the hang of it quickly.
SLASHING
To allow some of the steam built up in the dough to escape in a controlled fashion, most bakers slash the top of their dough in several places just before baking. It’s not essential, but it usually results in a more attractive loaf. Use a sharp knife or razor blade; if you’re going to be baking a lot, you might want to invest in the tool that bakers use, called a lame (pronounced lahm)—basically a long, thin stick with a razor blade on the end that gives you the most precision.
For baguettes, make three or four steep diagonal cuts, each about ¼ inch deep. For rolls, just make an X. Boules are where you can let your inner artist out; make a crosshatch pattern, parallel lines, swirls, or even write the first letter of your name.
BAKING
Strong heat and plenty of steam are the keys to a crackling crust and moist interior crumb, and there are many ways to achieve both.
For most loaves, you want to start with high heat (around 450°F) and a preheated, searing-hot surface. This is where a baking stone comes in; made of porous stone or clay, it absorbs heat and transfers it evenly and directly to the loaf. Put it on a rack in the oven (or leave it there all the time) and give it some time past normal preheating time—a half-hour isn’t too much—to come to temperature. Use a flexible cutting board, lightly floured peel, or the towel on which the dough rose to carefully drop the dough onto the stone to bake.
I also use an ovenproof skillet (preferably cast iron) for added heat and to create steam; adding moisture to the crust as it develops is what makes it brittle, as opposed to turning thick and hard. While the oven heats, put the skillet on the oven floor or the lowest rack. Right after you slide the bread into the oven, pour hot water into the skillet and immediately close the oven door. You will get lots and lots of steam. (I always take my glasses off first. And please be careful; steam is dangerous.) Close the oven door and bake as directed.
There are a zillion possible variations on this technique. Instead of or in addition to the baking stone, you can put some ordinary (but clean) rocks in the skillet, which absorb the heat like crazy and produce even more steam when you pour the water on top. And instead of or in addition to the skillet, you can use a spray bottle to mist the inside oven walls with water (just avoid spraying the lightbulb), or drop ice cubes straight into the bottom of the oven. All of these methods work, so use whichever you like best.
Once the bread is in the oven, you don’t have to pay tons of attention to it, although I rotate it about halfway through just to make sure it bakes evenly and keep an eye on the crust to make sure it doesn’t get too dark too fast (if it does, just lower the heat). Most bread is done when it makes a hollow sound when you thump it; a surefire way to know is when a quick-read thermometer inserted into the center of the loaf reads at least 200°F. Boules usually take about 40 minutes, baguettes and rolls about 20. But there are lots of variables, so keep your eyes open. If you cut into the loaf and find a gummy center, you can toast the individual slices to finish them up.
STORING BREAD
If you’re just keeping it for a few days, you can store it in wax paper—plastic makes the crust soggy—on the counter. Bread baked with added fat keeps the best since the fat locks in some moisture.
Baked bread freezes beautifully; wrap tightly in aluminum foil or plastic wrap, then in a large plastic bag. Defrost the bread on the countertop or in the fridge and then crisp it up right before serving in a 350°F oven for 10 minutes or so. Alternatively, you can place frozen loaves directly in a 400°F oven and reheat for 20 minutes or longer.
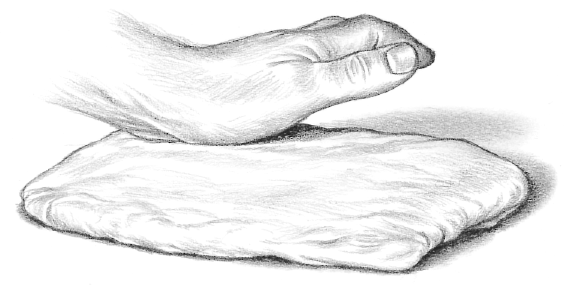
Shaggy vs. Smooth Dough
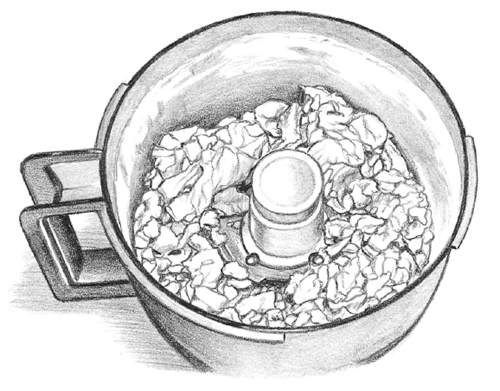
Dough about halfway through the mixing process—note that it’s still quite shaggy.

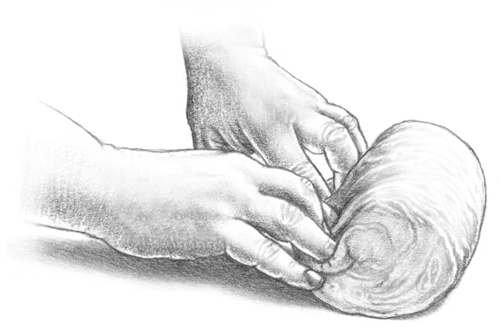
When the dough is ready, it will be ball shaped and easy to handle.
After the dough forms a ball, turn it out onto the counter and knead by hand (see illustrations, page 398) until ready to rise; depending on the recipe, this may take a few extra minutes or could be entirely unnecessary. If you want to mix bulky ingredients like raisins, nuts, or seeds into the dough, knead them in by hand or else they’ll get pulverized by the food processor blade. Just scatter the mix-ins on the counter and turn the dough out on top of them. Knead until they are incorporated into the dough.
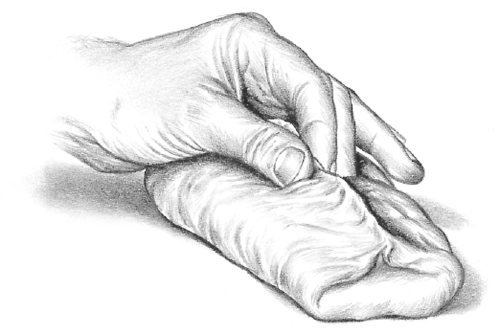
Kneading Dough
Good kneading is the key to good bread. Kneading develops gluten, which gives bread its structure and chewiness; it’s so important that you could think of it almost as another ingredient. It only takes a few minutes of elbow grease, during which time you can feel the dough go from a floury mass to a smooth, elastic ball—for many bread bakers, this is the most gratifying part of the process.

STEP 1
If necessary, use your hands or a strainer to dust the counter and dough with flour. How much you use, if any, depends on how sticky the dough is; you want to use just enough that the dough doesn’t stick to your fingers when you try to work it. Use the heels of your hands to press the dough down.
STEP 2
Fold the dough back over itself, then repeatedly fold and press the dough for 5 to 6 minutes, until it becomes far less sticky and quite elastic, like a taut ball.
Shaping Boules and Rolls
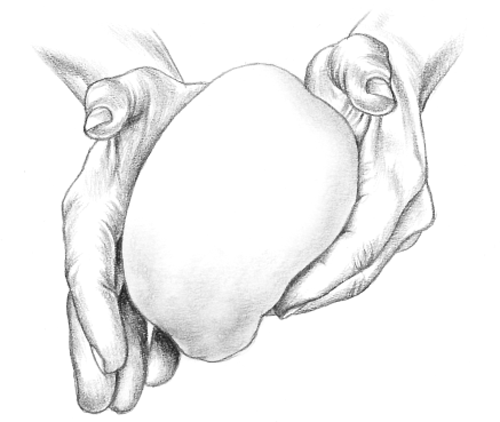
STEP 1
Shape the dough into a ball.
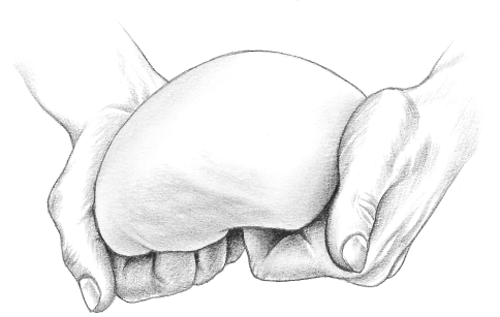
STEP 2
Continually tuck the dough toward the center of the bottom, stretching the top slightly, so that the ball becomes smooth and taut. Pinch the seam at the bottom to smooth it over as much as possible.
STEP 3
Put the ball in a bowl lined with a floured kitchen towel to rise.
STEP 4
Or, shape rolls as you would a small boule by rolling on a lightly floured surface.
Shaping Baguettes
STEP 1
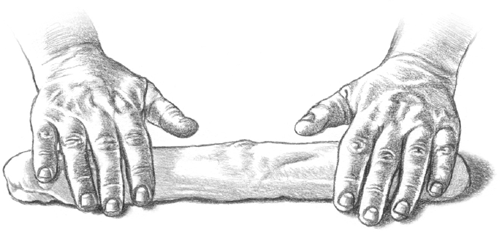
Roll the dough into a log.

STEP 2
Pinch the seam shut.
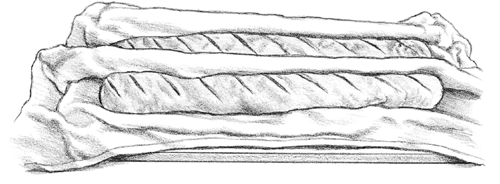
STEP 3
Let the baguettes rise on a couche made from a folded kitchen towel or tablecloth.
Shaping a Loaf
STEP 1
If the dough has risen in an oiled bowl, you need no flour; otherwise, work on a very lightly floured surface. Use the heel of your hand to form the dough into a rectangle.

STEP 2
Fold the long sides of the rectangle over to the middle.
STEP 3
Pinch the seam closed, pressing tightly with your fingers.

STEP 4
Fold under the ends of the loaf.

STEP 5
Use the back of your hand to press the loaf firmly into the pan.
Slashing the Dough
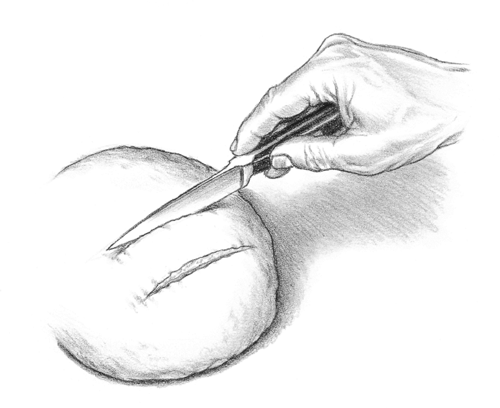
Slash the top of the shaped dough with a sharp knife or razor blade to allow steam to escape.
Making Time to Make Bread
The fact is that you can tailor bread’s rising schedule to your own. Here are a few possible scenarios:
▪ It’s easy to make dough in the morning and leave it in the fridge while you’re gone for 6 or 8 or 10 hours. Before you start to prepare dinner, take the dough out and shape it, let it rise, and then bake it. You can do that for pretty much any of the recipes in this chapter.
▪ It’s even easier—although it takes far longer—to make No-Knead Bread. Start the night before you want to eat it and plan on finishing it the following afternoon. Or start in the afternoon and plan to finish it midday the next day.
▪ Or you can mix the dough—or better still, feed your sourdough starter (see page 408) or make a sponge—at night and let it rise in a cool place (or the refrigerator) overnight, then turn the sponge into dough and let it rise again throughout the day, again in a cool place or the fridge.
▪ Since dough freezes well, you can whip up a double or triple batch of regular dough. Let the dough rise all day or overnight, then divide it, wrap the extra dough ball(s) in plastic, and toss them into the freezer. When you know you’ll want bread for dinner but don’t have the time or energy or foresight to make dough, remove a dough ball from the freezer when you wake up. Let it sit on the counter if you’re going to be around during the day to check on it or in the fridge if you’re away. Late in the afternoon, shape the dough; while making dinner, bake it. Dough balls keep well in the freezer for a few weeks; after that the yeast begins to lose power. (Dough prepared this way is well suited to pizza or pita, where maximum rise is not that important.)
▪ In a pinch, you can even skip rising: Make the dough, shape it, let it rest while you heat the oven, and bake it. This won’t be the tastiest bread you’ve ever had, but it’ll still beat most loaves you buy at the supermarket. There are many options, as you will see by the time you’ve made a few loaves; most of them are outlined in these pages.
Rustic Breads
These free-form loaves are at once humble and impressive—the kind of bread that serves as the centerpiece of a good meal and perhaps the ultimate symbol of simple nourishment. You’ll see that the ingredients lists don’t stray too far from flour, yeast, salt, and water, although there are plenty of ways to gussy them up (see Your Bread, Your Way).
Loaves like these can come with a hefty price tag at your local bakery, but it’s a total myth that you must be an artisan baker to make them. Some, like Rustic French Bread and No-Knead Bread, are so easy they feel like magic. Those with wild-yeast starters (pages 407-411) require a little more patience but no extra expertise.
Recipes
Rustic French Bread
No-Knead Bread
Black Bread
Basic Sourdough
Wild Yeast Peasant Bread
Sourdough Rye
Rustic French Bread
Makes: 1 boule
Time: About 5 hours, largely unattended
This, along with No-Knead Bread, is my go-to bread recipe. It’s easy (the dough comes together in seconds in the food processor), reasonably fast (the three-hour rise is pretty modest as far as breads go), and the crust is sensational. That last part is achieved by a hot oven and an initial blast of steam that you create by adding water to a preheated skillet. You can shorten the rise time without sacrificing much or slow it down for even better results (see the variations). You could also mix and knead the dough by hand or in a stand mixer as described on page 397.
- 4 cups all-purpose or bread flour, plus more as needed
- 1⅓ teaspoons salt
- 1 teaspoon instant yeast
1. Put the flour in the food processor, add the salt and yeast, and turn the machine on. With the machine running, pour 1½ cups water through the feed tube in a steady stream. Process until the dough forms a sticky ball. If the dough begins sticking to the side of the bowl, you’ve added too much water; add more flour, 1 to 2 tablespoons at a time, and keep going. If it’s too dry, add water 1 tablespoon at a time and process for 5 or 10 seconds after each addition.
2. Dump the lump of dough into a large bowl, cover with plastic wrap, and let rise on the counter for 3 to 4 hours.
3. Dust a counter or tabletop with a little flour. Shape the dough into a boule, sprinkling with flour as necessary but keeping it to a minimum. Line a colander or large bowl with a well-floured kitchen towel, put the dough on top, and cover with another towel (this keeps it from spreading too much). Let the dough rise for 40 minutes.
4. Put an ovenproof skillet (preferably cast iron) on the floor or lowest rack of the oven and heat the oven to 450°F. If you’ll be baking the dough on a baking stone, put it on the rack above the skillet; if not, line a baking sheet with parchment paper.
5. Slash the top of the loaf once or twice with a razor blade or sharp knife. If you’re using a baking stone, slide the boule, seam side down, onto a lightly floured peel or flexible cutting board; otherwise, place it directly on the prepared baking sheet. Use the peel or cutting board to transfer the boule to the stone or slide the baking sheet onto the rack above the heated skillet. Then partially pull out the rack with the skillet and very carefully pour in 1 cup hot water (it will create a lot of steam). Slide the rack back in and immediately close the oven door.
6. Bake for 40 to 45 minutes, rotating the bread or the baking sheet halfway through, until the crust is beautifully browned and the internal temperature reaches 200°F or the loaf sounds hollow when tapped. Keep an eye on it; if it’s browning too quickly, lower the temperature to 425°F. Remove the loaf, spray with a bit of water if you would like a shinier crust, and cool on a rack for at least an hour.
BAGUETTES OR ROLLS Same dough, different shape: Follow the directions and illustrations on pages 399 to 400. Go light on the flour when you’re shaping the dough; a little friction makes rolling easier. Cover and let rise directly on a floured towel, then transfer them to the baking stone or sheet. Bake at 465°F for 20 to 25 minutes, until the internal temperature reaches 200°F. Cool for at least 20 minutes.
FASTER FRENCH BREAD Though you sacrifice a little flavor and texture for speed here, you won’t be disappointed with the results: In Step 2, shorten the rising time to 1 hour.
WHOLE GRAIN FRENCH BREAD Substitute ¾ cup whole wheat, rye, or barley flour for ¾ cup of the all-purpose flour. You can replace up to a third of the flour (1⅓ cups) without losing the characteristic texture of the bread, but any more than that will produce a loaf with a softer crust and doughier crumb.
OVERNIGHT FRENCH BREAD Slower but even better. This bread requires 2 mixings, one to make a sponge and one to finish the dough, and takes 12 hours or preferably happens overnight. Otherwise nothing changes: In Step 1, combine 2½ cups of the flour, the yeast, and 1 teaspoon of the salt in the food processor. With the machine running, pour 1½ cups water through the feed tube. Process until a smooth, pancakelike batter is formed. Cover and let rest in a cool place overnight or for at least 6 hours. Add the remaining flour and salt to the mixture, turn the machine on again, and, if necessary, add water, a little at a time, until a moist, well-defined ball forms.
No-Knead Bread
Makes: 1 large loaf
Time: 24 hours, almost entirely unattended
Since I first shared this innovation—the word “recipe” does not do the technique justice—in the New York Times in 2006, thousands of people have made it. For many, it was their first foray into bread baking, the one that showed that the process isn’t scary, although the end result is so good that experienced bakers too have tried and fallen in love with it. It came from Jim Lahey, owner of Sullivan Street Bakery in New York City, who created a way to make a spectacular loaf at home, with a crackling crust, open-holed crumb, light texture, and fantastic flavor—all with next to no hands-on time. Perhaps the best sign of a good recipe: many have tinkered with it endlessly. I’ve listed a few of my favorite ideas for no-knead dough below, but don’t stop there. You can even use it for pizza.
A wet dough and slow fermentation are the keys to success; almost by magic, they take the place of kneading (see The Science Behind No-Knead Bread, below). You’ll also notice the unique baking method—a heated covered pot—which creates essentially an oven within an oven to trap steam as the bread bakes. I’m not kidding when I say the results will blow your mind.
The only thing required is forethought. Ideally, you will start the dough about 24 hours before you plan to eat it; you can cut that to 12 and even 9 (see the first variation), but you’ll be sacrificing some of the yeasty flavor and open crumb.
- 4 cups all-purpose or bread flour, plus more as needed
- Scant ½ teaspoon instant yeast
- 2 teaspoons salt
- 2 tablespoons olive oil (optional)
- Cornmeal, semolina, or wheat bran for dusting
1. Combine the flour, yeast, and salt in a large bowl. Add 2 cups water (it should be about 70°F) and stir until blended. You’ll have a shaggy, sticky dough; add a little more water if it seems dry. Cover the bowl with plastic wrap and let the dough rest for about 18 hours at room temperature (a couple of hours less if your kitchen is warmer; a couple more if it’s cool). The dough is ready when its surface is dotted with bubbles.
2. Lightly flour a work surface, transfer the dough to it, and fold it once or twice; it will be soft but not terribly sticky once dusted with flour. Cover loosely with plastic wrap and let rest for about 15 minutes.
3. Using just enough additional flour to keep the dough from sticking, gently and quickly shape the dough into a ball. Generously coat a cotton (not terry cloth) kitchen towel with cornmeal, semolina, or wheat bran (or use a silicone baking mat); put the dough seam side down on the towel and dust with more flour or cornmeal. Cover with another cotton towel (or plastic wrap) and let rise for about 2 hours. When it’s ready, the dough will be more than doubled in size and won’t spring back readily when poked with your finger.
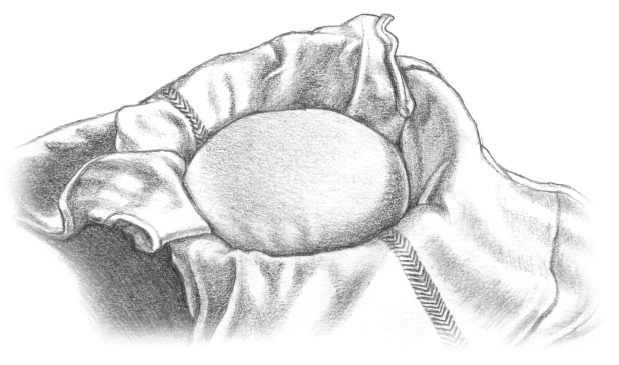
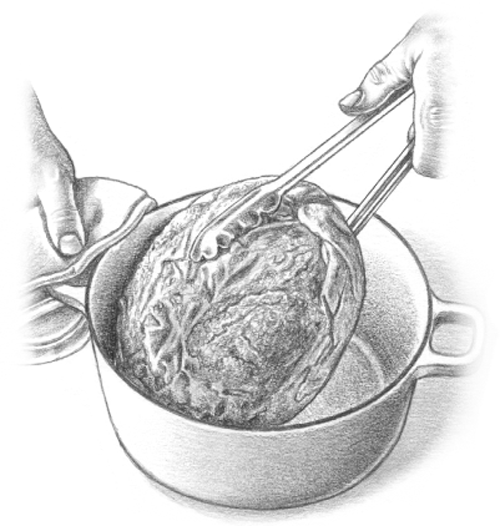
4. At least a half hour before the dough is ready, heat the oven to 450°F. Put a 3- to 4-quart covered pot (with the cover)— it may be cast iron, enamel, Pyrex, or ceramic—in the oven as it heats. When the dough is ready, carefully remove the pot from the oven and turn the dough over into the pot, seam side up. (See illustration: Slide your hand under the towel and just turn the dough over into the pot; it’s messy, and it probably won’t fall in artfully, but it will straighten out as it bakes.) Cover with the lid and bake for 30 minutes, then remove the lid and bake for another 20 to 30 minutes, until the loaf is beautifully browned; the bread’s internal temperature should be 200°F or more. (If at any point the dough starts to smell scorched, lower the heat a bit.) Remove the bread with a spatula or tongs and cool on a rack for at least 30 minutes before slicing.
FASTER NO-KNEAD BREAD Reduce the initial rise to 8 hours; skip the 15-minute resting period in Step 2 and then shape the dough in Step 3. Proceed immediately to Step 4.
WHOLE WHEAT NO-KNEAD BREAD Substitute whole wheat flour for up to 2 cups of the all-purpose flour. You won’t get quite as much rise, and the bread will be slightly denser but full flavored.
NO-POT NO-KNEAD BOULE Forget about the pot. Instead of doing the second rise on a cloth, do it on a floured pizza peel (if baking on a stone) or a parchment-lined baking sheet. After the dough has risen, put a baking stone on a low rack in the oven and a cast-iron skillet on the bottom of the oven and heat the oven to 450°F. When the oven is hot, dust the stone with cornmeal, then slide the dough from the peel onto the stone (or put the baking sheet in the oven). Pour 1 cup hot water into the skillet. Bake for 40 to 45 minutes, turning halfway through, or until the crust is golden brown.
All You Need to Know About No-Knead Bread
No-knead bread, which combines a wet dough with a long rise time, is the best way to get bakery-quality bread (crisp crust, large-holed crumb, and outstanding flavor) with almost no effort. Try it and you’ll be amazed.
The Science Behind No-Knead Bread
A few details are unique and instructive about the no-knead bread method, and they combine to give us such killer results. You can learn from these innovations and use them in the rest of your bread baking. Experiment with reducing the yeast and increasing the water and rise time for any lean bread dough—like Rustic French Bread, Pumpernickel, or Onion Rye—for similar rewarding results.
Here’s what it all means:
▪ Long rise time: A very long rise time takes the place of hands-on kneading and working. The slow fermentation also means you can start with very little yeast, giving it time to multiply on its schedule and deliver a more complex flavor.
▪ High moisture: This dough is extremely wet—more than 40 percent water, at the extreme high end of any bread recipe. Moisture is what creates crisp crust and large, well-structured crumb, but you have to limit it if you’re working the dough by hand. You couldn’t knead this wet a dough if you wanted to. And with such a long resting time, there is truly no need. (No pun intended.)
▪ Baking in a lidded pot: When you preheat the lidded pot, then add the dough, you create a moist, enclosed environment that essentially acts as its own oven, with plenty of steam inside to create the crunchy yet chewy crust. Then, once uncovered, the crust has time to harden and brown.
Baking No-Knead Bread
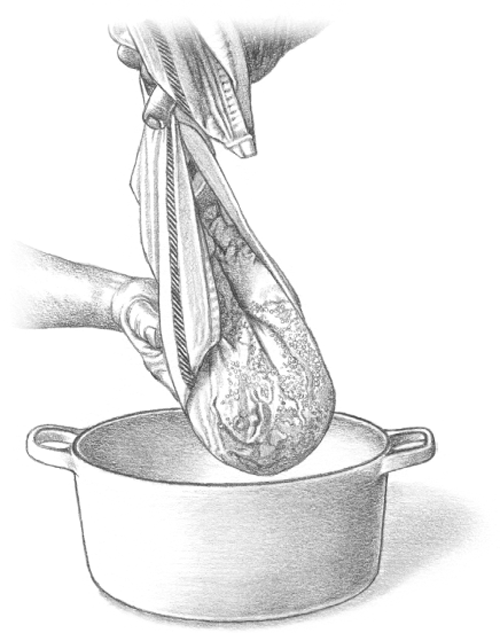
STEP 1
The trick is not to hesitate: Use the towel on which the dough rose to turn it over into the pot.
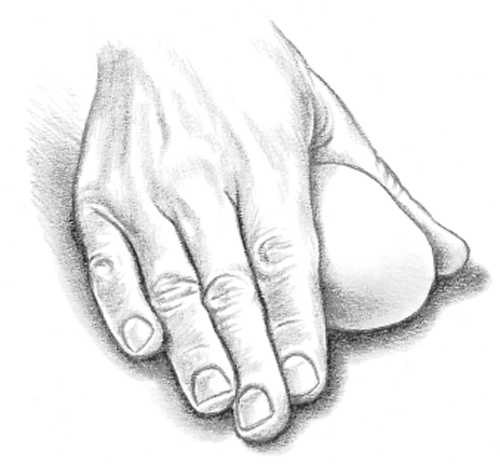
STEP 2
Use tongs to lift out the finished bread.
5 Ideas for No-Knead Bread
▪ Replace up to half the flour with whole wheat flour.
▪ Replace up to one third of the flour with whole grain flours. (The most accurate way to do this is by weight.)
▪ Incorporate add-ins or seasonings (see Your Bread, Your Way). Adding them after you’ve mixed the dough is best, except for perishable ingredients, like bacon or cheese, which have to be added just before the second rising.
▪ To make a crustier, browner loaf, remove the lid after 20 minutes and continue to bake, uncovered, for about 30 minutes.
▪ To change the shape of the loaf, use a different ovenproof lidded pot, like an oval casserole.
Black Bread
Makes: 2 small loaves or 1 large loaf
Time: 3 hours, largely unattended
This full-flavored, fairly dense, nearly black Russian-style rye is a faster alternative to its cousin, Pumper-nickel, and the added butter makes it a bit heartier too. Its characteristic color and flavor come from cocoa powder, molasses, and coffee; some versions even use chocolate (see the variation). It’s perfect for dipping into hearty soups or topping with cheese, pickles, and mustard.
- ½ cup 100 percent bran
- 2 cups all-purpose or bread flour, plus more as needed
- 1 cup rye flour
- 1 cup whole wheat flour
- 2 tablespoons cocoa powder
- 2 tablespoons sugar
- 1 tablespoon instant yeast
- 2 teaspoons salt
- 4 tablespoons ½ stick) butter, softened, or ¼ cup neutral oil (like grapeseed or corn), plus more for greasing
- ¼ cup molasses
- 2 tablespoons cider vinegar or fresh lemon juice
- 1¼ cups strong brewed coffee, lukewarm
1. Put the bran, flours, cocoa, sugar, yeast, and salt in a food processor and pulse for a few seconds to combine. Add the butter and molasses and pulse a few more times. With the machine running, pour the vinegar and 1 cup of the coffee through the feed tube. Process for about 30 seconds; the dough should be a well-defined, barely sticky, easy-to-handle ball. If it’s too dry, add coffee 1 tablespoon at a time and process for 5 or 10 seconds after each addition. If too wet, which is unlikely, add a tablespoon or 2 of flour and process briefly.
2. Grease a large bowl with a little butter or oil. Shape the dough into a rough ball, place it in the bowl, and cover with plastic wrap or a damp towel. Let rise for at least 2 hours, until nearly doubled in size. Deflate the ball and shape it once again into a ball; let rest on a lightly floured surface for about 15 minutes, covered lightly with plastic wrap. (You can make the dough ahead to this point, cover it, and refrigerate for several hours or overnight; return it to room temperature before proceeding.)
3. Using only enough flour to keep the dough from sticking to your hands or the work surface, knead the dough a few times and shape it into a large oval loaf (or divide it in half and make 2 smaller, round loaves). Grease a baking sheet with butter or oil. Put the loaf or loaves on the sheet. Cover again and let rest for 1 hour or until the dough has plumped up considerably.
4. Heat the oven to 325°F. Bake for 55 to 60 minutes for a large loaf or 40 to 45 minutes for smaller ones or until the bottom sounds hollow when you tap it and the internal temperature reads about 210°F on a quick-read thermometer. Carefully slide the loaf from the sheet and cool on a wire rack before slicing.
BLACK BREAD WITH CHOCOLATE Great with a smear of cream cheese or sour cream: Coarsely chop a 4-ounce piece of bittersweet chocolate. In Step 3, knead the chocolate into the dough.
Basic Sourdough
Makes: 3 or 4 baguettes, 1 boule, or 12 to 16 rolls
Time: At least 48 hours, largely unattended
It seems crazy to call a recipe that takes a few days “basic,” but don’t let the timing scare you off. This bread is no harder to make than any other, and most of the time is spent letting the starter ferment, which is how the bread gets its characteristic sourness. Unless someone lends you a starter, this bread will take longer to make the first time than it will going forward. For instructions on how to keep your starter alive and use it for subsequent loaves, see page 408. When it comes to shaping and baking, it’s just like Rustic French Bread.
- 4¾ cups all-purpose or bread flour, plus more as needed
- ½ teaspoon plus ⅛ teaspoon instant yeast
- 2 teaspoons salt
- 1 cup rye, whole wheat, or all-purpose flour
1. At least 3 days before you plan to bake the bread (4 days is better, really, to give the starter ample time to work), mix together 1½ cups of the all-purpose or bread flour, ⅛ teaspoon of the yeast, and 1½ cups warm water. Stir with a wooden spoon, cover loosely, and put on top of your refrigerator or in some other out-of-the-way place. Stir every 8 to 12 hours; the mixture will become bubbly and eventually develop a slightly sour smell. If your kitchen is very warm, this may happen in 24 hours; usually it takes a few days (I typically let it go for 3). When it’s frothy and has nearly doubled in volume, you’ve made sourdough starter!
2. The night before you’re ready to bake, feed the starter by combining it with 2 cups all-purpose or bread flour and about 1½ cups water. You can do this in a food processor or a bowl; process or mix until smooth. Cover and let rest overnight; the mixture will bubble and foam a bit. (You can shorten this process to 6 hours or so if you like.)
3. Next, transfer 12 ounces of it (about 1½ heaping cups) to a covered container and put it in the fridge (see page 408 for instructions on maintaining the starter and using it to make subsequent loaves). What’s left (which should be about 22 ounces, or a little less than 3 cups) is the basis for your bread; put it in the food processor with the remaining ½ teaspoon yeast, the salt, the remaining 1¼ cups all-purpose or bread flour, and the rye flour. Turn the machine on and process until a wet, very sticky, slightly shaggy dough forms. Depending on how wet your starter was, you may need to add more flour (or water, although that’s less likely). Add one or the other, 1 tablespoon at a time, processing after each addition until the dough comes together.
4. From this point on, you’re making bread as you would normally: Dump the lump of dough into a large bowl, cover with plastic wrap, and let rise on the counter for 3 to 4 hours.
5. Lightly dust a counter or tabletop with flour. Shape the dough into baguettes, a boule, or rolls (see illustrations, pages 399-400), sprinkling with flour as necessary but keeping it to a minimum. Let the shaped dough rise for another hour.
6. While it rises, heat the oven to 465°F for baguettes or rolls or 450°F for a boule. Put an ovenproof skillet (preferably cast iron) on the floor or lowest rack while the oven heats and position the rack on which you’ll cook the bread in the slot above it. If you’re using a baking stone, put it on the rack while the oven heats; if not, line a baking sheet with parchment paper.
7. Once you’re ready to bake, slide or turn the dough onto a lightly floured peel or flexible cutting board with the seam side down or onto the prepared baking sheet. Rub each loaf with a little flour and slash the top with a sharp knife or razor blade (see page 402). If you’re using a baking stone, use the peel or cutting board to slide the loaves onto the stone; otherwise, slide the baking sheet into the oven. Partially pull out the rack with the heated skillet and very carefully pour 1 cup hot water into skillet (it will create a lot of steam). Slide the rack back in and immediately close the oven door.
8. Bake for 25 to 30 minutes for baguettes and rolls or 45 to 50 minutes for a boule, turning the bread or the baking sheet halfway through, until the crust is beautifully browned, the internal temperature reaches 200°F on a quick-read thermometer, and the bottom sounds hollow when tapped. If the bread is browning too quickly, lower the temperature to 425°F. Remove the loaves, spray with a bit of water if you would like a shinier crust, and cool on a rack. Baguettes and rolls should cool for a minimum of 20 minutes and boules for at least an hour.
All About Sponges and Starters
When you need yeast, your first thought is probably to go to the store. But there is wild yeast in the air anywhere you go, as well as in all flour, and you can cultivate it with a starter—a natural method that bakers used before yeast was commercialized in the 19th century, which gives loaves like Sourdough and Wild Yeast Peasant Bread their deep flavor. A similar technique is used to make a sponge, essentially a predough mixture that’s used for everything from Ciabatta to Brioche.
Starters
Also called levain (“leavener”) or mother dough, sourdough starter is made by mixing together flour and water (plus, if you like, a pinch of instant yeast, which helps it along) and letting it sit for several days; see the full process on page 407. The mixture catches airborne wild yeast and Lactobacillus bacteria, which slowly ferment to create a characteristic tang.
The day before you’re ready to bake, you feed the starter more flour and water, let it sit, and then use some as leavening in your bread dough. The rest you put aside for the next time and feed from time to time with more water and flour to keep it “alive.” Cared for in this way, a sourdough starter can last forever; I’ve worked with ones that are literally a century old. (In fact, the easiest way to make your own sourdough is to get some starter from a friend; everyone with sourdough is happy to share.) A good sourdough starter will keep for a couple weeks or longer in the fridge without being fed.
Maintaining Sourdough Starter
Having a good bread starter on hand is a wonderful gift—it allows you to make best-quality bread on a whim. Once you’ve spent the time making it, the last thing you want to do is let it die; luckily, it’s easier to keep alive than many plants.
The easiest way to maintain yours is in the fridge. Feed your starter once a week by combining ½ cup starter with 1 scant cup flour—the same kind(s) you used to make the starter—and ½ cup water. Discard the rest of the starter, give it away (it’s a fantastic gift for other bakers!), use it to make bread, or see 9 Other Uses for Sourdough Starter. Stir the new mixture together in a nonmetal container and put it back in the fridge for a week. You can keep this up forever.
If you neglect your starter for a few weeks, it’s not the end of the world. A strong-smelling liquid (fermented alcohol) will have pooled on the surface, and the starter beneath it won’t be quite so bubbly. As long as it hasn’t turned moldy or a red or pink in color, you can save it. Stir the liquid back into the mixture or pour it off, feed it (as described above) twice a day, and keep it at room temperature until it becomes bubbly again. Once it does, in two or three days, you can return it to the fridge and resume the weekly feedings.
Maintaining starter in the fridge keeps it alive, but when you’re ready to use it to bake another loaf, you’re going to have to ramp up its activity level: About 36 hours before you’re ready to bake, take the starter out of the fridge. Feed it as described here three times at roughly 12-hour intervals. After that, it should be bubbly and ready to go. If you’re making the Basic Sourdough, proceed with Step 2 at this point.
Much of this is art and about your schedule; you will develop your own way to maintain a starter, and you will figure out how to get it ready for the heavy lifting of making a bread dough. Trust me. It’ll take time but you’ll enjoy it.
Sponge
Sometimes called by its Italian or French name biga or poolish, sponge is made in a similar way but with a shorter timeline and less demanding method. You combine flour, water, and yeast and let it sit for just a few hours or overnight, then combine it with more flour and water when it’s time to make the dough; this technique improves a loaf’s flavor and texture enormously.
Wild Yeast Peasant Bread
Makes: 1 loaf
Time: About 10 days the first time, almost entirely unattended
This is home baking at its finest. Similar to sourdough, this bread, pain levain in French, is made with only wild airborne yeast; the naturally fermented starter produces a lightly tangy flavor and wonderfully open crumb. Whole wheat flour makes this loaf heartier and more rustic, as good as or better than any comparable loaf at a top-notch bakery. Use bread flour for the rest, if you can, although all-purpose will do if it’s your only option. Use rice flour for dusting; this dough is especially sticky.
Also like sourdough, making it for the first time takes a while—somewhere around 10 days start to finish. Most of that is for periodically feeding the starter, which takes just a couple of minutes each day. The rewards are thousandfold; once you have the starter, this may just become your go-to loaf.
- About 5¼ cups bread flour (or all-purpose), plus more as needed
- About 2¼ cups whole wheat flour, plus more as needed
- 1½ teaspoons salt
- Rice flour for dusting
1. To make the starter, combine a scant ¼ cup each bread flour, whole wheat flour, and warm water in a small jar or container. Stir to combine, cover with a kitchen towel, and let sit at room temperature until it starts to bubble and puff up a bit, 2 or 3 days.
2. Once the starter bubbles and puffs, it’s time to feed it: Discard ¼ cup of the starter and combine what’s left with a scant 2 tablespoons each bread flour, whole wheat flour, and water. Repeat this discarding and feeding process at the same time every day until the starter begins to smell sour, about 1 week. When it’s ready, you can use it right away or cover and refrigerate for up to 3 days.
3. The night before you’re ready to bake, discard (or set aside) all but 2 heaping tablespoons of the starter. Combine what’s left with a scant ½ cup each bread flour, whole wheat flour, and warm water and stir well to combine. Cover and let rest overnight.
4. To make the dough, put ½ cup of the mixture in a bowl. (What’s left is your new starter; see this sidebar for how to maintain it for future use.) Add 1¾ cups warm water, 3½ cups bread flour, ½ cup whole wheat flour, and the salt. Use your hands to combine the ingredients until they come together into a sticky, shaggy dough. Cover and let rise in a warm place for 1 hour.
5. Dip your hand in water and fold the dough over on itself a few times in the bowl; cover. Repeat the same folding every hour for the next 3 hours for a total of 4 foldings. At this point, the dough should have increased noticeably in volume.
6. Line a large bowl or colander with a towel and dust it generously with rice flour.
7. Lightly dust a work surface with more rice flour, turn the dough out, and sprinkle a little rice flour on top, just enough to keep the dough from sticking. Gently and quickly shape the dough into a ball, then transfer to the bowl or colander with the seam side up. Cover and let rise in a warm place for 2½ to 3 hours (or, to enhance the sourness, refrigerate overnight); the dough should be puffed and a little jiggly, but you don’t want it too filled with gas bubbles or else it won’t rise very much during baking. (If you let it rise in the fridge overnight, bring it to room temperature before you’re ready to bake.)
8. At least 45 minutes before the dough is ready, heat the oven to 500°F. Put a 3- to 4-quart covered ovenproof pot (it may be cast iron, enamel, Pyrex, or ceramic) in the oven as it heats. When the dough is ready, carefully remove the pot from the oven and turn the dough over into the pot, seam side down. (See illustration, page 405: Pick up the towel and just turn the dough over into the pot; it’s messy, and it probably won’t fall in artfully, but it will straighten out as it bakes.) Slash the top of the dough a few times with a sharp knife or razor, then cover the pot. Reduce the heat to 450°F and bake for 20 minutes. Uncover the pot and bake for another 20 to 25 minutes, until the crust is beautifully browned.
9. Remove the bread with a spatula or tongs and cool on a rack for at least 30 minutes before slicing.
9 Other Uses for Sourdough Starter
When you’ve put the time into making a sourdough starter, it’s good to know that it can bring the same complex flavor and great rise to many of your other favorite yeasted recipes. Make any of the following recipes with unfed starter (straight from the fridge, what you might otherwise discard).
PIZZA DOUGH
Decrease the flour to 2½ cups and the yeast to ½ teaspoon; add 1 cup starter to the rest of the dough ingredients. Start with ½ cup water and add more, 2 tablespoons at a time, as needed. Proceed with the recipe.
SOFT PRETZELS
Decrease the flour to 3 cups and add 1 cup starter along with the other dough ingredients (keep the yeast). Add only ¾ cup water to start, then add up to ¼ cup more if the dough is too dry. Proceed with the recipe.
OVERNIGHT WAFFLES
Substitute 1 cup starter for the yeast and let sit overnight. Don’t bother separating the eggs when it’s time to cook; just add them to the sponge along with 1 teaspoon baking soda.
SIMPLEST PANCAKES
Use 1 cup starter in place of the baking powder and combine it with the flour, salt, and milk, along with 2 tablespoons sugar; cover and let sit at room temperature overnight. Add the eggs and melted butter just before cooking.
SIMPLEST CRACKERS
Increase the butter to 4 tablespoons (½ stick) and add 1 cup starter with the rest of the ingredients; leave out the water. Bake as directed.
CARROT CAKE
Combine the flour, spices, and salt; decrease the baking soda to 1 teaspoon and omit the baking powder. In a separate bowl, combine the sugar and oil with 1 cup starter. Use only 3 eggs and beat them in with the vanilla, then stir in the carrots, pineapple, nuts, and coconut. Fold the flour mixture into the wet ingredients and bake right away.
QUICK BREADS
Try Banana Bread or Zucchini Bread. Decrease the flour by ¼ cup and combine with ½ teaspoon each baking soda and salt; omit the baking powder. Separately, combine the sugar and oil or butter with ½ cup starter and only 1 egg. If the recipe contains milk or juice, decrease it by ¼ cup. Add the rest of the ingredients together.
SOUTHERN CORN BREAD
Omit the flour. Use 2 eggs, combined with the buttermilk and 1 cup starter. Increase the butter to 4 tablespoons (½ stick).
CHOCOLATE CAKE
Omit the baking powder, increase the baking soda to 1½ teaspoons, and decrease the milk to 1 cup. Use 2 whole eggs (don’t bother separating them) and add 1 cup starter along with the vanilla and chocolate.
Sourdough Rye
Makes: 2 loaves
Time: 5 hours, plus 5 days (including making the starter, and storing)
This recipe is adapted from one by my friend Trine Hahnemann, author of Scandinavian Baking. If you like loaves that are dense, chewy, and incredibly flavorful, it’s a revelation. Cracked rye grains add a little chewiness and interesting texture, though you can use rye flour if you’re not a fan of the texture. Fennel or caraway seeds are a welcome addition.
- 4⅔ cups rye flour
- ⅛ teaspoon instant yeast
- 2 cups all-purpose or bread flour
- 1 tablespoon salt
- 1½ cups cracked rye or additional rye flour
- Neutral oil (like grapeseed or corn) for greasing
1. To make the starter, mix together ⅔ cup rye flour, ½ cup water, and the yeast. Cover and let sit for 24 hours, then add another ⅔ cup rye flour and ½ cup water, mix, and let sit for another 24 hours. Repeat adding flour and water twice more at 24-hour intervals. Now your starter is ready.
2. Before making the dough, remove a heaping ½ cup of the starter and put it in a container to keep it alive in the fridge (feed it as directed on page 408, using rye flour instead of all-purpose flour).
3. To make the dough, combine the remaining starter in a large bowl with the remaining 2 cups rye flour, the all-purpose flour, and 2¼ cups lukewarm water. Mix well, cover with plastic wrap, and let sit overnight, up to 12 hours.
4. The next morning, the dough should be bubbly. Add the salt, the cracked rye, and 1 cup water—it will be more of a thick batter than a dough and should be pretty much pourable. Grease two 9 × 5-inch loaf pans with a little oil. Pour and scrape the batter into the pans; it should come to about an inch from the top, no higher. Cover the pans (doming them with a large bowl is preferable to plastic wrap, since the dough will stick to whatever it touches) and let rise until the dough reaches the rim of the pan, 2 to 3 hours.
5. Heat the oven to 325°F. Bake the loaves until a skewer inserted into the center comes out clean and the internal temperature reaches about 190°F on a quick-read thermometer, 1½ hours or slightly longer. Turn the loaves out of the pans and cool on a rack. Wrap in plastic and let sit at room temperature for a day before slicing and serving.
FINNISH RYE BREAD (RUISLEIPÄ) With the added tang of buttermilk and molasses, this chewy loaf is patted flat and baked as a circle with a hole in the middle. Eat it with butter and some sliced cucumber or radish or smoked fish: Make the starter as directed. When it’s ready, reserve a heaping ½ cup in the fridge to feed for later and put the rest in the food processor along with 2 cups rye flour, 1 cup all-purpose or bread flour, 1 teaspoon salt, and 2 tablespoons molasses (or more if you want a darker loaf and more intense molasses flavor). Pulse to combine. With the machine running, pour in ¼ cup buttermilk and process until the dough comes together into a sticky mass. Turn out onto a floured counter and knead a few times until smooth. Let rise in an oiled bowl until doubled in size, about 2 hours. Pat the dough into a circle about ¾ inch thick, then use your fingers or a cutter to make a hole in the middle about 2 inches in diameter. (If you prefer, you can cut the dough into a few pieces and make smaller circular loaves.) Dust the top with a little rye flour, prick the surface all over with a fork, and transfer the dough to a parchment-lined baking sheet. Cover with a kitchen towel and let rise for 1 hour. Bake at 375°F until the loaf is lightly browned and slightly crusty, about 45 minutes.
Sandwich Breads
Of course, you can make a sandwich with any bread you like, and any homemade bread will, hands down, make a better sandwich. But the recipes that follow are the classic loaves that you might find at a deli or buy in the aisle of your supermarket, and they’re leagues ahead of both.
Recipes
White Sandwich Bread
100-Percent Whole Wheat Bread
Sprouted Grain Bread
Deli Rye Bread
Onion Rye
Pumpernickel
White Sandwich Bread
Makes: 1 loaf
Time: About 5 hours, largely unattended
This is your classic loaf of white bread. Subtly sweet and rich with milk, with a perfectly tender and golden crust, it’s better than anything you can buy at the store. To get the dough to rise above the sides of the loaf pan (which is nice for looks but not essential), it helps to do the second rise (Step 4) in a warm place. I usually heat the oven as low as it will go, then turn off the heat, let it cool back down a bit, and let the dough rise in the oven for the first hour, then move the loaf pan on top of the stove for the last 30 minutes while I preheat the oven for baking. For some other go-to sandwich loaves, see the variations that follow.
- 1¼ cups whole or 2-percent milk, or more as needed
- 3½ cups all-purpose or bread flour, plus more as needed
- 1 teaspoon salt
- 2¼ teaspoons (1 package) instant yeast
- 1 tablespoon sugar
- 2 tablespoons neutral oil (like grapeseed or corn), plus more for greasing
1. Heat the milk in the microwave or in a pot on the stove until it reaches about 100°F, a little hotter than lukewarm. To mix the dough in a stand mixer (helpful here because it’s less likely than a food processor to overwork the wet dough), combine the flour, salt, yeast, sugar, oil, and milk in the mixer bowl. With a dough hook, mix on medium-low speed until the ingredients are combined, then on medium speed until the dough is tacky and smooth, 8 to 10 minutes.
2. To mix the dough in a food processor, pulse the dry ingredients together a few times to combine, then, with the machine running, add the oil and milk through the feed tube and process until the dough is a well-defined, barely sticky, easy-to-handle ball, about 30 seconds. Turn it out onto a lightly floured work surface and knead (you shouldn’t need much flour) until smooth, 4 or 5 minutes.
3. Grease a large bowl with oil. Shape the dough into a rough ball, put it in the bowl, turn it to coat all over with oil, and cover with plastic wrap. Let rest at room temperature until the dough has doubled in size, 2 hours or more.
4. Press down on the dough to deflate it. Dust your work surface with a little flour, turn the dough out onto the work surface, cover with plastic wrap, and let rest for 15 minutes.
5. Grease a 9 × 5-inch loaf pan with oil. Shape the dough into a sandwich loaf (see page 401) and transfer it to the pan. Loosely cover with a towel or plastic wrap and let rise in a warm place (see the headnote) until the top of the dough expands to about an inch above the top of the pan, about 1½ hours.
6. Heat the oven to 350°F. Brush or spray the top of the loaf lightly with water, then bake for 45 to 50 minutes, turning once, until the loaf falls easily from the pan and the bottom of the loaf sounds hollow when you tap it. (The internal temperature will be 200°F.) Remove the loaf from the pan and cool on a rack before slicing.
50-PERCENT WHOLE WHEAT SANDWICH BREAD Substitute half whole wheat flour for half of the white flour. Use honey instead of the sugar; if you’re adding the liquids separately, as you would for the food processor, add the honey with the other liquids. Let the dough rise for at least 2½ hours in Step 2.
BRAN AND OAT SANDWICH BREAD Decrease the flour to 2 cups. Add ½ cup wheat or oat bran and ¾ cup whole wheat flour. Use about ¼ cup honey or maple syrup instead of the sugar (add it with the liquids if using a food processor), and decrease the milk to about 1 cup. Add ¾ cup rolled oats (add them to the stand mixer or knead them in by hand if you used a food processor).
MULTIGRAIN BREAD This denser loaf doesn’t rise as high, but it’s big on flavor and texture: Substitute rye flour and whole wheat flour in whatever proportions you like for up to half the white flour (the less rye or whole wheat you substitute, the fluffier the loaf will be). Use 2 tablespoons honey instead of the sugar; add with the liquids if using a food processor. Knead in ¾ cup of any combination of the following: sunflower seeds, flaxseeds, sesame seeds, rolled oats, chopped nuts, and any cooked grains you might have lying around. Let the dough rise for at least 2½ hours in Step 2 and at least 2 hours in Step 4. After spraying the bread with water in Step 5, sprinkle the top with some seeds and oats (not the nuts or other grains) before baking.
ANADAMA BREAD A New England classic: Substitute ½ cup cornmeal for ½ of the cup flour. (You may also substitute 1 cup whole wheat flour for 1 cup of the white flour.) Replace the sugar with ½ cup molasses, added with the liquids if using a food processor, and use a little less milk.
ENGLISH MUFFINS A revelation and much easier than you think: Use the main recipe or any of the other variations. In Step 4, cut the dough into 12 roughly equal pieces (if you want perfectly sized muffins, use a scale). Using just enough flour to enable you to handle the dough, shape each into a 3- to 4-inch disk. Dust with flour and let rise for 30 to 45 minutes or until puffy. Heat a griddle or large skillet over low heat for about 10 minutes; do not oil it. Sprinkle it with cornmeal, then pan-cook the muffins, a few at a time, turning occasionally, until lightly browned on both sides, about 15 minutes total. Cool on a rack and split in half before toasting.
100-Percent Whole Wheat Bread
Makes: 1 loaf
Time: 12 to 28 hours, almost entirely unattended
The poofy supermarket bread that claims to be “whole wheat” is stretching the term to the point of meaninglessness. Truly whole wheat breads like this one are dense, so sturdy that some call it “travel bread.” What the loaf lacks in airiness, it makes up with its intensely nutty flavor. Slices are perfect for topping with pungent cheeses, jams, or any spread, and the dough can accommodate all sorts of additional ingredients (see the variations).
You can also substitute rye, cornmeal, oat, or other whole grain flours for up to 1 cup of the wheat flour. For a softer, lighter loaf that’s partially whole wheat, see 50-Percent Whole Wheat Sandwich Bread (page 412).
- 3 cups whole wheat flour
- ½ teaspoon instant yeast
- 2 teaspoons salt
- Neutral oil (like grapeseed or corn) for greasing
1. Combine the flour, yeast, and salt in a large bowl. Add 1½ cups water and stir until blended; the dough should be very wet, almost like a batter (add more water if it’s too thick). Cover the bowl with plastic wrap and let it rest in a warm place for at least 12 and up to 24 hours. The dough is ready when its surface is dotted with bubbles. Rising time will be shorter at warmer temperatures, a bit longer if your kitchen is chilly.
2. Grease a 9 × 5-inch loaf pan with oil. Scoop the dough into the pan and use a rubber spatula to gently spread it in evenly. Brush or drizzle the top with a little more oil. Cover with a towel and let rise until doubled, an hour or two, depending on the warmth of your kitchen. (It won’t reach the top of the pan, or will just barely.) When it’s almost ready, heat the oven to 350°F.
3. Bake for about 45 minutes, until the bottom of the loaf sounds hollow when you tap it or the internal temperature reaches about 200°F on a quick-read thermometer. Cool on a rack before slicing.
100-PERCENT WHOLE WHEAT BREAD WITH OLIVES AND WALNUTS Fold in ½ cup each chopped walnuts and chopped pitted olives (green are my favorite, but you can use any kind) before putting the dough in the pan in Step 2.
100-PERCENT WHOLE WHEAT HONEY BREAD WITH GRAINS AND FRUIT A slightly sweeter take: Add 2 tablespoons honey to the dough in Step 1. Fold in ½ cup each cooked grains (like oatmeal, quinoa, brown rice, or wheat berries) and dried fruit (chopped if necessary), before putting the dough in the pan in Step 2.
100-PERCENT WHOLE WHEAT BREAD WITH PUMPKIN AND SAGE Add 1 cup puréed cooked pumpkin (canned is fine) or squash and up to 2 teaspoons chopped fresh sage to the dough in Step 1. Reduce the water to ½ cup.
Sprouted Grain Bread
Makes: 1 loaf
Time: About 16 hours, largely unattended
A delicious vegan and gluten-free alternative to your traditional sandwich loaf. Slice it up, toast it, and enjoy with your favorite nut butter or jam.
- 3 cups spelt berries
- 1 teaspoon active dry yeast
- 2 tablespoons warm water
- 1 cup sunflower seeds
- ½ cup flaxseeds
- ½ cup walnuts
- 3 tablespoons honey
- 2 teaspoons salt
1. Rinse the spelt berries and cover them with tepid water. Let them soak for 12 to 16 hours at room temperature. The grains should be soft with the sprout barely peeking out.
2. Dissolve the yeast in the warm water and let sit for 10 minutes. Place the sunflower seeds, flaxseeds, and walnuts in a food processor and pulse until they form a grainy consistency, a minute or two.
3. Combine the spelt berries with the yeast/water mixture. Add to the food processor and pulse to combine, about 1 minute. Add the honey and salt, and process until the dough forms a ball, about 1 minute.
4. Turn the dough out onto the counter, add the nut/seed mixture, and knead it a few times. Form the dough into a ball. Grease a medium bowl with a little oil, transfer the dough to the bowl, turn to coat with oil, and cover with plastic wrap. Let the dough rise at room temperature for 1½ hours.
5. Heavily grease a loaf pan or line with parchment paper. Shape the dough into a sandwich loaf (see page 401) and transfer it to the pan. Let rise about 30 minutes, uncovered, in a warm place.
6. Heat the oven to 350°F. Bake the loaf until golden brown, about an hour. Remove the loaf from the pan as soon as it is cool enough to handle and let it cool on a rack. Serve warm or toasted.
Deli Rye Bread
Makes: 1 loaf
Time: At least 8 hours, largely unattended
This is the stuff of my childhood growing up in New York City, back when real Jewish delis were everywhere. Achieving the real thing, with a chewy crumb and dark, tough crust, does take some time, but, as with most breads, the amount of active work involved is minimal.
- 2¾ cups all-purpose or bread flour, plus more as needed
- 1 cup rye flour
- 1 teaspoon instant yeast
- 1 tablespoon sugar
- 1 tablespoon honey
- 2 tablespoons caraway seeds
- 2 teaspoons salt
- 2 teaspoons neutral oil (like grapeseed or corn), plus more for greasing
1. To make the sponge, combine ½ cup of the all-purpose flour, the rye flour, ½ teaspoon of the yeast, the sugar, honey, and 1½ cups water in a bowl (if you’re using a stand mixer, use the mixer bowl for this). Cover and let sit at room temperature for 3 to 4 hours or, if you prefer, overnight.
2. To mix the dough in a stand mixer, add the remaining 2¼ cups all-purpose flour and ½ teaspoon yeast, the caraway seeds, salt, and oil to the sponge. Using a dough hook, mix on medium-low speed until the ingredients are blended together, then raise the speed to medium and mix until the dough is elastic, shiny, and smooth (it’ll still be fairly sticky), 10 to 12 minutes.
3. To mix the dough in a food processor, put the sponge and the remaining dough ingredients except for the caraway seeds into the work bowl. Process, adding more flour 1 tablespoon at a time if the dough looks too wet, until the dough comes together into a sticky mass. Turn it out onto a well-floured counter and knead in the caraway seeds until they’re distributed throughout. Cover the dough and let it rest for 15 minutes, then knead again, sprinkling with just enough additional flour to keep it from sticking, until the dough is elastic, shiny, and smooth, another 5 minutes or so.
4. Grease a large bowl with a little oil, transfer the dough to the bowl, turn the dough in the bowl to coat it lightly in oil, cover with plastic wrap, and let rise at room temperature until doubled in size, 2 to 3 hours.
5. Turn the dough out onto a lightly floured counter and shape it into a round or oval loaf. Cover with plastic wrap and let rise on the counter for another 1½ hours.
6. About 45 minutes before the dough has risen, heat the oven to 425°F. Put an ovenproof skillet (preferably cast iron) on the floor or the lowest rack while the oven heats. If you’re using a baking stone, put it on the rack above the skillet while the oven heats; if not, line a baking sheet with parchment paper.
7. Once you’re ready to bake, slide the dough onto a lightly floured peel or flexible cutting board or transfer it to the prepared baking sheet. Slash the top of the loaf a few times with a sharp knife or razor blade and spritz the loaf with water. Use the peel or cutting board to slide the loaf onto the stone or slide the baking sheet into the oven. Partially pull out the rack with the heated skillet and very carefully pour 1 cup hot water into the skillet (it will create a lot of steam). Slide the rack back in and immediately close the oven door.
8. Bake for 10 minutes, then lower the heat to 400°F. Continue baking for 30 to 35 minutes, turning the bread or the baking sheet halfway through, until the crust is golden brown and the internal temperature reaches 200°F on a quick-read thermometer. Remove and cool on a wire rack.
9 Ways to Use Stale Bread
Stale bread is practically a different ingredient altogether; so many dishes, both sweet and savory, rely on bread that’s a little dry.
- French Toast and Overnight French Toast
- Bread Pudding, Many Ways
- Bread crumbs: It’s so helpful to have these on hand to toss with pasta, use as crust for panfried dishes, or toss over salads. Pulse very stale bread or crust in a food processor, grate it, or tear it by hand, depending on how large you want the crumbs to be. (You can toast the bread beforehand in a 250°F oven for up to an hour to get it bone-dry.) If you like, you can toss coarse crumbs in a bit of olive oil and toast until golden brown.
- Panzanella: Cube the bread, toss to coat lightly in olive oil, and toast; make a salad with chopped raw vegetables and herbs (tomatoes, cucumber, bell pepper, onion, and basil are all traditional and delicious, but you can also get creative) and dress with your favorite vinaigrette.
- Apple Charlotte
- French onion soup: Top a bowl with a thin slice of stale bread, sprinkle with grated Gruyère, and bake at 350°F for 20 to 30 minutes; broil for the last minute or two so the cheese gets toasted.
- Stuffing
- Summer Pudding, using bread instead of cake
- Anything from 7 Ways to Use Cake Scraps, particularly with sweeter breads like Challah or Brioche
Onion Rye
Makes: 1 large round or oval loaf
Time: About 4 hours, largely unattended
This rye bread is a lot faster than the preceding version; it’s a denser loaf, but the texture is nice and rustic thanks to the cornmeal. Onion packs it with flavor that’s awesome for sandwiches or with cream cheese and lox, but feel free to omit it for a shortcut version of standard rye.
- 1½ cups all-purpose or bread flour, plus more as needed
- 1 cup rye flour
- ½ cup cornmeal, plus more for dusting
- 2 teaspoons instant yeast
- 1 tablespoon sugar, honey, or molasses
- 2 teaspoons salt
- ⅔ cup milk, lukewarm
- ½ cup finely chopped onion
- 1 tablespoon plus 1 teaspoon caraway seeds
- 2 teaspoons neutral oil (like grapeseed or corn), for greasing
1. Combine the flours, cornmeal, yeast, sweetener, and salt in a food processor and process for 5 seconds. With the machine running, pour (don’t drizzle) the milk and ¼ cup plus 2 tablespoons water through the feed tube. Process for about 30 seconds, then remove the cover. The dough should be in a defined but shaggy ball, still quite sticky. If the dough is too dry, add water 1 tablespoon at a time and process for 5 or 10 seconds after each addition. If it is too wet, which is unlikely, add another tablespoon or 2 of flour and process briefly. Turn the dough out onto a lightly floured work surface and knead in the onion and 1 tablespoon of the caraway seeds by hand.
2. Put the oil in a large bowl and add the dough, turning it to coat all over, then cover with plastic wrap. Let rise until doubled in size, 2 or 3 hours (you can slow the rising by refrigerating for a few hours or hasten it by putting it in a warm place).
3. Turn the dough out onto a lightly floured surface and shape it into a round or oval loaf (it won’t rise much in the oven, so don’t make it too flat). Sprinkle a baking sheet with a little cornmeal and lay the loaf on top. Cover and let rise for another hour.
4. While the loaf rises, heat the oven to 450°F. Put an ovenproof skillet (preferably cast iron) on the floor or the lowest rack while the oven heats. If you’re using a baking stone, put it on the rack above the skillet while the oven heats.
5. Once you’re ready to bake, slide or turn the dough out onto a lightly floured peel or flexible cutting board with the seam side down if you’re using a baking stone; otherwise just leave it on the baking sheet. Slash the top with a sharp knife or razor blade, brush the loaf with a little water, and sprinkle with the remaining 1 teaspoon caraway seeds. Use the peel or cutting board to slide the loaf onto the stone or slide the baking sheet into the oven. Partially pull out the rack with the heated skillet and very carefully pour 1 cup hot water into the skillet (it will create a lot of steam). Slide the rack back in and immediately close the oven door.
6. Bake for 15 minutes, then lower the heat to 350°F and bake for another 30 to 45 minutes, until the loaf is nicely browned, its bottom sounds hollow when you tap it, and the internal temperature is 210°F on a quick-read thermometer. Cool on a rack before slicing.
Pumpernickel
Makes: 1 loaf
Time: About 5 hours, largely unattended
Molasses and cocoa powder give this deli classic its characteristic deep brown color and faintly bitter (in a good way) but balanced flavor. If you want something darker and more intense, you can increase both by 1 to 2 tablespoons, or just make Black Bread. For a really fun and impressive loaf, check out the Marble Rye variation that follows.
- 2¾ cups all-purpose or bread flour, plus more as needed
- ½ cup rye flour
- ½ cup whole wheat flour
- 2¼ teaspoons (1 package) instant yeast
- 2 teaspoons salt
- 1 tablespoon sugar
- 1 tablespoon cocoa powder
- 1 tablespoon molasses
- Neutral oil (like grapeseed or corn) for greasing
1. To mix the dough in a stand mixer, combine all of the ingredients except the oil in the mixer bowl with 1¼ cups water. Using a dough hook, mix on medium-low speed until the ingredients are blended together, then raise the speed to medium and mix until the dough is elastic, shiny, and smooth, 8 to 10 minutes.
2. To mix the dough in a food processor, put all the ingredients except the oil in the work bowl and pulse a few times to combine. With the machine running, stream in the water and process until the dough comes together into a sticky ball, about 30 seconds. Turn it out onto a floured counter and knead, using just enough additional flour to keep it from sticking, until the dough is elastic and smooth, 5 or 6 minutes.
3. Grease a large bowl with a little oil, transfer the dough to the bowl, rub a little more oil on the top of the dough, cover with plastic wrap, and let rise at room temperature until doubled in size, about 2 hours.
4. Turn the dough out onto a lightly floured counter and shape it into a round loaf. Line a colander or large bowl with a well-floured kitchen towel, put the loaf on top, and cover with another floured towel. Or, for sandwich bread, grease a 9 × 5-inch loaf pan, shape the dough into a loaf, and place in the pan (see illustrations, page 401). Let the dough rise for another 2 hours.
5. About 45 minutes before the dough has risen, heat the oven to 425°F. Put an ovenproof skillet (preferably cast iron) on the floor or the lowest rack while the oven heats. If you’re using a baking stone, put it on the rack above the skillet while the oven heats; if not, line a baking sheet with parchment paper (neither is necessary if using a loaf pan).
6. Once you’re ready to bake, slide or turn out the dough onto a lightly floured peel or flexible cutting board or transfer it to the prepared baking sheet. Slash the top of the loaf a few times with a sharp knife or razor blade. Use the peel or cutting board to slide the loaf onto the stone or slide the baking sheet or loaf pan into the oven. Partially pull out the rack with the heated skillet and very carefully pour 1 cup hot water into the skillet (it will create a lot of steam). Slide the rack back in and immediately close the oven door.
7. Bake for 10 minutes, then lower the heat to 400°F. Continue baking for 30 to 35 minutes, turning the bread or the baking sheet halfway through, until the crust is brown and the internal temperature reaches 195°F on a quick-read thermometer. Cool on a wire rack before slicing.
MARBLE RYE For this two-toned, spiral bread you make double the dough—a dark one (pumpernickel) and a light one (rye). It’s way less than double the effort, since they rise at the same time, and you get two stunning loaves in return: Make the pumpernickel dough as directed. For the rye, make the recipe again but omit the cocoa powder and molasses. After the doughs have risen in Step 2, divide each into 4 equal pieces. Pat the pieces into roughly 6-inch squares and stack them in an alternating pattern, 4 pieces per loaf. Tightly roll into a log and pinch the seam to seal. Place each loaf, seam side down, in a greased pan, cover, and let rise for another 1½ to 2 hours. Brush or spray the top of each loaf lightly with water and bake at 375°F for 45 to 50 minutes, rotating the pans halfway through, until the loaves sound hollow when you tap them. Remove from the pan and cool on a wire rack before slicing and serving.
Rich Yeasted Breads
These are made from enriched doughs—doughs that have milk, eggs, butter, and/or oil. These are not to be confused with the so-called “enriched” breads that line most supermarket shelves, which are really just your standard junky white bread, processed within an inch of its life but bulked up with a few additives to pass it off as healthy. In addition to contributing a richer flavor, the added fat inhibits gluten formation so that the crumb is softer and more tender. They’re fun to make and a real treat to eat, whether you’re having rolls at dinner or toasting slices for breakfast.
Recipes
Rich Golden Bread, 8 Ways
Brioche
Challah
Parker House Rolls
Ciabatta
Potato Bread
Rosemary Olive Oil Bread
Fougasse
Prosciutto Bread
Rich Golden Bread, 8 Ways
Makes: 1 (huge) or 2 medium round loaves
Time: At least 3 hours, largely unattended
A rich, versatile dough that yields a golden crumb and shiny crust. This bread goes from sandwich loaf to Cinnamon-Raisin Swirl Bread with just a few simple tweaks. And the add-in possibilities are endless. See Your Bread, Your Way for ideas.
- 3½ cups all-purpose or bread flour, plus more as needed
- 2 teaspoons instant yeast
- 2 teaspoons salt
- 1 tablespoon sugar
- 2 tablespoons cold butter
- 2 eggs
- About 1 cup milk, lukewarm
- Softened butter for greasing
- Melted butter for brushing
1. Combine the flour, yeast, salt, sugar, and cold butter in a food processor. Pulse the machine on and off until the butter is evenly distributed in the flour but not completely blended in. Add the eggs and pulse a few more times.
2. With the machine running, slowly add ¾ cup of the milk through the feed tube. Process for about 30 seconds, adding more milk if necessary, a little at a time, until the mixture forms a ball and is slightly sticky to the touch. If it is too dry, add another tablespoon or two of milk and process for another 10 seconds. In the unlikely event that the mixture is too sticky, add flour, a tablespoon at a time.
3. Turn the dough onto a floured work surface and knead it a bit by hand. (Now’s the time to add extra ingredients to the dough if you like; simply knead them in until well incorporated.) Form a smooth, round dough ball, put it in a bowl, and cover with plastic wrap; let rise until the dough doubles in size, 1 to 2 hours. (You can cut this rising time short if you are in a hurry, or you can let the dough rise more slowly, for up to 6 or 8 hours, in the refrigerator. At this point, you may also wrap the dough tightly in plastic wrap and freeze for up to a month; thaw in a covered bowl in the refrigerator or at room temperature.)
4. When the dough is ready, divide it into 2 pieces if you like or leave whole; roll each piece into a round ball. Put each ball on lightly floured surface, sprinkle with a little flour, and cover with plastic wrap or a towel. Let rest until the dough puffs slightly, about 20 minutes.
5. Pinch the bottom of the ball(s) to seal the seam as well as you can. Butter 1 or 2 shallow baking dishes or cake pans that will comfortably hold the loaves; they should not (yet) quite fill the pans. Cover and let rise for at least an hour and preferably longer, up to 2 hours. It’s okay if the dough rises over the sides of the pans a bit.
6. Heat the oven to 350°F and set a rack in the middle. Brush the top of the loaf or loaves with melted butter. Bake for about 40 minutes for one loaf (check at 25 minutes for 2 loaves), until the crust is golden brown and the internal temperature of the bread reaches 210°F on a quick-read thermometer. Immediately turn the breads out of their dishes or pans and cool on a rack. When ready to serve, cut with a serrated knife—the bread will be rich and delicate.
RICH GOLDEN ROLLS Slightly crisp on the outside, airy on the inside: In Step 4, instead of shaping the dough into 1 or 2 loaves, keep dividing it in half until you have 16 medium or 24 small balls, then shape them into rolls (see illustration, page 399). Grease a couple of baking sheets or line them with parchment paper. Put the rolls on the sheets, a couple inches apart, cover, and let rise for about 1 hour. Proceed with the recipe, baking for 20 to 30 minutes, depending on the size of the rolls.
RICH GOLDEN SANDWICH BREAD In Step 5, instead of greasing the baking dishes or cake pans, grease a 9 × 5-inch loaf pan. Shape the dough into a sandwich loaf (see illustrations, page 401). Proceed with the recipe, adding about 5 minutes to the baking time.
SAFFRON FRUIT-AND-NUT BREAD Like a fancy holiday bread, with less work: In Step 1, add a large pinch of saffron threads to the flour mixture before running the food processor. While the dough is rising for the first time, put 1 cup dried fruit—like golden raisins, cherries, cranberries, chopped apricots, or a mix—in a small bowl; heat ½ cup brandy, rum, or apple juice, pour it over the fruit, and let the fruit soak for about 30 minutes, then drain well. Roughly chop ½ cup almonds, pecans, or walnuts. In Step 3, knead in the fruit and nuts.
COCOA SWIRL BREAD Not too sweet, but definitely chocolaty: Follow the directions for the Rich Golden Sandwich Bread variation. While the dough is rising for the first time, mix together ¼ cup cocoa powder and ½ cup sugar. In Step 5, after you have shaped the dough into a rectangle but before you finish shaping it into a loaf, sprinkle the cocoa mixture evenly over the dough. Wet your hands and shake a few drops of water over all (or spray lightly with a water bottle if you have one; or use milk); use a fork to rub the cocoa and water into the dough a bit; it should be a light paste. Finish shaping the dough into a sandwich loaf (see page 401), fit it into the prepared loaf pan, and bake as directed.
CINNAMON-RAISIN SWIRL BREAD Follow the preceding variation, substituting 3 tablespoons cinnamon for the cocoa powder. After rubbing the cinnamon-sugar paste into the dough, sprinkle ½ cup raisins over the top and proceed.
POPPY SEED SWIRL BREAD An Old World treat made easy with prepared prune (dried plum) spread, which should be available in your supermarket: Follow the variation for Cocoa Swirl Bread, only instead of a cocoa-sugar mixture, combine ¾ cup prune spread with ¼ cup poppy seeds; spread over the rectangle of dough (no need to add any water).
BRAIDED RICH GOLDEN BREAD Like challah but easier: In Step 4, shape the dough into one large ball. In Step 5, divide the dough into 3 pieces; roll each piece into a rope about 14 inches long and 1 inch thick. Braid them on a lightly greased baking sheet, as illustrated on page 421. Right before baking, brush with egg wash if you like (see How Do I Get That Shiny Crust? above) and sprinkle with poppy seeds (also optional). Proceed with the recipe; reduce the rising time to about 1 hour and the baking time to 30 to 35 minutes.
How Do I Get That Shiny Crust?
It’s easy: Right before the bread or rolls go into the oven, make an egg wash by beating 1 egg yolk with a tablespoon of water. Lightly brush the top of the loaves or rolls with a little egg wash and pop them into the oven. You can use an egg wash on any type of bread, although sweet doughs like the one for Rich Golden Bread are the most traditional.
Brioche
Makes: 2 small loaves
Time: At least 3 hours, largely unattended
Brioche is the king of rich breads, loaded with butter and eggs, yet by that miracle of French baking, the result feels light and tender rather than like overkill. It’s hard to beat as a sandwich bread or as dinner rolls (or hamburger buns; see page 424), and it makes a mean French Toast or Bread Pudding. And if you want to gild the lily, see the variations. For an irresistible topping, sprinkle pearl sugar over the egg wash.
- 4 cups all-purpose flour, plus more as needed 1 teaspoon salt
- ¼ cup sugar
- 1½ teaspoons instant yeast
- 1 stick cold butter, cut into chunks, plus softened butter for greasing
- 3 eggs plus 1 egg yolk
- ½ cup plus 2 tablespoons milk, lukewarm
1. Combine the flour, salt, sugar, and yeast in a food processor and process for 5 seconds. Add the cold butter and the 3 whole eggs and process for 10 seconds. With the machine running, pour (don’t drizzle) ½ cup of the milk and ⅓ cup water through the feed tube. Process for about 30 seconds, then remove the cover. The dough should be thick but still very sticky. If it is too dry, add water 1 tablespoon at a time and process for 5 or 10 seconds after each addition. If it is too wet, which is almost impossible, add another tablespoon or two of flour and process briefly.
2. Grease a large bowl with softened butter and scrape the dough into it. Cover with plastic wrap and let rise until at least doubled in size, 2 to 3 hours.
3. Grease two 9 × 5-inch loaf pans. Deflate the dough and, using just enough flour to enable you to handle it, shape it into 2 sandwich loaves (see page 401). Put the dough into the prepared pans, cover, and let rise in a warm place for about 1 hour.
4. Heat the oven to 400°F. Mix the egg yolk with the remaining 2 tablespoons milk and brush the top of the loaves with this mixture. Bake the brioche for about 30 minutes, until nicely browned, the bottom sounds hollow when you tap it, and the interior temperature reaches 190°F on a quick-read thermometer. Let cool for 10 minutes in the pan, then remove to finish cooling on a rack—the bread will fall easily from the loaf pan.
BRIOCHE ROLLS This classic shape is fun to eat and fun to make; you can use the special fluted tins that are popular in France or make smaller versions in a muffin pan: Grease a standard muffin pan or 3-inch brioche tins. If you’re using the brioche tins, you’ll make a total of 16; you’ll get 24 if you’re using a muffin pan. Divide the dough into the right number of equal pieces and roll into very smooth balls. You can bake directly in the pans or, to make brioches à tête (brioche with “heads”), gently separate about a quarter of each ball. Reshape the larger piece into a smooth ball, then use your thumb to make a deep indentation in its center and nestle the smaller piece into it. Place in the pans with the small piece at the top.
CHOCOLATE CHUNK BRIOCHE Now this is overkill but delicious: After you shape the dough into loaves, scatter each with about ⅓ cup chopped chocolate. Or, if you’re making rolls, press a few pieces of chopped chocolate into the center.
CINNAMON-RAISIN BRIOCHE Add 2 teaspoons cinnamon to the dry ingredients in Step 1. After you press the dough into a rectangle to form it into loaves, scatter each loaf with about ⅓ cup raisins. To go the extra mile, soak the raisins in a few tablespoons of dark rum first; drain before adding.
BROWN BUTTER BRIOCHE A fantastic twist: Before starting Step 1, put the butter in a pan over medium-low heat and cook until it turns a nutty brown color (watch carefully to make sure it doesn’t burn). Transfer the butter to a dish and put it in the freezer to firm up before proceeding with the recipe.
FOUACE Think of this as the sweet counterpart to Fougasse—this, too, comes from southern France; it’s flavored with orange blossom water, and you can shape it like a flower or bake as a loaf: In Step 1, substitute 1 tablespoon orange blossom water for 1 tablespoon of the regular water. To shape the bread like a flower, after the dough has risen for the first time, divide it into 6 equal pieces. Roll each piece into a ball and arrange them on a parchment-lined baking sheet with one ball in the middle and the others circling around it like flower petals. The pieces of dough should touch each other so that when they rise they fuse tightly together. Bake as directed (it may take a few minutes less).
Challah
Makes: 1 large loaf
Time: At least 3 hours, largely unattended
The traditional Sabbath bread of European Jews is rich, eggy, and very, very tender. It’s not a whole lot different from Rich Golden Bread except there is more dough to make a festive braided loaf, which is easy to make and fun to shape. However, if you don’t have a food processor with at least an 11-cup work bowl, you will have to make this by hand or with a stand mixer (see page 397). Like its richer cousin, Brioche, leftover challah and its variations make excellent French Toast and Bread Pudding.
- 5 cups all-purpose flour, plus more as needed
- 2 teaspoons salt
- 2 teaspoons instant yeast
- A few saffron threads (optional)
- 1 tablespoon honey or sugar
- 3 eggs plus 1 yolk
- 1⅓ cups water or milk, lukewarm
- Neutral oil (like grapeseed or corn) or softened butter, for greasing
- 1 tablespoon poppy seeds (optional)
- Coarse salt (optional)
1. Put the flour in a food processor. Add the salt, the yeast, and the saffron if you’re using it and process for 5 seconds. With the machine running, add the sweetener, whole eggs, and most of the water or milk through the feed tube. Process for about 30 seconds, then remove the cover. The dough should be in a well-defined, barely sticky, easy-to-handle ball. If it is too dry, add water or milk 1 tablespoon at a time and process for 5 or 10 seconds after each addition. If it is too wet, which is unlikely, add another tablespoon or two of flour and process briefly. Knead for a few minutes by hand.
2. Grease a large bowl with oil or butter. Shape the dough into a rough ball, put it in the bowl, and cover with plastic wrap or a damp towel. Let rise for at least 1½ hours, until nearly doubled in size.
3. Deflate the ball and cut it into 3 equal pieces; shape them into balls and let them rest on a lightly floured surface, covered, for about 15 minutes.
4. Roll each ball into a rope about 14 inches long and 1 inch thick. Braid them on a lightly greased baking sheet, as illustrated on page 421. Cover and let rest for 30 minutes while you heat the oven.
5. Heat the oven to 375°F. Beat the egg yolk with 1 teaspoon water and brush the top of the loaf with this mixture; sprinkle with poppy seeds and a little coarse salt if you’re using them. Bake for 35 to 40 minutes or until the bottom of the loaf sounds hollow when you tap it or the internal temperature reaches about 195°F on a quick-read thermometer. Cool on a rack before slicing. Best eaten within a day.
RAISIN CHALLAH In Step 3, after you deflate the dough, roll it out into a rectangle ¼ to ½ inch thick. Spread ¾ cup raisins in a row down the center, then fold either side of the dough over the raisins and fold in the edges to seal them off. Divide this into 3 pieces and proceed as directed.
ROSH HASHANAH CHALLAH The dough is traditionally baked in a stunning round loaf to celebrate Rosh Hashanah, or the Jewish New Year; make it with the main dough or raisin variation: In Step 3, roll the dough into one long rope—30 to 36 inches. Cover and let rest for 15 minutes. Coil the dough around itself in a spiral on the baking sheet (you can also use a greased round cake pan or springform pan to help it keep its shape) and proceed as directed.
CINNAMON-ORANGE CHALLAH Add 2 teaspoons cinnamon and 1 tablespoon grated orange zest to the dry ingredients in Step 1. No need for the saffron.
CARDAMOM BREAD A riff on Finnish pulla: Use milk, not water, in the dough, and substitute 2 tablespoons butter, melted and cooled, for one of the eggs. Add 2 teaspoons cardamom along with the dry ingredients in Step 1. After the bread has baked for 20 minutes, brush with melted butter and sprinkle with a mixture of sugar and cardamom. Return to the oven to finish baking.
Shaping Challah
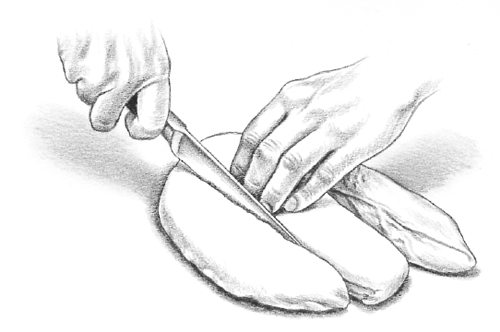
Step 1
Cut the dough into 3 equal pieces.
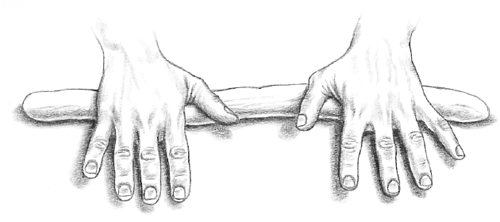
Step 2
Roll each piece into a strip about 14 inches long.

Step 3
Lay the strips next to one another and press their ends together.

Step 4
Start braiding, just as you would hair.

Step 5
Continue to braid the pieces.
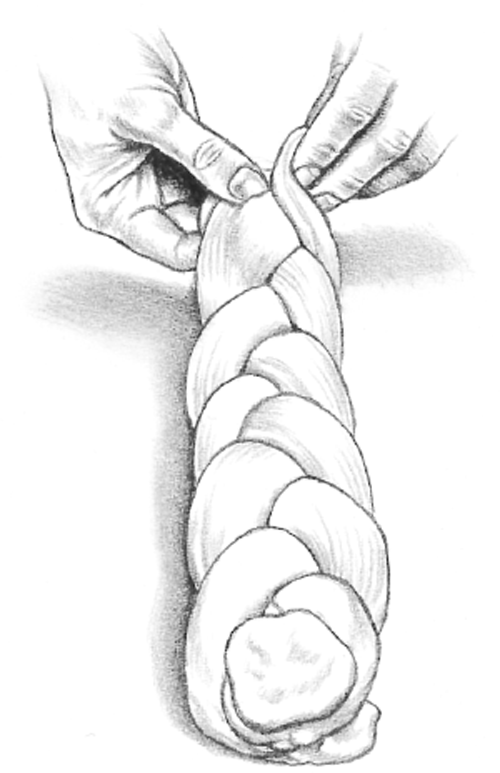
Step 6
When you are finished braiding, use your fingers to tightly press the ends together.
Parker House Rolls
Makes: About 18 rolls
Time: About 4 hours, largely unattended
The quintessential dinner roll (not surprisingly, given all the butter, both in the dough and brushed on top). Use coarse salt for sprinkling at the end; the extra crunch is fantastic.
- 1¼ cups plus 2 tablespoons whole milk
- 4 cups all-purpose or bread flour, plus more as needed
- 2 teaspoons salt, plus more for sprinkling
- 2¼ teaspoons (1 package) instant yeast
- 2 tablespoons sugar
- 4 tablespoons (½ stick) butter, cubed, plus 4 tablespoons melted butter for brushing
- Oil or more butter for greasing
1. Heat the milk in the microwave or in a pot on the stove until it reaches about 100°F, a little hotter than lukewarm. To mix the dough in a stand mixer, combine the flour, salt, yeast, sugar, cubed butter, and warmed milk in the mixer bowl. With a dough hook, mix on medium-low speed until the ingredients are combined, then on medium speed until the dough is tacky and smooth, 8 to 10 minutes.
2. To mix the dough in a food processor, pulse the dry ingredients together with the butter a few times to combine, then, with the machine running, add the milk through the feed tube and process until the dough is a well-defined, barely sticky, easy-to-handle ball, about 30 seconds—don’t overprocess here or the dough will lose its pillowy texture. Turn it out onto the counter and knead (you shouldn’t need much, if any, flour) until smooth, 5 or 6 minutes.
3. Grease a large bowl, shape the dough into a rough ball, put it in the bowl, and cover with plastic wrap. Let rest at room temperature until the dough has doubled in size, 2 hours or more.
4. Line a rimmed baking sheet with parchment paper or grease it with a little oil or butter. Turn the dough out onto a lightly oiled counter and cut it into 18 pieces. Roll each piece into a smooth ball and put them on the baking sheet, spaced about ½ inch apart. Cover with a kitchen towel and let rise in a warm place (see the headnote for White Sandwich Bread) until the dough balls start to touch each other, 1 to 1½ hours.
5. Heat the oven to 350°F. Brush the rolls with half of the melted butter and bake for 25 to 30 minutes until golden brown. Brush with the remaining melted butter, sprinkle with a little salt, and serve while they’re still warm.
GARLIC-PARSLEY PARKER HOUSE ROLLS Mix some minced garlic and parsley into the melted butter that you brush on the rolls before baking.
CRESCENT ROLLS In Step 3, divide the dough into 2 pieces and roll each piece into a circle ¼ to ½ inch thick. Cut each circle into 12 long, narrow wedges (imagine the hands of a clock), then roll the pieces, starting from the wide end, into crescents. Cover and proceed as directed.
CLOVERLEAF ROLLS So called because the tops of these pull-apart rolls resemble a clover, making for a lovely presentation: Grease the cups of a standard muffin pan. Roll tablespoon-sized pieces of dough into smooth balls and place 3 in each muffin cup; no need to press them together. Proceed with the recipe.
Ciabatta
Makes: 2 medium loaves
Time: 12 to 28 hours, almost entirely unattended
There is nothing intuitive about making ciabatta. The dough will seem preposterously sticky and wet, shaping it into rectangles will feel like a fool’s errand, and right up until the time the loaves go in the oven they will look flat, scruffy, and sad. Do not worry! Follow this process and you will be rewarded with rustic, light-as-a-feather loaves that have an airy, open crumb and a crust that turns from crackly and crisp when it comes out of the oven to wonderfully chewy as it cools.
Ciabatta dough is so wet that kneading it with your hands (without incorporating way too much flour) is nearly impossible. So you’re going to want a machine. A stand mixer is best because it gives you the most control, but a food processor works too. Ciabatta is the consummate Italian sandwich bread, which means that more often than not I slice the large loaves through their equators, make them into giant sandwiches, then cut them crosswise into smaller pieces.
- 3 cups all-purpose or bread flour, plus more as needed
- ½ teaspoon plus ⅛ teaspoon instant yeast
- 1¾ teaspoons salt
- ¼ cup milk, lukewarm
- Olive oil for greasing
1. At least 12 hours before you plan to bake the bread, mix together 1 cup of the flour, ⅛ teaspoon of the yeast, and ¾ cup water in a bowl. Stir with a wooden spoon to combine, cover with plastic wrap, and let stand at room temperature for anywhere between 8 and 24 hours. This is your sponge (or biga in Italian).
2. Put the sponge in the bowl of a stand mixer or food processor along with the remaining 2 cups flour and ½ teaspoon yeast, the salt, milk, and ½ cup water. If you’re using a stand mixer, mix on medium-low speed with the paddle attachment for 3 to 4 minutes, then switch to the dough hook and knead on medium speed until the dough is shiny, supple, and smooth, 10 to 12 minutes. It will be very sticky and wet. If you’re using a food processor, process for 1 minute. Grease a large bowl with olive oil and dump the dough into the bowl. Cover with plastic wrap and let the dough rise at room temperature until roughly doubled in size, about 2 hours.
3. Line a baking sheet with a large piece of parchment paper and dust some flour on top; generously flour your countertop while you’re at it. Turn the dough out onto the counter and dust a little more flour on top. Cut the dough in half and gently (but quickly) scoop each piece onto the baking sheet. Using the tips of your fingers, press each piece of dough into a rectangle roughly 9 × 4 inches, dimpling the surface as you go. Dust the tops with a little more flour, cover with a kitchen towel, and let rise until the dough is puffy and there are air bubbles just beneath the surfaces, another 2 hours.
4. About 45 minutes before the loaves have finished rising, heat the oven to 425°F. If you’re using a baking stone, put it on the center rack while the oven heats. When you’re ready to bake, either pull the piece of parchment (with the loaves on top) directly onto the baking stone (you can remove the parchment once the loaves firm up a bit in the oven), or just put the baking sheet directly in the oven.
5. Mist the inside walls of the oven with water to create steam and bake for 20 to 25 minutes, misting again 2 more times within the first 5 minutes and rotating the loaves once halfway through cooking, until the crust is golden and the internal temperature reaches 200°F on a quick-read thermometer. Remove and cool on a rack.
CIABATTA SANDWICH ROLLS Cut the dough into 16 pieces in Step 3 and shape them into smaller rectangles. Reduce the cooking time to 15 to 20 minutes.
ADAPTING RECIPES
How to Shape Hamburger and Hot Dog Buns
While you can shape any number of bread doughs into hamburger and hot dog buns, I like to use White Sandwich Bread, Potato Bread (this page), or Brioche, all of which are classics. Here’s how to do it.
After the dough has risen the first time, cut it into 12 pieces and roll them into balls. For hamburger buns, flatten the balls into disks about ¾ inch thick and 3½ inches in diameter. For hot dog buns, roll each dough ball into a cylinder about 4½ inches long (it helps to do this on a lightly greased counter). Put the buns on a baking sheet lined with parchment paper. If you want them to be soft on the sides, space them about ½ inch apart so they fuse together as they rise. For crisp-sided buns, space them a few inches apart. Cover with plastic wrap and let rise in a warm place until they roughly double in size, 1½ to 2 hours. Brush with egg wash, sprinkle with sesame seeds (for hamburger buns) or poppy seeds (for hot dog buns) if you like, and bake at 375°F until golden, about 25 minutes. Slice them open with a knife and you’re ready to go.
Potato Bread
Makes: 1 loaf
Time: About 5 hours, largely unattended
This is white bread 2.0, extra rich and fluffy from the addition of butter, egg, and, of course, mashed potatoes. If you’re mashing potatoes just for this purpose, a little less than 8 ounces of raw potatoes will get you the amount you need. The advantage of this is that you can use the starchy potato cooking water to further enrich the bread. Otherwise, just use leftover mashed potatoes (or sweet potatoes; see the variation).
If you don’t have a stand mixer, mix and knead this dough by hand; a food processor will make the potatoes gummy. Potato dough makes especially good hamburger and hot dog buns (see this sidebar).
- ½ cup mashed potatoes (save the cooking water if you’re making them from scratch)
- 3¼ cups all-purpose or bread flour, plus more as needed
- 2¼ teaspoons (1 package) instant yeast
- 1 tablespoon sugar
- 1 teaspoon salt
- 1 egg
- 4 tablespoons (½ stick) butter, melted and cooled
- Neutral oil (like grapeseed or corn) for greasing
1. To mix the dough in a stand mixer, combine all the ingredients except the oil in the mixer bowl and add ¾ cup warm water or potato cooking water. Using the paddle attachment, mix until the ingredients are combined, about 30 seconds. Then switch to the dough hook and knead on medium speed until the dough is shiny and smooth, 8 to 10 minutes (it will still be fairly sticky). To mix the dough by hand, combine all of the ingredients plus the water in a large bowl and stir with a wooden spoon or your hand until a shaggy dough forms. Turn it out onto a floured counter and knead, adding more flour a necessary but keeping it to a minimum, until shiny and smooth, 6 to 8 minutes.
2. Grease a large bowl with a little oil. Shape the dough into a rough ball, put it in the bowl, turn it over once to coat all over with oil, and cover with plastic wrap. Let rise at room temperature until the dough has doubled in size, 2 hours or more.
3. Press down on the dough to deflate it. Dust your work surface with a little flour, turn out the dough onto the work surface, cover with plastic wrap, and let rest for 15 minutes.
4. Grease a loaf pan with enough oil to coat the bottom and sides. Shape the dough into a sandwich loaf (see page 401) and transfer it to the pan. Cover with a kitchen towel and let rise in a warm place (see the headnote for White Sandwich Bread) until the top of the dough rises about an inch above the top of the pan, about 1½ hours.
5. Heat the oven to 350°F. Brush or spray the top of the loaf lightly with water. Bake for about 40 minutes, until the top is deep golden, the bottom sounds hollow when you tap it, and the internal temperature reaches about 200°F (the loaf will fall easily from the pan). Remove the loaf from the pan and cool on a rack before slicing.
SWEET POTATO BREAD For a beautiful golden hue and subtly earthy flavor, substitute mashed sweet potatoes for the regular potatoes.
Rosemary Olive Oil Bread
Makes: 1 large boule
Time: 4 to 5 hours, largely unattended
A healthy dose of olive oil gives this rosemary-infused bread a rich, moist crumb and pale golden hue; it also helps it keep a little better than other European-style breads. Among other things, this is a wonderful and unconventional loaf for sandwiches.
- 3 cups all-purpose or bread flour, plus more as needed
- 2 teaspoons instant yeast
- 2 teaspoons coarse kosher or sea salt
- ⅓ cup olive oil
- 1 tablespoon fresh rosemary leaves
1. Combine the flour, yeast, and salt in a food processor. Turn on the machine and add the olive oil through the feed tube, followed by ¾ cup water. Process for about 30 seconds, adding more water, 1 tablespoon at a time, until the mixture forms a ball and is slightly sticky to the touch.
2. Turn the dough onto a floured work surface and, by hand, knead in the rosemary until the dough feels smooth. Put it in a bowl, cover with plastic wrap, and let rise until the dough doubles in size, about 2 hours. (You can cut this rising time as short as 1 hour if you are in a hurry, or you can let the dough rise more slowly, in the refrigerator, for up to 8 hours. At this point, you may also wrap the dough tightly in plastic and freeze for up to a month; defrost in a covered bowl in the refrigerator or at room temperature.)
3. Lightly dust a work surface with flour. Shape the dough into a boule (see illustrations, page 399), sprinkling with flour as necessary but keeping it to a minimum. Line a colander or large bowl with a well-floured kitchen towel, set the loaf in the bowl, and cover with another towel (this keeps it from spreading too much). Let the dough rise for at least an hour and preferably longer, up to 2 hours.
4. About 45 minutes before the dough has risen, heat the oven to 425°F. Put an ovenproof skillet (preferably cast iron) on the floor or the lowest rack while the oven heats. If you’re using a baking stone, put it on the rack above the skillet while the oven heats; if not, line a baking sheet with parchment paper.
5. Once you’re ready to bake, slide or turn the dough out onto a lightly floured peel or flexible cutting board, seam side down, or just transfer it to the prepared baking sheet. Rub the loaf with a little flour (this helps prevent scorching) and slash the top with a sharp knife or razor blade. Use the peel or cutting board to slide the loaf onto the baking stone or slide the baking sheet into the oven. Partially pull out the rack with the heated skillet and very carefully pour 1 cup hot water into the skillet (it will create a lot of steam). Slide the rack back in and immediately close the oven door.
6. Bake for 45 to 50 minutes, turning the bread or the baking sheet halfway through, until the crust is golden brown, the bottom sounds hollow when tapped, and the internal temperature reaches 200°F on a quick-read thermometer. If the bread is browning too quickly, lower the temperature to 400°F. Remove and cool on a wire rack.
ROSEMARY OLIVE OIL BREAD WITH OLIVES OR TOMATOES In Step 2, knead 1 cup halved pitted oil-cured olives, roughly chopped dried tomatoes, or a combination into the dough along with the rosemary.
OLIVE OIL BREAD WITH ONIONS AND MINT A nice combo; you can make this with olives too (see the preceding variation), but omit the rosemary: In Step 2, knead 1 large onion, chopped, into the dough in place of or along with the olives. Add 1 tablespoon chopped fresh mint if you like.
PANCETTA AND BLACK PEPPER BREAD Rich, savory, and packed with flavor: You can use olive oil here if you’d rather not use the pancetta pan drippings: Omit the rosemary. Chop 1 pound pancetta (or bacon) and cook until it’s crisp. Drain the meat and set it aside, reserving ⅓ cup of the rendered fat. If you don’t have enough, add olive oil or good-quality lard to make up the balance. Proceed with the recipe, using the reserved fat in place of the oil. In Step 2, knead in the pancetta pieces and 2 tablespoons coarsely ground black pepper.
Fougasse
Makes: 2 flat loaves
Time: 2½ to 3 hours, largely unattended
A close cousin of Focaccia, this specialty from the south of France is soft thanks to olive oil and packed with flavor from olives and herbs. Let your imagination run wild when it comes to toppings. It’s traditionally slashed into the shape of a leaf, which makes it easy to tear apart—a fantastic snack.
- 3 cups all-purpose or bread flour, plus more as needed
- 1 teaspoon instant yeast
- 1 teaspoon salt, plus more for sprinkling
- 2 tablespoons olive oil, plus more for greasing and brushing
- Semolina or cornmeal, for sprinkling
- ⅓ cup minced olives (preferably a combination of black and green)
- 1 tablespoon chopped fresh rosemary
- Black pepper
1. Put the flour, yeast, salt, and oil in a food processor and pulse a few times to combine. With the machine running, pour in 1 cup water and process until the dough comes together into a ball; add more water 1 tablespoon at a time if it’s too dry or more flour 1 tablespoon at a time if it’s too sticky. Turn it out onto a lightly floured counter and knead a few times until the dough forms a smooth ball. Grease a large bowl with oil and put the dough in it, flipping it once to get the oil on all sides. Cover with plastic wrap and let rise until doubled in size, 1½ to 2 hours.
2. Heat the oven to 500°F. Line 2 rimmed baking sheets with parchment paper and sprinkle them with a little semolina or cornmeal. Turn the dough onto a lightly floured surface. Divide the dough in half and stretch each piece into a rectangle roughly 12 × 5 inches. Transfer the rectangles to the baking sheets. Using a sharp knife, cut one slit lengthwise down the center of the dough without cutting through either end, then a few shorter slits branching out from it on both sides to mimic the veins of a leaf (see illustrations). (None of the slits should connect.) Gently pull each slit apart with your fingers to open them up a bit. Alternatively, you can just cut 3 lengthwise parallel slits (how decorative you get doesn’t really matter, so long as you cut a few slits). Cover the dough with a kitchen towel and let rise until puffy, 30 minutes or so.
3. Brush the dough with a little olive oil, then sprinkle with the olives, rosemary, salt, and pepper. Bake for 10 to 12 minutes, until slightly puffed and golden. Serve immediately or cool on racks and store.
LOADED FOUGASSE At the same time as you add the minced olives and rosemary, sprinkle the bread with some finely chopped garlic, anchovies, and dried tomatoes.
CHEESY FOUGASSE Instead of (or in addition to) the olives and rosemary, top the bread with a generous dusting of freshly grated Parmesan.
Shaping Fougasse
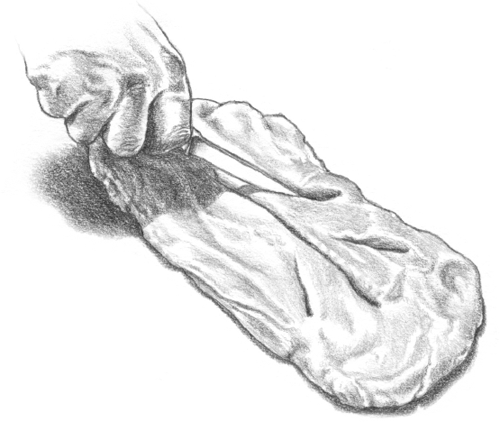
STEP 1
Cut a long slit down the center of the dough and then a few shorter slits branching out on both sides, to mimic a leaf.
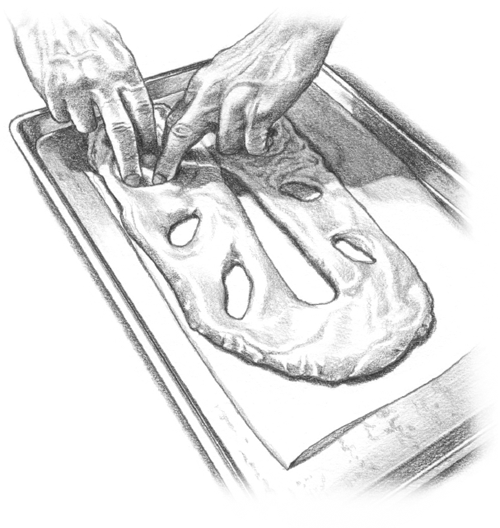
STEP 2
Gently open up each slit with your fingers.
Prosciutto Bread
Makes: 1 loaf
Time: About 3 hours, largely unattended
Prosciutto bread (also known as lard bread) is a pork lover’s loaf, with chopped prosciutto kneaded into the dough and melted lard both in the dough and brushed on top. Lard is what gives this crusty, ring-shaped loaf its distinctive flavor, so use it if you can. However, if you can’t find it (or don’t want to use it), you can use butter, olive oil, or rendered bacon fat instead.
- 2½ cups all-purpose or bread flour, plus more as needed
- 2 teaspoons instant yeast
- 1½ teaspoons salt
- 1 teaspoon black pepper
- 1 teaspoon sugar
- 3 tablespoons lard
- 4 ounces prosciutto, chopped
- Olive oil for greasing the bowl
1. Put the flour, yeast, salt, pepper, and sugar in a food processor; melt 1 tablespoon of the lard, add it to the other ingredients, and pulse to combine. With the machine running, pour in ¾ cup water and process until the dough comes together into a sticky ball, adding more flour or more water 1 tablespoon at a time if necessary. Turn out the dough onto a lightly floured counter and knead in the prosciutto until it’s fully incorporated, 3 or 4 minutes. Grease a large bowl with olive oil and put the dough in it, turning it over once to coat with oil. Cover with plastic wrap and let rise for 1 hour.
2. Turn the dough out onto a lightly floured counter and roll it into a rope roughly 20 inches long. On a piece of parchment, form the rope into a ring by slightly overlapping the two ends and pressing them together. Cover with plastic wrap and let rise for 1½ hours.
3. Heat the oven to 425°F. Put an ovenproof skillet (preferably cast iron) on the floor or the lowest rack while the oven heats. If you’re using a baking stone, put it on the rack above the skillet while the oven heats.
4. If using a baking stone, use the parchment to flip the dough directly onto the stone or flip it onto a peel or flexible cutting board and use the peel or cutting board to slide the dough onto the stone. Or just transfer the parchment with the dough onto a baking sheet. Partially pull out the rack with the heated skillet and very carefully pour 1 cup hot water into the skillet (it will create a lot of steam). Slide the rack back in and immediately close the oven door. Bake for 20 to 30 minutes, until the bread is golden and crusty. Melt the remaining 2 tablespoons lard and brush it over the loaf. Cool for a bit on a wire rack and serve warm or cool completely before storing.
CHEESY LARD BREAD Knead ½ cup chopped or grated provolone into the dough along with the prosciutto.
BACON OR PANCETTA BREAD Instead of the prosciutto, cook 4 ounces chopped bacon or pancetta in a skillet until it crisps and its fat renders. Remove it with a slotted spoon and let cool for a few minutes. Use the rendered fat in the dough instead of the melted lard, and knead the cooked bacon or pancetta into the dough. Use 2 tablespoons melted lard to brush the top of the dough as directed.
Sweet Breads
Somewhere between rich breads (page 417-428) and cake, these are wonderfully tender, flavorful, and moist, sweet enough to eat for dessert but mild enough to find a home on the breakfast table.
Recipes
Monkey Bread
Old-Fashioned Coffee Cake
Cinnamon Rolls
Chocolate Babka
Stollen
Panettone
Swedish Saffron Buns
Monkey Bread
Makes: 8 servings
Time: About 3½ hours
Monkey bread (aka sticky bread or bubble loaf) is undeniably fun to eat. It consists of lots of tiny balls of dough rolled in sugar, piled into a bundt pan, drowned in butter and brown sugar, and baked until sticky and golden. You turn the whole thing out onto a platter and have at it, pulling off pieces of the dough as you go. If you like, drizzle with Vanilla Glaze or any other glaze before serving.
- 1½ sticks butter, plus more for greasing
- 1 recipe Rich Golden Bread dough, prepared through Step 3
- ¾ cup granulated sugar
- ½ cup packed brown sugar
1. Grease a bundt pan with a little butter. Once the dough has completed its first rise, turn it out onto the counter and cut or tear it into small pieces roughly 1 inch in diameter. Put the granulated sugar in a large shallow bowl or baking dish. Roll the dough pieces into round balls and toss them to coat in the sugar. Put them in the prepared pan, stacking them on top of one another, cover with plastic wrap, and let rise in a warm place until the dough roughly doubles in size, 1 to 1½ hours.
2. Heat the oven to 350°F. When the dough balls have risen, put the butter and brown sugar in a small saucepan over medium heat and cook, stirring occasionally, until the sugar melts and combines with the butter, 3 or 4 minutes. Pour this mixture evenly over the dough.
3. Bake for 30 to 40 minutes, until the dough is deeply browned on top. Cool in the pan for about 15 minutes, then invert it onto a platter and serve warm or cool completely.
SPICED MONKEY BREAD Add any combination you like of cinnamon, cardamom, nutmeg, or ginger to the granulated sugar in Step 1.
NUTTY MONKEY BREAD Chop 1 cup pecans or walnuts and scatter them into the pan as you’re adding the dough balls. For an especially decadent version, you could do the same with some chopped chocolate.
Old-Fashioned Coffee Cake
Makes: 1 large loaf
Time: At least 4 hours, largely unattended
Most coffee cake that you see these days is a rich, soft quick bread (see page 70). This old-fashioned version has the same soft dough, mild sweetness, and crunchy streusel topping, but yeast adds another dimension of flavor and a springy crumb. A springform pan is ideal here, but you can certainly bake it in a 13 x 9-inch rectangular pan, a tube pan, or a large loaf pan as you like. Just shape the dough to fit whatever pan you choose as described in Step 4. If you want to drizzle some glaze over the top once it’s baked, see the recipes beginning on page 567.
- 3½ cups all-purpose flour, plus more for dusting
- 2 teaspoons instant yeast
- 2 teaspoons salt
- ⅓ cup sugar
- 6 tablespoons (¾ stick) cold butter, plus softened butter for greasing
- 2 eggs
- ½ cup whole milk, plus more as needed
- ½ cup raisins (optional)
- 1½ teaspoons cinnamon
- ½ cup chopped almonds, pecans, or walnuts
1. Combine 3 cups of the flour, the yeast, salt, and 2 tablespoons of the sugar in a food processor. Process for 5 seconds. Add 2 tablespoons of the cold butter and the eggs and pulse a few times, until well combined.
2. With the machine running, drizzle the milk through the feed tube. Process until a dough ball forms, adding more milk 1 tablespoon at a time if necessary. Turn out onto a lightly floured surface and knead by hand for a minute or two, adding the raisins if you like and a little more flour if necessary to prevent sticking. The dough is ready when it is silky smooth and quite elastic.
3. Butter a large bowl and place the dough ball in it. Cover with plastic wrap and let rise until about doubled in size, at least 2 hours. Meanwhile, grease a 9- or 10-inch springform pan. In a bowl, beat together the remaining butter and sugar, ½ cup flour, the cinnamon, and the nuts.
4. Heat the oven to 350°F. Punch down the dough, turn it out onto a floured work surface, and knead a couple times. Roll the dough into a ball again, then press it into the prepared pan. Sprinkle with the topping, pressing down to dimple the top. Cover and let rise until puffy, another 30 minutes or so. Bake for about 45 minutes or until a toothpick inserted into the center comes out clean. Cool in the pan on a rack, then remove. This cake keeps well for a couple of days and is good toasted for a couple more.
CARDAMOM COFFEE CAKE Use cardamom instead of the cinnamon. Use any nuts you like, but pistachios are particularly good here.
Cinnamon Rolls
Makes: 15 rolls
Time: 3 to 5 hours, largely unattended
The smell of these rolls in the oven will lure even the latest sleepers out of bed—although you would have to get up pretty early to have them ready in time for breakfast. Fortunately, they can rise in the fridge the night before and then sit for an hour at room temp before you bake them in the morning. Or bake them the night before and then reheat them. Serve as is or consider a drizzle of Vanilla Glaze.
- 3½ cups all-purpose or bread flour, plus more as needed
- 1 tablespoon instant yeast
- 2 teaspoons salt
- ¾ cup plus 1 tablespoon sugar
- 2 tablespoons cold butter, plus 6 tablespoons (¾ stick) softened butter, plus more for greasing
- 2 eggs
- ¾ cup whole milk, or more as needed, lukewarm
- 2 tablespoons cinnamon
1. Put the flour, yeast, salt, 1 tablespoon of the sugar, and the cold butter in a food processor. Pulse the machine a few times until the butter is evenly distributed but not completely incorporated. Add the eggs and pulse a few more times.
2. With the machine running, slowly add the milk through the feed tube. Process for about 30 seconds, adding more milk if necessary, 1 tablespoon at a time, until the mixture forms a ball and is sticky to the touch. If the mixture becomes too sticky, add flour, 1 tablespoon at a time, and process for 5 to 10 seconds after each addition.
3. Grease a large bowl with softened butter. Turn the dough out onto a lightly floured counter and knead it 5 or 6 times. Shape the dough into a smooth ball. Put the dough in the prepared bowl, turn it over once to coat all over with butter, and cover with plastic wrap. Let rise at room temperature until the dough doubles in size, 1 to 2 hours.
4. Punch the dough down to deflate it and then form it into a ball. Put the ball on a lightly floured surface, sprinkle with a little flour, cover with plastic wrap, and let rest about 20 minutes.
5. Thoroughly grease the bottom and sides of a 13 × 9-inch baking pan. Combine the cinnamon and remaining ¾ cup sugar in a small bowl. On a lightly floured surface, roll or press the dough into a rectangle about the size of the baking pan, spread the softened butter all over its surface, then sprinkle the cinnamon sugar over the top. Roll the dough lengthwise into a log and pinch the seam closed, then gently cut it into 15 slices. Arrange each slice, cut side up, in the pan. Cover with plastic wrap and let rest until the dough has doubled in size, 1 to 2 hours.
6. Heat the oven to 350°F. Uncover the pan and bake for 25 to 30 minutes, until the rolls are golden brown. Let the cinnamon rolls cool for a few minutes, then invert them onto another pan or platter. Smear them all over with glaze if you like and serve.
PECAN STICKY ROLLS After greasing the pan with butter, stir together ¾ cup packed brown sugar and ½ cup cream in a bowl to combine. Spread the mixture evenly over the bottom of the pan. Sprinkle ½ to ¾ cup chopped pecans on top. Put the rolls in the pan and let rise and bake as directed. Spoon any extra caramel from the baking dish over the rolls before serving.
CHOCOLATE-CINNAMON ROLLS In Step 5, sprinkle ½ to ¾ cup chopped chocolate over the dough along with the cinnamon sugar.
HOT CROSS BUNS A traditional Easter staple, hence the symbolic cross drawn in glaze over the top. In Step 1, add 1 teaspoon each cinnamon, allspice, and nutmeg to the food processor along with the flour and increase the sugar to ⅓ cup. You may need to add a splash more milk. In Step 3, knead ½ cup dried currants into the dough until fully incorporated, 3 or 4 minutes. After the dough rises in Step 3, divide it in half and roll each piece into a 12-inch log. Cut each log crosswise into 8 pieces, roll each into a ball, and put them on a buttered baking sheet spaced about 1½ inches apart. Cover with plastic wrap and let rise until the dough doubles in size, 1 to 2 hours. Bake at 400°F until golden, 15 to 20 minutes. Cool on a rack, and, if you like, decorate the top with vanilla glaze (in the shape of a cross or anything else).
Forming Cinnamon Rolls
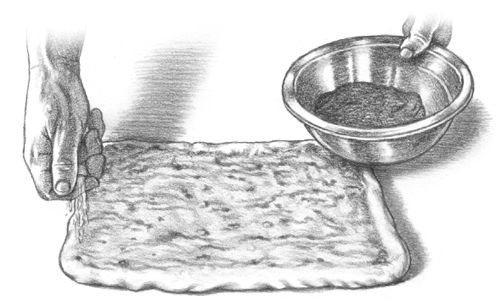
STEP 1
Shape the dough into a rectangle, spread with butter, and sprinkle with cinnamon sugar.
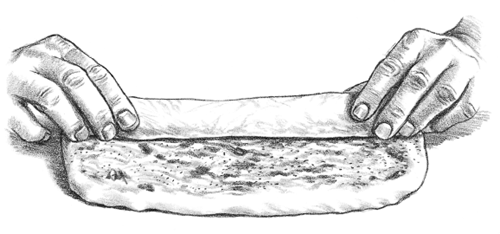
STEP 2
Roll it up the long way.
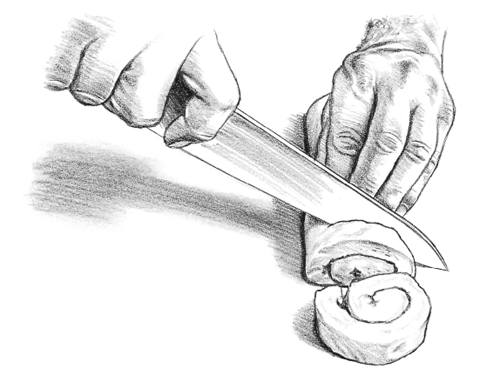
STEP 3
Slice it into swirls.
Chocolate Babka
Makes: 1 loaf
Time: About 3½ hours, largely unattended
Chocolate babka is one of the culinary wonders of the Eastern European Jewish tradition. It’s a rich, eggy, buttery loaf with generous swirls of chocolate, and once you’ve had it, it’s the kind of bread that instills lifelong cravings.
- 3¼ cups all-purpose or bread flour, plus more as needed
- 2¼ teaspoons (1 package) instant yeast
- ½ teaspoon salt
- ½ cup plus 1 tablespoon sugar
- 12 tablespoons (1½ sticks) very cold butter, cut into cubes, plus softened butter for greasing
- 2 whole eggs plus 2 egg yolks
- ¾ cup milk, lukewarm
- 8 ounces dark chocolate
- 1 tablespoon cinnamon (optional)
1. Combine the flour, yeast, salt, 1 tablespoon of the sugar, and 8 tablespoons (1 stick) of the butter in a food processor. Pulse the machine on and off until the butter is evenly distributed but not completely incorporated. Add the whole eggs and one of the additional yolks and pulse a few more times. With the machine running, slowly add the milk through the feed tube and process until the dough comes together into a slightly sticky ball. Turn it out onto a lightly floured counter and knead for a few minutes until smooth. Grease a large bowl with butter and put the dough in it. Cover with plastic wrap and let rise for 1½ hours.
2. Roughly chop the chocolate and put it in a clean food processor. Pulse until the chocolate is crumbled. Add the cinnamon if you’re using it, the remaining ½ cup sugar, and the remaining 4 tablespoons (½ stick) butter, and pulse until combined (the texture should be coarse and crumbly). Set aside. Grease a loaf pan with softened butter.
3. Press down on the dough to deflate it and transfer to a floured work surface. Roll the dough into a large rectangle (roughly 20 × 16 inches, about ⅛ inch thick). Spread all but 2 tablespoons of the chocolate filling over the dough, leaving a ¾-inch border around the edges. Working from the short side of the rectangle, roll the dough into a cylinder, press down on the seam to seal it, and pinch the ends closed. Roll the cylinder back and forth on the counter until it stretches out to about 18 inches long and pinch the ends shut to seal.
4. Sprinkle the remaining chocolate filling along the length of the cylinder (pressing it into the dough to help it stick). Fold the cylinder in half over itself to make a U shape, twist the 2 ends around each other once or twice, and pinch the ends together to seal it (see the illustrations below). Put the loaf into the prepared pan (if it’s too long for the pan, gently squeeze it until it fits). Let rise in a warm place for 1 hour (it won’t rise very high, and that’s fine).
5. Heat the oven to 350°F. Whisk the remaining egg yolk with 1 tablespoon water. Brush some of the egg wash (you won’t need to use it all) over the top of the loaf and bake for about 45 minutes, rotating the pan once halfway through, until the crust is deep golden and the internal temperature reaches around 195°F. Transfer to a rack to cool before serving.
CINNAMON BABKA Skip the chocolate. Increase the cinnamon to 2 tablespoons, substitute light brown sugar for granulated sugar in the filling, and add ¼ cup all-purpose flour to the filling. If you like, add some finely chopped walnuts as well.
CHOCOLATE-CHERRY BABKA Pulse ½ cup dried cherries along with the chocolate in the food processor. Omit the cinnamon.
BABKA WITH STREUSEL TOPPING Sprinkle the chocolate babka (or either of the preceding variations) with Streusel Topping before baking.
Shaping Babka

Step 1
Spread the filling over the dough, roll up into a cylinder, and then roll to elongate. Sprinkle the remaining filling on top of the cylinder and press to make it stick.
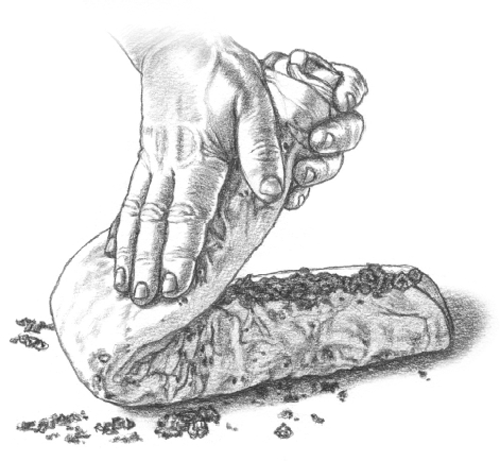
Step 2
Fold the cylinder over itself into a U shape.
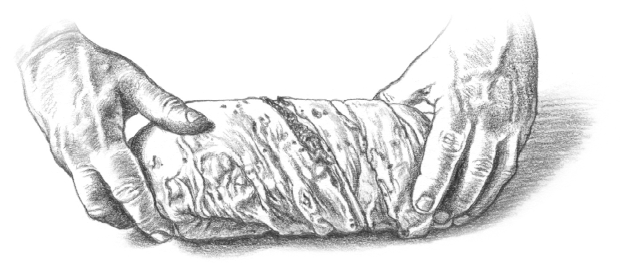
Step 3
Twist the dough once or twice.
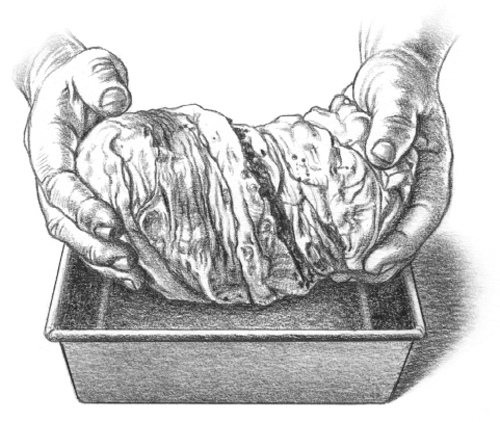
Step 4
Place the shaped dough in the pan.
Stollen
Makes: 2 small or 1 large loaf, enough for about 24 servings
Time: About 6 hours, largely unattended, plus a day to let it rest before serving.
Packed with rum-soaked dried fruit and almonds, then coated in a snowy layer of powdered sugar, this delicately spiced German Christmas loaf is dense yet light, like a brioche, and every bite is a little different. You can make it in the food processor, but a stand mixer cuts out the labor-intensive process of kneading all of the fruit and nuts into the dough by hand. The outrageous amount of confectioners’ sugar called for in the topping is not a typo—it’s essential to this cake’s festive presentation, and you must use it all.
- 2 cups small dried fruit (any combination of regular raisins, golden raisins, cherries, and cranberries)
- ½ cup chopped candied ginger
- 1 cup slivered or sliced almonds
- ½ cup dark rum or orange liqueur
- 4 cups all-purpose flour
- ½ cup milk, lukewarm
- 2¼ teaspoons (1 package) instant yeast
- ⅔ cup plus 2 tablespoons granulated sugar
- 1 teaspoon salt
- 1 teaspoon cinnamon
- 1 teaspoon cardamom
- ¾ teaspoon nutmeg
- 2 teaspoons grated lemon or orange zest
- 1 egg
- 3½ sticks butter, plus more for greasing
- 2 teaspoons ginger
- 1¾ cups confectioners’ sugar
1. Combine the dried fruit, candied ginger, almonds, and rum in a bowl. Stir to combine, cover with plastic wrap, and set aside.
2. In a separate bowl, combine ¾ cup of the flour, the milk, and the yeast and whisk to combine. Cover with plastic wrap and let sit at room temperature for 1 hour. This is your sponge.
3. To make the dough in a stand mixer, put the sponge in the mixer bowl and add the remaining 3¼ cups flour, 2 tablespoons of the sugar, the salt, cinnamon, cardamom, nutmeg, zest, and egg. Melt 2 sticks of the butter and add it to the bowl. Using a dough hook, mix on low speed until the ingredients are combined, about a minute. Then add the soaked dried fruit and almond mixture and mix on medium speed until the dough is smooth, glossy, and elastic, 8 to 10 minutes. Turn the dough out onto a lightly floured counter and knead a few times to incorporate the fruit and nuts all the way through the dough.
4. To make the dough in a food processor, combine the sponge, flour, sugar, salt, cinnamon, cardamom, nutmeg, and zest in the work bowl and pulse a few times to combine. Add the egg and pulse again. With the machine running, pour in the melted butter and any rum (there might not be any) that hasn’t soaked into the fruit. Process until the dough comes together into a sticky ball, then turn it out onto a floured counter and knead in the dried fruit and almonds until they’re incorporated throughout and the dough is smooth, 5 or 6 minutes.
5. Grease a large bowl with butter and put the dough in it. Cover with plastic wrap and let rise for 1½ hours. Press on the dough to deflate it, cover, and let rise for 45 minutes more.
6. Grease a baking sheet with butter. Divide the dough in half, shape each piece into an 8- to 10-inch oval loaf, and put the loaves on the baking sheet. Or if you prefer, form the dough into 1 large oval loaf. Cover with a kitchen towel and let rise for 1 hour.
7. Heat the oven to 350°F. Uncover the loaves and bake for 45 to 50 minutes for 2 smaller loaves or a little longer if you’re making one huge loaf, until they’re deep golden. Meanwhile, melt the remaining 1½ sticks of butter and combine the remaining ⅔ cup granulated sugar with the ginger. When the loaves are done baking, if any of the dried fruit has broken through the crust and burned (it can happen), just pluck it off and discard. Brush the hot loaves all over with the melted butter, letting it soak into the bread (it may seem excessive, but give it time to let it all soak in and be generous). Sprinkle the sugar-ginger mixture all over the loaves, top and bottom, and let the stollen cool completely.
8. Use a strainer to sift 1¼ cups of the confectioners’ sugar all over the stollen (including the bottom), patting it down to help it stick in a thick, opaque layer (again, it seems like a lot, but use it all). Wrap each loaf tightly in plastic wrap and let sit at room temperature for at least 1 day, dusting with the remaining ½ cup confectioners’ sugar before slicing and serving.
Panettone
Makes: 1 large boule
Time: About 16 to 24 hours, almost entirely unattended
You’re probably not going to eat this Italian Christmas bread more than once a year, so why not make it yourself? It’s more time-consuming than most breads (it has a couple of long rises, perfect for the holidays) but no harder or more labor-intensive. And with its soft and eggy dough, studded with bright citrus and raisins, this tall and billowing loaf is well worth the time. On the off chance that it’s not immediately polished off, it also makes phenomenal French Toast (page 117) and Bread Pudding.
The large, round paper molds that the loaves are traditionally baked in are available online and not expensive, but any straight-edged tall, round pan—even an empty 2-pound coffee can—will do. Like other breads that feature fairly wet doughs, panettone is easier to make in a stand mixer than in a food processor, but both will yield impressive results.
- 1 cup raisins
- 2 tablespoons dark rum or orange liqueur
- 3½ cups all-purpose flour, plus more as needed
- 2 teaspoons instant yeast
- ½ cup sugar
- ½ teaspoon salt
- ½ teaspoon vanilla extract
- ½ teaspoon lemon zest
- 2 whole eggs, plus one yolk
- 10 tablespoons butter, softened, plus more for greasing
- ½ cup chopped candied orange peel
1. Combine the raisins and rum and set aside.
2. To make the dough in a stand mixer, combine the flour, yeast, sugar, salt, vanilla, lemon zest, whole eggs, one of the yolks, the butter, orange peel, raisin mixture, and ½ cup water in the mixer bowl. Using a dough hook, mix on low speed until the ingredients are combined, then increase the speed to medium and beat for 10 minutes; the dough will be rather wet (if not all of the raisins and orange are incorporated into the dough, just fold them in when you scrape the dough into the bowl to rise).
3. To make the dough in a food processor, put the flour, yeast, sugar, salt, vanilla, and zest in the work bowl and pulse to combine. Add the butter, whole eggs, and additional yolk and pulse again. With the machine running, pour in ½ cup water and process until the dough comes together into a sticky mass, about 30 seconds. Scrape the dough out onto a floured counter and knead in the raisins and orange peel, adding more flour as necessary to prevent sticking but keeping it to a minimum, until the raisins and orange peel are incorporated throughout.
4. Grease a large bowl with butter and put the dough in it. Cover with plastic wrap and let rise in a warm place until roughly tripled in size, overnight or for up to 16 hours.
5. Put a panettone mold onto a rimmed baking sheet. Press down on the dough to deflate it, shape the dough into a loose ball, and drop it seam side down into the mold. Cover with buttered plastic wrap and let rise in a warm place until the dough is even with, or slightly above, the top of the mold, anywhere from 4 to 8 hours. (If the dough doesn’t rise all the way to the top of the mold, don’t worry.)
6. Heat the oven to 375°F. When the dough has risen, beat together the remaining egg yolk with 1 tablespoon water and brush some of the egg wash over the top. Bake for 40 to 45 minutes, until the top is deep golden and a wooden skewer inserted in the center comes out clean (slightly moist is okay). Cool completely on a rack. If you want to be sure that your panettone stands tall, you can slide 2 metal skewers along into the base of the cake, parallel to the counter, in the shape of an X. Then turn the cake upside down into a large bowl and let it hang from the skewers as it cools. When it’s entirely cool, turn it right side up, remove the skewers, and its dome will hold its shape. Panettone keeps, wrapped tightly in plastic, for about a week.
Swedish Saffron Buns
Makes: 12 buns
Time: About 2½ hours, largely unattended
In Sweden, these S-shaped buns, called lussekatter, are eaten on Saint Lucia’s Day, the Festival of Lights celebrated in early December. The eggy dough bears resemblance to challah, with a generous pinch of saffron imparting a beautiful golden color and subtle, warm, and exotic flavor.
- ¾ cup plus 1 tablespoon milk
- 4 tablespoons (½ stick) butter, plus more for greasing
- Pinch of saffron threads
- 4 cups all-purpose or bread flour, plus more as needed
- 2¼ teaspoons (1 package) instant yeast
- 1 teaspoon salt
- ¼ cup sugar, plus more for sprinkling
- 1 whole egg plus 3 yolks
- Golden raisins (optional)
1. Heat the milk, butter, and saffron in a small saucepan over medium heat. When the butter melts, turn off the heat and let the mixture cool until lukewarm.
2. Put the flour, yeast, salt, and sugar in the bowl of a food processor and pulse to combine. Pulse in the whole egg and 2 of the yolks. With the machine running, pour in the milk mixture and process until the dough comes together into a slightly sticky ball. Turn the dough out into a lightly floured counter and knead until smooth and elastic, 5 or 6 minutes. Grease a large bowl with butter and put the dough in it. Cover with plastic wrap and let rise until nearly doubled in size, 1 to 1½ hours.
3. Press the dough to deflate and cut it into 12 pieces. Roll each one roughly into a log, cover with a kitchen towel, and let rest for 15 minutes. Line a baking sheet with parchment paper or grease with a little butter.
4. Working with one piece of dough at a time (and keeping the rest covered), roll it into a thin rope about 16 inches long. Tightly spiral either end of the rope around itself in opposite directions to make an S shape; if you’re using the raisins, stick one into the center of each spiral and then transfer to the prepared baking sheet. Repeat with the remaining dough. Cover the baking sheet with plastic wrap or a kitchen towel and let rise until puffy, about 45 minutes.
5. Heat the oven to 375°F. Whisk the remaining egg yolk together with 1 tablespoon water, brush the buns with the egg wash, and sprinkle with a little sugar. Bake for 15 to 20 minutes, until golden. Cool on racks before serving.
Flatbreads
These are some of the oldest breads in existence. You don’t need much to cook them—some were originally baked in the desert on scorching-hot stones—so they’re practical and accessible, and you can find a different flatbread for just about every major civilization. Some versions are yeasted and some aren’t (see pages 375-387 for nonyeasted varieties); they can be made with all sorts of grains. One thing they all have in common is that they’re, well, flat, which makes them quick to cook and ideal company for any toppings or dips you can imagine. And since each one is so small, it’s that much easier to eat them at peak freshness, right out of the oven.
Most flatbreads are traditionally baked on searing-hot stones or on the walls of equally hot clay ovens. Assuming you don’t have one of those, a regular home oven cranked up to 500°F works just fine, and a baking stone, if you have one, makes a great approximation.
Recipes
Pita
Stuffed Pita
Naan
Afghan Snowshoe Naan
Lavash
Grilled Lebanese Flatbread
Persian Flatbread
Pita
Makes: 6 to 12 pitas, depending on size
Time: At least 2 hours, somewhat unattended
You can buy pita everywhere, although most are disappointingly tough and more “flat” than “bread.” It’s hard to find the real thing: the chewy, slightly puffed rounds that are ubiquitous in the eastern Mediterranean. Both a baking stone and a baking sheet will work, but you can also try dry-baking them in a hot skillet on the stovetop—a fun variation that gives the bread more of a golden crust.
- 3 cups all-purpose or bread flour, plus more as needed
- 3 tablespoons olive oil
- 2 teaspoons instant yeast
- 2 teaspoons coarse kosher or sea salt
- ½ teaspoon sugar
- Melted butter (optional)
1. Combine the flour, olive oil, yeast, salt, and sugar in a food processor. Turn the machine on and add 1 cup water through the feed tube. Process for about 30 seconds, adding more water, a little at a time, until the mixture forms a ball and is slightly sticky to the touch. If it’s dry, add another tablespoon or 2 of water and process for another 10 seconds. (In the unlikely event that the mixture is too sticky, add flour 1 tablespoon at a time.)
2. Turn the dough onto a floured work surface and knead by hand for a few seconds to form a smooth, round dough ball. Put the dough in a bowl and cover with plastic wrap; let it rise until doubled in size, 1 to 2 hours.
3. When the dough is ready, divide it into 6 or more pieces; roll each into a ball. Place each ball on a lightly floured surface, sprinkle with a little flour, and cover with plastic wrap or a towel. Let rest until they puff slightly, about 20 minutes.
4. Roll each ball out to less than ¼-inch thickness, using flour to prevent sticking as necessary. As you work, spread the flat disks out on a floured surface and keep them covered. When all the disks are rolled out, heat the oven to 350°F while you let the disks rest for at least 20 minutes. If you have a baking stone, put it on a low rack in the oven; if not, lightly oil a baking sheet and put it on the center rack. Alternatively, lightly oil and wipe out a heavy skillet or griddle, preferably cast iron.
5. To bake on a stone, use a peel or a large spatula to slide the individual disks—as many as will fit comfortably—directly onto the stone. Or bake 2 disks at a time on the baking sheet. To bake on the stovetop, put the skillet or griddle over medium-high heat; when the pan is very warm, add the dough. For whichever method, bake the pita until lightly browned on one side, then flip and brown on the other side. Total baking time will be between 5 and 10 minutes, generally only 5 or 6, perhaps even a bit less for stovetop baking.
6. As the breads finish baking, transfer them to a wire rack. If you’re going to eat them fairly soon, brush with melted butter. Otherwise cool, then store in wax paper or plastic bags; reheat gently in a 200°F oven before serving.
WHOLE WHEAT PITA Substitute whole wheat flour for half of the all-purpose or bread flour.
GARLIC-ZA’ATAR PITA You can work any number of ingredients into pita dough (see the list on page 394), but this is a favorite combination: Add 1 tablespoon minced garlic to the food processor in Step 1 or knead it into the dough by hand. Before baking, sprinkle the pita rounds with some za’atar (cumin or paprika is also good).
Stuffed Pita
Makes: 6 large pitas
Time: 20 minutes with premade dough
This half-open bread—with the filling partially enclosed and baked right into the dough—is a street treat found throughout the eastern Mediterranean (similar in spirit to the Georgian Cheese Bread). It’s ideal for lunch or a snack; or cut the hearty pitas into slices to serve at parties or picnics. They’re as great at room temperature as they are hot.
- 1 recipe Pita dough, prepared through Step 4
- 2 cups crumbled feta or blue cheese
- 4 tablespoons (½ stick) butter at room temperature
- 4 eggs
- 1 cup snipped fresh dill
- Black pepper
- Toasted sesame seeds (optional)
1. When the disks of dough are ready to bake, put the feta, butter, eggs, and most of the dill in a bowl, along with a good sprinkling of black pepper; stir to combine. Put a portion of this filling on each of the disks and bring the sides up to partially seal on opposite ends. The goal is to bring the pita sides up enough to keep the filling in but not so much that you enclose it entirely. Traditional filled pitas are longer than they are wide, kind of boat shaped, but any shape is fine as long as it contains the filling.
2. Bake as you would pita (although obviously without flipping), but for a little bit longer, perhaps 10 minutes. Sprinkle with the remaining dill and a few sesame seeds and eat hot or at room temperature.
Naan
Makes: About 12 naan
Time: 2 hours, largely unattended
While the subtle sourness of this North Indian staple comes through most in the plain main recipe, naan also takes especially well to garlic (see the variation). Using a little whole wheat flour along with all-purpose results in a slightly warmer, more savory flavor, but you could also use all-purpose only.
- 2 teaspoons instant yeast
- 2 tablespoons milk, lukewarm
- 2 tablespoons yogurt
- 1 tablespoon sugar
- 3½ cups all-purpose flour plus ½ cup whole wheat flour, plus more as needed
- 1 egg
- 2 teaspoons salt
- Neutral oil (like grapeseed or corn) for greasing
- 4 tablespoons (½ stick) butter, melted and still warm
1. Stir together the yeast, milk, yogurt, and sugar in a bowl and set aside.
2. Combine the flour, egg, and salt in a food processor. Turn the machine on and add the yeast mixture through the feed tube. Process for about 30 seconds, adding 1½ cups water, a little at a time, until the mixture forms a ball and is slightly sticky to the touch. If it is dry, add another tablespoon or 2 of water and process for another 10 seconds. In the unlikely event that the mixture is too sticky, add flour 1 tablespoon at a time.
3. Turn the dough onto a floured work surface and knead by hand for a few seconds to form a smooth, round ball. Put the dough in a lightly oiled bowl and cover with plastic wrap; let rise until doubled in size, 1 to 2 hours. (You can cut this rising time short if you are in a hurry, or you can let the dough rise in the refrigerator for up to 6 or 8 hours.)
4. Put a baking stone or baking sheet on a rack on the lowest rack of your oven; heat the oven to 500°F. Punch the dough down and, using as much flour as necessary to keep the dough from sticking to the board or your hands, roll it into a snake, then tear the snake into 12 equal-size balls. Let rest for 10 minutes covered with plastic wrap or a damp towel.
5. Roll out one of the balls into an oval roughly 6 to 8 inches long and 3 or 4 inches wide. Open your oven door, grab the dough, one hand on each end of the oval, and give it a little tug with one hand to shape it into a teardrop, then toss it onto the stone or baking sheet. Close the oven door and flip the naan after 3 minutes. The naan is ready when it’s puffed, mottled, and browned around the edges, 6 to 8 minutes in total. You can cook as many naan as will comfortably fit on the stone or sheet at once.
6. Wrap the freshly baked naan in a kitchen towel to keep them warm and pliable. Serve as soon as possible, brushed on one side with melted butter.
GARLIC NAAN Make a paste out of 1 tablespoon minced garlic and 2 teaspoons lemon juice. If you like, add some minced fresh green chile for heat, and a pinch of cumin seeds. Add the mixture to the food processor in step 2.
Afghan Snowshoe Naan
Makes: 3 flat loaves
Time: At least 5 hours, largely unattended
These long, slightly puffed rectangular loaves have dimples poked into the top; when you stretch out the dough before baking, the dimples elongate and resemble snowshoe tracks; hence the name. Somewhere between a flatbread and a fully risen loaf, snowshoe naan can be served alongside pretty much any kind of cuisine, even though it looks and sounds so obscure. The tiny black nigella seeds look wonderful speckled on the dough and add a slightly nutty, peppery bitterness to the bread, but you can leave them out.
- 1 cup whole wheat flour
- 1 teaspoon instant yeast
- 2 teaspoons salt
- 1 tablespoon sugar
- 3 cups all-purpose flour, plus more as needed
- Olive oil for greasing
- Nigella seeds (optional)
1. Combine the whole wheat flour, ½ teaspoon of the yeast, and ¾ cup water in a bowl and stir well to combine. Cover with plastic wrap and let stand at room temperature for 2 to 3 hours. This is your sponge.
2. Put the sponge in a food processor along with the remaining ½ teaspoon yeast, the salt, and the allpurpose flour. With the machine running, pour in ¾ cup plus 1 tablespoon water and process until the dough comes together into a sticky ball. Turn it out onto a lightly floured counter and knead, adding only enough extra flour as necessary to prevent sticking, until smooth and elastic, 3 or 4 minutes. Grease a large bowl with olive oil and put the dough in it, turning it once to coat with oil. Cover with plastic wrap and let rise for 2 to 3 hours.
3. Press on the dough to deflate it and turn it out onto a floured surface. Divide the dough into 3 pieces and stretch or press each piece into a rectangle roughly 7 × 5 inches. Cover with plastic and let rise for 30 minutes.
4. Heat the oven to 475°F. If using a baking stone, set it on the lowest rack; otherwise line 2 rimmed baking sheets with parchment paper. Sprinkle a little more flour underneath the dough. To give the bread its final shape, dip your fingers in water and press lots of tightly spaced, deep indentations all over the dough. Shape the dough into long rectangles by picking it up from both ends and gently stretching it apart; the rectangles shouldn’t be longer than the baking sheet or baking stone. If you’re using nigella seeds, brush the top of the dough with a little water and sprinkle on some seeds.
5. If you’re using a baking stone, flour a pizza peel or a flexible cutting board, put one of the rectangles on top, and use the peel or cutting board to slide it onto the stone. Otherwise, put the dough on the prepared baking sheets and slide them into the oven. Bake in 2 batches if necessary. Bake for 5 to 8 minutes, until the bread is crusty and lightly browned on top. Serve immediately or cool on racks and store.
SPICED AFGHAN SNOWSHOE NAAN An incredibly flavorful alternative if you don’t have nigella seeds: Sprinkle the dough with a combination of cumin seeds, sesame seeds, paprika, salt, and pepper.
Lavash
Makes: 8 large flatbreads
Time: About 3 hours
This Armenian bread is so basic that you can use it for just about anything. It’s the ultimate sandwich wrap, you can use it as a pizza crust, or you can top with a thin layer of spiced meat (see the variation for Lahmacun that follows). The key to success here is rolling and baking directly on sheets of parchment, which lets you get the dough super-thin and then seamlessly transfer it to the oven.
- 3¼ cups flour, plus more as needed
- 2 teaspoons instant yeast
- 2 teaspoons salt
- 1 teaspoon sugar
- 3 tablespoons olive oil, plus more for greasing
- Sesame seeds (optional)
1. To mix the dough in a stand mixer (the easier method since this dough is so wet; it allows you to omit kneading by hand entirely), combine the flour, yeast, salt, sugar, olive oil, and 1¼ cups water in the mixer bowl. With a dough hook, mix on medium-low speed until the ingredients are combined, then on medium speed until the dough is elastic and smooth (it will still be fairly wet), 8 to 10 minutes.
2. To mix the dough in a food processor, pulse the dry ingredients together a few times to combine, then, with the machine running, add the oil and water through the feed tube and process until the dough comes together into a sticky mass, about 30 seconds. Turn it out onto a well-floured work surface and knead, adding more flour as necessary to prevent sticking, until smooth, 4 or 5 minutes.
3. Grease a large bowl with a little oil and put the dough in the bowl. Cover with plastic wrap and let the dough rise until doubled in size, 1½ to 2 hours. About an hour before you’re ready to bake, heat the oven as high as it will go, setting a baking stone on the lowest rack if you have one..
4. When the dough has doubled in size, put a large sheet of parchment paper on the counter and flour it well. Break off a piece of the dough, roughly one-eighth of the total amount (you can cut the dough into 8 pieces if you want to be exact), and put it on the parchment. Flour the dough and your rolling pin and roll it into a rectangle or circle as thin as you possibly can; the shape doesn’t really matter as long as it isn’t bigger than the baking sheet or baking stone. If you’re using sesame seeds, brush the top of the dough with a little water and sprinkle on some seeds.
5. If you’re using a baking stone, transfer the parchment (with the dough on it) to a pizza peel or a flexible cutting board, then use the peel or cutting board to slide the parchment onto the stone. Otherwise, transfer the parchment with the dough to a baking sheet. Bake for 1 or 2 minutes if you’re using a stone, a little longer if on a baking sheet, until the bread is puffed with some light brown spots on the bottom. (Either way, make sure not to let the bread get too brown; if you do, the middle will become crisp like a cracker.)
6. Slide the parchment with the bread off the baking stone onto a clean baking sheet, or remove the baking sheet from the oven and slide the bread onto a clean baking sheet or counter. Cover with a kitchen towel to keep warm. Repeat the process, rolling and baking one piece of dough at a time and stacking them beneath the kitchen towel as they’re done. Serve right away (they’re best this way) or let cool and store in the fridge for no more than a day or 2.
LAHMACUN A Turkish staple—lavash topped with a spiced mixture of tomato and ground lamb: Omit the sesame seeds. In a medium bowl, combine ¼ cup tomato paste, 3 tablespoons minced parsley, 1 tablespoon minced garlic, 8 ounces ground lamb, ½ small onion, grated, 1 small tomato, grated, ½ teaspoon grated lemon zest, ¼ teaspoon each cumin, paprika, cayenne, and hot red pepper flakes and a pinch each of cinnamon, salt, and pepper. Mix vigorously until everything is well combined. To check the seasoning, cook a pinch of the mixture in a skillet so you can taste it, and adjust as you like. After rolling out a piece of dough, scoop about 3 or 4 tablespoons of the mixture on top and spread it thinly to the edges with your fingers (you want to press it down firmly so that it basically fuses into the dough). Bake for 3 to 4 minutes, until the topping is cooked through and the dough is lightly browned on the bottom.
Grilled Lebanese Flatbread
Makes: 8 flatbreads
Time: About 1½ hours
Made by hand and cooked over fire, this quick-rising bread is primitive and delicious. You can bake these or cook them in a skillet as you would with Pita (page 435), but the char you get from the grill is undeniably appealing, especially for the onion variation that follows.
- 2 teaspoons salt
- 1 teaspoon sugar
- 1 tablespoon instant yeast
- 3 cups flour
- Olive oil for brushing
- 2 tablespoons za’atar (optional)
1. Whisk together the salt, sugar, yeast, and 1 cup water in a large bowl and let sit for a couple of minutes. Add the flour and mix until well combined. (If the dough is very dry, add more water 1 tablespoon at a time to moisten it.) Cover with plastic wrap and let rise in a warm place for 1 hour.
2. Meanwhile, prepare a grill; the heat should be medium-high and the rack about 4 inches from the fire. When the dough has puffed up, transfer it to a well-floured surface and knead until soft and silky, 5 to 8 minutes.
3. Cut the dough into 8 equal pieces and roll out each one until it’s about 6 inches in diameter; don’t worry about making these perfectly round, but try to keep them relatively even in thickness. Brush one side of the breads with olive oil and put as many on the grill, oiled side down, as will comfortably fit at one time. While the first side cooks, brush the other side with more oil; when the breads begin to brown and puff up, flip them (cook for 3 to 5 minutes per side). When the second side is nicely browned, remove from the grill and sprinkle with the za’atar, if you’d like. Serve immediately.
GRILLED ONION FLATBREAD Cut a small onion into super-thin half moons (this is a good task for a mandoline if you have one). In Step 3, press a few slices of onion into each disk of dough and roll the dough so the onions stick. Grill on one side only without flipping.
LEMON-THYME GRILLED FLATBREAD Knead 1 tablespoon fresh thyme leaves and 1 teaspoon grated lemon zest into the dough in Step 2. Omit the za’atar or keep it if you prefer.
Persian Flatbread
Makes: 2 large flatbreads
Time: About 3½ hours, largely unattended
In Iran, these long, oval loaves with their trademark ridges, called barbari, are often served with a soft cheese similar to feta. What makes this bread so good is that it’s rubbed with a cooked paste of flour, oil, and water before baking, which produces a beautiful golden crust.
- 3½ cups plus 1 tablespoon all-purpose or bread flour, plus more as needed
- 2¼ teaspoons (1 package) instant yeast
- 1 teaspoon salt
- 1 tablespoon neutral oil (like grapeseed or corn) or butter, plus more for greasing
- ½ teaspoon sugar
- Semolina or cornmeal for dusting
- Sesame or poppy seeds or a combination for sprinkling
1. To mix the dough in a stand mixer, combine 3½ cups of the flour, the yeast, salt, and 1½ cups water in the mixer bowl. With a dough hook, mix on medium-low speed until the ingredients are combined, then on medium speed until the dough is tacky and smooth, 8 to 10 minutes.
2. To mix the dough in a food processor, pulse the dry ingredients together a few times to combine, then, with the machine running, add the water through the feed tube and process until the dough comes together into a fairly wet, sticky mass, about 30 seconds. Turn it out onto a lightly floured counter and knead, adding more flour as necessary to prevent sticking but keeping it to a minimum, until smooth and elastic, 5 to 6 minutes. Grease a large bowl with oil or butter and put the dough in it and turn to coat it. Cover with plastic wrap and let rise until doubled in size, 1½ to 2 hours.
3. Press on the dough to deflate it, and turn it out onto a lightly oiled work surface. Divide the dough in half and shape each piece into an oval. Cover with plastic wrap and let rise for 1 hour.
4. Meanwhile, combine the remaining 1 tablespoon flour, the oil or butter, sugar, and ½ cup water in a small saucepan. Cook the mixture over medium heat, whisking constantly, until it thickens, about 2 minutes. Set aside. Heat the oven to 450°F, setting a baking stone on the lowest rack if you have one.
5. If you’re using a baking stone, generously dust a pizza peel or a flexible cutting board with semolina or cornmeal. Otherwise, line 2 rimmed baking sheets with parchment paper and dust those. On a lightly floured work surface, press each piece of dough into a long oval roughly 16 × 5 inches. Transfer the dough to the peel or baking sheets. To give the bread its characteristic ridges, dip your fingertips in water and use them to press 5 or 6 deep grooves lengthwise along the dough, stopping just shy of the edges. Then rub the cooked flour paste (you may not use all of it) all over the surface of the dough with your fingers (at this point the dough won’t be sticky anymore, and you can use your fingers to deepen the ridges). Sprinkle lightly with the seeds.
6. Use the peel or cutting board to slide the dough onto the baking stone or put the baking sheets in the oven. Bake for 12 to 15 minutes, until the bread is puffed and golden. Serve warm or cool on racks.
GARLICKY PERSIAN FLATBREAD When you’re cooking the flour paste in Step 3, add 2 crushed garlic cloves along with the rest of the ingredients. Fish them out right before you rub the paste onto the dough.
Bagels and Beyond
These are just plain fun—they may seem like a novelty to make yourself, but try them once and you may get hooked when you see how easy they are. Most of us are accustomed to getting our bagels at bagel shops or, worse, the supermarket. And soft Pretzels are so hard to find now, you almost have to make them yourself. There’s nothing quite as fulfilling as having your own fresh, piping-hot versions whenever inspiration hits.
Recipes
Bagels
Bialys
Breadsticks
Soft Pretzels
Crumpets
Bao Buns
Bagels
Makes: 10 bagels
Time: 3 to 4 hours, largely unattended
These are real bagels—bagels with chewy insides and respectable crusts—not the puffy kind sold so often nowadays. Cooking a bagel is a two-step process: First you boil, then you bake. Other than that, they are as simple as any other bread. (Malt syrup, the traditional sweetener, can be bought in some specialized cooking shops or wherever beer supplies are sold.) The classic method for shaping bagels is to roll the dough into a rope and wrap it around your hand. I find this produces extra work at best and wildly misshapen bagels at worst. Far easier is to cut the dough into circles and poke the hole with your finger.
- 3½ cups all-purpose or bread flour, plus more as needed
- 2¼ teaspoons (1 package) instant yeast
- 2 teaspoons sugar
- 2½ teaspoons salt
- Neutral oil (like grapeseed or corn) for greasing
- 2 tablespoons malt syrup or sugar
1. Put the flour in a food processor. Add the yeast, sugar, and salt and process for 5 seconds. With the machine running, pour (don’t drizzle) 1½ cups water through the feed tube. Process for about 30 seconds, then remove the cover. The dough should be in a well-defined ball, only slightly sticky and very easy to handle. If the dough is too dry, add water 1 tablespoon at a time and process for 5 or 10 seconds after each addition. If it is too wet, add a tablespoon or 2 of flour and process briefly. Turn the dough out onto a lightly floured counter or tabletop and knead for a minute or 2 longer by hand, adding as much flour as necessary to make a smooth, tough, very elastic dough.
2. Lightly grease a large bowl with oil and dump in the dough, turning it over once to coat with the oil. Cover loosely with plastic wrap and let rise at room temperature until roughly doubled in size, about 2 hours. If you would like to let the dough rise for a longer period of time, which will help it develop flavor, refrigerate for up to 12 hours; bring it back to room temperature before proceeding.
3. Turn the dough out onto a lightly floured counter and press down on it to deflate so that the dough is roughly 1 inch thick. With a cookie or doughnut cutter, or a floured drinking glass (about 3½ inches in diameter), cut out as many circles as you can. Gently press the scraps together and cut out a few more circles. Keeping the rest of the dough circles covered with a kitchen towel as you work, flour an index finger and poke it through the center of each circle to form a hole. With the tip of your finger touching the counter, move your finger around in circles so the dough spins around it and the hole gets a little bigger. That’s your bagel. When they’re all shaped, cover and let rise for about 30 minutes.
4. While they rise, pour the malt syrup into a large pot of water and bring it to a boil. Heat the oven to 400°F. Put an ovenproof skillet (preferably cast iron) on the floor or the lowest rack while the oven heats. If you’re using a baking stone, put it on the rack above the skillet while the oven heats; if not, line baking sheets with parchment paper or lightly grease with oil. Drop the bagels, one at a time, into the boiling water; don’t crowd. The bagels will sink, then rise to the surface. Boil for 45 seconds on each side, then remove them with a slotted spoon and put on a lightly greased rack to drain; continue boiling in batches.
5. Put the bagels on a floured pizza peel or flexible cutting board, or on the prepared baking sheets. Use the peel or cutting board to slide them onto the stone, or slide the sheets into the oven. Partially pull out the rack with the heated skillet and very carefully pour 1 cup hot water into the skillet (it will create a lot of steam). Slide the rack back in and immediately close the oven door. Bake for 20 to 25 minutes or until the bagels are nicely browned. Remove, spray with a bit of water if you would like a shinier crust, and cool on a wire rack; these keep well for a day or 2.
ONION BAGELS The best, in my opinion. Two methods: The first, which is simple, is to add about ½ cup roughly chopped onion to the food processor along with the flour. The second, a little more flavorful, is to sauté ½ cup minced onion in 1 tablespoon butter or oil, stirring until very soft, about 10 minutes. Knead these into the dough by hand after removing it from the food processor. In either case, when you’re ready to bake the bagels, brush them with a little water and sprinkle each with about a teaspoon of very finely minced onion.
RAISIN BAGELS Knead about ½ cup raisins into the dough by hand after removing it from the food processor. About ½ teaspoon cinnamon is good here as well.
BAGELS TOPPED WITH SESAME SEEDS, POPPY SEEDS, COARSE SALT, ETC. There are two ways to do this. As you remove the bagels from the boiling water, drain briefly and dip the top of each into a plate containing whatever topping you like. Alternatively, just before baking, brush the bagels lightly with water or egg wash and sprinkle with the topping. The first method gives you a thicker topping; the second gives you more control. For everything bagels, combine 2 tablespoons each poppy seeds, sesame seeds, granulated garlic, and granulated onion with 1 tablespoon kosher salt.
MONTREAL-STYLE BAGELS These have the same cult following as their New York-style counterparts, with a crisper crust and sweeter, less fluffy center—a must-try for all bagel lovers: In Step 1, add ⅓ cup honey, 3 tablespoons neutral oil, 1 egg, and 1 egg yolk. You’ll need more flour—up to 1 cup extra—to get the right consistency. After the first rise, shape the dough as directed in the recipe or divide it into 16 even pieces, roll each into an 8- to 10-inch rope, and pinch the ends together to make a ring. To cook, heat the oven to 450°F and increase the malt syrup to ¼ cup (you can also use honey). Follow the directions in the preceding variation to coat in poppy seeds or sesame seeds, then bake for 20 to 25 minutes.
Making Bagels

STEP 1
After cutting out rounds of dough, insert a floured finger into the center.
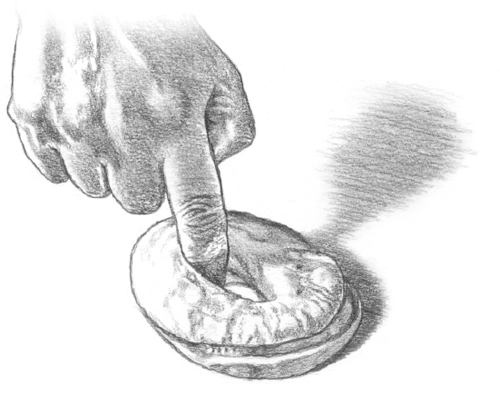
STEP 2
With the tip of your finger touching the counter, move your finger to spin the dough and widen the hole.
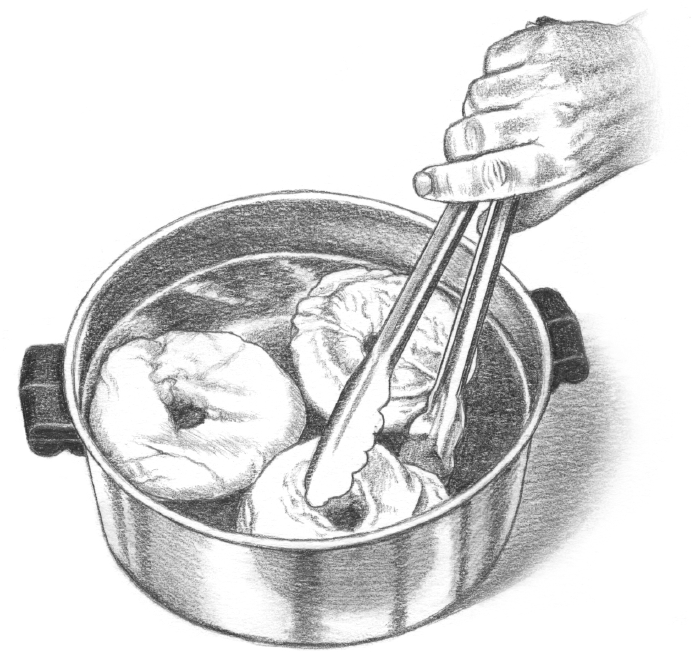
STEP 3
Once the shaped bagels have risen, boil them, without crowding the pot, before baking.
Bialys
Makes: 10 bialys
Time: 3 to 4 hours, largely unattended
In my humble opinion, bialys are every bit as good as bagels, their more popular cousin. The dough is nearly identical; this one has just slightly less water. The major difference is that where bagels are boiled before baking, these are just baked, which gives their crust a matte (as opposed to shiny) look. Instead of a hole in the middle, bialys are indented and filled with caramelized onions, then (sometimes) sprinkled with poppy seeds and salt and cooked in a hot oven until brown and crusty. These are a treat so seldom sold these days that the best way to get a truly great one is to make it yourself.
- 3½ cups all-purpose or bread flour, plus more as needed
- 2¼ teaspoons (1 package) instant yeast
- 2 teaspoons sugar
- 2½ teaspoons salt, plus more for the onions
- 3 tablespoons olive oil, plus more for greasing
- 2 medium onions, chopped
- Poppy seeds and/or salt (optional)
1. Put the flour in a food processor. Add the yeast, sugar, and salt, and process for 5 seconds. With the machine running, pour (don’t drizzle) 1¼ cups water through the feed tube. Process for about 30 seconds, then remove the cover. The dough should be in a well-defined ball, only slightly sticky and very easy to handle. If the dough is too dry, add water 1 tablespoon at a time and process for 5 or 10 seconds after each addition. If it is too wet, add a tablespoon or 2 of flour and process briefly. Turn the dough out onto a very lightly floured work surface and knead for a minute or 2 longer by hand, adding as much flour as necessary to make a smooth, tough, very elastic dough.
2. Lightly grease a large bowl with oil and dump in the dough, turning once to coat with oil. Cover with plastic wrap and let rise at room temperature until the dough has roughly doubled in size, about 2 hours. If you would like to let the dough rise for a longer period of time, which will help it develop flavor, refrigerate for up to 12 hours; bring it back to room temperature before proceeding.
3. Turn the dough out onto an unfloured work surface—you want it to be a little sticky—and cut it into 10 equal pieces. Roll each piece into a ball, then gently press it into a disk about 4 inches in diameter. Cover and let rise for 1 hour.
4. While they rise, put the oil in a medium skillet over medium-high heat. When it’s hot, add the onions and a sprinkle of salt. Cook, stirring occasionally and adjusting the heat as necessary to prevent burning, until the onions are soft and a deep caramel color, 15 to 20 minutes. Set aside. Heat the oven to 450°F. Put an ovenproof skillet (preferably cast iron) on the floor or the lowest rack while the oven heats. If you’re using a baking stone, put it on the rack above the skillet while the oven heats; if not, line baking sheets with parchment paper or lightly grease with oil.
5. When the bialys have risen, use your finger to make in indentation in the middle of each of them, leaving roughly a 1-inch border of puffed dough around the edges and making sure not to poke through the dough. Prick the indented parts with a fork to prevent them from rising too much in the oven and spoon the onion filling into the indentations. If you like, brush the puffed rim with a little water and sprinkle with poppy seeds and salt.
6. Put the bialys on a floured peel or flexible cutting board or on the prepared baking sheets. Use the peel or cutting board to slide them onto the stone or just slide the sheets into the oven. Partially pull out the rack with the heated skillet and very carefully pour 1 cup hot water into the skillet (it will create a lot of steam). Slide the rack back in and immediately close the oven door. Bake for about 15 minutes, until the bialys are nicely browned. Cool on a wire rack; these keep well for a day or two.
OLIVE AND ONION BIALYS Not traditional, but those indentations are primed for all sorts of fillings: Use just 1 onion. When it’s cooked, stir in ½ cup finely chopped pitted olives. For an herbal note, fresh thyme or rosemary leaves are nice.
Breadsticks
Makes: 50 to 100
Time: A day or so, largely unattended
In Piedmont, the breadstick capital of Italy, grissini are eaten plain. But in America they sometimes get a delicious if not traditional sprinkling of sesame seeds or sea salt right before baking. To make rustic-looking breadsticks, roll the strips of dough lightly on the countertop; for a more polished appearance, cut them with a pizza cutter or use a pasta machine (see Step 4).
- 3 cups all-purpose or bread flour, plus more as needed
- 2 teaspoons instant yeast
- 1 teaspoon sugar
- 2 teaspoons salt
- 2 tablespoons olive oil, plus more for greasing
- Semolina flour or cornmeal for dusting
1. Combine the all-purpose flour, yeast, sugar, and salt in a food processor; pulse once or twice. Add the oil and pulse a couple of times. With the machine running, add 1 cup water through the feed tube. Continue to add water 1 tablespoon at a time until the mixture forms a ball. It should be a little shaggy and quite sticky.
2. Put a little oil in a bowl and transfer the dough ball to it, turning to coat well. Cover with plastic wrap and let it rise for 1 hour in a warm place. Punch the dough down and reshape the ball, put it back in the bowl, cover again, and let rise in the refrigerator for several hours or preferably overnight.
3. Heat the oven to 400°F. Lightly grease 2 baking sheets with olive oil and sprinkle very lightly with semolina flour or cornmeal.
4. Cut the dough into 3 pieces; keep 2 covered while you work with the other. To roll by hand: On a well-floured surface, roll out a piece of dough as thinly as possible into a large rectangle, about a foot long. Use a sharp knife or pizza cutter to cut the dough into roughly ¼-inch-thick strips (slightly smaller is better than slightly bigger).
5. To roll with a pasta machine: Roll out the dough to ¼ inch thickness by hand. Put it through the machine at the largest setting, then cut it using the fettuccine setting and cut the strips into 1-foot lengths.
6. Transfer the strips to the baking sheets, spaced 1 inch apart, and brush with olive oil. Bake until crisp and golden, 10 to 20 minutes, then cool completely on wire racks. Serve immediately or store in an airtight container for up to 1 week.
HERBED BREADSTICKS Add to the dough mixture 2 teaspoons chopped fresh rosemary, thyme, or sage along with the olive oil.
PARMESAN BREADSTICKS Dip these in tomato sauce: Add up to ¾ cup grated Parmesan cheese to the food processor along with the flour in Step 1.
OLIVE OR DRIED TOMATO BREADSTICKS Darkly colored and full flavored: Before beginning the dough in Step 1, use the food processor to purée ½ cup pitted olives (green or black) or dried tomatoes along with the olive oil. Add the dry ingredients and proceed with the recipe.
SESAME RICE BREADSTICKS Serve with Asian dishes: Replace 1 cup of the flour with brown rice flour. Sprinkle the breadsticks with light or black sesame seeds before baking.
Soft Pretzels
Makes: 8
Time: About 4½hours, largely unattended
Like bagels, pretzels are boiled before baking. The key is adding baking soda to the water, which gives pretzels their distinctive flavor and brown, glossy crust. The main recipe here produces perfectly chewy pretzels with dark, burnished exteriors (and there’s also a variation for the hard crunchy kind). If you like your soft pretzels to have a little more crunch on the outside but remain tender and chewy in the middle, just lower the oven temperature and bake for a little longer. Serving these without a little mustard for dipping is heretical.
- 3½ cups all-purpose or bread flour, plus more as needed
- 2 teaspoons instant yeast
- 1 tablespoon sugar
- 2 teaspoons salt
- 3 tablespoons butter, melted
- Neutral oil (like grapeseed or corn) for greasing
- 2 tablespoons malt syrup or brown sugar
- ⅓ cup baking soda
- 1 egg
- Coarse salt for sprinkling
1. Put the flour in a food processor. Add the yeast, sugar, salt, and melted butter and process for 5 seconds. With the machine running, pour (don’t drizzle) 1¼ cups water through the feed tube. Process for about 30 seconds, then remove the cover. The dough should be in a well-defined ball, only slightly sticky and very easy to handle. If the dough is too dry, add water 1 tablespoon at a time and process for 5 or 10 seconds after each addition. If it is too wet, add a tablespoon or 2 of flour and process briefly. Turn the dough out onto a lightly floured work surface and knead by hand, adding flour as needed, until the dough is tacky and smooth, 4 to 6 minutes.
2. Lightly grease a large bowl with oil and dump in the dough, turning to coat. Cover with plastic wrap and let rise at room temperature until the dough has roughly doubled in size, 1½ to 2 hours. If you would like to let the dough rise for a longer period of time, which will help it develop flavor, refrigerate for up to 12 hours; bring it back to room temperature before proceeding.
3. Turn the dough out onto the work surface and divide it into 8 equal pieces. Keeping the rest of the dough covered with a kitchen towel as you work, shape each piece into a pretzel (see illustrations, page 445). When they’re all shaped, cover with a kitchen towel and let rise until puffy, 30 to 45 minutes.
4. Meanwhile, heat the oven to 450°F and line baking sheet with parchment paper or lightly grease with oil. When the pretzels are nearly done rising, fill a large pot with 8 cups of water and bring it to a vigorous simmer. Add the malt syrup and baking soda; as soon as you add the baking soda the water will foam up considerably, so be careful, and if it looks like the pot will overflow, just remove from the heat until the foam subsides. Stir to dissolve the baking soda and adjust the heat so the water simmers steadily but not violently.
5. Drop the pretzels, one at a time, into the boiling water; don’t crowd. Boil for 45 seconds on each side, then remove them with a slotted spoon or slotted spatula and put on a lightly greased rack to drain. When they’re all boiled, transfer to the prepared baking sheets. Beat the egg with 2 teaspoons water to make an egg wash. Brush it over the tops of the pretzels and sprinkle them with coarse salt.
6. Bake for 12 to 15 minutes, until the pretzels are deep golden and glossy. Cool on a rack until you can handle them and serve while still warm. Alternatively, these will keep in a paper bag or bread box for about a day.
PRETZEL ROLLS OR TWISTS For an alternative shape, you can form the dough into rolls (see page 399) or twists: For twists, fold each long rope in half and tightly twist the two sides around each other. Press the two ends together. Boil and bake both as directed (rolls will take a little longer than twists or regular pretzels).
HARD PRETZEL STICKS The addictively crunchy kind: In step 3, divide the dough into 24 pieces, and roll each one into a rope 8 to 10 inches long and ½ inch thick. Rise and boil as directed; since the dough is thinner, take care when you add it to the water to ensure they’re not overcrowded and don’t stick together. Bake at 350°F until deep golden and completely dried out, 30 to 40 minutes. Cool completely on wire racks; they’ll crisp more as they cool. Store in an airtight container for up to a few days.
Shaping Pretzels
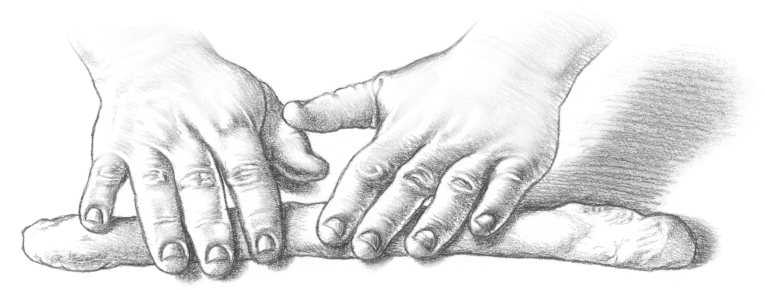
STEP 1
Roll each piece of dough into a long rope.
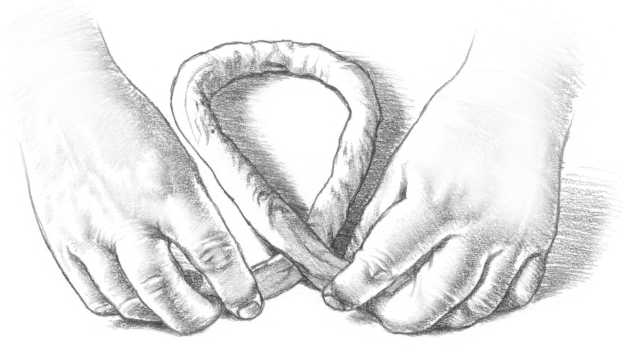
STEP 2
Pick up the ends and cross them over each other.

STEP 3
Twist the ends once.
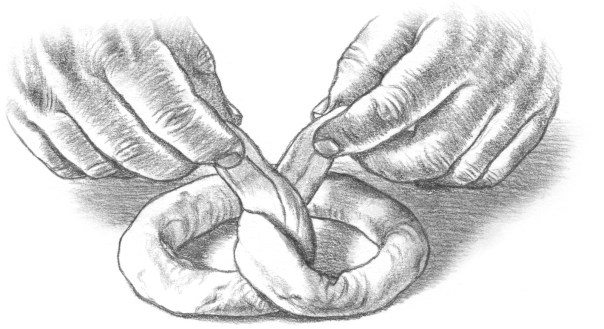
STEP 4
Flip the ends toward you and press onto the bottom of the pretzel.
Crumpets
Makes: About 20 crumpets
Time: About 1 hour
These chewy, spongy cakes are similar to English Muffins and get their puffed, circular shape from being cooked on a griddle (or skillet) in a mold. There are special molds made just for this purpose, but any ring molds or round metal cookie cutters will work. If you have a set of ring molds in decreasing sizes, you can either cook multiple crumpets at once and be okay with them being slightly different sizes (the smaller ones will finish cooking faster) or cook one at a time if you have the patience of a saint. If you don’t have any molds at all, you can cook the batter free-form, but then you’re essentially making yeasted pancakes, not crumpets. Store these for up to a few days and toast them before serving, ideally with butter and Fruit Jam.
- 3 cups all-purpose or bread flour
- 2 teaspoons instant yeast
- 2 teaspoons baking powder
- 1 teaspoon sugar
- 1½ teaspoons salt
- 1 cup lukewarm milk
- Neutral oil (like grapeseed or corn) for cooking
1. Combine all of the ingredients except the oil in a large bowl with 1 cup plus 2 tablespoons water and whisk vigorously until smooth. Cover with plastic wrap and let sit in a warm place for 30 minutes.
2. Put a griddle or large skillet over medium-low heat and grease it lightly with oil. If you’re using crumpet or ring molds, grease them well. Put the molds (you likely won’t have room for more than 3 or 4) in the skillet and spoon in the batter so it reaches about ¼ inch up the sides of the molds.
3. Cook until holes have formed on the surface, 5 or 6 minutes, then carefully remove the molds (run a thin, sharp knife around the edges if necessary), flip the crumpets, and cook until golden on the other side, another 2 or 3 minutes. If you’re not using molds, cook the crumpets as you would pancakes. Grease the pan as necessary until you use up all of the batter. Cool completely before serving.
WHOLE WHEAT CRUMPETS Substitute whole wheat flour for half of the all-purpose flour.
Bao Buns
Makes: About 30 buns
Time: About 4 hours, largely unattended
In addition to leading a food revolution in New York City, iconic chef and old friend David Chang ruined me for traditional pork buns. He fills his with sliced pork belly (see the following variation), but you can stuff these downy, almost creamy clamshell-shaped rolls with a million different things, Asian flavored or not: meatballs, pickled vegetables, grilled anything, etc.
- 2 teaspoons instant yeast
- 4 cups bread or all-purpose flour
- 1¼ cups all-purpose flour, plus more for dusting
- 1½ teaspoons salt
- ¼ cup sugar
- 2½ tablespoons pork fat or lard, melted
- Neutral oil (like grapeseed or corn) for greasing
1. Put the yeast in 1½ cups lukewarm water and let it sit for a couple of minutes. To make the dough in a stand mixer, combine the flours, salt, sugar, fat, and yeast-water mixture in the mixer bowl. Using a dough hook, mix on low speed until the ingredients are combined, then increase the speed to medium and mix until the dough is smooth and elastic, 8 to 10 minutes.
2. To make the dough in a food processor, put the flours, salt, sugar, and fat in the work bowl and pulse to combine. With the machine running, pour in the yeast-water mixture and process until the dough comes together into a barely sticky ball. Turn it out onto a lightly floured counter and knead until smooth and elastic, 5 or 6 minutes. Grease a large bowl with a little oil and put the dough in it, turning it over to coat with oil. Cover with plastic wrap and let rise until doubled in size, 1½ to 2 hours.
3. Line a baking sheet with parchment and lightly flour a work surface. Press down on the dough to deflate, then turn it out onto the counter and roll it into a rope about 30 inches long (or two 15-inch ropes if your surface isn’t long enough). Cut the rope(s) into 30 pieces, put them on the baking sheet, cover with plastic wrap or a kitchen towel, and let rise for 45 minutes.
4. While the dough rises, cut 30 4-inch squares of parchment paper (it seems tedious, but it’s worth it). Working with one piece of dough at a time, press the piece of dough flat and roll into an oval roughly 5½ × 3 inches. Rub each oval with a little oil, fold it over on itself like a clamshell (don’t press, just fold), and put it on one of the parchment squares (see illustration below). Repeat with the rest of the dough, cover with a kitchen towel, and let rise for another 30 minutes.
5. Rig a steamer in a large pot, using either a steaming basket or a plate placed over an inverted bowl; add water and bring to a boil over high heat. Working in batches so you don’t crowd, put the buns (with the parchment) in the pot and steam until the dough has puffed and cooked all the way through, 6 to 10 minutes. Cover the finished buns with a damp paper towel so they don’t dry out. Fill them with whatever your heart desires and serve warm.
PORK BELLY BAO Put a large piece of skinless pork belly, at least 3 pounds, in a roasting pan that will comfortably fit it. For each pound of pork, combine a heaping tablespoon each of salt and sugar, then rub this mixture all over the pork. Cover and refrigerate overnight. Roast the pork at 450°F for 30 minutes, then decrease the heat to 275°F and cook for another hour or 2, until it’s very tender. To serve, cut it into thick slices and, if you like, brown it in a skillet with a little oil. You can wrap it tightly in plastic and refrigerate for a couple days before slicing and browning. Fill each bao bun with a few slices of the pork, hoisin sauce, sliced cucumbers, and scallions.
Shaping Bao Buns
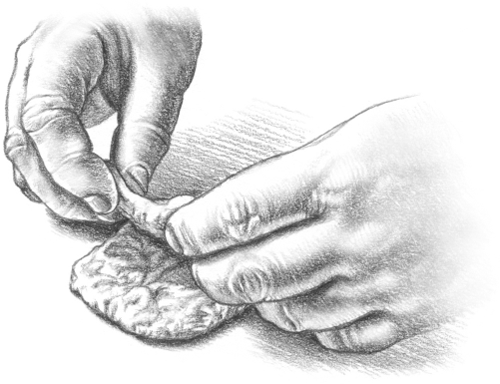
Roll each piece of dough into an oval, rub with a little oil, and then fold it in half like a clamshell; set each one on a parchment square.