The Complete Chess Course From Beginning To Winning Chess! (2016)
Book Eight
How to Play the d-pawn Openings
Miscellaneous Double d-pawn Openings
There are openings in which White plays 1.d4 and Black replies 1…d5, whereupon White deliberately avoids playing the Queen’s Gambit. The result is an absence of tension in the central pawn position. This lack of tension makes it easy for Black to achieve equality.
(a) Colle System
Colle System
White - Black
1.d4 d5 2.Nf3 Nf6 3.e3 c5 4.c3
The characteristic move of this system. White’s idea is to support his d-pawn with a view to an eventual e3-e4. This often gives him the initiative in the center. In turn such a preponderance, if met by indifferent moves, may lead to a powerful attack by White.
The alternative 4.b3 has gone out of style because of the continuation 4…e6 5.Bb2 Nc6 6.Bd3 Bd6 7.0-0 0-0. Now if 8.Nbd2 Qe7! 9.Ne5 (else Black frees himself at once with …e5) 9…cxd4 10.exd4 Ba3 with an excellent game for Black. This applies also to 8.a3 Qc7 followed by …e5.
4…Nbd7!
An important finesse. After 4…e6 5.Nbd2 Nc6 6.Bd3 Bd6 7.0-0 0-0 8.dxc5! Bxc5 9.e4! White has the initiative in the center plus the queenside majority of pawns. These advantages have led to some very impressive White victories with the Colle System. (D)
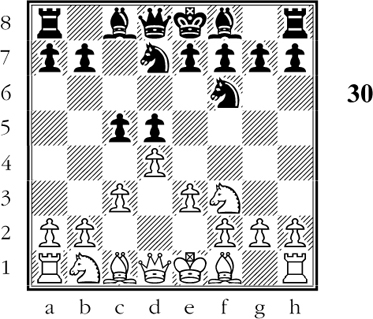
Position after 4…Nbd7
If now 5.Nbd2 e6 6.Bd3 Bd6 7.0-0 0-0 8.e4 cxd4! 9.cxd4 (not 9.Nxd4? Nc5!) 9…dxe4 10.Nxe4 and White is left with the positional disadvantage of an isolated d-pawn.
5.Nbd2 g6
As the last note indicates, 5…e6 is a perfectly suitable alternative. However, 5…g6 is even more promising, as it breaks the diagonal of White’s light-square bishop and thereby crushes White’s hopes of a kingside attack.
Note that Black’s 5…g6 is made possible by his previous move, which guards his c-pawn and gives him freedom of action.
6.Bd3 Bg7 7.0-0 0-0
If now 8.e4 dxe4 9.Nxe4 cxd4 10.Nxd4 (not 10.cxd4?, leaving White with an isolated d-pawn) 10…Ne5 11.Nxf6+ Bxf6 12.Be2 Bd7 and Black has more freedom of action.
We arrive at the same conclusion after 8.b4 cxb4 9.cxb4 Ne8! 10.Bb2 Nd6 11.Qb3 Nb6 12.a4 Bf5! 13.Bxf5 gxf5! when White’s remaining bishop is hemmed in by its own pawns.
(b) Stonewall Variation
Stonewall Variation
White - Black
1.d4 d5 2.e3 Nf6 3.Bd3 c5 4.c3
White intends to continue with f2-f4, establishing the stonewall formation of his center pawns. The force of this is best seen after the passive 4…e6? 5.f4 Nbd7 6.Nf3 Bd6 7.Nbd2 b6 8.Ne5 Bb7 9.Qf3, leaving White with a very powerful position in the center that often leads to an overwhelming attack.
4…Nc6
Black intends to proceed along different lines. He does not mind the possibility of 5.dxc5, which gives him a tremendous pawn center after 5…e5. In any event, 5.dxc5 would be the negation of White’s planned stonewall setup.
5.f4 Bg4!
Immediately solving the problem of the troublesome bishop.
6.Nf3 e6 7.Nbd2 Bd6 8.h3 Bh5 9.b3 cxd4 10.cxd4 Rc8 11.0-0 Bg6
Black has somewhat the better of it after 12.Bxg6 hxg6 as his remaining bishop has more freedom of action than the White bishop.
(c) 2.Bf4 Variation
2.Bf4 Variation
White - Black
1.d4 d5 2.Bf4
This old-fashioned move is discredited nowadays for two reasons. In the first place, White gives Black the initiative in the center by permitting him to play …c5. Secondly, White plays out his dark-square bishop before ascertaining what is the best square for that piece.
2…Nf6 3.Nf3 c5! 4.e3 Nc6 5.c3 Qb6
Black is developing very comfortably.
6.Qc1 Bf5 7.Nbd2 e6
It is clear that White has frittered away the initiative. Black has a very promising game.