The Complete Chess Course From Beginning To Winning Chess! (2016)
Book Seven
How to Play the e-pawn Openings
Ruy Lopez
In the whole realm of the e-pawn openings, this is White’s most serious attempt to seize the initiative. There are many lines of play in which White maintains a lasting pressure on Black’s position. Undoubtedly Black’s best defense is some form of the “Strongpoint” Variation, for this gives him his best chance of freedom.
(a) Tchigorin Variation
Ruy Lopez
White - Black
1.e4 e5 2.Nf3 Nc6 3.Bb5
This move exercises unmistakable pressure on Black’s game. Sooner or later White will be threatening to win a pawn by Bxc6 followed by Nxe5. (D)
Position after 3.Bb5
Black can play 3…a6 for if 4.Bxc6 dxc6 5.Nxe5, Black recovers his pawn with 5…Qg5 or 5…Qd4.
3…a6
This (known as the Morphy Defense) is Black’s best. By driving off White’s bishop with an eventual …b5, Black rids himself of White’s potential threat to win the e-pawn and gives his forces more playing room.
A possibility here for White is the Exchange Variation, which does not have much sting: 4.Bxc6 dxc6. This may continue 5.d4 exd4 6.Qxd4 Qxd4 7.Nxd4 Bd7 8.Be3 0-0-0 9.Nd2 Ne7 10.0-0-0 Re8 11.Rhe1 Ng6. Black’s bishops give him an excellent game.
4.Ba4 Nf6
A good developing move which gains time by attacking White’s e-pawn.
5.0-0
Momentarily White can leave his e-pawn in the lurch, as he has threats on Black’s e-pawn himself.
5…Be7
Black can also play 5…Nxe4, as in Variation (c). (D)
Position after 5…Be7
White can now choose between defending his e-pawn and advancing in the center by d2-d4.
If White advances 6.d4, Black’s best reply is 6…exd4. In that event, White should not pause for 7.Re1, as he may fall into the Noah’s Ark trap: 7…b5 8.Bb3 d6 9.Nxd4?? Nxd4 10.Qxd4 c5 followed by 11…c4 winning White’s bishop!
In reply to 6…exd4 White’s best course is 7.e5. Then, after 7…Ne4 8.Nxd4 Nxd4 (not 8…Nxe5?? 9.Re1) 9.Qxd4 Nc5 the position is fairly level: White gets a lead in development, while Black has the two bishops.
Coming back to the position of Diagram 45, White can also stop to defend his e-pawn with 6.Qe2. Then if 6…0-0? there follows 7.Bxc6 dxc6 8.Nxe5 Qd4 9.Nf3 Qxe4 10.Qxe4 Nxe4 11.Re1 and White wins a piece.
Consequently, after 6.Qe2 Black plays 6…d6 although after 7.c3 0-0 8.d4 his game is somewhat constricted.
6.Re1
This is the usual move. Now that White has protected his own e-pawn, he threatens to win a pawn by 7.Bxc6 and 8.Nxe5.
6…b5
Driving off the bishop in order to safeguard his e-pawn.
7.Bb3 d6
The safe and sane course, which avoids the premature counterattack 7…0-0 8.c3 d5?!. In that event there may follow 9.exd5 Nxd5 10.Nxe5 Nxe5 11.Rxe5 c6 12.d4! Bd6 13.Re1 Qh4 14.g3 Qh3 15.Re4!.
Although Black still has some attacking prospects, White has a satisfactory defense. His extra pawn should tell in his favor.
8.c3 0-0 9.h3!
More precise than the immediate 9.d4, which would allow the pin 9…Bg4. By advancing his h-pawn, White deprives Black’s light-square bishop of his best square.
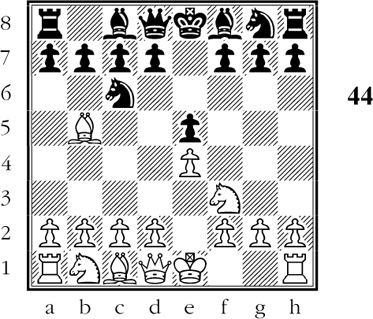
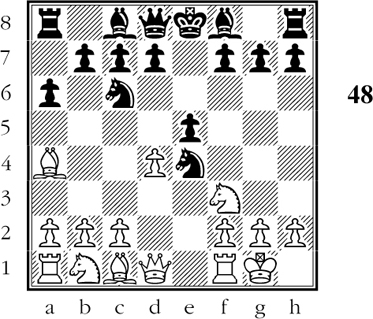
9…Na5! 10.Bc2 c5 11.d4 Qc7 (D)
(Position after 11…Qc7
Black has established a “strong point” at e5. By advancing his queenside pawns (beginning with 3…a6) he has established ample maneuvering space for his forces.
12.Nbd2 Nc6
A plausible alternative is 12…cxd4 13.cxd4 Nc6 14.d5 Nb4 15.Bb1 a5 16.a3 Na6. Black’s queen knight will come to c5, but White’s game is slightly freer.
13.d5 Nd8 14.a4! Rb8
But not 14…b4, which allows White to post his queen knight magnificently at c4.
15.c4! b4 16.Nf1 Ne8 17.g4 g6 18.Bh6 Ng7
The position is approximately even. White has more maneuvering space, but Black’s game is very compact and hard to get at.
(b) Steinitz Defense Deferred
Ruy Lopez
White - Black
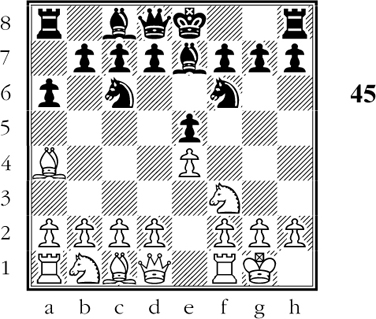
1.e4 e5 2.Nf3 Nc6 3.Bb5 a6 4.Ba4 d6 (D)
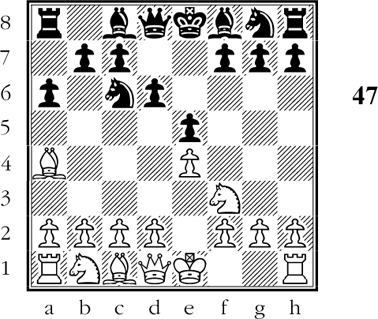
Position after 4…d6
Black has delayed playing out his king knight as he has in mind variations in which this piece may play to e7 or h6; he may also want to advance his f-pawn.
If now 5.Bxc6+ bxc6 6.d4 Black holds the center with 6…f6! and after 7.Be3 Ne7 8.Nc3 Ng6 9.Qd2 Be7 his position is satisfactory.
Another possibility is 5.d4 b5 6.Bb3 Nxd4 7.Nxd4 exd4. Now 8.Bd5 is satisfactory for White, whereas 8.Qxd4?? c5 9.Qd5 Be6 10.Qc6+ Bd7 11.Qd5 c4 gives us another version of the Noah’s Ark Trap.
5.c3 Bd7
Here 5…f5 is premature: 6.exf5 Bxf5 7.d4! e4 8.Ng5 d5 9.f3! forcing line opening which is distinctly in White’s favor.
6.d4 g6 7.Bg5 f6 8.Be3 Nh6! 9.0-0 Bg7 10.h3 Nf7 11.Nbd2 0-0 12.dxe5 dxe5 13.Bc5 Re8
The position is approximately even. White’s apparent pressure is neutralized by Black’s solid position.
(c) Open Defense
Ruy Lopez
White - Black
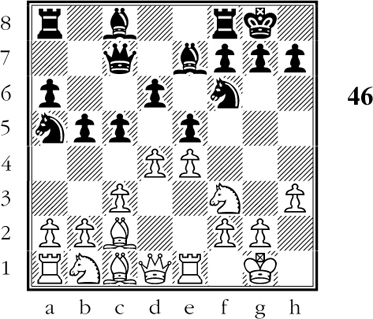
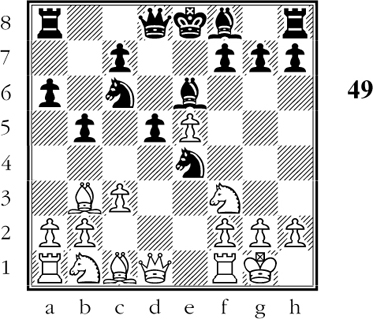
1.e4 e5 2.Nf3 Nc6 3.Bb5 a6 4.Ba4 Nf6 5.0-0 Nxe4 6.d4! (D)
Position after 6.d4!
Winning a second pawn leads to trouble for Black, for example 6…exd4 7.Re1 d5 8.Bg5! Qd6 9.c4! dxc3 10.Nxc3 Be6 11.Nxe4 dxe4 12.Nd4 b5 13.Rxe4! bxa4 14.Qxa4 Qd5 15.Re5!! and wins.
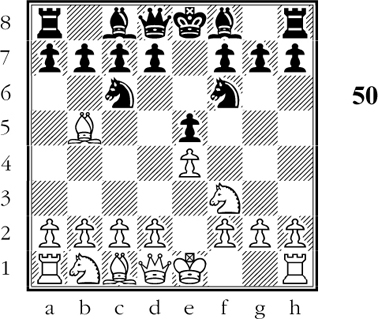
6…b5 7.Bb3 d5 8.dxe5 Be6 9.c3
An interesting possibility is 9.Qe2, for example 9…Nc5 10.Rd1 Nxb3 11.axb3 Qc8 12.c4! dxc4 13.bxc4 Bxc4 14.Qe4 and White has a winning attack. (D)
Position after 9.c3
Here 9…Bc5 gives Black an aggressive development but leaves him with a vulnerable pawn position - for example 10.Qd3 0-0 11.Be3 Bxe3 12.Qxe3 Ne7 13.Bc2 f5 14.exf6 Rxf6 15.Nd4!.
9…Be7 10.a4!
Now White gets a strong initiative.
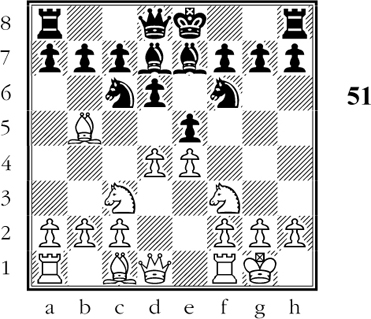
10…b4 11.Nd4! Nxe5 12.f4 Bg4 13.Qc2 c5
Not 13…Ng6 14.cxb4 Bxb4? 15.Nc6.
14.fxe5 cxd4 15.cxd4 0-0
White has a clear advantage because of his greater mobility, attacking chances, and prospects of creating weaknesses in Black’s kingside.
(d) Berlin Defense
Ruy Lopez
White - Black
1.e4 e5 2.Nf3 Nc6 3.Bb5 Nf6 (D)
Position after 3…Nf6
The drawback of this once-popular defense is that it leads to a weak pawn position for Black.
4.0-0 Nxe4 5.d4 Be7
Note that 5…exd4?? will not do because of 6.Re1.
6.Qe2 Nd6 7.Bxc6 bxc6 8.dxe5 Nb7 9.Nc3 0-0 10.Nd4 Bc5 11.Rd1 Bxd4 12.Rxd4 d5 13.exd6 cxd6
The position is decidedly in White’s favor. Black’s game is very difficult because of his weak pawns and the bad position of his knight.
(e) Steinitz Defense
Ruy Lopez
White - Black
1.e4 e5 2.Nf3 Nc6 3.Bb5 d6
This defense gives Black a cramped game.
4.d4! Bd7 5.Nc3 Nf6
If instead 5…exd4 6.Nxd4 Nf6 7.Bxc6! bxc6 8.Qf3! and White has the better of it, for example 8…Be7 9.e5! dxe5 10.Nxc6 etc.
6.0-0 Be7 (D)
Position after 6…Be7
A likely continuation is 7.Bg5! exd4 8.Nxd4 0-0 9.Bxc6 bxc6 10.Qd3 Ng4 11.Bxe7 Qxe7 12.f4! f5 13.Rae1!. White has the better game. His aggressive development gives him greater freedom of action.
(f) Classical Defense
Ruy Lopez
White - Black
1.e4 e5 2.Nf3 Nc6 3.Bb5 Bc5 (D)
Position after 3…Bc5
The drawback of this defense is that Black’s dark-square bishop becomes a target for attack.
4.0-0 Nge7 5.c3 Bb6 6.d4 exd4 7.cxd4 d5 8.exd5 Nxd5 9.Re1+ Be6 10.Bxc6+! bxc6 11.Qa4 Qd6 12.Bg5 0-0 13.Nc3
Thanks to Black’s shattered pawn position, White has a strategically won game.
(g) Bird’s Defense
Ruy Lopez
White - Black
1.e4 e5 2.Nf3 Nc6 3.Bb5 Nd4 (D)
Position after 3…Nd4
This defense lacks punch. The offered exchange wastes time and allows White to get a clear initiative on the kingside.
4.Nxd4 exd4 5.0-0 g6 6.d3 Bg7 7.c3! Ne7 8.cxd4 Bxd4 9.Nc3 c6 10.Ba4 d6 11.Be3! Bg7 12.Qf3 0-0 13.Bb3 Kh8 14.Qg3
White is clearly forcing the pace, while Black has a difficult defensive game.
(h) Schliemann’s Defense
Ruy Lopez
White - Black
1.e4 e5 2.Nf3 Nc6 3.Bb5 f5 (D)
Position after 3…f5
Black’s counterattack is risky and invites a brisk reaction by White.
4.Nc3! fxe4 5.Nxe4 d5 6.Nxe5! dxe4 7.Nxc6 bxc6 8.Bxc6+ Bd7 9.Qh5+ Ke7 10.Qe5+ Be6 11.Bxa8 Qxa8
White is ahead in material and Black’s king is exposed to attack.