The Complete Chess Course From Beginning To Winning Chess! (2016)
Book Five
How to Win When You’re Ahead
Chapter Seven
Endings with Minor Pieces
In endings with minor pieces we often see a struggle of bishop against knight.
There has been much argument pro and con as to which of these pieces is to be preferred. In modern master play the bishop is the more popular piece, mainly because of its long-range effectiveness. The following endgames illustrate the versatile powers of the bishop as against a knight.
The Agile Bishop
Although Black is a pawn ahead, he seems at first to have a puzzling task ahead of him, as his king cannot advance and there seems to be no immediate progress in sight. (D)
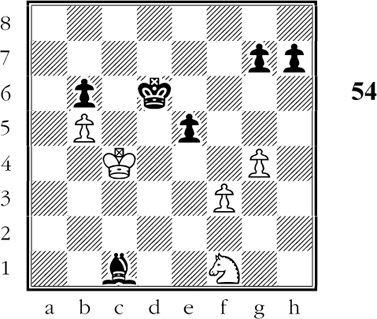
Black to move
The right way is 1…Bf4!, stalemating White’s knight. This forces the white king to move, so that Black can win another pawn shortly.
As indicated above, Black wins quickly with 1…Bf4!, paralyzing the knight. There might follow 2.Kb4 Kd5 and now Black threatens the devastating march …Kd4-d3-e2, winning the knight.
White has nothing better than 3.Kc3, allowing 3…Kc5 which wins White’s b-pawn. With two pawns ahead, one of them a passed pawn, Black wins easily. (Another winning method is 3…e4! assuring a successful raid by Black’s king.)
In Diagram 55 White is not only a pawn ahead; he already has a remote passed pawn. The win may take a little time, but it should be absolutely certain! (D)
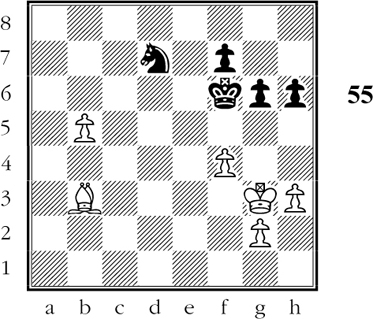
Black to move
White’s passed pawn splits up Black’s forces. The king and knight - or both - must prevent the pawn from queening. Meanwhile White invades the undefended kingside. The first part, as usual, is for him to centralize his king.
1.Kf3 Ke7 2.Ke3 f6
Necessary before he can play …Kd6. But now his g-pawn will be a weakness.
3.Kd4 Kd6 4.Bd1 Nb6 5.Bf3 Nc8 6.h4! Ne7 7.Be4! (D)
Black to move
Now the knight is tied to the defense of the weak pawn. Black’s king dare not move, as that would allow penetration by Kc5. The passed pawn paralyzes the black king. Hence a weakening pawn move is forced.
If the black pawns get on light squares the bishop will become fearfully effective, for example: 7…f5 8.Bf3 Nc8 9.Bd5 Ne7 10.Bf7 Kd7 11.Ke5 followed by Kf6 winning all the pawns. If instead 7…h5 8.g3! f5 9.Bf3 Nc8 10.Bd5 Ne7 11.Bf7 Kd7 12.Ke5 as above.
7…g5 8.fxg5 fxg5 9.hxg5 hxg5 10.b6! g4 11.b7 Kc7 12.Ke5 g3 13.Kf4 Ng8 14.Kxg3 Nf6 15.Bf3 Nd7 16.Kf4 Kd6 17.Kf5 Ke7 18.Bc6! Nb8 19.Bb5! Black resigns.
Black realizes that although his king can cross to g7 and prevent White’s g-pawn from queening, White can bring his king to c7, winning the knight and then obtaining a new queen. Play this out for yourself!
Diagram 57 shows some exciting possibilities. (D)
Black to move
Black is a pawn ahead and he has a pawn that is ready to queen. Overconfidence can cause his downfall, thus: 1…Bh6 (or 1…Ba3) 2.b6! c1Q? 3.Nxc1 Bxc1?? 4.b7 and White’s pawn cannot be stopped!
In Diagram 57 Black prudently plays:
1…e4!!
This opens up a diagonal to enable the bishop to stop the pawn in time.
2.dxe4 Bh6 3.b6 c1Q 4.Nxc1 Bxc1 5.Kf3
On 5.b7 Black has 5…Bf4 and wins.
5…Ba3 6.e5
Threatening 7.b7 followed by queening.
6…Bc5 7.b7 Ba7
Just in the nick of time. The rest is a typical ending with a piece to the good. Black either picks up more pawns or gives up his bishop for a different kind of advantage.
8.Kg4
For example, 8.Ke4 Kf7 9.Kd5 Bb8 10.e6+ Ke7 11.h3 h6 and White loses the e-pawn.
8…h6 9.Kf4 Kf7 10.Ke4 Ke6 11.Kf4 Bb8 12.Kf3 Kxe5 13.Kg2 Kf4 14.Kh1 Kf3 15.Kg1 h5 16.Kh1 Ba7! 17.h4 Kg3 18.b8Q+ Bxb8 Black resigns.
White’s last move was nothing but despair - the familiar spite check.
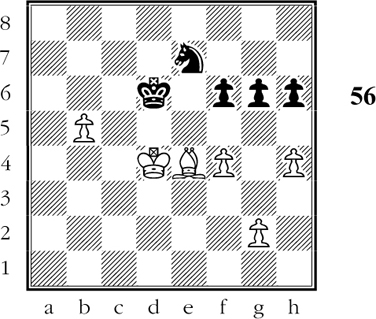
The Agile Knight
But it is wrong to despise the knight, as so many modern players do. This piece can sometimes unleash enormous power, especially where the opponent has most of his pawns on the same colored squares as those his bishop travels on. (D)
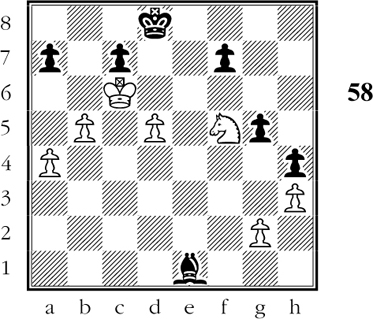
White to move
At the moment White does not have an advantage in material, but he will soon remedy this. The bishop has the impossible job of defending four pawns on the dark squares. These pawns in turn deprive the bishop of mobility.
In Diagram 58 White proceeds with:
1.d6!
This leaves Black no choice, for if 1…Ba5 2.d7! Bb6 3.Nh6! Ke7 4.Nxf7! winning.
1…cxd6 2.Nxd6 f6
And now 2…Ke7 is answered by 3.Nc8+ (forking check) followed by 4.Nxa7 with an easy win for White because of his two connected passed pawns.
3.Ne4!
The classic elegance of this knight move is delightful. The first point of the move is that 3…f5 allows 4.Nxg5. The second point is that Black cannot play 3…Bc3.
3…Ke7 4.Kb7!
Now comes the third point of the knight move: Black cannot defend his a-pawn with 4…Bf2.
And so White wins the a-pawn, which gives him two connected passed pawns and a technically easy win.
Exception to an Exception
Diagram 59 illustrates an ending with bishops on opposite colors.
This is a term we use when one player has a bishop that travels on light squares, while his opponent has a bishop that travels on dark squares.
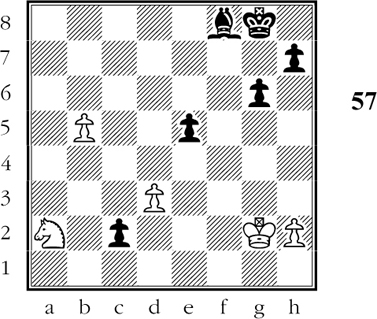
It sometimes happens in such endings that the advantage of a pawn - or even two pawns - is not enough to win. This is due to the fact that the player with the extra pawns does not command the squares to which his bishop does not have access. (See Diagram 77 for an explanation of this point.) (D)
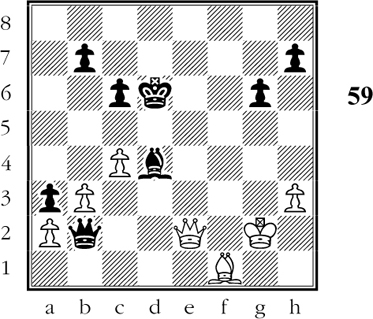
White to move
Relying on the reputed drawing qualities of the bishops on opposite colors, White exchanges queens. He overlooks, however, that his bishop will be tied down by the queening threat of Black’s pawn at b2.
From Diagram 59 play proceeds:
1.Qxb2 axb2! 2.Bd3
White’s bishop must prevent Black’s advanced pawn from queening. Black will therefore advance his two pawns to one on the kingside with a view to creating a second passed pawn.
2…Ke5 3.Kf3 Bc5 4.Bb1 Kf6 5.Ke4 h5! 6.Bc2 g5! 7.Bb1 Bd6! 8.Bc2 g4! 9.hxg4 hxg4
Now Black has his second passed pawn.
10.Bb1 g3 11.Kf3 Bf4
If now 12.Kxf4 g2 and the pawn must queen.
12.Kg2 Ke5 13.Kf3 Kd4
The rest is easy.
14.Kg2 Kc3 15.Kf3 Kd2 16.Kg2 Kc1 17.Be4 b1Q 18.Bxb1 Kxb1
Thus the queening of the pawn has won a piece in typical fashion, Leaving Black with an easy win.
Squeeze Play
In Diagram 60 we see a memorable knight and pawn ending in which the winner avoids several crafty traps. (D)
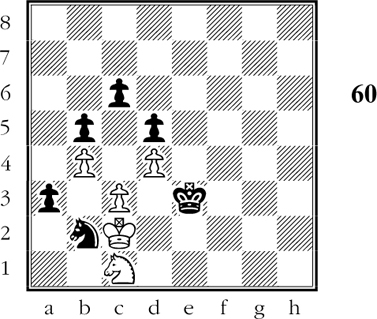
Black to move
Black is a pawn ahead. However, it looks as if his passed pawn may easily go lost. And, as soon becomes clear, there are other drawing dangers in the position. Nevertheless, Black can win by sacrificing his knight.
1…Nd3!! 2.Nb3
For if 2.Nxd3 a2 3.Kb2 Kxd3 and Black wins all of White’s pawns. And if 2.Na2 Ke2! 3.Kb3 Kd2 4.Kxa3 Kc2 when White is starved for moves.
2…Ne1+ 3.Kd1 Kd3! 4.Kxe1 Kxc3 5.Na1
Now Black can win back the piece with 5…Kb2? 6.Kd2 Kxa1 - but after 7.Kc1 Ka2 8.Kc2 the game is a draw!
5…Kxd4! 6.Nc2+ Kc3
All this is beautifully played. If now 7.Nxa3 Kb2 trapping the knight, which can be safely captured this time.
7.Kd1 a2 8.Kc1 d4 9.Na1 d3 10.Nc2
He tries to trick Black, since 10.Kd1 Kb2 is hopeless for White.
10…c5!
Of course not 10…dxc2?? stalemating White. After 10…c5! White resigns, for after 11.bxc5 dxc2! 12.c6 there follows 12…a1Q# - the perfect promotion.