The Complete Chess Course From Beginning To Winning Chess! (2016)
Book Five
How to Win When You’re Ahead
Chapter Five
Endgames with the Exchange Ahead
To be the exchange ahead - to have a rook for a bishop or knight - generally assures you an easy win. Nevertheless, it is well for you to be prepared for a little trouble, or at least some hard work. The advantage of the exchange does not win by itself!
The Rook’s Superior Mobility
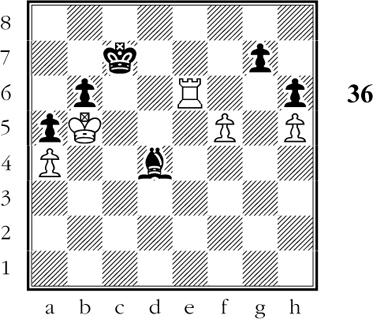
The following endgame shows what the rook can sometimes accomplish on open lines. (D)

White to move
White has the exchange for a pawn. Naturally this makes the win harder than if Black were not a pawn up.
White’s pawns are all isolated, which gives us a discouraged feeling that they cannot be put to good use. So White must give some thought to the problem of employing these pawns profitably.
He has one consolation: Black’s pawns are not in very good shape either. Black’s g-pawn, e-pawn, and b-pawn require protection by pieces.
These pawns are “backward” pawns; they can no longer be protected by neighboring pawns. They are therefore vulnerable to attack from the rook. Luckily, the rook has a lot of scope. It has a choice of three open files.
So, here is White’s diagnosis:
To win on the superior mobility of his rook, he needs to create additional open lines by c3-c4! and c4-c5!. This will also create points of invasion for his king.
It will not be long before Black will find himself in trouble because his bishop and king are tied to the defense of weak pawns.
1.c4! Kc6
Or 1…dxc4+ 2.Kxc4 and White has a standing threat of Kb5 (or Kd5 after f4-f5 and the resulting exchange of pawns).
2.Rb5! Be7 3.f5!
Splendid timing. Watch how the mobility of White’s pieces is increased.
3…dxc4+ 4.Kxc4 exf5 5.Rxf5 Bf6
Though Black’s position looks as solid as it did at the beginning, White has actually made great progress.
His next goal: a check on the sixth rank with his rook, forcing Black’s king to retreat.
6.f4 Kd6 7.Rb5 Kc6 8.f5
Black feels the noose tightening, for if 8…Ba1 9.Rb1 Bf6 10.Re1 and White is ready for the decisive Re6+.
8…Bg5 9.Re5! Bf6 10.Re6+! Kc7 11.Kb5 Bd4 (D)
White to move
White is ready to exploit the fact that Black has achieved his best defensive position. The bishop protects two weak pawns, and White forces Black to choose between these weak pawns.
12.Rc6+!!
Magnificent endgame play!
Black’s laborious defense topples as a result of this masterstroke, for if 12…Kb7 13.Rd6! and White wins a pawn, depending on where the menaced bishop moves.
12…Kd7 13.Rc4! Bc5 14.Rg4! Ke7
He cannot save the g-pawn because he cannot play …Bd4. Thus White’s rook triumphs.
15.Rxg7+ Kf6 16.Rg6+ Kxf5 17.Rxh6 Black resigns.
For White is about to force an easily won king-and-pawn ending with 18.Rxb6.
Delicate Rook Maneuvers
From this ending, too, you can learn how to take splendid advantage of the rook’s superior mobility. (D)
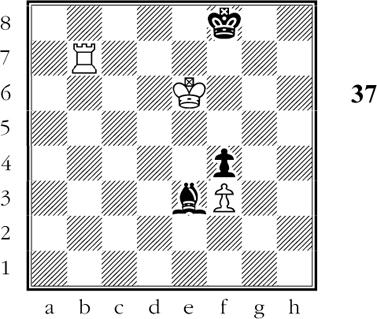
White to move
This ending looks easy at first sight. Apparently White need only attack the black pawn with his rook and king, and play Rxf4, giving up the exchange to get a won king and pawn ending. This is easier said than done!
1.Rf7+! Ke8
Best. If 1…Kg8 2.Kf6 Bd4+ 3.Kg6 Be3 4.Rf5 and the unfortunate mating position of Black’s king loses quickly for him.
Thus, if 4…Bd2 (If 4…Bc1 5.Rc5 wins the same way.) 5.Rd5! (threatens mate) 5…Bb4 6.Rd8+ Bf8 7.Re8 or any other rook move on the rank followed by checkmate next move!
2.Rf5!
Now Black’s choice of moves is limited.
2…Bd2
If 2…Bc1? 3.Rc5 (threatening mate) wins on the spot. And if 2…Kd8 3.Rf8+! drives Black’s king away so that after 3…Kc7 4.Ke5 Kd7 5.Rxf4! Bxf4+ 6.Kxf4 Ke6 7.Kg5 and White assures the queening of his pawn (see Diagram 28).
White can now win the pawn with 3.Ke5 Ke7 4.Rxf4? Bxf4+ 5.Kxf4. But after 5…Kf6! Black has the opposition and the position is drawn (See Diagram 29).
3.Kf6!
Taking advantage of the fact that Black dare not play 3…Kd8?? or 3…Kd7?? because of 4.Rd5+.
3…Kf8 (D)
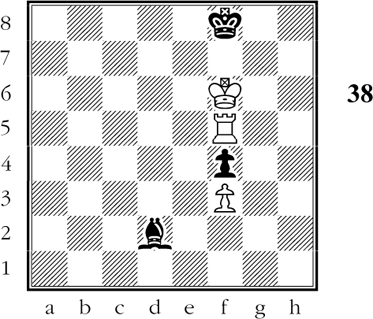
White to move
Now White succeeds in driving off the black king.
4.Rc5!
White threatens mate.
4…Kg8
If Black parries with 4…Ke8 then 5.Kg7!! followed by Re5+ and Re4. Black’s king is then cut off from the e-file, so that White can comfortably play Kg6 and Kf5 and then capture the black pawn with an easily won king and pawn ending.
5.Rc8+!
Driving the black king away.
5…Kh7 6.Kf7! Black resigns.
For now, no matter how Black replies, White plays Rg8. Then, with Black’s king hopelessly cut off, White continues with Kf6 and Kf5, picking off the black pawn at his leisure. The resulting king-and-pawn ending is an easy win.
White’s rook maneuvers give us a vivid notion of the power of this piece.
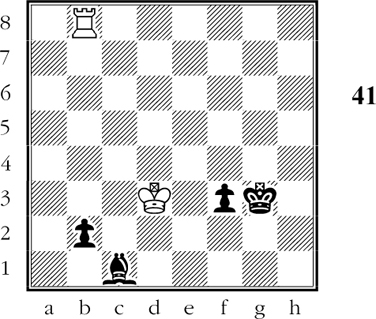
Passed Pawns Fight for Supremacy (D)
White to move
White has the exchange in return for a pawn. His king is tied down by a dangerous passed pawn. In addition, he must watch out for …Kd3-d2 or else …Kxd4 followed by the advance of the d-pawn.
White’s rook is bound to do great damage on the seventh rank, but first he must get a shipshape position against Black’s threats, so:
1.Ke1 Kxd4 2.Kd2
Now White is safe and therefore ready to invade the seventh rank.
2…a6 3.Rb7 Bd3 4.Rc7!
Forcing the advance of Black’s h-pawn, as Black’s bishop is overloaded with defensive tasks. White makes telling use of the rook’s superior mobility.
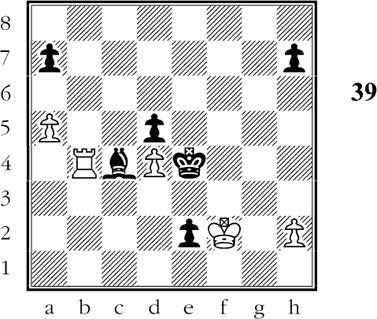
4…h5 5.h4 Ke4 6.Re7+ Kd4 7.Re6! Bc4 8.Rh6 Ke4 9.Rxh5 Kf4 (D)

White to move
White’s clever rook maneuvers have won material. He is now ready to advance his own passed pawn, but he must keep an eye on the possibility of …Kf3 and …Kf2, whereby Black renews his threats to queen the e-pawn.
10.Rg5!
White cuts off Black’s king from any attempt to stop the passed pawn. Black must seize his last desperate chance for counterplay.
10…d4 11.Rg7 d3 12.h5 Kf3 13.Re7
White is too wily for 13.h6 Kf2 14.h7??? 14…e1Q#!.
13…Kf2 14.h6 Bg8 15.h7!
Very sly. On 15…Bxh7 White interpolates 16.Rf7+! (not 16.Rxh7??) and then picks up the bishop.
15…e1Q+ 16.Rxe1 Bxh7 17.Re6 Black resigns.
White has reduced Black to helplessness in view of the coming Rxa6 followed by the queening of the a-pawn.
A very pleasing ending by reason of the rook’s agile maneuvers.
Victory for the Minor Piece
When a player is the exchange down and has two extra pawns by way of compensation, the material may be said to be fairly even. Where the pawns are passed and well advanced, the rook is definitely at a disadvantage. (D)
White to move
White is in trouble because his forces are split. His king has to stop one of the passed pawns; his rook has to stop the other one. Black’s winning plan is to give up his b-pawn at the right moment, forcing the queening of his other pawn.
1.Rg8+ Kf2 2.Kc2 Ke2 3.Re8+ Kf1! 4.Rf8 f2
Now that this pawn is poised to queen, Black’s only problem is to find shelter for his king against the rook checks.
5.Rf7 Ke2 6.Re7+ Kf3 7.Rf7+ Bf4!
White resigns, as the f-pawn must queen. Thus we see that when passed pawns are dangerously far advanced, even a rook is helpless against them.