The Complete Chess Course From Beginning To Winning Chess! (2016)
Book Five
How to Win When You’re Ahead
Chapter Three
King and Pawn Endings
In one sense, king and pawn endings are very simple.
The only material on the board has been greatly simplified. Only kings and pawns remain. Everything else has been swapped off.
However, king and pawn endgames abound in interesting finesses. In that sense, they are far from simple.
We need to be familiar with king and pawn endings because some of them, as you will soon see, are of a standard form that is always a win.
This means that whenever you can manage to win a pawn free and clear, you are in effect threatening to swap off all the pieces, reducing the game to a standard king and pawn ending that is an almost automatic win for you! The threat of this simplification is a potent weapon in your handling of the game.
Passed Pawns
Most king and pawn play revolves about passed pawns - their creation and their advance to the queening square. (A passed pawn is one that is not impeded by hostile pawns on either of the neighboring files. In Diagrams 21 and 22, White has two passed pawns.)
Some passed pawns are especially powerful. We can see this in Diagrams 21 and 22.
Connected Passed Pawns (D)
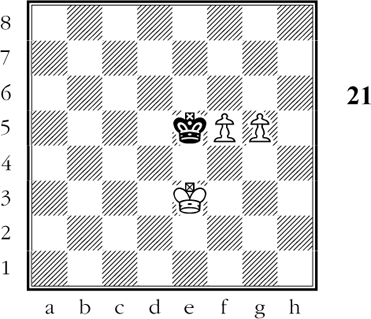
White to move
White’s passed pawns are connected: they are placed on neighboring files. They are capable of protecting each other without their king’s help.
Here is a typical line of play which wins for White in Diagram 21:
1.g6 Kf6
If 1…Kxf5 2.g7 and the pawn cannot be prevented from queening.
2.Kf4 Ke7 3.Ke5 Kf8 4.f6 Kg8 5.f7+ Kf8 6.Ke6 Kg7 7.Ke7
White guards the queening square, so that he can now continue with 8.f8Q(+) with a quick mate in the offing.
Remote Passed Pawns (D)
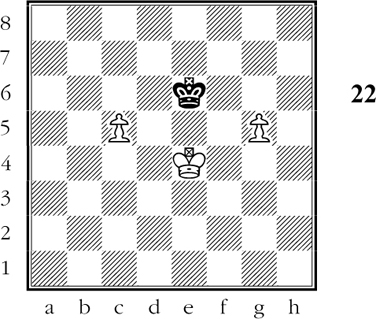
White to move
Here White’s pawns are said to be “remote passed pawns” or “distant passed pawns.” We use this term because they are too far away from the black king to be caught by him as they advance to queen.
In Diagram 22 White’s remote passed pawns are so powerful that White can queen a pawn without the help of his king. This is how he does it:
1.g6
(White can also start the same process with 1.c6.)
1…Kf6
For the moment the black king can still catch either pawn in time.
2.c6 Ke6
Else the c-pawn marches through to promotion.
3.c7 Kd7 4.g7
Now it is too late for the black king to catch the g-pawn, which will become a queen on the next move.
White’s remote passed pawn wins for him without the aid of his king. (D)
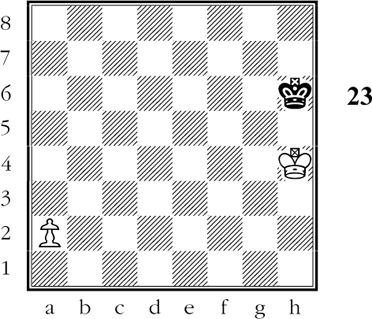
White to move
In Diagram 23 the play is:
1.a4! Kg7 2.a5 Kf7 3.a6 Ke7 4.a7 Kd7
And now White plays 5.a8Q and will soon force checkmate. Thus we see from these examples the enormous power of the remote passed pawn.
Now we come to a basic concept in chess known as the “opposition.” (D)
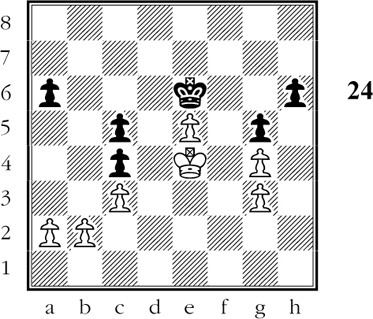
White to move
The kings are in “opposition.” We use this term when they face each other with an odd number of squares between them. The king that does NOT have to move is said to “have the opposition.”
Before we see what happens in Diagram 24, please study the above paragraph carefully. In the basic king and pawn endings, which we are now about to study, the winning process often depends on “having the opposition.”
To make our study of Diagram 24 easier, let’s assume for the moment that it’s Black’s turn to move: He plays 1…a5 and White replies 2.a4!.
Now Black’s pawn moves are exhausted, and he has to move his king. That means that White has the opposition - Black’s king has to give way.
Why is this important to us?
Well, White is a pawn ahead to begin with. He has a passed e-pawn which is momentarily blocked. If a free path is created for this passed pawn, White can advance it, supported by his king, to the queening square.
Not only that; if Black’s king gives way, White can advance his own king to d5, capturing both weak c-pawns. Here is what happens:
1…Ke7 2.Kd5! Kd7 3.Kxc5 Ke6 4.Kd4!
Now Black must move his king away from the e-pawn, allowing White to play 5.Kxc4. Then White is three pawns up, and he has a new passed pawn - the c-pawn. By advancing both of his passed pawns, supported by his king, White must promote to a queen, leading up to a quick checkmate.
So far all this is clear and convincing, but remember we said in the caption to Diagram 24 that White moves first. Given that condition, White must be on the alert. For example, suppose he starts from Diagram like this:
1.a4?? a5!
Now White has botched it. He has no pawn moves, and must move his king. In other words, BLACK HAS THE OPPOSITION!
The consequence? After White moves his king, he loses his e-pawn, and the position is a draw!
Now back to Diagram 24. White can win, and this is how:
1.a3!! a5 2.a4!!
Note the finesse of making two moves with the a-pawn instead of one. Now it is White who after all has the opposition; Black’s king must give way. White plays 3.Kd5, as shown above, and continues on his way to victory.
That was what we meant when we said that the simple king and pawn endings are not always “simple.” However, their tricky qualities add to their fascination.
Who Moves? (D)
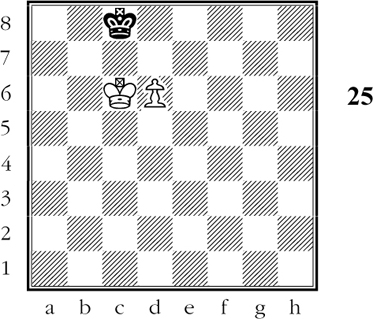
If Black moves, White wins. If White moves, the position is a draw. In other words: if White has the opposition, he wins. If Black has the opposition, he draws.
Diagram 25 is one of the most important situations in basic king and pawn endings.
If Black moves, here is what happens:
1…Kd8 2.d7 Ke7 3.Kc7
And on the next move White plays 4.d8Q(+), checkmating quickly.
If White moves first, he cannot win:
1.d7+ Kd8
Now the only move to hold the pawn is 2.Kd6, but that causes stalemate!
Suppose White tries a different way:
1.Kb6 Kd7 2.Kc5 Kd8! 3.Kc6 Kc8
Black has maneuvered his king to keep the opposition. He thus maintains the draw.
The important moral is, then, that in the basic ending of king and pawn vs. king, you must make sure that you keep the opposition. The method will be explained in later endings. (D)
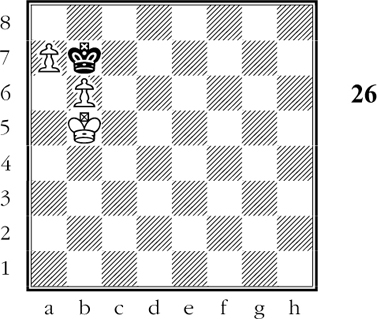
White to move
Here too White has stalemate troubles. Thus, if 1.Kc5 Ka8 2.Kc6 and Black is stalemated. How is White to win?
In Diagram 26 White has more material than he needs for winning purposes. Here is how he solves his difficulty, getting rid of the stalemate:
1.a8Q+! Kxa8 2.Ka6!
The point. White has the opposition. Black’s king must give way.
2…Kb8 3.b7
Here is a valuable hint about positions where the stronger side’s king does not control the queening square: whenever your pawn advances to the seventh (second) rank without giving check, you win the ending.
Black must now play 3…Kc7, whereupon White continues 4.Ka7, making 5.b8Q(+) possible, followed by a quick mate.
Who Moves First? (D)
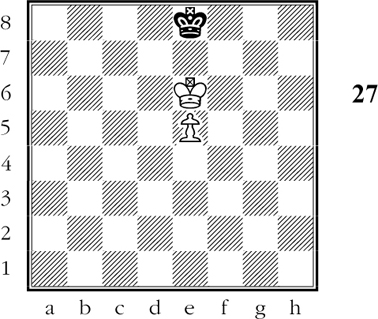
It doesn’t matter! Because White’s pawn is still on the fifth rank, he can always advance the pawn at any point where he has lost the opposition. This will cause Back to give way with his king.
Suppose, in Diagram 27, that Black moves first. Then he has lost the opposition, and his king must give way:
1…Kd8
Or 1…Kf8 2.Kd7 with the same result.
2.Kf7 Kd7 3.e6+ Kd8
Now White continues 4.e7+ followed by 5.d8Q(+), followed by a quick checkmate. Now back to Diagram 27. Suppose White moves first. What follows is extremely important, and you must study it until you fully understand it.
White must move his king, and therefore loses the opposition:
1.Kd6
(Note that 1.Kf6 serves the same purpose.)
1…Kd8
Black maintains the opposition. So far so good for Black. But now White has a move in reserve:
2.e6!
(In Diagram 25 White’s pawn was already on the sixth rank, so he no longer had this “tempo” in reserve!)
2…Ke8
Black’s king must give way. He has lost the opposition.
3.e7
The pawn has advanced to the seventh rank without check.
As we know from earlier examples, this means that White’s pawn will soon become a queen and enforce checkmate.
An important moral we deduce from Diagram 27 is this: if your single pawn has not reached the sixth (third for Black) rank, don’t advance it too hastily. Reserve the moves of the pawn to a time when you will be badly in need of them.
Now let’s apply what we’ve learned.
Who Moves First? (D)
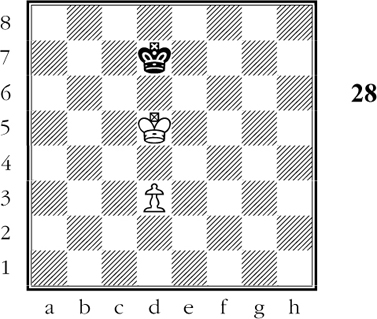
It doesn’t matter. If Black moves first, he loses the opposition immediately, and White wins with ease. If White moves first, he keeps the opposition with 1.d4!.
Diagram 28 should offer no difficulties.
If Black moves first, White quickly lays down a path for his pawn to advance and queen. For example:
1…Ke7 2.Kc6! Kd8 3.Kd6 Kc8 4.d4 Kd8 5.d5
Again Black loses the opposition: 5…Ke8 6.Kc7 etc. or 5…Kc8 6.Ke7 etc. and White’s king guards the queening square.
If White moves first in Diagram 28, the procedure is pretty much the same:
1.d4! Ke7 2.Kc6 Kd8 3.Kd6 Ke8 4.Kc7 Ke7 5.d5 Ke8 6.d6 Kf8 7.d7
Again the pawn becomes a queen and forces checkmate.
There is still one more vital point we need to know about king and pawn endings.
In Diagram 28 White’s king was ideally posted - in front of the pawn. However, if the stronger side’s king is at the side of the pawn, or in back of it, and if the weaker side’s king is well advanced, the lone king can draw.
Black Draws! (D)
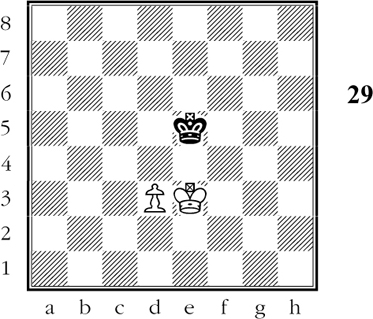
Black is able to draw because, due to the unfavorable position of the white king, Black can always assume the opposition at the critical moment.
Diagram 29 is a draw no matter who moves first.
Let’s see the play with Black moving first. He loses the opposition at once, but he regains it when he needs it. This will lead in due course to the drawing method of Diagram 25.
1…Kd5 2.d4 Kd6!
After 2…Kc4?? 3.Ke4! White wins because Black can never get back the opposition. If 3…Kb5 4.Kd5!.
3.Ke4 Ke6! 4.d5+ Kd6 5.Kd4 Kd7 6.Ke5 Ke7!
If 6…Kc7?? 7.Ke6 and White gets the opposition after 7…Kd8 8.Kd6. Then if 8…Ke8 9.Kc7 wins; or 8…Kc8 9.Ke7 wins in familiar fashion.
7.d6+ Kd7 8.Kd5
A crucial situation for Black If 8…Kc8?? 9.Kc6 White gains the opposition and wins. The same thing happens after 8…Ke8?? 9.Ke6. But Black does have a saving move:
8…Kd8!! 9.Kc6
Or 9.Ke6 Ke8 with a similar windup.
9…Kc8!
Now we have the exact position of Diagram 25 with Black having the opposition and White having to move. As we know from Diagram 25, this is a drawn position.
From our study of the positions in this chapter, you now know which positions to aim for when a king and pawn ending is in prospect, and which positions to avoid.
You have learned of the importance of the opposition, and you have seen how you can use it to your advantage by keeping pawn moves in reserve.
These positions are well worth playing over, preferably with a friend, so that you can iron out any misunderstandings. You will find that familiarity with these endings is very profitable in terms of additional wins you will score.