Poppet Magick: Patterns, Spells & Formulas for Poppets, Spirit Dolls & Magickal Animals - Silver RavenWolf 2018
Basic Poppet Construction
Stitching, Stuffing, and Spellcraft
Everything is connected. All of it. Every sound, every image, every person, each energy, all plants, animals, minerals, and elements—all are connected. All are part of the sea of potential that you can access at any time. You need only acknowledge that the connection exists and that you have the ability to access anything you desire. When you make a poppet, you are stitching, blending, and building a new connection to the fabric of the universe and to a desire in particular.
Making a Felt Poppet
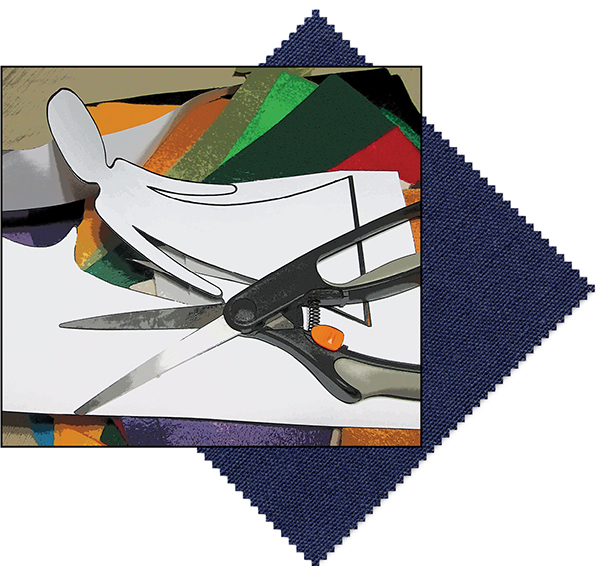
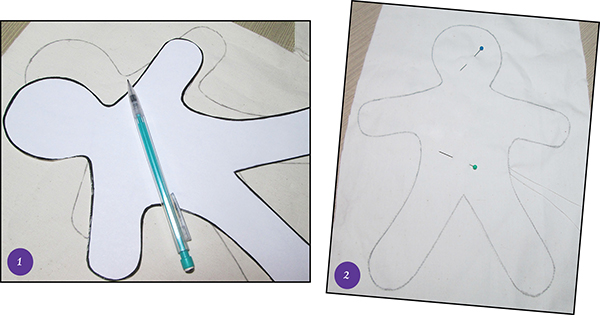
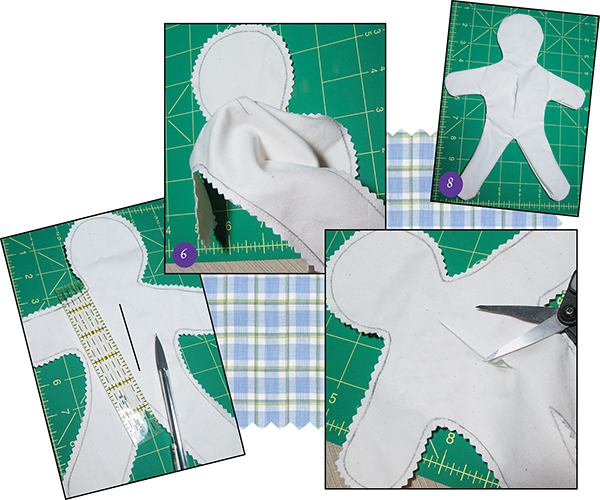
Copy the poppet pattern of your choice on plain paper. You can also trace your pattern on freezer paper, then lightly iron the waxed side of the paper directly on the felt. After the paper cools, cut the shape out of both paper and felt. This saves a lot of snipping headache. When working with felt, the sharper the scissors, the better!
Cut out the pattern, pin it to two pieces of fabric, and cut the fabric around the pattern. You do not have to leave a seam allowance as most poppets are stitched with wrong sides together, leaving raw edges. Felt is often a preferred medium because it doesn’t fray. Remove the pattern and pin the two pieces of fabric together so that the sides match evenly. If they do not, trim before sewing.
Should you choose to glue your poppet together, my advice is to use a glue gun rather than bottled glue. I’ve tried a number of glues with felt and have been regularly dissatisfied. Tacky Glue will hold for a time, but if you are looking for the most stable choice for a long-lasting spirit animal or doll, the glue gun tops the list.
If you want to mix stitching and gluing (as I did with the chakra fish in chapter five), avoid placing glue where you will be sewing, as poking a needle through the glue can be very difficult. If you can’t avoid it, keep a larger sharp needle available to poke a hole in the material first, then sew (like the old-fashioned sewing cards).
For my felt creations, I use two kinds of embroidery thread: standard, wherein you have to split the skein into three threads through the needle, and cotton perle, which is so much easier to handle and you don’t have to fuss with splitting the threads. The only drawback to using the perle lies in the needle choice, mainly if you are going to do beadwork as well. Because the perle thread is heavier, make sure you have several sizes of needles that can accommodate the weight.
![]()
WHEN WORKING WITH FELT, THE SHARPER THE SCISSORS, THE BETTER
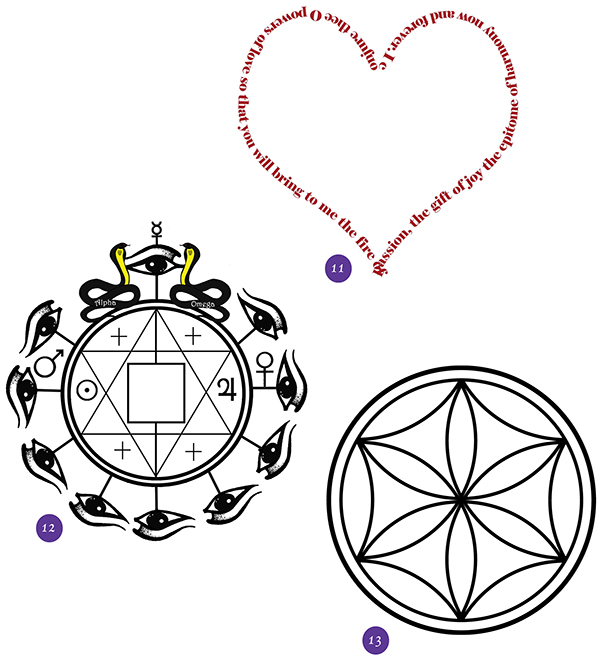
Add Embellishments or Extra Appendages
Before Sewing the Poppet Together
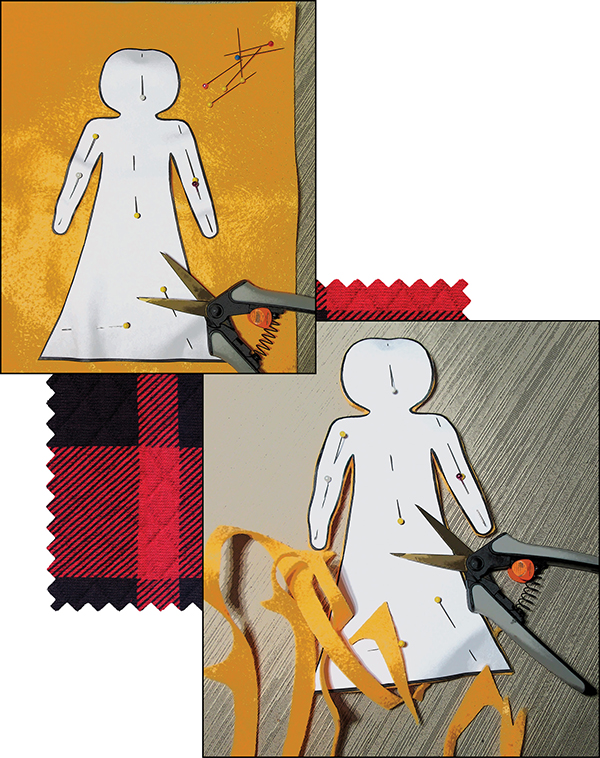
To make the construction of your poppet a breeze, add as many of your chosen stitched embellishments as possible before actually sewing the poppet together. Objects such as buttons, eyes, brads, rivets, crystals, beads, and sequins are much easier to sew on the top piece of your poppet before you make the poppet sandwich. This also makes a neater image, enabling you to hide knots. Animal tails and ears can also be tacked or secured, depending upon the construction of the image. If you will be turning the animal right-side out to finish, tack ears and tails to the reverse side, pointing inward. When you turn the animal out, the appendage will be secured in the seam and look great!
In the orange success poppet example shown here, the beadwork and button were applied before sewing the front and back of the poppet together (the poppet sandwich). In the green good fortune poppet, the eyes (pumpkin seeds held to poppet with brads and reinforced with a bit of glue) and the center green clover were affixed onto the poppet before sewing both sides together. A bead drilling tool was used to slowly puncture a hole in the pumpkin seed to avoid splitting the seed.
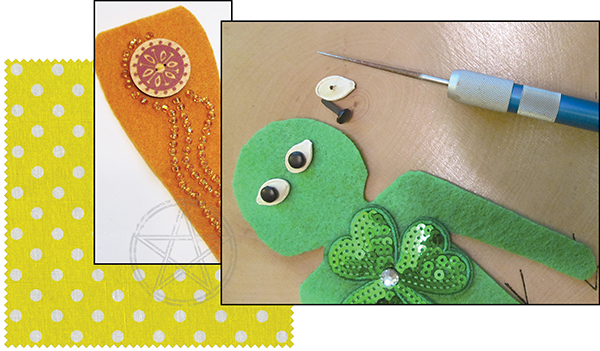
To add a special kick to the above red love poppet, blessed rose petals dressed with Cleopatra love oil and rose liquid fluid condenser were inserted into the appliqué heart. A small lodestone or magnet could also be inserted into the pink heart before it is completely sewn shut. The button eyes were stitched onto the doll before sewing the front and back together. This really takes the hassle out of placing the eyes later!

IF THE EYES ARE FLAT, I OFTEN PLACE THEM ON THE POPPET FACE BEFORE SEWING AND STUFFING; JUST BE SURE TO KEEP THE EDGES OF THE EYES AWAY FROM YOUR INTENDED SEAM ALLOWANCE
![]()
I SAVE ROSES THAT PEOPLE GIVE ME FOR SPECIAL OCCASIONS AND DRY THEM TO USE IN POPPETS AND SPIRIT DOLLS
Yarn can be used as hair or to give your poppet a unique look. Simply lay out the number of loops you desire on a flat surface, keeping them about the same size, then gather together. Pinch the loops together and lay the yarn on the back inside piece of the poppet. Tack into place with a bit of glue or use a few basting stitches. The final sewing of the poppet sandwich will keep the yarn firmly in place.
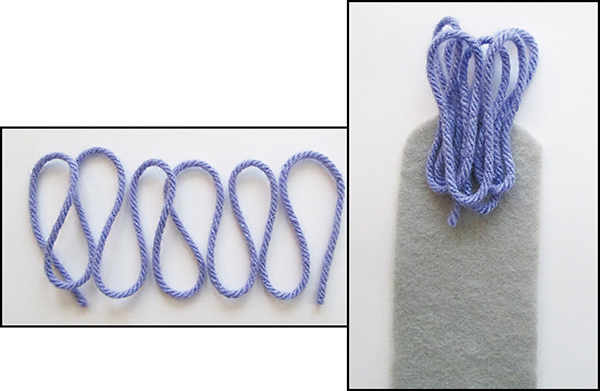
(ABOVE)
ADDING YARN HAIR TO A POPPET
![]()
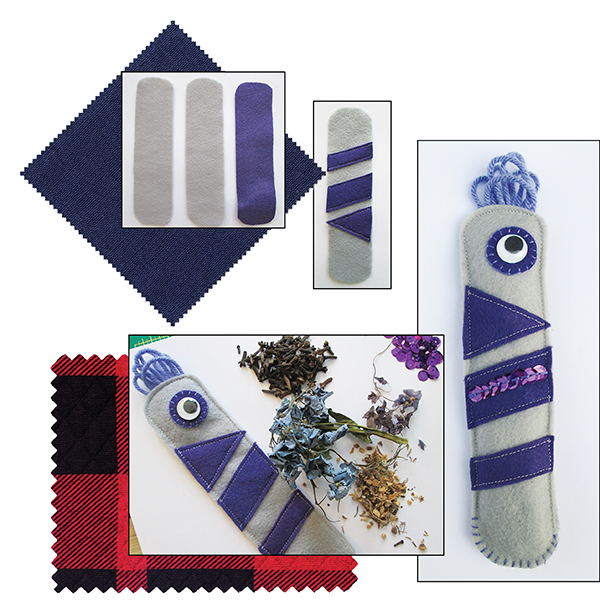
(NEXT IMAGE) THIS MONSTER POPPET WAS CREATED WITH BANISHING HERBS OF LARKSPUR, AFRICAN VIOLET, CLOVES SOAKED IN VINEGAR AND DRIED, HYDRANGEA FLOWERS, WHITE SAGE, AND MISTLETOE
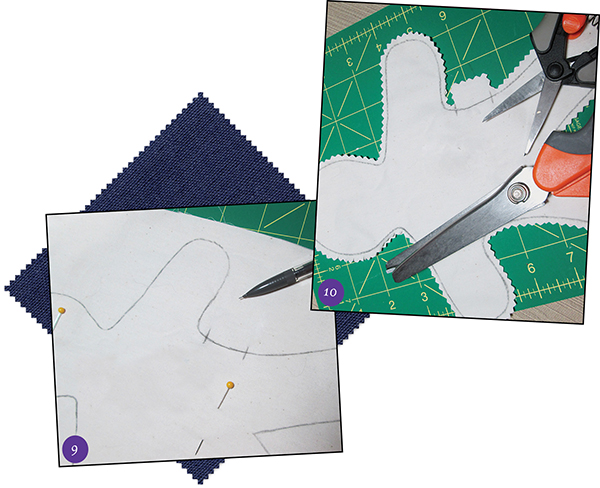
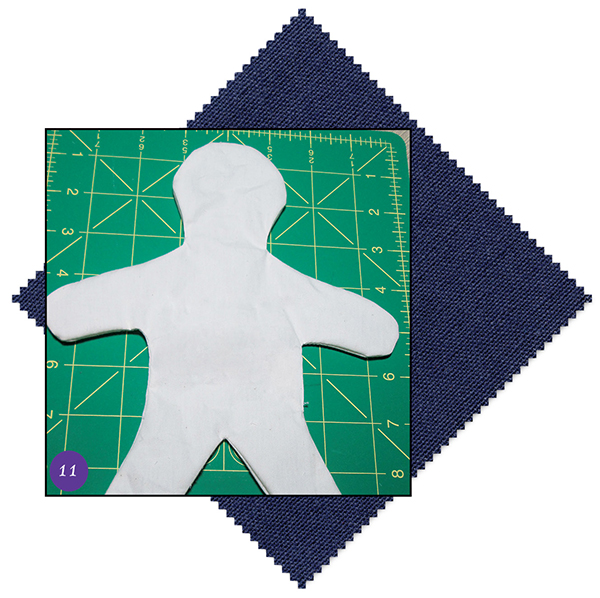
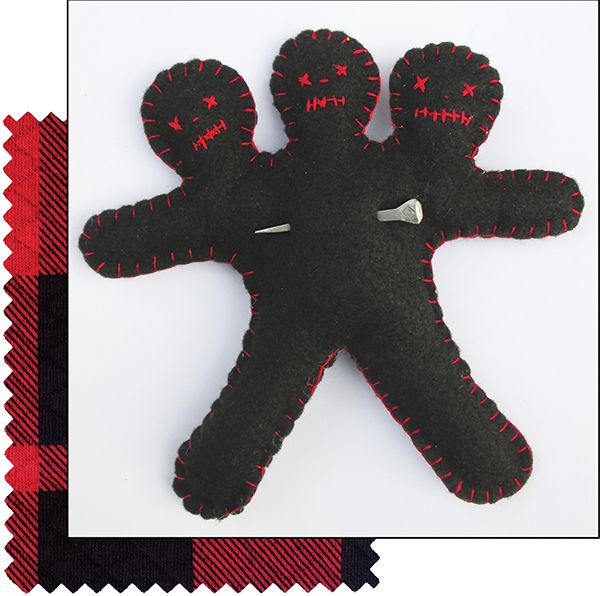
You can take any shape and turn it into a unique spirit doll. Use different colors of felt to embellish your poppet, as in this monster-eater poppet. Cut three pieces of felt for your poppet sandwich instead of two. The third piece is a different color and can be trimmed to create fabric embellishments.
Cut the pieces of the different-colored felt into any shapes you desire. In this example, a sewing machine was used to quickly affix the pieces. Then, the front and back of the poppet were placed together and any excess purple trimmed away. The finished poppet is to ward off astral nasties, ghosties, nightmares, and things that go bump in the night. It is a perfect poppet for a child’s room. If the young one is too small to play with the poppet (as the eyes and sequins are a choking hazard), hang the poppet near the top of a window.
Putting Your Poppet Together
“As I stitch thee, so I wish thee.”
If you are planning to sew your poppet, you can either hand stitch or use a sewing machine. Choose which method (hand stitching or machine) suits your needs and your comfort level. Hand stitching can add more power and a greater connection with your intent to the materials. Chanting or singing activates the field of potential around the poppet. Your breath infuses the poppet with the life of the words.
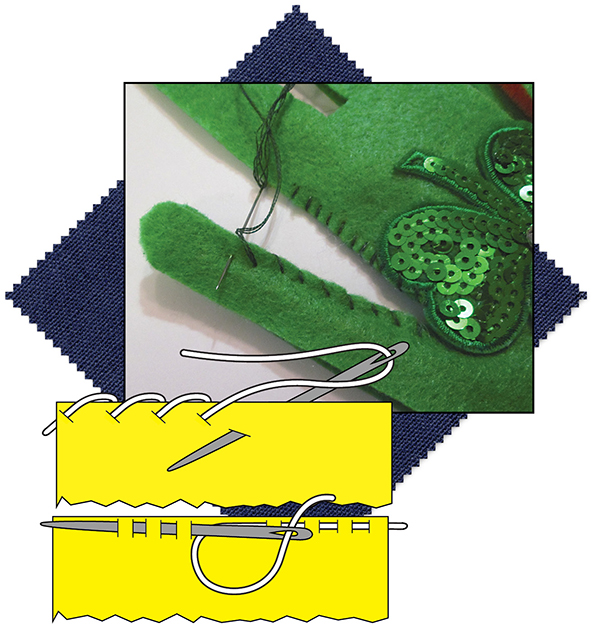
![]()
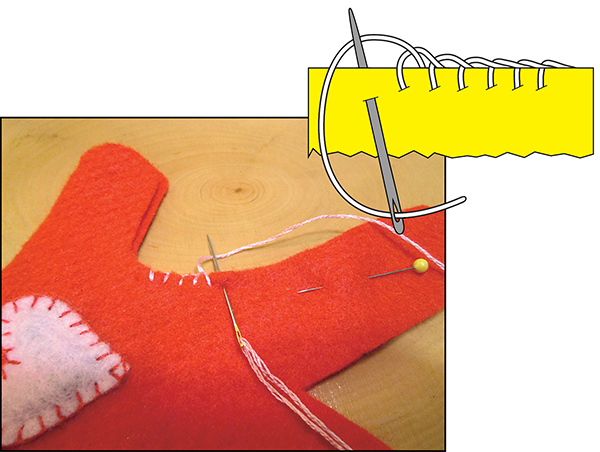
WHIP STITCH (TOP) AND RUNNING STITCH (BELOW RIGHT)
Chanting or singing as you stitch (whether it be hand work or machine) imbues the doll with a stronger link to your desire. Common hand stitches for closing poppets are the whip stitch and the blanket stitch. The running stitch can also be used.
You can also use fabric glue or a glue gun—just remember to leave an opening if you want to stuff your poppet and add special ingredients or a petition paper. Using a glue gun is a fast and simple way to put your poppet together. Be careful, however, if you plan to burn the poppet, as the glue could possibly create some harmful fumes.
![]()
BLANKET STITCH; I LIKE TO USE THREE STRANDS OF EMBROIDERY FLOSS TOGETHER FOR STRONGER SEAMS WHEN HAND STITCHING
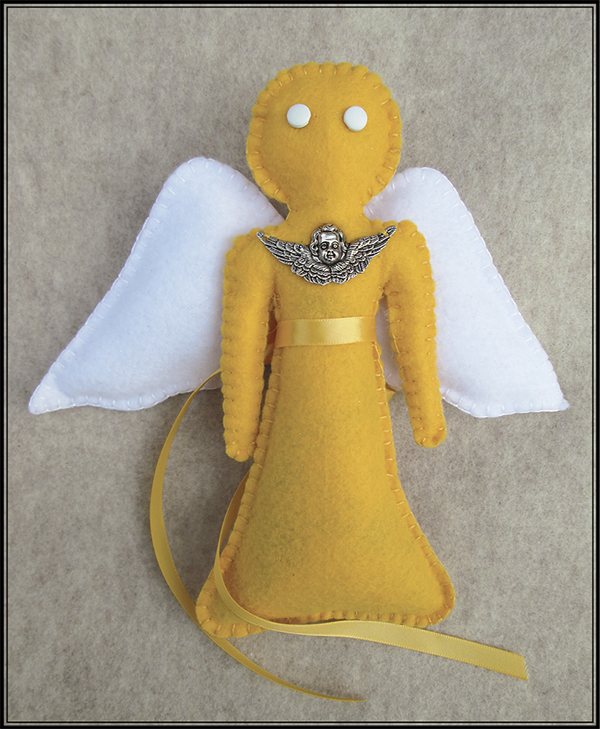
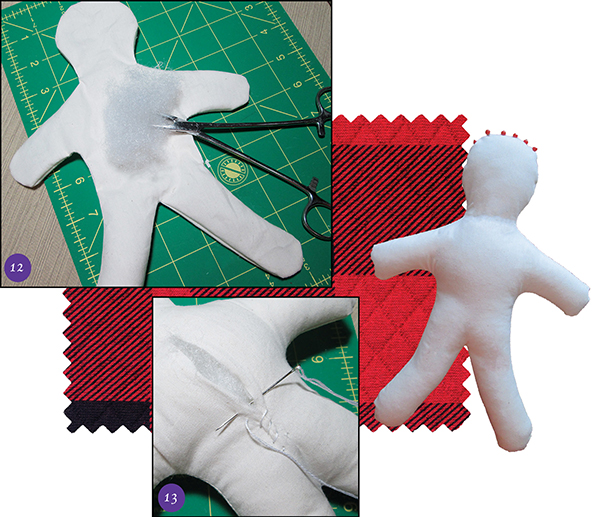
Stuffing As You Go
Before you begin sewing the poppet, consider where you will leave an opening for inserting the stuffing and additional ingredients. This decision is based on the shape of the poppet and the number and type of spell inclusions—you don’t want to leave a small opening if you have a large buckeye to put inside. There is nothing more frustrating than quickly sewing a poppet together (for example, beginning on an arm or a leg) and then realizing that the opening you have left is insufficient for the ingredients you have, or even if you successfully stuff the poppet, your placement of the opening has made the hole difficult to close. To avoid these types of mistakes, I often stuff the image in stages, completing the head and the arms, then moving on to the trunk of the body.
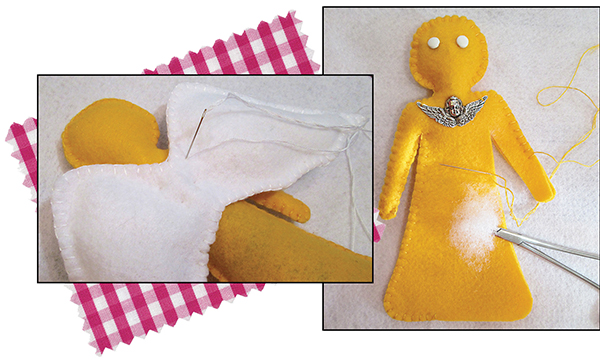
THIS GUARDIAN ANGEL POPPET WAS CREATED WITH THE “STUFF AS YOU GO” TECHNIQUE, INSERTING STUFFING INTO THE HEAD AND ONE ARM FIRST. WHEN I FINISHED STITCHING THE SECOND ARM, I STUFFED THAT ARM BEFORE STITCHING THE REMAINDER OF THE BODY.
![]()
WINGS WERE STITCHED AND STUFFED SEPARATELY, THEN TACKED TO THE BACK OF THE BODY WITH A FEW QUICK STITCHES.
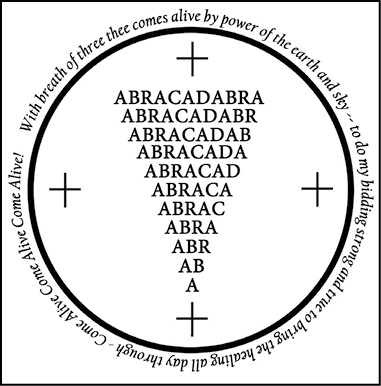
The “Come Alive” Technique
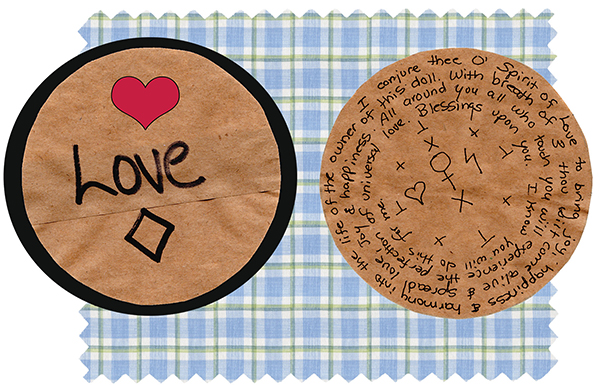
Many practitioners like to add specific cleansed and empowered items that match their intent, a photograph of the individual the doll represents, or a taglock into the body of the poppet right before they close the poppet. If you have already gathered, cleansed, and empowered these items, put them into the poppet now. This is the stage where I often insert a “come alive” petition—a piece of paper on which I have written a specific chant or charm that applies to the intent, as well as a “come alive” statement. The statement often differs, depending upon the intent. Any type of paper can be used for the “come alive” petition. The petition can be hand drawn (which is best) or computer printed, ornate or very simple. Sometimes I will use a simple “come alive” statement, and on other occasions the statement is extremely specific.
![]()
MY SHELF OF MAGICKAL HERBS AND
ITEMS THAT I USE IN MAKING SPIRIT DOLLS
![]()
A “COME ALIVE” PETITION WRITTEN ON BROWN PAPER
The “come alive” statement serves three purposes:
· It solidifies your intent.
· It ensures that any poppet you make can never be used against you. And if this is a very real worry for you (perhaps you make and sell your poppets), you can also add a specific statement that indicates the doll will lose all power should the owner try to use it against you or someone you love or use the doll in an unethical manner.
· It ensures that the poppet cannot be used in a way not intended.
If you are worried about someone opening the doll and reading what you have written, you can always use a magickal alphabet such as Theban, Angelic Script, or Passing the River. You can find these alphabets in many magickal books and on the internet. You may also like to try the method of “retrograde writing” used by the ancient Greeks when banishing or binding is required; this is writing your petition backwards. The ancient magicians often wrote chants, charms, names, and the intent on one side of the sigil and the name of a deity (the power you may be petitioning) on the opposite side of the paper.
My “come alive” petition almost always has the following inscription somewhere within the design:
With breath of one, I come alive.
With breath of two, I come alive.
With breath of three, I am alive!
I then use this small incantation, with a slight change, when empowering or activating the doll. I either breathe into its mouth or into its heart chakra, repeating:
With breath of one, you come alive.
With breath of two, you come alive.
With breath of three, (doll’s name), you are alive!
I command thee, (doll’s name): live! Live! Live!
And without my permission, thou shall never die!
Every practitioner eventually finds a set of magickal items, words, or designs that work extremely well for them. These things are not predicated on what someone tells you is right or what someone insists is the “right way.” This amazing combination will be unique to you. For example, I have specific wording for most of my doll work. I always use kyphi oil to empower all my dolls. I always include the Egyptian ankh and the Egyptian Eye of Horus sigil. I always use my own personal magickal sigil-key that I developed myself for my work—sort of like a logo. I have a specific tuning fork to activate the dolls. Do not be afraid to use your own creativity and vibratory power.
![]()
Your magick is about your well-being and the good health of those you love. Magick is about being part of something greater than yourself, filled with compassion and love. That’s the real magick.
![]()
![]()
THIS ABRACADABRA SIGIL FOR BANISHING IS AN EXAMPLE OF A COMPUTER-PRINTED CHARM TO BANISH ILLNESS WITH A SPECIFIC ACTIVATION STATEMENT FOR THE POPPET
To many practitioners, just writing the chant or charm is not enough—it must be empowered so that the energy matches the words. The reasoning here is that you can say a string of words anytime and anywhere; however, if you wish to turn those words into magickal vehicles, where they have more strength and a better chance of manifestation, then empowerment is necessary for the creation and accurate direction of the force.
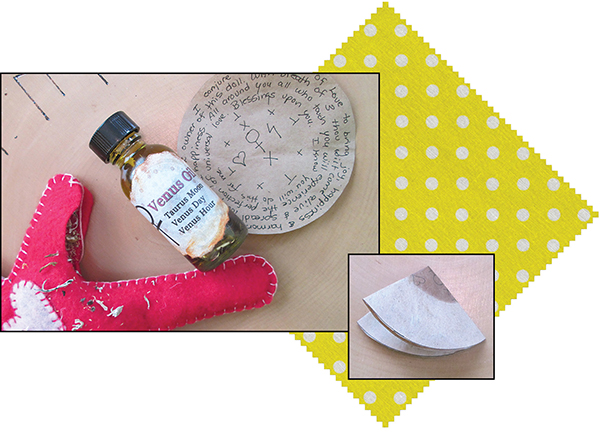
After I have prepared my “come alive” paper charm, I dress it with a magickal oil that matches my intent as well as a liquid fluid condenser. Then I intone various chants, depending upon the need. As I chant, I rub the paper in my hands, running the energy up from the ground and into my crown chakra as I inhale, and then into my hands and into the paper as I exhale. The empowerment depends upon the intent of the doll; the chant may echo the words I’ve written on the paper or it may be a general one, such as:
From nothing to something, I will this doll to form—
I know my intent will manifest and to this world be born.
I always chant any empowerment statement at least nine times, then I draw an equal-armed cross over the paper and fold it. If the doll is to draw something to the owner or me, I fold the paper toward myself. If the doll is to banish or repel a specific energy or problem, I fold the paper away from myself. I fold the petition as small as possible, making it easier to insert deeply into the body of the doll. The folded petition is often brushed with a liquid fluid condenser (that will match the type of magick that will be used in spellcasting) or with a universal liquid fluid condenser that can be used with any type of magickal operation.
![]()
THIS PETITION WAS DRESSED WITH VENUS OIL THAT I MADE DURING A TAURUS MOON ON A VENUS DAY IN A VENUS HOUR USING JOJOBA CARRIER AND VARIOUS HERBAL INGREDIENTS; THE PLANET VENUS IS KNOWN FOR ITS ATTRACTION ENERGY
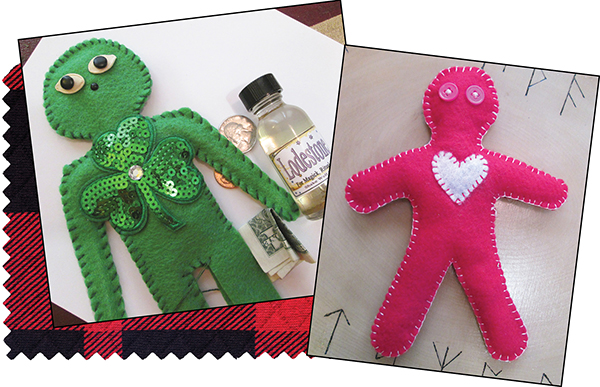
THE PROSPERITY/MONEY POPPET (LEFT) CONTAINS REAL MONEY (A BILL AND COINS), SASSAFRAS, A LODESTONE, GOLDEN SAND, AND LODESTONE OIL I PREPARED MYSELF BY PLACING LODESTONE CHIPS AND GOLDEN AND SILVER SAND IN A BOTTLE OF MINERAL OIL FOR 30 DAYS (MOON TO MOON); I ALSO ADDED 3 DROPS OF CORNUCOPIA LIQUID FLUID CONDENSER
![]()
THE LOVE POPPET (RIGHT) HAS A TINY PIECE OF LODESTONE AND ROSE PETALS STUFFED UNDERNEATH THE HEART
Heart Packets
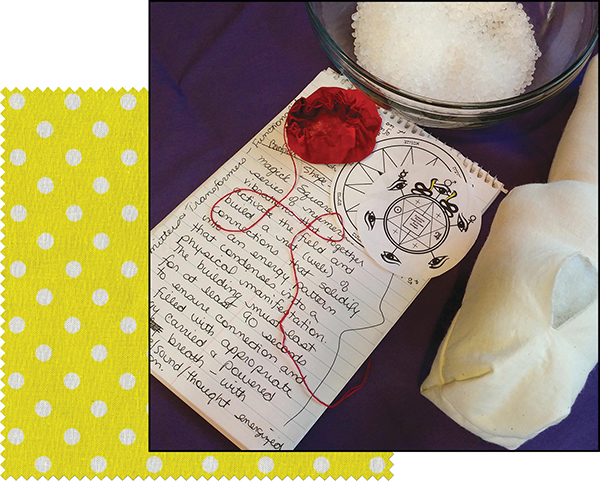
I often create “heart packets” (spell sachets)—small pouches that are red in color to manifest the energy heartbeat of the poppet. These packets contain a heart-shaped rose quartz pendant or stone, a sigil, herbs relating to the intent of the doll, a match, and three pennies (to pay the spirits).
Geist/Spirit Bag
The heart of the magickal doll or spirit animal is a conjure packet or sachet bag filled with herbs, charms, gemstones, prayers, natural objects, and/or a petition constructed in a ritualistic way and deposited deep inside the image. It is here where the intent of the doll links to specially selected items that will blend through sound, breath, and thought to create the doll’s unique enchanted pattern. This “inside” power runs through the entire doll and jumps into action upon your command. I call this packet/sachet bag the geist bag, meaning spirit bag. It contains the essence of the doll in the world of spirit as well as the corporal world; the bag is a portal, a gate where energy moves from unmanifest to manifest upon your word. In some of my creations there is a second image—a secret one that nestles deep within the geist bag. This handcrafted creature is the “soul” of the doll or animal, known only to me.
One of the most valuable lessons about magick I’ve ever learned came from Llewellyn author Ray Malbrough. “Spellcasting,” Ray would say, “is all about the process—from the idea to gathering the ingredients to creating a harmonious area in which to work, through the actual casting of the spell itself. Always remember,” he said, “that the process, and where your head is at during that process, is the most important aspect. What you think during the entire progression will make or break your work.”
Ray’s way of teaching followed the Hermetic principles of vibration and rhythm. Everything has a heartbeat, a pattern, a rhythm of existence that ebbs and flows. Just as success has a rhythm and a vibration, so does poverty. Your thoughts determine which type of rhythm and vibration you tap in to and how far you ride with it. If you are continuously depressed, unhappy, and thinking angry thoughts, then you are attuning yourself to the negative. If you are upbeat and think, speak, and display ideas of success, then your entire vibrational pattern (and the area directly around you) will draw (attract) events, experiences, and people who also vibrate to positive ideas of success. Our emotions, as a result of our thoughts, create the pathway to either a successful vibration and rhythm or a pattern of failure. Where thought goes, energy flows.
With the principles of rhythm and vibration in mind, Ray’s emphasis on celebrating the entire process of any working with enthusiasm is a sure way to reach any successful goal. In essence, you should enjoy all of it—the whole thing, the entire step-by-step process—to solidify the desired result. You wish to ride the pendulum to success, and, once that is reached, switch gears to the next successful cycle.
So, how do you do that? By being excited and happy about what you want to achieve, not worried or fearful or angry or irritated. Allow enthusiasm into the process. Key your emotions to that of joy, not sorrow. Invite creativity, happiness, and, yes, even laughter, into the activities surrounding your working(s). Be enthused about the objects you choose to enhance your work—the color, the texture, the sound, the aroma…all of it. Love every bit of it because what you love creates the emotional golden road to success.
Really.
It is that simple.
Why not take a moment and think about something happy—something that makes you smile. Tap out a rhythm on the table or desk beside your computer that mimics how you feel. This, then, is your primary rhythm of happiness. (If you don’t like the New Age sound of the word “tap,” then think “drum,” as in drumming in a ritual circle.) You can use the sound pattern you choose for happiness when empowering your mojo/conjuring bags. Now, just for giggles, think of something you dislike; tap out a rhythm for that. Excellent! So! We want to avoid that type of emotional pattern while working on our conjuring bags, dollies, and spirit animals!
Consider each dolly or animal you make as a marvelous opportunity for a unique and fulfilling treasure hunt. Every item you place in that geist/spirit bag should mean something to you and make you excited that the object is going to be a part of the overall creation.
One way to empower your geist bag is through a color visualization that follows the chakras. Once you have blessed and cleansed all the things you wish to put in the bag, set them in an undisturbed place until you are able to perform your ritual or spellwork. When you are ready for the blending process, pick up each item and speak the intent of the doll (the purpose) aloud, letting your breath travel across the surface. One-word activation works best: for example, “healing,” “joy,” etc. I then drop a lit match in the bag to activate the contents with the light of Spirit. Tie the bag shut. I spray my geist bags with universal liquid fluid condenser as well as kyphi oil. Hold the bag between both palms at about the height of your heart chakra; some practitioners prefer the third-eye chakra. Close your physical eyes. Open your third eye. Connect your third eye to the throat chakra and then to the heart chakra. Take three deep breaths, blowing on the bag. Begin chanting (if you have a chant you would like to use) or repeating the one-word intention. In your mind begin visualizing the bag in your hands glowing, first with white light. Change the white light to purple, then to indigo (dark blue), then to light blue, to green, to yellow, to orange, and finally to red. Red, the root chakra, facilitates the manifestation of the desire on this plane of existence.
Declare: “So be it!” and draw an equal-armed cross over the bag when your concentration breaks to seal the working.
Put the geist/spirit bag in a safe place, covered with red cloth, until you place it in the doll or animal.
Can you change this ceremony? Certainly! Let your intuition be your guide.
Other Bags, Boxes, and Jars
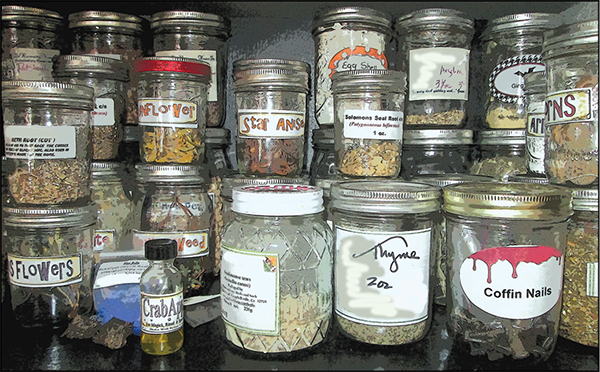
You may also like to place your poppet in a special bag that has additional space for herbs, gemstones, or charms that you found after the doll’s initial birthing ceremony. These bags can be of any shape, color, or style—the choice is entirely up to you. A few of your creations may “demand” a particular color bag, sachet pillow, or other charm. Gnomes and some small spirit animals seem to love glass jars where you can store new pennies, fun finds from the forest, unique gems, etc., along with the doll. I have an entire shelf of gnomes in jars—every jar is different, and every gnome has a unique skill. Some of my jars have solar light lids. I often set those jars on the porch rail outside during the day and bring them inside at night, where the soft light plays magickally across my altar.
![]()
MAGICKAL ITEMS DON’T ALWAYS HAVE TO BE PLACED IN THE CENTER OF THE DOLL; IN THIS PHOTO, THE HERB CINQUEFOIL (FIVE-FINGER GRASS) AND A HIMMELSBRIEF WERE STUFFED INTO ONE OF THE ARMS
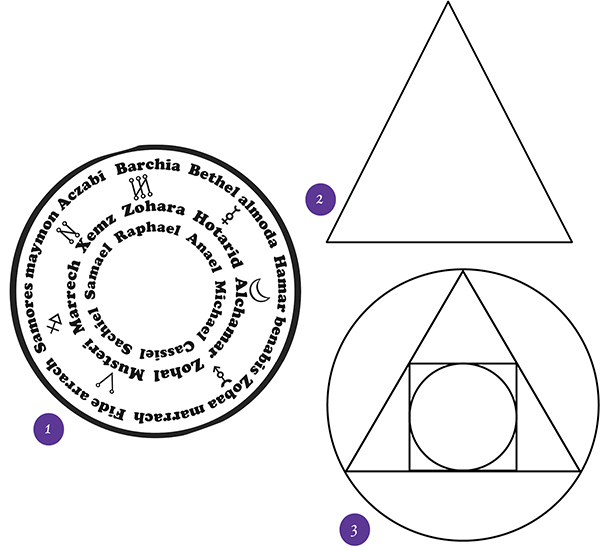
Other Seals and Shapes You May
Find Useful for Including in Poppets
ı. Chaldean Commanding Sigil: From the outside in, the seven winds, followed by the seven stars (planets, their sigils and names), and the seven ruling angels. This seal comes from the Picatrix. Write your intention in the center of the disk.
2. The Triangle: Often used to contain power or separate a particular energy from other energies in the working. Also symbolizes the cone of power and the point of manifestation.
3. Alchemical Seal: Use the alchemical seal for personal transformation.
4. SATOR Square: This is used for protection, banishing, destroying inflammation and disease, and defeating gossip. It can also be used effectively as a spoken command, particularly if you recite with great feeling and conviction.
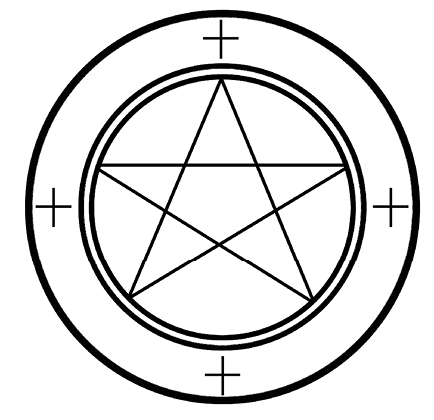
5. The Pentacle: This is used for protection and accessing the powers of earth, air, fire, water, and the human ability of manipulating thought into form. The circle represents the Spirit of the Universe—the perfection of divinity. The pentacle is a representation of the path of the planet Venus in the heavens.
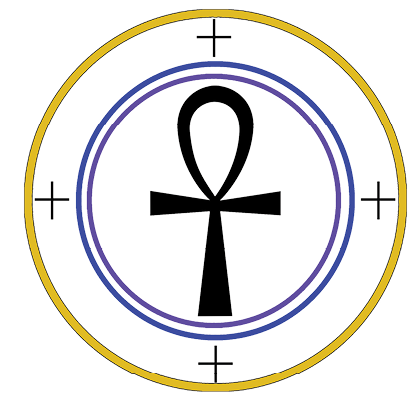
6. The Egyptian Ankh: A sigil used for a variety of purposes, including petitions at the gates of death for those who are very sick and ready to cross over (this works for animals as well as people). The ankh is life-affirming in that it is used for good health, strength, a fruitful manifestation of wealth, birth of people and animals, long life, knowledge, and protection.

s |
a |
t |
o |
r |
a |
r |
e |
p |
o |
t |
e |
n |
e |
t |
o |
p |
e |
r |
a |
r |
o |
t |
a |
s |


7. Healer’s Sigil: Uses the caduceus (center), OM (top—the sound of perfection), the Reiki Double Cho-Ku-Rei (right and left—the gateway to manifestation), and the Reiki Harth (bottom sigil—healing of the heart and personal enlightenment). Use this sigil for any healing work. Also applicable to spiritual knowledge.
8. The Crossroads Seal: Works for all manner of petitions. Write your intent inside the circle. Dot each equal-armed cross with a magickal oil of your choice.
9. The Spirit Circle: The spirit circle summons the names of God and the four directions. This general spirit circle is from the Sixth and Seventh Books of Moses.

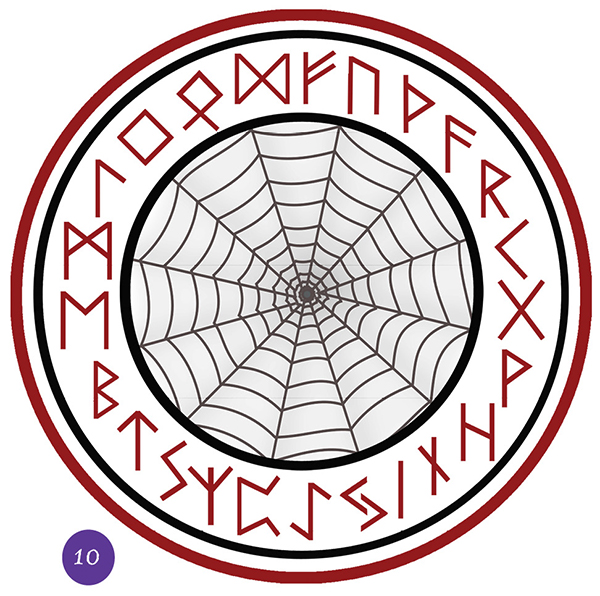
ı0. The Runic Spider Web Circle: Used to capture and hold any energy. Burn to manifest or bury whole to catch a criminal or evil person in their own web of deceit.
ıı. Love Poppet Sigil: Words written in shapes are thought to carry more power. Using a heart shape touches the universal idea of love and can go to the “heart” of the matter.
ı2. Eyes of Spirit Sigil: Used for planetary workings, invoking the wisdom of Spirit or angelic energy, finding the truth of a matter, or protecting a person or object; also known as the angelic wheel of power.
ı3. Hexefus/Blummersterne: Flower of protective power! The Blummersterne symbol means “flower star” and is used in Pennsylvania Dutch lore to ward off bad luck, accidents, illness, gossip, and general evil. The symbol is invoked as a protective sigil for home, barn, office, or vehicle and works well in healing magick. The Blummersterne is also called the Hexefus rosette, meaning “witch’s foot.”
Closing the Poppet

Closing the poppet can be a small magickal rite in itself. You might light a match and quickly extinguish it inside the poppet to add the “fire of spirit” or use a different technique of activation, such as drawing a specific sigil or rune over the poppet. You can blow into the poppet right before stitching it up, bidding it once again to be of service in the way you choose and reminding the poppet it can only function as you have commanded. You may wish to have a specific chant that you always use when finishing the last of your stitching or when making the mouth of a clay poppet, or you might like to pass a particular scent of incense over the work. The more unique the rite, with layers of specific thought and action, the better, because in this small technique lies a locking mechanism that only you know.
Basic Construction of the
Traditional Cotton Poppet
1. Using a pencil, trace the outline of the poppet onto the cotton. This example uses traditional unbleached muslin. When selecting bleached or unbleached muslin (or any fabric choice), feel the weight of the fabric between your fingers. If the cloth is too thin, it will easily fray and tear during the construction process. Select a fabric of heavier weight.
2. There are two types of openings for stuffing used in traditional cotton poppets. The primitive opening (where a slit is cut in the back of the poppet after the stitching is completed) and the side opening (where space is left unsewn). The primitive opening is used for easier stuffing. The side opening is a bit more complicated, particularly with its placement. It shouldn’t be too close to a bend in the stitching line (such as between the legs or on curves under the arms) because it can make the poppet difficult to stuff and to close.
3. Normally, a side opening is much smaller, giving rise to problems in stuffing, particularly if you need to place large roots, charms, or other objects into the poppet. However, if you plan to insert only a few herbs, one small charm, or a slip of paper, you might like to use this type of opening instead. The primitive opening is often used so that the basic seams look clean and unmarred and there is plenty of room to add ingredients.
4. If you choose to use the primitive opening technique, sew entirely along the pencil line. Trim the seams to ¼ or ½ inch, depending on how much of a folded edge you want when the doll is turned. Clip corners, being careful not to cut the stitching. Clipping the corners and circular or rounded seams allows the material to “give” a bit during stuffing, letting your curved seams fill and smooth out without puckering.


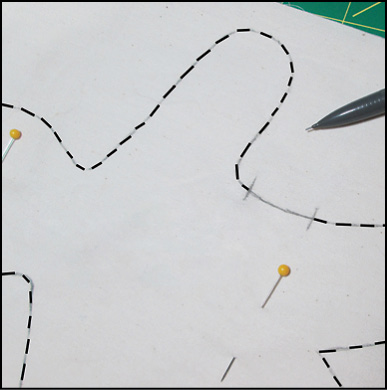

5. After the seams are trimmed and clipped, draw a straight line with a pencil on one side of the poppet. Make sure the line isn’t too long or too short. Too long and the seam can fray and be difficult to close. Too short and you won’t have enough room to add your spell ingredients.
6. Once you have drawn the line, gently pull the front material from the back material. This can be a bit tricky on a smaller poppet size—just take your time.
7. The next step is to cut along the pencil line with a pair of sharp scissors, being careful not to clip the bottom fabric. You are only clipping the top piece of fabric.
8. Turn poppet right-side out. Your poppet is now ready for stuffing.
9. If you choose the side-opening style of the poppet, stitch along the pencil line, leaving the marked area open. Strengthen stitching at edges of opening by reversing a few stitches on either side.
10. As with the primitive opening poppet, trim seams and clip curves, except this time you are going to leave a “tag” when trimming the poppet. The tag makes it easier to close the stuffed poppet and helps to create a neater seam.
11. Turn the poppet right-side out and tuck the tag inside the body of the poppet. Your doll is ready for stuffing.
12. Stuff the poppet. Add any spell-related items, such as pictures, sigils, or other inclusions.
13. Remember to command the poppet to match your intent before stitching up the back or side of the poppet.
Should you wish to write your petition in permanent marker on the doll, you may like to take the following words from the Picatrix into consideration:
You ought to write the name of the Lord of the Mansion* and your petition with it. In those images that are made for the good, and to cause gathering, uniting and generating friendship and love, you ought to write on the chest of the figure; and in all workings that are done to cause disunion, separation and to generate enmity and ill will, you ought to write behind the shoulders (that is, along the spine of the image); while in all workings that are done to acquire glory, honor, and advancement, you ought to write on the head of that image (Greer and Warnock 2010, 295).
* There are several differing resources regarding the mansions of the moon: the Picatrix (mentioned above) and H. C. Agrippa’s Occult Philosophy. Another excellent resource is The Complete Magician’s Tables by Stephen Skinner. You may find this website helpful: http://www.yeatsvision.com/mansions.html. To find which mansion is currently active for timing the making or birthing of poppets, you can use an astrological software program or purchase an app for your phone or iPad: https://itunes.apple.com/us/app/mansions-of-the-moon/id479654763?mt=8.
To increase the power of your poppet, you might also take into consideration the planetary hours or other astrological information. You may find my book The Witching Hour useful in timing the creation and birthing of your cloth poppet.
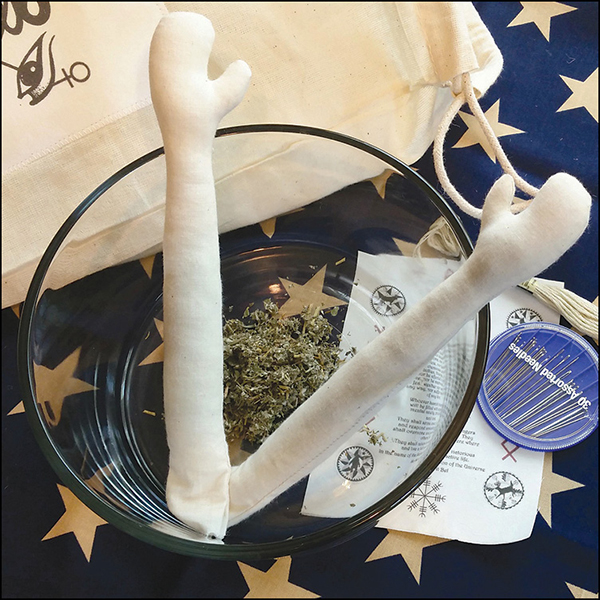
Pins, Sticks, and Nails in Poppets
Folks have been poking sticks, nails, and pins (or drilling holes) in poppets since the magick of ancient Egypt, Greece, and Rome. The pointed vehicle (such as a pin or nail) denoted the direction of concentrated energy and was used to “nail down” the energy into the doll. Surprisingly enough, most poppets in the ancient world weren’t designed to kill people—instead, they were fashioned to deflect or defeat. In many cases, they were used in future tense, urging the doll to make something happen (or not). Using a doll for revenge of a past injustice was not common; rather, the force of the doll was directed to the future, whether it was stopping a person from doing more harm, winning a chariot race, or getting away with a crime.
![]()
HISTORICALLY POPPETS WERE USED AS “FUTURE” DEVICES, ENCOURAGING SOMETHING TO HAPPEN THAT HAD NOT YET OCCURRED
Judicial poppets (those used for court proceedings) were common—not against the criminal, but against the counsel! In several instances, attorneys claimed they lost their cases because their tongues had been tied by magick. When working on legal issues, I teach my students to concentrate on attorney action and judge’s decisions (that the client will be treated fairly and without duress), not the individual who is accusing the defendant. In the realm of poppet magick, the past is the past—it is the future you must change.
For example, let’s say you wanted to do a protection poppet because Harold has been giving you a really bad time at work. You would make a poppet to represent Harold and inside the poppet include a taglock (something that belongs to him, such as a pencil, a business card, etc.; if you didn’t have any of those things, you might write his name nine times on a piece of paper). Then, you might hold the doll so that your breath hits the doll and intone the following chant nine times:
You can’t see me
You can’t hear me
You can’t hurt me anymore.
![]()
In the realm
of poppet magick,
the past is the past—
it is the future
you must change.
![]()
While repeating the chant, you would stick a pin through both of the poppet’s eyes, one pin through his ears, and one through his mouth (or you could sew his mouth shut). If the situation is really bad, you might also bind his arms and legs with wire or strong string. This act is not to physically hurt Harold—basically, it is to shut him up, push his attention elsewhere, and keep him from harming you or anyone else. Finally, you might perform the sending technique in chapter four to finish the job.
Another way to deal with a bothersome person is to make the poppet, and, in ritual, bind the poppet to the earth by sticking a knife through it and into the earth outdoors (where no one will bother it). This act is not to kill the individual, it is to give that person to the earth for positive self-transformation. Of course, if you stuck the poppet in a graveyard…um…don’t forget the rule of three: what you put out comes back to thee.
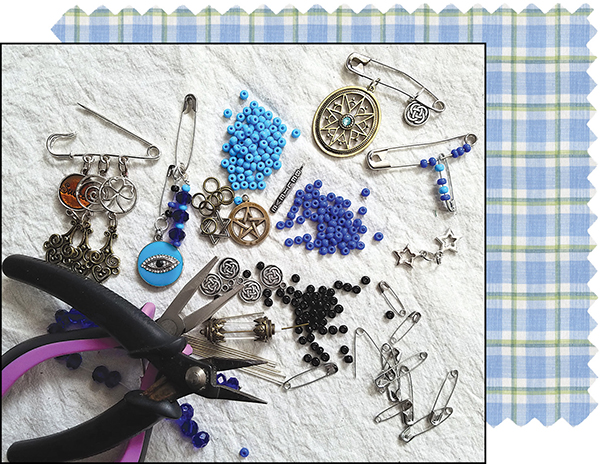
Pins, sticks, and nails were also used to direct energy in a positive way. For example, some practitioners use straight pins inserted at chakra points on the doll to direct healing energy. Most of my dolls carry pins of some type as well as unique needles. I have several styles and combinations for different purposes. In Braucherei work we use safety pins both for protection and to “pin” an area of the body that needs healing focus. Safety pins can also be used to affix a small petition of healing right onto the doll. This is particularly useful for family poppets, where you might have made a poppet for each member of the family. Life changes, so your requests for them will change. Placing the petition on the outside of the doll allows you to remove it when necessary. In Braucherei straight, sharp objects (such as nails, screws, stakes, and straight pins) are used in banishing and pinning the evil created by the individual back on him or her. Some of these directive sharp objects are long doll needles decorated with beads, rawhide, jute, polymer clay, painted gears, glass eyes, watch faces, and more. These long needles have been turned into very powerful dollies in their own right! The safety pin is used for healing, directing energy, protection, and holding petitions. Charms or pieces of colored thread are often tied or secured with jump rings to the safety pin for a variety of magickal purposes.
Charm pins can be added to your puppets and spirit dolls to increase the connection to your intent. I learned to use safety pins as magical vehicles from Preston Zerby in the early 90s. Preston taught me several Braucherei techniques. He always wore a safety pin on his left sleeve indicating that this was to keep away evil and witches. In Preston’s view, witches were people who carried negativity in their hearts or they were individuals who willingly would try to harm him. The Pennsylvania Dutch understanding of the word “Witch” is not the same as those who practice the religion of Witchcraft today.
Safety pins were also pinned over the heart to bring good fortune or true love. For example, those who sold goods at market would pray over the pins and then fix them to their shirt or blouse in hopes of having a good business day, “pinning” good fortune to their family or career.
The photograph shows possible embellishments, including charms and beads for your safety pin enchantments. Undecorated safety pins are an innocuous way of carrying empowered objects with you, as they can be pinned to the inside or hem of a garment and no one would ever be the wiser.