Yoga for Climbers: How to Stretch, Strengthen and Climb Higher (2016)
CHAPTER 3
YOGA POSES FOR CLIMBERS
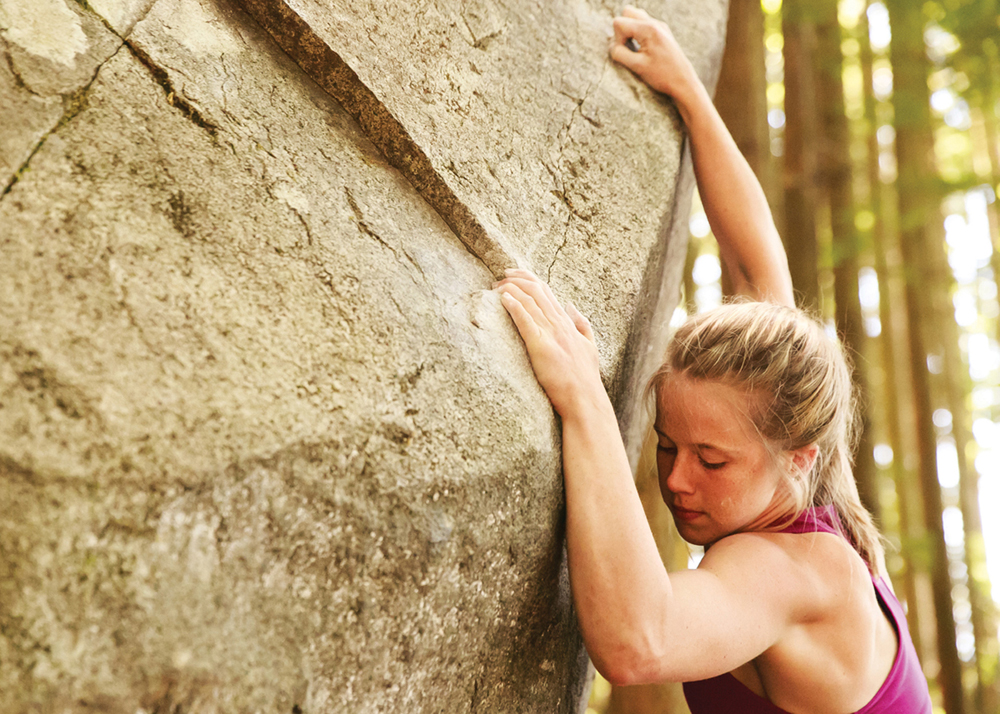
AS A CLIMBER, YOU know strength. You are well practiced on how to execute a power move on a boulder, exploding from your legs and torso to reach for the next hold. You know endurance, climbing pitch after pitch on a tall rock wall to test your body’s limits to go ever higher. You know focus, working on the same elusive, next-level route, refining your technique to solve problems that remain just out of reach.
Powerful climbing relies on a foundation of strength. Finger strength allows you to hang onto a crimp hold with just your fingertips. Leg strength helps you balance on one foot while maneuvering to the next hold. Shoulder strength keeps you moving ever upward.
But somewhere along the way, the need for balance shows up. You may notice first that you have a slight hitch in your shoulders or a twinge in your elbow. Or you are frustrated you can’t step as high as you’d like because of tight hips. You look at your hands and realize they don’t open the way they did before you started climbing.
Physical balance in your body not only prevents injury, it allows you to do sports other than climbing (gasp), to know your body more deeply, and to know the full range of your body’s capabilities. By focusing on strengthening all the muscles in your shoulders, not just the ones you are accustomed to using to climb, your shoulders will be stronger and more stable. By stretching your feet, you counter the effects of tight climbing shoes and stabilize the muscles that keep you upright while walking. When you understand the mechanics of a twist, you protect your lower back and know how to twist even more gracefully in between moves.
POSE BASICS
Bring your feet together: This is a cue for neutral alignment in your feet. Yoga poses start with feet pointed straight ahead. For most people, it is big toe knuckles touching, with a slight gap at the heels so the outer edges of your feet are roughly parallel to each other.
Four corners of your feet: This refers to your big toe knuckle, pinky toe knuckle, and the two sides of your heels. Balance and your foundation start here by distributing your weight evenly among these four corners of your feet in all poses. If your foot is off the floor, stretch out your toes and continue to activate the four corners.
Core lock: Pull your belly button up and in toward your mid-back to stabilize your spine and trunk.
Hip-width distance: Make fists with your hands, fold forward and place them between your feet to set your feet at hip-width distance. In some cases, like Downward-Facing Dog, you will have to visualize it.
Sit bones: The bones at the base of your pelvis, which you might feel after sitting for a long time on a hard bleacher, are a reference point for alignment. (See figure 4, muscles of the core, in this chapter.)
Pelvic bowl: Your pelvis is shaped like a bowl. Out of habit, most of us stand with it tilting slightly forward or back. Engage your core lock and tilt your tailbone toward the floor to move it into a neutral position. You can bring your hands to your hips to check your pelvic bowl position.
Creating balance starts with noticing what is going on in your body. Understanding how your body functions and seeing ways to counter the effects of climbing ultimately will help you understand your body better and help you access your climbing potential. And if you train off the wall to take on healthy alignment, you will do it subconsciously while climbing.
“Climbers go into [yoga] class with the idea, ‘I’ll get better range of motion,’” says chiropractor and climber Stephen Sherman. “They can really help their climbing by getting greater control and working on proprioception (understanding of how the body moves in space) of different joints.”
Climbing requires endurance, strength, and mental focus; it does plenty to push you physically. Supporting your body, from strengthening to rest, on the days you are not climbing is also vital. A yoga practice is an excellent complement to regular climbing at the gym in winter and outdoors in the summer. Yoga offers physical strengthening, endurance and cardiovascular conditioning. It also provides new tools for staying present and expanding mental stamina on the wall.
Take on a powerful, vinyasa practice once or twice a week, and you may be surprised at your gains, whether it’s being less prone to injury, feeling rejuvenated rather than tired and sore the next day, or adding in some ease while taking on the next, tough climb. Add in a weekly restorative practice, and you may be amazed at how relaxed you can feel. Your overall health and mindset can shift more than you know.
This chapter covers major areas of the body that are affected on a climb, from the soles of your feet to your spine. Each section highlights yoga poses that can support a specific area, especially if you are prone to injury. Please note that this is meant to be a glimpse into the poses and that they are most beneficial when included in a full practice with a warm-up and cool down. All poses in this chapter are included in the Strength and Recovery practices that offer a full practice.
INDIVIDUAL POSES COVERED IN THIS CHAPTER
» Mountain Pose
» Tree
» Toes Pose
» Halfway Lift
» Crescent Lunge
» Half Pigeon
» Side Plank
» Reverse Tabletop
» Eagle
» Downward-Facing Dog
» Plank
» Seated Twist
» Locust
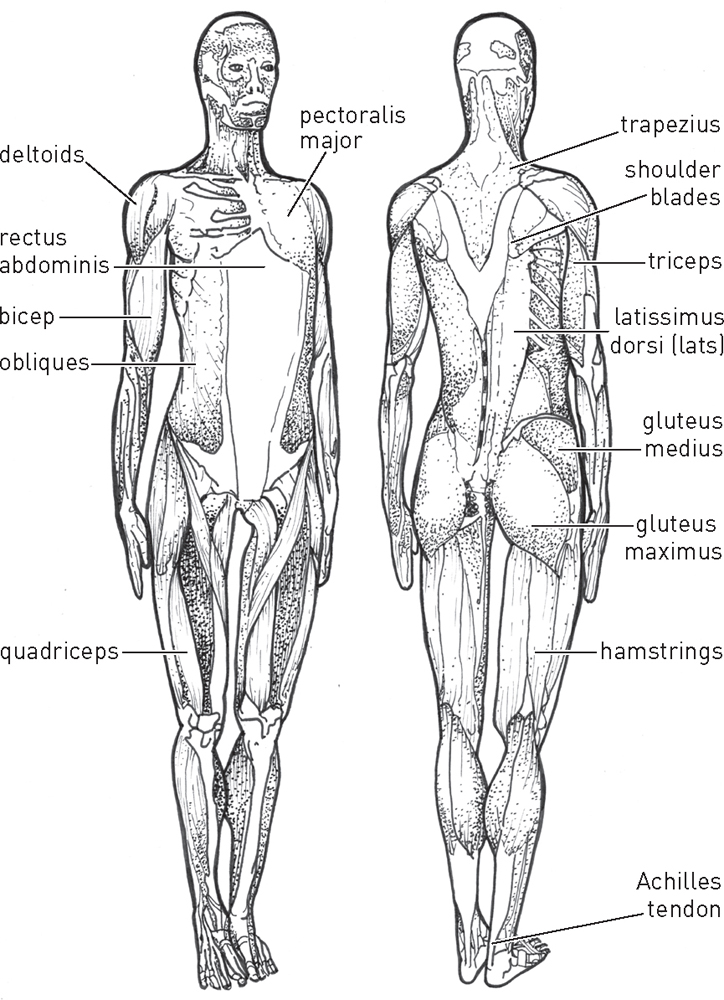
Figure 1. Full body musculature, front and back
SUPPORT YOUR FEET
Trusting your feet is one of the first techniques climbers learn. Even if you feel you’ve mastered this important body part, spending time focusing on your feet will improve your climbing foundation.
Your feet bear your weight throughout a climb, and are the foundation for your time on the wall. Your feet have twenty-eight bones each, with four layers of musculature, a bottom layer called your plantar fascia (see figure 2), and the pads of your feet. When the bones and muscles work together, they create lift, balance, and movement in your foot, according to well-known anatomy expert Leslie Kaminoff in Yoga Anatomy. Feet adapt incredibly well to uneven terrain, critical to staying balanced on just your big toe on a tiny hold. But most people spend the majority of time on smooth, artificially even surfaces common in our modern world. Over time, if they are not challenged, the deeper muscles that support your feet weaken and only the surface layer, the plantar fascia, prevent collapse.
A climbing wall continually challenges the musculature of your feet, but the constant pressure on the inside of your big toe—in addition to cramped climbing shoes that squish your big toe—means the muscles mainly work in one direction. By doing yoga poses in bare feet, stretching the big toe muscle in the opposite direction and practicing balancing your weight evenly over the sole of your foot, you condition your feet to maintain strength, balance, and integrity.
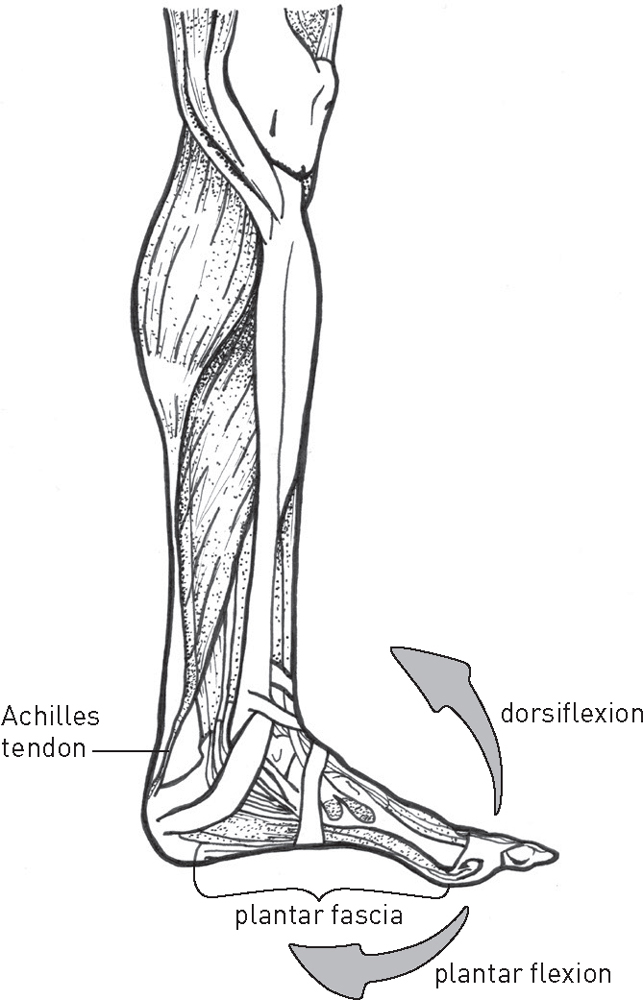
Figure 2. Muscles of the feet and ankles
POSES FOR FEET
Mountain Pose
A foundational pose for the entire practice, Mountain Pose starts with awareness in your feet. It engages your whole foot and creates strength. The pose also illuminates weaknesses in your feet, allowing you to work that area.
» Stand with your feet directly underneath your hips with the outer edges of your feet parallel to your mat, arms relaxed by your sides.
» Lift and spread your toes, creating gaps between every toe from your big toe to your pinky toe. Notice how this lifts the arches of your feet.
» Soften your toes to the floor. Press the four corners of your feet into the floor.
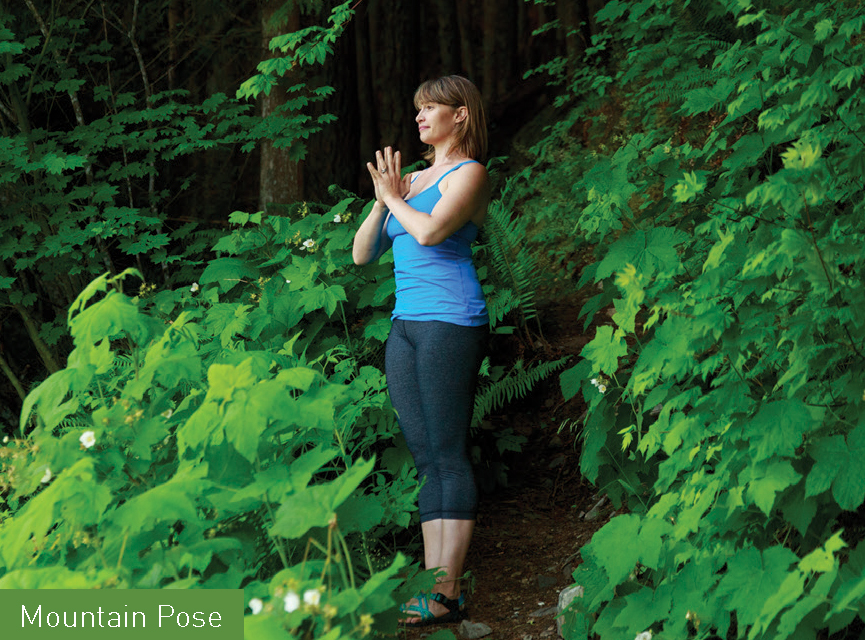
» Keep your feet grounded and spin your inner ankles toward the back of your mat. Energetically draw your outer ankles down toward the floor.
» Fold forward toward your shins. Cross your wrists, palms facing away from each other, and bring your palms to your inner calves. Press opposite palms into opposite inner calves. Notice the action in your feet, calves, and inner thighs.
» Stand up slowly. Keep your awareness in your feet. Close your eyes and notice how your feet flex and balance to keep your body upright.
TREE
A simple balancing pose, Tree focuses attention on your feet and ankles to engage micro-stabilizing muscles, which develops stability and strength. Your inner thigh muscles lengthen and your rear muscles engage. You also will open your hip on your lifted leg.
» Stand with your feet together. Feel the four corners of your feet on the floor or mat.
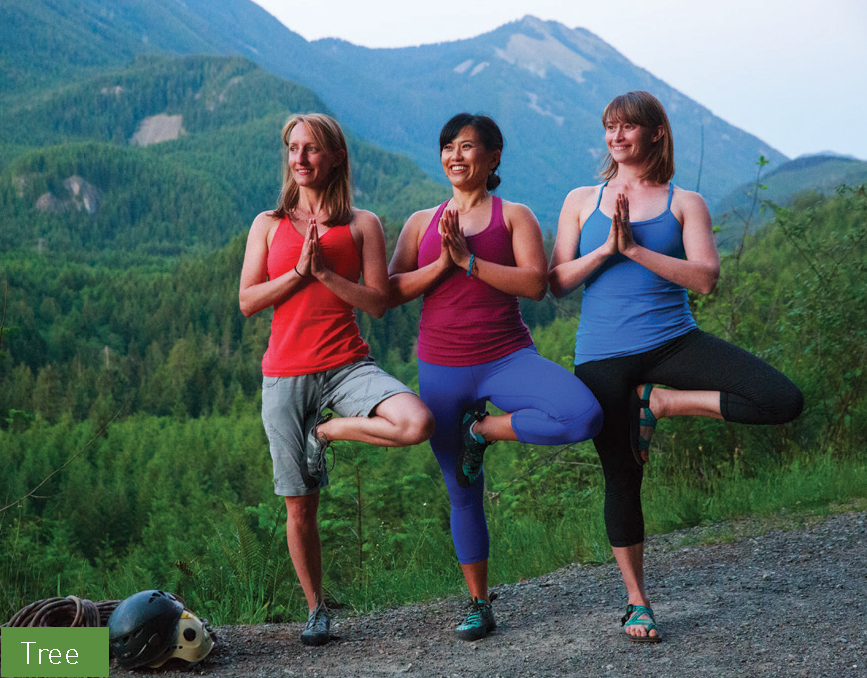
» Lift one foot to either your inner calf, or above your knee joint to your inner thigh. If balancing is challenging, prop the foot of your bent leg against the ankle of your standing foot with the ball of your foot on the floor.
» Pull your belly in toward your spine to engage your core.
» Bring your palms together at the center of your chest. Stay for five breaths.
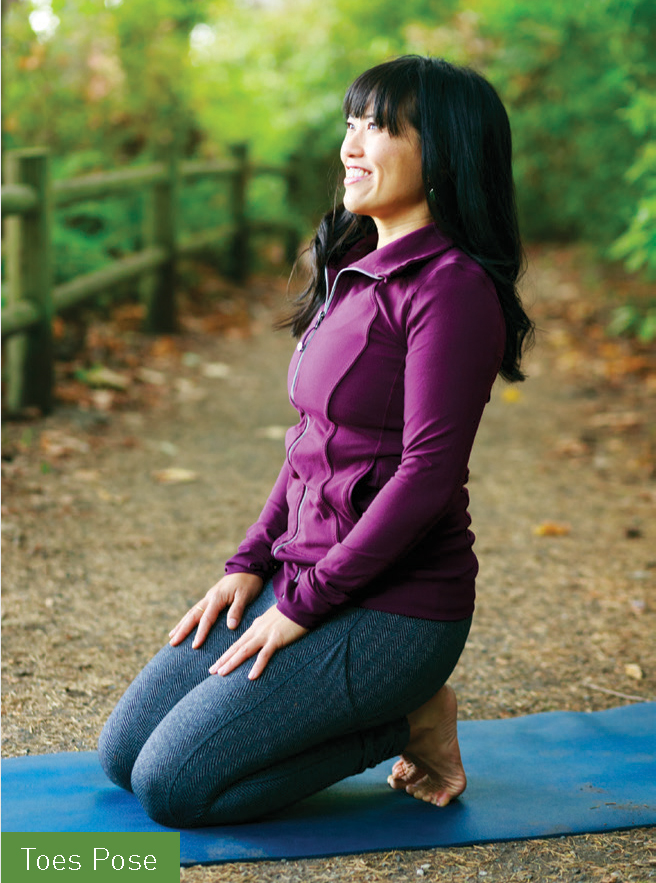
Toes Pose
Many people find this pose quite intense. Toes Pose opens your toes, and stretches both your Achilles tendon and the fascia in the soles of your feet. You may not have stretched your ankles and feet in this direction before. Work up toward holding this pose. You can modify Toes Pose by tucking a rolled-up blanket behind your knees. Do not stay in the pose if it is painful for you.
» Come to your knees on a mat. Tuck your toes underneath you until you are on the balls of your feet—tuck your pinky toes in if they escape.
» Sit up slowly and lift your chest over your hips until you feel the sensation in your feet.
» Breathe deeply for thirty seconds, or stay up to one minute.
» Counter pose: Shift forward onto your hands and knees. Release your toe tuck and point your toes on the floor. Bring your hands to the ground behind you and lean back on your feet to stretch into your shins, the front of your foot and your ankles in the opposite direction to counter the intensity.
RELEASE YOUR HIPS AND GLUTES
Unlock your hips and you are on the road to access your full potential on a climb. You may already know tight hips prevent you from reaching distant holds on a route you have zeroed in on. The more you open your hips, the easier it will be to get a higher heel hook. Understanding how your hips rotate also will give you a new perspective on how to adjust your body next to the wall while climbing. Learning to hinge at your hips with a long flat back in a Halfway Lift will help strengthen your lower back and teach your body to rely on bigger, stronger muscles in your hips. Strengthening your glutes and other muscles around your hips also will give you more power on the wall.
Your pelvis grounds and stabilizes your body. You use the muscles attached to your pelvis daily, relying on the psoas muscle deep in your hip to get out of bed. Your gluteus maximus and gluteus medius, the big butt muscles, and hamstrings kick in when you walk. (See figure 3, muscles of the hips, glutes, and hamstrings.) And yet most people don’t know how to engage their glutes. Weak glutes, a result of sitting and general underuse, can lead you to overrely on your lower back when walking or twisting. Your hip flexors also get shorter from sitting at a 90-degree angle all day.
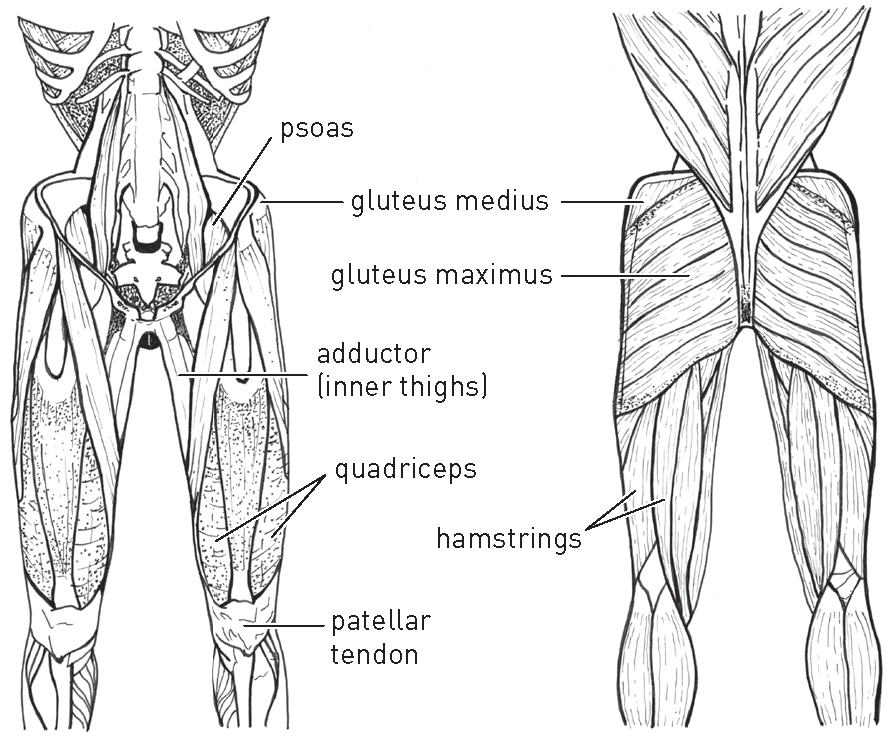
Figure 3. Muscles of the hips, glutes, and hamstrings
Your pelvis has big flat bones with lots of muscles attached. It’s easy for tension to get locked up in your hips, buried among all those muscles and connectors, and it takes time to release. Tension in your hips often works its way into your lower back, and stretching your hips also can provide some release from lower back pain. Rather than focusing solely on hip rotation for climbing, be mindful of the burden your hips and glutes take on every day to keep you moving. Hip-release poses help your muscles relax and let go, while strengthening your glutes will provide more durability when you need the endurance.
POSES FOR HIPS AND GLUTES
Halfway Lift
Essentially a hip hinge, Halfway Lift builds upon Mountain Pose and challenges you to engage your core, activate your hamstrings, and strengthen your lower back. It also teaches your body to bend at the hips versus at your lower back. (See photo on p. 101.)
» Bring your big toes to touch. Stretch your toes and connect the four corners of your feet to the floor.
» Place your hands on your shins. Bend your knees and squeeze your thighs.
» Lengthen your chest parallel to the floor. Stretch your sit bones toward to the wall behind you and spin them out from each other.
» Hug your shoulder blades onto your spine and stretch your chest longer.
» Lift your head in line with your spine. Set your gaze past the top of your mat.
» Stay for ten rounds of breath.
Crescent Lunge
Holding Crescent Lunge for a long time tests your balance, stabilizes your knees and ankles, and teaches you to breathe through challenge! Your hips internally rotate to stabilize in Crescent Lunge, and by pulling your thigh bones into your pelvis, you can practice pulling into a strong, stable centerline.
» Step into a long lunge with right foot forward, left foot back. Stack your right knee over the ankle of your right foot. Lift your left heel so your toes are bent and the sole of your foot is perpendicular to the ground. Move your feet hip-width distance apart for stability.
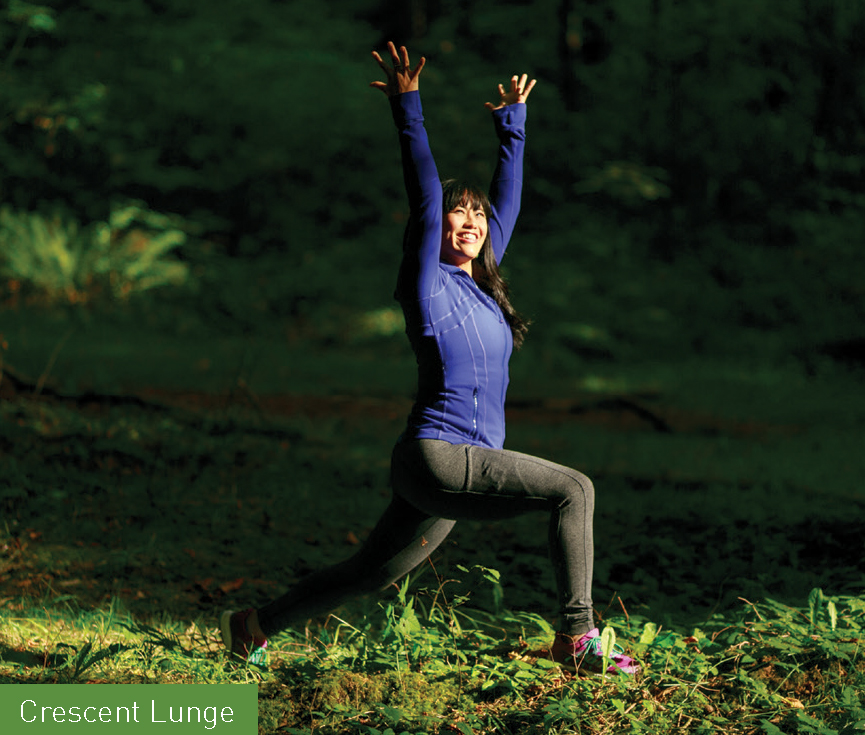
» Lift your chest over your hips and extend your arms up to the ceiling.
» Squeeze your back hamstring straight.
» Pull your belly in and up to support your core.
» Square your pelvis toward the front of your mat.
» Reach your arms up parallel to your ears, pinky fingers forward.
» Stay for five breaths, then switch sides.
» To intensify, lower your back knee so it hovers two inches from the ground. Hold for five breaths. Straighten your back leg. Switch sides.
Half Pigeon
As much as you need to strengthen your hips, it is important to relax the muscles that support your pelvis. Half Pigeon is a restorative pose that works in your hip to release your piriformis, a hip stabilizer, and also releases in your butt muscles. Your front leg rotates out, and it will work deeply into the muscles around your hips. If you climb outdoors frequently, hip release also is important to soften from the intensity of additional weight your lower body bears from carrying heavy ropes, carabiners, and other gear.
» From a seated position, bend your right leg in front of you. Move your right thigh parallel to the outer edge of your mat with your right foot tucked in toward your pelvis. Flex your right foot to protect your knee.
» Extend your left leg straight behind you so that the top of your thigh is on the ground.
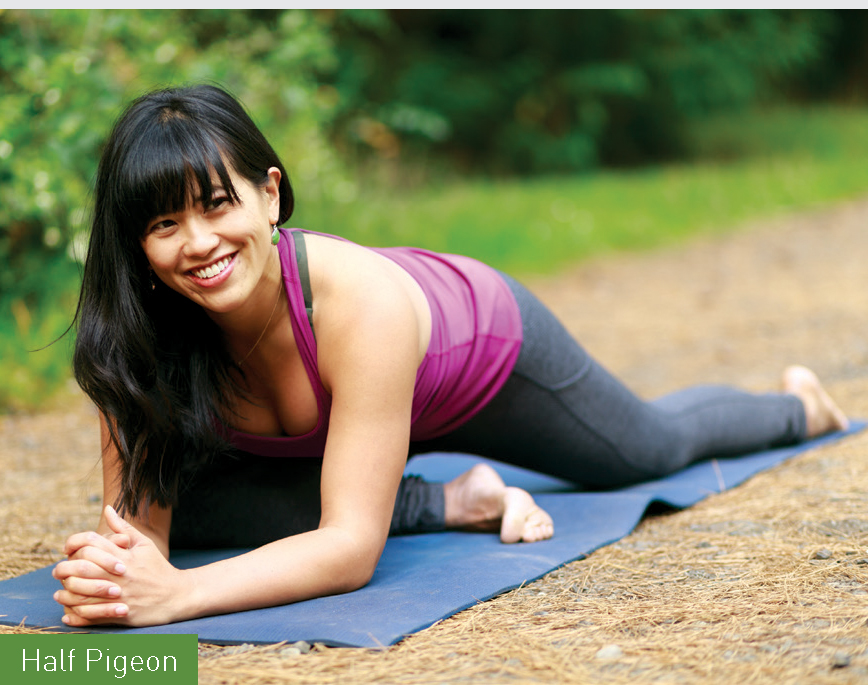
» Flex your toes on your back foot and come up to the ball of your foot.
» Roll up to center so your pelvis is squared toward the front of your mat. Place a block under your right hip if you have trouble staying centered.
» Lengthen your chest and lower your torso toward the floor. Stay here for twenty breaths. Switch sides.
» Deepen: If you don’t feel sensation in your hip, move your front shin toward parallel with the front edge of your mat.
» Modify: If you have knee injuries and this pose exacerbates any pain in your knees, take a Reclined Half Pigeon. (See p. 126 in Strength Practice I in chapter 4.)
TIGHTEN YOUR CORE
Your trunk holds you up—and together! Taking care of it will keep your body healthy long-term. Think of it like a canister, says chiropractor and climber Stephen Sherman, with a base of your pelvic floor, a top with your diaphragm, and muscles that make up the circular sides, including your abdominals, side oblique muscles, the tiny muscles of your spine, and more.
Using your diaphragm is a key step to understanding your core. In a yoga practice, ujjayi breathing teaches you to move your diaphragm for your breath and engage your belly muscles. People with shoulder injuries in particular can use their shoulders and other muscles to breathe, Sherman says. Engaging the diaphragm to support the core and stop using unnecessary muscles for a basic function is job one.
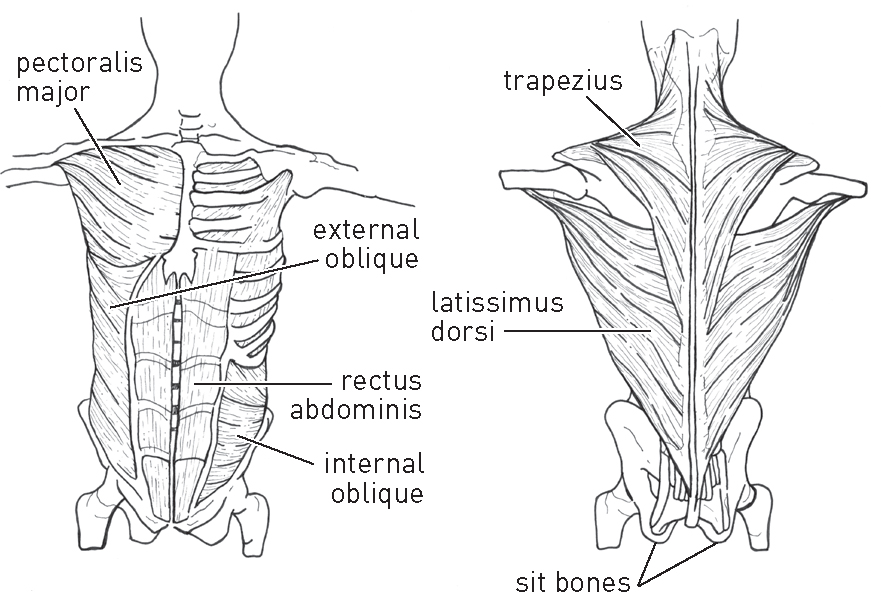
Figure 4. Muscles of the core
The core lock used in yoga also teaches you to tilt your pelvis to a neutral position. Your pelvis is shaped like a bowl, and you want it to be level, tipping neither forward nor backward. Your core lock also engages multiple levels of muscles that support your spine, including your rectus abdominis, the central washboard muscles seen on some and used by all, that play a role in Forward Folds and protects the lower spine (lumbar) in backbends. Your obliques along the side of your trunk contribute to twisting, while the transverse addominus, the deepest abdominal muscle, supports uddhiyana bandha. Your back and shoulder muscles connect into your glutes, so the stronger you keep your back muscles overall, the stronger you will feel in your lower body.
Endurance also is an important element to core stability. Once you build your core strength, it will be natural for you to engage it when you climb—your technique will flow naturally from your center.
POSE FOR YOUR CORE
Side Plank
Side Plank challenges your external oblique muscles in your torso as well as other parts of your core. It works deep into your glutes and the lower arm and shoulder holding you up, firing the muscles on half of your body. It also strengthens your hands and wrists. The goal is for your body to stabilize using neutral alignment of your spine and legs.
» Plant your hands under your shoulders for Plank. Tuck your toes and lift your knees off the ground. Bring your hips slightly below level with your shoulders.

» From Plank, bring your feet to touch. Roll onto the outer edge of your right foot with your left foot stacked on top.
» Stack your right shoulder over your right wrist; all your weight will be on your right hand. Your right hand faces the front of the mat and is stacked just a couple of inches forward of your shoulder.
» Lift your left hand up to the ceiling, palm facing the same direction as your chest.
» Flex your toes toward your knees and squeeze the muscles of your legs to the bone.
» Keep your body at one angled plane from shoulders to feet.
» Set your gaze and look up to the ceiling.
» Stay for ten breaths. Switch to your left hand.
» Modify: Bring your lower knee to the floor and stack it under your hip. Keep your lower hand, knee, and foot in line with each other. Use your core to stabilize in the pose.
OPEN YOUR SHOULDERS AND ELBOWS
Your upper body is taxed on the wall as it continually pulls you upward hold by hold. Your shoulders in particular take on a heavy load as you climb. Athletes who reach overhead generally need some mobility in their mid-back, the thoracic spine, but since most people spend their days slumped forward, their shoulders a casualty of gravity, the spine locks up fairly easily. If you don’t focus on rotating your mid-spine, you most likely compensate by reaching through your lower back or your neck, forcing your shoulder to do more work than it needs to, says Sherman.
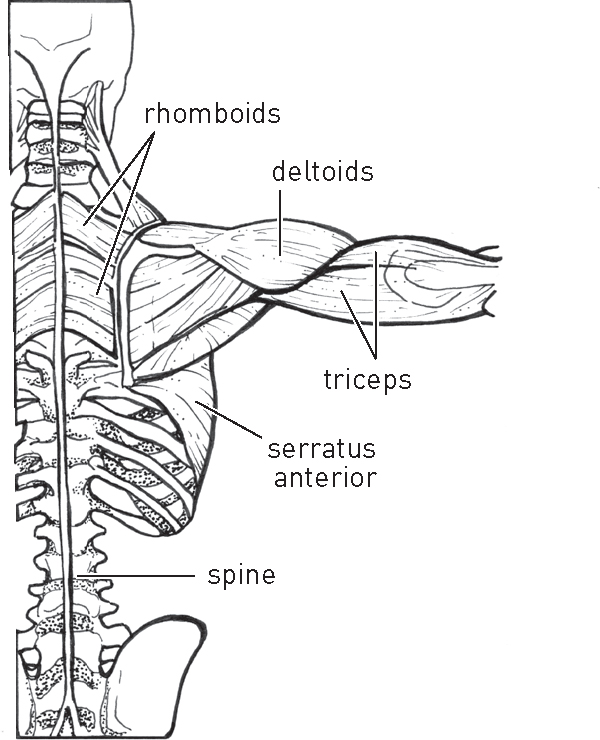
Figure 5. Muscles of the spine and shoulders
In climbing, people tend to bend their elbows and rotate their shoulders forward toward their chest, relying on their chest and the front of their shoulders for strength. If you are suffering from a lot of shoulder and elbow injuries, consider it a signal that you lack balance in your upper body. Your back is packed with powerful, strong muscles, and when you instead rotate your shoulders back toward your spine and access the multiple layers of muscles in your core, you will have more strength and endurance overall, not to mention happier, healthier shoulders.
Training your shoulders to rotate toward your back to open your chest will create balance in your shoulder strength and also lengthen your spine. Pulling your upper arm bones into your shoulder sockets and adding weight, like a plank, will get your body accustomed to engaging new muscles for a healthier shoulder girdle.
Another common shoulder challenge is shoulder impingement. Think of a belayer, shoulders slumped forward with chin jutted forward and his head tilted back looking up at the climber. In this position, the rotator cuff or the bicep tendon can get pinched from the constant roll forward.
When focusing on your shoulders, soften your trapezius, the muscles under your ears, and pull your shoulder blades in toward your spine. Activate the muscles underneath your shoulder blades and the serratus anterior, which wrap around your ribs. By activating different muscles, you’ll learn to externally rotate and protect your shoulders while you climb. Backbends are an important practice to rotate your shoulders externally and open tight chest muscles.
Shoulder health is a priority for any climber. If you take good care of your shoulders, your elbows will by extension be healthier, and your climbing will get stronger.
COMMON INJURIES
» Elbow tendinitis: If tendons get injured and you keep climbing, your elbow tendons will degenerate over time.
» Tennis (or golfer’s) elbow: With so much time spent gripping holds, the flexors in your hands work more than the extensors that straighten your hands, and that imbalance can move into your elbow causing pain at the joint.
» Shoulder impingement: When your shoulders are constantly internally rotated, your rotator cuff or bicep tendon can get pinched, causing pain in the shoulder.
POSES FOR SHOULDERS AND ELBOWS
Reverse Tabletop
Reverse Tabletop is a modified backbend that deeply stretches your pectoral muscles, your deltoids, and your biceps opening your chest, shoulders, and upper arms. It reverses the feeling of gravity pulling forward on your shoulders. Your triceps straighten your arms.
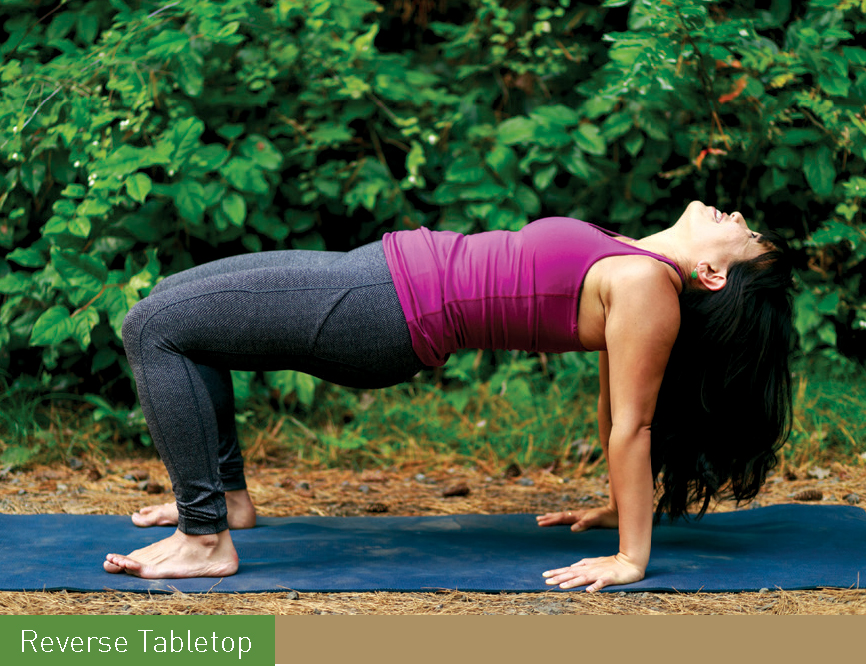
» From a seated position, place your hands behind you with your fingertips facing your body.
» Walk your feet in toward you so they are flat on the floor at hip-width distance.
» Ground into the four corners of your feet, and lift your hips toward the ceiling.
» Press your palms into the ground.
» Lengthen the crown of your head behind you. Gently release your head onto your shoulders.
» Stay for five breaths.
Eagle
Eagle challenges your balance and the bind opens your shoulders. Be patient if you can’t immediately bind and try the modification for now. Your shoulders will open over time.
» Stand in Mountain Pose. Reach your arms out parallel to the floor, palms facing forward. Cross your right upper arm under your left upper arm. Wind your forearms around each other. Bring your palms to touch for the full bind.
» Lift your elbows even with your shoulders. Press your hands away from your face to vertical so your wrists stack over your elbows.
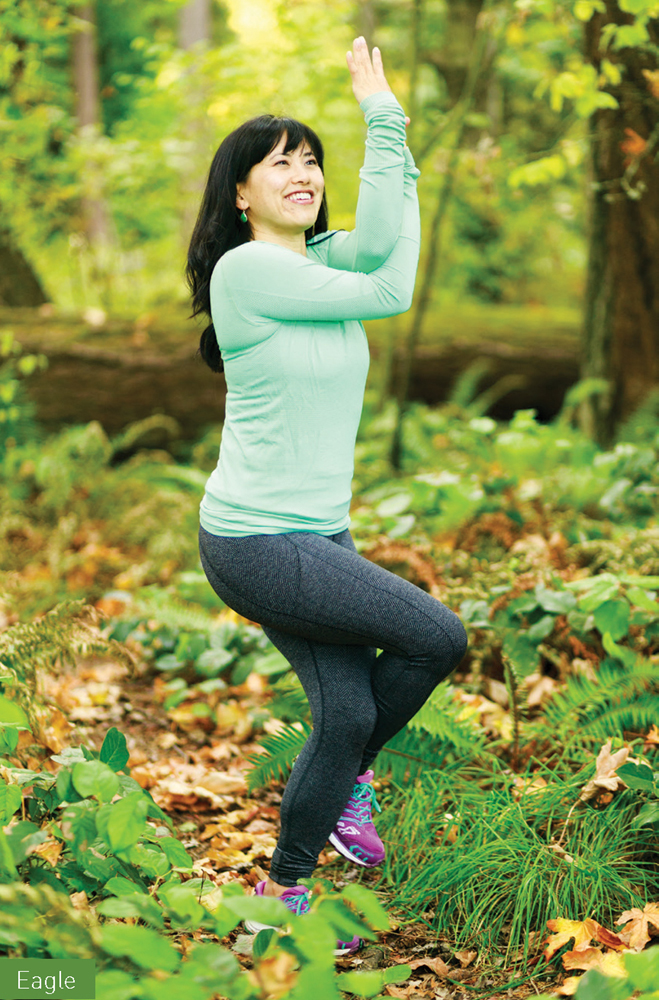
» With your big toes touching, bend your knees to lower your hips toward the floor for Chair. Cross your right thigh on top of your left thigh. Your upper foot can dangle; stretch out your toes to activate your foot. Squeeze your inner thighs.
» Stay for five breaths. Switch sides.
» Modify: If you can’t wrap your arms for the full bind, take hold of opposite shoulders. Lift your elbows off your chest.
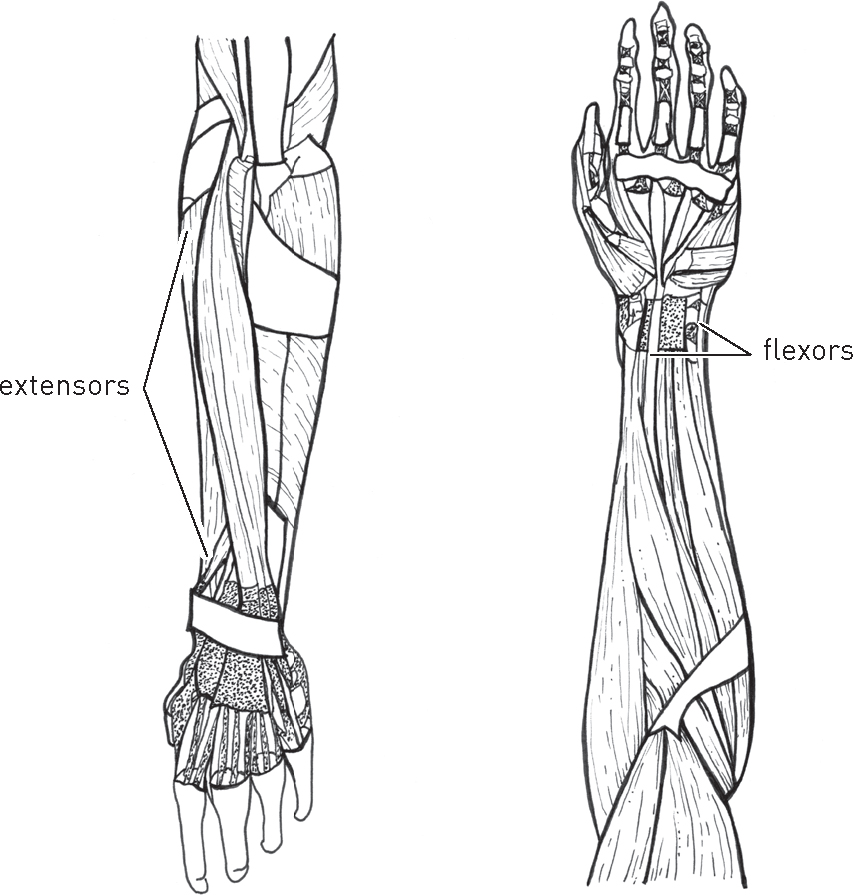
Figure 6. Muscles of the forearms and wrists
BALANCE YOUR HANDS AND WRISTS
When you first learned to climb, you probably realized rather quickly that it requires strong hands and wrists. Over time, your hands may have gotten so strong and accustomed to a curled position for holds, that the flexors are now stronger than the extensors that straighten your fingers, which can lead to tendinitis. Balancing out the strength in your hands will in turn keep your wrists healthy.
In addition to stretching, focus on strengthening your hands and wrists in the opposite direction of climbing. Yoga poses like Downward-Facing Dog are an excellent place to practice both.
POSES FOR HANDS AND WRISTS
Downward-Facing Dog
Downward-Facing Dog is a widely used pose for good reason—it has benefits for the whole body. An inverted V-shape, it lengthens your hamstrings, your calves, and your spine, and in the pose, you practice grounding into your hands and learning to open and strengthen your shoulders. This pose is a good place to pay attention to your sit bones, the bones at the base of your pelvis. (See figure 4, muscles of the core.) In Downward-Facing Dog, practice spinning your sit bones up to the ceiling to lengthen your spine and engage your core.
» Come to your hands and knees, with your hands positioned underneath your shoulders, index finger pointing straight forward.
» Tuck your toes underneath you, and lift your hips up to the ceiling. Walk your feet back about six inches.
» Bend your knees and lift your tailbone until your spine lengthens. Spin your sit bones to the wall behind you.
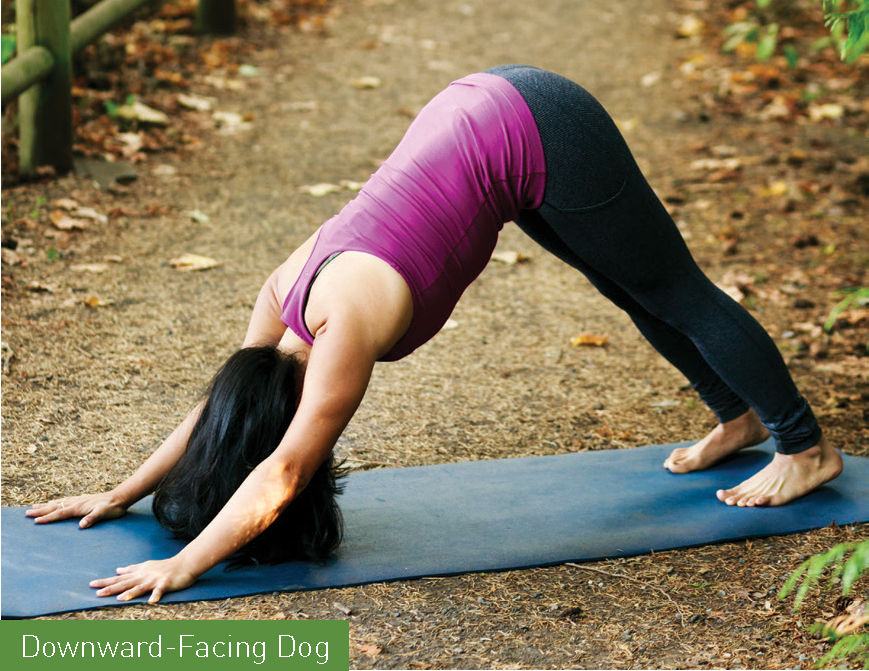
» Roll your shoulders up to your ears, then use your back muscles to pull your shoulders down and in toward your spine. Squeeze your upper arms toward each other.
» Drive your heels toward the floor (they don’t need to touch the floor).
» Pull your belly in toward your spine.
» Lift the muscles just above your knees to engage your thighs and open into your hamstrings. Stay for fifteen full breaths.
Plank
Plank pose is commonly used as a core strengthener. In yoga, the emphasis on doing a Plank on your hands rather than elbows brings awareness to your palms as your foundation and strengthens your wrists by pushing into the floor. Flatten your hands onto the floor and stretch your fingers out to counter any clenching from climbing. This is also a good place to work on rotating your shoulders down your back and strengthening your shoulders. If that wasn’t enough, Plank also strengthens your thighs and the oblique muscles along the lateral sides of your torso.
» Come to your hands and knees on your mat. Stack your hands underneath your shoulders, index finger pointed straight ahead.
» Step your feet to the back of your mat. Tuck your toes and lift your knees off the floor, and squeeze your legs straight.
» Keep your hips just below level with your shoulders.
» Lift your head so your neck is level with your shoulders.
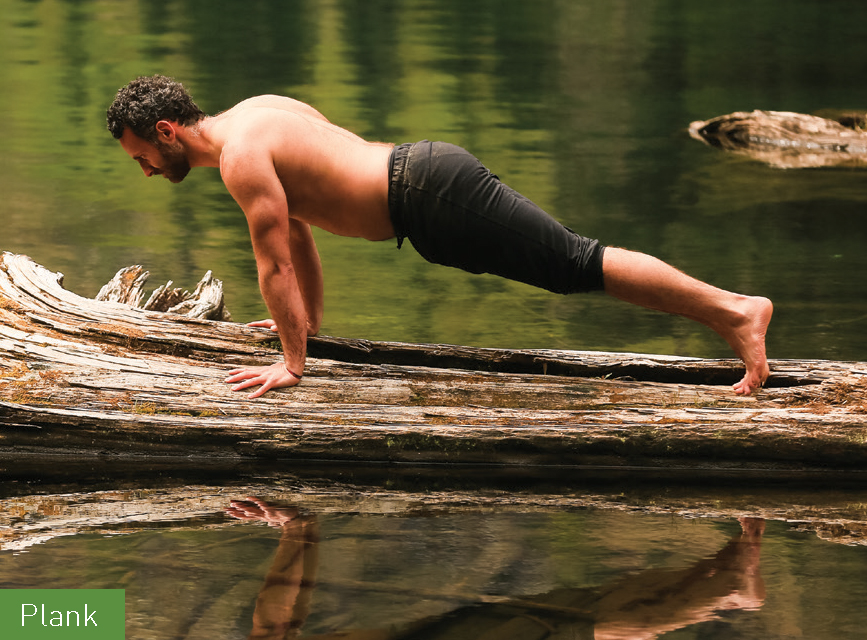
» Spiral your inner thighs up to the ceiling. Lengthen the backs of your knees and squeeze your thighs. Tilt your tailbone toward your heels.
» Press your palms firmly into the floor. Squeeze your upper arm bones toward each other.
» Spin the inner eye of your elbows forward, and pull your shoulder blades together.
» Lift your belly in toward your spine and wrap your front ribs together.
» Breathe and hold for one minute. If you can’t hold for one minute, build up to it. Repeat three times.
» To modify the pose, bring your knees to the floor. Keep your hips on an even plane between your shoulders and your knees, belly muscles fully engaged.
TWIST AND LENGTHEN YOUR SPINE AND NECK
Your spine is the central pillar of your body, and you want to keep it supple and strong. Adding in twists to rotate your spine keeps it flexible by encouraging the muscles between vertebrae and around your spine to open up. Backbends strengthen the muscles that arch your back and keep your spine in healthy alignment.
If height is not on your side in climbing, take comfort in knowing that if you work on lengthening your spine through twists and backbends, you can get added extension to grab a hold that looks out of reach. Twists and backbends develop more body awareness around your spine, and you will learn to reach from your spine rather than your shoulders. By using the following poses to understand what it feels like to extend while you’re still safely on the ground, it will become natural when you’re reaching for holds on a massive rock face.
POSES FOR SPINE AND NECK
Seated Twist
A simple twist you can do anywhere, Seated Twist will offer release from long periods of sitting or from a big day outside.
» From a seated position, extend your right leg straight to the front of your mat, toes flexed. Bend your left knee and walk your left foot in close to your hip.
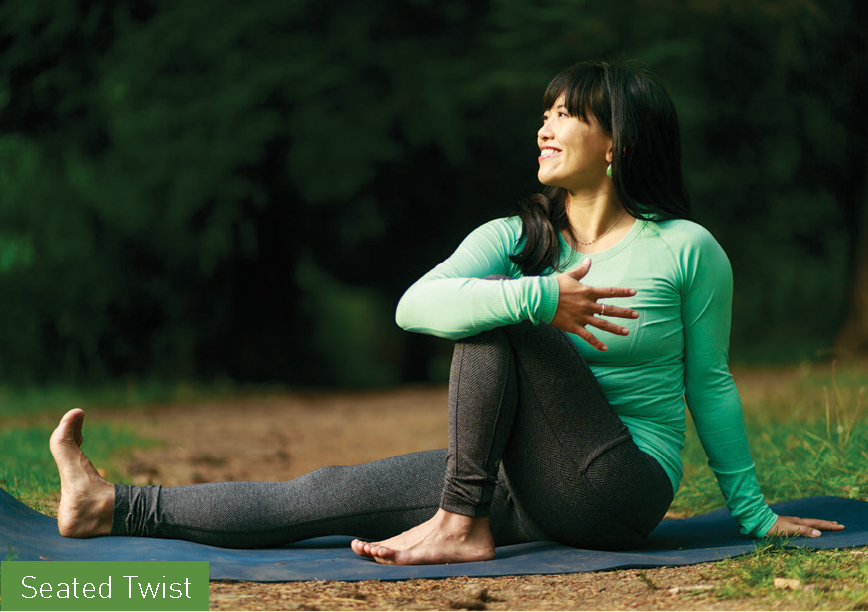
» Place your left hand on the floor behind you. Reach your right arm up to the ceiling, then wrap it around your bent leg.
» Stay for ten breaths. Switch sides.
Locust
Backbends build strength in your spine and also work deeply into the big back muscles in your torso that support your spine. Locust pose focuses on the muscles that arch the back and is helpful for strengthening your lower back.
» Lie on your belly. Bring your feet to hip-width distance, toes pointed.
» Reach your hands alongside your body, hands down by your hips, palms facing down.
» Pull your belly in toward your spine.
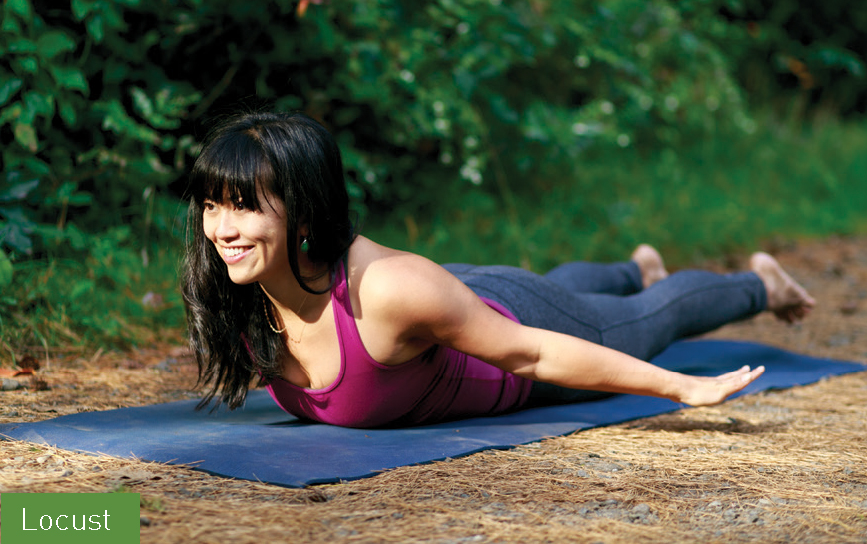
» Press the tops of your feet into the floor, and lift your knees off the ground. Keep your upper legs engaged, and lift them off the floor.
» Lift your upper arm bones toward the ceiling and float your hands above your hips.
» Set your gaze on a point on the ground below your nose. Stay for ten breaths.