Yoga for Climbers: How to Stretch, Strengthen and Climb Higher (2016)
CHAPTER 4
YOGA PRACTICES FOR CLIMBERS
I OFTEN REMIND STUDENTS when they get perfectionistic about yoga poses to remember it is called a yoga practice. The power comes from doing it over and over. When you put your body into different shapes that challenge your strength and flexibility, pay attention to alignment, and meld poses with breath, it is a formidable combination. The more you practice and pay attention to your body in poses, the more you rewire your body and your mind. And that repeated effort gives you access to the subterranean levels of change and growth available in a yoga practice.
In this chapter, you will learn about a power yoga practice. Physical power in your body can be interpreted as bursts of speed, like a power move to reach for a hold. In yoga, power stems from holding poses to build stability, building heat in your body from those holds, and experiencing freedom physically through alignment.
You will encounter challenge—that is a major component of your yoga practice. Rather than muscling through or forcing your body, consider breathing more deeply, listening and seeing if you can shift your alignment or your perspective in a pose you initially find tough. Take Child’s Pose to return to your intentional ujjayi breath.
The sequences in this chapter are designed for two different approaches—strength and recovery. The Strength Practices will support you while climbing, creating stability and endurance in your lower body, spine, and core as well as dynamically opening into your hips and shoulders. The later sequences include poses to practice before you climb and at the end of a long day climbing to support your body to stay at its most optimal.
In the Strength Practices, you will do poses to connect to your body so that you can let go mentally. Strength Practice I will build your strength in a short amount of time. Your heart rate will elevate and you will sweat! Do it regularly to get stronger and practice noticing your body sensations. In Strength Practice II you will build upon what you learned in the first, adding on more challenging poses and pushing your endurance for a longer stretch of time. Both practices start by activating your core, then move you into Sun Salutations, which are a traditional way to open a vinyasa practice. They build heat through repetition and help you practice connecting breath with movement. Once your body becomes accustomed to opening your practice this way, you will notice more ease and flow.
The standing poses for both practices build stability, challenge balance, and open your spine. They are strong poses designed to push you to your edge. The balancing poses strengthen your feet and test your body’s limits to keep you upright, while arm balances test your skills and determination! Keep going.
Backbends open your chest and heart. Most of us habitually hunch forward, our posture sloppy from years of slouching. Backbends require us to reverse those years of habit, and they are a particularly effective way for climbers to stretch the muscles in the chest and practice external shoulder rotation. You may feel some resistance to backbends when first starting, partly because of your body’s physical ways, and also the energetic opening experience that comes with a backbend. It can feel uncomfortable to release in your chest and around your heart if you are not used to it. Be patient and soften in your chest. You never know what you may find.
Inversions turn your perspective upside down. Seeing your legs in the air may be all it takes. When your body is upside down, more blood moves to your heart, pumping more efficiently and slowing your heart rate and your blood pressure. Your heart gets a break and in turn, you relax.
You may be tempted to skip Final Rest. Savor it. It’s the key to letting all the energy you’ve opened up in your body resettle. It trains you to restore. It offers a space of stillness—all too rare in a busy day.
All the practices include recovery poses, particularly important for athletes who push their limits day in and day out. If you normally take a rest day after a long day climbing, do the Recovery Practice. It is designed for a body that feels achy and tired. Your muscles and energy contract after a lot of intensity, and the recovery sequence will allow your body to both open and heal from a big day outdoors.
These practices are intended to support your time climbing both at the gym and outdoors, and a regular practice is key to seeing a shift. To experience the most impact physically and mentally, do one Strength Practice at least twice a week, but know that it is designed to practice daily. Build from the 25-minute sequence to the 45-minute one. Do the Recovery Practice once a week.
“Practice, practice, practice. That’s it.”
—Sri K Pattabhi Jois, in an interview
UNDERSTANDING THE POSES
Each pose description includes the following:
» Name: Common English name for the pose.
» Introduction: Context for the pose, relationship to the body, and how the pose supports you on the rock.
» Setup: Getting into the pose.
» Alignment: Specific cues to pay attention to for proper body alignment.
» Release: Some poses have directions for a specific release.
» Gaze & focus: Where to set your drishti (gaze) during the pose and where to focus your attention within your body during a pose.
» Deepen: Ways to deepen a pose for the next level of challenge.
» Common challenges: Physical challenges you may experience during the pose.
» Modifications: Alternatives to modify the full pose.
For poses that are already modifications of the full pose, challenges and modifications are not listed.
SEQUENCE FOR STRENGTH PRACTICE I
» Supine Butterfly
» Happy Baby
» Boat
» Plank
» Low Cobra
» Child’s Pose
» Downward-Facing Dog
» Rag Doll
» Halfway Lift
» Mountain Pose
» Sun Salutation A
» Sun Salutation B
» Gorilla
» Twisted Chair
» Low Lunge
» Twisted Crescent Lunge
» Warrior 2
» Triangle
» Side Angle
» Eagle
» Tree
» Flip dog
» Side Plank
» Bow
» Bridge
» Reclined Half Pigeon
» Seated Forward Fold
» Seated Twist
» Legs Up the Wall
» Corpse Pose
GET READY
The Strength Practices are based on a power vinyasa practice. This weaves held poses for stability and challenge with a flow connecting breath and poses to build heat. They are designed to be challenging. You’ll find as you grow in strength and mobility, you will build endurance and cultivate ease in the flow. If you start to lose your breath or need a rest at any time, remember you can take Child’s pose. Return to your ujjayi breath and then resume the sequence when you are ready.
KEY
Many of the cues are based in Mountain Pose. It is the foundation for your entire practice! The cues for poses also presume you are practicing in a room with walls and a ceiling, but feel free to interpret the cues if you are practicing outdoors. Please note that you have seen some of these poses in chapter 3. For those poses, you will see some additional alignment cues in this chapter to support a deeper understanding and experience of the pose.
Each pose should be held for five full breaths (each breath is made up of both an inhale and an exhale) unless otherwise noted. If there is a necessary transition between poses, you’ll see a notation for a Sequence Transition.
STRENGTH PRACTICE I
TIME: 25 MINUTES
EQUIPMENT: YOGA MAT, BLOCK, AND STRAP
RELEASE AND ACTIVATE
This first phase of the sequence is a time to focus on your breath and your core, and in the process, release mental lists. Bring your attention to your physical body and notice your ability to listen to it and learn.
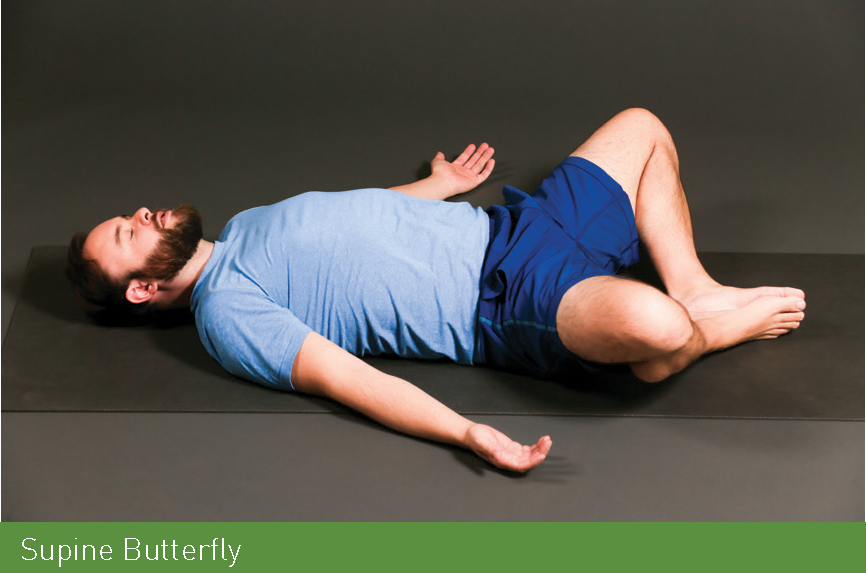
Supine Butterfly
Starting your yoga practice lying on your back gives your body time to relax; the contact between your spine and the floor signals your brain that it’s time to let go. Gravity draws your legs down toward the floor, naturally opening your hips. Your shoulders relax down into your mat; close your eyes if you like. Give yourself time in this pose to feel the floor under you and to let your mind settle. Focus on your active ujjayi breath.
SETUP Lay down with your back on your mat. ✵ Bring the soles of your feet together so your legs form a diamond shape.
ALIGNMENT Let your arms relax on the floor, palms facing up. ✵ Notice the connection of your spine to the floor and the natural curve of your lumbar Spine at your lower back. ✵ Hug your belly in and up toward your spine to activate your core. ✵ Bring in your ujjayi breath.
GAZE & FOCUS Close your eyes. ✵ Bring your attention to your spine on the floor and an active core.
COMMON CHALLENGES Tight hips or lower back pain prevent you from relaxing your knees toward the floor.
MODIFICATION Bring your feet as wide as your mat and rest your knees together to bring your lower back to the mat.
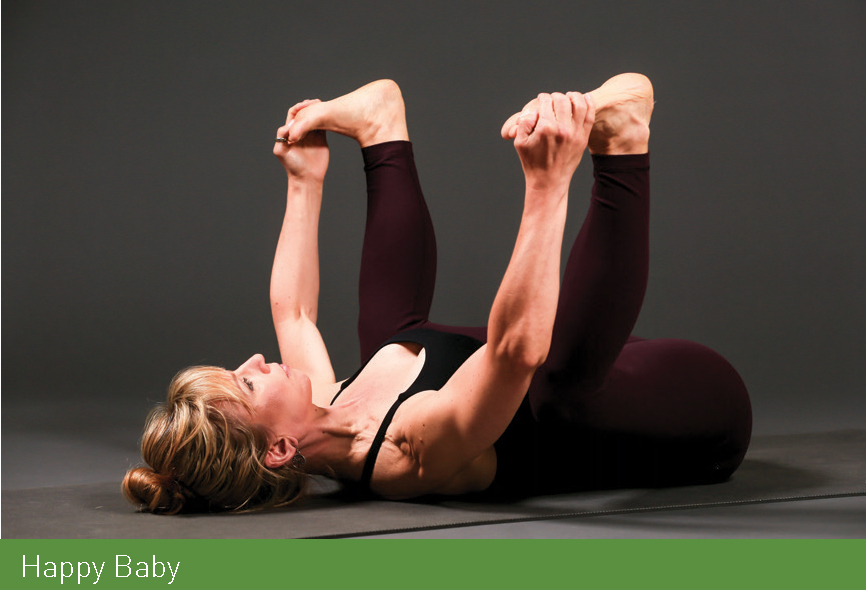
Happy Baby
Happy Baby opens your hips and brings your spine into neutral alignment. This is a wonderful pose to check in at the beginning of practice and again at the end to see what has changed in your spine and hips. If you can roll around on the floor and embody the name of this pose, you’ll love the pose even more.
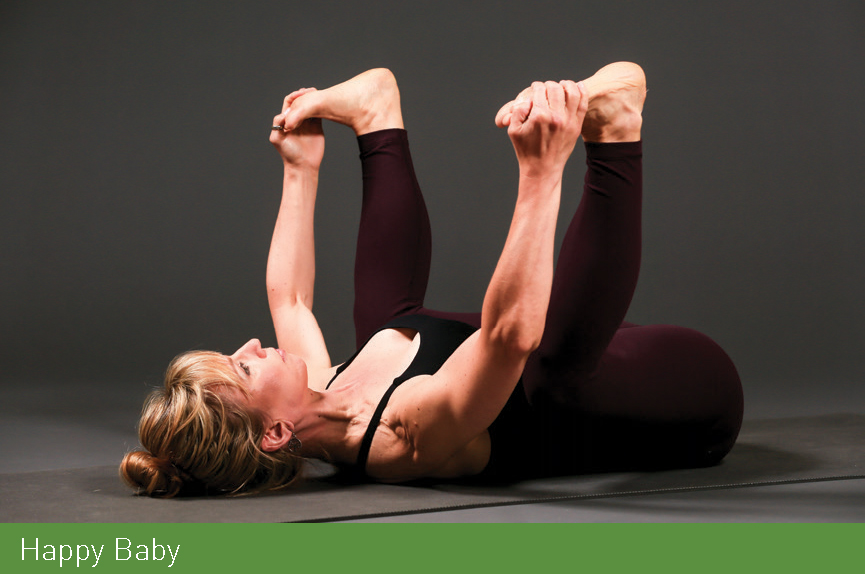
SETUP From Supine Butterfly, pull your knees into your chest. Take your knees wide outside your chest. ✵ Reach inside your legs for the inner arches of your feet and lift your feet toward the ceiling.
ALIGNMENT Flex your feet toward your knees. Bend your knees at 90 degrees. Press your heels toward the ceiling. ✵ Relax your shoulders. ✵ Lengthen your lower back toward the floor while pulling on your feet with your hands. Press your feet into your hands.
GAZE & FOCUS Look at a spot on the ceiling. ✵ Lengthen your spine to the mat.
DEEPEN Switch your grip on your feet to the outside arch of your foot; pull your knees deeper down outside your ribs.
COMMON CHALLENGES Tight hips or lower back prevent you from reaching your feet.
MODIFICATION Hold the backs of your thighs instead of your feet. Open your knees wider than your chest. ✵ Place a block under your head.
SEQUENCE TRANSITION From Happy Baby, pull your knees into your chest. ✵ With momentum, rock up to a seated position.
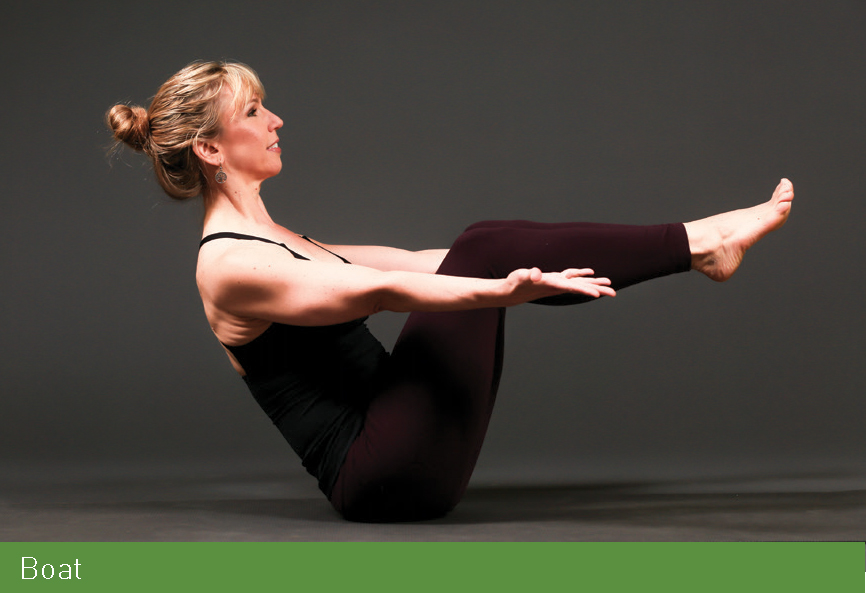
Boat
You use your core intensely during a climb, and the more you connect to the strength of your trunk, the more you will flow on the wall. One of the most effective ways to strengthen your core, Boat pose challenges your trunk muscles in multiple ways. That said, people love to cheat this pose! Be sure to lift your chest to get the full impact.

SETUP Hold the backs of your thighs, and balance between your sit bones at the base of your pelvis and your tailbone. Lift your feet off the floor.
ALIGNMENT Pull your thighs toward your chest. Hold your shins parallel to the floor. ✵ Squeeze your thighs toward each other. Spread out your toes so you see a gap between each one. ✵ Pull your shoulder blades toward each other. Lift your chest toward the ceiling. ✵ Reach your arms straight in front of you. ✵ Stay for ten breaths. ✵ Transition to Low Boat pose. Lower until your lower back is on the floor, your shoulders off the floor and your legs hover above the mat. Squeeze your thighs together. Stay for five rounds of breath. ✵ Lift back to Boat. Stay for ten breaths.
GAZE & FOCUS Set your gaze on your toes. ✵ Concentrate on lifting your chest and lengthening your spine.
DEEPEN Once your hamstrings allow it, straighten your legs at a 45-degree angle away from the floor.
COMMON CHALLENGES Lower back weakness prevents you from lifting your chest.
MODIFICATION Hold the back of your thighs to keep your chest lifted.
SEQUENCE TRANSITION From Boat, set your feet on the floor. ✵ Hug your knees and lift your chest to the ceiling to release in your core. ✵ From a seated position, roll over your feet hands and knees. ✵ Plant your hands at the front of your mat and step your feet to the back edge of your mat.
Plank
Your core is the key link for your entire body, and Plank is an effective way to build trunk strength and heat! Plank is also an excellent place to practice Mountain Pose on a different plane, by keeping your legs fully engaged, pulling your shoulder blades into your spine, and lifting your head to be level with the rest of your spine.
SETUP Stack your hands underneath your shoulders, index finger pointed straight ahead. Stay on the balls of your feet, lift your knees off the floor, and squeeze your legs straight.
ALIGNMENT Keep your hips just below level with your shoulders. ✵ Spiral your inner thighs up to the ceiling. Lengthen the backs of your knees and squeeze your thighs. ✵ Lift your head so your neck is level with your shoulders. ✵ Press your palms firmly into the floor. Squeeze your upper arm bones toward each other. ✵ Spin the inner eye of your elbows forward, and pull your shoulder blades together. ✵ Tilt your tailbone toward your heels. ✵ Lift your belly in toward your spine and wrap your front ribs together. ✵ Stay for ten breaths.
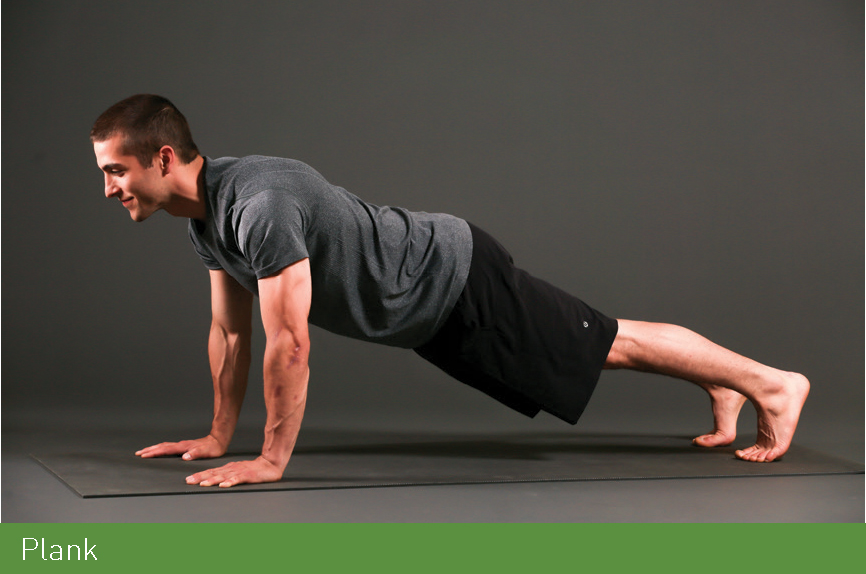
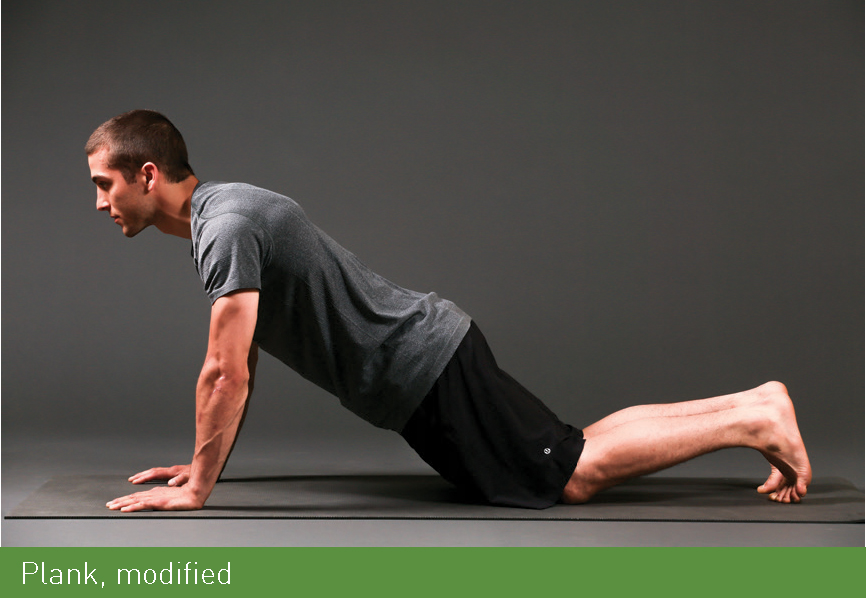
GAZE & FOCUS Set your gaze past the front of your mat. ✵ Keep your legs and core firm. Breathe deeply to maintain the pose.
COMMON CHALLENGES Building strength to hold the full pose for ten breaths can take some practice.
MODIFICATION Bring your knees to the floor, toes curled under. Keep your hips in one line with your shoulders with your core engaged.
SEQUENCE TRANSITION From Plank, shift to the tips of your toes and slowly lower to the floor, chest and pelvis touching down at the same time on the mat.
Low Cobra
A gentle backbend, Low Cobra still has plenty of impact. When practiced diligently with strong legs and a lift in your chest and spine, it builds strength in your back and opens your chest, reversing any forward slump you may have created.
SETUP Press the tops of your toes into the floor. ✵ Squeeze your thighs and lift your knees off the mat. ✵ Place your hands next to your lower ribs so your elbows are at a 90-degree angle.
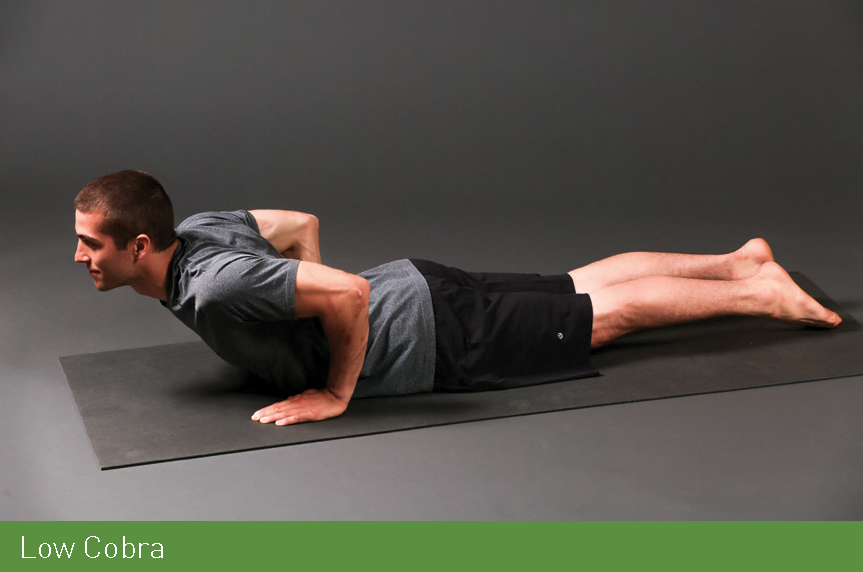
ALIGNMENT Press your pelvis into the floor. ✵ Engage your core and lift your chest off the floor. Hug your arm bones toward your spine. ✵ Tilt your tailbone toward your heels slightly. ✵ Lift your hands an inch off the floor to take weight out of your hands.
GAZE & FOCUS Lift your gaze forward about a foot in front of you. ✵ Maintain strong legs and lift from your core.
DEEPEN Press your palms down and lift to Upward-Facing Dog (see Strength Practice II).
SEQUENCE TRANSITION Lower your chest back to the floor. ✵ Press up to hands and knees.
Child’s Pose
In a world of constant stimulation, Child’s Pose offers a quiet, internal space. It brings your focus inward to your body and your breath, and it relaxes your spine and lower back, your hips and your shoulders. This pose is optional; if you would like to skip it, feel free. But remember you can come into this pose any time the practice becomes too intense. Use it to pause and return to your ujjayi breath.
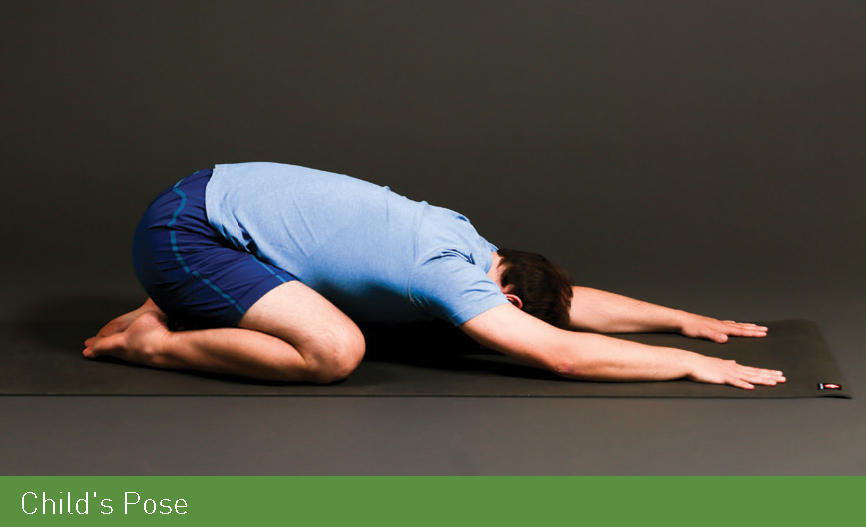
SETUP From hands and knees, bring your big toes together and move your knees to the edges of your mat. Sink your hips back over your heels. Walk your hands forward at shoulder-width distance and bring your forehead to the ground.
ALIGNMENT Let go of tension in your shoulders. ✵ Engage your core gently, pulling your belly up and in toward your spine. ✵ Come into your ujjayi breath. ✵ Stay for ten breaths.
GAZE & FOCUS Close your eyes. ✵ Deepen your ujjayi breath. Pay attention to the feeling of the mat under your hands and forehead.
COMMON CHALLENGES A tight lower back or hips can prevent your forehead from touching the ground. ✵ Knee injuries can prevent you from bending your knees comfortably.
MODIFICATIONS Bring a block under your forehead to relax your neck. ✵ Roll over onto your back for Supine Butterfly or lay flat on your belly.
SEQUENCE TRANSITION Come up to hands and knees.
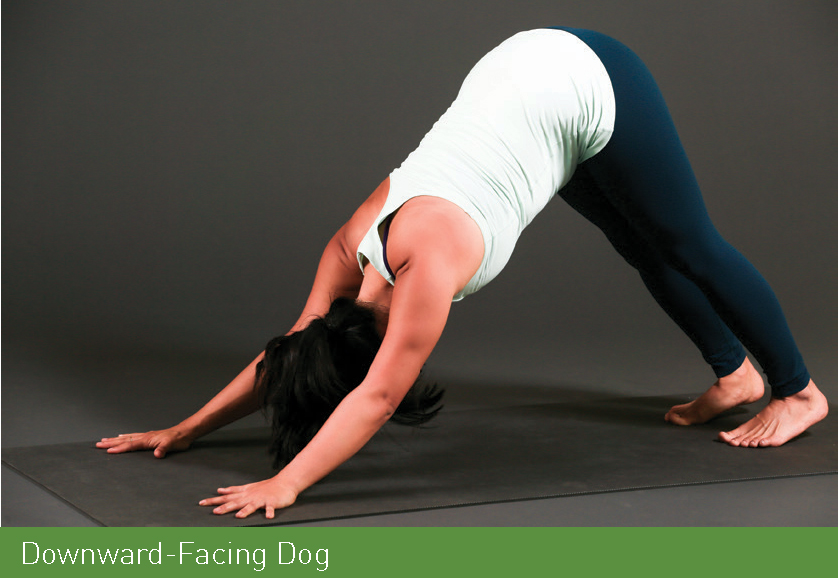
Downward-Facing Dog
New students are often skeptical that Downward-Facing Dog can become a resting pose, but the more you do it, the more your experience of the pose shifts to freedom. It is great practice to rotate your shoulders away from your ears while bearing weight in your upper body. As your body awareness grows, you will experience length, strength, and softening all at once. In a flow sequence, it’s a time to return to your ujjayi breath, to open your spine and hamstrings, and to open and strengthen tight ankles.
SETUP On your hands and knees, point your index finger to the front edge of your mat, or midnight on a clock. Tuck your toes and lift your hips to the sky. ✵ Move your feet back about six inches toward the back edge of your mat. Your hands and feet should be about the same distance from each other as Plank.
ALIGNMENT Point your index fingers to the front of your mat. ✵ Flatten your palms until the knuckles at the base of your index and middle fingers are grounded on your mat. ✵ Move your feet to hip-width distance. Spin your inner ankles back so the outer edges of your feet are parallel with the edge of your mat. ✵ Bend your knees and lift your tailbone toward the ceiling until your spine lengthens. ✵ Spin your sit bones to the wall behind you. ✵ Roll your shoulders up to your ears, then use your back muscles to pull your shoulders down your back and in toward your spine. Squeeze your upper arms toward each other. ✵ Press your chest toward your thighs; keep your shoulders engaged and do not hyperextend in your shoulders if you are extra flexible. ✵ Drive your heels toward the floor (they don’t need to touch the floor). ✵ Pull your belly in toward your spine. ✵ Lift the muscles just above your knees to engage your thighs and open into your hamstrings. ✵ Create a long line from your wrists to your shoulders and hips; bend your knees as you need to.

GAZE & FOCUS Look backward at the floor between your big toes. ✵ Lift your tailbone high toward the ceiling.
DEEPEN Once the pose feels more comfortable, press your heels deeply toward the mat until your toes can spread and soften.
COMMON CHALLENGES Tight hamstrings can lead to a rounded spine. ✵ If you have a wrist injury, it may be painful to stay on your hands.
MODIFICATIONS For tight hamstrings, bend your knees and lift your tailbone toward the ceiling. Pull your shoulders toward your spine. Press your chest toward your legs without hyperextending in your shoulders. ✵ For wrist pain, come down to your elbows for Dolphin pose: Bend your elbows so they are stacked directly under your shoulders. Walk your feet in toward your elbows as close as you can. Lift your tailbone to the ceiling.
SEQUENCE TRANSITION From Downward-Facing Dog, walk your feet to your hands.
Rag Doll
Rag Doll releases compression in your spine through gravity. The pose also connects you to your feet and legs, grounding into the lower half of your body and releasing your hamstrings, all areas that can use release after a climb.
SETUP Place your feet hip-width distance apart. Stretch out your toes and activate your feet. Fold your chest toward the floor. Hold your elbows and hang your upper body, letting your head go.
ALIGNMENT Lift and spread out your toes, creating gaps between every toe from your big toe to your pinky toe. ✵ Soften your toes to the floor. Press the four corners of your feet—your big toe and pinky toe knuckles, and the two sides of your heels—into the floor. ✵ Spin your inner ankles toward the back of your mat and energetically draw your outer ankles toward the floor. ✵ Bend your knees slightly until your belly comes down to the tops of your thighs. Squeeze your inner thighs up toward your pelvis. ✵ Turn your head side to side to soften your neck. Stick out your tongue to release your jaw. ✵ Sway gently side to side.
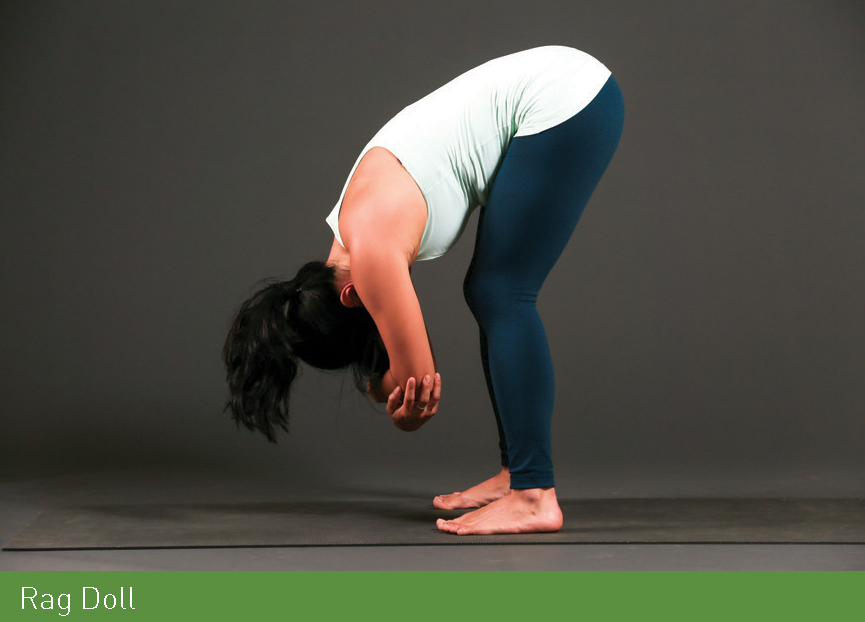
GAZE & FOCUS Close your eyes or set your gaze on a spot between your feet. ✵ Release your spine and neck.
DEEPEN As you get more open in your hamstrings and lower back, your legs straighten more. Keep your knee joints soft still in the pose.
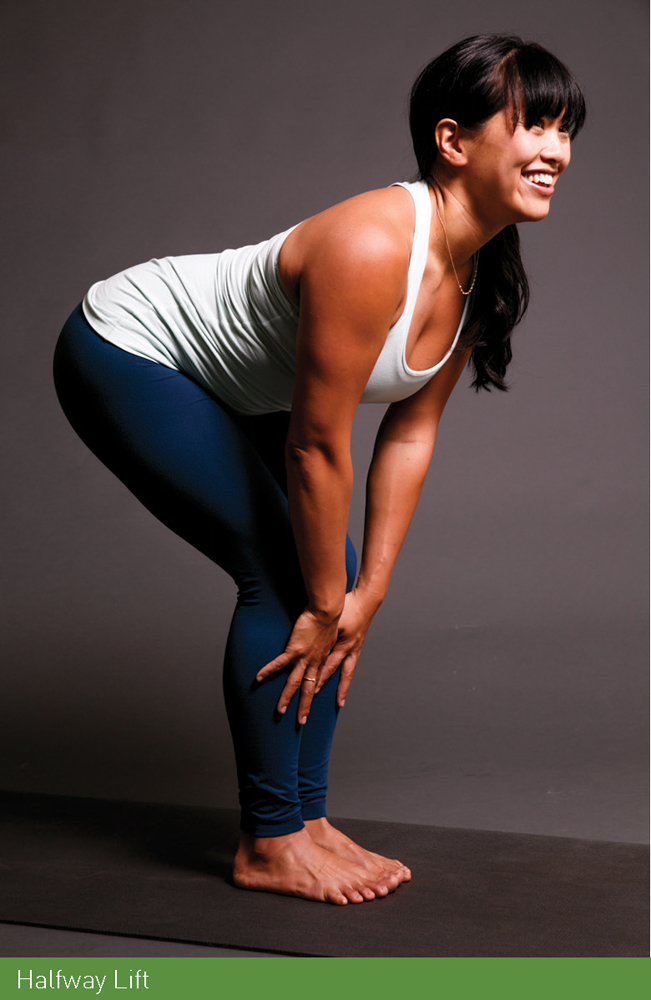
Halfway Lift
A transition pose, Halfway Lift builds strength in your lower back when you hold the pose. It also teaches you to activate your core while hinging at your hips, the biggest joint in your body. In turn, you activate your hamstrings and glutes.
SETUP From Rag Doll, release your hands to the floor. Bring your big toes together. Place your hands on your shins. Lift your chest parallel to the floor.
ALIGNMENT Root your feet firmly into the floor. Bend your knees as needed and squeeze your thighs. ✵ Stick your butt out toward the wall behind you. Lift your chest even with your hips. ✵ Lengthen the crown of your head away from your tailbone. ✵ Hug your shoulder blades together to spine to activate your centerline. Pull your belly up and in.
RELEASE Fold forward to your feet and exhale.
GAZE & FOCUS Look at a spot on the floor in front of your toes. ✵ Create extension in your spine and wrap your shoulder blades toward your spine. Engage your core.

DEEPEN Place your fingers or hands flat on the floor on the outsides of your feet.
COMMON CHALLENGES Your back rounds because of tight hamstrings.
MODIFICATION Bend your knees. Place your hands above your knees on your thighs or on a block in front of your feet.
Mountain Pose
If you were to set your sights on mastering any pose, make it Mountain Pose. This aptly titled pose holds the key to the universe of yoga poses, teaching neutral alignment of the feet, legs, pelvis, core, shoulders, and spine. Like its namesake, it starts with a broad, strong foundation and rises through your core to lengthen through the top of your head. Once you have mastered the pose, it will bring extraordinary power to your practice and your climbing.
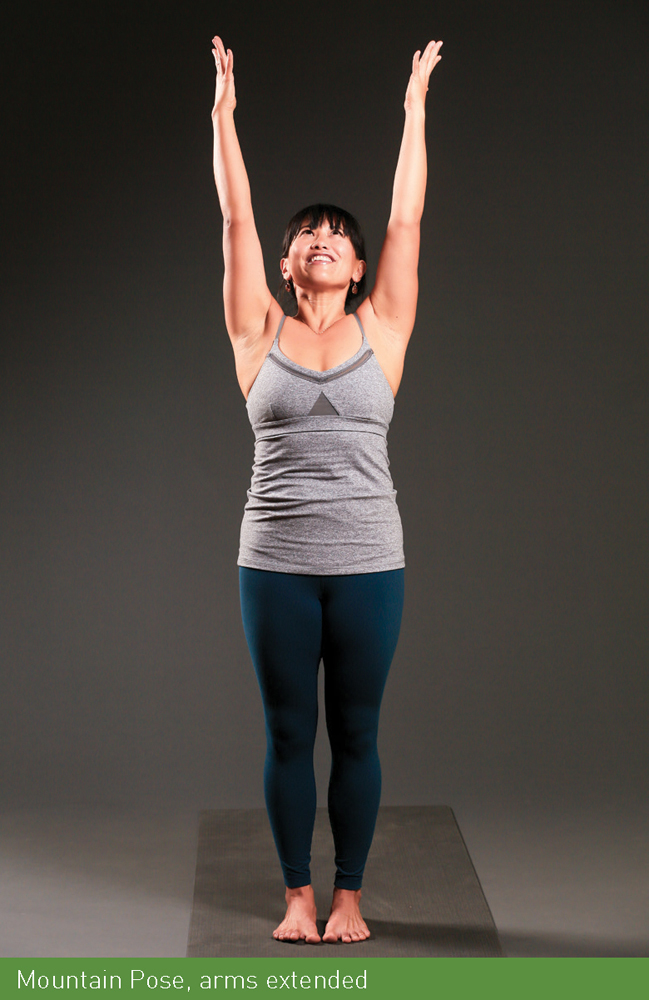
SETUP Come to standing, with your feet directly underneath your hips, outer edges of your feet parallel to your mat, arms relaxed by your sides.
ALIGNMENT Point your toes straight ahead, and bring the outer edges of your feet parallel with the edges of your mat; you may observe a slight pigeon-toe. Lift your toes and connect with the four corners of your feet to the mat. Soften your toes back to the floor. ✵ Lift the arches of your feet, and with your feet grounded, press your outer shins out until you feel your legs engage and with your feet grounded, spiral your inner ankles toward the back of your mat. Energetically, drive your outer ankles down to the floor. ✵ Squeeze your thigh muscles to the bone. If your knees became stiff, soften the joints slightly. ✵ Tilt your tailbone down toward the floor. Gently pull in your belly button to engage your core. Squeeze your front ribs toward each other. ✵ Roll your shoulders up to your ears, then soften them down away from your ears. Pull your upper arm bones toward your shoulder blades to engage your shoulders. ✵ Contract the muscles under your shoulder blades. Send breath into your ribs in your mid-back. ✵ Let your hands relax by your sides, and spin your palms to face forward. ✵ Extended arms: Reach your arms up to the ceiling in line with your shoulders. Spin your palms to face inward with your thumbs toward the back of your mat. Stretch your fingers out wide. ✵ Lift the crown of your head up toward the sky to lengthen your neck. Soften your jaw. ✵ Set your gaze on one point. ✵ Take ten deep ujjayi breaths.
GAZE & FOCUS Set your eyes at one point in front of you. ✵ Ground your feet and legs, relax your shoulders, and breathe deeply.
VINYASA: BREATH AND MOVEMENT
A flow practice builds heat by connecting breath and poses in your practice. Challenge yourself to breathe according to the sequence of Sun Salutation A and B. As your body tunes in to the practice, notice what shifts in your experience of the flow.
Sun Salutation A
At this point in Strength Practice I, you have already learned all the poses for a Sun Salutation A. This sequence links poses together with cues and breaths for each pose. It builds heat in your body and is a powerful way to warm up your spine and to focus on your breath and the foundational elements of the practice. Repeat the entire sequence three times.
Mountain Pose, inhale with arms up. ✵ Forward Fold, exhale. ✵ Halfway Lift, inhale. ✵ Plank lowered to floor, exhale. ✵ Low Cobra, inhale. ✵ Downward-Facing Dog, exhale, hold pose for five breaths. ✵ Step or jump forward. ✵ Halfway Lift, inhale. ✵ Forward Fold, exhale. ✵ Mountain Pose, inhale.
Sun Salutation B
Your body has now warmed up with Sun Salutation A. The Sun Salutation B sequence goes deeper into your leg strength and builds even more internal fire for the next series of standing poses with two new poses: Chair and Warrior I, described below. Do three full rounds of Sun Salutation B as follows.
Chair, inhale with arms up. (First round: hold for five breaths.) ✵ Forward Fold, exhale. ✵ Halfway Lift, inhale. ✵ Plank to floor, exhale. ✵ Low Cobra, inhale. ✵ Downward-Facing Dog, exhale. ✵ Warrior 1, right side, inhale. (First round: hold for five breaths.) ✵ Plank to floor, exhale. ✵ Low Cobra, inhale ✵ Downward-Facing Dog, exhale. ✵ Warrior 1, left side, inhale. (First round: hold for five breaths.) ✵ Plank to floor, exhale. ✵ Low Cobra, inhale. ✵ Downward-Facing Dog, exhale. Hold pose for five breaths. ✵ Step or jump forward to the front of your mat. ✵ Halfway Lift, inhale. ✵ Forward Fold, exhale.
NEW POSES FOR SUN SALUTATION B
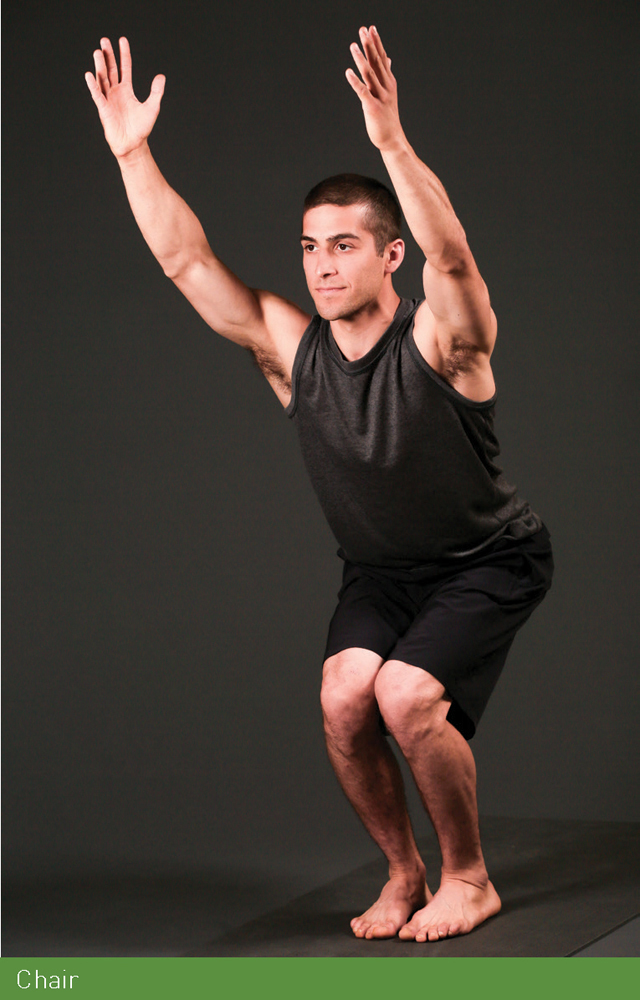
Chair
Contrary to its name, Chair is hardly restful. Without a chair underneath you, you build strength in your legs and your core, with particular strength in hamstrings, quads, glutes, core, and your shoulder girdle. Gravity is your main source of resistance, and this pose builds heat! Remember to breathe.
SETUP Stand with your feet together on your mat (ankles and heels may be slightly apart). Lower your hips toward the floor until you feel your legs engage. Reach your arms up to the ceiling, parallel to your ears with palms facing toward each other. ✵ Activate your core lock and lift your chest toward the ceiling.
ALIGNMENT Keep your toes soft and in view just past your knees. ✵ Spread out your toes. Lift the arches of your feet off the mat and spin your inner ankles toward the back of your mat. ✵ Squeeze your inner thighs toward each other. ✵ Tilt your tailbone toward the floor. Pull your belly in to activate your core. ✵ Lift your chest over your hips and pull your front ribs together. ✵ Soften your shoulders down away from your ears. Engage your back to pull your shoulder blades toward the centerline. ✵ Straighten your arms, stretch out your palms and spread your fingers wide toward the ceiling.
GAZE & FOCUS Lift your eyes off the floor and look at a spot on the wall in front of you. ✵ Focus on strength in your legs and a strong lift in your chest toward the ceiling.
DEEPEN Sink your hips deeper toward the floor. Keep your spine lifted toward the ceiling.
COMMON CHALLENGES Weak quadriceps may pull your knees away from each other. ✵ Tight shoulders prevent you from bringing your arms directly overhead.
MODIFICATIONS Lift the arches of your feet to hug your knees toward each other. ✵ Bend your elbows even with your shoulders at 90-degree angles like a cactus. Hug your shoulder blades together to engage your shoulders. Squeeze your front ribs in toward each other.
Warrior 1
Warrior poses are intentionally challenging. Warrior 1 is the first you will encounter—it is a foundational pose in Sun Salutation B. The pose opens and strengthens your ankles and your hip flexors. It also builds your hamstring strength. In addition, your core engagement and shoulder awareness will grow. It is a whole body posture that will challenge you in a new way. While the fundamentals may get easier as you get stronger, you can constantly adjust and refine alignment to challenge yourself.
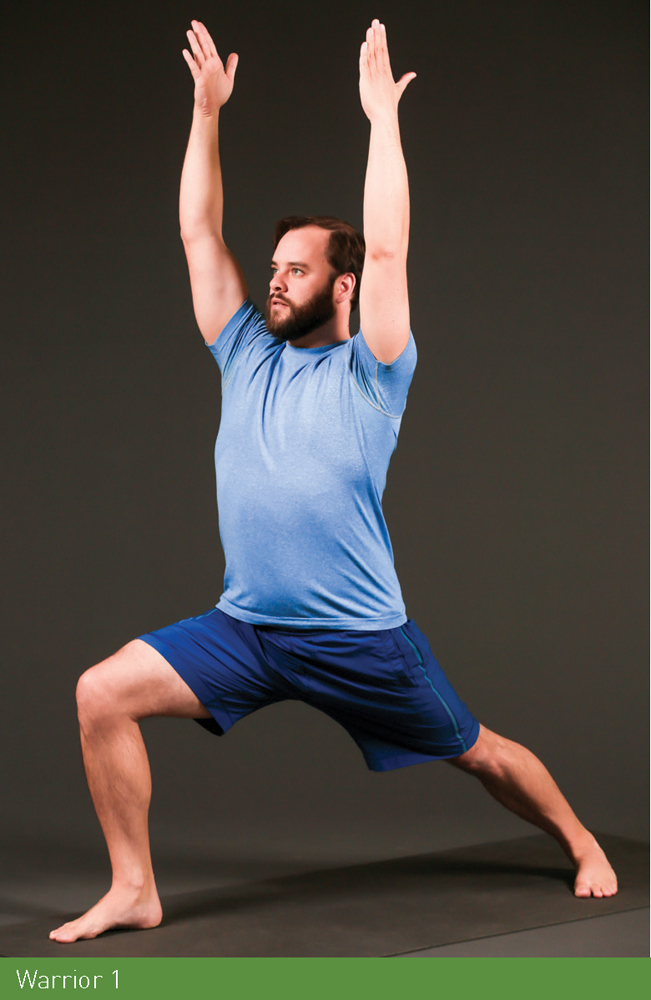
SETUP From Downward-Facing Dog, step your right foot next to your right thumb. Spin your left heel down and ground it into the mat. Lift your arms up to the ceiling.
ALIGNMENT Point your back foot out about 60 degrees on your mat, with your toes slightly in front of your back heel. ✵ Press the outer edge of your back foot into the mat to connect all four corners of your foot to the floor. ✵ Align your feet so your heels are in one line. Point your front foot toward the front of your mat. Bend your front knee over your ankle. ✵ Spin the hip of your back leg toward the front of your mat while still grounding your back foot. You will feel an opening in your back hip flexor. ✵ Lift your belly button in toward your spine. Squeeze your front ribs toward each other. ✵ Soften your shoulders away from your ears, and squeeze your shoulder blades toward your spine. Reach your arms to the ceiling, keeping your arm bones parallel with your ears. ✵ Stretch out your hands toward the ceiling; spread out your fingers.
GAZE & FOCUS Set your gaze on a wall in front of you. ✵ Squeeze your back leg straight. Hug your core in and up toward your centerline.
DEEPEN Lengthen your stance and bend your front knee to a 90-degree angle.
COMMON CHALLENGES Tight hip flexors and psoas prevent you from bending your front knee to 90 degrees and pull at your lower back. ✵ Tight ankles prevent you from grounding your back foot.
✵ Knee injury prevents you from keeping your heel grounded on your back foot.
MODIFICATIONS Shorten your stance slightly for both challenges until your ankle and hip flexors become more mobile. ✵ If you have a knee injury, lift your back heel for Crescent Lunge (see Strength Practice II).
HEALTHY, HAPPY KNEES
A common misalignment in Warrior 2 and Side Angle is to collapse in your front knee. Weak or tight hips and butt muscles can cause your front knee to collapse inward. The collapse puts unhealthy pressure on your knee joint, an area that already needs all the support it can get to stay strong and stable balance while you are on the wall.
In Warrior 2, squeeze your thigh bones toward your centerline and stack your front knee over your ankle. In Side Angle, the action intensifies. Pull your front thigh bone into your hip socket and squeeze your front outer hip and butt cheek to keep your knee stacked. The alignment will build strength in your glutes, inner thighs, and thigh muscles, and your poses will become strong and grounded.
SEQUENCE TRANSITION Complete Sun Salutation B through the final Forward Fold at the front of your mat.
STRENGTH
The next series of standing poses build strength and power throughout your body. Twists open your spine and chest, while holding standing poses works the smaller muscles in your joints to create stability.
Gorilla
A big wrist and hand release, Gorilla is a counter pose to Downward-Facing Dog and Plank, and stretches your hands out from the climber hand clench. It releases the impact of weight bearing in your wrists, and in this modern day of constant typing and texting, it’s a great release for cramped hands.
SETUP In a Forward Fold, move your feet to hipwidth distance. Keep your feet stacked under your hips. Slide the palms of your hands underneath your feet—the top of your hands are touching your mat.

ALIGNMENT Wiggle your hands deeper under your feet until your toes reach your wrists. ✵ Bend your elbows to the outer edges of your mat. ✵ Hug your shoulder blades together. Pull your chest deeper toward your spine. ✵ Soften your knees and bring your belly down to your thighs. Engage your thigh muscles. ✵ Release your neck and hang your head toward the floor.
GAZE & FOCUS Look at the floor behind your feet. ✵ Engage your shoulders and back muscles to pull your chest closer to your shins.
DEEPEN Work your legs as straight as your hamstrings allow while still squeezing your thighs. Keep your knee joints soft.
COMMON CHALLENGES Tight hamstrings prevent you from sliding your hands under your feet.
MODIFICATION Make fists and place the tops of your hands on a block, curled fingers facing in toward your body. Bend your knees.
SEQUENCE TRANSITION Release your hands from under your feet. ✵ Bring your feet together. ✵ Stand in Mountain Pose.
Twisted Chair
A powerful twist to release your spine, this twisting add-on to the already energetic Chair gives you a major strength boost in your legs! Twisting poses also teach you to rotate your spine through your mid-back, and will translate to twisting more effectively for complex moves on the wall. Hang on through this one.
SETUP Bring your toes together and lower your hips into Chair. Connect your palms together in front of your chest. On your exhale, twist to the right, hooking your left elbow outside your right knee.
ALIGNMENT Soften your toes and ground the four corners of your feet into the floor. ✵ Make sure your knees stay even; knees askew are an indicator you are popping out a hip to one side. ✵ Lift your right elbow up to the ceiling; press through your hands to deepen your twist. ✵ Pull your belly in toward your spine and stick your sit bones out behind you. ✵ Stretch your chest and head forward, pulling your shoulder blades toward your spine.

GAZE & FOCUS Look up at the ceiling past your upper hand. ✵ Keep your knees even and aligned throughout the twist.
DEEPEN Open your lower hand to a block just outside your right foot. Extend your upper hand to the ceiling, palm facing the same direction as your chest. ✵ Settle your hips lower toward the floor. Hug your inner thighs toward each other and rotate your upper ribs to the ceiling.
COMMON CHALLENGES A lack of torso rotation prevents you from reaching your lower hand outside your foot.
MODIFICATION Bring the block just in front of your feet to support the extension in your twist.
SEQUENCE TRANSITION Release your chest forward to your feet. ✵ Inhale and lengthen your chest to Halfway Lift.
Low Lunge
A modified Crescent Lunge, Low Lunge minimizes the factors of balance and strength. Our hip flexors shorten from sitting all day, and are in constant use when walking. Use this lunge to give your hip flexors some space.
SETUP From Halfway Lift, step your left foot to the back edge of your mat. Lower your back knee to the floor. Point your back toes. Bring your hands to your front thigh.
ALIGNMENT Square your hips toward the front of your mat. Pull your front foot and back knee toward each other to integrate. Your hips will lift slightly higher than before. ✵ Once your centerline is established, slowly shift your weight forward toward your front foot. Stack your front knee over your ankle. ✵ Squeeze your belly in toward your spine and hug your front ribs together. ✵ Reach your arms up toward the ceiling, palms facing in. Breathe deeply into the stretch in your hip flexor.
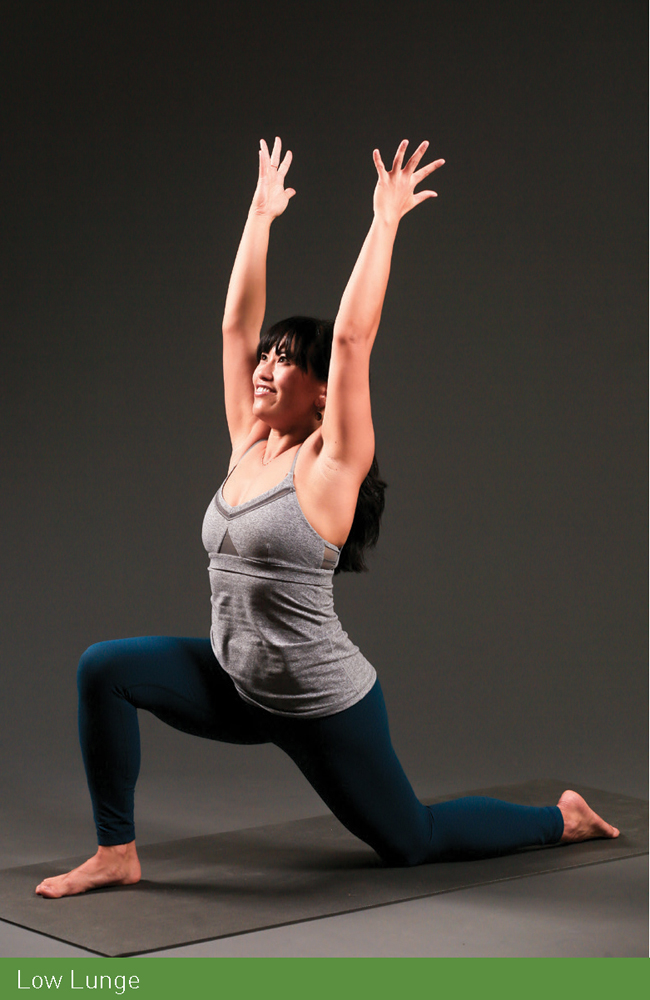
GAZE & FOCUS Look at a spot on the wall in front of you. ✵ Hug your inner thighs toward each other to keep your body strong while opening into your hip.
DEEPEN Tuck your back toes for a full Crescent Lunge. Lift your back knee off the floor. Squeeze your inner thighs toward your pelvis. Lift your back leg straight.
COMMON CHALLENGES Your knee hurts from being on the ground.
MODIFICATION Fold over an edge of your mat to pad your knee.
Twisted Crescent Lunge
A deep twist that challenges balance, Twisted Crescent Lunge opens your hip flexors, builds strength in your legs, and supports an opening twist in your spine. The pose builds stability in your lower body and releases your spine, important tools for keeping your balance while rotating on the wall.
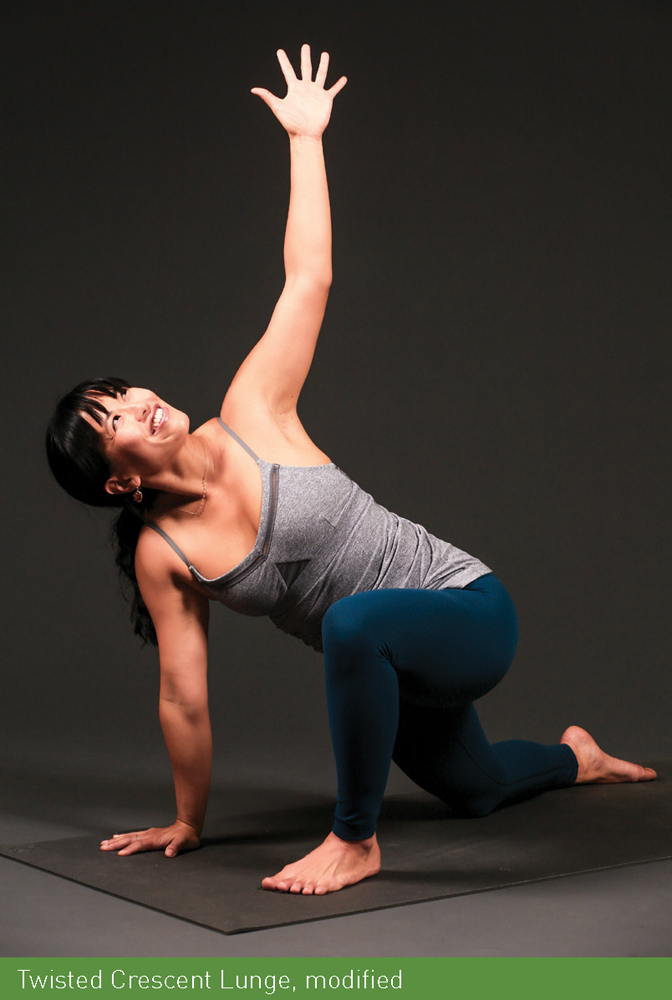
SETUP From Low Lunge, bring your palms together in front of your chest. Lengthen your chest on an inhale. Exhale and hook your right elbow over your left knee. If you need a block, set it inside your front foot.
ALIGNMENT Shift your weight forward toward your left foot, keeping your knee pointing forward over your ankle; don’t let it cave in or out. ✵ Lift your left elbow toward the sky; press down into your palms. ✵ Lengthen your spine through the crown of your head to create more space for the twist. ✵ Hug your shoulder blades toward your spine, and deepen your twist. ✵ Pull your belly in toward your spine. ✵ Bring your lower hand to the floor, or a block inside your front leg. Stretch your upper fingers out wide and toward the ceiling.
GAZE & FOCUS Set your gaze on a spot on the ceiling. ✵ Squeeze your shoulder blades toward each other. Engage the muscles underneath your shoulder blades to deepen your twist.
DEEPEN Tuck your back toes to the ball of your foot and lift your back leg off the floor. Bring your lower hand to the floor or a block outside your front leg.
COMMON CHALLENGES You will need to develop strength and stability in your legs to hold the full pose. Squeeze your inner thighs for balance.
MODIFICATION Keep your back knee on the floor. Pad your knee if you feel pain in your kneecap.
SEQUENCE TRANSITION Bring both hands to the floor on either side of your front foot in a Low Lunge. ✵ Tuck your back toes and spin your back heel down to the floor. ✵ Stack your chest over your hips for Warrior 2.
Warrior 2
Warrior poses rely on your leg strength, and are a good place to explore the balance of effort and ease. Warrior 2 offers great strength, building your quads and hamstrings to keep you strong on the wall. It also teaches you to set your gaze, soften your shoulders, and breathe deeply into the challenge.
SETUP Point your right foot toward the front edge of your mat. Open your toes on your back foot to a 90-degree angle, but no wider than that, from your front foot. Turn your chest to face the same direction as your hips. Reach your arms toward the front and back of your mat parallel to the floor.
ALIGNMENT Stack your front knee over your ankle. (Widen your feet if your knee is bending past the top of your ankle.) ✵ Lift the inner arch of your back foot off the floor. ✵ Pull your feet toward each other to activate your inner thighs toward your pelvis. ✵ Press your front heel firmly into the mat. ✵ Stack your chest over your hips. Lengthen your tailbone down toward the floor. Lift your belly button in toward your spine. ✵ Release your shoulders away from your ears. Pull your arm bones in toward your centerline. Hover your arms parallel to the floor. ✵ From your spine, stretch your fingers to the front and back walls.
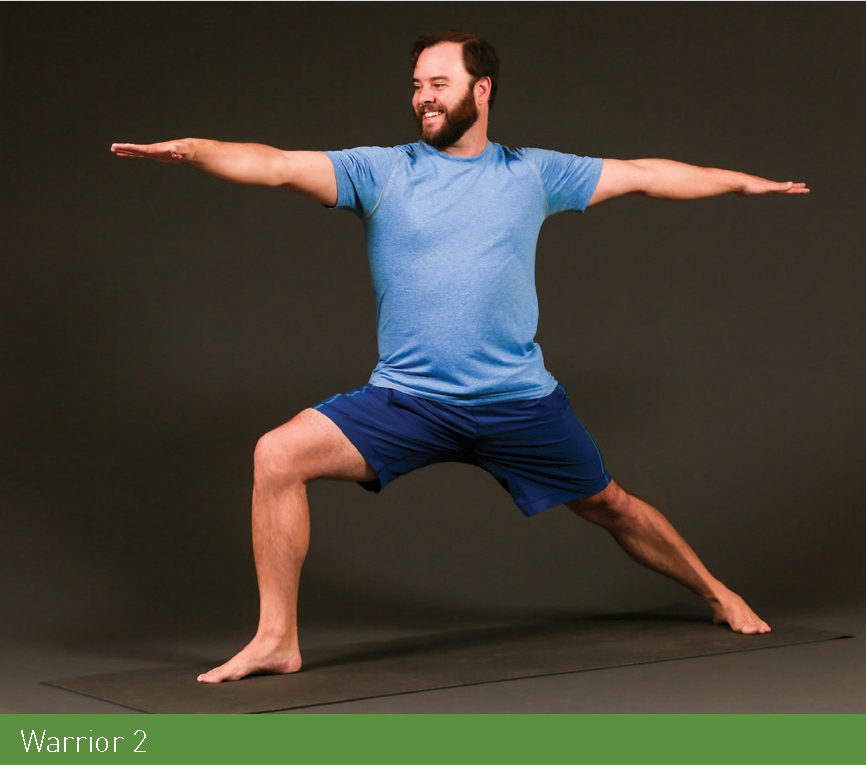
GAZE & FOCUS Turn your head toward your front hand and set your gaze at your fingertips. ✵ Squeeze your thigh bones in toward each other. Relax your jaw and eyes.
DEEPEN Widen your stance and bend your right knee to a 90-degree angle over your front ankle.
COMMON CHALLENGES Weak or tight outer hips and glutes can cause your front knee to collapse inward rather than staying stacked over your front ankle.
MODIFICATIONS Shorten your stance. Keep your knee aligned over your front ankle to build strength and prevent injury.
SEQUENCE TRANSITION From Warrior 2, straighten your front leg.
Triangle
A powerful grounding pose, Triangle relies on the bones of your body to open and strengthen. You’ll get into your deeper psoas muscle in your hip; lengthen your hamstrings; and create a long, neutral spine. Triangle pose gives you greater stability against gravity and encourages a deeper listening to your body. Challenge yourself by moving your drishti to the ceiling.
SETUP With both legs straight, extend your front hand toward the front of your mat until your torso is parallel to the floor. Shift your front hip toward the back of your mat. Place your right hand on your front shin or on a block outside your right foot. Reach your upper hand toward the ceiling.
ALIGNMENT Ground the four corners of both feet into the floor. ✵ Pull your front thigh bone up into your hip socket; your back hip will roll slightly forward toward the floor. ✵ Lift the top of your right kneecap to lengthen into your hamstrings. Keep a slight bend in your front knee so you don’t lock or hyperextend into the joint. ✵ Hug your shoulders in toward your spine. ✵ Stretch your chest toward the front of your mat; spin your upper ribs toward the ceiling. Stretch out your fingers on your upper hand.
GAZE & FOCUS Look up at the ceiling and set your gaze on one spot. ✵ Press your big toe knuckle of your front foot into the floor. Focus on the stability of your legs and length in your spine.
DEEPEN Widen your stance. Reach your lower hand deeper toward your ankle or the floor.
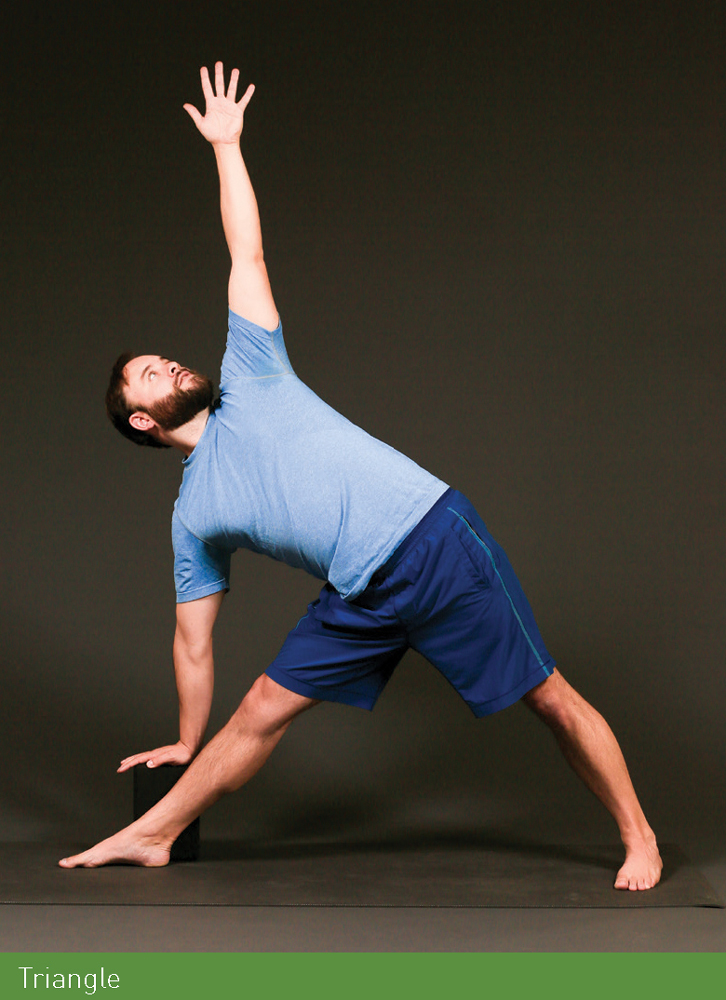
COMMON CHALLENGES Tight hamstrings or a tight psoas prevent you from reaching your shin. ✵ You overextend in your front knee joint.
MODIFICATION Use a block at the tallest height outside your front foot. If necessary, stack two blocks to get enough height to lengthen your spine. ✵ Soften your front knee joint and lift the muscles above your knee.
SEQUENCE TRANSITION From Triangle, come up to Warrior 2. ✵ Bend your front leg for Side Angle.
Side Angle
If I were permitted to have a favorite pose, it would be this one. One of the most challenging standing poses when done with proper alignment, Side Angle strengthens your glutes and legs and opens your spine. It will test your limits. Take on the challenge.
SETUP Lower your front forearm onto your front thigh. Reach your upper arm up to the ceiling, your palm facing the same direction as your chest.
ALIGNMENT Ground the four corners of both feet into the floor. Squeeze both feet toward the center of your mat. ✵ Stack your front knee over your front ankle. ✵ Pull your front thigh bone into your hip socket until you feel your outer glute engage. ✵ Keep your right hip even with your bent front knee. ✵ Lift the arch of your back foot and squeeze your back inner thigh. ✵ Engage your belly to lighten the weight of your front arm on your thigh. ✵ Pull your shoulder blades toward your spine. Spiral your upper ribs up toward the ceiling. ✵ Spread out your fingers on both hands.
GAZE & FOCUS Set your gaze on your upper fingertips. ✵ Squeeze your front hip and bend your front leg deeper.
DEEPEN Lower your front hand to a block or the floor just inside your front foot. Extend your upper arm in a diagonal line forward.
COMMON CHALLENGES Weak glutes cause your front knee to collapse inward.
MODIFICATION Shorten your stance slightly as long as you keep your front knee aligned over your ankle.

SEQUENCE TRANSITION Connect through a Vinyasa: Bring both hands to the floor for Plank. ✵ Shift forward and lower to the floor on an exhale. ✵ Lift your chest for Low Cobra, inhale. ✵ Tuck your toes and lift your hips to the sky for Downward-Facing Dog on an exhale. ✵ Step or jump to the front of your mat. ✵ Repeat the poses on the left side from Twisted Chair to Side Angle. ✵ Step to the front of your mat for Balancing Poses.
BALANCING
Climbers must master balance to climb well. Unlike the wall where tiny toe-holds require nimble feet, focus on grounding into all four corners of your standing foot in your yoga poses. You will stabilize your feet, ankles, and knees and keep them healthy for challenging climbing moves.
Eagle
A balancing pose that generates from your centerline, Eagle builds balance and requires concentration and focus. Squeeze your inner thighs for strength and observe how the arm bind opens shoulders tight from climbing.
SETUP Stand in Mountain Pose, extend your arms out wide and parallel to the floor, palms facing forward. Cross your right upper arm underneath your left upper arm. Wind your forearms around each other. Bring your palms to touch for the full bind. Lower into Chair in your legs. Cross your right thigh on top of your left thigh.
ALIGNMENT Ground into your standing foot. Squeeze your inner thighs all the way together. ✵ Stretch out your toes on your upper foot. ✵ Stack your shoulders over your hips; engage your core lock. ✵ Lift your elbows level with your shoulders. Press your hands away from your face to stack your wrists over your elbows. ✵ Soften your shoulders away from your ears; pull your arm bones in toward your shoulder sockets.
GAZE & FOCUS Look past your arms to set your drishti on a spot on the wall. ✵ Engage your belly firmly and set your gaze.
DEEPEN Bend your standing leg deeper and wrap your right foot around your calf. Challenge your balance by moving your gaze in toward your forearms.
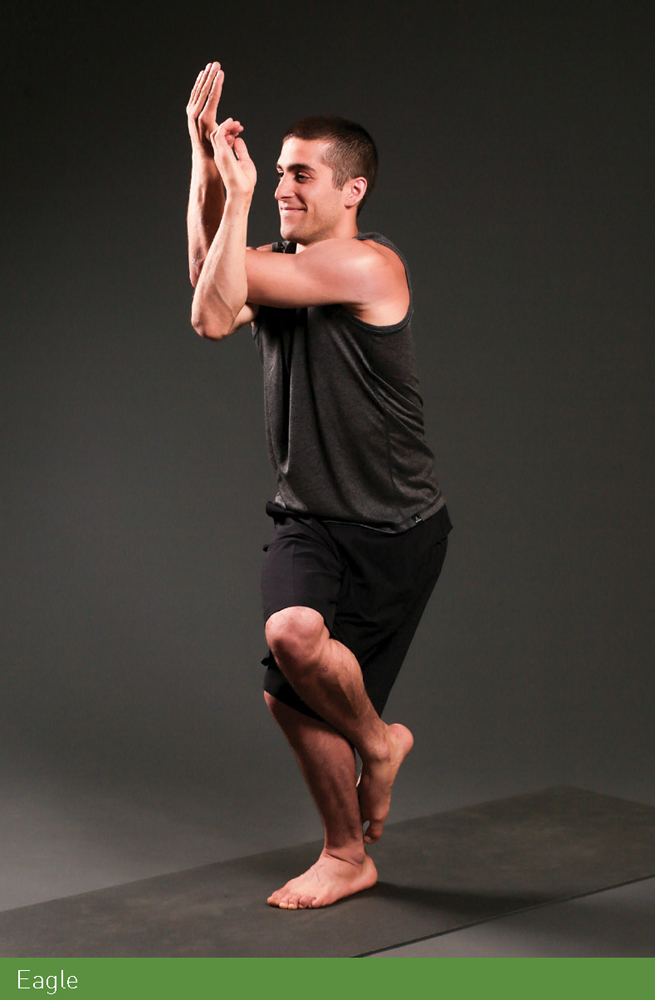
COMMON CHALLENGES Tight shoulders can prevent you from taking a full bind.
MODIFICATION Reach for opposite shoulders and lift your elbows even with your shoulders.
SEQUENCE TRANSITION Release into Mountain Pose. ✵ Do Eagle on the left side; wrap your left arm under your right, and lift your left leg over your right leg.
Tree
Tree pose embodies the art of balancing. Your standing foot spreads wide and stretches into the earth. Your standing leg is straight and strong. When you hug into your core, you can extend your arms and energy up and out. Let go of the worry that you might step out of the pose. Instead, lift your gaze skyward and see what is possible.
SETUP Stand with your feet together in Mountain Pose. Lift your right foot to either your inner calf or above your knee joint to your inner thigh. Bring your palms together at the center of your chest.

ALIGNMENT Ground the four corners of your standing foot into your mat. ✵ Press your lifted foot into your standing leg. ✵ Hug your shoulder blades to your spine. Press your palms together. ✵ Pull your belly in toward your spine; lift your lower ribs away from your pelvis. ✵ Lift your hands on an inhale toward the ceiling, palms facing each other.
GAZE & FOCUS Set your gaze on a spot in front of you. Once you are stable, move your drishti up the wall to the ceiling or your hands. ✵ Ground your standing leg and stretch your spine skyward.
DEEPEN Walk your gaze up to a spot on the ceiling behind you.
COMMON CHALLENGES You are still building strength in your feet and have trouble staying upright with only one foot on the floor.
MODIFICATION Prop the foot of your bent leg against the ankle of your standing foot with the ball of your foot on the floor.
SEQUENCE TRANSITION Release to Mountain Pose. ✵ Do Tree on the left side. ✵ From Mountain Pose, reach your arms overhead, inhale. ✵ Fold your chest to your thighs, exhale. ✵ Lift your chest to Halfway Lift, inhale. ✵ Plant your hands and step your feet to Plank. ✵ Roll to the tops of your toes and lower to the floor, exhale. ✵ Lift your chest for Low Cobra, inhale. ✵ Exhale and press back to Downward-Facing Dog.
BACKBENDS
Backbends train your body away from habits including the tendency to roll your chest forward, whether it’s sitting during the day or while climbing. By opening your chest, you will shift how you use your shoulders, strengthen your spine, and energize your body.
Flip Dog
A fun backbend, Flip Dog opens your chest and strengthens your shoulder girdle, working the opposite direction of how you use your shoulders while climbing. It looks intimidating, but is surprisingly easy. Let your neck relax once you’re there and press into your legs for full strength in the pose.
SETUP From Downward-Facing Dog, lift your right leg to the ceiling. Bend your right knee and roll your hip open for Three-Legged Dog. Look under your left arm for your upper foot and lower it to the floor behind you. Turn your other foot around 180 degrees until both toes are flat and parallel on the ground. ✵ Keep your left hand where it started on the ground and reach your free arm overhead toward the floor.

ALIGNMENT Set your feet hip-width distance. ✵ Press into the four corners of your feet and lift your hips to the ceiling. ✵ Bend your right elbow even with your shoulder for a cactus arm. Hug your shoulder blades toward each other to open your chest. ✵ Engage your core lock. ✵ Soften your neck to let your head hang toward the floor.
GAZE & FOCUS Set your gaze on the front wall or the floor under you. ✵ Press down into your feet to lift your hips higher. Hug your shoulder blades in toward your spine.
DEEPEN Reach your hand overhead toward the floor.
COMMON CHALLENGES If you have shoulder pain, be mindful in this pose—and skip if it exacerbates the injury.
MODIFICATION Stay in Three-Legged Dog.
SEQUENCE TRANSITION To release, lift your right arm to the ceiling. ✵ Hop back over to Three-Legged Dog. ✵ Lower your upper foot and move forward to Plank. ✵ Bring your feet together, shift your weight into your right hand, and roll to the outer edge of your right foot.
Side Plank
Side Plank brings the art of a static hold to one side of your body. It works the lower side of your body closest to the floor, from your legs to your obliques to your back muscles and shoulders. A strong Side Plank will develop your body’s endurance and overall strength for long days climbing.
SETUP Stack your left foot on top of your right foot. Move your right shoulder over your right wrist. Lift your left hand up to the ceiling, palm facing the same direction as your chest.
ALIGNMENT Your right fingers face the front of the mat and your right hand is stacked a couple of inches forward of your shoulder. ✵ Flex your toes toward your knees and squeeze the muscles of your legs to the bone. ✵ Keep your body at one angled plane from shoulders to feet. ✵ Pull your shoulder blades in toward your spine to take the weight out of your wrist. ✵ Spread out the fingers on your upper hand. ✵ Lengthen the crown of your head toward the front of your mat.
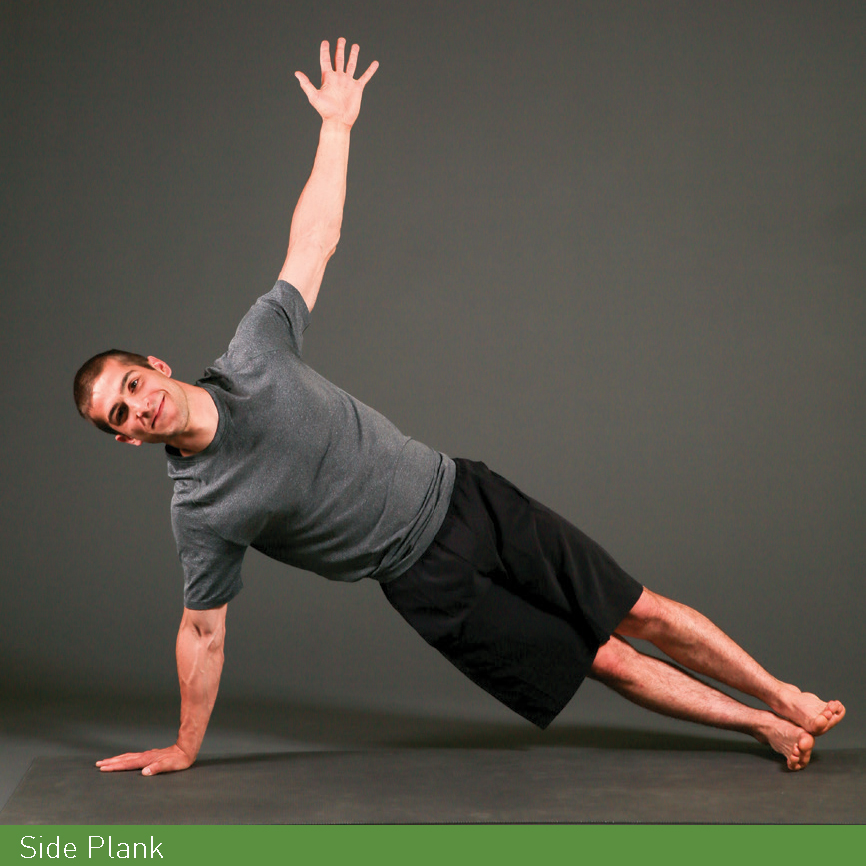
GAZE & FOCUS Look at the ceiling. ✵ Create stability through your legs and core.
DEEPEN Lift your upper leg as high as you can toward the ceiling.
COMMON CHALLENGES You are still building strength and struggle to hold the pose.
MODIFICATION Bring your lower knee to the floor underneath your hip for support, keeping your foundation of hand, lower knee and feet in one line.
SEQUENCE TRANSITION From Side Plank, bring your upper hand to the floor for Plank. ✵ Shift forward and lower to the floor on an exhale. ✵ Lift to Low Cobra, inhale. ✵ Move to Downward-Facing Dog, exhale. ✵ Do Flip Dog through Side Plank on your left side. ✵ Move forward to Plank. ✵ Exhale and lower to the floor for Bow.
Bow
Strong legs are instrumental to backbends, and Bow pose teaches your body how to engage your legs for backbends, in addition to opening up your quadriceps and strengthening your back.
SETUP From your belly on the floor, bend both knees. Reach for the outer edges of your feet with your hands.
ALIGNMENT Bring your knees to hip-width distance to support your lower back and tap into your leg strength. ✵ Stretch out your toes, and spin your inner ankles toward your lower back. ✵ Pull your belly in toward your spine. ✵ Press your pelvis down toward the floor. Lift your feet up toward the ceiling. ✵ Use your leg strength to lift as high as you can.
GAZE & FOCUS Lift your eyes to the floor or the front of the room. ✵ Engage your core and use your legs in the pose.
DEEPEN Reach for your ankles. Flex your toes and rock back to the tops of your thighs.
COMMON CHALLENGES Tight hamstrings or knee injuries prevent you from grabbing both of your feet at the same time.
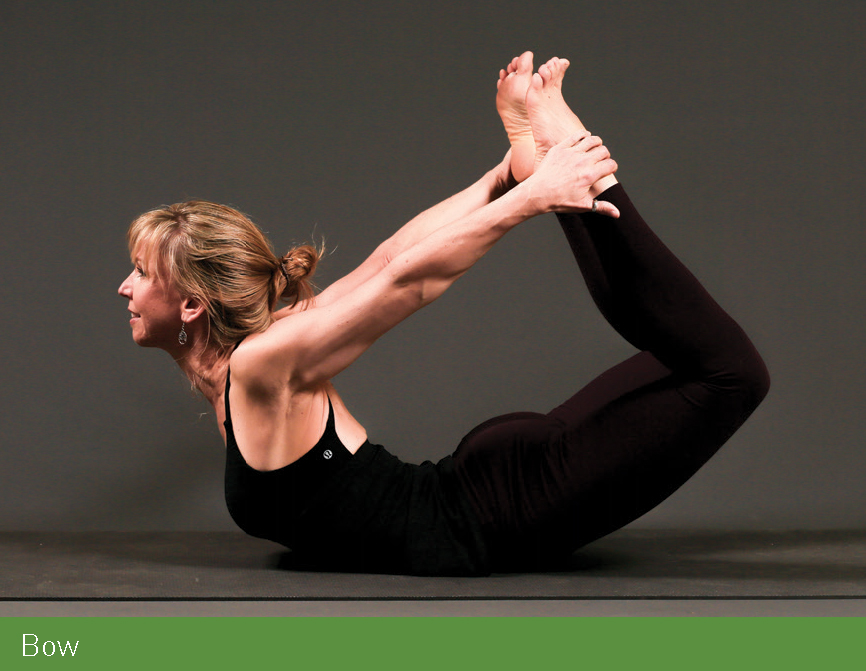
MODIFICATION Bring your left forearm parallel to the front edge of your mat. Stack your left elbow under your left shoulder, palm facing down on the floor. Reach your right hand to your right foot. Press into your left elbow and lift your right foot up to the ceiling. Do both sides. ✵ Alternative: Substitute with the Locust pose (see Strength Practice II later in this chapter).
SEQUENCE TRANSITION Let go of your feet gently. Roll your hips side to side on the floor. ✵ Do a second Bow. ✵ Plant your hands next to your ribs. ✵ Lift to Low Cobra, inhale. ✵ Tuck your toes and come back to Downward-Facing Dog, exhale. ✵ Walk your feet forward between your hands. ✵ Sit down and lower down to your back for Bridge.
Bridge
Despite the temptation to rest on your back, it’s not time yet! Bridge is a modification for Wheel, which you will learn in Strength Practice II. More importantly, this backbend teaches you to use your legs and to open your chest by integrating and opening your spine and shoulders.
SETUP Walk your feet closer to your body until your fingertips brush your heels. Set your feet parallel and hip-width distance. Press into the four corners of your feet to lift your hips to the ceiling. Move your shoulders together and interlace your hands underneath your body.
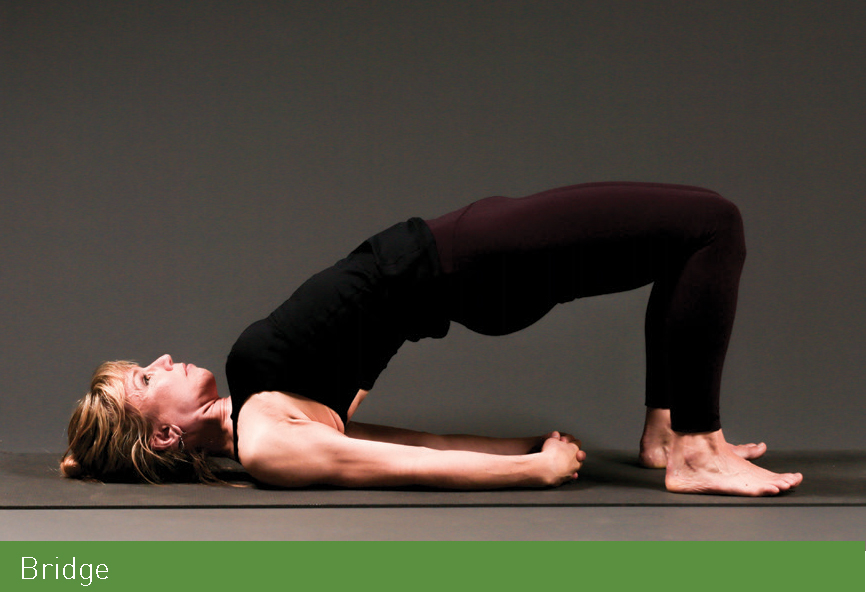
ALIGNMENT Press your feet into your mat until your legs engage. ✵ Stack your knees over your ankles. ✵ Spin your inner thighs toward each other and down toward your mat. ✵ Position your hands at your spine just above the tailbone. Feel the ridge of muscles around your spine engage. Lift until you feel your spine engage between your shoulder blades. Press your interlaced hands into the floor. ✵ Pull your chest toward the back wall. ✵ Squeeze your front ribs together.
RELEASE Reach your arms up to the ceiling. Slowly release your spine toward the floor, one vertebrae at a time.
GAZE & FOCUS Look at a spot on the ceiling. ✵ Press deeply into your feet for strong legs.
DEEPEN Lift your right knee into your chest. Press strongly into your rooted foot. Extend your right leg, foot flexed, to the ceiling, keeping your hips level. Switch sides.
COMMON CHALLENGES Tight shoulders prevent you from interlacing your hands.
MODIFICATION Use a strap between your hands for a bind. Or press your palms into the floor.
SEQUENCE TRANSITION Reach your arms to the ceiling to slowly release down. ✵ Do a second Bridge. ✵ Lower your hips to the floor for Reclined Half Pigeon.
RECOVER AND RESTORE
The end of a practice gives your body time to soften and relax. Throughout these final poses, notice how your body sensations and your mental state have shifted through the practice.
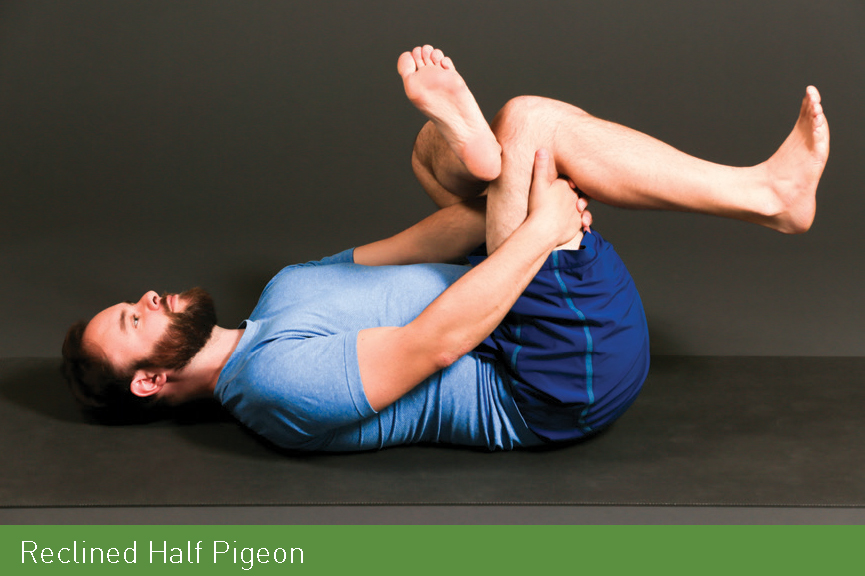
Reclined Half Pigeon
Reclined Half Pigeon is a supported way to open your muscular hip region. Hip opening can be an intense experience—there is no need to force the opening, but rather surrender into it. Breathe deeply and move gently to deepen into the pose.
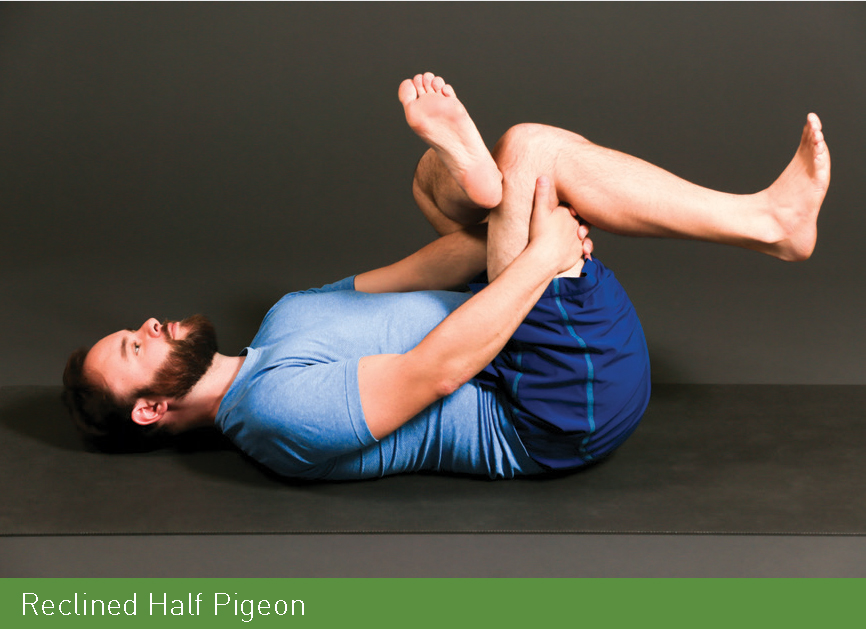
SETUP With your feet flat on the floor, cross your right ankle over your left knee. Keep your right foot flexed toward your knee to protect your knee joint. Reach your right hand between your legs and your left hand behind your left thigh to support it, and pull your legs toward your chest.
ALIGNMENT Pull your left leg toward you to get a deep stretch in your outer right hip. ✵ Relax your shoulders toward the floor. ✵ Press your right elbow into your right inner thigh to deepen the stretch. ✵ Take ten deep breaths.
GAZE & FOCUS Close your eyes or look at a spot on the ceiling. ✵ Notice the sensations in your hip and breathe into it to release the muscles.
DEEPEN Straighten your free leg up to the ceiling and press through your heel.
COMMON CHALLENGES Tight hips prevent you from holding the back of your leg.
MODIFICATION Take a strap around the back of your left leg, and pull your leg toward your chest.
SEQUENCE TRANSITION Release your legs from Half Pigeon. ✵ Repeat Reclined Half Pigeon on your left side. ✵ Pull your knees into your chest. ✵ Using momentum, rock yourself up to a seated position.
Seated Forward Fold
Gravity comes into play in all forward folds as you pull your torso toward your legs. In a Seated Forward Fold, you also stretch your calves, hamstrings, glutes, and the muscles along your spine—a stretch that feels exceptionally good after many hours of climbing.
SETUP From your seated position, extend your legs straight to the front of your mat. ✵ Reach your hands toward the outer edges of your feet.
ALIGNMENT Flex your toes toward your knees. ✵ Contract your quad muscles to the bone. ✵ Pull your chest toward your feet and lengthen your lower back. ✵ Relax your head.
FOCUS Lengthen your chest toward your feet. Extend from your lower spine.
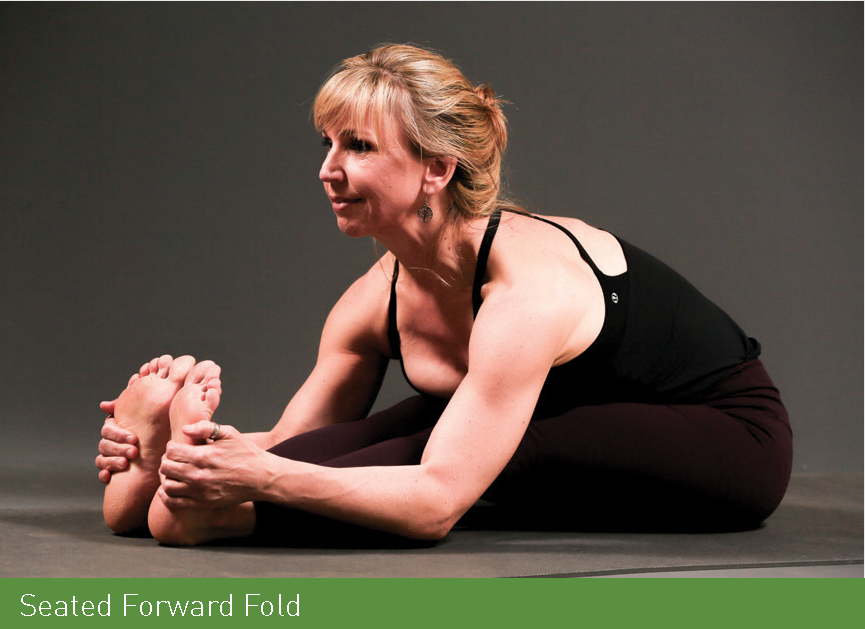
DEEPEN Press the backs of your knees toward the floor without overextending the joint, and squeeze your quads. If your hands reach past your feet, use a block at the soles of your feet to give you more room to deepen.
COMMON CHALLENGES A tight lower back, hamstrings, or hip flexors can tend to contract and prevent your torso from folding forward.
MODIFICATIONS Place a block or blanket underneath your sit bones to relax your hips and core for the forward fold. Alternatively, bend your knees to reach for your feet, or use a strap to lengthen your reach to your feet to allow your hips flexors and core to relax.
Seated Twist
Final twists, such as this Seated Twist, release the spine after the intensity of a practice. They relax your spine while also working into a natural rotation.
SETUP From Seated Forward Fold, extend your right leg straight to the front of your mat, toes flexed. Place your left foot on the floor outside your right thigh. Place your left hand on the floor behind you. Reach your right arm up to the ceiling. Wrap your right arm around your bent leg.
ALIGNMENT Lengthen your spine on your inhale. Twist toward your bent leg on your exhale.

GAZE & FOCUS Move your gaze past your left shoulder. ✵ Inhale to lengthen your spine and exhale to deepen your twist. Do not force the twist.
DEEPEN Hook your right elbow outside your left leg. Cross your lower leg underneath you.
SEQUENCE TRANSITION To release, come back to center. ✵ Repeat the twist on the right side. ✵ Bring your feet to the floor and lower down to your back.
Legs Up the Wall
Inversions allow gravity to lighten the load your heart usually takes on to pull blood up from your legs. Legs Up the Wall lets gravity do the work and is a restorative pose. Feel free to take the name of this pose literally by moving to a wall—or practice it on your mat.
SETUP Walk your feet in and lift your hips like you are going to Bridge pose. Position a block at its lowest height underneath your sacrum. Set your hips down, adjusting the block to find a comfortable resting point. ✵ Lift your legs to the ceiling.
ALIGNMENT Flex your toes toward your knees. ✵ Relax your shoulders, face, and hands.
GAZE & FOCUS Set your drishti on your feet. ✵ Breathe deeply and relax. Keep your legs still.
DEEPEN Choose a more active inversion with Shoulder Stand (see Strength Practice II).
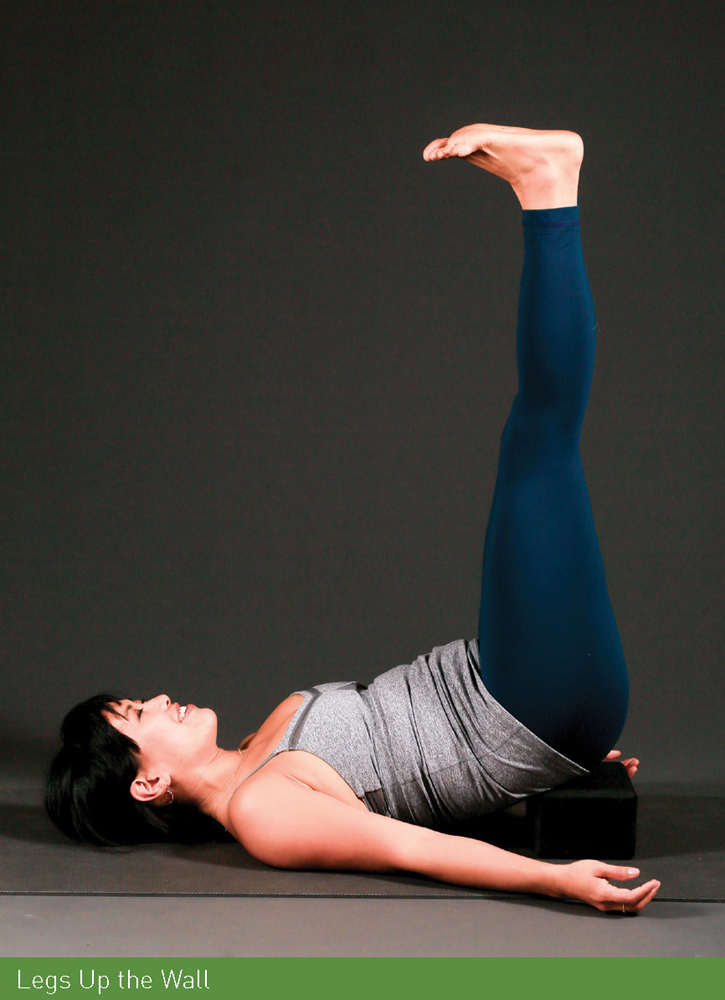
COMMON CHALLENGES Tight hamstrings make it uncomfortable or difficult to keep your legs vertical.
MODIFICATION Loop a strap over the soles of your feet. Flex your feet. Hold onto the ends of the strap. Bring your elbows to the floor.
SEQUENCE TRANSITION Bring your feet back to the floor. ✵ Lift your hips and move the block aside.
FINAL REST
Some people, especially active folks, can find stillness uncomfortable. Let go of your fidgety side. Take on Final Rest, and be soft and still.
Corpse Pose
Corpse Pose will either be the best pose you have ever tried, or the worst! Commit to closing your eyes and being quiet. If you are cold, cover yourself with a blanket.
SETUP From your back, straighten your legs on your mat. With arms at your sides, turn your palms to face the sky.
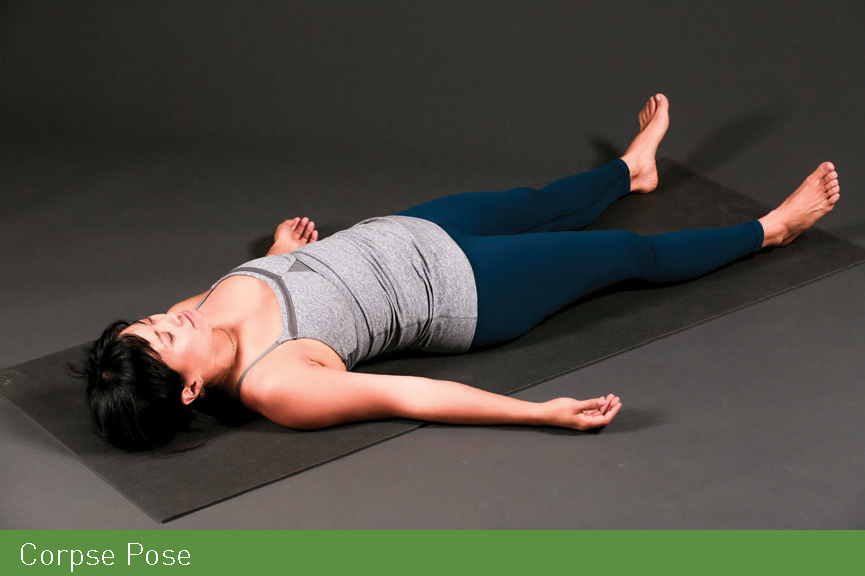
ALIGNMENT Slide your shoulders under you. ✵ Relax the muscles in your legs, shoulders, and face. ✵ Move into your natural breath. ✵ Close your eyes. ✵ Stay in this pose for three minutes.
FOCUS Stay awake and still. Notice your natural breath.
DEEPEN Take a five-minute final rest.
STRENGTH PRACTICE II
TIME: 45 MINUTES
EQUIPMENT: YOGA MAT, BLOCK, AND STRAP
This 45-minute strength sequence builds off the first, adding on more challenge in the early Sun Salutation A and B sequences plus new and added intensity during the standing poses. Once you are comfortable with Strength Practice I, dive in. Or, if you are ready for a challenge, take on this practice now!
All poses should be held for five breaths unless otherwise noted.
RELEASE AND ACTIVATE
Lying on your back sends a signal to your brain to relax. Let go of any tension in your body at the beginning of your practice. Bring in your ujjayi breath before you start.
Supine Butterfly
As you learned in Strength Practice I, Supine Butterfly activates your hips and sends a signal to your brain that all is well.
SEQUENCE FOR STRENGTH PRACTICE II
» Supine Butterfly
» Reclined Half Pigeon
» Happy Baby
» Boat
» Plank
» Downward-Facing Dog
» Halfway Lift
» Sun Salutation A
» Sun Salutation B
» Hand-to-Big-Toe Forward Fold
» Gorilla
» Twisted Chair
» Crescent Lunge
» Twisted Crescent Lunge
» Warrior 2
» Triangle
» Half-Bound Side Angle
» Wide-Legged Forward Fold
» Skandasana
» Squat
» Crow
» Eagle
» Hand-to-Knee Balancing Pose
» Airplane
» Half Moon
» Revolved Triangle
» Flip Dog
» Side Plank
» Locust
» Bow
» Bridge
» Wheel
» Lizard
» Half Pigeon
» Double Pigeon
» Reverse Tabletop
» Head-to-Knee Seated Forward Fold
» Shoulder Stand
» Ear Pressure Pose
» Fish
» Supine Twist
» Corpse Pose
SETUP Lay down with your back on your mat. Bring the soles of your feet together so your legs form a diamond shape.
ALIGNMENT Let your arms relax on the floor, palms facing up. ✵ Notice the connection of your spine to the floor and the natural curve of your lumbar spine at your lower back. ✵ Hug your belly up and in toward your spine to activate your core. ✵ Bring in your ujjayi breath.
GAZE & FOCUS Close your eyes. ✵ Bring your attention to your spine on the floor and an active core.
COMMON CHALLENGES Tight hips or lower back pain prevent you from relaxing your hips.

MODIFICATION Bring your feet as wide as your mat and rest your knees together to bring your lower back to the mat.
Reclined Half Pigeon
Create a gentle opening into your hips at the beginning of this practice. Use this time to notice any tension that has built up from sitting or hauling heavy gear for a climb.
SETUP Bring your feet flat to the floor. Cross your right ankle over your left knee. Keep your right foot flexed toward your knee to protect your knee joint. ✵ Reach your right hand between your legs and your left hand behind your left thigh to support it, and pull your legs toward your chest.
ALIGNMENT Pull your left leg toward you to get a deep stretch in your outer right hip. ✵ Relax your shoulders toward the floor. ✵ Press your right elbow into your right inner thigh to deepen the stretch. ✵ Take ten deep breaths.
GAZE & FOCUS Close your eyes or look at a spot on the ceiling. ✵ Notice the sensations in your hip and breathe into it to release the muscles.
DEEPEN Straighten your free leg up to the ceiling and press through your heel.
COMMON CHALLENGES Tight hips prevent you from holding the back of your leg.
MODIFICATION Take a strap around the back of your left leg, and pull your leg toward your chest.
SEQUENCE TRANSITION Do Reclined Half Pigeon on your left side. ✵ Pull your knees into your chest.
Happy Baby
Open your hips and lengthen your spine and relax. Experiment with the pose by switching your hands between the inner and outer arches of your feet.
SETUP Take your knees wide outside your chest. Reach inside your legs for the inner arches of your feet and lift your feet toward the ceiling.
ALIGNMENT Flex your feet toward your knees. Bend your knees at a 90-degree angle. ✵ Press your heels toward the ceiling. ✵ Relax your shoulders. ✵ Lengthen your lower back toward the floor while pulling on your feet with your hands. ✵ Press your feet into your hands.
GAZE & FOCUS Look at a spot on the ceiling. ✵ Lengthen your spine to the mat.
DEEPEN Switch your grip on your feet to the outside arch of your foot; pull your knees deeper down outside your ribs.
COMMON CHALLENGES Tight hips or lower back prevent you from reaching your feet.
MODIFICATION Hold the backs of your thighs instead of your feet. Open your knees wider than your chest. Place a block under your head.
SEQUENCE TRANSITION From Happy Baby, pull your knees into your chest. ✵ With momentum, rock up to a seated position.
Boat
Boat accesses deep core muscles that stabilize you even when you don’t know it. Challenge yourself in this sequence by taking on additional Low Boats, see variation below.
SETUP From a seated position, hold the backs of your thighs, and balance between your sit bones at the base of your pelvis and your tailbone. Lift your feet off the floor.
ALIGNMENT Pull your thighs toward your chest. Hold your shins parallel to the floor. ✵ Squeeze your thighs toward each other. Spread out your toes so you see a gap between each one. ✵ Pull your shoulder blades toward each other. Lift your chest toward the ceiling. ✵ Reach your arms straight in front of you. ✵ Stay for ten breaths.
LOW BOAT VARIATION Lower your torso and legs until your lower back connects to the floor, your shoulders stay off the floor, and your legs hover off the mat straight ahead. Squeeze your thighs together. Look at your toes. Use your core, and lift back to (High) Boat. ✵ Repeat this cycle five times, holding each variation for five breaths.
GAZE & FOCUS Set your gaze on your toes. ✵ Concentrate on lifting your chest and lengthening your spine.
DEEPEN Once your hamstrings allow it, straighten your legs at a 45-degree angle away from the floor.
COMMON CHALLENGES Lower back weakness prevents you from lifting your chest.
MODIFICATION Hold the back of your thighs to keep your chest lifted.
SEQUENCE TRANSITION Bring your feet to the floor. ✵ Squeeze your knees and lift your chest to release in your abdominal muscles. ✵ Cross your ankles, roll over your feet, and come to your hands and knees for Plank.
Plank
Add some heat to your Plank pose with additional variations to fire up your abdominal and back muscles.

SETUP Stack your hands underneath your shoulders, index finger pointed straight ahead. Step your feet to the back of your mat. Stay on the balls of your feet, lift your knees off the floor and squeeze your legs straight.
ALIGNMENT Keep your hips just below level with your shoulders. ✵ Spiral your inner thighs up to the ceiling. Lengthen the backs of your knees and squeeze your thighs. ✵ Lift your head so your neck is level with your shoulders. ✵ Press your palms firmly into the floor. Squeeze your upper arm bones toward each other. ✵ Spin the inner eye of your elbows forward, and pull your shoulder blades together. ✵ Tilt your tailbone toward your heels. ✵ Lift your belly in toward your spine and wrap your front ribs together. ✵ Stay for ten breaths.
PLANK VARIATION I Lift your right foot off the floor three inches, toes flexed. Squeeze your leg muscles, especially in your left leg. Hold for five breaths. Switch legs.
PLANK VARIATION II Bring your right knee to your chest. Keep your hips level with your shoulders and lift your gaze forward. Step your right foot back. ✵ Bring your left knee to your chest. Keep your head lifted. Hug your knee to your chest. ✵ Do both sides three times.
GAZE & FOCUS Set your drishti past the front of your mat. ✵ Keep your legs and core firm. Breathe deeply to maintain the pose.
COMMON CHALLENGES Building strength to hold the full pose for ten breaths can take some practice.
MODIFICATION Bring your knees to the floor, toes curled under. Keep your hips in one even line with your shoulders, core engaged.
SEQUENCE TRANSITION From Plank, lift your hips to the ceiling for Downward-Facing Dog.
Downward-Facing Dog
Strengthen your ankles and open your hips by mixing in a Three-Legged Dog pose with your Downward-Facing Dog. Adding a leg lift and hip rotation also stretches dynamically into your hip, which can always use more attention and space to boost your climbing.
SETUP Keep your hands at shoulder-width distance. Lift your hips up to the ceiling.
ALIGNMENT Point your index fingers to the front of your mat. ✵ Flatten your palms until the knuckles at the base of your index and middle fingers are grounded on your mat. ✵ Move your feet to hip-width distance. Spin your inner ankles back so the outer edges of your feet are parallel with the edge of your mat. ✵ Bend your knees and lift your tailbone toward the ceiling until your spine lengthens. Spin your sit bones to the wall behind you. ✵ Roll your shoulders up to your ears, then use your back muscles to pull your shoulders down your back and in toward your spine. Squeeze your upper arms toward each other. ✵ Press your chest toward your thighs; keep your shoulders engaged and do not hyperextend in your shoulders if you are extra flexible. ✵ Drive your heels toward the floor (they don’t need to touch the floor). ✵ Pull your belly in toward your spine. ✵ Lift the muscles just above your knees to engage your thighs and open into your hamstrings. ✵ Create a long line from your wrists to your shoulders and hips; bend your knees as you need to.
GAZE & FOCUS Look backward at the floor between your big toes. ✵ Lift your tailbone high toward the ceiling.
DEEPEN Once the pose feels more comfortable, press your heels deeply toward the mat until your toes can spread and soften.
COMMON CHALLENGES Tight hamstrings can lead to a rounded spine. ✵ If you have a wrist injury, it may be painful to stay on your hands.
MODIFICATIONS For tight hamstrings, bend your knees and lift your tailbone toward the ceiling. Pull your shoulders toward your spine. Press your chest toward your legs. ✵ For wrist pain, come down to your elbows for Dolphin pose: Bend your elbows so they are stacked directly under your shoulders. Walk your feet in toward your elbows as close as you can. Lift your tailbone to the ceiling.
THREE-LEGGED DOG VARIATION From Downward-Facing Dog, bring your feet together. Lift up your right leg and stretch it toward the wall behind you. Bend your knee and roll your right hip on top of your left. Lift your right knee up to the ceiling. ✵ Lift your upper knee another three inches toward the ceiling. Keep your shoulders squared to the floor. ✵ Keep your left shoulder level with your right. Stay for five breaths. ✵ Gaze: Set your gaze on the back of your mat.
SEQUENCE TRANSITION Do Three-Legged Dog on the right side. ✵ Repeat on the left side. ✵ Lower your upper leg to the floor. Step or hop to the front of your mat. Bring your feet together.
Halfway Lift
An inhale moves you into an extension of your spine in this Halfway Lift pose. Lead with your breath to create more space between your vertebrae and to strengthen your lower back and core. Bend your knees to ensure you are hinging at your hips.
SETUP Bring your hands to your shins. Lift your chest parallel to the floor. Squeeze your shoulder blades to your spine. Hug your belly muscles in toward your back, and lift your chest parallel to the floor.
ALIGNMENT Root your feet firmly into the floor. Bend your knees as needed and squeeze your thighs. ✵ Stick your butt out toward the wall behind you. Lift your chest even with your hips. ✵ Lengthen the crown of your head away from your tailbone. ✵ Hug your shoulder blades together to spine to activate your centerline. Pull your belly in and up.
GAZE & FOCUS Look at a spot on the floor in front of your toes. ✵ Create extension in your spine and wrap your shoulder blades toward your spine. Engage your core.
DEEPEN Place your fingers or hands flat on the floor on the outsides of your feet.
COMMON CHALLENGES Your back rounds because of tight hamstrings.
MODIFICATION Bend your knees. Place your hands above your knees on your thighs or on a block in front of your feet.
SEQUENCE TRANSITION Fold forward toward your feet to release.
VINYASA: BREATH AND MOVEMENT
The following flow practice intensifies with the addition of Chaturanga and Upward-Facing Dog in Sun Salutation A and B. Challenge yourself to continue breathing according to the sequences to build strength, heat, and lung capacity.
Sun Salutation A
You will follow roughly the same sequence for Sun Salutation A as you did in Strength Practice I, but add Chaturanga and Upward-Facing Dog, described below. Do this sequence three times.
Mountain Pose, inhale with arms up. ✵ Forward Fold, exhale. ✵ Halfway Lift, inhale. ✵ Chaturanga, exhale. ✵ Upward-Facing Dog, inhale. ✵ Downward-Facing Dog, exhale, five breaths. ✵ Step or jump to the front of your mat. ✵ Halfway Lift, inhale. ✵ Forward Fold, exhale. ✵ Mountain Pose, inhale.
NEW POSES FOR SUN SALUTATION
A Chaturanga (Low Plank)
A low plank, as Chaturanga is sometimes called, is a step up from the strength needed to lower with control to the floor in Strength Practice I. Chaturanga strengthens your legs, torso, arms, and wrists, and yet many people overrely on shoulder ligaments rather than big trunk muscles for strength. Learn to integrate your shoulders into your spine through Mountain Pose and Plank to balance shoulders strong from climbing, and to develop a powerful Chaturanga.
SETUP From Plank, the fourth pose in Sun Salutation A, roll forward in the pose until you’re on the tops of your toes. Lower your body in a strong plank, your core strong and active, until your shoulders are even with your elbows.
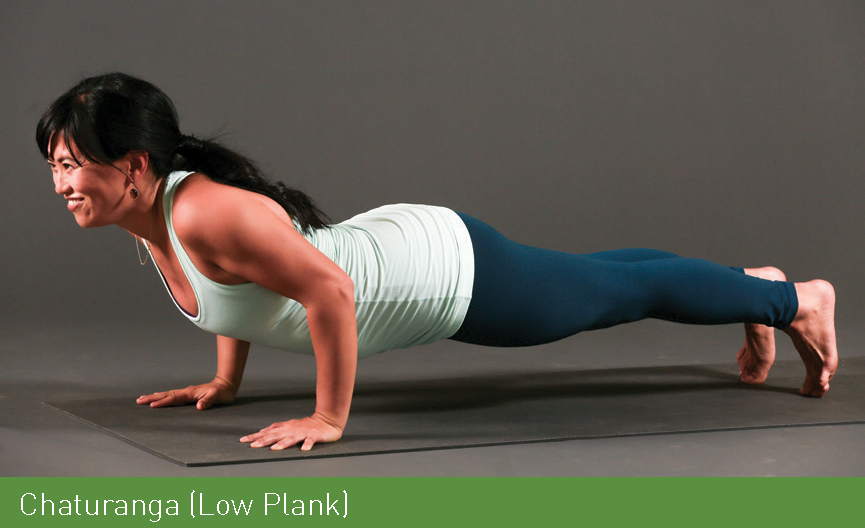
ALIGNMENT Squeeze your thigh muscles to the bone. ✵ Pull your shoulder blades toward your spine to keep your chest open. ✵ Engage your core as you lower. ✵ Tilt your tailbone toward your heels to engage your front ribs and core muscles. ✵ Point your elbows to the back of your mat, keeping them about two inches or so away from your ribs and stacked directly over your wrists. ✵ Ensure your shoulders are even with your elbows at a 90-degree angle. If that is difficult to hold, stop with your shoulders slightly higher than your elbows. Do not dip below 90 degrees. ✵ Practice lowering from Plank into Chaturanga with a one-breath exhale.
GAZE & FOCUS Look past the front edge of your mat. ✵ Squeeze your shoulder blades together, and use your back and belly muscles to hold.
DEEPEN Hold Chaturanga for five breaths.
COMMON CHALLENGES Weakness in core and shoulders leads to shoulders rolling forward toward your mat or dropping below a 90-degree angle.
MODIFICATION Bring your knees to the floor. Keep your hips in one diagonal line with your shoulders and lower to a 90-degree bend in your elbows. To modify further, lower to the floor.
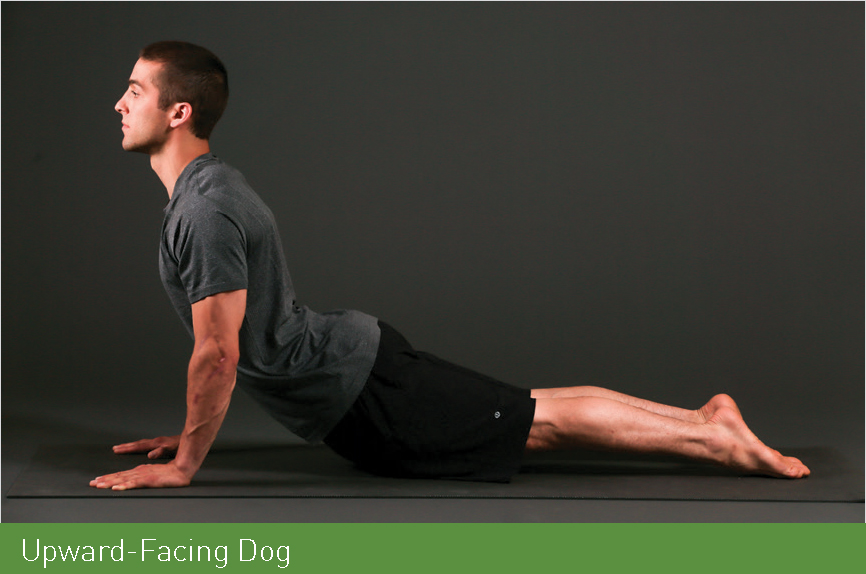
Upward-Facing Dog
A backbend that develops strength in your back and shoulders, energizes your spine, and opens your chest, Upward-Facing Dog is strong and fiery.
SETUP From Chaturanga, roll onto the tops of your feet. Pull your chest forward and up to the ceiling and straighten your arms. Stack your shoulders over your wrists.
ALIGNMENT Press the tops of your toes into your mat. ✵ Lift your knees off the floor and press the pinky toe edge of your feet into the floor; squeeze your thighs. ✵ Press all the knuckles of your hands firmly into the floor to lift your chest higher to the ceiling. ✵ Roll your shoulder blades toward each other. ✵ Lift your belly in toward your spine. ✵ Lengthen the top of your head toward the ceiling.
GAZE & FOCUS Keep your gaze level with your head and look at a spot on the wall in front of you. ✵ The only contact points with the floor are your hands and feet. Press firmly into your foundation and lift your chest so your shoulder blades squeeze in toward your spine.
DEEPEN Lift your gaze toward the ceiling.
COMMON CHALLENGES Lower back pain can prevent you from taking the pose without pain.
MODIFICATION Substitute with Low Cobra (see Strength Practice I for more details).
Sun Salutation B
Focus on your hands and feet, and keep your gaze steady and centered.
Chair, inhale with arms up (first round: hold for five breaths). ✵ Forward Fold, exhale. ✵ Halfway Lift, inhale. ✵ Chaturanga, exhale. ✵ Upward-Facing Dog, inhale. ✵ Downward-Facing Dog, exhale. ✵ Warrior 1, right side, inhale (first round: hold for five breaths). ✵ Chaturanga, exhale. ✵ Upward-Facing Dog, inhale. ✵ Downward-Facing Dog, exhale. ✵ Warrior 1, Left side, inhale (first round: hold for five breaths). ✵ Chaturanga, exhale. ✵ Upward-Facing Dog, inhale. ✵ Downward-Facing Dog, exhale, stay for five breaths. ✵ Step or jump forward. ✵ Halfway Lift, inhale. ✵ Forward Fold, exhale. ✵ Chair, inhale. ✵ Repeat for two more rounds. End with a Forward Fold.
NEW POSES FOR SUN SALUTATION B
Warrior 1
Warrior 1 opens and strengthens your ankles and hip flexors and builds your hamstring strength. (See photo on p. 106.)
SETUP From Downward-Facing Dog, step your right foot next to your right thumb. Spin your left heel down and ground it into the mat. Lift your arms up.
ALIGNMENT Point your back foot out about 60 degrees. ✵ Press the outer edge of your back foot into the mat to connect all four corners of your foot to the floor. ✵ Align your feet so your heels are in one line. Point your front foot toward the front of your mat. Bend your front knee over your ankle. ✵ Spin the hip of your back leg toward the front of your mat. You will feel an opening in your back hip flexor. ✵ Lift your belly button in toward your spine. Squeeze your front ribs toward each other. ✵ Soften your shoulders away from your ears, and squeeze your shoulder blades toward your spine. Reach your arms up and spread out your fingers.
GAZE & FOCUS Set your gaze on a wall in front of you. ✵ Squeeze your back leg straight. Hug your core in and up toward your centerline.
DEEPEN Lengthen your stance and bend your front knee to a 90-degree angle.
MODIFICATIONS Shorten your stance slightly for both challenges until your ankle and hip flexors become more mobile. ✵ Lift your back heel for a crescent Lunge modification.
Chair
Chair requires powerful leg and core strength. Keep your shoulders engaged and palms facing inward to get used to rotating your shoulders down toward your spine. (See photo on p. 104.)
SETUP Stand with your feet together. Lower your hips toward the floor until you feel your legs engage. Keep your toes in view when you look at your knees. Reach your arms up, parallel to your ears with palms facing.
ALIGNMENT Keep your toes soft and in view just past your knees. ✵ Spread out your toes. Lift your arches and spin your inner ankles toward the back of your mat. ✵ Squeeze your inner thighs toward each other. ✵ Tilt your tailbone toward the floor. Pull your belly in to activate your core. ✵ Lift your chest over your hips and pull your front ribs together. ✵ Soften your shoulders down away from your ears. Engage your back to pull your shoulder blades in toward each other. ✵ Straighten your arms, stretch out your palms and spread your fingers wide toward the ceiling.
GAZE & FOCUS Set your drishti at a spot on the wall in front of you. ✵ Focus on strength in your legs and a strong lift in your chest toward the ceiling.
DEEPEN Sink your hips deeper toward the floor. Keep your spine lifted toward the ceiling.
COMMON CHALLE NGES Weak quadriceps may pull your knees away from each other. ✵ Tight shoulders prevent you from bringing your arms overhead.
MODIFICATIONS Lift the arches of your feet to hug your knees toward each other. ✵ Bend your elbows even with your shoulders at 90-degree angles like a cactus.
STRENGTH
Create more stability in your lower body by adding on new, challenging standing poses in this section of the practice.
Hand-to-Big-Toe Forward Fold
Active Forward Folds open your spine and create more space in your lower back. Harness your shoulders and back muscles to deepen your forward bend. In this Hand-to-Big-Toe Forward Fold pose, your big toes serve as an anchor for your hands to pull your chest deeper into the fold, opening your lower back and your hamstrings. Keep your knees bent, particularly if your hamstrings feel tight in general or from an active day on the wall.
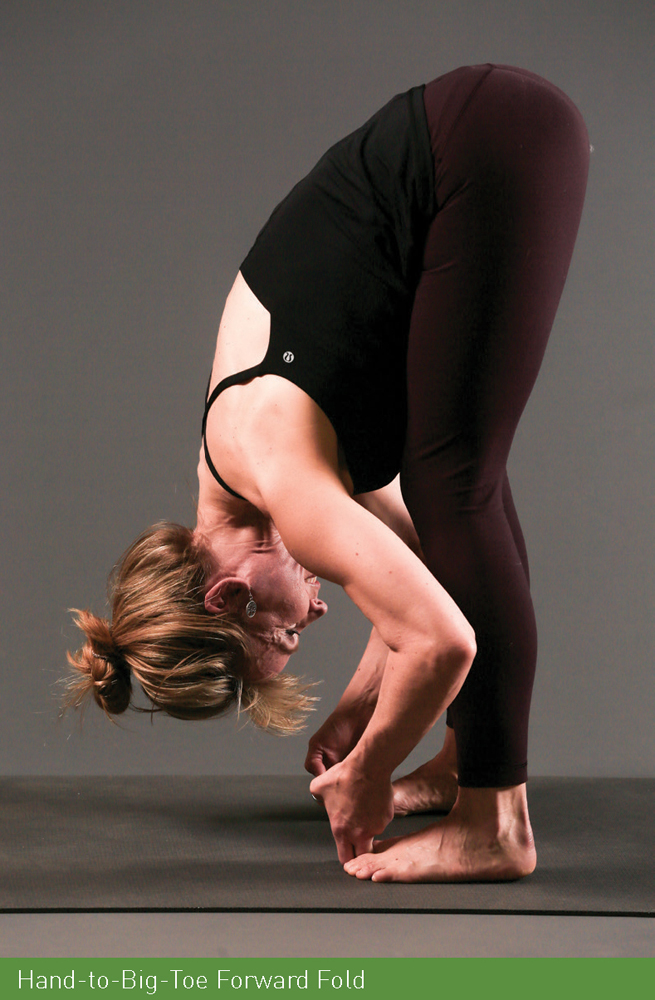
SETUP Stack your feet directly under your hips—place two fists between your feet to measure. Loop your peace fingers (index and middle finger) around your big toes. Pull up on your big toes and press the four corners of your feet down toward the floor.
ALIGNMENT Bend your elbows to the outer edges of your mat to pull your chest toward your shins. ✵ Hug your shoulder blades toward your spine. Engage the muscles under your shoulders to go deeper into the pose. ✵ Bend your knees as needed—don’t lock them!—and bring your belly down to your thighs. Squeeze your thighs. ✵ Release your head toward the floor.
GAZE & FOCUS Look at the floor between your feet. ✵ Squeeze your shoulder blades toward your spine to pull your chest closer toward your feet.
DEEPEN Work your legs as straight as your hamstrings allow while hugging your thigh muscles; do not force your legs to straighten and keep your knee joints soft.
SEQUENCE TRANSITION Release your big toes.
Gorilla
A big wrist and hand release, Gorilla is a counter pose to Plank, Chaturanga, and Downward-Facing Dog. It releases the impact of weight bearing in your wrists, which is important when you spend much of your time gripping holds. Do both hand variations to open your wrists and palms in two directions and free your hands to stretch completely.
SETUP Stand with your feet at hip-width distance. Bend your knees. Slide your hands underneath your feet, palms facing up and fingers reaching toward your heels.
ALIGNMENT Wiggle your hands deeper under your feet until your toes reach your wrists. ✵ Bend your elbows to the outer edges of your mat. ✵ Hug your shoulder blades together. Use your big trunk muscles under your shoulders to pull your chest deeper toward your spine. ✵ Soften your knees and bring your belly down to your thighs. Engage your thigh muscles. ✵ Release your neck and hang your head toward the floor.
GORILLA VARIATION Flip your hands so your palms face the floor with your fingers pointing in toward your heels, thumbs toward the outer edges of your feet. Slide your hands under your feet as deeply as you can go. Bend your elbows and soften your knees.
GAZE & FOCUS Look at the floor behind your feet. ✵ Engage your shoulders and back muscles to pull your chest closer to your shins.
DEEPEN Work your legs as straight as your hamstrings allow while still squeezing your thighs. Keep your knee joints soft.
COMMON CHALLENGES Tight hamstrings prevent you from sliding your hands under your feet.
MODIFICATION Make fists and place the tops of your hands on a block, curled fingers facing in toward your body. Bend your knees.
SEQUENCE TRANSITION Release your hands from under your feet. ✵ Bring your feet together. ✵ Stand in Mountain Pose.
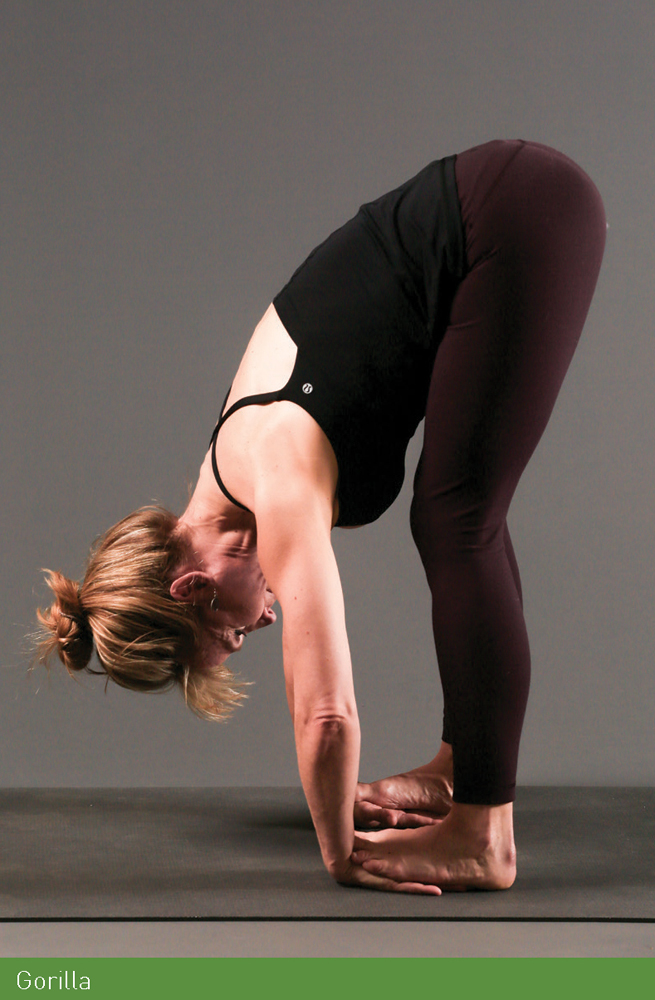
Twisted Chair
Focus on the alignment in Twisted Chair to better understand where your hips are in space while rotating your spine—a useful skill for climbing moves that require you to twist!
SETUP Bring your toes together and lower your hips into Chair. Connect your palms together in front of your chest. ✵ On your exhale, twist to the left, hooking your right elbow outside your left knee.
ALIGNMENT Soften your toes and ground the four corners of your feet into the floor. ✵ Make sure your knees stay even; knees askew are an indicator you are popping out a hip to one side. ✵ Lift your left elbow up to the ceiling; press through your hands to deepen your twist. ✵ Pull your belly in toward your spine and stick your sit bones out behind you. ✵ Stretch your chest and head forward, pulling your shoulder blades toward your spine. ✵ Open your lower hand to a block just outside your left foot. Extend your upper hand to the ceiling, palm facing the same direction as your chest.
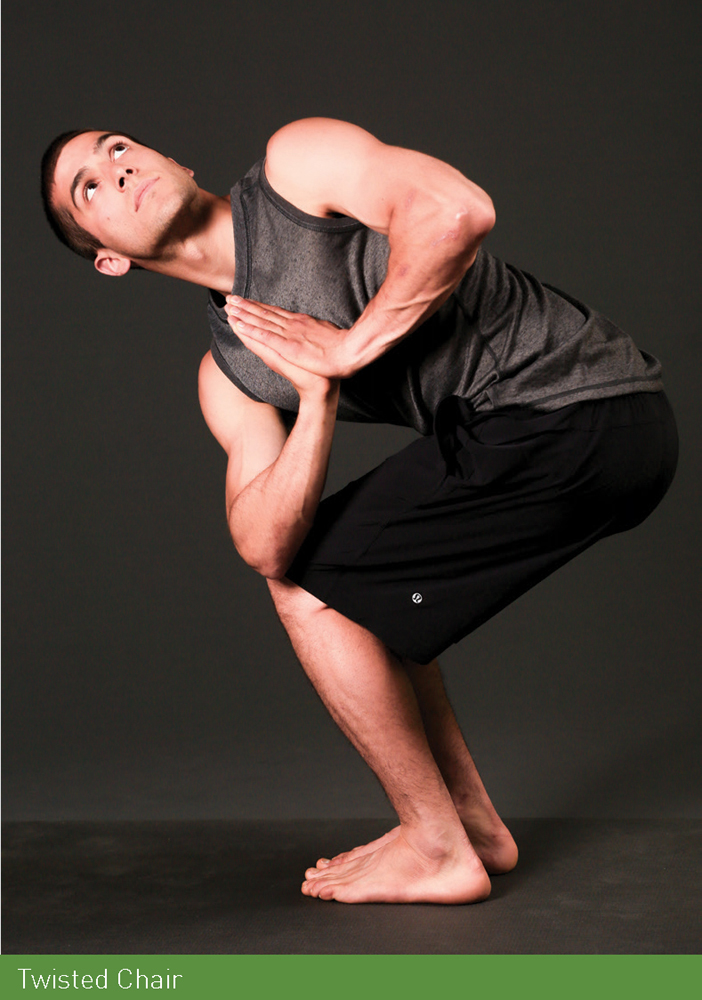
GAZE & FOCUS Look up at the ceiling past your upper hand. ✵ Keep your knees even and aligned throughout the twist.
DEEPEN Settle your hips lower toward the floor. Hug your inner thighs toward each other and rotate your upper ribs to the ceiling.
COMMON CHALLENGES A lack of torso rotation prevents you from reaching your lower hand to the outside edge of your foot.
MODIFICATION Bring the block just in front of your feet to support the extension in your twist.
SEQUENCE TRANSITION Release your chest forward to your feet. ✵ Inhale and lengthen your chest to Halfway Lift. ✵ Step your left foot to the back of your mat.
Crescent Lunge
A great stabilizing pose, Crescent Lunge develops the muscles around your front knee, and strengthens your thighs, hamstrings, and glutes even more than the Low Lunge. Here, you learn to stabilize into the centerline by hugging your inner thighs to your pelvis and engaging your core.
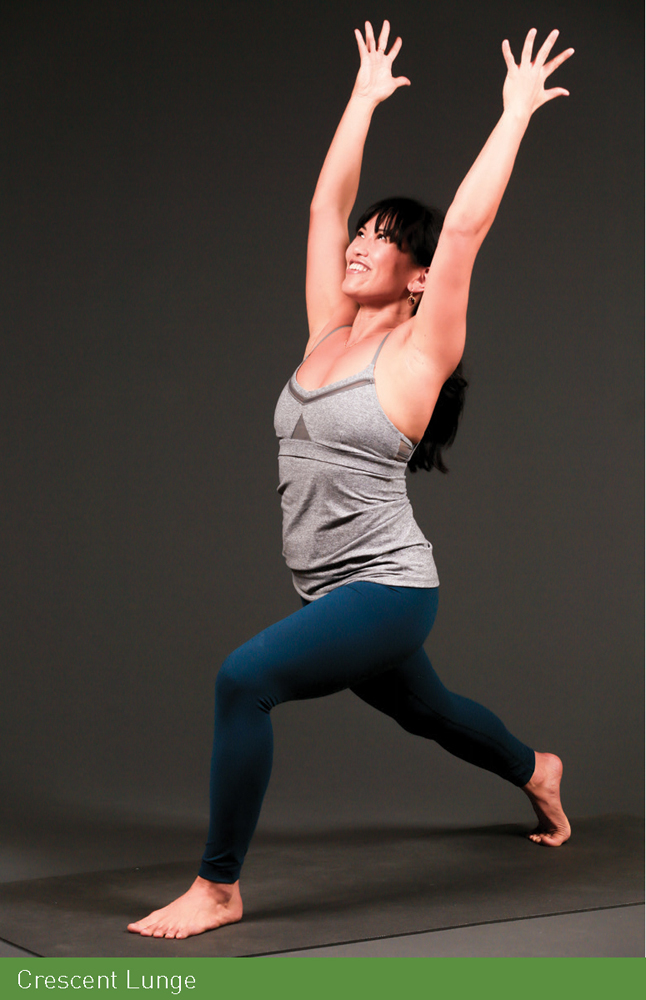
SETUP From a lunge position in your legs, stack your front knee over your ankle. Lift onto the ball of your left foot, toes bent, so your left heel is perpendicular to the ground. Squeeze your back hamstring straight. ✵ Lift your chest over your hips and extend your arms straight up to the ceiling.
ALIGNMENT Move your feet hip-width distance apart for stability. Press your front foot into the ground. ✵ Lift your back hamstring up to the ceiling. ✵ Square your pelvis toward the front of your mat. Squeeze your front heel and back foot toward each other. ✵ Pull in your core lock. ✵ Release your shoulders away from your ears. Reach your arms up to the ceiling parallel to your ears, pinky fingers forward. ✵ Pull your shoulder blades in toward each other.
GAZE & FOCUS Set your drishti at a spot on the wall in front of you. ✵ Ground your front foot and straighten your back leg.
DEEPEN Lengthen your stance and bend your front knee to a 90-degree angle.
COMMON CHALLENGES Your front foot moves around.
MODIFICATIONS Ground into the big toe knuckle at the base of your front foot, and your heel. Lower your back knee to the floor for a Low Lunge if you need to.
Twisted Crescent Lunge
Adding a twist to an already challenging standing pose requires your body to stabilize to hold the pose. Twists create a healthy opening for your spine and release tightness that has accumulated in your lower back and shoulders from climbing. Your glutes also will activate.
SETUP From crescent Lunge, bring your palms together in front of your chest. On your exhale, hook your right elbow outside your left knee.
ALIGNMENT Squeeze your feet in toward each other to activate your inner thighs and stabilize your legs. Keep your front knee stacked over your ankle. ✵ Squeeze your back thigh muscles, and straighten your back leg toward the ceiling. ✵ Lift your upper elbow toward the ceiling. Press down into both palms equally. ✵ Hug your belly in toward your spine, elevating your front ribs off your front thigh. ✵ Pull your shoulders in toward your chest, and lengthen your chest forward to keep your spine long and straight and to deepen your twist. ✵ Keep your shoulders higher than your hips.
GAZE & FOCUS Set your gaze on a spot on the ceiling. ✵ Squeeze your shoulder blades toward each other. Engage the muscles underneath your shoulder blades to deepen your twist.
DEEPEN Open your arms, with your lower hand on the floor or on a block outside your front leg. Lift your upper hand to the ceiling, palm facing the same direction as your chest. ✵ Stretch your upper fingers away from your body.
COMMON CHALLENGES You will need to develop strength and stability in your legs to hold the full pose. Squeeze your inner thighs for balance.
MODIFICATION Keep your back knee on the floor. Pad your knee if you feel pain in your kneecap.
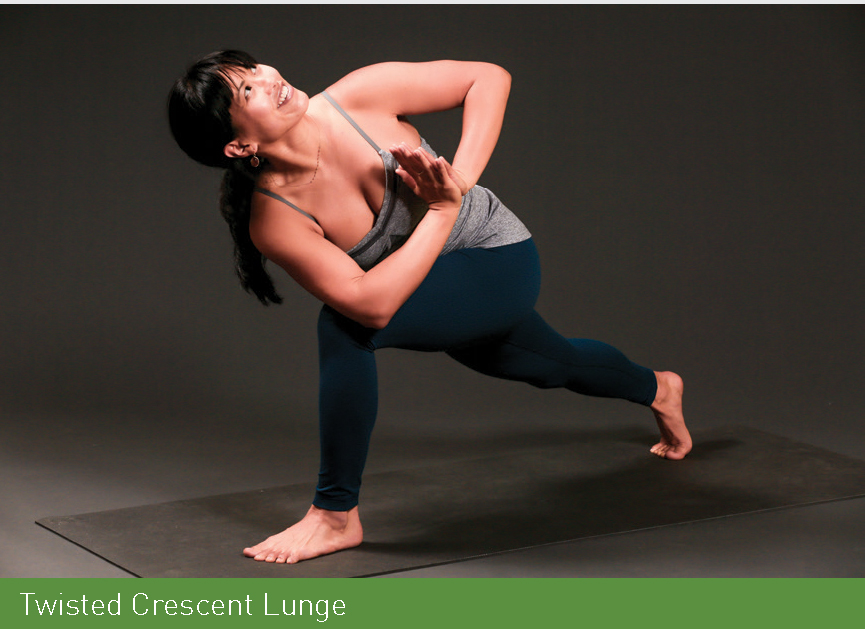
SEQUENCE TRANSITION Release your hands to the floor. ✵ Ground your back heel, and lift your torso above your hips for Warrior 2.
Warrior 2
Widen your stance and bend your front knee deeper to challenge yourself in your evolving Warrior 2. Practice bringing ease into your face and your experience of the pose, and imagine bringing the same softness to solving a problem on a climb.
SETUP On an exhale, ground your back heel to the mat. Stack your chest over your hips and extend your arms. Open your back toes so your foot is parallel with the back edge of your mat. Bend your front knee over your front ankle; don’t let your knee cave in. Stretch your arms toward the front and back parallel with the floor, and set your gaze over your front hand.
ALIGNMENT Point your front foot toward the front of your mat. Stack your front knee over your ankle. (Widen your feet if your knee is bending past the top of your ankle.) ✵ Line your back foot up with the back edge of your mat at roughly 90 degrees, but no wider than that, from your front foot. Lift the inner arch of your back foot off the floor. ✵ Hug your feet toward each other to activate your inner thighs toward your pelvis. ✵ Press your front heel firmly into the mat. ✵ Stack your chest over your hips. Lengthen your tailbone down toward the floor. Lift your belly button in toward your spine. ✵ Release your shoulders away from your ears. Hover your arms parallel to the floor. ✵ Pull your shoulders in toward your centerline. From your spine, stretch your fingers to the front and back walls.
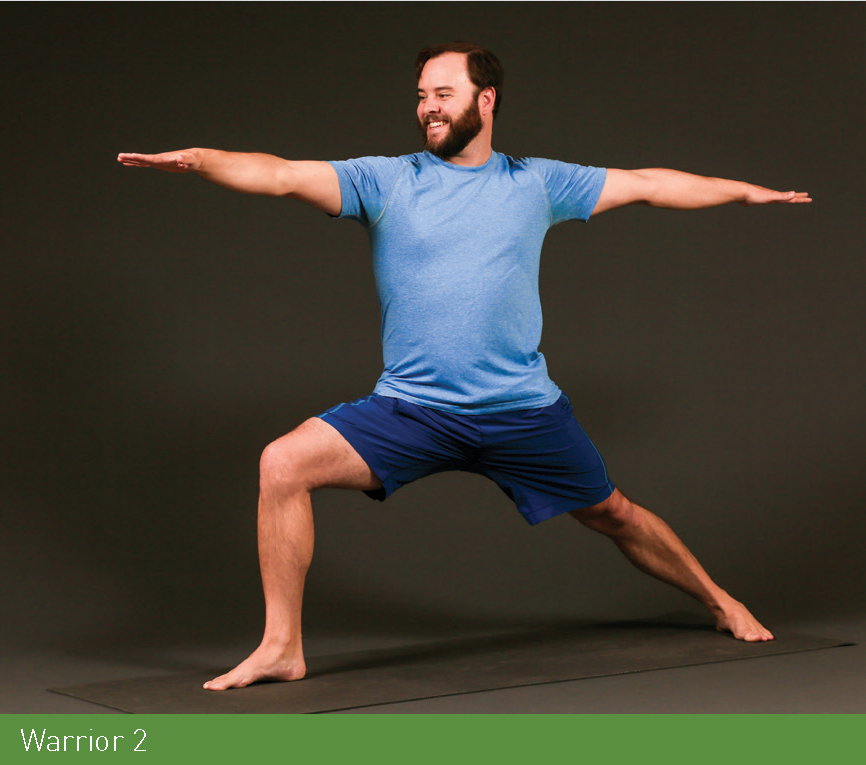
GAZE & FOCUS Turn your head toward your front hand and set your gaze on your fingertips. ✵ Squeeze your thigh bones in toward each other. Relax your jaw and eyes. Breathe into the challenge.
DEEPEN Widen your stance and bend your right thigh parallel to the floor.
COMMON CHALLENGES Weak or tight outer hips and glutes can cause your front knee to collapse inward rather than staying stacked over your front ankle.
MODIFICATIONS Shorten your stance. Keep your knee aligned over your front ankle to build strength and prevent injury.
SEQUENCE TRANSITION From Warrior 2, straighten your front leg.
Triangle
A pose to ground you, Triangle relies on your bone structure rather than muscle strength to bring attention to your hamstrings, hips, and spine. Challenge your stability and see what is possible in the pose with a longer stance.
SETUP With both legs straight, reach your front hand toward the front of your mat until your torso is parallel to the floor. Shift your front hip toward the back of your mat. Place your right hand on your front shin or on a block outside your right foot. Reach your upper hand toward the ceiling.
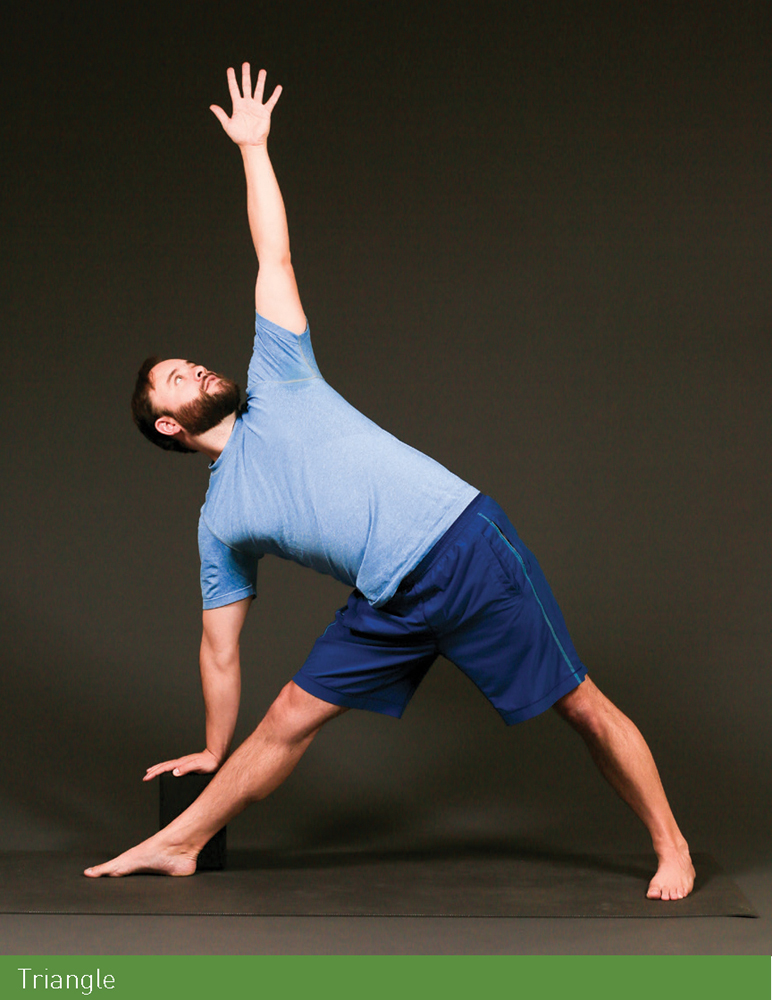
ALIGNMENT Ground the four corners of both feet into the floor. ✵ Pull your front thigh bone up into your hip socket; your back hip will roll slightly forward toward the floor. ✵ Lift the top of your right kneecap to contract your thigh muscle. Keep a slight bend in your front knee so you don’t lock or hyperextend into the joint. ✵ Hug your shoulders in toward your spine. ✵ Stretch your chest toward the front of your mat; spin your upper ribs toward the ceiling. ✵ Stretch out your fingers on your upper hand.
GAZE & FOCUS Look up at the ceiling and set your gaze on one spot. ✵ Press your big toe knuckle of your front foot into the floor. Focus on the stability of your legs and length in your spine.
DEEPEN Widen your stance. Reach your lower hand deeper toward your ankle or the floor.
COMMON CHALLENGES Tight hamstrings or a tight psoas prevent you from reaching your shin. ✵ You overextend in your front knee joint.
MODIFICATION Use a block at the tallest height outside your front foot. If necessary, stack two blocks to get enough height to lengthen your spine. ✵ Soften your front knee joint and lift the muscles above your knee.
SEQUENCE TRANSITION From Triangle on an inhale, lift your chest over your hips for Warrior 2.
Half-Bound Side Angle
Open your tight climbing shoulders with a half bind in your Side Angle. In addition to the challenge of holding the pose in your legs, you also can release in your upper shoulder and neck through the bind. It’s a glorious, intense release.
SETUP From Warrior 2, bring your front hand to a block inside your front foot. Hug your outer right hip toward your back foot. Reach your upper arm to the ceiling, then wind the top of your hand around your lower back. Walk your fingers in toward your front inner thigh for the bind. If you can’t reach your thigh, grab some clothing.
ALIGNMENT Ground the four corners of both feet into the floor. Squeeze both feet toward the center of your mat. ✵ Stack your front knee over your front ankle. ✵ Pull your front thigh bone into your hip socket until you feel your outer glute engage. ✵ Keep your right hip even with your bent front knee. ✵ Lift the arch of your back foot and squeeze your back inner thigh. ✵ Engage your belly to lighten the weight of your front arm on your thigh. ✵ Roll the top of your upper shoulder in toward your chest. Walk your fingers deeper into the bind toward your front inner thigh. ✵ Pull your belly in toward your spine.✵ Lengthen the crown of your head and spiral your chest toward the ceiling. Notice the release in your neck.
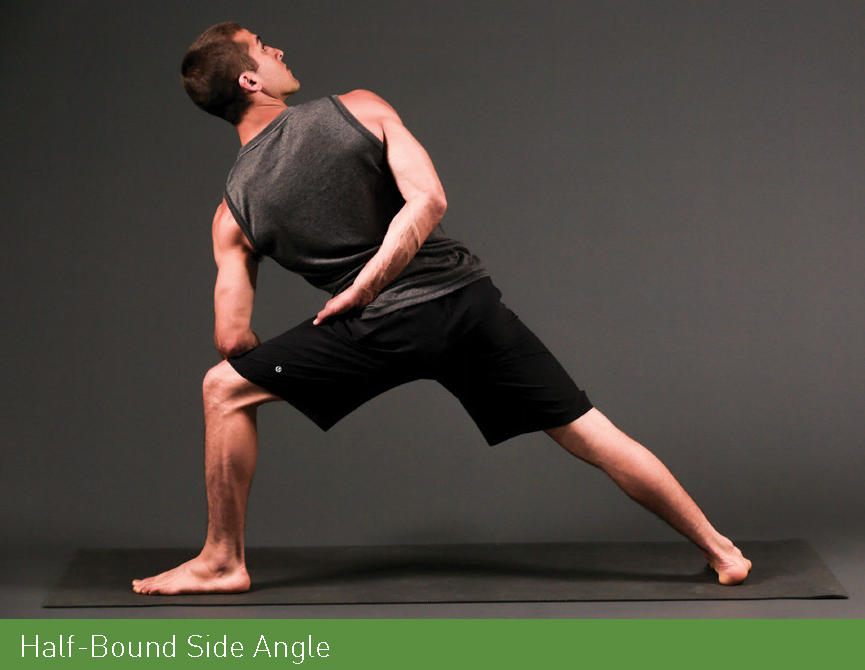
GAZE & FOCUS Set your gaze on the ceiling. ✵ Breathe into your upper shoulder as it releases through the bind.
DEEPEN Reach your lower hand under your front thigh and clasp your bound hand to create a full bind. ✵ Move your hands toward your front knee and lift your chest off your thigh.
COMMON CHALLENGES Weak glutes cause your front knee to collapse inward.
MODIFICATION Shorten your stance slightly as long as you keep your front knee aligned over your ankle.
SEQUENCE TRANSITION Stretch your upper arm to the ceiling to release. ✵ Lift your chest to Warrior 2. ✵ Straighten your front leg. ✵ Turn your right foot to left edge of your mat so your feet are parallel.
Wide-Legged Forward Fold
This pose reaches deeply into new regions of your hamstrings and inner thighs—creating more space in your spine. Legs that work hard balancing on a wall will appreciate this pose.
SETUP With your feet parallel to each other, widen your heels just outside your toes until the outer edges of your feet are parallel to the mat. Bring your hands to your hips. On an inhale, lift your chest to the ceiling; on an exhale, fold forward.
ALIGNMENT Bring your hands to the floor under your shoulders. Point your fingers in the same direction as your toes. ✵ If your hamstrings and lower back allow, walk your hands back between your feet. ✵ Lift the arches of your feet; squeeze your inner thighs up toward your pelvis. ✵ Pull your chest deeper toward the floor with your hands. ✵ Left side: Interlace your hands at your lower back. Hug your shoulder blades in toward your spine. Straighten your arms, press your hands away from your lower back and fold forward.
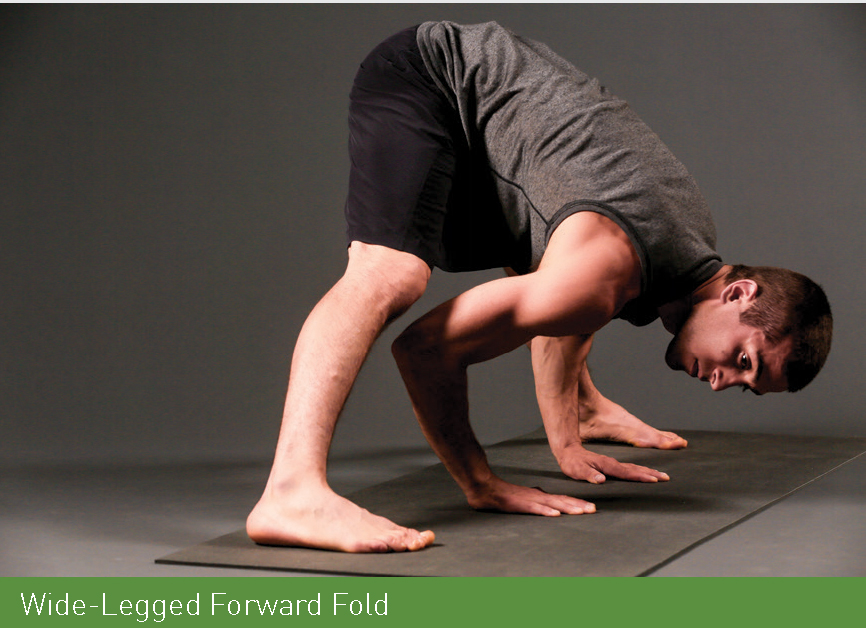
GAZE & FOCUS Look at a spot on your mat between your feet; resist the urge to look around! ✵ Squeeze your thigh muscles and shift your weight slightly forward toward your toes.
DEEPEN Straighten your legs. Pull your head toward your mat.
COMMON CHALLENGES Tight hamstrings or lower back prevent your hands from reaching the floor.
MODIFICATION Use a block under your hands. Bend your knees to give your spine more space.
TRIPOD HEADSTAND VARIATION Bring the crown of your head—the spot between your forehead and the top of your head—to the floor. Walk your wrists back so you have a triangular base between your hands and your head. Stack your elbows over your wrists. Hug your elbows in toward each other. When your arms feel stable, engage your core. ✵ If you are new to Tripod, practice the Variation in Crow (see later in the chapter.) If you are stable in Tripod, slowly lift your feet from the wide-legged position until they are stacked over your head. Squeeze your core throughout the headstand.
SEQUENCE TRANSITION From the fold, walk your hands forward underneath your shoulders. ✵ Turn your toes on your back foot out at a slight angle, and bend your back knee for Skandasana.
Skandasana
Moving your body in different planes of motion is inherent to climbing. Skandasana adds in a sideto-side movement to your practice, and strengthens legs and hips. A deep side lunge, it is particularly effective for refining balance and practicing rotating your hips and spine in different directions.
SETUP Bend your back knee over your back foot, keeping your heel on the ground. Ground your front foot into the mat.
ALIGNMENT Deepen into the lunge toward your back foot. Keep your front foot parallel. ✵ Lift the arches of your feet off the floor and pull your feet in toward each other. ✵ Stack your hands underneath your shoulders. Lengthen your chest parallel with your hips. Widen your sit bones out behind you. ✵ Lift your front ribs into your body. ✵ Engage your inner thighs toward your pelvis. ✵ Hug your shoulders into your back, and engage your core.
VARIATION Turn your back toes out to a 45-degree angle, and bend your knee even deeper with your back heel still grounded. Flex your front toes up to the sky, your heel on the ground. ✵ Bring both hands together, pressing your left elbow into your inner knee.
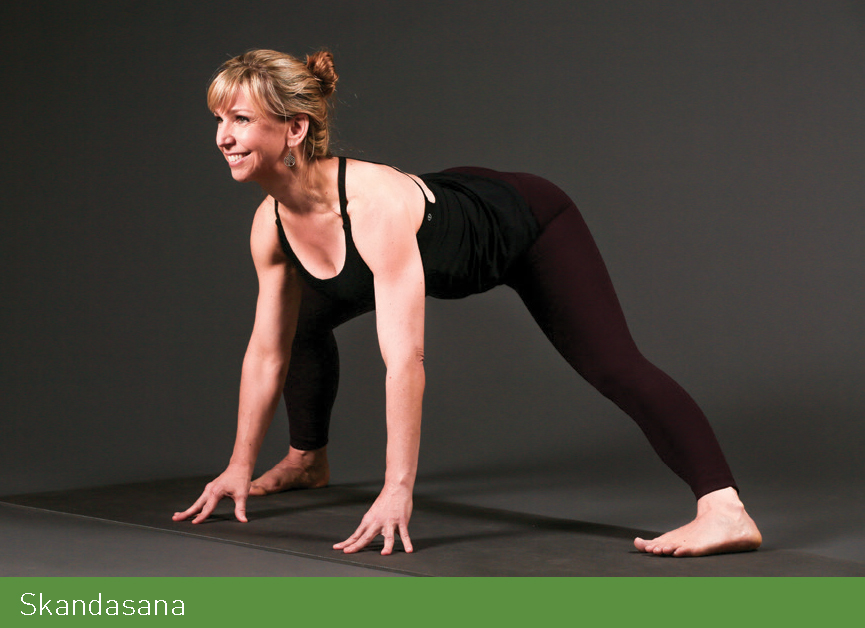
GAZE & FOCUS Look at one spot on the floor directly at a natural point between your hands. ✵ Play with the bend in your knee and keep your core engaged.
COMMON CHALLENGES Tight hips and lower back prevent your hands from reaching the floor.
MODIFICATIONS Stay in the first variation of the pose with feet flat on your mat. Stack your hands under your shoulders on a block.
SEQUENCE TRANSITION Straighten your back leg. ✵ Walk your hands back to the front edge of your mat. ✵ Step your back foot to meet your front foot. Bring your feet together and do a Halfway Lift, inhale. ✵ Exhale and Forward Fold. ✵ Complete the sequence from Twisted Chair through Skandasana on your left side. ✵ Step to the front edge of your mat.
Squat
A squat releases your lower back and hips, and allows your body to move into the natural curves of your spine. It also opens your ankles. Activate your feet, press your elbows into your knees, and work on lifting your chest to release your spine.
SETUP Walk your feet as wide as your mat. Bend your knees to lower your hips toward the floor. If your heels lift off the floor, widen your stance until you can get your feet flat. Your toes can turn out wider than your heels. ✵ Bring your hands together, palms touching, in front of your chest.
ALIGNMENT Shift your weight into the outer arches of your feet, and lift your inner arches. Squeeze your heels in toward each other like you are trying to wrinkle your mat. ✵ Lift your belly button in toward your spine to lift your chest toward the ceiling. ✵ Press your elbows into your inner knees. ✵ Stay for ten breaths.
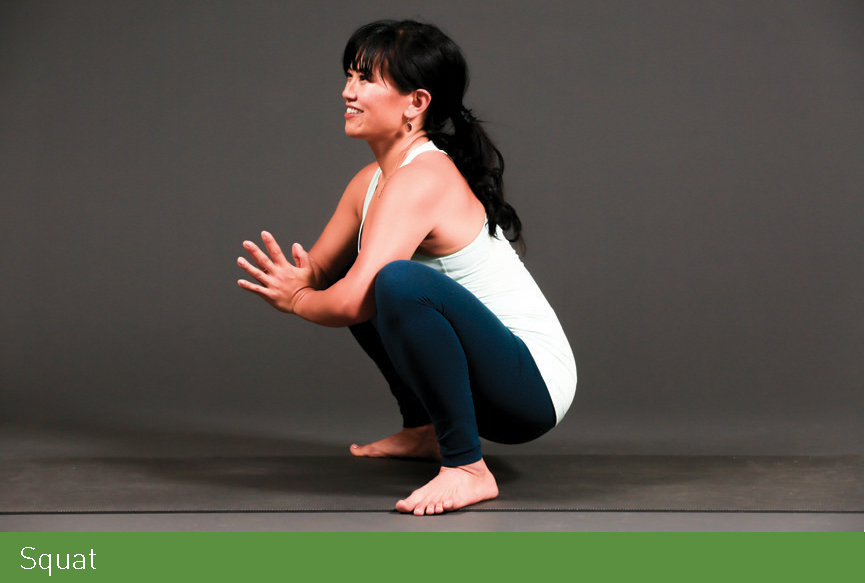
GAZE & FOCUS Set your gaze on a spot on the wall ahead. ✵ Lengthen your spine and keep your knees aligned over your feet. ✵ Play with sitting in a passive squat, then engage your pelvic floor and lift your hips an inch out of the bottom of the squat into an active one.
DEEPEN Bring your feet wider and sink your tailbone closer toward the floor. Work your feet toward parallel.
COMMON CHALLENGES Tight hips prevent you from grounding your heels.
MODIFICATION If you have trouble lowering down below your knees, stay in a higher squat position or bring a folded blanket under your heels.
Crow
Crow is yoga wrapped up into one tiny arm balance. It presents mental and physical challenges all at once. I have heard every reason possible why people can’t do this pose—my arms aren’t strong enough, I’m scared to fall over, what’s the point of this pose? The point is to trust yourself and learn to do something that scares you—a whole new world of possibilities awaits.
SETUP From a Squat, set your hands on the floor a foot in front of you so your hands are underneath your shoulders. Lift your hips until your shoulders come over your wrists and your hips are shoulder height or higher. ✵ Lift your hips above your shoulders, and walk your feet in closer toward each other. Bend your elbows slightly and wrap them back toward parallel. Place your knees on your upper arms above your elbows. ✵ Shift your weight forward to take all your weight into your arms.
ALIGNMENT Keep your gaze forward in front of your hands for balance. ✵ Put all your weight into your hands. Lift one foot off the floor. Try the other foot. ✵ If you can balance with one foot off the floor, slowly lift the other one. ✵ Safety note: Do not hop into the pose. Move mindfully, leaning your weight into your arms with your gaze lifted so your head can counterbalance the weight of your body. ✵ Lift your feet slowly. ✵ Release into a Squat.
GAZE & FOCUS Lift your drishti to the floor past your fingertips. ✵ Play with transferring your weight into your hands, with your head and gaze still lifted forward.
DEEPEN Bring your big toes together while hovering off the floor in the pose. Straighten your arms.
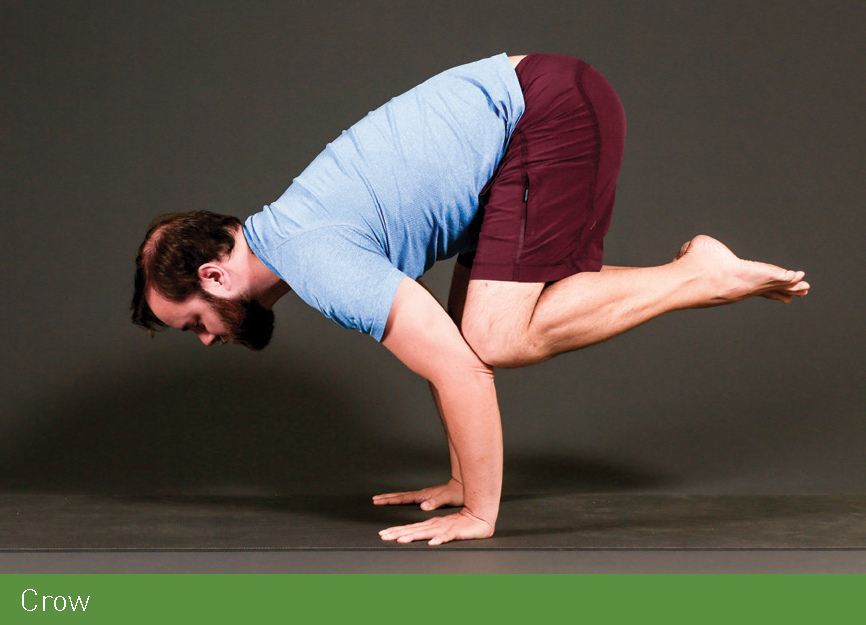
TRIPOD HEADSTAND VARIATION Lower the crown of your head—the spot between the top of your head and hairline—to the floor in front of your hands. ✵ Make sure your hands and head are in a stable triangle shape. Wrap your elbows toward each other and pull your shoulders into your back. ✵ Your knees still should be on your upper arms. Tilt your hips forward until they are stacked above your shoulders and slowly pull one knee in toward your chest. If you are stable, pull your other knee in toward your chest. ✵ Hold with your knees in at your chest, and squeeze into your centerline. ✵ If you are stable, extend one leg at a time toward the ceiling. Flex your feet. If you feel unstable, bring your feet down or practice somersaulting out. Only take this pose if you feel comfortable rolling out. Leave yourself room! ✵ Note: When new to inversions, you can also practice against a wall until you are comfortable trying this in the middle of the room.
COMMON CHALLENGES If you have a wrist injury, be mindful in Crow.
MODIFICATION Squat with your heels on the floor.
SEQUENCE TRANSITION From a Squat, lift your hips up to the sky into a Forward Fold. ✵ Walk your big toes to touch. ✵ Inhale and reach your arms up to the sky.
Eagle
Observe if your shoulders are starting to open in the bind and focus on breathing deeply into the sensations. Set your gaze and bend your standing leg more deeply for more challenge.
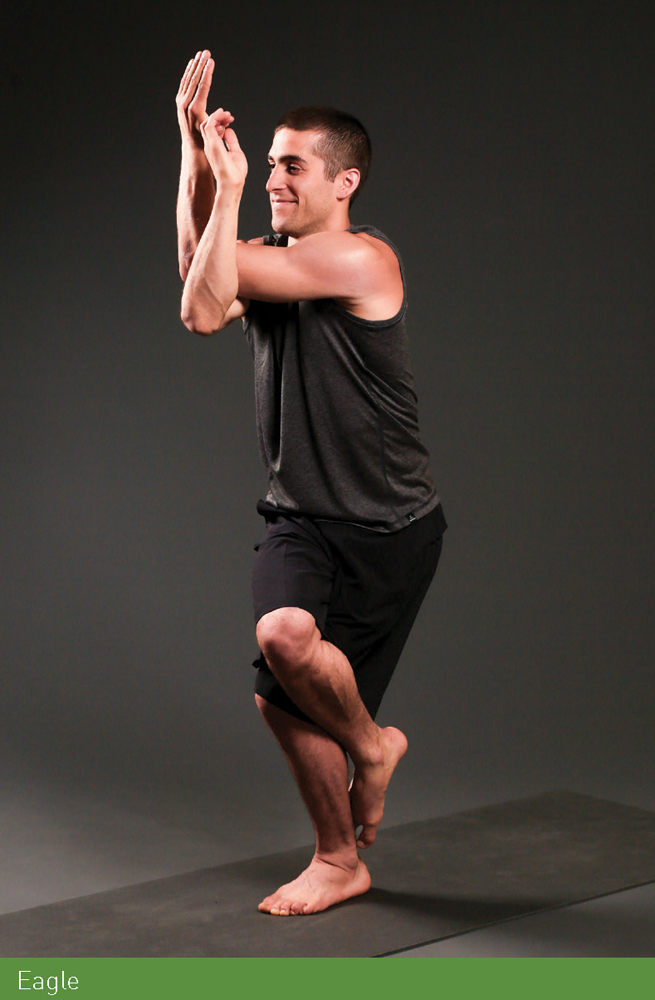
SETUP From Mountain Pose, extend your arms out wide and parallel to the floor, palms facing forward. Cross your right upper arm underneath your left upper arm. Wind your forearms around each other. Bring your palms to touch for the full bind. ✵ Lower into Chair in your legs. Cross your right thigh on top of your left thigh.
ALIGNMENT Ground into your standing foot. Squeeze your inner thighs all the way together. ✵ Stretch out your toes on your upper foot. ✵ Stack your shoulders over your hips; engage your core lock. ✵ Lift your elbows level with your shoulders. Press your hands away from your face to stack your wrists over your elbows. ✵ Soften your shoulders away from your ears; pull your arm bones in toward your shoulder sockets.
GAZE & FOCUS Look past your arms to a spot on the wall. ✵ Engage your belly firmly and set your gaze.
DEEPEN Bend your standing leg deeper and wrap your right foot around your calf. Challenge your balance by moving your gaze in toward your forearms.
COMMON CHALLENGES Tight shoulders can prevent you from taking a full bind.
MODIFICATION Reach for opposite shoulders and lift your elbows even with your shoulders.
SEQUENCE TRANSITION Release to Mountain Pose. ✵ Do Eagle on the left side; wrap your left arm under your right and lift your left leg over your right leg.
Hand-to-Knee Balancing Pose
Your body relies on several systems for balance, including feet, core, and gaze. Hand-to-Knee Balancing pose challenges your balance by using your standing leg as the foundation while your other leg switches positions and directions. You also move your gaze, testing your inner ear balance and eyes. It’s a poetic little series of poses.
SETUP Stand in Mountain Pose. Ground into the four corners of your left foot. Lift your right knee even with your hip and hold your knee with your right hand.
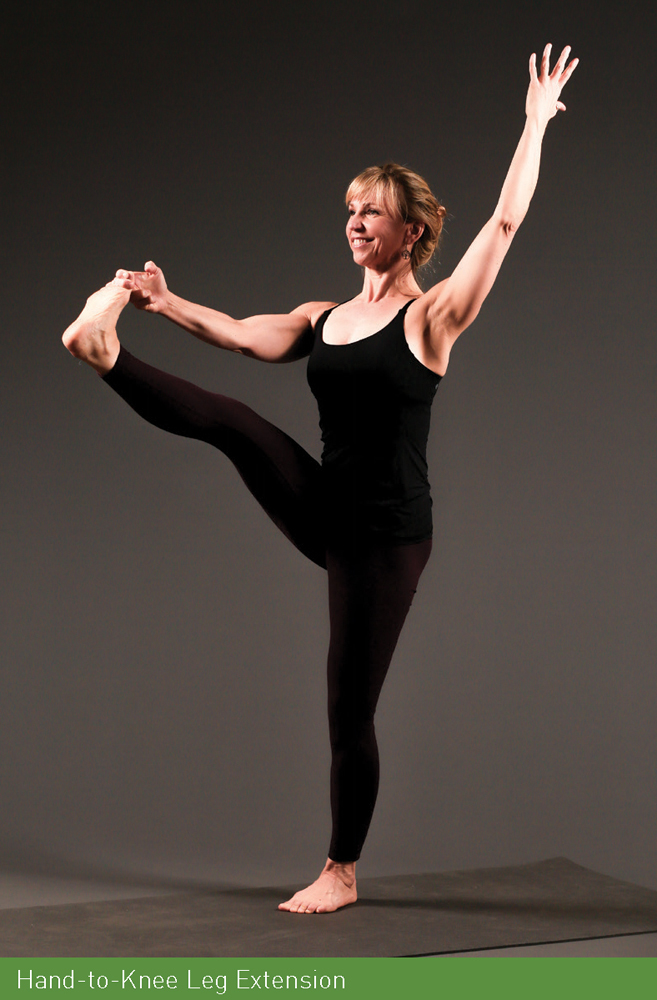
ALIGNMENT Hug your belly in toward your spine. ✵ Extend your free arm up to the ceiling, palm facing your body. ✵ Lower your shoulders away from your ears and pull your shoulder blades toward each other. ✵ Stay for five breaths.
GAZE Look at a spot on the wall in front of you.
DEEPEN Loop your peace fingers around your big toe. Extend your leg forward for a balance challenge and hamstring opening. Squeeze your right thigh muscles to lengthen your hamstring. Maintaining a long, neutral spine is more important than the extension. Focus on standing up straight. Pull the shoulder of your extended arm in toward your spine. Lengthen your leg last.
HAND-TO-KNEE SIDE On an inhale, move your knee to the right. Extend your left hand toward the opposite side of the room, palm facing up. ✵ Pull your right thigh bone into your hip socket to keep your pelvis level and your leg integrated into your body. ✵ Lower your shoulders down your back and squeeze your shoulder blades toward each other. ✵ Stay for five breaths. ✵ Gaze: Move your gaze over your left palm. ✵ Deepen: While holding your big toe, open your leg to the right. Hug your right thighbone into your hip socket to keep your pelvis level and spin your inner right thigh up to the ceiling. The tendency is to lose the centerline, which makes the balance harder! Press through your lifted heel and hug your thigh muscles to the bone.
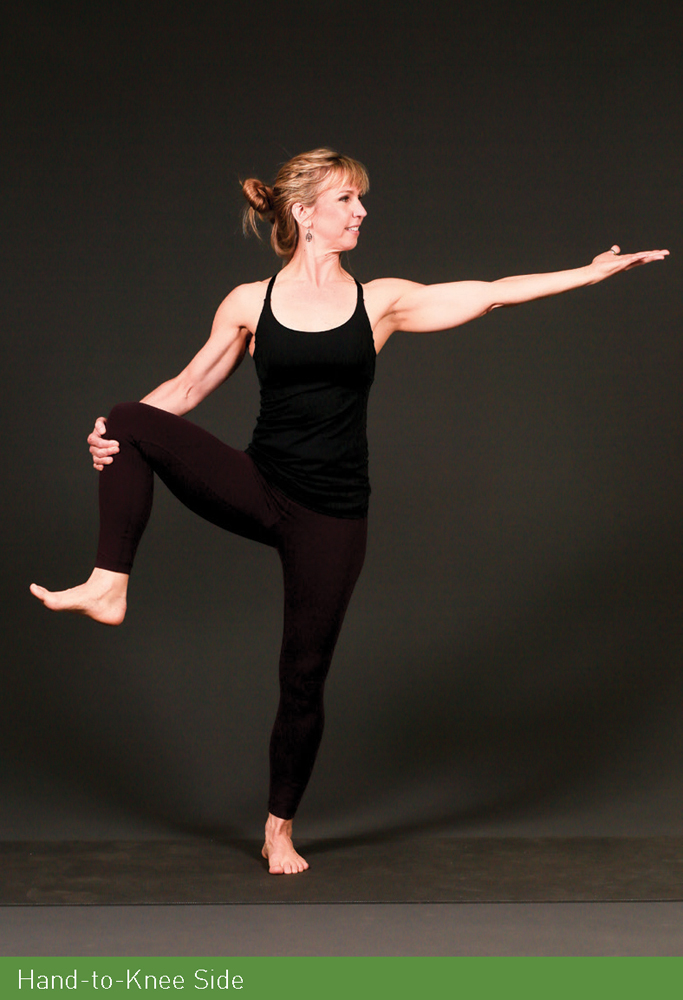
HAND-TO-KNEE LEG EXTENSION On an inhale, bring your right leg back knee back in front of you. Extend your right leg forward and parallel with the floor. ✵ Press through your extended heel. Lift your arms straight up to the ceiling. ✵ Stack your shoulders over your hips. Engage your core. If you feel it in your lower back, you are leaning back too far. ✵ Engage your shoulders toward each other. ✵ Set your drishti at your extended foot. ✵ Stay for five breaths.
SEQUENCE TRANSITION Release your upper foot and stand in Mountain Pose. ✵ Do all the Hand-to-Knee variations on your left side. ✵ Come to stand in Mountain Pose.
Airplane
As the name implies, this pose benefits from a lift in your chest like the nose of an airplane. Your standing leg becomes a lever, and the lean of your chest counterbalances the lift of your leg behind you, developing great functional strength for understanding balance no matter the circumstances while climbing. Activate your core to support your lower back.
SETUP Stand tall in Mountain Pose. Shift your weight to your left foot. Extend your right foot toward the back of your mat. Reach your hands back toward your legs and float them above your hips.
ALIGNMENT Flex the toes on your back foot toward your kneecap. ✵ Lift your shoulders just above your hips. ✵ Hug your shoulder blades onto your spine. Rotate your thumbs away from your body, with your palms facing down. ✵ Rotate your right hip down and level with your left hip so your toes point toward the floor. Pull your right thigh bone into your hip socket. ✵ Engage your core lock. ✵ Elevate your right foot even with your head.
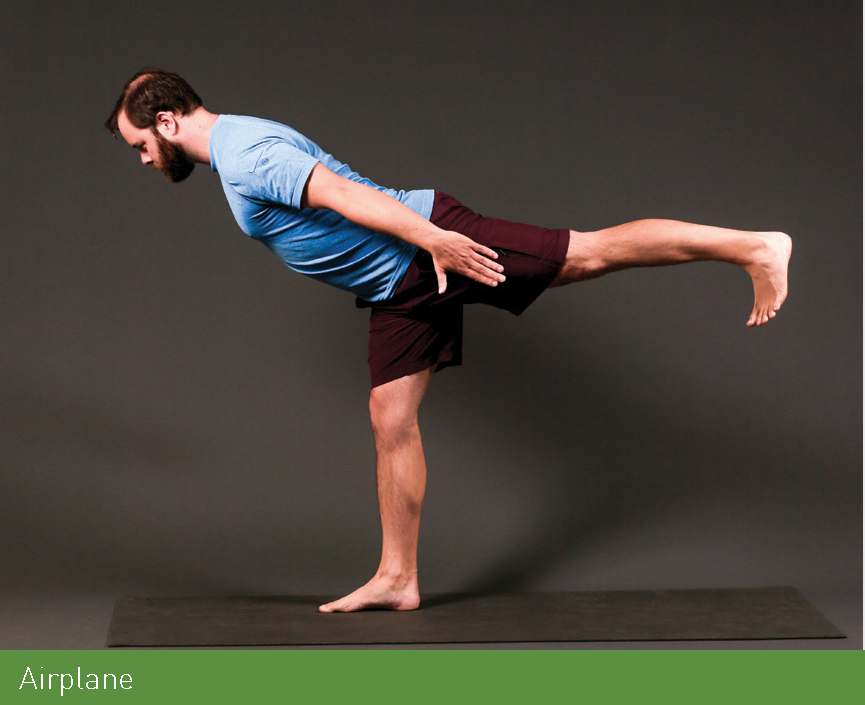
GAZE & FOCUS Look at the floor in front of your standing foot. ✵ Lift your back leg until you feel your hamstrings engage. Keep your belly lifted in and up.
DEEPEN Extend your arms forward and parallel with your head to take the pose to Warrior 3.
COMMON CHALLENGES A lack of strength and balance challenges you to stay steady in the pose.
MODIFICATIONS Bring your hands to a block placed directly under each of your shoulders to balance. Lift your chest and engage your back muscles and core. ✵ Extend your back leg parallel with the floor.
SEQUENCE TRANSITION In Airplane, bring your hands together at your chest. ✵ Lower your left hand to a block just to the left of your left foot. ✵ Roll your right hip open for Half Moon.
Half Moon
Another balancing pose, Half Moon requires engagement in your standing leg and strength in your glutes. Practice this pose and you will have a deeper understanding of your strength and grace in the pose and while flowing into moves on the wall.
SETUP Line up a block (at its tallest height) underneath your left shoulder, just to the left of your standing pinky toe. Bring your left hand to the block. Shift your weight into your left foot. ✵ Lift your right leg and roll your right hip on top of your left. Lift your upper arm to the ceiling.
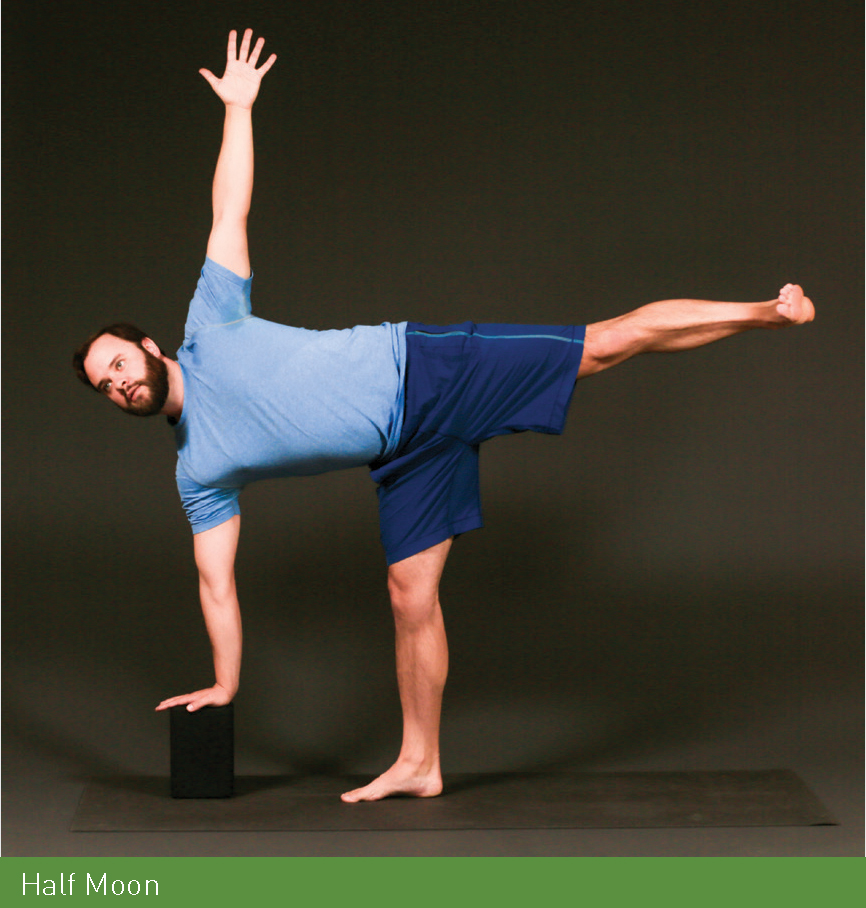
ALIGNMENT Press firmly into your standing foot with your toes pointing straight forward. Squeeze your thighs. ✵ Flex the toes of your lifted leg. Bring your lifted leg in line with your hip. You should be able to see your back toes. ✵ Pull your upper thigh bone in toward your hip. Notice your upper glute engage; lift your upper leg higher. ✵ Extend your chest long, pulling your belly in toward your spine. ✵ Keep the weight on your lower hand light; rely on your standing leg for strength. ✵ Pull your shoulder blades into your back. Extend your upper fingers to the ceiling.
GAZE & FOCUS Look at the floor. ✵ Press deeply into your standing foot and radiate out from your core in every direction.
DEEPEN Move your gaze to the ceiling. Lighten the touch of your lower hand on the block or floor.
COMMON CHALLENGES You have trouble balancing in the middle of the room.
MODIFICATION Do this pose against a wall for support.
SEQUENCE TRANSITION Bring both hands to the floor. ✵ Step your upper leg about halfway back on your mat for Revolved Triangle.
Revolved Triangle
A twist and a balance rolled up into one pose, Revolved Triangle can sometimes feel like patting your head and rubbing your belly at the same time. It requires stability in your legs to free your spine for the twist. Like a crux climbing move that requires your body to move in multiple directions, the pose will test your body awareness, determination, and focus.
SETUP Set your feet up in a stance slightly shorter than Warrior 1 (the distance between your front and back foot is about the length of your leg). Take your feet about hip-width distance, back foot set at about a 45-degree angle, for lateral stability. Take your left hand to your left hip. ✵ Stand up and extend your right arm up to the ceiling. Lower your chest parallel to the floor, your core lock engaged. ✵ Bring your right hand to a block at the tallest or middle height inside your front shin.
ALIGNMENT Press your back foot into the floor and lengthen your tailbone to press your sit bones to the wall behind you. ✵ Distribute your weight evenly between front and back foot. ✵ Squeeze your thigh muscles, including your inner thighs, toward your pelvis. ✵ Pull your belly in toward your spine. ✵ Stretch your chest parallel to the floor to lengthen your spine. ✵ With your left hand still on your hip, squeeze your shoulder blades in toward your spine and spin your chest left and up toward the ceiling. ✵ Reach your left arm up to the ceiling.
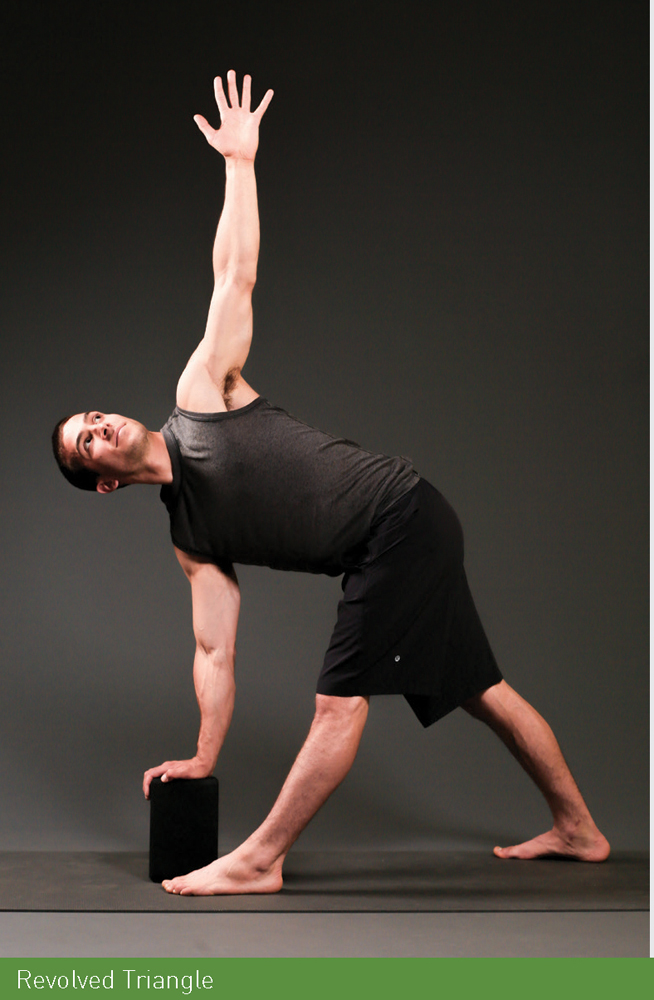
GAZE & FOCUS Look at your upper hand. ✵ Press your back foot deeply into the mat. Rotate from your oblique muscles.
DEEPEN Bring your lower hand to the floor inside your foot, or place your block outside your front foot to challenge your balance and twist.
COMMON CHALLENGES Weak glutes or tight hamstrings prevent you from grounding your back foot and keeping your hips even as you twist.
MODIFICATIONS Use the block at the tallest height or even your shin, avoiding your knee. Focus on grounding your feet before you twist.
SEQUENCE TRANSITION Step to the front edge of your mat. Complete Airplane, Half Moon, and Revolved Triangle on your left side. ✵ Bring your hands to the floor for Plank. ✵ Lower to Chaturanga, exhale. ✵ Lift your chest to Upward-Facing Dog, inhale. ✵ Exhale into Downward-Facing Dog.
BACKBENDS
A backbend practice ramps up the intensity, moving you even deeper into your spine and opening your shoulders, particularly when you add in a Wheel. Build upon what you have learned about opening your chest, engaging your big back muscles, and learn to activate the smaller muscles around your spine to work safely into your backbends.
Flip Dog
Bring lightness and flow into your Flip Dog, landing quietly into the pose and exiting with energy when you hop back over.
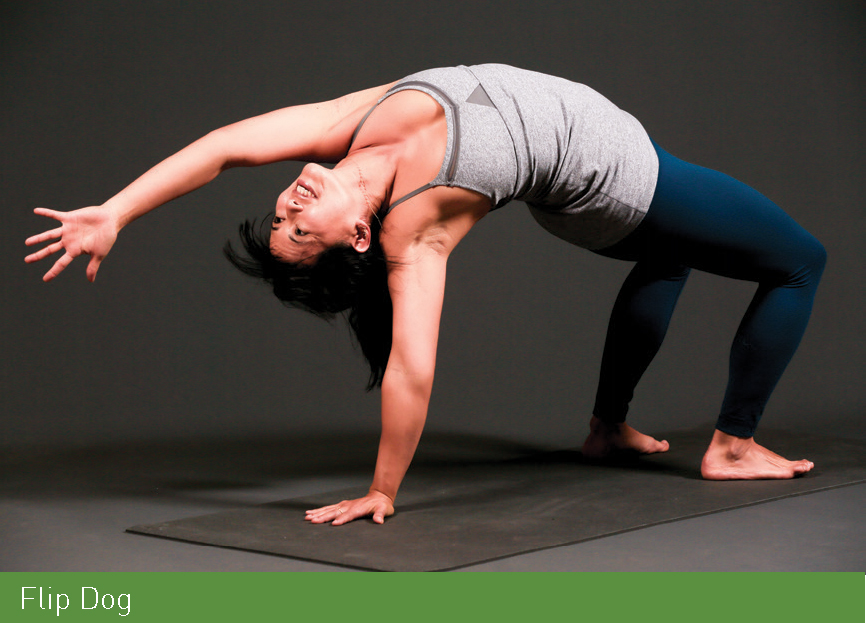
SETUP From Downward-Facing Dog, lift your right leg to the ceiling. Bend your right knee and roll your hip open for Three-Legged Dog. ✵ Look under your left arm for your upper foot and lower it to the floor behind you. Turn your other foot around 180 degrees until both toes are flat and parallel on the ground. ✵ Keep your left hand where it started on the ground and reach your free arm overhead toward the floor.
ALIGNMENT Set your feet hip-width distance. ✵ Press into the four corners of your feet and lift your hips to the ceiling. ✵ Bend your right elbow even with your shoulder for a cactus arm. Hug your shoulder blades toward each other to open your chest. ✵ Engage your core lock. ✵ Soften your neck to let your head hang toward the floor.
GAZE & FOCUS Set your gaze on the front wall or the floor under you. ✵ Press down into your feet to lift your hips higher. Hug your shoulder blades in toward your spine.
DEEPEN Reach your hand overhead toward the floor.
COMMON CHALLENGES If you have shoulder pain, be mindful in this pose—and skip if it exacerbates the injury.
MODIFICATION Stay in Three-Legged Dog.
SEQUENCE TRANSITION To release, lift your right arm to the ceiling. ✵ Hop back over to Three-Legged Dog. ✵ Lower your upper foot and move forward to Plank. ✵ Bring your feet together, shift your weight into your right hand, and roll to the outer edge of your right foot.
Side Plank
The more you practice rotating your shoulders away from your chest toward your spine, the more natural it will feel. When you add your own body weight, it balances your shoulder strength and keeps a heavily used joint healthy for more climbing.
SETUP Stack your left foot on top of your right foot. Move your right shoulder over your right wrist. Lift your left hand up to the ceiling, palm facing the same direction as your chest.
ALIGNMENT Your right fingers face the front of the mat and your right hand is stacked a couple of inches forward of your shoulder. ✵ Flex your toes toward your knees and squeeze the muscles of your legs to the bone. ✵ Keep your body at one angled plane from shoulders to feet. ✵ Pull your shoulder blades in toward your spine to take the weight out of your wrist. ✵ Spread out the fingers on your upper hand. ✵ Lengthen the crown of your head toward the front of your mat.

GAZE & FOCUS Look at the ceiling. ✵ Create stability through your legs and core.
DEEPEN Lift your upper leg as high as you can toward the ceiling.
COMMON CHALLENGES You are still building strength and struggle to hold the pose.
MODIFICATION Bring your lower knee to the floor underneath your hip for support, keeping your foundation hand, lower knee and feet in one line.
SEQUENCE TRANSITION From Side Plank, lower your upper hand for Plank. ✵ Roll forward on your toes and lower to Chaturanga. ✵ Inhale and lift your chest to Upward-Facing Dog. ✵ Exhale and lift your hips for Downward-Facing Dog. ✵ Do Flip Dog to Side Plank on the left side. ✵ Move forward to Plank and lower to the floor.
Locust
An active backbend, Locust builds strength in your lower back and activates the muscles around your spine. Your body must lift to counter gravity, strengthening to extend your chest and legs. Think about lifting from the front side of your body. It is a heart opener, after all.
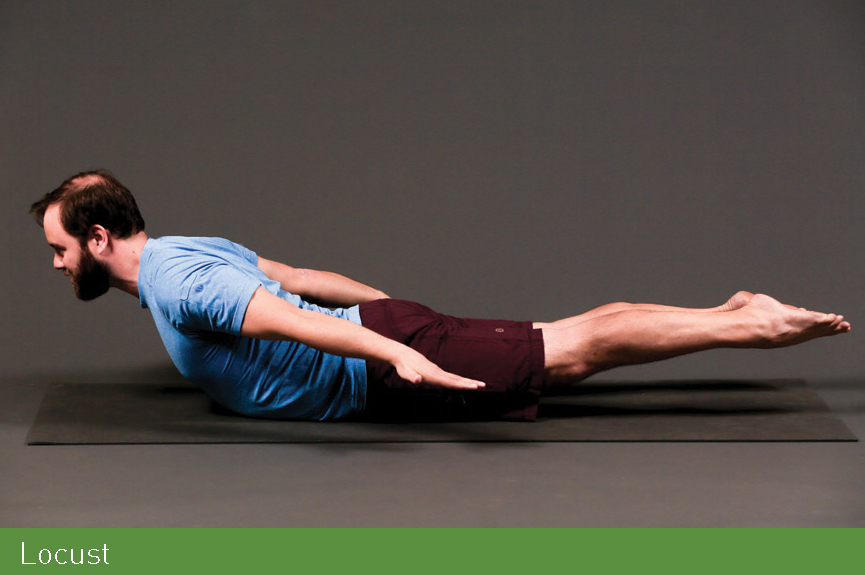
SETUP On your belly, bring your feet to hip-width distance, toes pointed. Reach your arms alongside your body, hands down by your hips, palms facing down.
ALIGNMENT Press the tops of your feet into the floor, and lift your knees off the ground. ✵ Keep your upper legs engaged, and lift them off the floor. ✵ Lengthen the crown of your head forward, and lengthen and lift your chest to the ceiling. Hug your shoulders in toward your spine. ✵ Lift your upper arm bones toward the ceiling and float your hands above your hips. ✵ Pull your belly up and in to lift even higher into the pose.
BOUND VARIATION Interlace your hands at your lower back. If you have tight shoulders and cannot do the bind, hold a strap with your hands to modify. Lift your hands off your lower back in the pose.
GAZE & FOCUS Look past your nose at the front edge of your mat or the floor. ✵ Squeeze your legs, engage your core, and lift from your chest forward and up to the sky.
DEEPEN Bring your inner thighs and ankles together and lift.
COMMON CHALLENGES You feel lower back strain.
MODIFICATION Keep the tops of your feet on the floor. Place your hands by your lower ribs. ✵ Lift your chest into Low Cobra.
SEQUENCE TRANSITION Do a second Locust with the Bound Variation. ✵ Release to the floor.
A HEALTHY SPINE
Reversing your hunch from sitting at a computer all day takes practice—in case you missed that memo. Backbends are an effective way to signal to your brain that you want to open your chest, loosen your tight shoulders, and strengthen your lower back, which are all impacted from rolling your shoulders forward all day, a pattern that often continues when climbing.
The belly backbend Locust, for example, strengthens the muscles that arch your back, including the muscles along your spine, your lower back muscles, and your butt muscles. Upward-Facing Dog strengthens your arms in addition to opening your chest. Wheel, the deepest extension of the backbends, stretches deeply into your shoulders.
When first practicing backbends, most people tend to bend at the weakest point in their spine, particularly if their body is already open. Focus on keeping your core engaged, lengthening your lower back, and using your back strength to create a long, beautiful arc in your backbend.
Deep backbends foster healthy alignment, teach you to use your legs to access your core, strengthen and support your spine, and open your chest. Energetically, backbends also open your heart, and give you a path to connect to your body and energy. Instead of skipping them, learn to love them!
Bow
Strong legs are instrumental to backbends, and Bow pose teaches your body how to engage your legs for backbends, in addition to opening up your quadriceps and strengthening your back. It also is a powerful opening in your chest and shoulders.
SETUP From your belly on the floor, bend both knees. Reach for the outer edges of your feet with your hands.
ALIGNMENT Bring your knees to hip-width distance to support your lower back and tap into your leg strength. ✵ Stretch out your toes and spin your inner ankles toward your lower back. ✵ Pull your belly in toward your spine. ✵ Press your pelvis down toward the floor. Lift your feet up toward the ceiling. ✵ Use your leg strength to lift as high as you can.
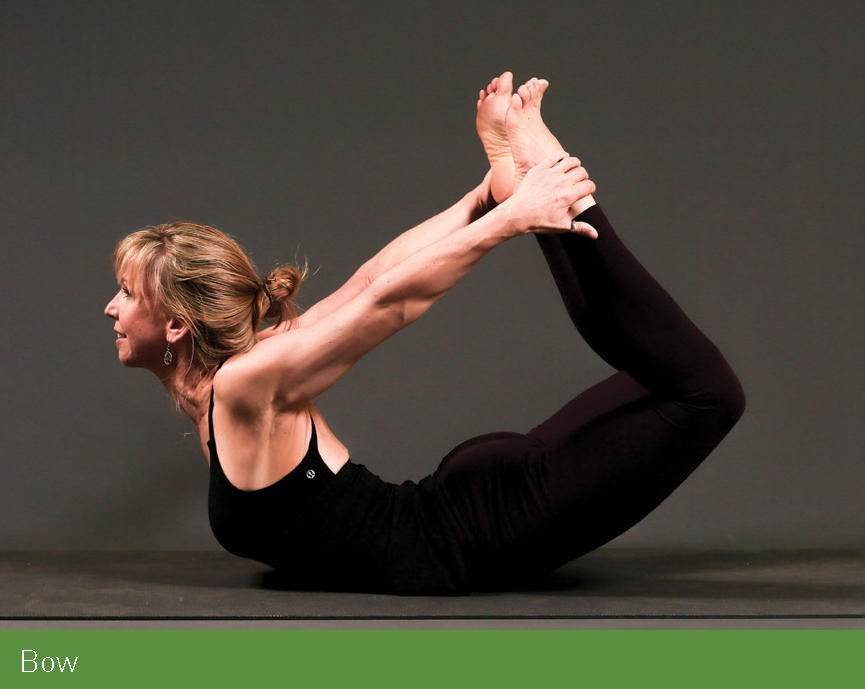
GAZE & FOCUS Lift your eyes to the floor or the front of the room. ✵ Engage your core and use your legs in the pose.
DEEPEN Reach for your ankles. Flex your toes and rock back to the tops of your thighs.
COMMON CHALLENGES Tight hamstrings or knee injuries prevent you from grabbing both of your feet at the same time.
MODIFICATION Bring your left forearm parallel to the front edge of your mat. Stack your left elbow under your left shoulder, palm facing down on the floor. Reach your right hand to your right foot. Press into your left elbow and lift your right foot up to the ceiling. ✵ Do both sides. ✵ Alternative: Substitute with Locust pose.
SEQUENCE TRANSITION Release your feet from Bow with care to the floor. ✵ Press up to your hands and knees. ✵ Move over to a seated position. ✵ Set your feet hip-width distance and flat on the mat. ✵ Lower down to your back.
Bridge
Apply what you learned about leg strength in Bow for Bridge. The more you engage your legs, the stronger your backbends will be, opening your chest and shoulders.
SETUP Walk your feet closer to your body until your fingertips brush your heels. Set your feet parallel and hip-width distance. Press into the four corners of your feet to lift your hips to the ceiling. ✵ Move your shoulders together and interlace your hands underneath your body.
ALIGNMENT Press your feet into your mat until your legs engage. ✵ Stack your knees over your ankles. ✵ Spin your inner thighs toward each other and down toward your mat. ✵ Take one hand to your spine just above the tailbone. Feel the ridge of muscles around your spine engage. Lift your spine until you feel the engagement between your shoulder blades. ✵ Lift your chest toward the back wall. ✵ Squeeze your front ribs together.
GAZE & FOCUS Look at a spot on the ceiling. ✵ Press deeply into your feet for strong legs.
DEEPEN Lift your right knee into your chest. Press strongly into your rooted foot. Extend your right leg, foot flexed, to the ceiling, keeping your hips level. Switch sides.
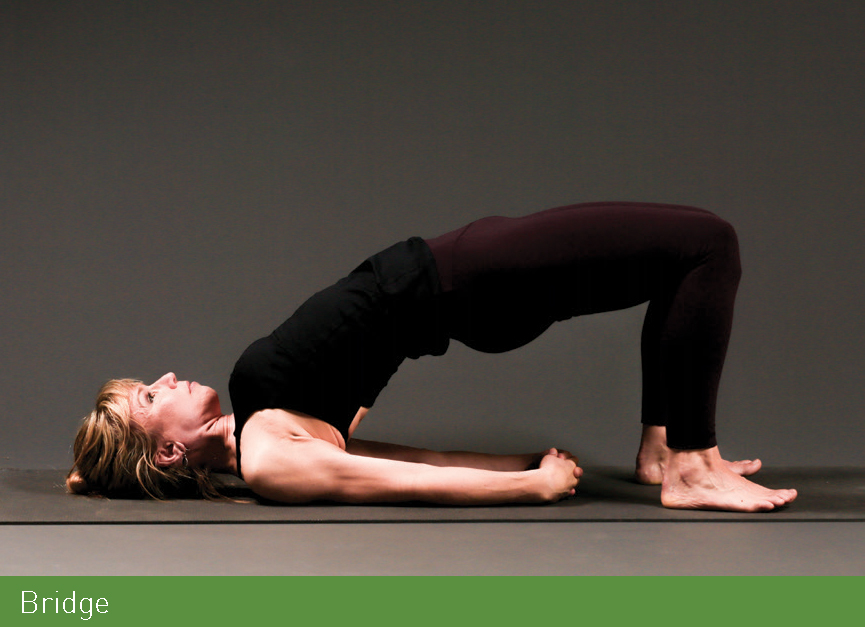
COMMON CHALLENGES Tight shoulders prevent you from interlacing your hands.
MODIFICATION Use a strap between your hands for a bind. Or press your palms into the floor.
SEQUENCE TRANSITION To release, reach your arms up to the ceiling and slowly lower down the length of your spine. ✵ Keep your feet in the Bridge setup to prepare for Wheel.
Wheel
Wheel is where all the alignment you have learned comes together. A fully extended backbend, this peak pose requires powerful legs, integrated shoulders, and deep breathing. You will experience strength, heart opening, and an energy burst. If the last time you did this pose was around the age of six, today is the best day to start.
SETUP From your Bridge with your feet at hip-width distance, plant your hands on either side of your head as wide as your mat, fingers turned in toward your shoulders. Point your elbows directly to the back of your mat. Lift your hips like you are going into Bridge. Push down into the floor with your hands. ✵ Set the crown of your head on the floor and wrap your elbows in toward each other so your upper arms are parallel. Press your hands down into the floor to straighten your arms.
ALIGNMENT Ground your feet deeply into the floor. ✵ Spiral your inner thighs toward each other and down toward your mat. ✵ Pull your shoulders away from your ears, and wrap your shoulder blades in toward your spine. ✵ Press your hands deeply into the earth. ✵ Pull your front ribs in toward each other. ✵ Tilt your tailbone and pull your pubic bone toward your ribs to lengthen your lower back. ✵ Let your head hang toward the floor.
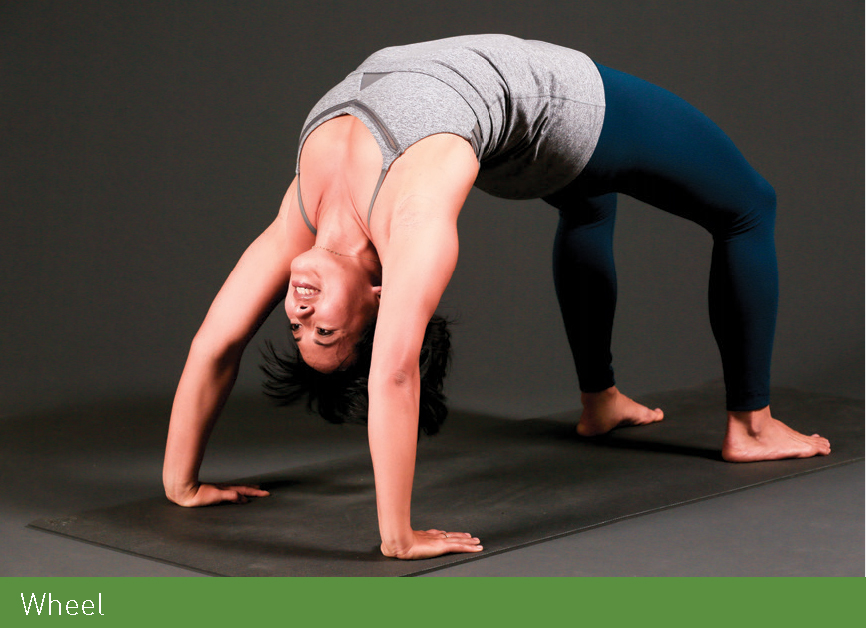
GAZE & FOCUS Look at the floor behind you. ✵ Push into your feet to get strong in your legs. Spin your inner thighs toward each other and down toward the floor. Pull your shoulder blades in together.
DEEPEN Place a block between your inner thighs at the narrowest height as high as it will go. Come up to Wheel while squeezing the block.
COMMON CHALLENGES Shoulder or wrist injuries may prevent you from accessing the full pose. ✵ You struggle to straighten your arms. ✵ The pose puts pressure on your lower back.
MODIFICATION For shoulder or wrist injuries, stay in Bridge pose. ✵ To create more space in your shoulders, place your hands as wide as your mat. ✵ For lower back pain, bring your feet wider and spin your inner thighs toward the floor. Hug your belly in before you come up. If you are still feeling lower back pain, build strength in Bridge.
SEQUENCE TRANSITION To release, tuck your chin, lower to the back of your head, and slowly lower down the length of your spine. ✵ Do Wheel three times total. ✵ Come down to your back, and bring the bottoms of your feet together for Supine Butterfly. Stay for five breaths. ✵ Rock up to a seated position. ✵ Move to Downward-Facing Dog.
Lizard
A deep, dynamic hip opener, your hips may be more inclined to shout at you than sigh with delight here. Either way, Lizard is a release valve for your glutes and hips. Catch your back foot for a stretch deep into your quads while working toward a higher high step.
SETUP From Downward-Facing Dog, step your right foot outside your right hand. Lower your back knee to the mat.
ALIGNMENT Flex your front foot and roll to the outer edge of your foot. The sole of your foot is off the floor and your right knee will roll open. ✵ Lower your elbows down beside your foot with elbows roughly in line with your heel. ✵ Release your head toward your hands. ✵ Stay for ten breaths.
GAZE & FOCUS Look at the floor just inside your front foot. ✵ Notice the sensations in your hip and send your breath there.

BOUND VARIATION Come up to your hands. Reach your right hand for your back foot. Stay on your left hand or lower your left elbow to a block or the floor. ✵ Slowly shift your weight toward your front foot. Stay another ten breaths. Look to a spot on the wall to the right or close your eyes. ✵ Modification: If you have trouble grabbing your foot because of tightness in your hamstrings or hips, loop a strap around your foot and hold the strap for the stretch.
DEEPEN Do not bind your Lizard. Instead, tuck your back toes, squeeze your quads, and lift your back leg to the ceiling.
COMMON CHALLENGES Tight hips prevent you from coming down to your elbows.
MODIFICATION Place a block underneath your elbows.
SEQUENCE TRANSITION If in Bound Lizard, release your foot gently. ✵ Come up to your hands.
Half Pigeon
How do hips get tight? Let me count the ways: hiking, running, sitting, and countless more. Your muscular hips need to be both strong and flexible to climb at your most optimal, and they need extra time to relax and release. Your body may resist this stretch initially as you work into your piriformis, a deep hip stabilizer. Breathe deeply into the sensation in your body, and give the muscles around your hip time to soften as you work into the stretch.
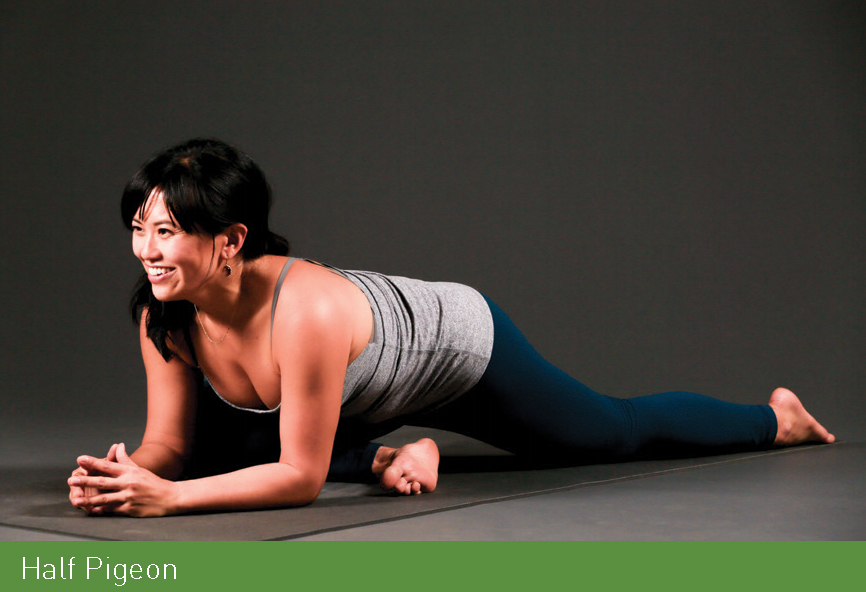
SETUP From Lizard, move your right foot across your mat and in toward your pelvis, keeping your right foot flexed to protect your knee. Extend your left leg straight behind you so that the top of your thigh is on the ground.
ALIGNMENT Flex the toes on your back foot and come up to the ball of your foot. ✵ Roll up to center so your pelvis is squared toward the front of your mat. Place a block under your right hip if you have trouble staying centered. ✵ Pull your thigh bones in toward your pelvis. ✵ Lengthen your chest and slowly lower your torso toward the floor. ✵ Walk your arms in front of you. Soften your shoulders and face. ✵ Place a block under your forehead if it doesn’t touch your mat. ✵ Stay for one minute.
GAZE & FOCUS Close your eyes. ✵ Breathe deeply into your hips.
DEEPEN Shift your front shin closer to parallel with the front of your mat to get a deeper opening.
COMMON CHALLENGES Knee injuries prevent you from staying in this pose without sharp pain or you are experiencing lower back and leg pain from sciatica.
MODIFICATION Take Reclined Pigeon (see Strength Practice I for more details).
Double Pigeon
If you thought Half Pigeon was a delight, Double Pigeon will transport you into a whole new realm of hip opening. This pose is the very essence of patience! See if you can breathe deeply and relax the intensity of the pose, breathing into unexplored territory in your hips.
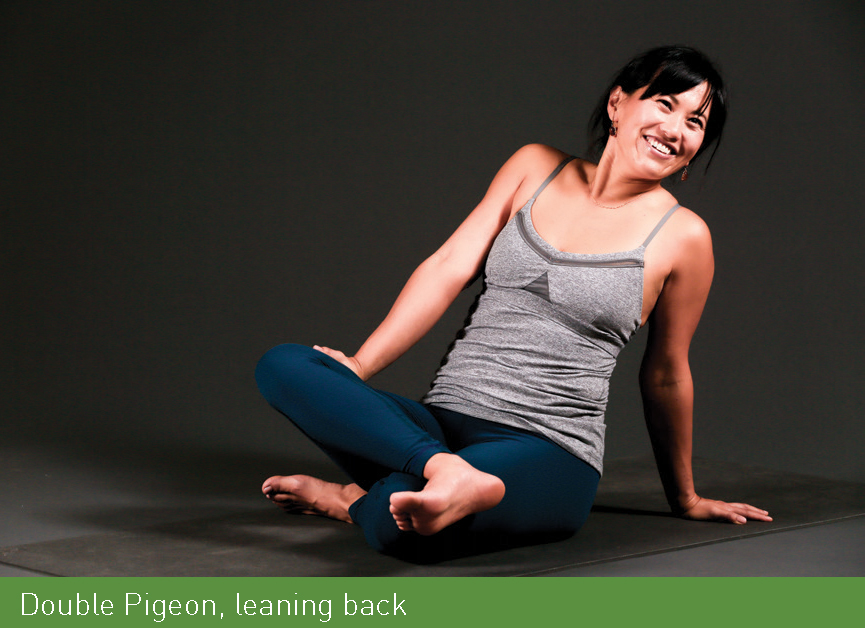
SETUP From Half Pigeon, swing your back leg forward and around. Flex your upper foot and move it until your ankle bone is just past your thigh. ✵ Flex the toes of your right foot and tuck your foot in toward your pelvis.
ALIGNMENT Move around until you can ground your sit bones on the floor. ✵ Bring your thighs parallel with the long edges of your mat. Flex both of your feet to protect your knees. ✵ Place your left hand on your left inner thigh. Bring your right hand to the floor behind you. Press your left thigh open toward the floor. ✵ Place your hands on either side of your hips and slowly reach your chest forward toward your legs. If you can walk your hands forward and relax, do that. ✵ Stay for one minute.
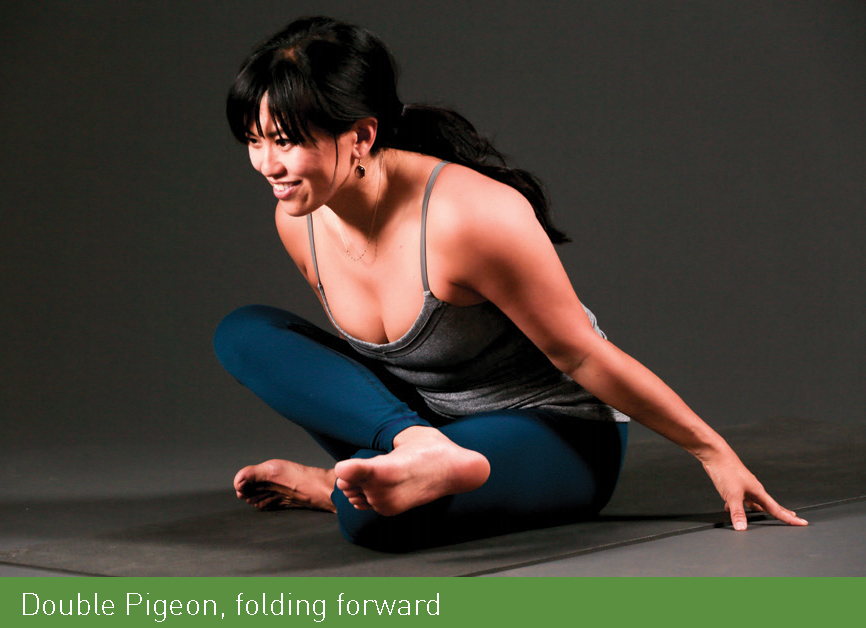
GAZE & FOCUS Close your eyes or look at the ground in front of you. ✵ Pay attention to the sensation in your hips and send your breath there.
DEEPEN If you have open hips, bring your lower shin in line with your upper shin. Keep your toes flexed. Lower your chest forward over your legs.
COMMON CHALLENGES Tight hips prevent you from bringing both of your sit bones to the ground.
MODIFICATION Sit on a block to take the work out of your hip flexors and into the bigger muscles around your pelvis.
SEQUENCE TRANSITION Swing your upper leg to the back of your mat. ✵ Step your front foot toward the back edge of your mat for Downward-Facing Dog. ✵ Step your left foot forward for Lizard through Double Pigeon on your left side. ✵ From Downward-Facing Dog, move into a seated position.
Reverse Tabletop
A shoulder opener, Reverse Tabletop is also a backbend that moves deeply into your chest, biceps, and deltoids in your shoulders, an area that can use some opening after climbing. Always an interesting challenge, it’s a powerful, modified backbend.
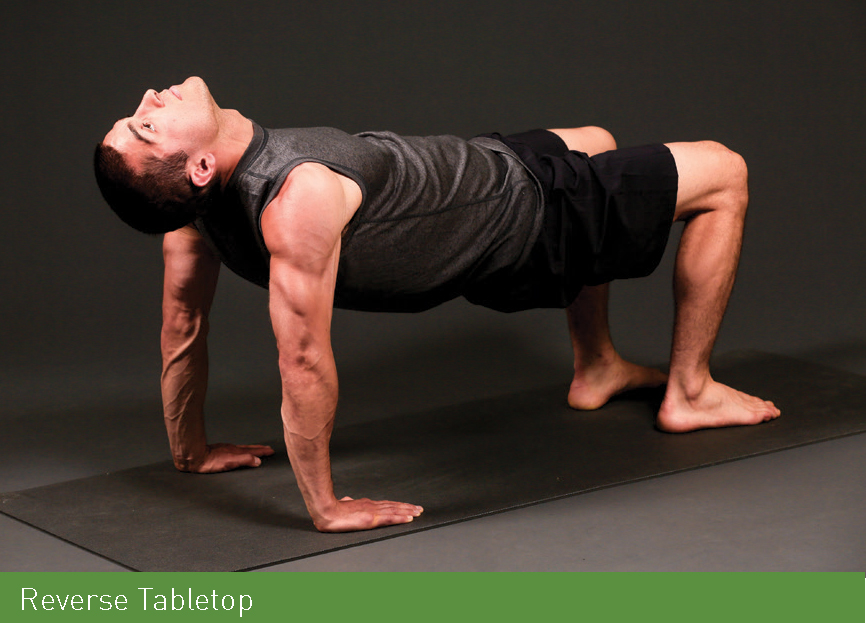
SETUP From a seated position, place your hands behind you on the mat with your fingertips facing your body. Walk your feet in so they are flat on the floor at hip-width distance.
ALIGNMENT Ground into the four corners of your feet and lift your hips toward the ceiling. ✵ Press your palms into the ground. ✵ Lengthen the crown of your head behind you. Gently release your head onto your shoulders. ✵ Rotate your inner thighs toward each other and down toward your mat.
GAZE & FOCUS Set your gaze on the ceiling or wall behind you. ✵ Ground your feet deeper into the floor to activate your leg muscles.
DEEPEN Extend your legs straight on the floor. Press into your heels to lift your hips. Press the soles of your feet into the earth; spin your inner thighs down toward the floor.
COMMON CHALLENGES Weak hamstrings make it difficult to keep your legs internally rotated. Also, tight chest muscles can make breathing feel challenging.
MODIFICATION Play with moving your breath around to stay in the pose.
SEQUENCE TRANSITION Lower your hips to the floor from Reverse Tabletop into a seated position.
Head-to-Knee Seated Forward Fold
When your body is tired from practice, it is easier to relax into stretches. Use your breath to soften your muscles and get deeper into your body.
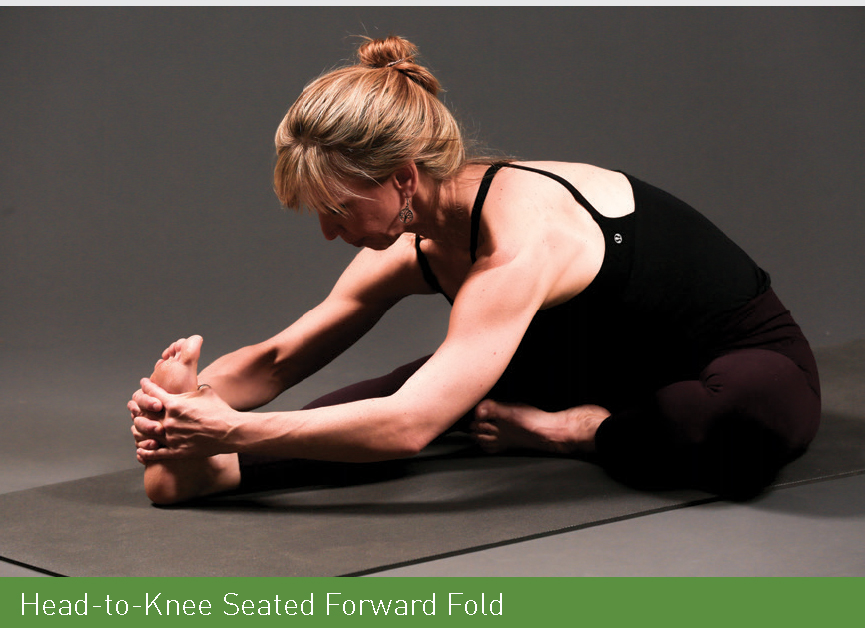
SETUP From a seated position, extend one leg straight. Tuck your other foot in toward your pelvis, bringing the sole in against your inner thigh.
ALIGNMENT Flex the toes on your extended leg. ✵ Reach your hands for your extended foot. ✵ Squeeze your thigh muscles to extend into your hamstring. ✵ Lengthen your chest toward your foot. Release your head toward your shin. ✵ Keep your sit bones grounded. ✵ Hold for ten breaths.
GAZE & FOCUS Close your eyes. ✵ Ground your sit bones into the mat.
DEEPEN On your inhale lengthen your chest toward your foot; exhale and fold deeper.
COMMON CHALLENGES Knee injuries prevent you from bringing your foot in toward your pelvis.
MODIFICATION If you can’t reach your foot, use a strap or a towel. ✵ Bring your bent foot into your shin instead of to your inner thigh.
SEQUENCE TRANSITION Repeat pose on other side. ✵ Come to a seated position and roll down onto your back.
Shoulder Stand
Going upside down is a hallmark of a yoga practice, inverting both your body and your perspective on the world. The queen of all inversions, Shoulder Stand creates harmony in your nervous and endocrine systems. It is a restorative inversion, stimulating the heart and flushing your spine.
SETUP From your back, lift your feet up and over behind your head, reaching them toward the floor behind you so your pelvis stacks over your shoulders. Wiggle your shoulders underneath you to create a solid base. ✵ Place your palms on your back.
ALIGNMENT Inch your shoulders in closer toward your spine to create a solid foundation. ✵ Lift your hips and legs higher with your hands on your back by walking your elbows in toward each other. ✵ Extend your legs up toward the ceiling. ✵ Keep a gap between your chin and chest to keep your neck off the floor.
GAZE & FOCUS Set your drishti on the ceiling and keep it focused there; avoid turning your head from side to side—this will protect your neck. ✵ Keep your legs still.
DEEPEN Lift your hips higher over your shoulders.
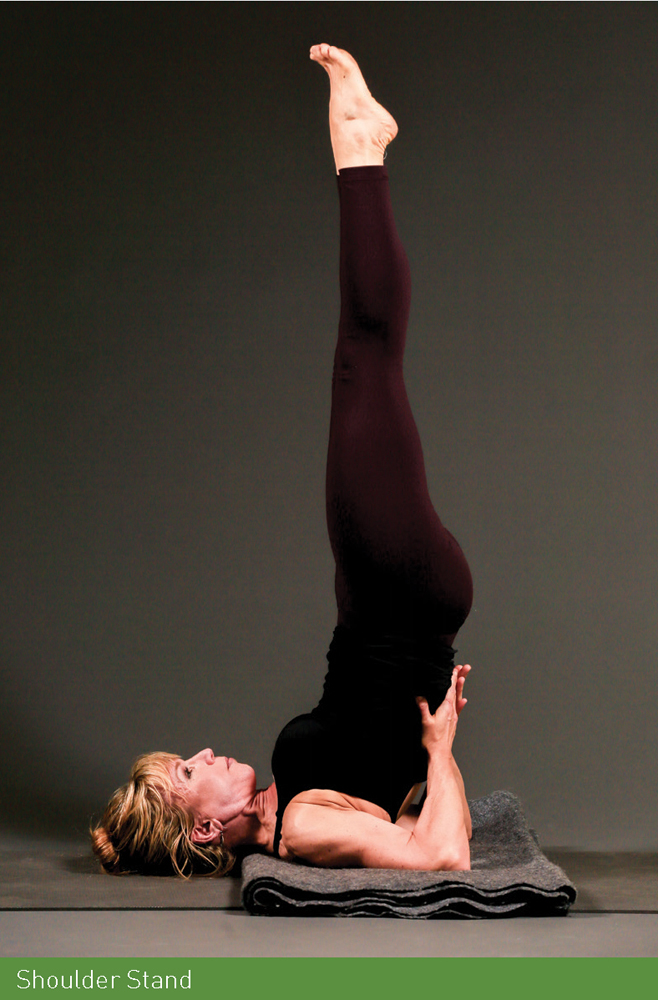
COMMON CHALLENGES A tight lower back and/or hamstrings make it difficult to get into the pose.
MODIFICATION Place a folded blanket under your shoulders for padding before moving into the pose. Or substitute with Legs Up the Wall pose (from Strength Practice I.)
Ear Pressure Pose
Allow yourself to relax into the Ear Pressure Pose and feel the benefits of this deep stretch into the mid-back and turning your body upside-down.
SETUP From Shoulder Stand, lower your knees toward your forehead. Keep your hips stacked over your shoulders.
ALIGNMENT Keep your hands on your back; relax your mid-back. ✵ Rest your knees on your forehead. ✵ If your body allows, bring your knees outside your ears. ✵ If your knees come down by your ears, wrap your arms around the backs of your thighs. Otherwise, keep your hands on your back.
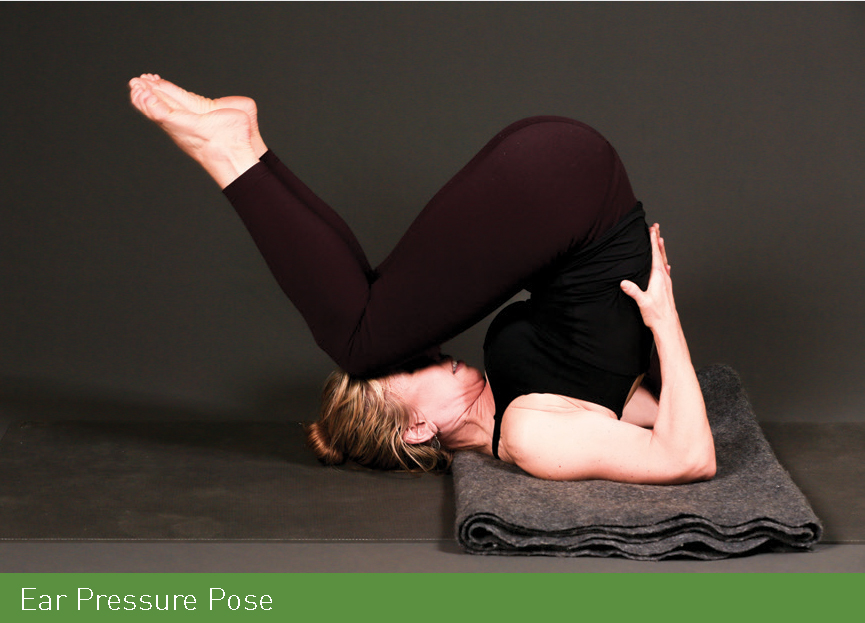
GAZE & FOCUS Close your eyes. ✵ Soften your spine and mid-back.
COMMON CHALLENGES Your back doesn’t allow your knees to reach your ears.
MODIFICATION Keep your knees on your forehead.
SEQUENCE TRANSITION Roll slowly out of Ear Pressure pose. ✵ Come up to a seated position.
Fish
A backbend counter pose to Shoulder Stand, Fish opens your chest and throat wide to the sky. Now is a perfect time to take a Lion’s Breath, a big, open-mouthed loud exhale. Stick your tongue out to release your jaw!
SETUP From a seated position with your legs straight on the mat, slide your fingertips underneath your sit bones. Lower to your elbows, keeping your shoulders off the floor. Press into your hands and puff your chest up to the ceiling. ✵ Lower the top of your head to the mat.
ALIGNMENT Tuck your chin to lengthen the top of your head behind you and lower your head toward the floor. ✵ Press deeply into your hands and slide them underneath you to bring your head onto the floor. ✵ Open your chest to the sky. ✵ Take a Lion’s Breath: Inhale deeply. On your exhale, stick out your tongue and roar loudly.
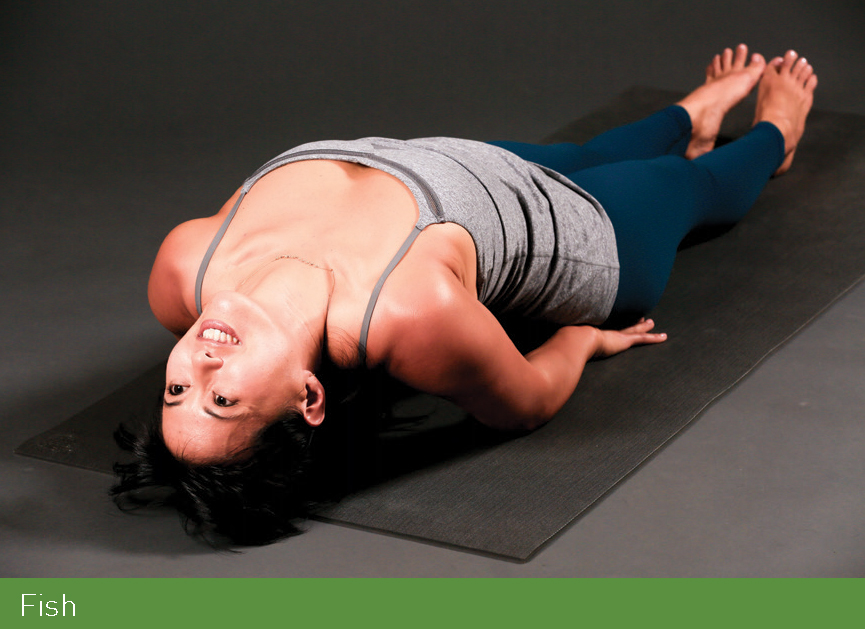
GAZE & FOCUS Close your eyes or look at a spot on the floor behind you. ✵ Connect the top of your head to the floor to relax your neck. Breathe into your chest.
COMMON CHALLENGES You can’t get your head to the floor.
MODIFICATION Slide your hands deeper underneath you. Or, place a block (in its widest direction) just below your shoulder blades. Relax over your block for a more restorative Fish.
SEQUENCE TRANSITION Tuck your chin to release to the floor.
Supine Twist
A Supine Twist relaxes your spine and allows your body to wind down from the intensity of practice and also to loosen your spine from the impact of gravity. (Note: Photo shows deeper option.)
SETUP From a resting position on your back, pull your knees into your chest. Extend your arms open into a T.
ALIGNMENT Lower your knees to your left, knees still hugging in toward your chest. ✵ Shift your hips under you toward the right. ✵ Keep both shoulders anchored on the floor. ✵ Look away from the twist to your right hand so your neck also benefits from the rotation. ✵ Stay for ten breaths.
GAZE & FOCUS Look away from your knees toward your opposite hand. ✵ Relax your body and allow gravity to take the weight of your legs toward the floor.
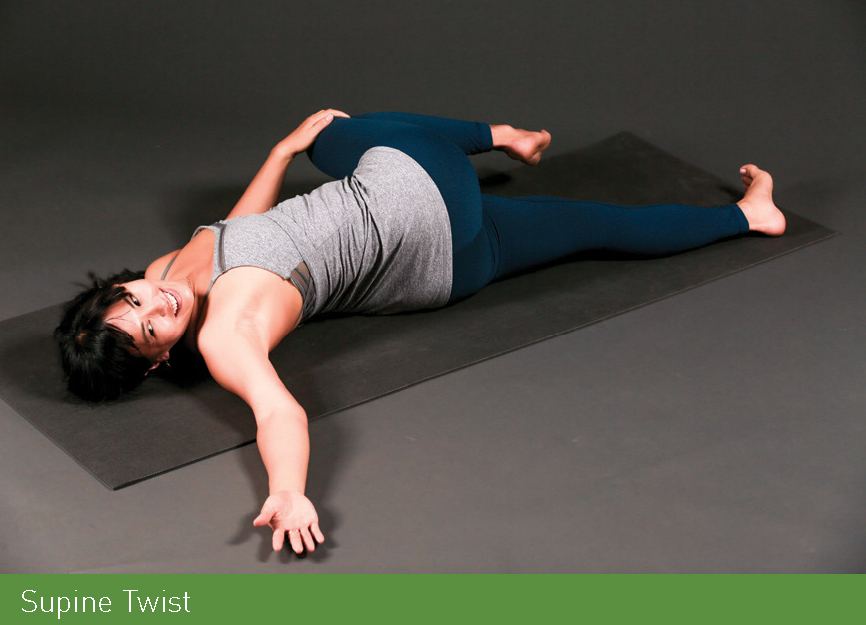
DEEPEN Pull your right knee into your chest, and straighten your left leg on the ground to deepen the twist. Roll your right knee toward your left side.
SEQUENCE TRANSITION Repeat the twist on the other side of your body.
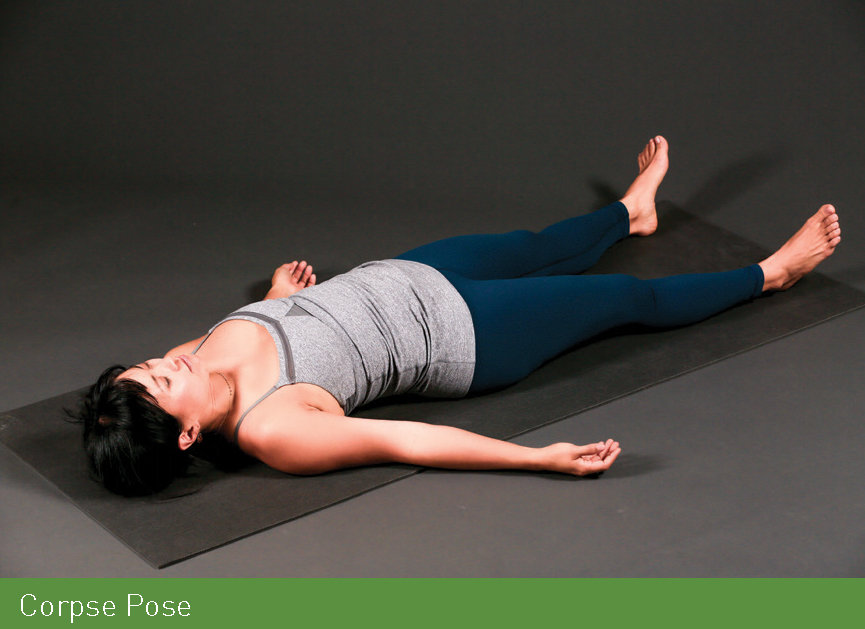
FINAL REST
You’ve got this one! Lay down, relax all the muscles in your body, let go of your ujjayi breath, and know that all is well.
Corpse Pose
Relax all the muscles in your body, starting with your legs, moving through your hips, belly, shoulders, and face. Commit to staying still.
SETUP From Supine Twist, come to Corpse Pose with your arms at your sides, palms facing up.
ALIGNMENT Slide your shoulders under you. ✵ Relax the muscles in your legs, shoulders, and face. ✵ Move into your natural breath. ✵ Stay in this pose for three minutes.
GAZE & FOCUS Close your eyes. ✵ Stay awake and still. Notice your natural breath.
DEEPEN Take a five-minute final rest.
RECOVERY PRACTICE
TIME: 30 MINUTES
EQUIPMENT: BLOCK, YOGA MAT, STRAP,
AND BOLSTER (OPTIONAL)
Pushing limits comes naturally to climbers. The sport requires focus and persistence to master the next level of climb. As a climber, you know what it’s like to chase a route, taxing your body over and over again for hours at a time, and testing your physical endurance and mental strength.
Your body also is meant to rest and recover. You may be excellent at the school of recovering prone on the couch. Some days, I include myself in this category. I love a good day of doing nothing, despite the advice of my own trainers to do something every day, even on a rest day. Others of you may itch to move, unwilling to spend a day without expending any energy.
A middle ground exists between relentless action and zero. When tired, and especially when sore, you may be tempted to take the couch approach. You reason that you already spent hours outdoors, and your legs are throbbing, your shoulders ache, and your hands are fried. And the idea of movement sounds torturous, and the temptation to stay still is strong. But it is still wise to move your body—and you will move through the soreness faster by moving again.
A restorative yoga practice offers your body a soft approach, giving it the space it needs to heal from the previous day’s intensity while still moving the lactic acid through your muscles to support a faster recovery.
The following practice is intended for a day you can tell you need to take it down a notch. It addresses the major parts of the body that need a gentler touch after an extended day climbing, including long stretches into your hips and shoulders and mellow twists to open your spine. With a focus on breathing, you will notice the sensations of your body and more easily relieve any stress you may feel.
SEQUENCE FOR RECOVERY PRACTICE
» Child’s Pose
» Cat-Cow
» Downward-Facing Dog
» Rag Doll
» Modified Sun Salutation A
» Low Lunge
» Twisted Crescent Lunge, Modified
» Lizard
» Squat
» Gorilla Variation
» Eagle
» One-Armed Shoulder Opener
» Locust
» Heart Throat Nose Pose
» Toes Pose
» Half Pigeon
» Double Pigeon
» Frog
» Reverse Tabletop
» Head-to-Knee Seated Forward Fold with a Twist
» Seated Twist
» Legs Up the Wall
» Corpse Pose
With a 30-minute restorative yoga practice, you can hone in on areas that ache or feel like they need some attention, allowing you more time in longer stretches to release more deeply and recover with ease.
INTEGRATE AND ACTIVATE
Even in a recovery sequence, it’s still important to warm the body before moving into deep stretches. Use this time to settle your mind, get connected with your body and prepare to release mentally and physically.
Child’s Pose
Start your recovery practice with Child’s Pose to notice your physical body and your ujjayi breath, and to bring your mind to the present. Observe the feeling of your mat underneath your hands and forehead. Feel your breath move into your ribs. Listen to what your body is telling you.
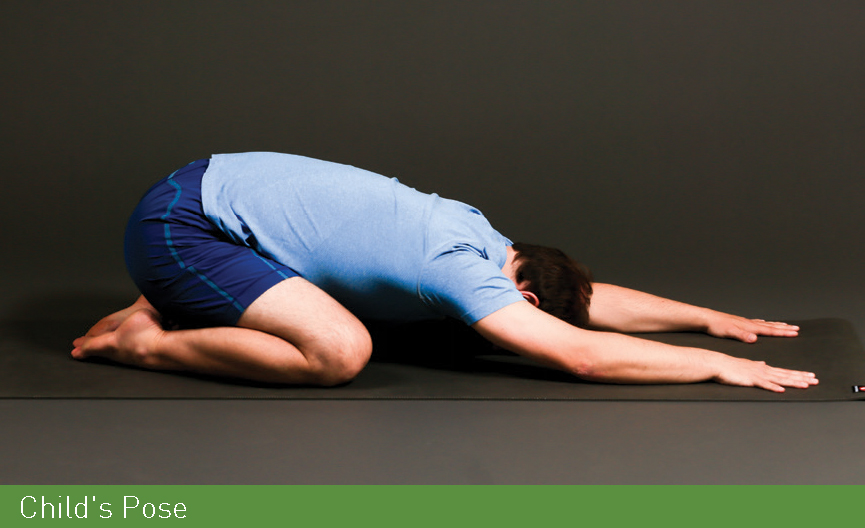
SETUP From a seat, move your knees to the edges of your mat, and bring your big toes together to touch. Sink your hips back over your heels. Walk your hands forward at shoulder-width distance and bring your forehead to the ground.
ALIGNMENT Let go of tension in your shoulders. ✵ Engage your core gently, pulling your belly up and in toward your spine. ✵ Come into your ujjayi breath. ✵ Stay for ten breaths.
GAZE & FOCUS Close your eyes. ✵ Deepen your ujjayi breath. Pay attention to the feeling of the mat under your hands and forehead.
COMMON CHALLENGES A tight lower back or hips can prevent your forehead from touching the ground. ✵ Knee injuries can prevent you from bending your knees comfortably.
MODIFICATIONS Bring a block under your forehead to relax your neck. ✵ Roll over onto your back for Supine Butterfly or lay flat on your belly.
SEQUENCE TRANSITION Move forward to your hands and your knees.
Cat-Cow
Cat-Cow is a gentle way to warm up your spine, releasing tension there, including your neck. The pose creates fluidity in your pelvis and lower back, particularly if you are feeling stiff after a long day hauling gear and climbing. It also syncs your breath with your body’s movement for a vinyasa flow.
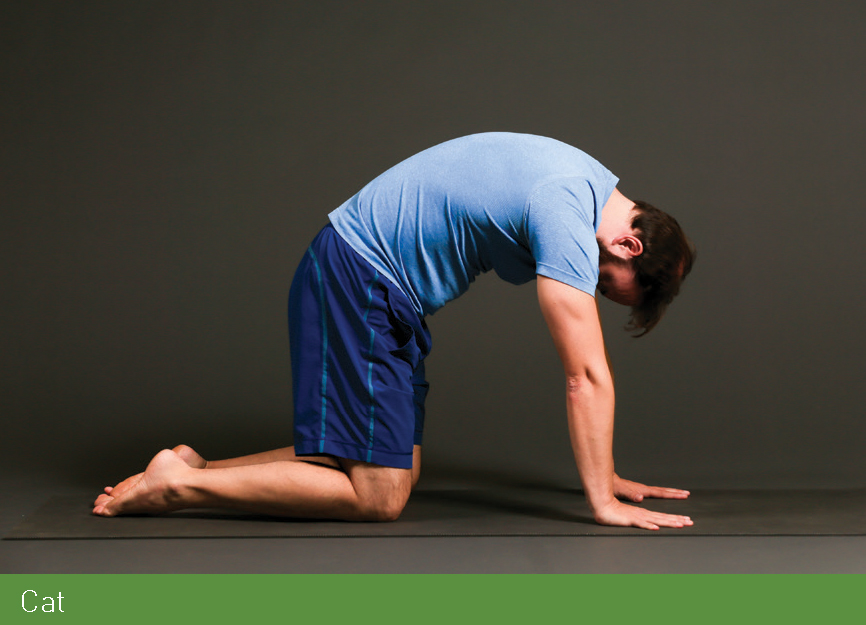
SETUP On your hands and knees, stack your hands underneath your shoulders, palms flat. Stack your knees under your hips.
ALIGNMENT Pull your navel up and in toward your spine. Keep your spine neutral to start. ✵ Cat: On an exhale, arch your spine and roll your shoulders forward. Keep your belly engaged as you round your spine. Move your gaze down toward your legs. ✵ Cow: On an inhale, lift your tailbone and chest toward the ceiling. Soften your belly toward the floor while keeping your core engaged. Stretch the crown of your head toward the ceiling. ✵ Repeat the Cat-Cow cycle five times.
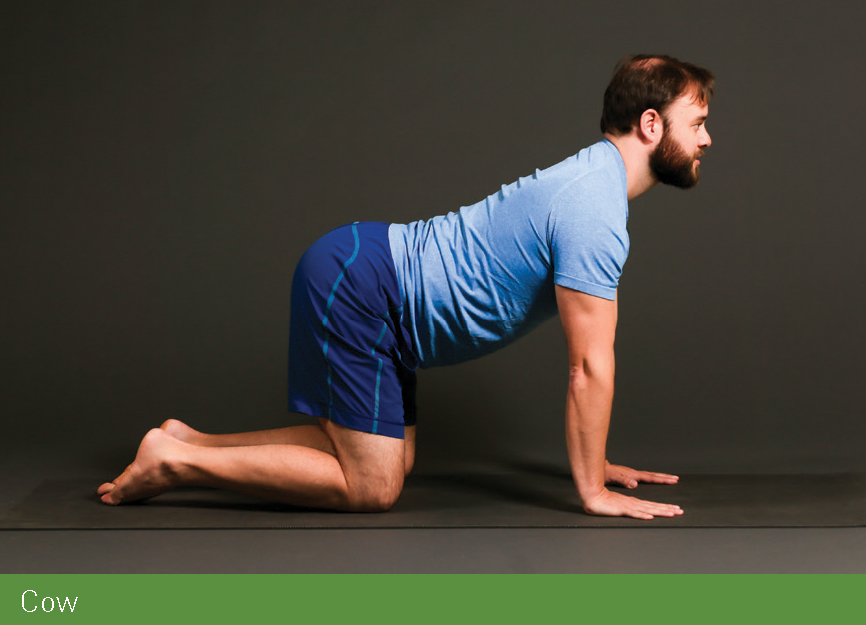
GAZE & FOCUS Let your drishti move naturally with the pose, or work with your eyes closed. ✵ Move your spine slowly, and let the pace of your breath determine how long it takes to do each Cat and Cow. Take your time and breathe fully.
DEEPEN Shift your hips in broad circular movements. Start clockwise, moving your right hip out past your mat, swing it back down over your heels, move to the left edge of your mat, and move your weight forward into your hands to complete a circle. Do it three times, then repeat counterclockwise three times.
SEQUENCE TRANSITION Tuck your toes and lift your hips to the ceiling for Downward-Facing Dog.
Downward-Facing Dog
As you become familiar with it, Downward-Facing Dog may evolve into the resting pose it is meant to be. Use the time in this pose to listen to your body, open into your shoulders, spine and hamstrings, and focus your gaze.
SETUP Lift your hips to the sky. Move your feet back about six inches toward the back edge of your mat.
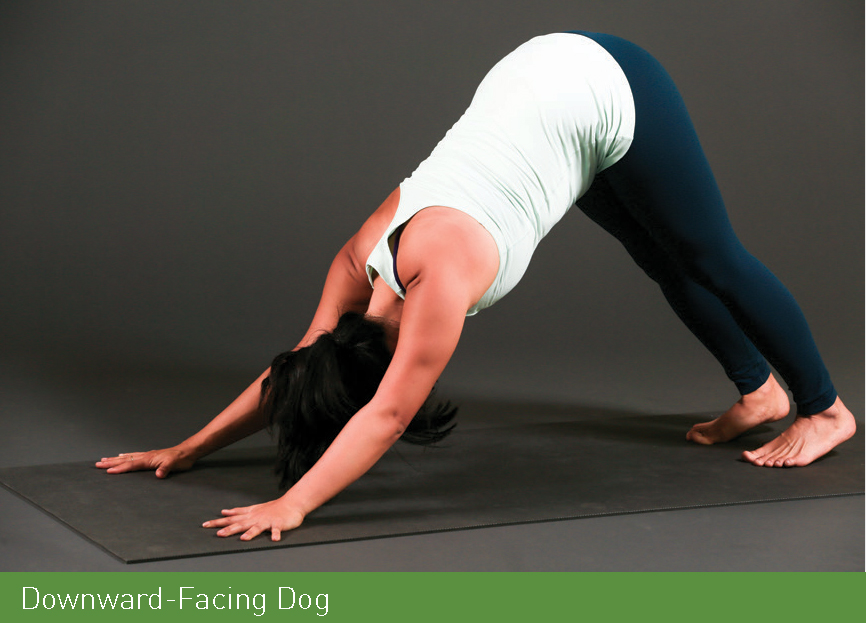
ALIGNMENT Point your index fingers to the front of your mat. ✵ Flatten your palms until the knuckles at the base of your index and middle fingers are grounded on your mat. ✵ Move your feet to hip-width distance. Spin your inner ankles back so the outer edges of your feet are parallel with the edge of your mat. ✵ Bend your knees and lift your tailbone toward the ceiling until your spine lengthens. ✵ Spin your sit bones to the wall behind you. ✵ Roll your shoulders up to your ears, then use your back muscles to pull your shoulders down your back and in toward your spine. Squeeze your upper arms toward each other. ✵ Press your chest toward your thighs; keep your shoulders engaged and do not hyperextend in your shoulders. ✵ Drive your heels toward the floor (they don’t need to touch the floor). ✵ Pull your belly in toward your spine. ✵ Lift the muscles just above your knees to engage your thighs and open into your hamstrings. ✵ Create a long line from your wrists to your shoulders and hips; bend your knees as you need to. ✵ Stay for ten breaths.
GAZE & FOCUS Look backward at the floor between your big toes. ✵ Lift your tailbone high toward the ceiling.
DEEPEN Once the pose feels more comfortable, press your heels deeply toward the mat until your toes can spread and soften.
COMMON CHALLENGES Tight hamstrings can lead to a rounded spine. ✵ If you have a wrist injury, it may be painful to stay on your hands.
MODIFICATIONS For tight hamstrings, bend your knees and lift your tailbone toward the ceiling. Pull your shoulders toward your spine. Press your chest toward your legs. ✵ For wrist pain, come down to your elbows for Dolphin pose: Move your elbows in so they are stacked directly under your shoulders. Walk your feet in toward your elbows as close as you can. Lift your tailbone to the sky.
SEQUENCE TRANSITION Walk your feet to the front of your mat.
Rag Doll
Connect to your feet, relax your spine, and let go in your neck.
SETUP Stand with your feet hip-width distance apart. Stretch out your toes and activate your feet. Fold your chest toward the floor. Hold your elbows and hang your upper body, letting go of your head.
ALIGNMENT Lift and spread out your toes, creating gaps between every toe from your big toe to your pinky toe. ✵ Soften your toes to the floor. Press the four corners of your feet—your big toe and pinky toe knuckles, and the two sides of your heels—into the floor. ✵ Spin your inner ankles toward the back of your mat and energetically draw your outer ankles toward the floor. Notice how this lifts the arches of your feet. ✵ Bend your knees slightly until your belly comes down to the tops of your thighs. ✵ Squeeze your inner thighs up toward your pelvis. ✵ Turn your head side to side to soften your neck. Stick out your tongue to release your jaw. ✵ Sway gently side to side. ✵ Stay for five breaths.
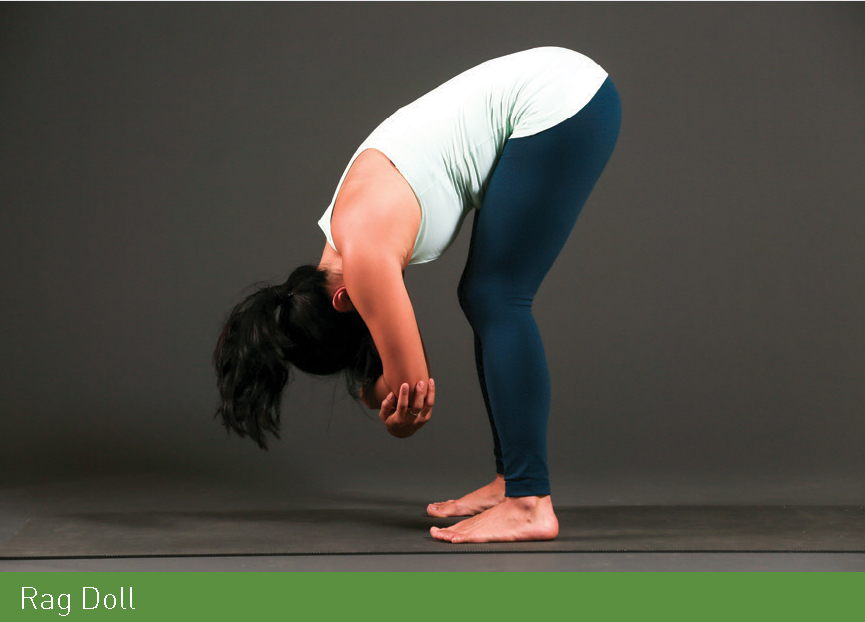
GAZE & FOCUS Close your eyes or set your gaze on a spot between your feet. ✵ Release your spine and neck.
DEEPEN As you get more open in your hamstrings and lower back, your legs straighten more. Keep your knee joints soft in the pose.
SEQUENCE TRANSITION Release your elbows and bring your feet together.
Sun Salutation A
Follow the sequence for Sun Salutation A as outlined in Strength Practice I to warm up your body and to focus on your breath. Do three rounds.
Mountain Pose, inhale with arms up. ✵ Forward Fold, exhale. ✵ Halfway Lift, inhale. ✵ Plank to floor, exhale. ✵ Low Cobra, inhale. ✵ Downward-Facing Dog, exhale, hold pose for five breaths. ✵ Step or jump forward to the front of your mat. ✵ Halfway Lift, inhale. ✵ Forward Fold, exhale. ✵ Mountain Pose, arms up, inhale. ✵ Repeat sequence two more times.
Low Lunge
Focus on pulling your thigh bones in toward your pelvis to feel your center line and stretch into your hip flexors.
SETUP Move through Sun Salutation A to Downward-Facing Dog. From Downward-Facing Dog, step your right foot between your hands. Lower your back knee to the floor and point your back toes. Bring your hands to your front thigh.
ALIGNMENT Square your hips toward the front of your mat. Pull your front foot and back knee toward each other to integrate. Your hips will lift slightly higher than before. ✵ Once your centerline is established, slowly shift your weight forward toward your front foot. Stack your front knee over your ankle. ✵ Squeeze your belly in toward your spine and hug your front ribs together. ✵ Reach your arms up toward the ceiling, palms facing in. Breathe deeply into the stretch in your hip flexor. ✵ Stay for five breaths.
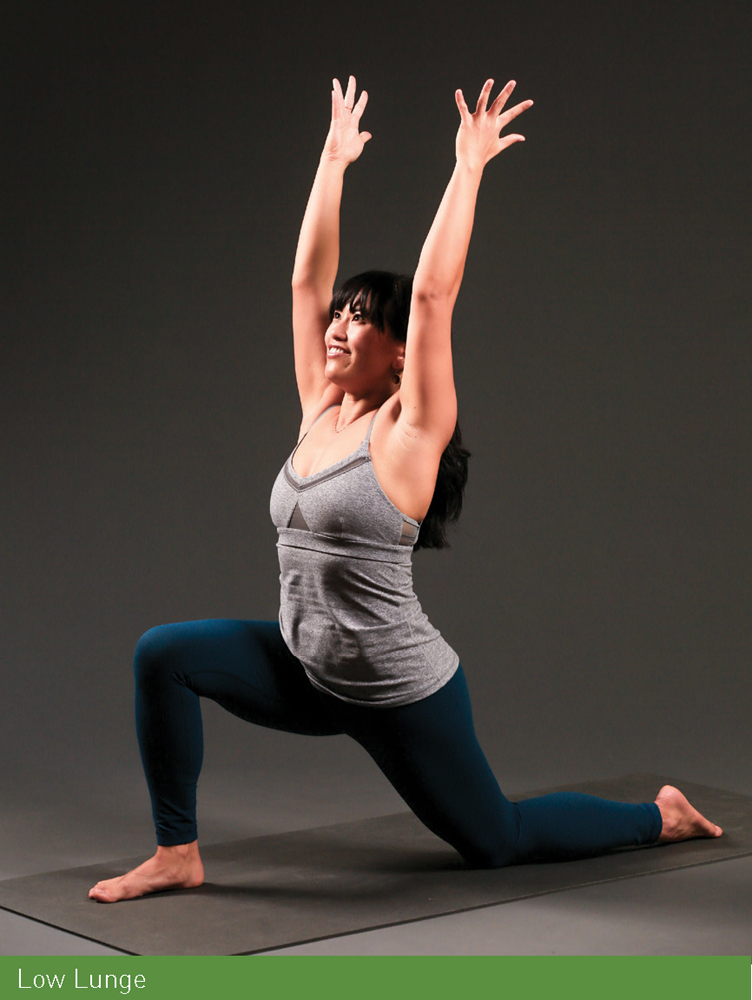
GAZE & FOCUS Look at a spot on the wall in front of you. ✵ Hug your thigh bones in toward each other to keep your body strong while opening into your hip.
DEEPEN Tuck your back toes and lift your heel vertically over the ball of your foot for Crescent Lunge (see Strength Practice II).
COMMON CHALLENGES Your knee hurts on the ground.
MODIFICATION Fold over an edge of your mat to pad your knee.
Twisted Crescent Lunge
Move gently into a twist to activate your core and back muscles and release your spine from a vigorous day climbing. Keep your back knee on the floor to take the intensity down.

SETUP From Low Lunge, place your right hand to the inside of your front foot on a block or the floor. ✵ Extend your left hand in line with your shoulder. On an inhale, stretch your chest longer to get more space in your spine. On an exhale, move deeper into the twist in your mid-back.
ALIGNMENT Shift your weight forward toward your left foot, keeping your knee pointing forward over your ankle; don’t let it cave in or out. ✵ Lengthen your spine through the crown of your head to create more space for the twist. ✵ Pull your shoulder blades toward your spine, and engage the muscles under your shoulder blades to deepen your twist. ✵ Pull your belly in toward your spine. ✵ Stretch your upper fingers out wide and toward the ceiling. ✵ Stay for five breaths.
GAZE & FOCUS Set your gaze on a spot on the ceiling. ✵ Squeeze your shoulder blades toward each other. Spin your chest toward the ceiling.
MODIFICATION Pad your knee if you feel pain in your kneecap.
SEQUENCE TRANSITION Bring your hands to the floor on either side of your front foot to a Low Lunge.
Lizard
Your body may resist the intensity of this hipopening pose at first. Use your breath to release deep into your hips.
SETUP From Low Lunge, bring both hands to the floor inside your front leg. Angle your toes on your front foot to the outer edge of your mat.
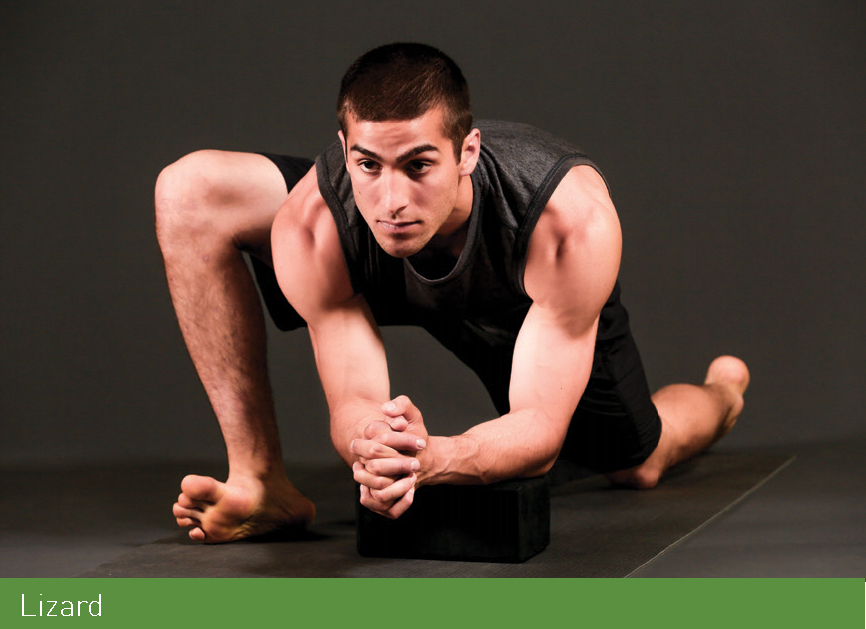
ALIGNMENT Flex your front foot and roll to the outer edge of your foot. The sole of your foot is off the floor and your right knee will roll open. ✵ Lower your elbows down beside your foot with elbows roughly in line with your heel. ✵ Release your head toward your hands. ✵ Stay for ten breaths.
GAZE & FOCUS Look at the inside of your front foot. ✵ Notice the sensations in your hip and send your breath there.
BOUND LIZARD VARIATION While still in Lizard, come up to your hands. Reach your right hand for your back foot. Stay on your left hand or lower your left elbow to a block or the floor. Slowly shift your weight toward your front foot. Stay another ten breaths. Look to a spot on the wall to the right, or close your eyes. If you have trouble grabbing your foot because of tightness in your hamstrings or hips, loop a strap around your foot and hold the strap for the stretch.
DEEPEN Do not bind your Lizard. Instead, tuck your back toes, squeeze your quads, and lift your back leg to the ceiling.
COMMON CHALLENGES Tight hips prevent you from coming down to your elbows.
MODIFICATION Place a block underneath your elbows. ✵ Let go of your back foot gently.
SEQUENCE TRANSITION If in Bound Lizard, release your foot gently. ✵ Come back up to your hands. Bring your right foot flat and pointed forward to the front of your mat. ✵ Press your hands into the mat and step back to Downward-Facing Dog. ✵ Do Low Lunge through Lizard on your left side. ✵ Move to Downward-Facing Dog. ✵ Step to the top of your mat.
Squat
Allow yourself to settle into a squat, opening into your spine and your hips. Breathe in deeply and let your hips sink a little more toward the floor.
SETUP Walk your feet as wide as your mat. Bend your knees to lower your hips toward the floor. If your heels lift off the floor, widen your stance until you can get your feet flat. Your toes can turn out wider than your heels. ✵ Bring your hands together, palms touching, in front of your chest.
ALIGNMENT Shift your weight into the outer arches of your feet, and lift your inner arches. Squeeze your heels in toward each other like you are trying to wrinkle your mat. ✵ Lift your belly button in toward your spine to lift your chest toward the ceiling. ✵ Press your elbows into your inner knees. ✵ Stay for ten breaths.
GAZE & FOCUS Set your gaze on a spot on the wall ahead. ✵ Lengthen your spine and keep your knees aligned over your feet. Play with sitting in a passive squat, then engage your pelvic floor and lift your hips an inch out of the bottom of the squat into an active one.
DEEPEN Bring your feet wider and lower your tailbone closer toward the floor. Work your feet toward parallel.

COMMON CHALLENGES Tight hips prevent you from grounding your heels.
MODIFICATION If you have trouble lowering down below your knees, stay in a higher squat position or bring a folded blanket under your heels.
SEQUENCE TRANSITION From a Squat, fold your chest forward over your legs.
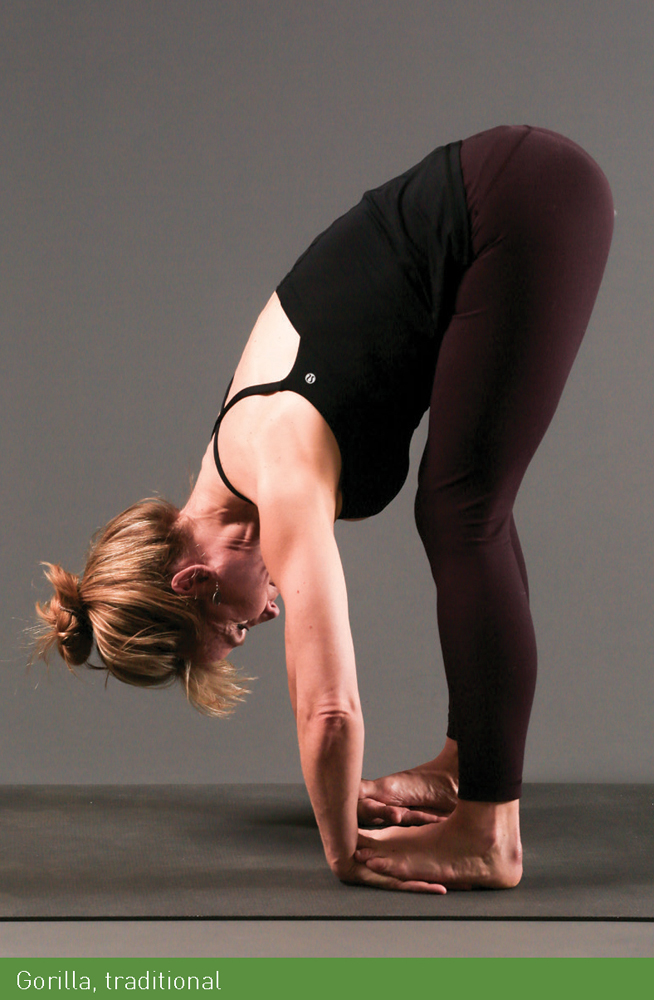
Gorilla, Traditional
It’s wise to spend some time releasing your forearms and wrists after climbing. Be forewarned this variation on Gorilla takes the intensity of release to another level, particularly for tight climber hands and wrists. Be gentle and keep breathing through the pose.
SETUP Measure two fists between your feet for hipwidth distance. Lift the arches of your feet and bend your knees. Turn your fingers to face in toward your feet, palms facing down and thumbs spinning out. ✵ Slide your hands underneath your feet like you do in a traditional Gorilla. Bend your elbows to pull your chest down toward your feet. Shift your weight slowly toward your wrists to open more deeply into your wrists and forearms. ✵ Stay for ten breaths.
ALIGNMENT Wiggle your hands deeper under your feet until your toes reach your wrists. ✵ Bend your elbows, and pull your shoulder blades together. ✵ Pull your chest deeper toward your spine. ✵ Soften your knees and bring your belly down to your thighs. Engage your thigh muscles. ✵ Release your neck and hang your head toward the floor.
GAZE & FOCUS Look at the floor behind your feet. ✵ Engage your shoulders and back muscles to pull your chest closer to your shins.
DEEPEN Work your legs as straight as your hamstrings allow while still squeezing your thighs. Keep your knee joints soft.
COMMON CHALLENGES Tight hamstrings prevent you from sliding your hands under your feet.
MODIFICATION Place your hands in the same position (fingers facing your feet, thumbs facing out) in front of your feet, or place them in that position on a block. Bend your knees.
SEQUENCE TRANSITION Release your hands from under your feet. ✵ Bring your feet together. ✵ Stand in Mountain Pose.
Eagle
If you’re not feeling like an old pro at the Eagle bind for your arms just yet, focus on your standing foot, core, and gaze. The shoulder opening will come with time.
SETUP From Mountain Pose, extend your arms out wide and parallel to the floor, palms facing forward. Cross your right upper arm underneath your left upper arm. Wind your forearms around each other. Bring your palms to touch for the full bind. ✵ Lower into Chair in your legs. Cross your right thigh on top of your left thigh.
ALIGNMENT Ground into your standing foot. Squeeze your inner thighs all the way together. ✵ Stretch out your toes on your upper foot. ✵ Stack your shoulders over your hips; engage your core lock. ✵ Lift your elbows level with your shoulders. Press your hands away from your face to stack your wrists over your elbows. ✵ Soften your shoulders away from your ears; pull your arm bones in toward your shoulder sockets. ✵ Stay for five breaths.
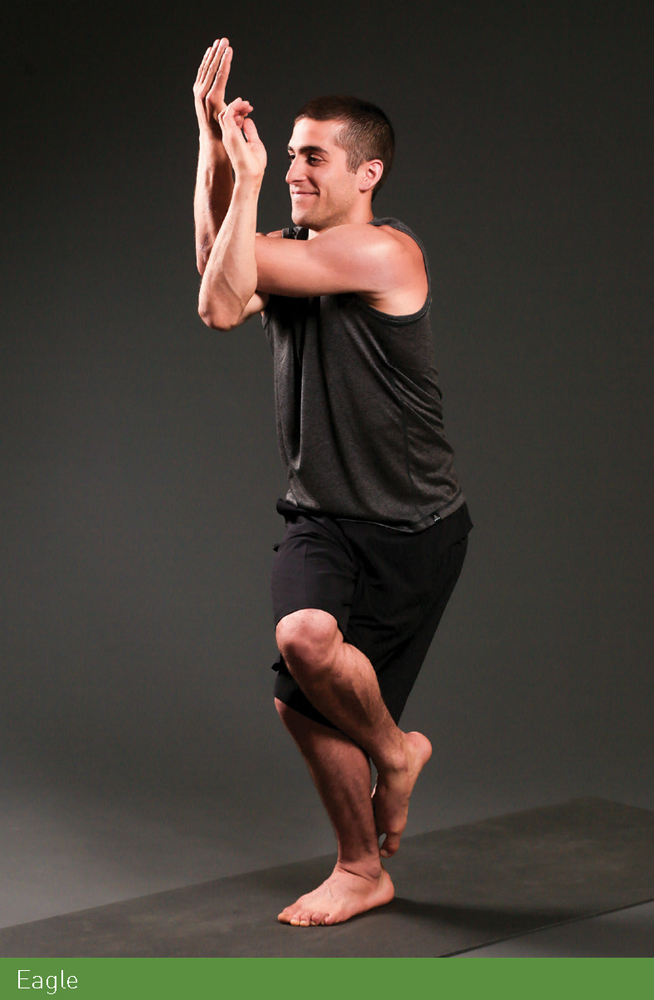
GAZE & FOCUS Look past your arms to a spot on the wall. ✵ Engage your belly firmly and set your gaze.
DEEPEN Bend your standing leg deeper and wrap your right foot around your calf. Challenge yourself by moving your gaze in to your forearms.
COMMON CHALLENGES Tight shoulders can prevent you from taking a full bind.
MODIFICATION Reach for opposite shoulders and lift your elbows even with your shoulders.
SEQUENCE TRANSITION Release into Mountain Pose. ✵ Do Eagle on your left side, wrapping your left arm under your right and lifting your left leg over your right thigh. ✵ Inhale and reach your arms up to the ceiling to release. ✵ Fold your chest forward to your feet and exhale. ✵ Lengthen your chest to Halfway Lift, and inhale. ✵ Step back to Plank. ✵ Shift to your toes and lower to the floor.
One-Armed Shoulder Opener
Many poses you have learned strengthen your shoulders. This pose is a passive stretch deep into your shoulder girdle, reversing your body’s inclination from climbing and sitting to hunch forward. It also supports the mobility of your shoulder joint and can provide release for your upper back, where many people hold stress. Don’t force this pose; breathe deeply into the sensations in your shoulder.
SETUP From your belly on the floor, extend your right arm out so your wrist is level with your eyes, palm down. Place your left hand next to your ribs on the floor, elbow bent at a 90-degree angle to the floor. ✵ Roll over onto your right hip, bend your left leg and set your foot on the floor behind your right leg. Rest your temple on the floor or on a block.
ALIGNMENT With your left hand, which has leverage, press gently into the floor until your body naturally stops you. ✵ Relax your shoulder and your face. ✵ Stay for ten full breaths.
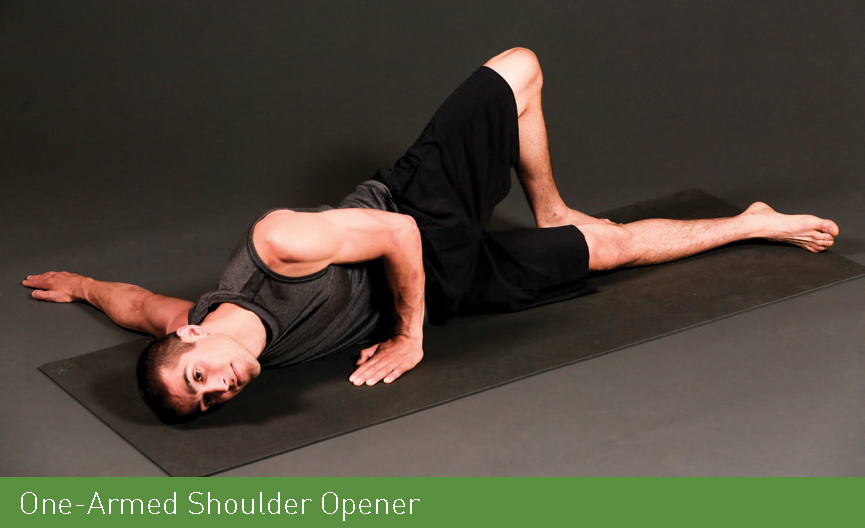
GAZE & FOCUS Look at the floor or close your eyes. ✵ Relax into the pose. Stay focused on your breath.
DEEPEN If your body allows, bend your lower leg and place your foot flat on the floor parallel with your left foot, like a bridge. ✵ Reach your left hand up toward the ceiling, wind it behind your body, reaching for your extended lower hand to bind. Keep your lower hand in line with your shoulder.
COMMON CHALLENGES If you have a shoulder injury, particularly in your rotator cuff, your shoulder may not allow you to do this stretch.
MODIFICATION Substitute Locust pose with a bind at your lower back. See below.
SEQUENCE TRANSITION Roll onto your belly to release. ✵ Do One-Armed Shoulder Opener on your left side.
Locust
Now that you have experience with backbends, keep your legs strong and lift from your belly and chest to open your shoulders and strengthen your back.
SETUP On your belly, bring your feet to hip-width distance, toes pointed. Reach your arms alongside your body, hands down by your hips, palms facing down.
ALIGNMENT Press the tops of your feet into the floor, and lift your knees off the ground. ✵ Keep your upper legs engaged, and lift them off the floor. ✵ Lengthen the crown of your head forward, and lengthen and lift your chest to the ceiling. Pull your shoulders in toward your spine. ✵ Lift your upper arm bones toward the ceiling and float your hands above your hips. ✵ Pull your belly up and in to lift even higher into the pose. ✵ Stay for five breaths.
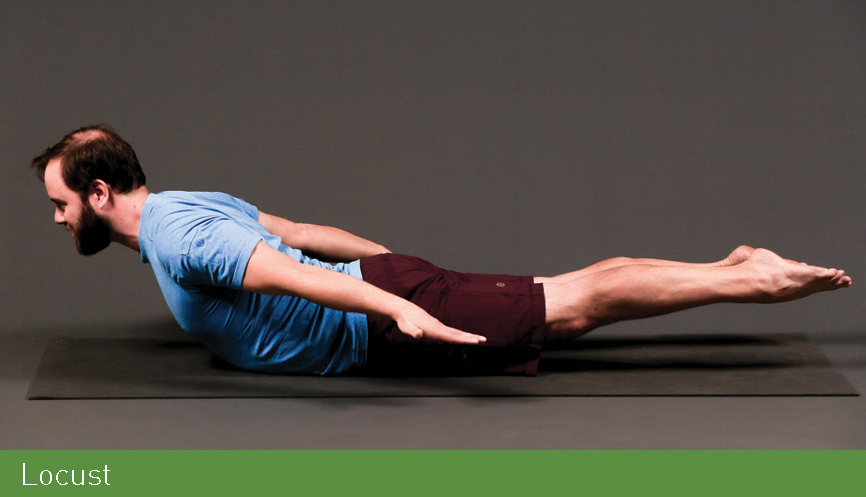
BOUND VARIATION Interlace your hands at your lower back. If you have tight shoulders and cannot bind, hold a strap with your hands to modify. Lift your hands off your lower back in the pose.
GAZE & FOCUS Look past your nose at the front edge of your mat or the floor. ✵ Squeeze your legs, engage your core, and lift from your chest forward and up to the sky.
DEEPEN Bring your inner thighs and ankles together and lift.
COMMON CHALLENGES You feel lower back strain.
MODIFICATION Keep the tops of your feet on the floor. Place your hands by your lower ribs. ✵ Lift your chest into Low Cobra.
SEQUENCE TRANSITION Lower slowly to the floor from Locust. Wiggle your hips side to side to release your back. ✵ Do a second Locust with the Bound Variation. ✵ Plant your hands next to your chest and press up to your hands and knees.
Heart Throat Nose Pose
Another shoulder and heart opener, Heart Throat Nose pose can feel comforting because we face the floor rather than the open air above. It creates a big opening into your chest and shoulders while maintaining a grounding quality.
SETUP From hands and knees, walk your arms forward, keeping your hips stacked over your knees, until your forehead comes to the ground.
ALIGNMENT Activate your core to protect your lower back. ✵ Melt the space between your shoulders toward the floor; soften your chest toward the ground. ✵ Stay for five breaths.
GAZE & FOCUS Set your gaze on the floor or close your eyes. ✵ Engage your core and soften into your upper back.
DEEPEN If your shoulders are open enough so your chest touches the floor, lift your chin and place it on the floor.
SEQUENCE TRANSITION Walk your hands in and come to a seated position on your knees.
Toes Pose
Your feet, ankles, and calves work intensely on holds, mastering balance points on your toes. In addition, most people spend at least some of their day up on the balls of their feet in shoes with a slightly lifted heel rather than flexing their feet and working into their Achilles tendon. Toes Pose stretches into the soles of your feet and can be an intense stretch. Breathe!
SETUP Tuck your toes underneath you until you are on the ball of your foot—tuck your pinky toe in if it escapes. Sit up slowly and lift your chest over your hips until you feel the sensation in your feet.
ALIGNMENT If the pose is immediately too intense, lean forward for a moment, then return to lift your chest upright. ✵ Engage your core lock. ✵ Stay for ten full breaths. ✵ Counter pose: Shift forward onto hands and knees. Release your toe tuck and point your toes on the floor. Bring your hands by your hips and lean back to stretch into your shins, the front of your foot and your ankles in the opposite direction to counter the intensity. ✵ Stay for ten breaths.
GAZE & FOCUS Set your gaze on a spot on the wall. ✵ Notice if your mind wants to take you out of the pose. Stay with the pose.
DEEPEN Hold for twenty breaths.
COMMON CHALLENGES Knee pain prevents you from taking the pose.
MODIFICATIONS Roll up a blanket (or small towel) and place it behind your knees or on top of your ankles
SEQUENCE TRANSITION Move to a seated position on your sit bones and set up for Half Pigeon.
RELEASE AND RESTORE
It’s time to move into poses that both release and restore your body. Your trunk and lower body have shouldered much of the work. Focus on breathing and releasing in these deep stretches.
Half Pigeon
By now, you may have a new appreciation for the release available in your hips. Challenge yourself to stay in Half Pigeon longer than you have before.
SETUP From a seated position, move your right foot across your mat and in toward your pelvis, keeping your right foot flexed to protect your knee. Extend your left leg straight behind you so that the top of your thigh is on the ground.
ALIGNMENT Flex the toes on your back foot and come up to the ball of your foot. ✵ Roll up to center so your pelvis is squared toward the front of your mat. Place a block under your right hip if you have trouble staying centered. ✵ Pull your thigh bones in toward your pelvis. ✵ Lengthen your chest and slowly lower your torso toward the floor. ✵ Walk your arms in front of you. Soften your shoulders and face. ✵ Place a block under your forehead if it doesn’t touch your mat. ✵ Stay for one minute.
GAZE & FOCUS Close your eyes. ✵ Breathe deeply into your hips.
ACTIVE & PASSIVE RELEASE
Your brain is in constant conversation with your muscles while you stretch so it’s helpful to understand how you can release. If you’re not making much progress in mobility, you may not be stretching the targeted muscles. Follow cues in the poses to stretch into the appropriate part of your body.
Passive release: When you are doing passive stretches, you use body weight, gravity, and muscles to stretch. A stretch held for a longer period of time will also stretch into fascia, the connective tissue holding your body together. You never want to force your body into a stretch, which causes the muscles to contract and blocks the deepening of the stretch. Work slowly, breathing to release into the muscle. Holding a passive stretch for thirty to sixty seconds gives the muscle time to relax.
Active release: Here, you focus on a combination of muscles for release by contracting one muscle targeted for the stretch to let another muscle relax and deepen in. For example, your thigh muscles extend or straighten your knee. Contracting your thighs also signal the hamstrings to relax. In a Seated Forward Fold, you reach for your feet and straighten your legs to stretch your hamstrings. But if you soften slightly at the knee, then contract your thigh muscle to straighten your knee again, you signal the muscle to soften and you will get even deeper into the stretch.
In another method of stretching, sometimes called ballistic, your body remembers the length of muscles from the last time you practiced. Each time you do a Sun Salutation, your muscles reset to the length from the last time you did yoga. Essentially, you are opening muscles throughout your entire practice, not just when you stretch at the end.
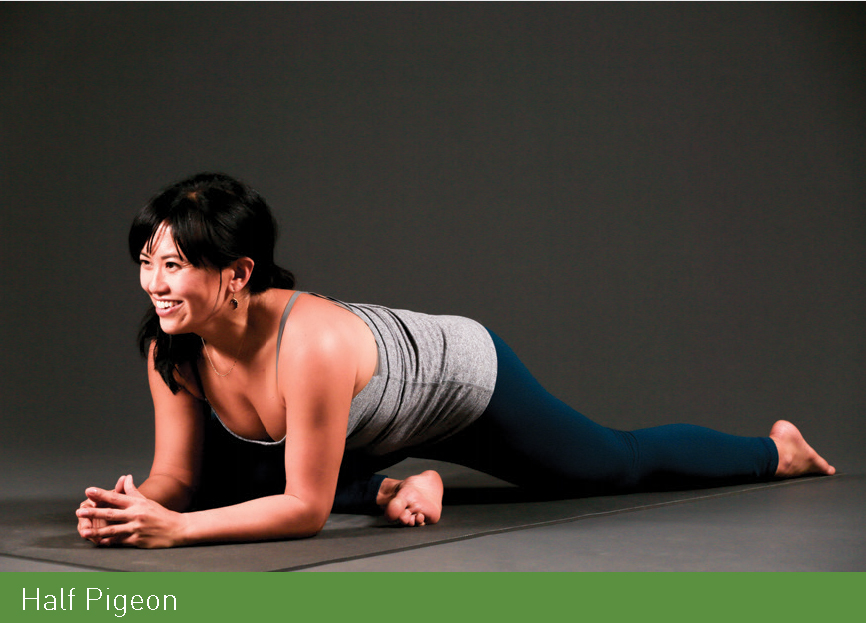
DEEPEN Shift your front shin closer to parallel with the front of your mat to get a deeper opening.
COMMON CHALLENGES Knee injuries prevent you from staying in this pose without sharp pain.
MODIFICATION Take Reclined Pigeon (see Strength Practice I for more details).
SEQUENCE TRANSITION From Half Pigeon, sweep your back leg forward to set up for Double Pigeon.
Double Pigeon
If you haven’t made friends with Double Pigeon yet, the best way is more practice, of course. See if you can relax and deepen into hip opening.
SETUP From Half Pigeon, swing your back leg forward and around. Flex your upper foot and move it until your ankle is just past your thigh. Flex the toes of your lower foot and tuck it in toward your pelvis.
ALIGNMENT Move around until you can ground your sit bones on the floor. ✵ Bring your thighs parallel with the long edges of your mat. Flex both of your feet to protect your knees. ✵ Place your left hand on your inner thigh. Bring your right hand to the floor behind you. Press your left thigh open toward the floor. ✵ Place your hands on either side of your hips and slowly reach your chest forward toward your legs. If you can walk your hands forward and relax, do that. ✵ Stay for one minute.
GAZE & FOCUS Close your eyes or look at the ground in front of you. ✵ Pay attention to the sensation in your hips and send your breath there.

DEEPEN If you have open hips, bring your lower shin in line with your upper shin. Keep your toes flexed. Lower your chest forward over your legs.
COMMON CHALLENGES Tight hips prevent you from bringing both of your sit bones to the ground.
MODIFICATION Sit on a block to take the work out of your hip flexors and into the bigger muscles around your pelvis.

SEQUENCE TRANSITION Unwind your legs from Double Pigeon to a seated position. ✵ Tuck your left foot in toward your pelvis to set up for Half and Double Pigeon on the left side. ✵ Bring both feet to the floor and sway your knees side to side to release.
Frog
An intense pose that moves into your inner thighs and groin, Frog may take some time to love. But once you fall, you fall deeply. It takes practice to stay in the pose for more than a few breaths, but it’s worth pursuing: you will open deeply into new regions of your hips, and learn more about how to stay in one place when confronted with challenge, akin to the experience you have on challenging climbs.
SETUP Fold up the short edges of your mat to pad your knees. Bring your inner knees wider than hip-width distance apart on the padded edges. ✵ Come down to your elbows (you will be off the long edge of your mat). Move your feet to a 90-degree angle with your knees. Flex your feet and bring your inner ankles to the floor. ✵ Stack a block under your forehead.
ALIGNMENT Ensure your hips are even with your knees. ✵ If you don’t feel sensation, move your knees wider. ✵ Pull your thigh bones in toward your pelvis. ✵ Stay for two minutes.
GAZE & FOCUS Close your eyes. ✵ Stay with your breath and focus on the slow release in your groin.
DEEPEN Stay longer! Try staying in this pose for up to three or four minutes, and see what happens.
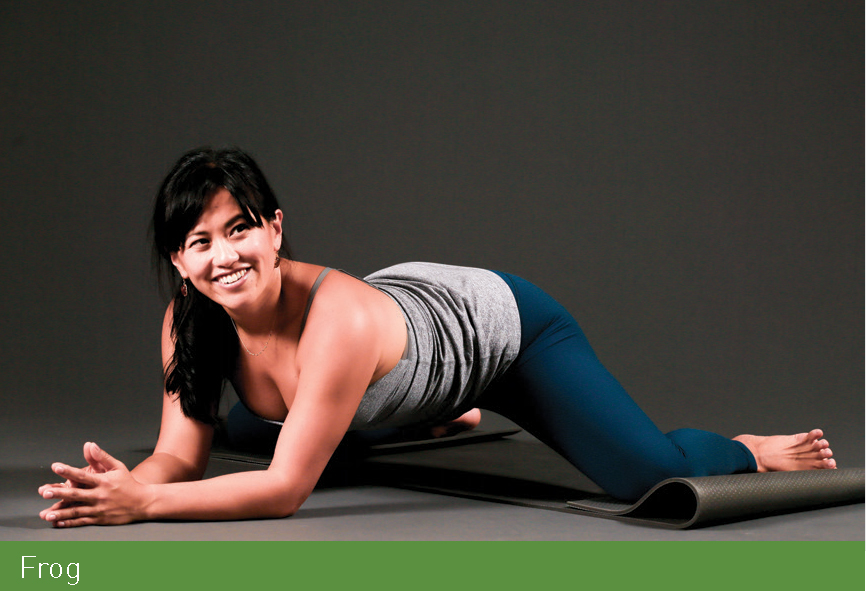
SEQUENCE TRANSITION Slowly slide forward onto your belly. ✵ Press up to hands and knees. ✵ Come to a seated position at the front of your mat.
Reverse Tabletop
A modified backbend that releases into your chest and shoulders, Reverse Tabletop also helps your body release from the intensity of Frog.
SETUP From a seated position, place your hands behind you on the mat with your fingertips facing your body. Walk your feet in so they are flat on the floor at hip-width distance.

ALIGNMENT Ground into the four corners of your feet and lift your hips toward the ceiling. ✵ Press your palms into the ground. ✵ Rotate your inner thighs toward each other and down toward your mat. ✵ Tuck your chin, lengthen the crown of your head behind you and gently release your head onto your shoulders. ✵ Stay for five breaths.
GAZE & FOCUS Set your gaze on the ceiling or wall behind you. ✵ Ground your feet deeper into the floor to activate your leg muscles.
COMMON CHALLENGES Weak hamstrings make it difficult to keep your legs internally rotated. ✵ Tight chest muscles can make breathing feel challenging.
MODIFICATION Play with moving your breath around to stay in the pose.
SEQUENCE TRANSITION Lower your hips to the floor.
Head-to-Knee Seated Forward Fold with a Twist
By adding a twist (not pictured), this pose works spinal length and also moves into your side body.
SETUP From a seated position, extend your right leg toward the top right corner of your mat. Tuck your left foot in to your inner thigh. Flex your toes on your extended leg. ✵ Twist by placing your right forearm on your right shin or lower it just inside your shin to the floor. Extend your left arm up to the ceiling. Hug your left shoulder in toward your spine.
DEEPEN Reach your upper hand toward your right foot, palm facing down. Rotate your chest toward the ceiling. If you can reach your foot, hold on to your big toe. Make sure to spin your chest toward the sky. ✵ Stay for ten rounds of breath.

SEQUENCE TRANSITION Do Head-to-Knee Seated Forward Fold with a Twist on your left side.
Seated Twist
Release your spine gently from practice through a seated twist.
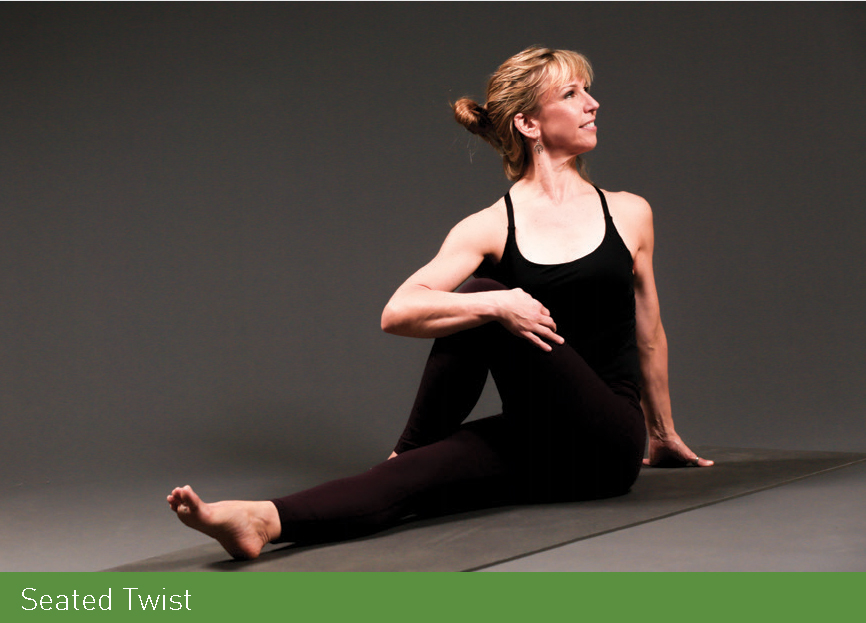
SETUP Extend your right leg straight to the front of your mat, toes flexed. Place your left foot on the floor outside your right thigh. ✵ Place your left hand on the floor behind you. Reach your right arm up to the ceiling. Wrap your right arm around your bent leg.
ALIGNMENT Lengthen your spine on your inhale. Twist toward your bent leg on your exhale. ✵ Move your gaze past your left shoulder. ✵ Stay for five breaths.
FOCUS Inhale to lengthen your spine and exhale to deepen your twist.
DEEPEN Hook your right elbow outside your left leg. Cross your lower leg underneath you.
SEQUENCE TRANSITION Do the Seated Twist on your right side. ✵ Slowly roll down your back to the floor.
Legs Up the Wall
If you haven’t tried this pose at the wall, this is the moment. You’ll truly appreciate this restorative inversion after all of the release in this sequence.
SETUP Move your mat to a wall. Come to a seated position by the wall, and bring your left hip to touch the base of the wall. Lower yourself down to your back, and lift your legs up the wall at the same time. Scoot your sit bones to touch the wall.
ALIGNMENT Press your feet into the wall, lift your hips, and slide a block underneath your lower back. ✵ Relax your legs. ✵ Soften your shoulders, face, and hands. ✵ Stay for ten breaths or longer.

GAZE & FOCUS Close your eyes. ✵ Breathe deeply and relax. Keep your legs still.
SEQUENCE TRANSITION If you are coming out of Legs Up the Wall, pull your knees to your chest and roll to one side. ✵ Move onto your back.
FINAL REST
You can stay in Legs Up the Wall pose for your Final Rest—it’s a wonderful modification that restores your body. Or, if you would like to rest in Corpse Pose, come back to the floor.
Corpse Pose
Observe how Corpse Pose feels after a slower practice.
SETUP From your back, straighten your legs on your mat. With your arms at your sides, turn your palms to face the sky.
ALIGNMENT Slide your shoulders under you. ✵ Relax the muscles in your legs, shoulders, and face. ✵ Move into your natural breath. ✵ Close your eyes. ✵ Stay in this pose for three minutes.
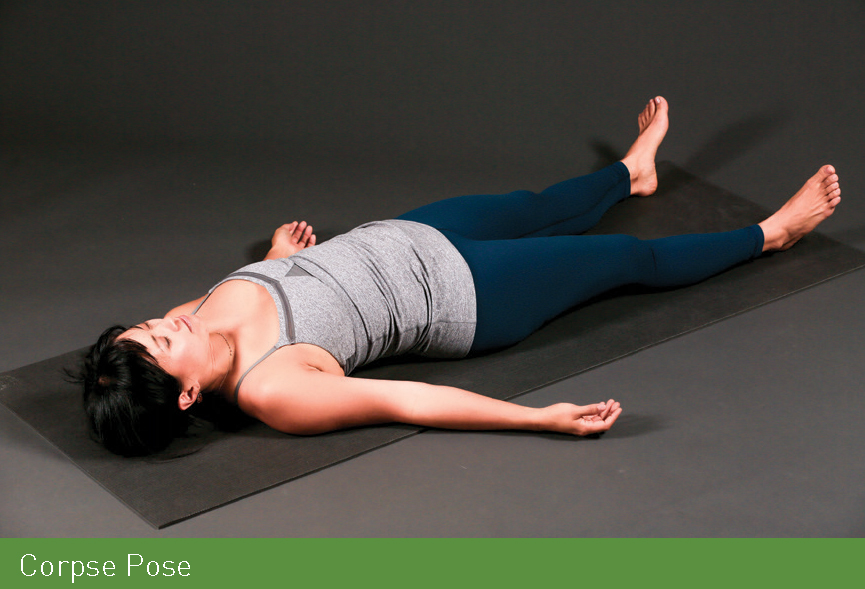
GAZE & FOCUS Close your eyes. ✵ Stay awake and still. Notice your natural breath.
DEEPEN Take a five-minute final rest.
SUPPORTED FINAL REST Sweeten your Final Rest with a bolster. Come up to a seated position. Place a bolster lengthwise at the base of your spine. Lay down along the bolster. ✵ Release your hands to the floor. Close your eyes. Ahh!