The Complete Chess Course From Beginning To Winning Chess! (2016)
Book Two
The Nine Bad Moves
Number Two
Exposing your King to Attack
The king is unlike any other piece. In every game of chess, the object, direct or potential, is to checkmate your opponent’s king. No matter how the game proceeds, no matter what your plans may be, you must guard your king and look for opportunities to menace your opponent’s king.
Since the king’s safety controls the fate of the game, you take unnecessary risks whenever you expose your king to attack. One of the most common ways to endanger the king is to leave him on his original square in the middle of the back rank. The other chess pieces are most active in the center and exert their greatest power in that area. Consequently, the king is most vulnerable at his original square.
Leaving the king in the center is particularly dangerous in “open” positions - those in which there are open files. Such open lines are highways along which the queen and rooks can operate to menace the hostile king. (In “closed” positions - those in which the pawn position is locked - a king may be fairly safe in the center.
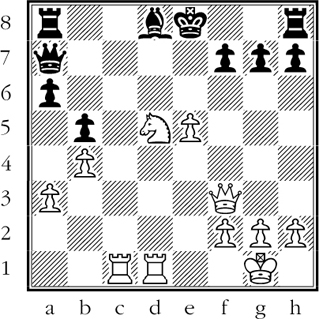
Leaving the king in the center sometimes leads to ferocious “king-hunts.” In the course of such a savage drive on a hostile king, he may be hounded all the way from his original square to the other side of the board. The king-hunt is the extreme example of the helplessness of a king stranded in the center and exposed to the fury of the hostile pieces. (D)
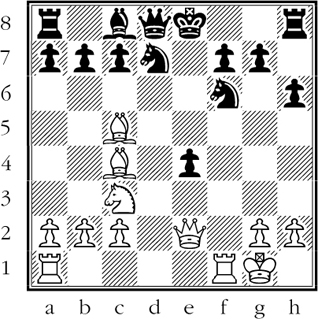
White to move
Here is a good example of the dangers confronting a king in the center in an open position. After 1.Qxe4+!! Black resigns, for if 1…Nxe4 2.Bxf7#.
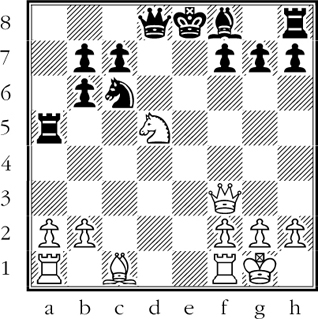
Knowing that it is bad policy to leave the king exposed to attack in the center, how are we to avoid such dangers? The safest course is to castle fairly early in the game - say no later than the tenth move. Once the king is castled on one side or the other, he is much less vulnerable than in the center. (D)
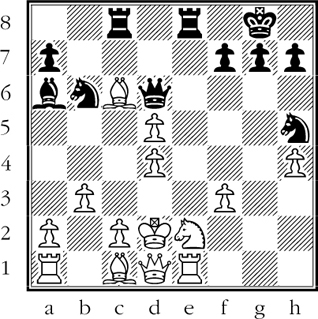
Black to move
Though White is three pawns up, his position is disorganized, his development chaotic, his king endangered in the center. It is interesting to see how Black drives the white king to his doom by a series of smashing moves. White is in no position to resist as his king steadily gives ground.
To break up White’s position, Black must remove the bishop at c6 and the knight at e2.
1…Rxc6! 2.dxc6 Bxe2 3.Rxe2
Mission accomplished. Now Black can begin the king hunt.
3…Qxd4+ 4.Ke1 Qg1+ 5.Kd2 Rd8+ 6.Kc3
Now 6…Qxd1 would win easily. However, the combination Black chooses shows that he has a sense of humor.
6…Qc5+ 7.Kb2 Na4+! White resigns.
The amusing alternative is 8.Kb1 Nc3+ 9.Kb2 Nxd1+ 10.Kb1 Nc3+ 11.Kb2 followed by 11…Nxe2.
Black Provokes a King-Hunt
Evans Gambit
White - Black
1.e4 e5 2.Nf3 Nc6 3.Bc4 Bc5 4.b4 Bxb4 5.c3 Ba5 6.d4 exd4 7.0-0 Nf6 8.Ba3
White sacrifices a pawn in this opening to gain time and open up lines for attack.
8…Bb6
Four of Black’s moves have been made with this bishop. Such loss of time is bound to lead to disaster.
9.Qb3 d5 10.exd5 Na5 11.Re1+ Be6 (D)
11…Kd7 is refuted by 12.Bb5+ c6 13.dxc6+ and 14.Qxf7+.
White can now win a piece with 12.Qa4+. Instead, he decides to sacrifice his queen to bring about a murderous king-hunt.
12.dxe6!! Nxb3 13.exf7+ Kd7 14.Be6+ Kc6
Black’s king gets no support from the other black pieces.
15.Ne5+ Kb5 16.Bc4+ Ka5 17.Bb4+ Ka4 18.axb3#
The king has met a gruesome fate deep in enemy territory.
White Neglects Castling
Giuoco Piano
White - Black
1.e4 e5 2.Nf3 Nc6 3.Bc4 Bc5 4.c3 Bb6 5.d4 Qe7 6.d5
A questionable move; it closes the diagonal of White’s bishop at c4 and opens the diagonal of Black’s bishop at b6.
6…Nd8
This is a good point for White to castle his king into safety.
7.Be2?
Incomprehensible. Not only does White neglect to castle; he loses time by moving the already developed bishop.
7…d6 8.h3?
Again neglecting castling and again wasting time; besides, the pawn’s move may turn out to have a weakening effect on White’s position.
8…f5 9.Bg5 Nf6 10.Nbd2 0-0 11.Nh4?
Once more he misses castling, and once more he fritters away precious time by moving an already developed piece.
11…fxe4 12.Nxe4
Calmly relying on the pin on Black’s king knight. But White’s numerous violations of chess theory allow Black to violate chess theory too! Black now sacrifices his queen for a piece of considerably lesser value.
12…Nxe4!! (D)
13.Bxe7 Bxf2+ 14.Kf1 Ng3#
What are the technical factors that made this mate possible? Firstly, 7.Be2? deprived the king of a possible flight square. Secondly, 8.h3? weakened the kingside (allowing the eventual …Ng3#). Finally, 11.Nh4? resulted in the complete opening of the f-file.
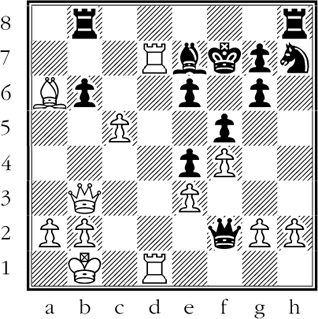
Thus we see that Black’s brilliancy was grounded in the shortcomings of White’s faulty play. Yet the crowning mistake was White’s failure to castle. (D)
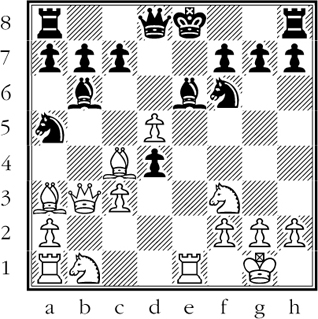
White to move
Black’s king is in the center and, what is even worse, he lags considerably in development. The position of Black’s king is an invitation to attack. The aggressive disposition of White’s forces gives him the means of sacrificing successfully.
The lack of communication among Black’s forces is likely to be disastrous for him. Reckoning on this favorable factor, White plays:
1.Nc7+!
This leaves Black no choice. If he refuses to capture the knight, he loses a whole rook. But why shouldn’t he capture the knight?
1…Bxc7 2.Rxc7
This is why! White menaces the black queen and also threatens 3.Qxf7#.
2…Qxc7 3.Qxa8+ Ke7
Forced, but now he loses the other rook, leaving him with a hopeless disadvantage in material.
4.Qxh8 Black resigns.
It was the vulnerable position of Black’s king in the center that made White’s brilliant combination possible. Had Black’s king been castled, White’s position would still have been vastly superior; but no immediate win would have been in sight. (D)
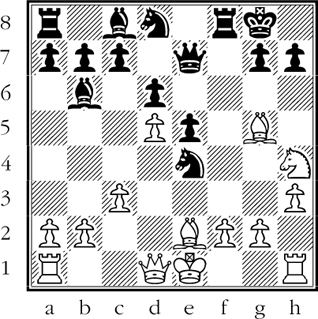
The position of Black’s king is ominous. Both center files are open, but Black is not yet ready to castle. In all such cases the attacker must proceed incisively. If he fails to press his advantage energetically, he will give the hostile king time to escape. Thus time is of the essence.
White to move
1.Re1+
Black’s vulnerable king must submit to a disagreeable pin. If 1…Ne7 2.Nc3, and White has lasting pressure on the e-file, as Black’s castling is postponed indefinitely.
1…Be7
Hoping to gain time to castle. Everything hinges on the question of time.
2.Nxe7
The simplest way to dispose of his menaced knight.
2…Nxe7 3.Bg5!!
A surprise stroke which gains time to develop his queen rook with decisive effect. If 3…f6 4.Bxf6! gxf6 5.Rad1! Qc8 6.Qxf6 wins at once.
3…Rxg5 4.Rad1! Qc8
If 4…Rd5 5.Rxd5 and Black cannot retake the rook because of the pin.
5.Qe3! 0-0
He cannot save the rook and stop the mate too.
6.Qxg5 Black resigns.
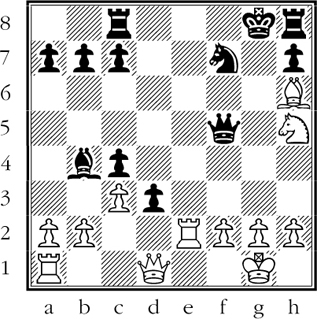
With the exchange ahead, White wins easily. (D)
White to move
All the elements in this picture are familiar to you by now. Black’s king is in the center and has little cooperation from the black pieces. Particularly bad is the indifferent position of Black’s queen, which is “out of the battle” and offers no support to the menaced king.
White has sacrificed a piece to get this position - a good investment, for the black pieces have left their king to a miserable fate. White’s astounding first move is the key to a fantastic winning process:
1.Qxe6+!!! Kxe6
He must capture.
2.Bc4+ Kf6
Again Black has no choice. Yet his king is so critically threatened that his enormous material advantage is useless.
3.R1d6+!! Bxd6
And again he has no choice.
4.Rf7#
An extraordinarily impressive finish. White’s enormous material disadvantage underlies the tragic split in the placement of the black pieces. Given the scattered formation of Black’s men, catastrophe was bound to come. (D)
White to move
Black failed to castle and his battered king has been driven from the center. His kingside pawns are gone. One rook is bottled up; the other has little value. Momentarily White has two pieces under attack, but this is of little importance; with 1.Re3 he avoids loss of material.
As you have seen from the discussion of the diagramed position, White can play 1.Re3 with satisfactory results. But the exposed position of Black’s king is tantalizing: there ought to be some rapid, sensational, conclusive method of putting an end to the black king’s sufferings. And there is!
1.Re8+!!!
To find such a winning line requires imagination of the highest order. But remember this: without the previous weakening of the black king’s position, all the imagination in the world would be useless. Perfectly sound positions are safe from sudden, startling demolition.
1…Rxe8 2.Qg4+!!!
White’s amazing first move was merely the preparation for the even more amazing queen sacrifice.
2…Qxg4
Now that Black’s queen is out of the way, White achieves his objective.
3.Nf6#!