The Complete Chess Course From Beginning To Winning Chess! (2016)
Book Two
The Nine Bad Moves
Number One
Neglecting Development of Your Pieces
In the original starting position of a game of chess, the pieces are not ready for action. The process by which we advance them to squares on which they can attack and defend and maneuver freely is called “development.”
If we develop the pieces slowly or ineffectively, their action is limited. Their attacking ability is slight, and the initiative passes into the hands of our opponent.
If we move one piece repeatedly, it follows that other pieces are being neglected, still left on their original squares where they accomplish nothing. Lagging or ineffective development accounts for many a stinging defeat on the chessboard.
While each opening presents its special problems, there are some practical rules that are helpful guides. Always start by playing out a center pawn, as this creates a line for developing a bishop. Bring out the king knight very early - preferably to f3 (f6). By playing out the king knight and king bishop quickly, you make early castling possible and thus get your king out of any immediate danger.
Try to avoid placing your bishops on diagonals where they are blocked by your own pawns. Avoid, too, an excessive number of pawn moves - they contribute little or nothing to development.
Play over your games to see whether you are achieving the following minimum in the first ten moves: both center pawns advanced; both knights developed; both bishops developed; castling completed. This is an ideal goal which you may not always achieve, but it will help you to guard against moving the same piece repeatedly.
Managing the queen is a different matter. If you develop her too soon you will only expose her to harrying by enemy pieces of lesser value. A later chapter will treat this point in detail.
Disastrous Pawn Moves
King’s Knight’s Opening
White - Black
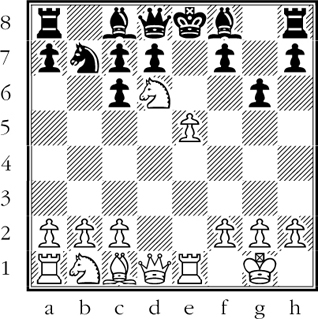
1.e4 e5 2.Nf3 Nc6 3.Bc4 f6?? (D)

Black’s third move should have been 3…Bc5 or 3…Nf6 - useful developing moves that prepare castling.
Instead, the actual move played, 3…f6??, is damaging in a number of ways. It is basically bad because it opens up a line of attack on the black king. (The further play will illustrate the dangers involved.)
Secondly, 3…f6?? has the great defect of making it very difficult for Black to castle. The pawn move extends the diagonal of White’s bishop on c4 so that the bishop controls g8 - the square the black king would occupy in castling. There might be some point to 3…f6?? if the move had good qualities to set off its defects. But it not only has no advantageous features - it even has a fourth defect! - it deprives the g8-knight of its best square at f6.
4.Nh4
White wants to exploit 3…f6?? by playing Qh5+.
4…g5???
Suicide. Now White’s queen check will lead to checkmate.
5.Qh5+ Ke7 6.Nf5#
Of the five moves that Black made, three were pawn moves and one a king move. Aside from contributing nothing to the development of his pieces, the pawn moves were definitely harmful in opening the gates to the enemy.
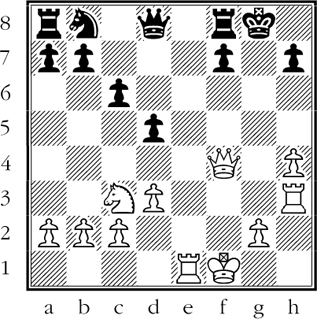
Poor Development, Poor Defense
Ruy Lopez
White - Black
1.e4 e5 2.Nf3 Nc6 3.Bb5 Nf6 4.0-0 Nxe4 5.d4 Nd6 6.Bxc6 bxc6 7.dxe5 Nb7
Out of his first seven moves, Black moves the knight four times and winds up on a bad square toward the side of the board. Even with best play from now on, Black will have to make at least one more move with the knight to get him into active play.
As the game goes, the knight never gets into play.
8.Nd4 Be7 9.Nf5 Bf8
More loss of time. The bishop makes two moves and lands on his original square. All that Black has to show for nine moves is a knight on the wretched square b7. Such faulty “development” must lead to disaster.
10.Re1 g6
Black’s anxiety to be rid of the encroaching knight is understandable. He succeeds in driving off the knight, but his success is a very costly one. In any event, it no longer seems possible for Black to make up for previous lost time.
11.Nd6+! (D)
11…Bxd6
On 11…cxd6 12.exd6+ Be7 13.Rxe7+ winning easily. And if 11…Ke7 12.Bg5+ leading to a quick mate (12…Ke6 13.Qg4+, etc.).
12.exd6+ Kf8 13.Bh6+ Kg8 14.Qd4
Threatens mate.
14…f6 15.Qc4#!
Black’s lack of development plagues him to the very end. Bad development plus king in the center - a fatal combination of weaknesses.
White Neglects his King’s Welfare
King’s Gambit Declined
White - Black
1.e4 e5 2.Nc3 Nc6 3.f4 Bc5 4.Nf3 d6
White should now continue developing his pieces by playing 5.Bc4.
5.f5?
Not good. He wastes time by moving the pawn again.
5…Nf6
Note how Black keeps developing his pieces.
6.h3?
Another time-killer.
6…d5!
True, Black loses time by moving the d-pawn a second time, but he is opening up the game to his advantage.
7.Nxe5?
White expects 7…Nxe5 - which he will answer with 8.d4, winning back the piece. But Black has other plans.
7…Nxe4!
Threatening immediate destruction with …Qh4+. White’s king, stranded in the center, is exposed to a devastating attack. In fact, even at this early stage, White is lost. The game is opened up, his king is subject to assault by four black pieces, and his lagging development leaves him without the means to fight back.
8.Nf3 (D)
A shamefaced retreat: he wants to prevent …Qh4+.

8…Qh4+!!!
Black gives short shrift to the unfortunate white king stranded in the center.
9.Nxh4 Bf2+ 10.Ke2 Nd4+
Black sacrificed his queen to make this move possible.
11.Kd3 Nc5#!
The brilliant attack has extracted a brutal penalty for White’s foolish policy of neglecting the development of his pieces and the safety of his king.
How to Lose in Nine Moves
Bird’s Opening
White - Black
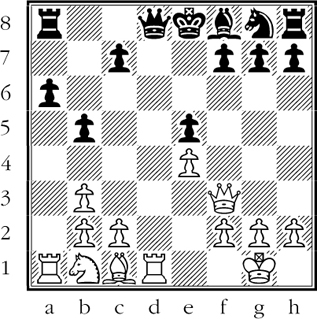
1.f4 Nf6 2.c4
White’s first two moves are unfortunate. He should begin by moving center pawns (e-pawn and d-pawn), which would create lines of development for his bishops and gain control of important squares in the center.
2…d5 3.cxd5 Nxd5 4.d3 e5
Black sacrifices a pawn to seize the initiative.
5.fxe5 Bb4+ 6.Bd2 Ne3
The attack on White’s queen cannot be met by 7.Bxe3, as White’s bishop at d2 is pinned. White’s only chance now is 7.Qc1.
7.Qa4+?? (D)
After this plausible (?) move White’s queen is lost! - a clear indication that he has botched his development.
7…b5!!
This is the move that traps the queen. White belatedly realizes he cannot play 8.Qxb4, for the reply 8…Nc2+ forks king and queen.
8.Qxb5+ Bd7 9.Qb7 Bc6 White resigns.
White’s queen is still trapped: again, if 10.Qxb4 Nc2+!.
The pitiable situation in which White finds himself underlines the serious mistakes he made in neglecting his development.
The chief moral for you to derive from the game is that playing out the center pawns at an early stage gives you your best chance of achieving a quick, normal development. Neglecting the center pawns may create lasting difficulties in getting your pieces out and in finding a safe refuge for your king. And, of course, your chances of successful attack or defense are ruined by poor development. Your pieces cannot function effectively if they are badly developed, or undeveloped.
Thoughtless Development Proves Disastrous
Ruy Lopez
White - Black
1.e4 e5 2.Nf3 Nc6 3.Bb5 a6 4.Ba4 b5 5.Bb3 Na5?
This move does not lose material, for if 6.Nxe5 Nxb3 7.axb3 Qg5 and Black recovers his pawn. But Black moves the knight three times and then exchanges it for White’s bishop. Naturally Black’s development suffers sadly.
6.0-0 Nxb3 7.axb3 d6 8.d4 Bg4
Previously Black neglected his development; here he makes a thoughtless developing move. As you will see next move, Black must exchange …Bxf3 thus speeding up White’s development.
9.dxe5
Now if 9…dxe5 10.Qxd8+ Rxd8 and 11.Nxe5 winning a pawn for White. This forces Black’s reply.
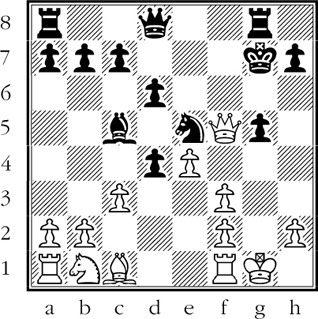
9…Bxf3 10.Qxf3 dxe5 11.Rd1 (D)
Let’s take stock. As a result of Black’s unsatisfactory development, he has parted with the two pieces he developed - his queen knight and queen bishop. White meanwhile has castled, placed both rooks on open files and developed his queen aggressively. All Black’s forces are still on the back rank, his king helplessly exposed.
11…Qf6
11…Bd6 is his best chance to catch up in development.
12.Qd3 Qc6
If 12…Bd6 White has a brilliant reply in 13.Rxa6! Rxa6 14.Qxb5+ winning the black rook.
13.Rxa6!! Black resigns.
A pretty conclusion. If 13…Rxa6 14.Qd8# If 13…Qxa6 14.Qd7#. White made admirable use of the open lines that Black presented to him.
Good Development Trounces Poor Development
Scotch Gambit
White - Black
1.e4 e5 2.Nf3 Nc6 3.d4 exd4 4.Bc4 Bc5 5.0-0 d6 6.c3 Bg4
So far both players have consistently devoted themselves to good development.
7.Qb3 Bxf3 8.Bxf7+ Kf8 9.Bxg8 Rxg8 10.gxf3 g5!
Black’s king has lost the castling privilege, but he is in no danger. The foregoing exchanges have left White with only one piece developed - his queen.
On the other hand, White’s kingside is broken up, and this is a source of danger. Another difficulty, as far as White is concerned, is that all three queenside pieces are still roosting on their home squares.
11.Qe6 Ne5! 12.Qf5+ Kg7! (D)
Black does not fear 13.Bxg5, for after 13…Kh8! the bishop is pinned and lost (14.h4 h6 etc.).
Incidentally, the seemingly exposed position of the black king is deceptive. Since White is playing a one-piece attack, Black’s king has nothing to fear and will be tucked away safely in the corner. Actually it is the white king, menaced by several black pieces, that is in danger.
13.Kh1 Kh8 14.Rg1 g4! 15.f4 Nf3 16.Rxg4 Qh4!!
This brilliant move threatens …Qxh2#. White is lost.
17.Rg2 Qxh2+! 18.Rxh2 Rg1#!
Very pretty play, made possible by the efficient cooperation of Black’s aggressively developed pieces. Note that White’s queenside pieces are still on their original squares.
How Exchanges May Influence Development
King’s Gambit
White - Black
1.e4 e5 2.f4 exf4 3.Nf3 g5
This pawn advance often weakens Black’s kingside formation.
4.h4 g4 5.Ne5 Nf6 6.Nxg4 Nxe4 7.Qe2 d5 8.d3
Threatening to win the pinned knight and thereby forcing Black’s reply. The exchange that follows is the first of a series of exchanges that greatly increase White’s lead in development. Although Black does not commit any clear error, he finds that his arrears in development keep increasing all the time.
8…Bxg4 9.Qxg4 Ng3 10.Rh3 Bd6 11.Bxf4 Qe7+ 12.Kf2 Bxf4 13.Qxf4 Nxf1
An instructive moment: the knight, which has made four moves, is exchanged for White’s bishop, which is still on its original square. This involves a colossal loss of time for Black.
14.Nc3
As Black’s knight cannot escape, White keeps hammering away at development.
14…0-0
Naturally he cannot allow his queen to be pinned by 15.Re1. However, castling is anything but safe, in view of the gap left in the castled position by the disappearance of Black’s g-pawn.
15.Kxf1 c6 16.Re1 Qd8 (D)
The upshot of the exchanges is that White has all his pieces out, while Black’s forces are all on the back row. Add to this the exposed position of Black’s king, and you have the elements of a brilliant finish.
17.Rg3+ Kh8 18.Qh6
Threatens 19.Qg7#.
18…Rg8 19.Re8!!
Beautiful play. Naturally Black cannot play 19…Rxe8 while 19…Qxe8 also allows mate.
19…Qxe8 20.Qf6+ Rg7 21.Qxg7#
White clearly owed his victory to his overwhelming lead in development. Had Black developed his queen knight, that would have been enough to make the winning combination impossible!