The Literature Book (Big Ideas Simply Explained) (2016)
SEVEN
Just like each action has an equal and opposite reaction, every push has its pull, and any solid training program must balance the two. Unfortunately, it’s not as easy to do pulling exercises at home, so some of these will require you to go outside and get creative. A pull-up bar is a great resource, but you’ll also want something about half that height that you can hang from to perform
![]()
PULL
![]()
more of a horizontal pull, known as a row. These exercises target your back, shoulders, and arms. Many of them require you to “pack your shoulders,” meaning you pull your shoulder blades back a bit until you find a stable—but not immobile—feeling within the ball-and-socket joint of your shoulder. This prevents injury and reinforces good form by keeping your shoulder blades from protracting too far, which would cause your shoulders to elevate and your arms to rotate inward. And, as always, a weak core will greatly reduce the amount of strength you can pull with, so make sure you have your core under control before you start on the more advanced pulling exercises.
CLOSED GRIP ROW
![]()
Primary muscle groups: Trapezius, Deltoids
Secondary muscle group: Biceps
61
BASE
BENT KNEE CLOSED GRIP ROW
62
INTERMEDIATE
STRAIGHT LEG CLOSED GRIP ROW
63
ADVANCED
SWITCH GRIP ROW
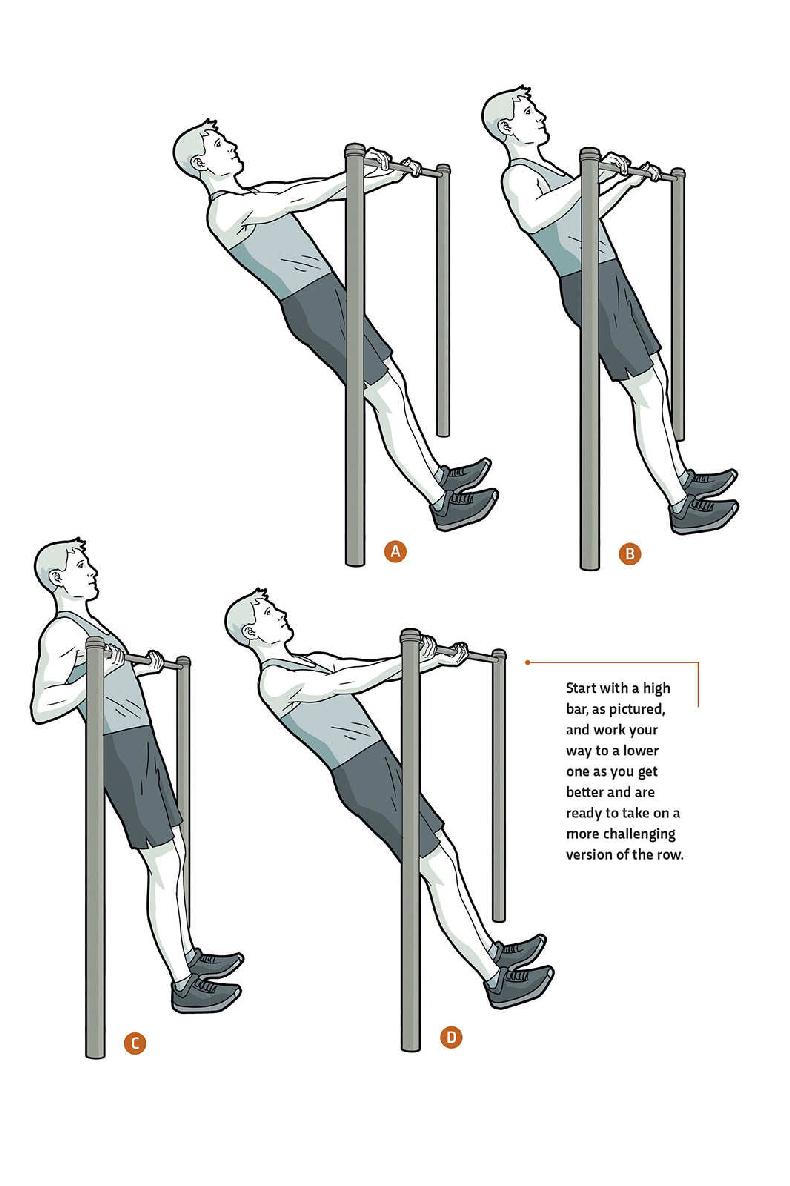
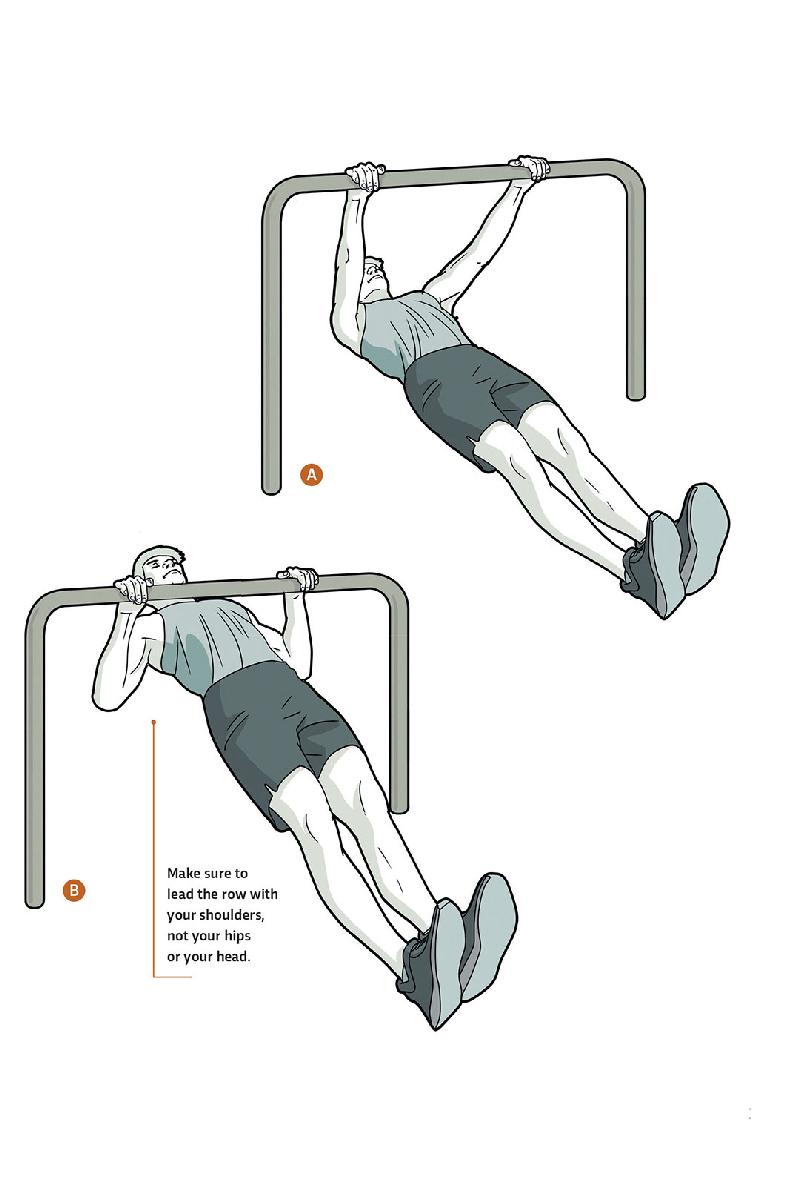
These versions of the row use a grip called the closed, supinated, or reverse grip, putting your arms naturally into an outwardly rotated position, which is much safer for your shoulders. They also challenge your biceps a little more. You can do these rows from varying bar heights as well as with straight or bent legs to control difficulty. The lower the bar and the straighter your legs, the more difficult the movement.
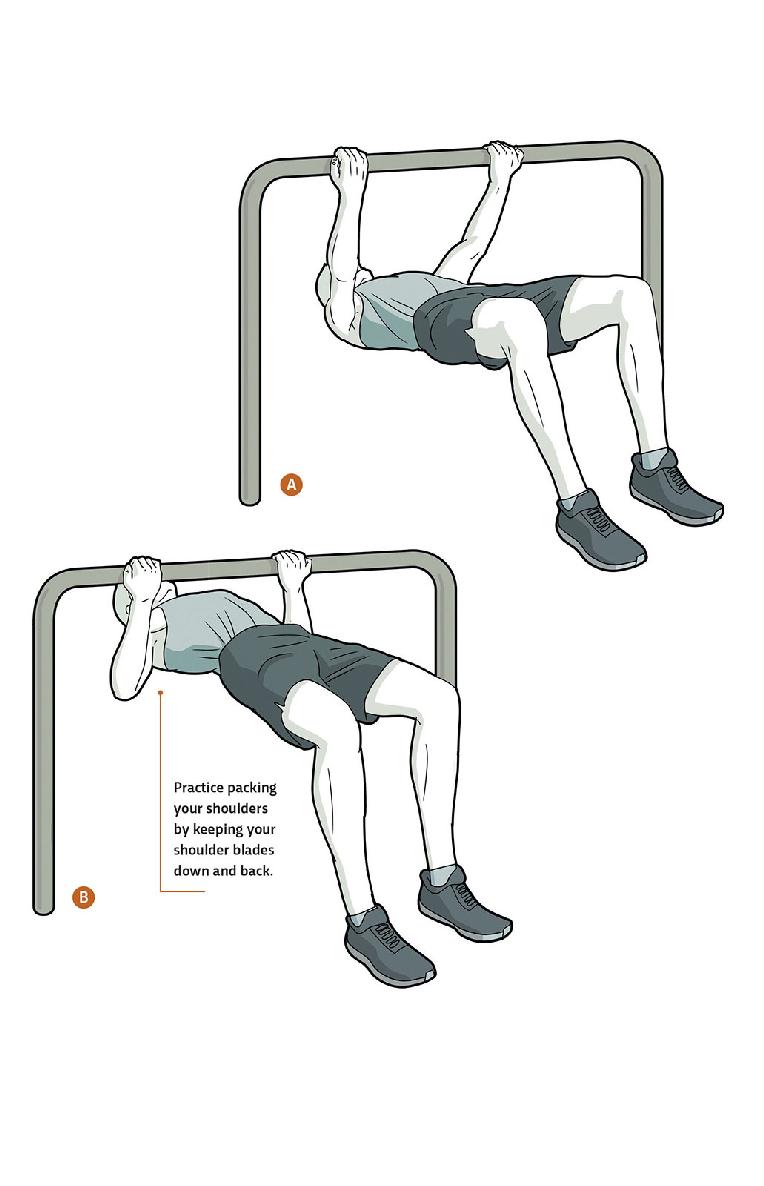
61 / BENT KNEE CLOSED GRIP ROW
This variation is a great option if the only bar you have to row from is low. As the height of the bar lowers, the row exercise becomes exponentially more difficult, and bending your knees is a great way to make things easier. Grabbing the bar with a closed (palms-up) grip will help you strengthen the external rotators of your arm, because they have to stabilize you while you move through the full range of motion. You’ll feel your biceps working harder, as they now have a longer stretch and thus become more active.
GOAL: 20 repetitions
1Grip your chosen bar with your palms up, and hang underneath it. Bend your knees so your legs roughly form a 90-degree angle. Align your body so there's a straight line through your knees, hips, shoulders, and head. ![]()
![]()
2Engage your trapezius muscles by pulling your shoulders down toward your hips, slightly retracting your shoulder blade to find stability in your shoulder.
![]()
3Pull your chest toward the bar ![]() by bending your arms and pulling back your shoulder blades, being careful not to elevate your shoulders.
by bending your arms and pulling back your shoulder blades, being careful not to elevate your shoulders.
![]()
4Once the bar touches your lower chest, slowly lower your body back to the starting position, being careful not to extend your shoulders too far. ![]()
62 / STRAIGHT LEG CLOSED GRIP ROW
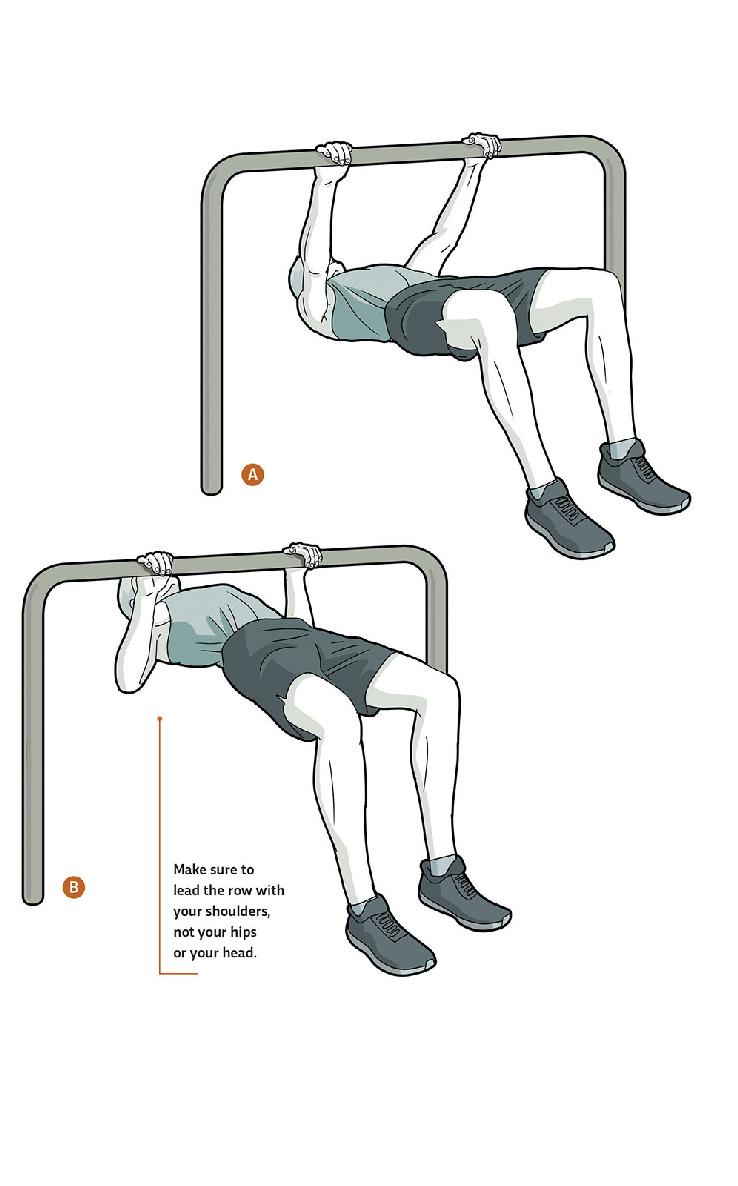
In this variation, you use the palms-up grip and keep your body straight under the bar as you row. The bar should make contact with or come close to the lower portion of your chest. If it’s at your upper chest or collarbone, you’re misaligned or elevating your shoulders too much during the row. You keep your legs out straight and use your heels as the pivot point of the movement. This variation requires much more core stability than the previous exercise. Be careful not to lead the row with your hips. Instead, keep your hips down and lead with your shoulders, keeping your body in an upside-down plank position.
GOAL: 20 repetitions
1Grip your chosen bar with your palms up, and hang underneath it. Straighten your legs, dig your heels into the ground, and flex your feet up toward your face. Align your body so there's a straight line all the way through your ankles, knees, hips, shoulders, and head. ![]()
![]()
2Engage your trapezius muscles by pulling your shoulders down toward your hips, slightly retracting your shoulder blade to find stability in your shoulder.
![]()
3Pull your chest toward the bar by bending your arms and pulling back your shoulder blades, being careful not to elevate your shoulders. ![]()
![]()
4Once the bar touches your lower chest, slowly lower your body back to the starting position, being careful not to extend your shoulders too far. ![]()
63 / SWITCH GRIP ROW
This variation is a great way to add a little difficulty if the bar you’re working with feels too high, but it can get a little risky, so proceed with caution. For the switch grip row, you have to pull yourself up with enough speed that you generate the momentum necessary to let go of the bar at the top of the motion and quickly switch your grip for every rep.
GOAL: Work toward doing 20 repetitions.
1Grip your chosen bar with your palms facing away from you (closed grip), straighten your legs, dig your heels into the ground, and flex your feet up toward your face. Align your body so there’s a straight line all the way through your ankles, knees, hips, shoulders, and head. ![]()
![]()
2Engage your trapezius muscles by pulling your shoulders down toward your hips, slightly retracting your shoulder blade to find stability in your shoulder.
![]()
3Pull your chest toward the bar at fairly high speed ![]() so that as you reach the top of your motion, you can quickly let go with both hands and grab the bar with your palms facing away from you (open grip).
so that as you reach the top of your motion, you can quickly let go with both hands and grab the bar with your palms facing away from you (open grip). ![]()
![]()
4Catch yourself with the new grip, and absorb your weight as you transition smoothly back to the starting position. ![]()
![]()
5Repeat, this time switching your grip from palms up to palms down. A rep with each grip counts as one.
OPEN GRIP ROW
![]()
Primary muscle groups: Trapezius, Deltoids
Secondary muscle group: Biceps
64
BASE
BENT KNEE OPEN GRIP ROW
65
INTERMEDIATE
STRAIGHT LEG OPEN GRIP ROW
66
ADVANCED
ONE ARM OPEN GRIP ROW
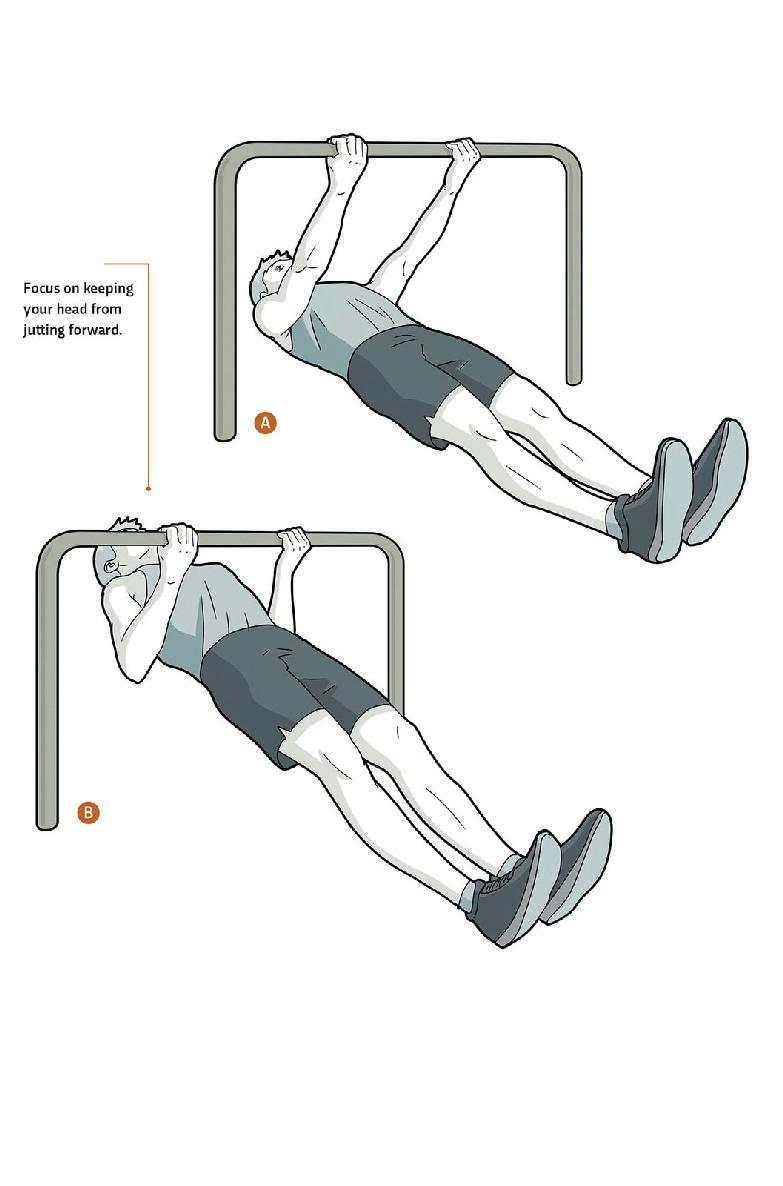
This is a traditional row with a pronated (palms-down) grip. It’s important to have good awareness of your spine and neck position when building a good rowing pattern. Make sure not to jut your head forward through any of the motions. You should also try to keep your hips neutral by firing your glutes and abs together just like you would in a plank (01). You’ll move quickly through these variations as you get better at them. You’ll start with a bent-knee variation to reduce the amount of weight you have to row, then move on to a straight-leg version before finally tackling a one-arm row.
64 / BENT KNEE OPEN GRIP ROW
This variation lets you bend your legs to reduce the amount of weight you need to pull. You’ll need a sturdy bar to work from, about 4-feet high, give or take a few inches depending on your height and arm length. As you finish your row, the bar should land at lower-chest level. If it lands at midchest level or up near your collarbone, your shoulder blades are forced up around your ears, which will prevent you from reaching your true strength potential. Like you do during a push-up, always try to keep your shoulder blades pulled down toward your hips.
GOAL: 20 repetitions
1Grip your chosen bar with your palms facing away from you, and hang underneath it. Bend your knees so your legs form roughly a 90-degree angle. Align your body so there’s a straight line between your knees, hips, shoulders, and head. ![]()
![]()
2Engage your trapezius muscles by pulling your shoulders down toward your hips, slightly retracting your shoulder blades to find stability in your shoulders.
![]()
3Pull your chest toward the bar by bending your arms and pulling back your shoulder blades, being careful not to elevate your shoulders. ![]()
![]()
4Once the bar touches your lower chest, slowly lower your body to its starting position, ![]() being careful not to extend your shoulders too far.
being careful not to extend your shoulders too far.
65 / STRAIGHT LEG OPEN GRIP ROW
In this variation, you’ll squeeze your legs straight and row yourself in an upside-down plank position. You’ll have to pull an amount much closer to your full body weight than you did in the bent knee row (64). You may have to walk your feet out a little farther, but the bar should still come to your lower chest as you finish the row. Remember to practice supporting your arms from your back muscles, and don’t let your shoulder blades protract too far.
GOAL: You should be comfortable with doing at least 20 repetitions before you attempt the One Arm Open Grip Row (66).
1Grip your chosen bar with your palms facing away from you, and hang underneath it.
![]()
2Straighten your legs, dig your heels into the ground, and flex your feet so that your toes point up toward your face. ![]()
![]()
3Align your body so there’s a straight line between your ankles, knees, hips, shoulders, and head.
![]()
4Engage your trapezius muscles by pulling your shoulders down toward your hips, slightly retracting your shoulder blades to find stability in your shoulders.
![]()
5Pull your chest toward the bar by bending your arms and pulling back your shoulder blades, ![]() being careful not to elevate your shoulders or push your head forward.
being careful not to elevate your shoulders or push your head forward.
![]()
6Once the bar touches your lower chest, slowly return to the starting position, ![]() being careful not to extend your shoulders too far.
being careful not to extend your shoulders too far.
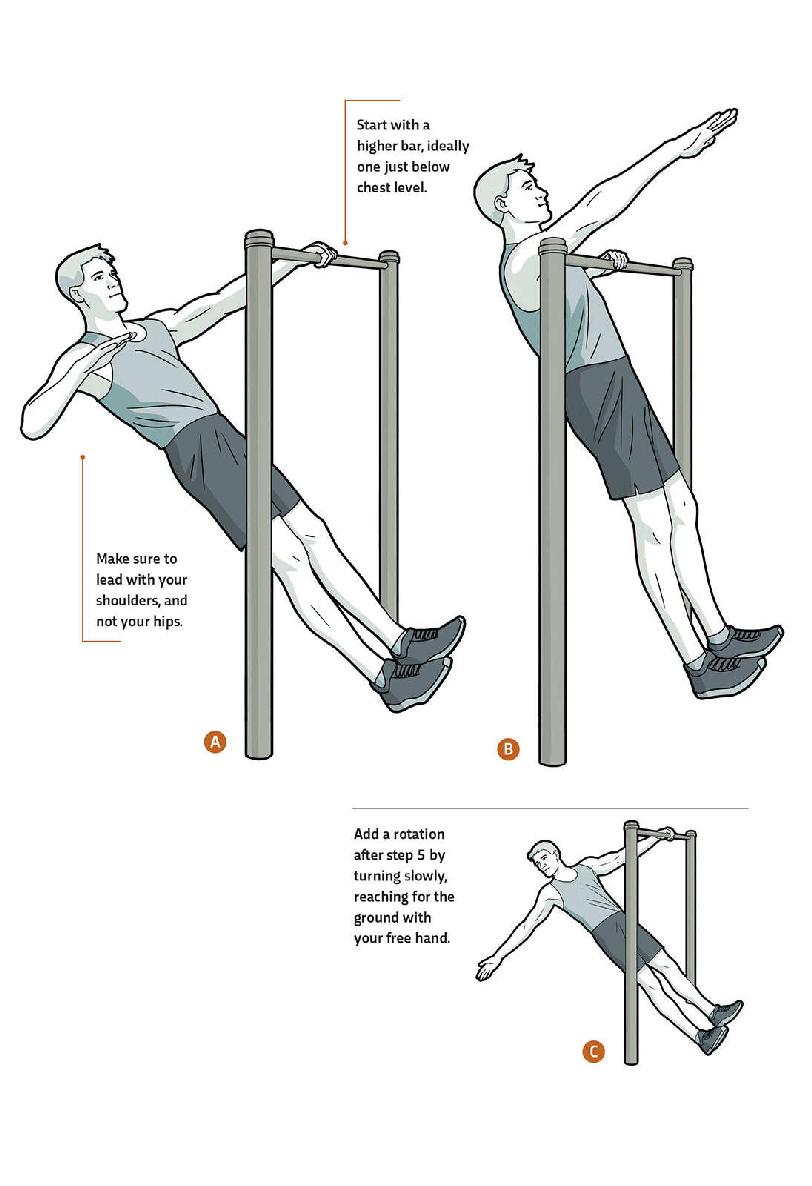
66 / ONE ARM OPEN GRIP ROW
This variation gets difficult quickly, challenging single arm strength as well as hip and shoulder stability. Ideally, you should do this row from a higher bar so that it’s not too difficult, but you can also regress it by bending your knees if your choice of bars is limited. For an extra challenge, you can add a rotation at the bottom of the row, introducing some chest and abdominals to a movement that normally focuses on your shoulders, back, and arms.
GOAL: 10 repetitions on each side
![]()
1Grip your chosen bar with your palms facing away from you, and hang back into straight arms. Straighten your legs, dig your heels into the ground, and flex your feet so that your toes point up toward your face.
![]()
2Make sure your left hand is lined up with your shoulder, and let go of the bar with your right hand. ![]()
![]()
3Engage your trapezius muscles by pulling your shoulders down toward your hips, retracting your shoulder blades to find stability in your shoulders. Pull your chest toward the bar by bending your left arm and pulling back your shoulder blade, being careful not to elevate your shoulder. Keeping your free right arm straight, pass it over the top of the bar. ![]()
![]()
4Once the bar touches your lower chest, slowly lower your body back to the shoulder-packed position, being careful not to extend the shoulders too far. See tip for additional rotation. ![]()
![]()
5Do the desired number of reps on the left side before switching to the right.
CLOSED GRIP
PULL-UP
![]()
Primary muscle groups: Biceps, Lats
Secondary muscle group: Trapezius
67
BASE
FLEXED ARM HANG
68
INTERMEDIATE
CHIN-UP
69
ADVANCED
CHIN-UP WITH PIKE
Chin-ups are a type of pull-up that are executed with a closed grip, and thus the official name for them is closed grip pull-up. They typically feel a little easier than the classic pull-up because with your palms facing upward, your biceps have a more direct line of pull and can pitch in more. Rather than using a negative chin-up as a regression for this exercise, you’ll start with a flexed arm hang, which is a great exercise for building shoulder stability. The second variation is the classic chin-up, and the last is a chin-up with the legs straight out in a pike position.
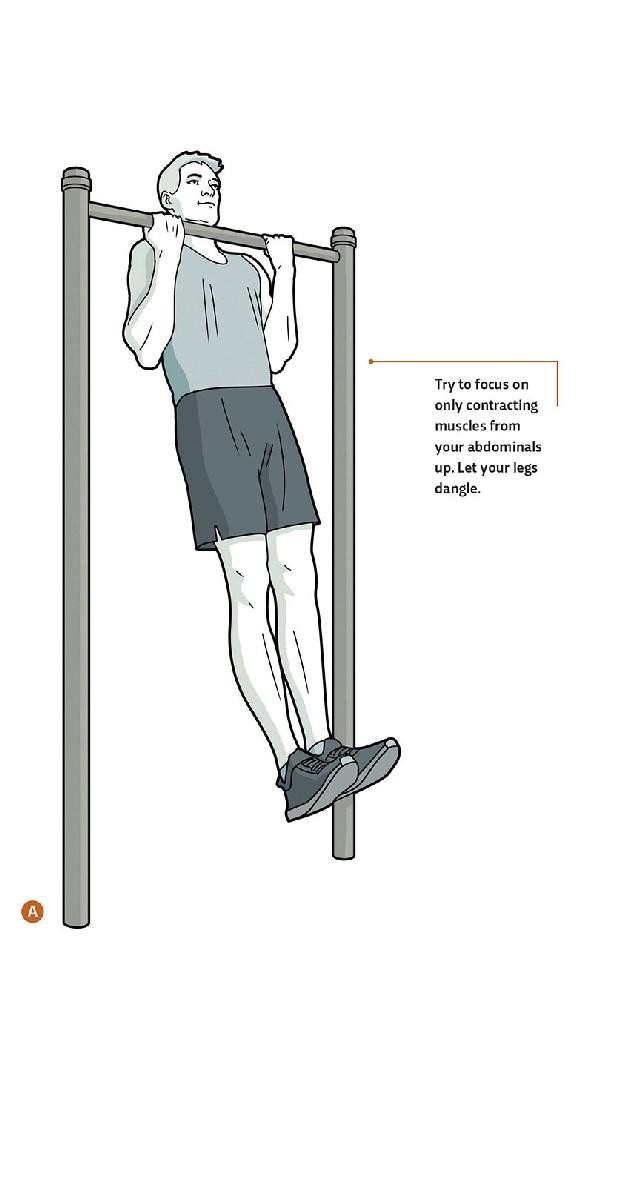
67 / FLEXED ARM HANG
This variation helps you develop the shoulder stability you need for proper chin-ups and pull-ups. It’s a great option for building the strength necessary for a chin-up—but still a great challenge if you already have that strength. You can do it from a lower bar or from a high bar with a step under it—anything that lets you comfortably get yourself into the fully flexed position with your feet in the air. This exercise doesn’t involve repetitions, so you’ll aim to hold it for a certain length of time instead of counting reps.
GOAL: Your first goal should be to hold the position for intervals totaling 30 seconds. As you get stronger, progress to intervals totaling 60 seconds.
1Using a low bar or a step beneath a high bar, position your body at the top range of a chin-up. Your elbows should be bent, and the bar should be even with or just below your chin. ![]()
![]()
2Hold the position for at least 10 seconds, making sure your shoulders stay down.
![]()
3To release, lower yourself smoothly back to the ground or the step.
![]()
4Jump back up or use the step to return to the starting position, and repeat.
68 / CHIN-UP
The chin-up is a version of a pull-up that uses a closed or supinated grip (palms up) instead of a pronated one (palms down). It typically feels easier than the classic pull-up because the position of your hands allows your biceps to be more involved. Try to keep your body stable and avoid swaying back and forth as you perform the pull. This helps train your lats to fully extend without pulling your back into extension and throwing your body into a swing.
GOAL: Build up to 20 repetitions.
1Start by hanging from a bar with your palms facing toward you. Engage your abdominals to prevent excessive extension in your lower back.
![]()
2Keeping your shoulders depressed, pull yourself up ![]() until your chin is at the same level as the bar.
until your chin is at the same level as the bar. ![]() Slowly lower yourself back into your starting position.
Slowly lower yourself back into your starting position.

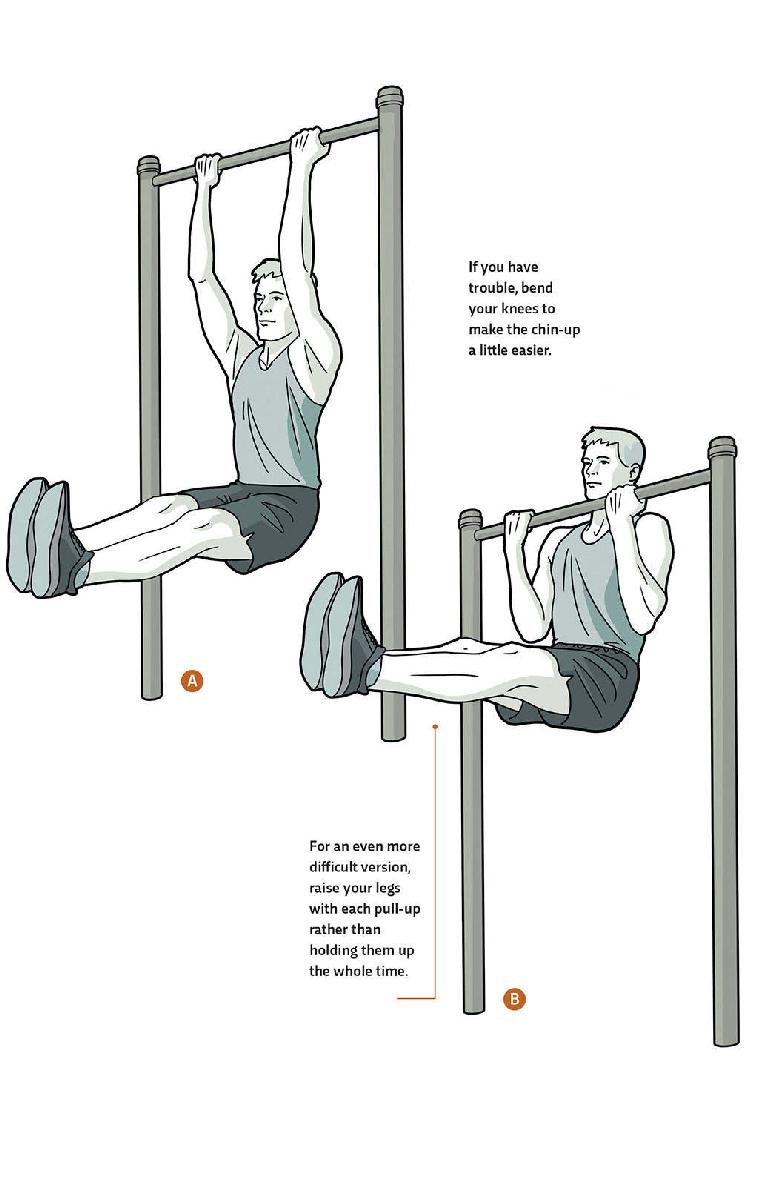
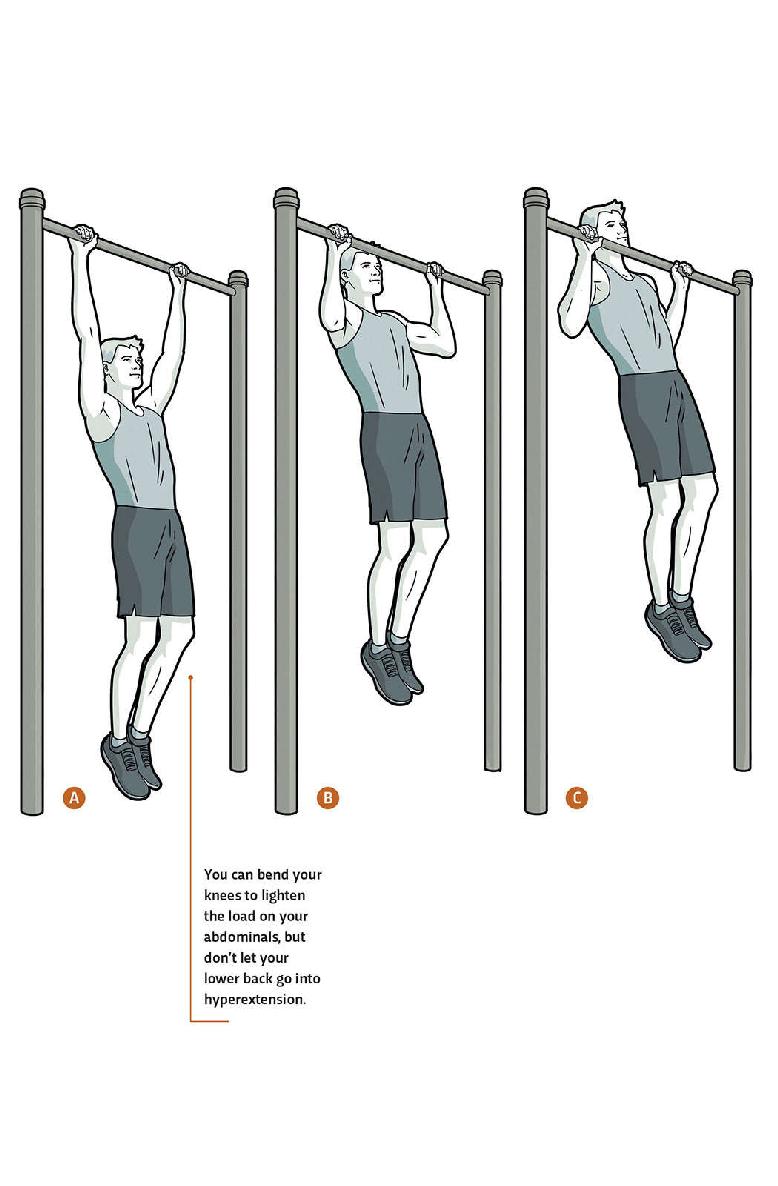
69 /CHIN-UP WITH PIKE
This variation of the chin-up forces your abdominals to maintain a straight-leg position through the entire motion, which prevents your lower spine from extending as a result of weak core stabilizers. It also forces your lats to fully extend at the bottom so they can’t try to cheat and stay short, pulling your lower back into extension.
GOAL: 20 repetitions
1Start by hanging from a bar with your palms facing toward you.
![]()
2Engage your abdominals, and lift your legs straight out in front of you in a pike position. ![]()
![]()
3Keeping your shoulders depressed, pull yourself up until your chin is at bar level. ![]() Slowly lower yourself back into your starting position.
Slowly lower yourself back into your starting position. ![]()
OPEN GRIP
PULL-UP
![]()
Primary muscle groups: Biceps, Lats
Secondary muscle group: Trapezius
70
BASE
NEGATIVE PULL-UP
71
INTERMEDIATE
OPEN GRIP PULL-UP
72
ADVANCED
ROCK CLIMBER PULL-UP
Pull-ups may just be the most difficult bodyweight exercise—but they’re also the best display of total bodyweight strength. Because we rarely do this motion in our daily lives, these muscles can begin to lose strength and connection with the brain. That’s why it’s so important to keep your body moving through all the different ranges of motion on a regular basis. If you don’t, the strength you need for rarer motions starts to disappear. The first variation of this exercise will be to lower yourself in what’s called an eccentric, or negative, pull-up. The next level is a true pull-up, and the last has a horizontal shift challenge.
70 /NEGATIVE PULL-UP
For the negative pull-up, you’ll want either a lower bar (head- to chest-level) or a step underneath a normal pull-up bar. You need to be able to comfortably get your body into the finishing position of a pull-up—the part where you’re holding your weight up and the bar is below your chin—and then slowly lower yourself in a controlled manner until your arms are fully extended. It’s like a reverse or “negative” version of a regular pull-up, where you focus on carefully lowering your body instead of lifting it. Make sure you keep your shoulders pulled down toward your hips, and don’t let them ride up around your ears throughout the whole lowering motion. This will help train your lower-trapezius muscles to activate and support your shoulder blades.
GOAL: Once you can do 20 repetitions, you’re ready to tackle the classic Open Grip Pull-Up (71).
1Using a low bar or a step underneath a high bar, position your body at the top range of a pull-up. ![]() Your elbows should be bent, and the bar should be below your chin.
Your elbows should be bent, and the bar should be below your chin.
![]()
2Keeping your lower-trapezius muscles engaged by pulling your shoulders down toward your hips, slowly extend your arms, lowering your body ![]() until your elbows are straight.
until your elbows are straight. ![]()
![]()
3Jump back up or use the step to return to the starting position, ![]() and repeat.
and repeat.
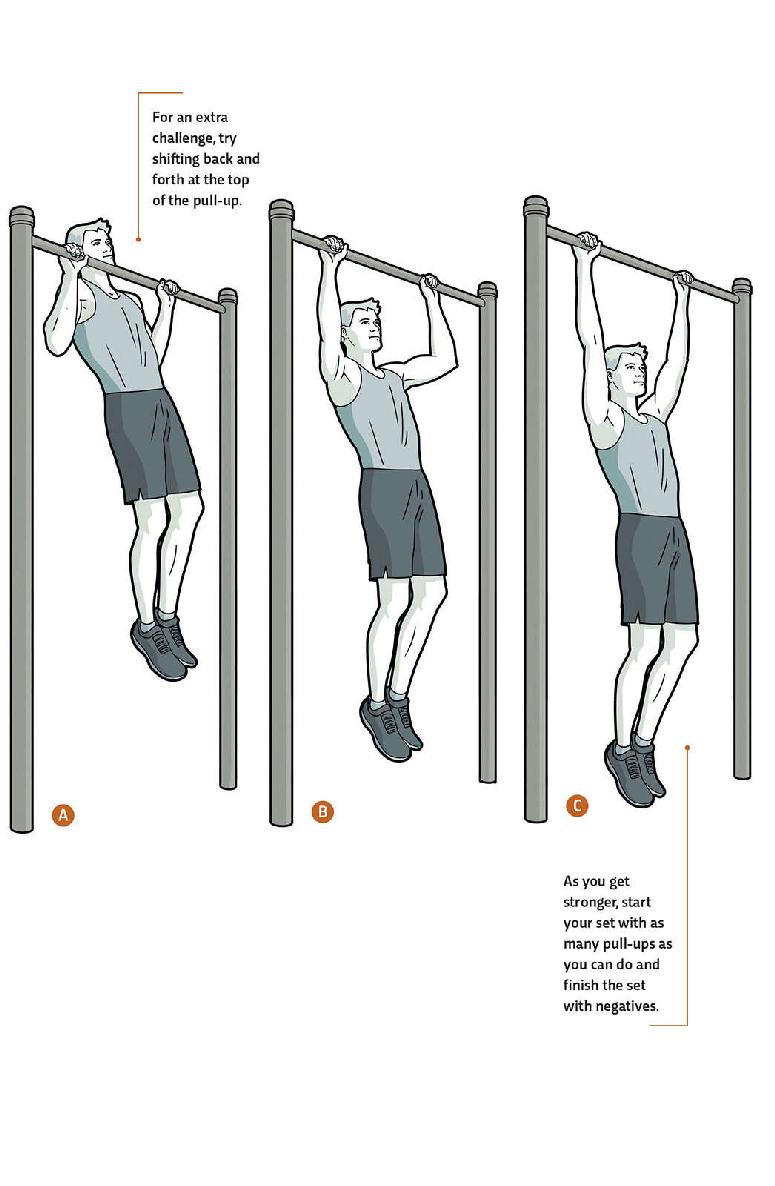
71 /OPEN GRIP PULL-UP
Here it is: the true test of bodyweight strength. In this variation, you’ll start from a fully extended arm position, hanging from a bar. In a good pull-up, your chin breaks the plane of the bar (without tilting your head back to get another inch or two of chin height). You don’t need to go to a full dead hang between repetitions unless you want the extra challenge, but your elbows should come within just a few degrees of being straight. Make sure to keep your lower-trapezius muscles and abs firing through all phases of this exercise.
GOAL: Build up to 20 repetitions.
1Start by hanging from a bar with your palms facing away from you. ![]()
![]()
2Engage your abdominals to prevent excessive extension in your lower back.
![]()
3Keeping your shoulders depressed, pull yourself up ![]() until your chin is at the bar’s level.
until your chin is at the bar’s level. ![]() Slowly lower yourself back into your starting position.
Slowly lower yourself back into your starting position. ![]()
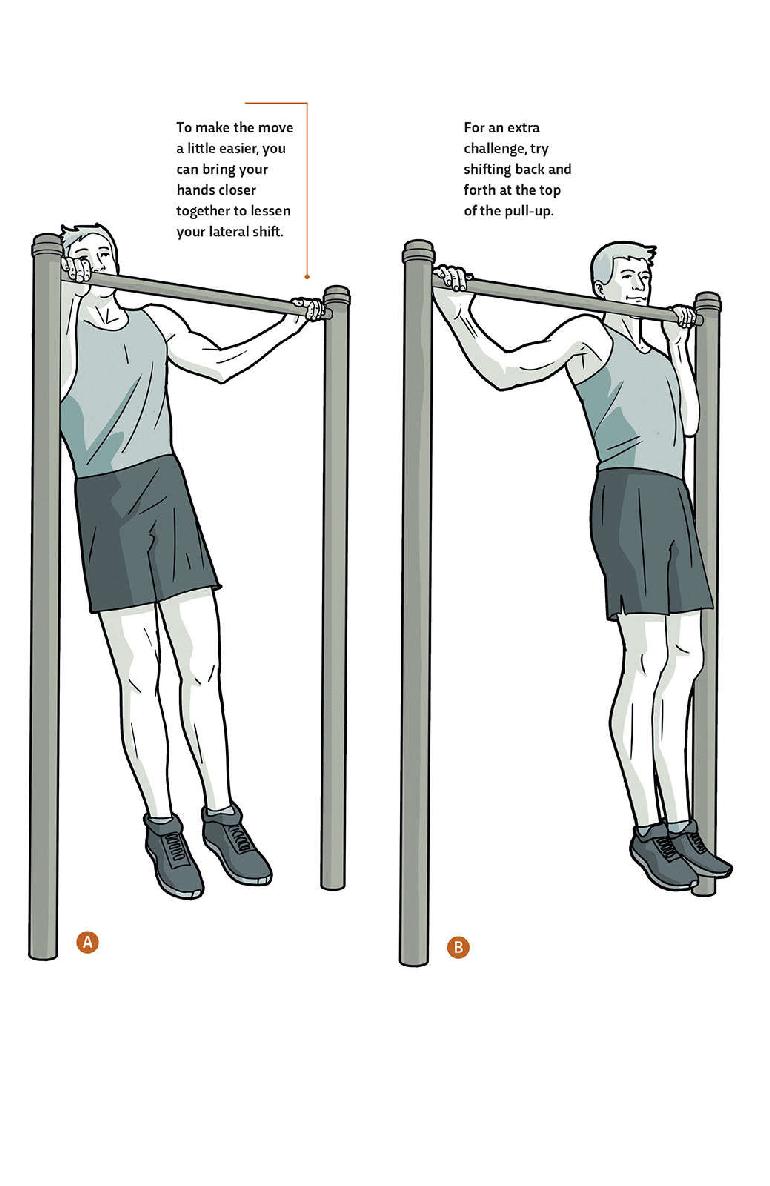
72 / ROCK CLIMBER PULL-UP
These pull-ups take your body from one side to another, alternately challenging each side to do more of the pulling. Your goal is to get your right shoulder to tap your right hand as you pull up to your right side, and then do the same on the left. As you go up and down, try to keep your lateral translation smooth, and match it with your vertical motion. The wider your hand grip, the harder this variation will be.
GOAL: 10 repetitions on each side
1Start by hanging from a bar with your palms facing away from you.
![]()
2Engage your abdominals to prevent excessive extension in your lower back.
![]()
3Keeping your shoulders depressed, pull your right shoulder up to your right hand. ![]()
![]()
4Lower yourself smoothly back into your starting position. Repeat on the left side. ![]()
SPINAL EXTENSION
![]()
Primary muscle groups: Spinal erectors, Trapezius
Secondary muscle group: Deltoids
73
BASE
PRONE SPINAL EXTENSION
74
INTERMEDIATE
PRONE SWIMMER
75
ADVANCED
PRONE SHOULDER PRESS
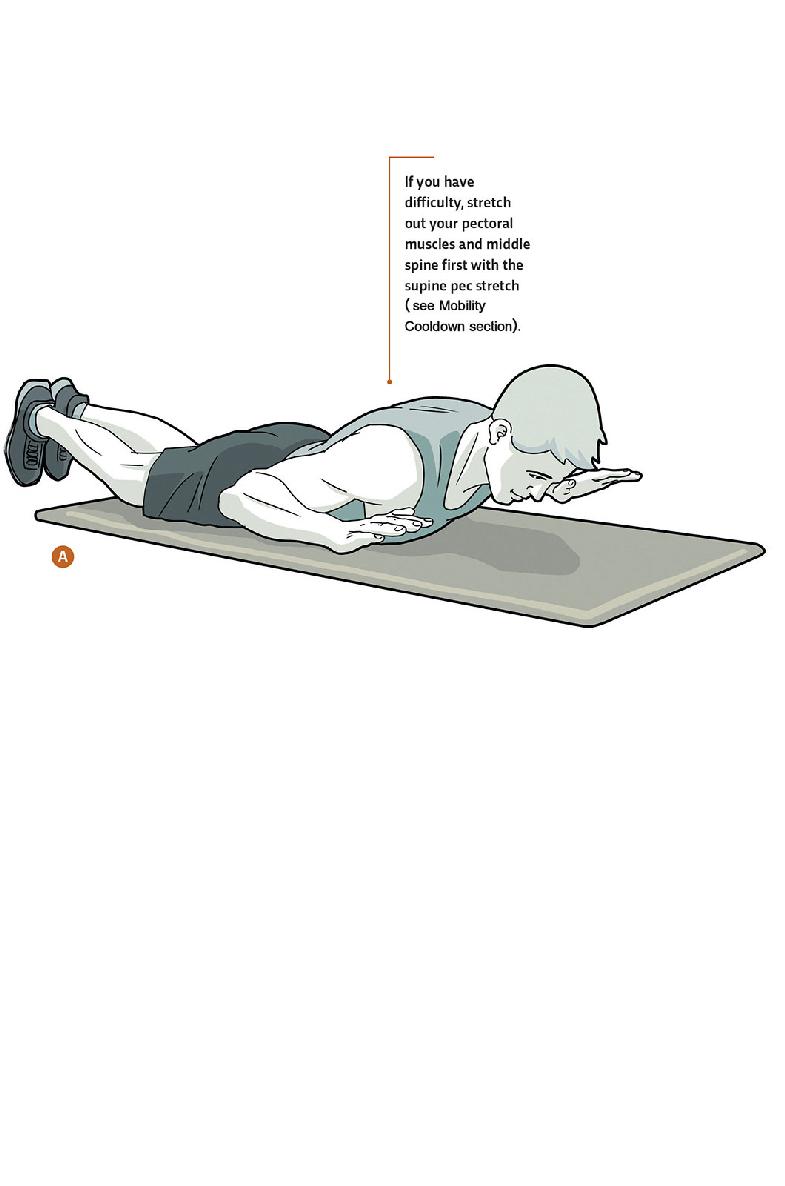
Spinal extensions are great for strengthening your mid-spine extensors and activating your mid and lower-trapezius muscles, which control your shoulder blades. Building good rhythm between your shoulder blades and your arms is essential for healthy arm and shoulder movement. It’s important to practice correct depression and retraction of your shoulder blades so that your upper trapezius muscles don’t become overactive when your arms are overhead. These exercises are a great way to build that control. Begin each exercise lying face down, which is known as the prone position.
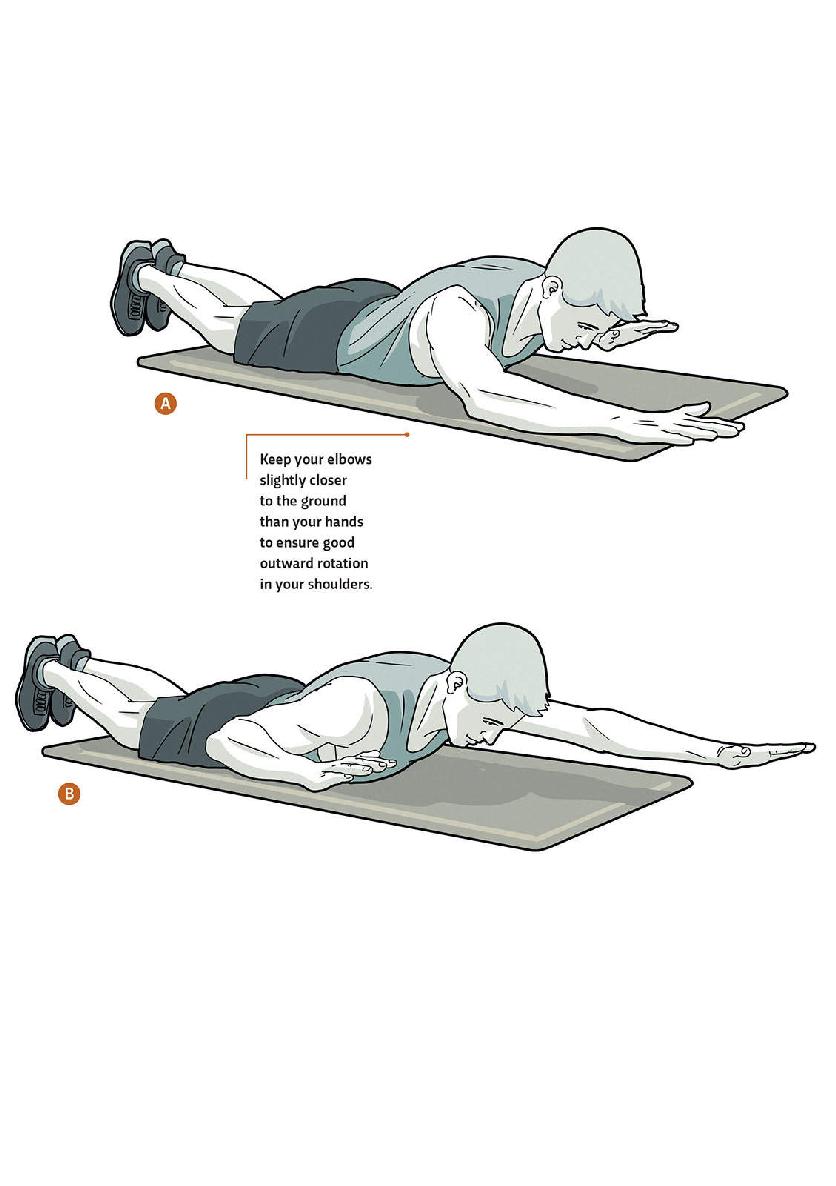
73 / PRONE SPINAL EXTENSION
The most basic of the spinal extensions, this exercise involves lifting your head, shoulders, and chest off the ground while leaving your legs and hips neutral and in contact with the ground. It doesn’t use repetitions, so, like you did with the flexed arm hang (67), you’ll aim to hold it for a certain length of time. Try to keep your shoulders rolled open into outward rotation and your elbows lower than your wrists.
GOAL: Start by holding the position for intervals totaling 30 seconds. Progress to intervals totaling 60 and then 90 seconds.
1Lie face down. Your hands should be palms down, placed even with, and just wider than, your shoulders.
![]()
2Make sure your shoulder blades are pressed down toward your hips and slightly retracted.
![]()
3Gently lift your head, shoulders, and arms a few inches off the ground as one unit. ![]() The movement should come from the middle of your spine with the lower spine staying relatively relaxed.
The movement should come from the middle of your spine with the lower spine staying relatively relaxed.
![]()
4Hold this position for 30 seconds, breathing deeply and trying to get your chest taller and the back of your neck longer with each exhalation.
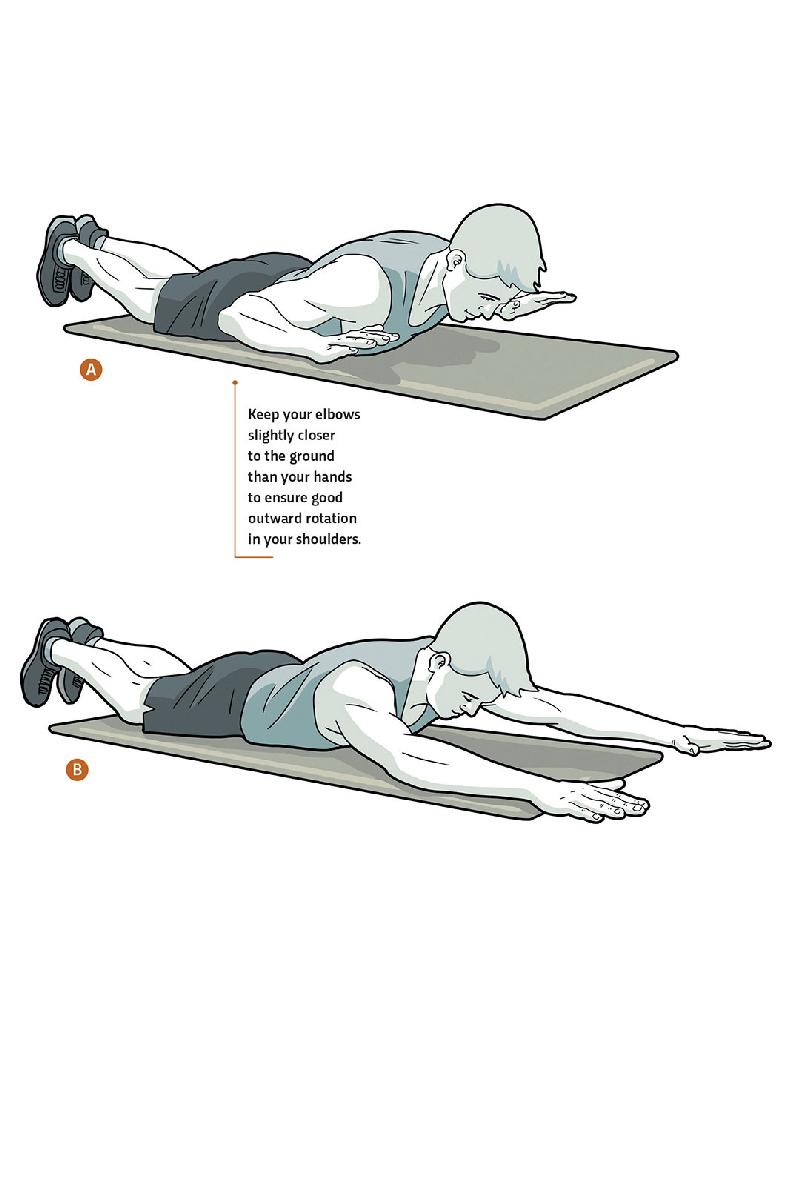
74 / PRONE SWIMMER
This variation begins to challenge the upward and downward rotation of your shoulder blades (scapulae) as you reach your arms overhead. The point of this exercise is to work your shoulders’ outward rotators and to practice moving your arms overhead without allowing the upper traps to become overactive. Your shoulders should not creep up around your ears. If you can’t get your arms all the way up over your head without using your upper-trapezius muscles, only go as high as you can. Move your arms in an alternating pattern, and focus on returning them to a low position that lets your upper-trapezius muscles completely turn off between each rep.
GOAL: 20 repetitions
1Lie face down. Your hands should be palms down, placed even with, and just wider than, your shoulders.
![]()
2Make sure your shoulder blades are pressed down toward your hips and slightly retracted.
![]()
3Gently lift your head, shoulders, and arms a few inches off the ground as one unit. ![]() The movement should come from your middle spine, while your lower spine stays relaxed.
The movement should come from your middle spine, while your lower spine stays relaxed.
![]()
4Keeping your arms and hands just an inch from the ground, slowly reach one arm overhead, ![]() trying to straighten your elbow while preventing overactivity of your upper trapezius muscles.
trying to straighten your elbow while preventing overactivity of your upper trapezius muscles.
![]()
5As you return that arm to the starting position, extend the other in a reciprocating motion. ![]()
75 / PRONE SHOULDER PRESS
The prone shoulder press is similar to the prone swimmer (74), but this one challenges motion in both shoulder blades at the same time. Moving one side of your body at a time involves different mechanics than moving both sides together, and you may find this variation more difficult. Remember, only bring your arms as high overhead as you can before your upper-trapezius muscles kick in. You want to keep your lower- and mid-trapezius muscles engaged and keep your upper-trapezius muscles from becoming overactive. You should not feel stress in your neck while doing this exercise. If you do, you need to strive for more lower-trapezius engagement and more outward rotation of your shoulders and arms. Also check to make sure you’re not craning your neck and trying to look out in front of you.
GOAL: 20 repetitions
1Lie face down. Your hands should be palms down, placed even with, and just wider than, your shoulders. Make sure your shoulder blades are pressed down toward your hips and slightly retracted.
![]()
2Gently lift your head, shoulders, and arms a few inches off the ground as one unit. ![]() The movement should come from your middle spine, while your lower spine stays relaxed.
The movement should come from your middle spine, while your lower spine stays relaxed.
![]()
3Keeping your arms and hands just an inch from the ground, slowly reach up overhead with both hands, straightening your elbows as best you can. ![]()
![]()
4Return to the starting position as soon as you feel your upper trapezius muscles starting to pull your shoulders up toward your ears or your elbows lifting up.
CONDITIONING
STRENGTH TRAINING
TOTAL BODY SHRED