The Literature Book (Big Ideas Simply Explained) (2016)
SIX
The multijoint movements in this chapter’s exercises will build your pectorals, deltoids, triceps, and other stabilizing muscles in your upper body. There are two main types of pushes: horizontal and vertical. A good workout program uses a balanced mix of both, which is why I’ve included exercises like dips, shoulder presses, and many variations on the push-up. In order to
![]()
PUSH
![]()
have a strong push, you have to have a stable platform to push from. Think about playing chicken in a pool on your friend’s shoulders. If the person on the bottom isn’t stable, the person on top won’t be able to push with any leverage. Your core is like the person on the bottom, so you have to make it strong before you can ask the person on top—your upper body—to perform well. If you’re having trouble with any of these exercises, make sure you’ve adequately trained your core before you start blaming any push muscles.
PUSH-UP
![]()
Primary muscle groups: Pectorals, Deltoids
Secondary muscle groups: Triceps, Abdominals
46
BASE
ELEVATED PUSH-UP
47
INTERMEDIATE
CLASSIC PUSH-UP
48
ADVANCED
PUSH-UP WITH SHOULDER TAP
These variations of the push-up challenge your chest, shoulders, and triceps to provide the power for your motion, while your core provides the stabilization your arms need to push. Here you’ll start with an elevated, regressed version of the push-up to perfect your form before moving on to the classic push-up and then a harder version with a stability challenge. All of these variations are classified as horizontal pushes.
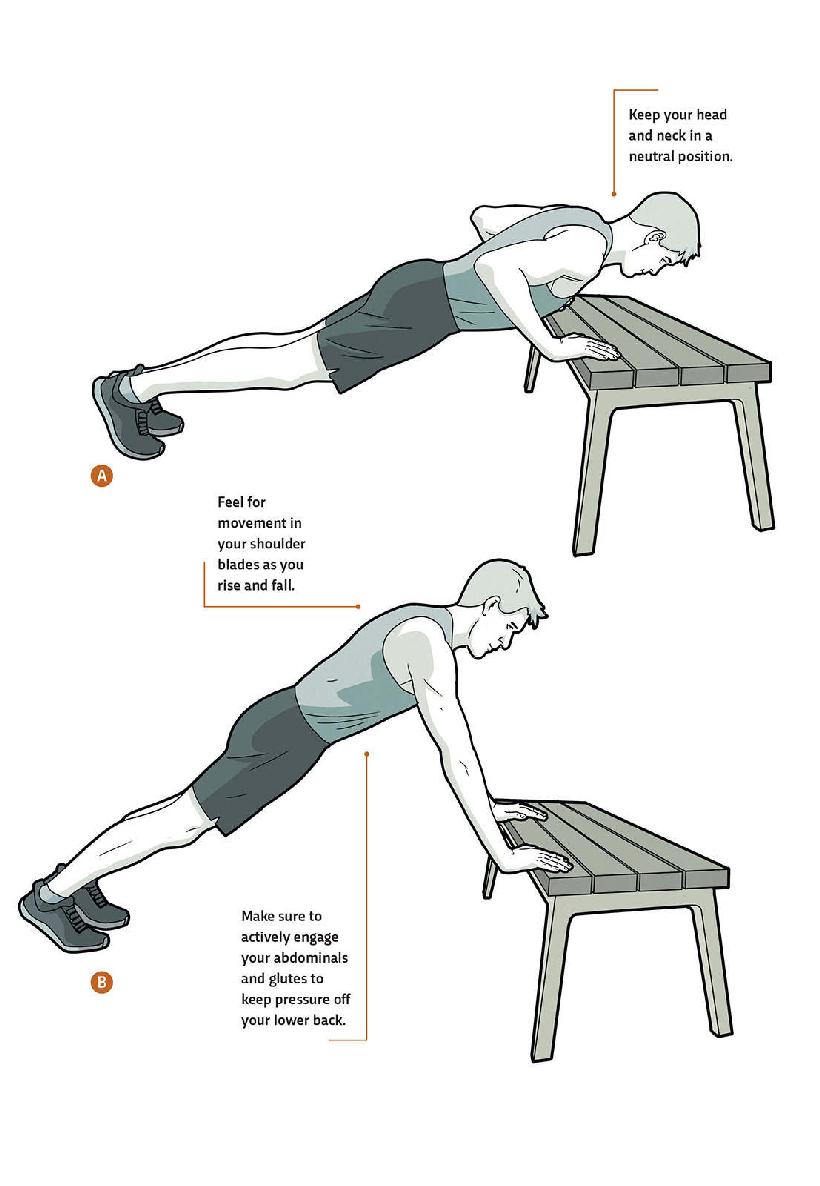
46 / ELEVATED PUSH-UP
Many people don’t think of a push-up as an advanced exercise, but it’s harder than you might think to do one correctly. With all the stabilization it requires, a push-up isn’t really a basic exercise—it’s actually a progression of the gym’s traditional horizontal push, the bench press. If you don’t have the stability or strength to perform several repetitions, you can start off by pushing up from an elevated position using a bench or counter. That way, your core still gets the practice of hip and spine stabilization, but your chest and shoulders don’t have to work as hard to lift your body. Once your core is strong enough to keep your spine and pelvis neutral consistently, you can move up to the classic push-up (47).
GOAL: You want to be able to do at least 20 repetitions and hold a plank position (01) for at least 1 minute before progressing to the Classic Push-Up (47).
![]()
1Place your hands on a solid elevated structure like a bench or counter. To find the correct position for your feet, bend your arms to replicate the “down” part of a push-up and then place your feet so that the edge of the counter lies just below your sternum.
![]()
2With your pelvis in a neutral position, press through your arms, fully extending your elbows. ![]()
![]()
3When you’re ready, slowly lower your body in a controlled manner toward the counter.
![]()
4As your chest comes within a few inches of the counter, press through your arms and fully extend your elbows again. ![]()
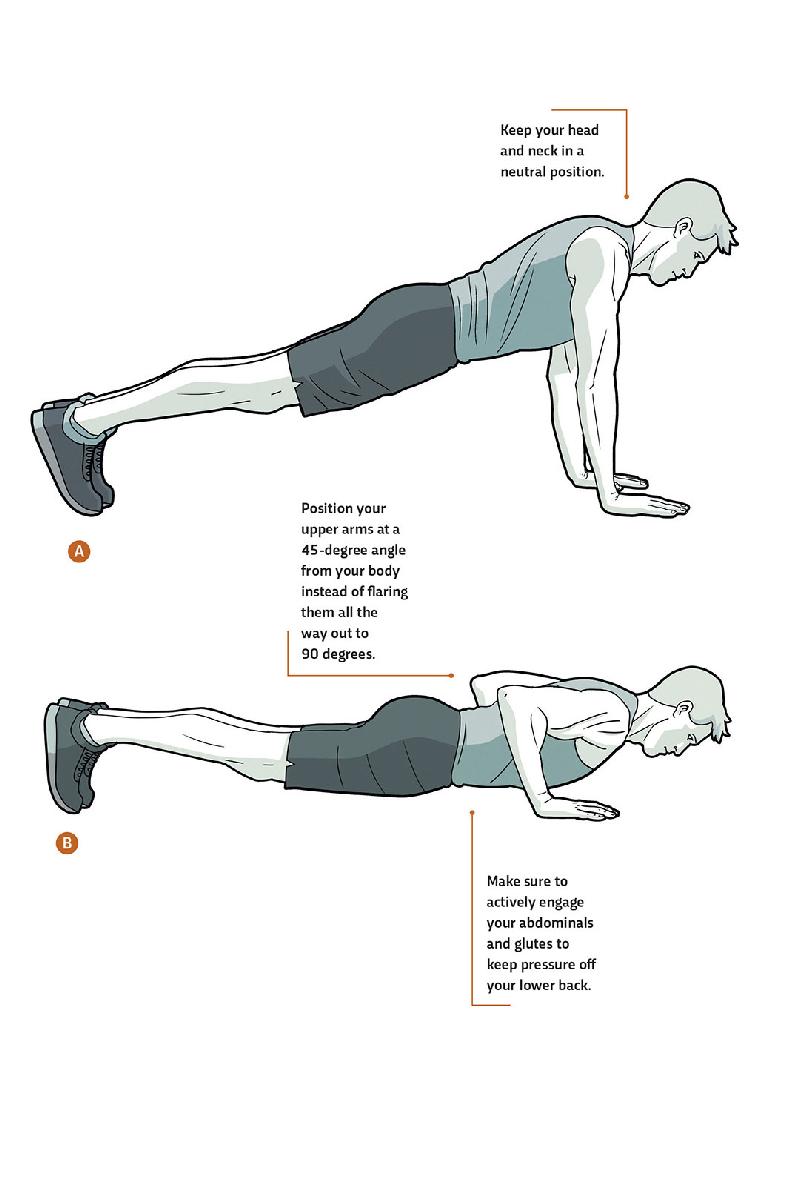
47 / CLASSIC PUSH-UP
This exercise is a staple of calisthenics. You’ll go on to use many variations of it, so it’s important to master this more basic version. It uses the chest, shoulders, and triceps to press the full weight of your body while forcing your core to stabilize you throughout the entire motion. Remember that without a stable core, these muscles have nothing to push against, and the level of strength you can achieve diminishes greatly.
GOAL: When you can do 20 repetitions with perfect form, you’re ready to try the Push-Up with Shoulder Tap (48).
1Start in a plank position facing the floor with your arms straight out in front of you, your knees locked, and your feet together on the floor. ![]()
![]()
2Keeping your pelvis in a neutral position, use your arms to lower your shoulders and hips as one unit toward the floor.
![]()
3When your chest is about 3 inches from the floor, press through your palms, continuing to move your shoulders and hips as one unit, and return to the starting position. ![]()
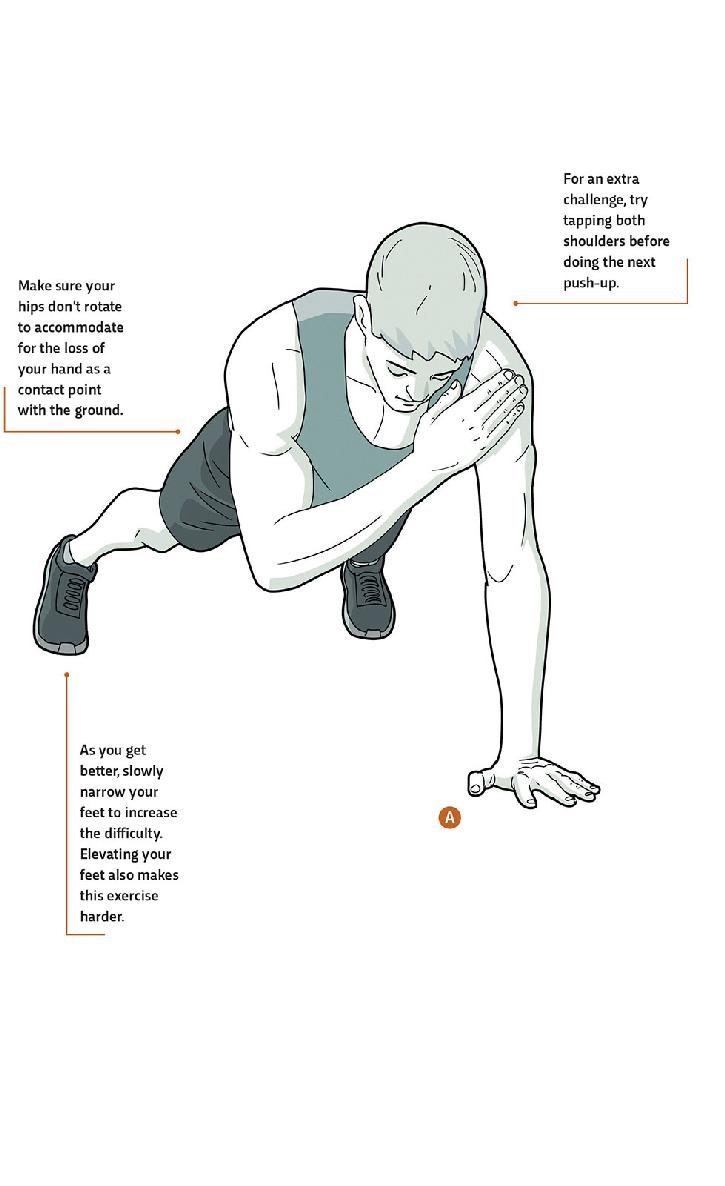
48 / PUSH-UP WITH SHOULDER TAP
This variation on the classic push-up (47) adds a stability challenge by decreasing your base of support. Between each push, you slowly lift one arm from the ground and tap the opposite shoulder. You’ll probably have to spread your feet wide at first to regain some of the stability you’ll lose by lifting one arm. But as you build your strength, you can slowly narrow the spread of your feet, increasing the difficulty of the exercise and working your core harder.
GOAL: Work toward getting your feet 12 inches apart or closer. Aim to do 10 taps on each side.
1Start in a plank position facing the floor with your arms straight out in front of you, your knees locked, and your feet at shoulder-width or wider on the floor.
![]()
2Keeping your pelvis in a neutral position, use your arms to lower your shoulders and hips as one unit toward the floor.
![]()
3When your chest is about 3 inches from the floor, press through your palms, continuing to move your shoulders and hips as one unit, and return to the starting position.
![]()
4Before starting the next repetition, lift one hand and tap the opposite shoulder. ![]() Switch your tapping hand at the end of each repetition.
Switch your tapping hand at the end of each repetition.
SLIDING PUSH-UP
![]()
Primary muscle groups: Pectorals, Deltoids
Secondary muscle groups: Triceps, Abdominals
49
BASE
HORIZONTAL SLIDING PUSH-UP FROM KNEES
50
INTERMEDIATE
HORIZONTAL SLIDING PUSH-UP FROM FEET
51
INTERMEDIATE
VERTICAL SLIDING PUSH-UP
Sliding push-ups are a modification of the classic push-up. These horizontal push exercises work the shoulders in a fly-like motion. You do them on a mat with a towel under one hand so that you can slide that hand back and forth. Here you’ll start with a regression done from the knees so you can get used to the movement and perfect your form. You’ll do the next level from your feet, then switch to a vertical slide for some directional variation.
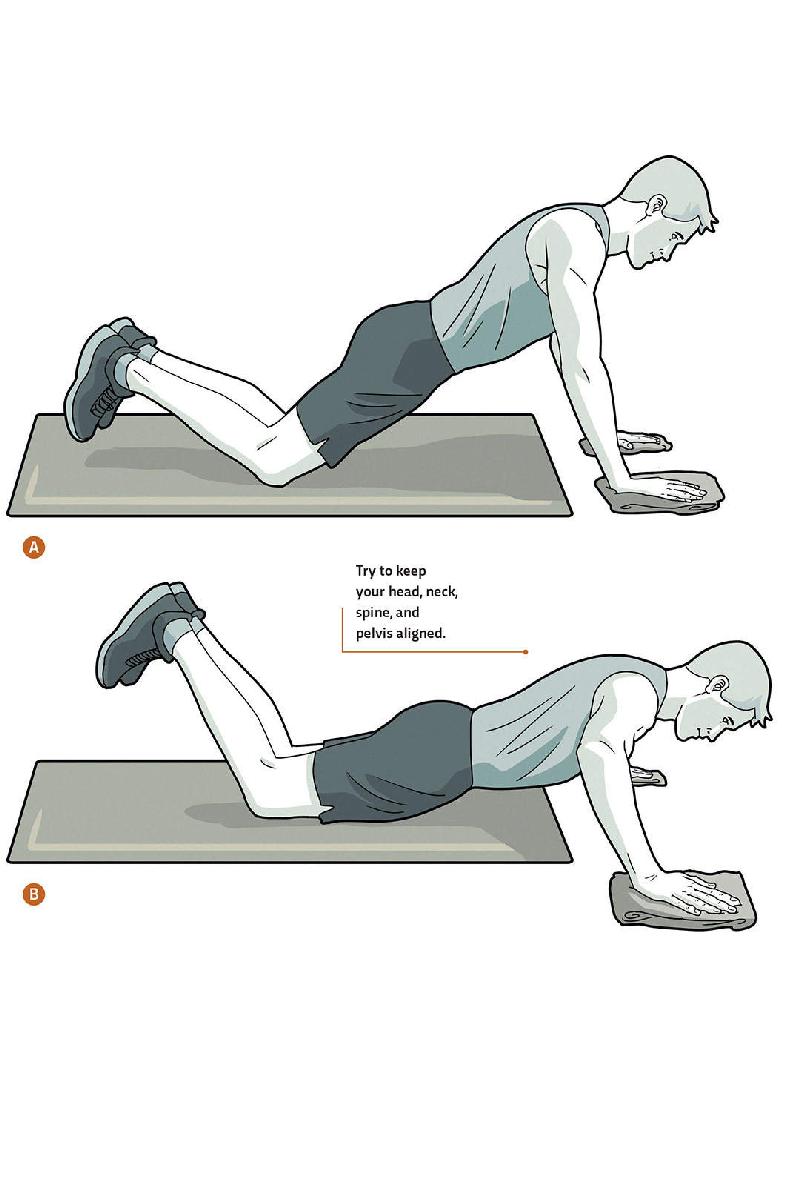
49 / HORIZONTAL SLIDING PUSH-UP FROM KNEES
As its name implies, this push-up is done from the knees, which decreases the challenge on the stability of your core and shoulders while you build strength in your chest and arms. You use the same basic motion as a push-up (47), but you keep a towel (or washcloth, napkin, etc.) under each hand, and when you drop into a push-up, slide one hand out to the side, reaching as far as you can while keeping your sliding arm straight. As you return to the starting position, you try to keep the sliding arm straight, which forces the chest and shoulders to work from a different angle, maximizing the exercise’s benefits.
GOAL: Aim to do 10 repetitions on each side before progressing from your knees to your feet (50).
1On a mat, assume a modified push-up position with your knees on the ground and your hands lined up slightly wider than your shoulders. Put a towel under each hand. ![]()
![]()
2Slowly drop into a push-up, and at the same time, slide one hand laterally until your chest is a few inches from the floor. ![]()
![]()
3Press through both palms as you squeeze with the chest and return your hand to its starting position. ![]() Make sure to keep the sliding arm straight, forcing a different muscle contraction from the stable arm.
Make sure to keep the sliding arm straight, forcing a different muscle contraction from the stable arm.
![]()
4Switch to the other side and repeat, alternating hands on each repetition.
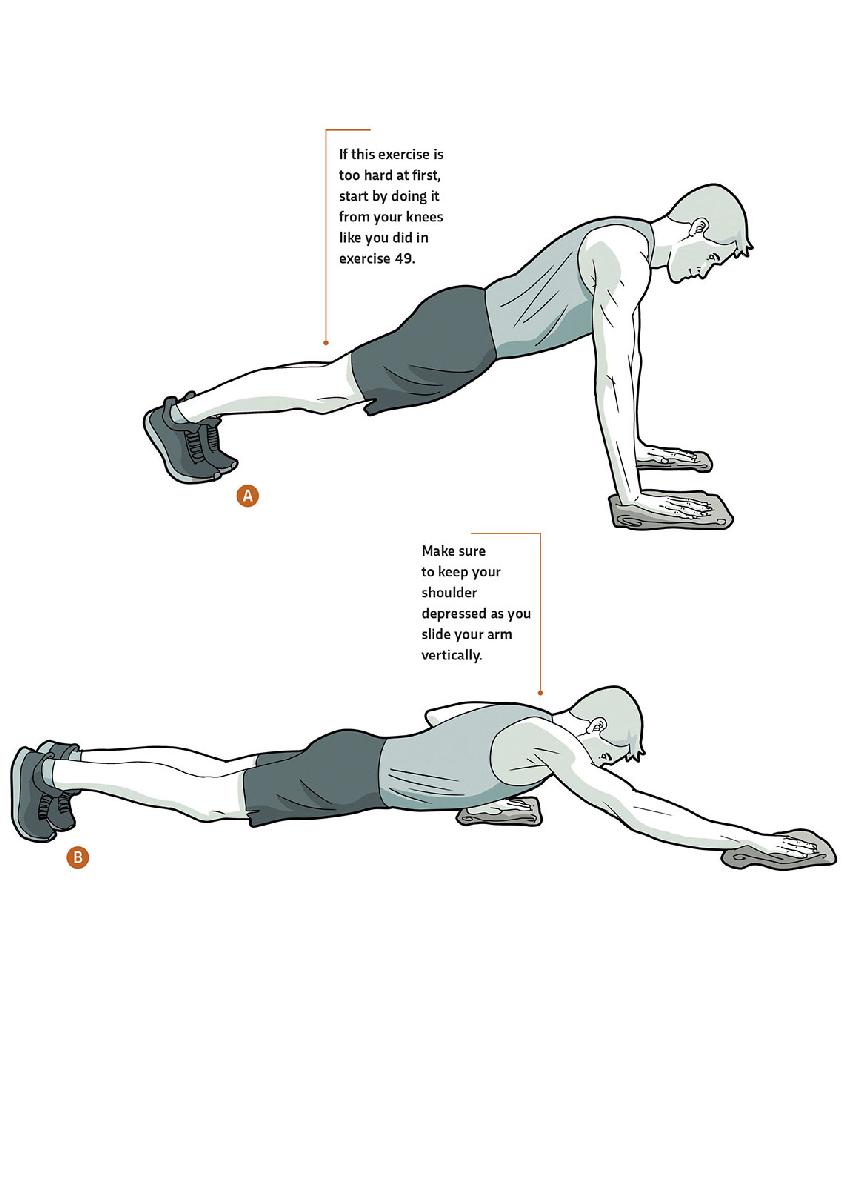
50 / HORIZONTAL SLIDING PUSH-UP FROM FEET
In this variation, you do the sliding push-up from your feet instead of your knees. Now that gravity has more leverage to pull you down, you’ll feel the intense amount of core stabilization and chest strength needed to perform the press. With this kind of stress running through your shoulders, it’s imperative that you keep your arms rotated outward, meaning the insides of your elbows are pointing out in front of you rather than in toward each other. Rotating them inward increases the risk of a shoulder impingement or rotator cuff injury. To encourage outward rotation, make sure that when you bend your arms, they fall close to your body rather than flaring way out to the side.
GOAL: Aim to do 10 repetitions on each side.
1On a hard surface, assume a plank position with your hands lined up under your shoulders, your knees locked, and your feet on the ground. Keep a towel under each hand. ![]()
![]()
2Slowly drop into a push-up, and at the same time, slide one hand out laterally until your chest is a few inches from the floor. ![]()
![]()
3Press through your palms as you squeeze with your chest and slide your hand back to its starting position.
![]()
4Switch to the other side and repeat, alternating hands on each repetition.
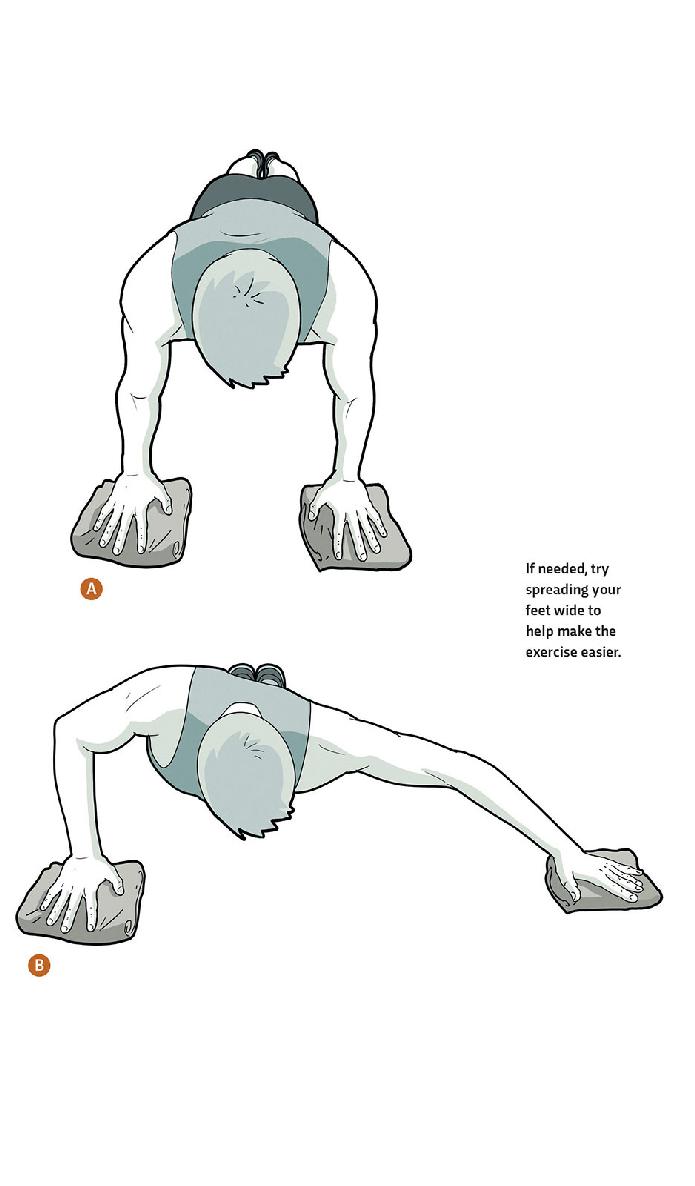
51 / VERTICAL SLIDING PUSH-UP
This variation is similar to the previous one (50), but your hand will slide up overhead instead of out to the side. You may need to do this sliding push-up with a slightly wider foot base because the vertical slide doesn’t give you as much stability as the horizontal one, but that lack of stability is also what makes this move so great for building core strength. The vertical slide takes away your chest’s leverage, forcing your lats to support the movement.
GOAL: 10 repetitions on each side
1On a hard surface, assume a plank position with your hands lined up under your shoulders, your knees locked, and your feet on the ground. Keep a towel under each hand. ![]()
![]()
2Slowly drop into a push-up, and at the same time, slide one hand out vertically overhead until your chest is a few inches from the floor. ![]()
![]()
3Press through the palm as you squeeze with your chest and armpit to return the sliding hand to its starting position. ![]()
![]()
4Switch to the other side and repeat, alternating hands on each repetition.
PIKE PUSH-UP
![]()
Primary muscle groups: Deltoids, Pectorals
Secondary muscle group: Triceps
52
BASE
BENT KNEE PIKE PUSH-UP
53
INTERMEDIATE
STRAIGHT LEG PIKE PUSH-UP
54
ADVANCED
HANDSTAND PUSH-UP
Doing something in a “pike position” means you’re bending at the waist but keeping your legs straight. This version of the push-up is classified as a vertical push, and it targets your shoulders. Pike push-ups build up to handstand push-ups (54), but they also allow you to do many more repetitions and give you a slightly larger range of motion than true handstand push-ups do, so I actually prefer the first two exercises to the final variation here. You can do these from the ground or on a step for varying degrees of difficulty.
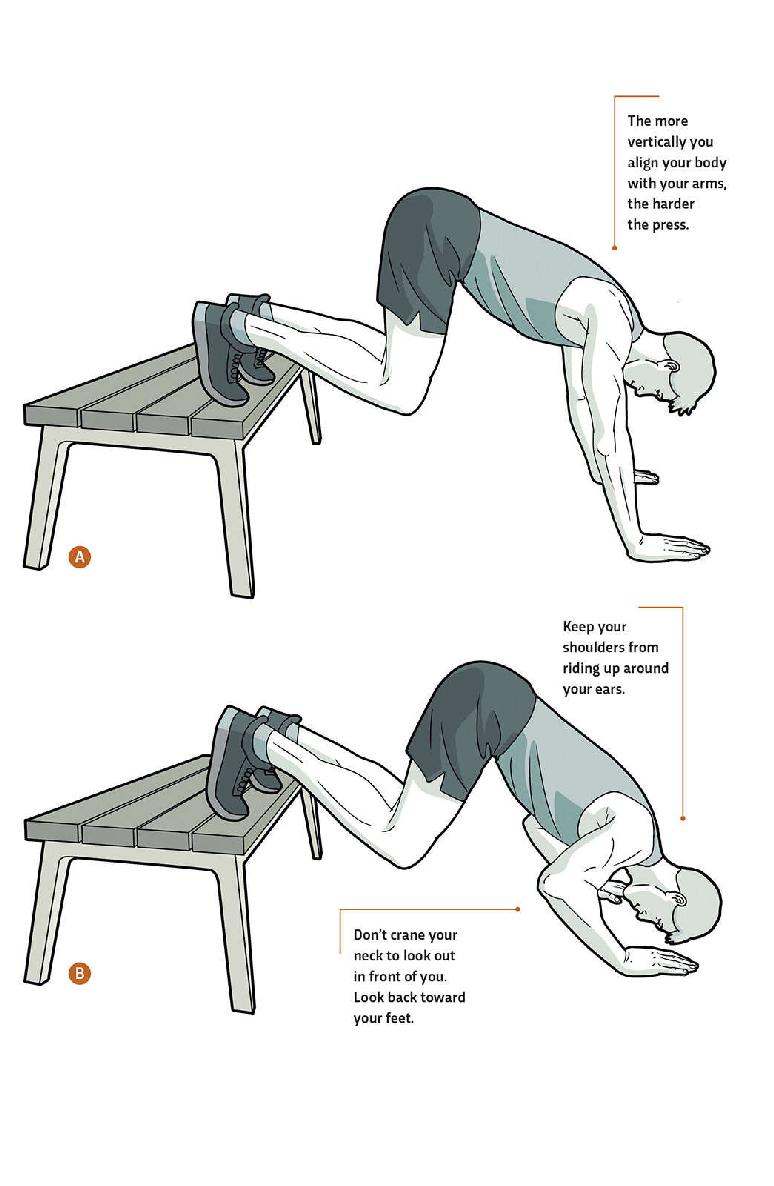
52 / BENT KNEE PIKE PUSH-UP
You do this variation from a step with your knees bent to limit the amount of body weight you put over your arms and shoulders. When you’re doing any pressing with your arms, it’s important to remember to keep your shoulders pulled down toward your hips and not let them get up around your ears. The same rules apply when you’re upside down in an exercise like this one.
GOAL: When you can do 20 repetitions comfortably, you’re ready to attempt it with straight legs (53).
1Stand with your back to a bench or other elevated surface. Bend forward, place your hands on the ground, and place your feet on top of the elevated surface, bending your hips and knees to align your body over the hands and shoulders. ![]()
![]()
2While keeping your arms rotated outward with the insides of your elbows facing out away from your feet, bend your elbows and lower your head toward the ground. ![]()
![]()
3Just before the top of your head touches the ground, press through your palms and return to the starting position. ![]()
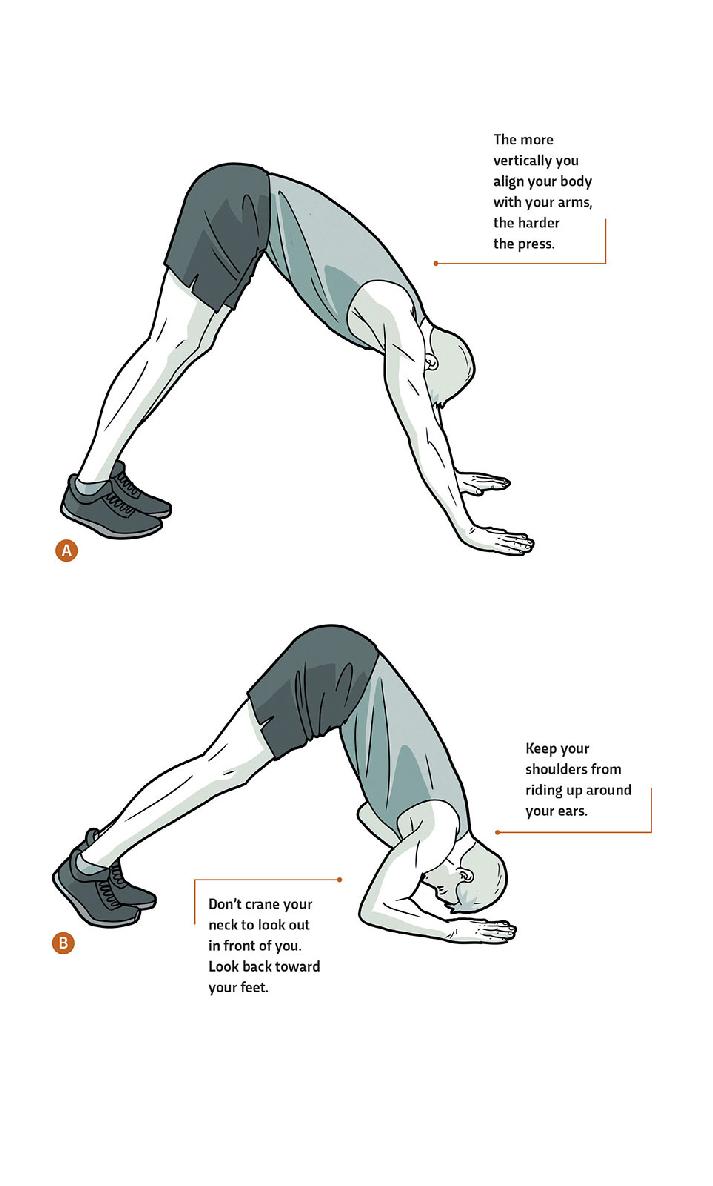
53 / STRAIGHT LEG PIKE PUSH-UP
You can do this variation from a step or from the ground, depending on your hip mobility. You want to have a neutral spine, so if your lower back has to round excessively when your feet are on the ground, elevate them onto a step. The straighter you can stack your spine on top of your arms and shoulders, the more difficult the push-up—and the closer you are to doing a handstand push-up (54). Again, keep your shoulders pulled down toward your hips and not up around your ears when doing any pressing, even when you’re upside down. And keep your arms rotated outward by not letting your elbows flare too wide.
GOAL: Get very comfortable with doing 20 repetitions and supporting your weight with your shoulders before you attempt the Handstand Push-Up (54).
![]()
1Place your hands on the ground, and move your feet up as close to your hands as you can while still keeping your knees straight and your spine from rounding. ![]() Your body should form a sort of upside-down V. If you need to, put your feet on top of a step or other elevated surface.
Your body should form a sort of upside-down V. If you need to, put your feet on top of a step or other elevated surface.
![]()
2Keeping your legs locked, shift as much weight as you can over your hands and shoulders.
![]()
3Bend your elbows and lower your head toward the ground while rotating your arms outward by turning the insides of your elbows toward your face and away from your feet. ![]()
![]()
4Just before the top of your head touches the ground, press through your palms and return to the starting position. ![]()
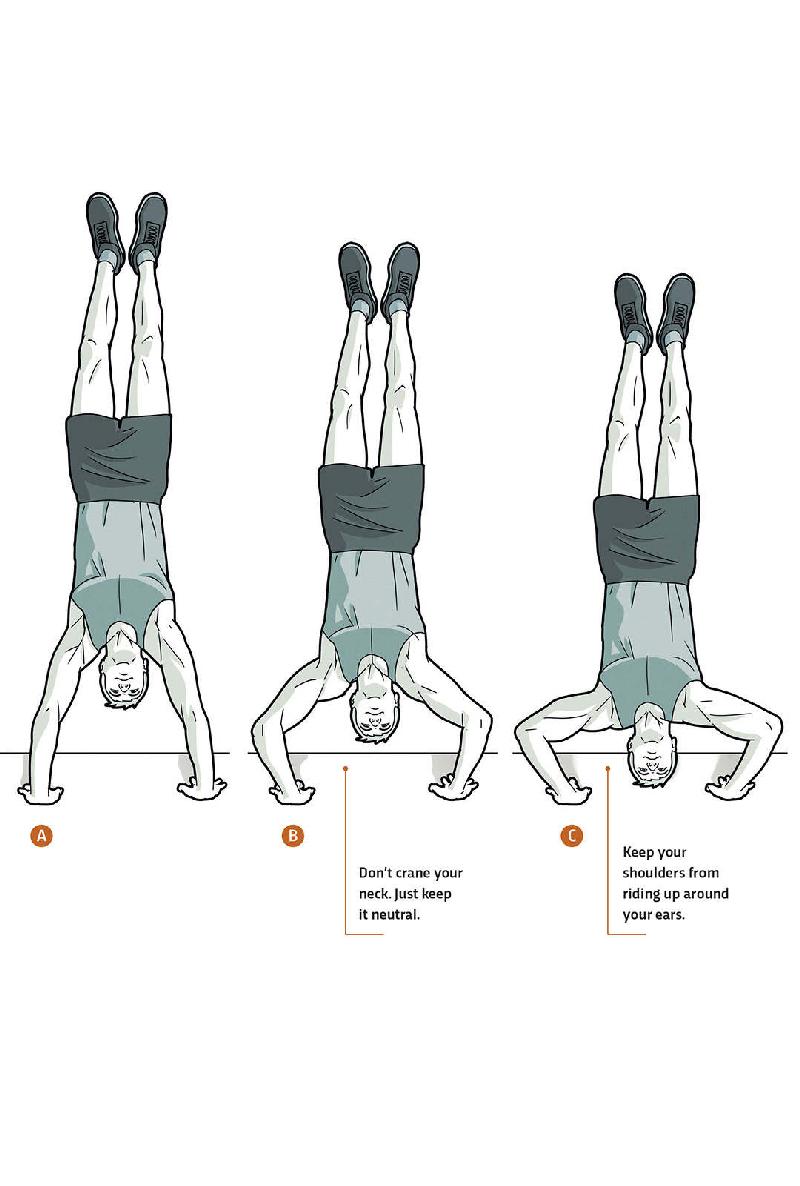
54 / HANDSTAND PUSH-UP
This variation is about as vertical a push as anyone can do and is possibly the most difficult exercise you’ll encounter in any typical bodyweight training program. Unless you’re a gymnast and can comfortably do a handstand, you’ll need to do this in front of a wall to keep your balance. Please use caution when attempting this. Falling on your head can result in serious injury.
GOAL: 10 repetitions
1Stand facing a wall, and place your hands on the floor 12 to 18 inches in front of it.
![]()
2Fling your legs up so that the wall is supporting you in a full handstand. ![]()
![]()
3Bend your elbows and lower your head toward the ground while rotating your arms outward by turning the insides of your elbows toward your face. ![]()
![]()
4Just before the top of your head touches the ground, ![]() press through your palms and return to the starting standing position.
press through your palms and return to the starting standing position.
DYNAMIC PUSH-UP
![]()
Primary muscle groups: Pectorals, Deltoids
Secondary muscle groups: Triceps, Abdominals
55
BASE
T PUSH-UP
56
INTERMEDIATE
SIDE TO SIDE PUSH-UP
57
ADVANCED
SCOOPING PUSH-UP
Dynamic, or moving, push-ups are another variation on the push-up. They have the added challenge of stabilizing the body as it moves through a weight shift during the push-up. Two of the variations have a horizontal shifting pattern, while the third moves through a fluid range of vertical motion, challenging your shoulders’ strength and stability.
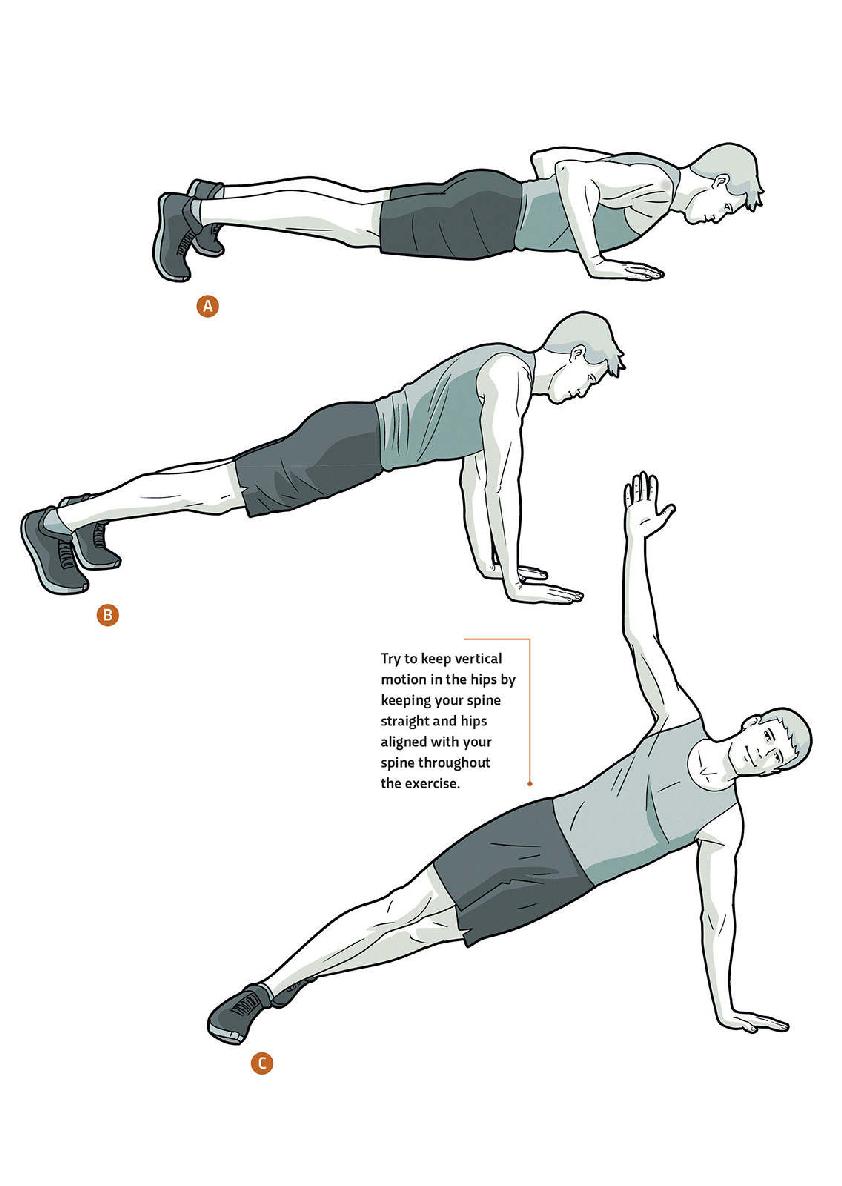
55 / T PUSH-UP
This variation combines the work of a classic push-up (47) with a side plank (02). Between each push up, the shoulders and core must stabilize the body through a horizontal weight shift into a full side plank from the hands.
GOAL: Work toward doing 10 repetitions on each side.
![]()
1Position yourself in a basic push-up position, but with feet about 12 inches apart. Perform a classic push-up, ![]() and as you finish the press,
and as you finish the press, ![]() lift one hand, rotate through your hips, land on the sides of your feet, and come to rest in a side plank position.
lift one hand, rotate through your hips, land on the sides of your feet, and come to rest in a side plank position. ![]()
![]()
2Hold for one second, then rotate back to the classic push-up position. ![]()
![]()
3Perform another push-up, ![]() but this time as you finish the press, rotate in the opposite direction and come to rest in a side plank on the other side.
but this time as you finish the press, rotate in the opposite direction and come to rest in a side plank on the other side.
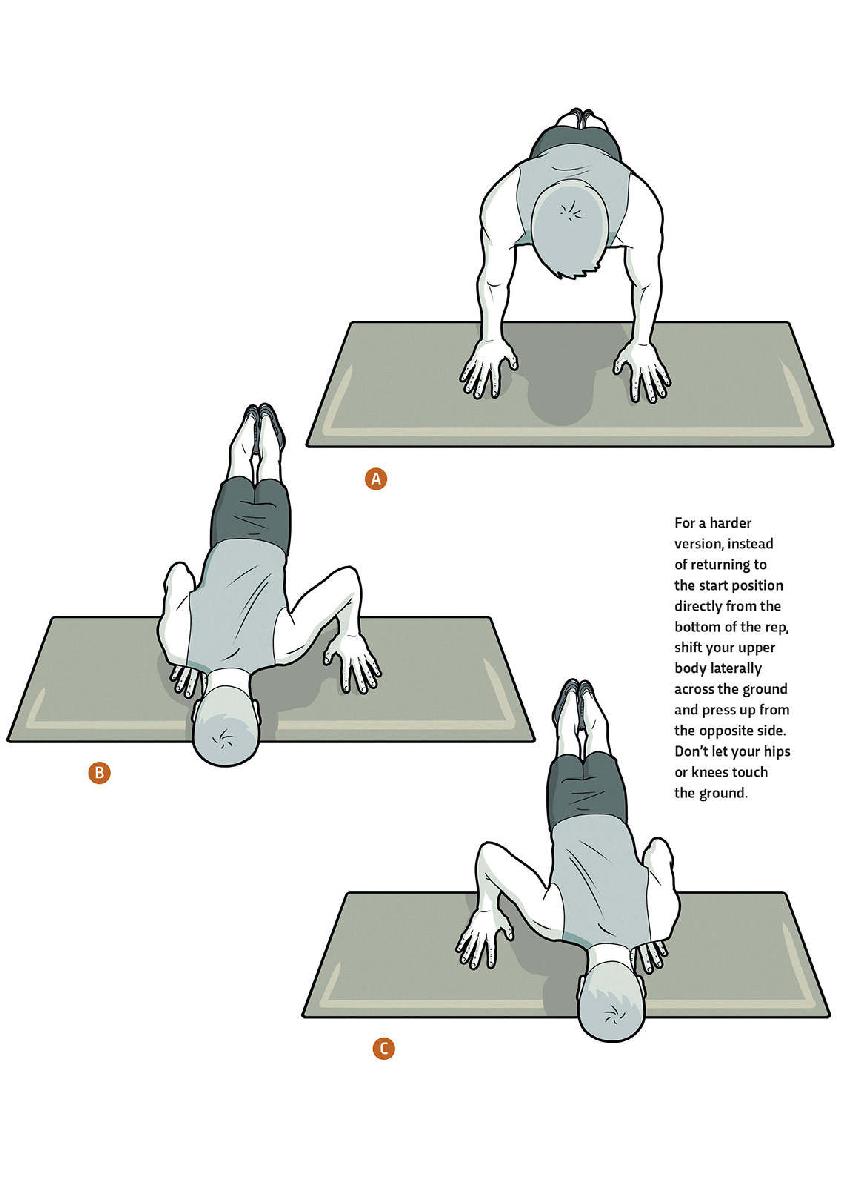
56 / SIDE TO SIDE PUSH-UP
This is a fun variation that again challenges your body with a horizontal shift. You perform it like a classic push-up (47), except that as you lower yourself, you shift your body to one side and position one shoulder directly over the hand so that the bottom of the push-up is over to one side. Start with a wider foot base, bringing the feet closer together as you progress.
GOAL: Gradually decrease your foot base until you can do the exercise with your feet together. Work toward doing 10 repetitions on each side.
1Start in a push-up position with your feet 12 inches apart. ![]() As you lower yourself into the push-up, smoothly shift your body laterally so you land at the bottom with your right shoulder positioned directly over your right hand.
As you lower yourself into the push-up, smoothly shift your body laterally so you land at the bottom with your right shoulder positioned directly over your right hand. ![]()
![]()
2As you press back up to the starting position, smoothly shift back to center so that you finish the press at the same time you finish the shift. Alternate and repeat on the left side. ![]()
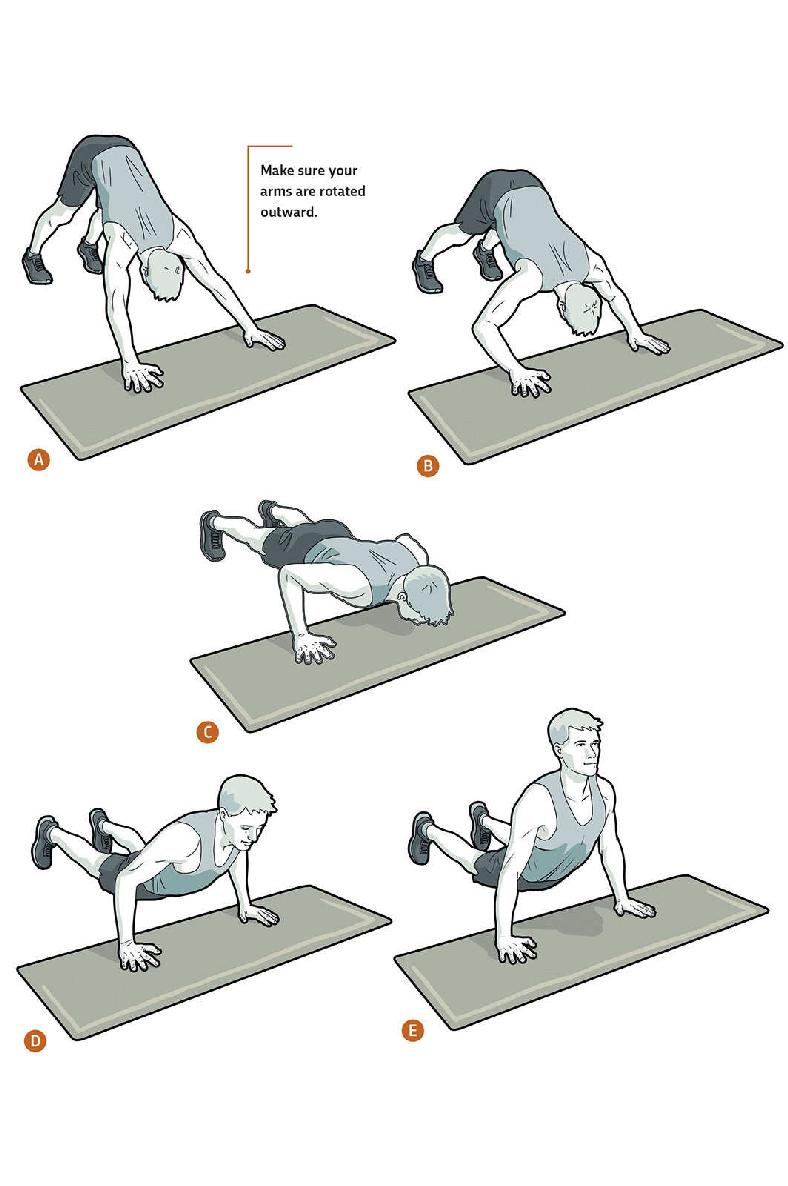
57 / SCOOPING PUSH-UP
Unlike the first two variations, the scooping push-up offers a dynamic vertical motion for the chest and shoulders to control. It starts in a downward dog position rather than a plank and forces you to lower yourself while shifting your bodyweight forward. As your chest passes your hands, you press your arms back out, extending your spine into a modified cobra position in the scooping motion that gives this variation its name. Then you just shift your hips upward, slide your shoulders back behind your hands, and lower your head, and you’re ready to start over again. If you feel pain or pressure in your lower back or shoulders, this may not be the best variation for you just yet.
GOAL: 20 repetitions
1Start on your hands and knees, then straighten your legs and press your hips upward so you form a sort of upside-down V (downward dog). ![]() Find a straight line from your hands through your arms, shoulders, and spine all the way to your hips.
Find a straight line from your hands through your arms, shoulders, and spine all the way to your hips.
![]()
2With your arms rotated outward so that the insides of your elbows are toward your face, bend your elbows (they should point down toward your feet) and bring your shoulders toward your hands. ![]()
![]()
3As you pass your hands, ![]() perform a scooping motion by pressing through your arms and lifting only your head and shoulders,
perform a scooping motion by pressing through your arms and lifting only your head and shoulders, ![]() leaving your hips just a few inches from the ground. Take a moment to stretch with your spine in extension.
leaving your hips just a few inches from the ground. Take a moment to stretch with your spine in extension. ![]()
![]()
4Press your hips back upward and lower your shoulders until you’re back in your starting position. ![]()
DIP
![]()
Primary muscle groups: Deltoids, Triceps
Secondary muscle group: Pectorals
58
BASE
BENT KNEE BENCH DIP
59
INTERMEDIATE
STRAIGHT LEG BENCH DIP
60
ADVANCED
PARALLEL BAR DIP
The dip is another vertical push, and it’s a great way to work your triceps and deltoids. Dips can be tough on the shoulder joint, however, so if you have improper mobility or poor upper-body posture, proceed with caution. If they cause you pain, stick to the pike push-ups. However, if you do have the mobility and alignment to do dips well, you can do them in many ways, including from a bench, step, or parallel bars. Here you’ll do two variations that use a bench and finish by supporting your full body weight on the parallel bars.
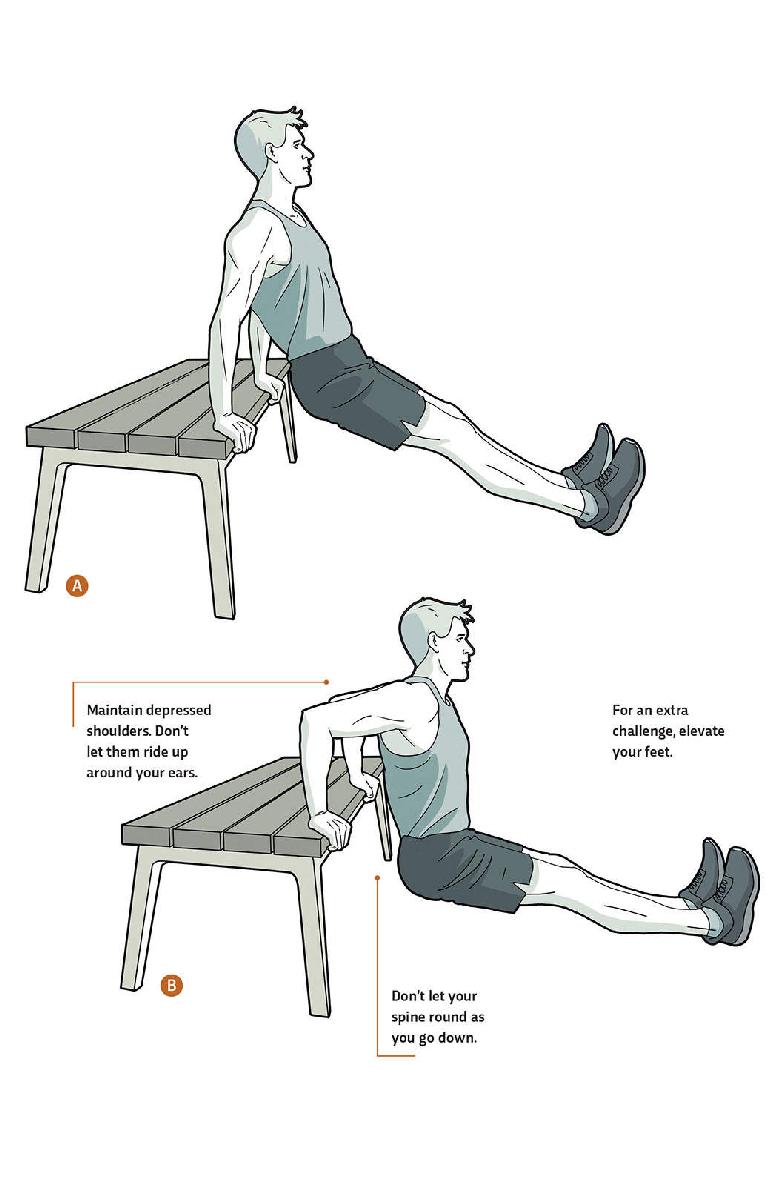
58 / BENT KNEE BENCH DIP
These dips are a good place to begin because you do them with your knees bent and your feet flat, so if your upper body isn’t strong enough to hold most of your body weight, you can easily support yourself with your legs. You’ll need a bench, step, or retaining wall of at least knee height to do this variation. Keep the physiological limitations of your shoulders in mind during these dips. When a joint like the elbow extends to the limit of its range of motion, it’s stopped by bone, but when you reach the end of your shoulder’s range of motion, there’s only soft tissue. You don’t want to stress it too hard, or you could end up with an injury.
GOAL: When you can do 20 repetitions without any assistance from your legs, you’re ready for the Straight Leg Bench Dip (59).
1With your back to a bench, step, or retaining wall of at least knee height, squat down and place the heels of your palms on the top surface with your fingers coming down over the edge. ![]()
![]()
2Slowly walk your feet out until you can use your arms to comfortably lower your body while maintaining a vertical spine without scraping up against the edge of the structure.
![]()
3Keeping your knees bent and your feet flat on the ground, use the movement of your elbows and shoulders to lower your body. ![]() Don’t let your upper arm go past the point where it’s parallel with the ground.
Don’t let your upper arm go past the point where it’s parallel with the ground.
![]()
4Keeping your chest up and your shoulders down, press through your hands, straightening your arms and lifting your body back to its starting position. ![]()

59 / STRAIGHT LEG BENCH DIP
This variation is also done off a bench or step, but this time you keep your legs straight so that only the heels of your feet are on the ground. This position keeps your legs from helping you and forces your upper body to provide all the strength necessary to complete the movement. The optimal position for your legs is one that lets your spine remain mostly vertical through the motion as it passes very close to the ledge you have your hands on.
GOAL: 20 repetitions
1With your back to a bench, step, or retaining wall of at least knee height, squat down and place the heels of your palms on the top surface with your fingers coming down over the edge.
![]()
2Slowly walk your feet out. Straighten your legs, and place your heels on the ground at a distance that lets you use your arms to comfortably lower your body while maintaining a vertical spine without scraping up against the edge of your structure. ![]()
![]()
3Use the movement of your elbows and shoulders to lower your body, keeping your spine as neutral and vertical as possible. ![]() Don’t let your upper arm go past the point where it’s parallel with the ground.
Don’t let your upper arm go past the point where it’s parallel with the ground.
![]()
4Keeping your chest up and your shoulders down, press through your hands, straightening your arms and lifting your body back to its starting position. ![]()
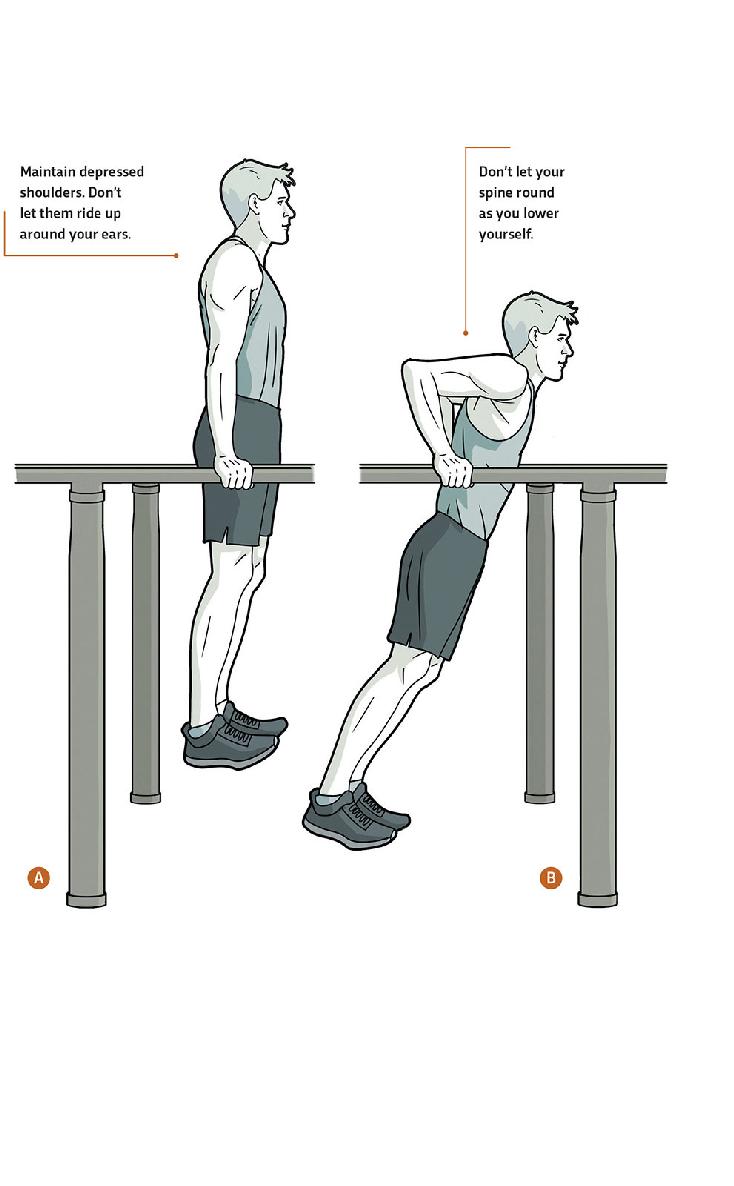
60 / PARALLEL BAR DIP
These dips require the use of parallel bars and force you to press your entire body weight. By leaning your body forward, you recruit more chest muscles into the movement, and by leaning back, you use more triceps and deltoids. Again, be careful as you descend toward your maximum depth, because the soft tissue of the shoulder capsule doesn’t have much protection from hyperextension. If you feel pain, you can decrease your depth or omit the exercise altogether.
GOAL: Build up to doing 20 repetitions.
1Stand between parallel bars with one hand on each bar. Straighten your arms and lift your body into a tall position. ![]()
![]()
2While supporting your entire body weight, bend your elbows and shoulders to slowly lower your body. ![]() Do not lower yourself past the point where your upper arm is parallel with the ground.
Do not lower yourself past the point where your upper arm is parallel with the ground.
![]()
3Keeping your chest up and your shoulders down, press through your hands, straightening your arms and lifting your body back to its starting position. ![]()
CLOSED GRIP ROW
OPEN GRIP ROW
CLOSED GRIP PULL-UP
OPEN GRIP PULL-UP
SPINAL EXTENSION