Against the Grain: Extraordinary Gluten-Free Recipes Made from Real, All-Natural Ingredients (2015)
cookies and bars

Italian Tricolor Rainbow Cookies
italian tricolor rainbow cookies
WHEN WE MOVED TO PHILADELPHIA for graduate school, we lived five blocks north of the Italian Market, the oldest outdoor market in the country. It was a colorful place, from the vendors who wouldn’t let you touch the beautiful displays of fruits and vegetables, to one who sold us a big bag of pecans without any meat in the shells. And then there were the Italian bakeries and delis. What a feast for the senses they were—the hanging cheeses and salamis, the buttery Italian cookies, and the cannoli! We didn’t often have the money to splurge on anything but basic meals, but when we did we always went for either cannoli or the Italian tricolor rainbow cookies. Who could resist such beautiful almond-scented delicacies?
These cookies are the first tricolor cookies I have had in years. Because these cookies are based principally on almond paste, they are ideally suited to a gluten-free adaptation. I’m not a big fan of using food coloring, but I could barely contain my excitement when I took all three colorful layers out of the oven. The smell brought me right back to the Italian Market bakeries, teeming with customers on a Saturday morning. These cookies have light sponge layers, spread with seedless raspberry or apricot jam, and covered in a dark chocolate shell.
makes 3 dozen cookies
3 large eggs, separated
¾ cup sugar
12 tablespoons salted butter
7 ounces almond paste, store-bought or homemade
1 teaspoon almond extract
½ cup (96g) potato starch
½ cup (70g) tapioca starch
¼ teaspoon salt
1 jar (10 ounces) seedless raspberry or apricot jam
1 cup dark chocolate chips
¼ cup coconut oil
Food coloring (red and green)
1. Position an oven rack in the center of the oven and preheat to 350°F. Grease the sides and bottoms of three 8 × 8-inch pans with butter. (Disposable aluminum pans work well, or you can use one pan, bake a layer, cool it, bake another pan, and so on.) After buttering the sides of the pans, line each pan with parchment paper, allowing a flap to extend over two sides.
2. In a bowl, with a hand mixer, beat the egg whites on high until medium peaks are formed. Set aside.
3. In a separate bowl, cream the sugar and butter. Add the almond paste, almond extract, and egg yolks and beat on high until they are well mixed. The batter will be quite stiff.
4. Fold in the potato starch, tapioca starch, and salt by hand until incorporated. Fold in the egg whites, taking care to keep the batter as light as possible with minimal stirring. Weigh the batter, if possible, to divide it equally among 3 separate bowls.
5. Add 8 to 15 drops of red food coloring to one bowl and 8 to 15 drops of green to another; leave the third without additional coloring. Spoon each batter into a separate pan and smooth the surface using a butter knife or spatula.
6. Bake the three layers for approximately 20 minutes, or until the cakes are slightly springy in the centers and the sides start to pull away from the edges of the pans. Allow the cakes to cool in the pans for approximately 5 minutes. Then lift the cakes out using the parchment paper flaps and transfer to a cooling rack (leaving the parchment in place). Allow the cakes to cool completely.
7. Using a clean piece of parchment paper, invert the pink cake onto the paper and peel the bottom piece of parchment paper off. Flip the cake again, top side up, onto a parchment-lined baking sheet. Spread the surface edge to edge with a thin layer of jam. Repeat the steps for the yellow layer to invert it on top of the pink layer, and spread with a layer of jam. Top the yellow layer with the inverted green cake.
8. Weight the cakes down (to press the layers together) by placing a piece of parchment paper on the top layer and topping it with a baking pan filled with canned goods. Place the weighted cake in the refrigerator for at least 1½ hours.
9. In a microwaveable bowl, microwave the chocolate chips and coconut oil on high for 1 minute. Stir vigorously to hasten melting, and microwave for another 30 seconds.
10. Cut the layer cake into four 2-inch-wide strips and transfer them to a cooling rack set inside a baking pan. Spoon the melted chocolate over the tops, then turn each strip to one of its sides and spoon chocolate over it, then turn to the uncoated side and spoon chocolate over that as well as the ends (all sides, except the bottom will be chocolate covered). After the chocolate has set, place the cakes in the freezer overnight before cutting cleanly into ¾-inch-wide cookies.
snickerdoodles
SNICKERDOODLES ARE ONE COOKIE that has the culinary historians stumped. No one knows anything of their origin except that they first appeared in cookbooks at the turn of the twentieth century. I had never heard of them until I moved to New England, where nearly every parent brought them to an end-of-the-season party at the ski slopes. There I saw many ways to make them. There were puffy ones and flat ones, dry crinkly ones and moist ones. No matter what ingredients are used, if you love cinnamon and sugar, you’ll love snickerdoodles.
Historically, snickerdoodle recipes included milk, but those older recipes produced pan cookies rather than drop cookies. The oldest recipes also used baking soda to leaven the cookies and cream of tartar as an acid to activate the baking soda reaction. Baking powder, a more modern invention than baking soda, includes an acid in its formulation, and it works just as well. For a gluten-free adaptation, I use dehydrated potatoes as the base to make the cookies moist and chewy. Balanced with brown rice flour and just a tad of tapioca starch, it makes a crinkly-on-the-outside, tender-on-the-inside cookie.
makes 2½ dozen cookies
FOR THE COOKIES:
2 cups (100g) dehydrated potato flakes
¾ cup (120g) brown rice flour
¼ cup (35g) tapioca starch
1 teaspoon baking powder
¼ teaspoon salt
4 tablespoons salted butter
2 tablespoons canola oil
1¼ cups sugar
2 large eggs
1 teaspoon vanilla extract
FOR THE CINNAMON SUGAR:
3 tablespoons sugar
1 tablespoon ground cinnamon
1. Make the cookies: In a food processor, grind the potato flakes until they are powder-like. Add the rice flour, tapioca starch, baking powder, and salt and process until well blended.
2. In a bowl, with a hand mixer, cream the butter, oil, and sugar. Add the eggs and vanilla.
3. Add the dry ingredients to the butter and egg mixture. Beat the dough until well blended. Refrigerate the dough for 30 minutes.
4. Meanwhile, position an oven rack in the center of the oven and preheat to 400°F. Line two baking sheets with parchment paper.
5. Make the cinnamon sugar: In a shallow bowl, blend the sugar and cinnamon.
6. Roll the dough into 1-inch balls and roll in the cinnamon-sugar mixture. Place the cookies 2 inches apart on the baking sheets. Bake the cookies for 8 minutes, rotating halfway through baking, or until the tops are set.
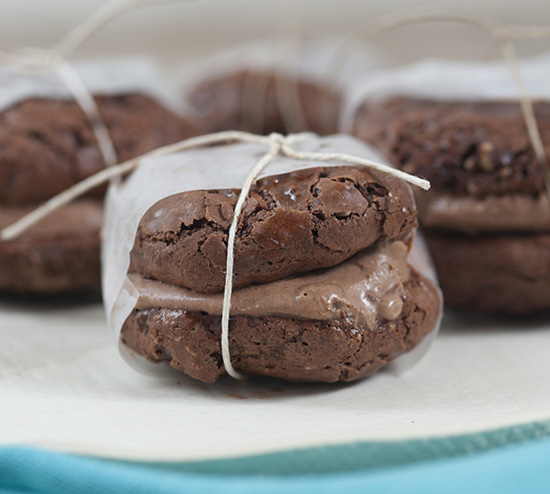
Chocolate Mint Ice Cream Cookies
chocolate mint ice cream cookies
FLOURLESS RECIPES always get my attention and stimulate my creative juices. Such was the case when I first spotted a recipe for Flourless Chocolate-Walnut Cookies in François Payard’s Chocolate Epiphany, using primarily powdered sugar and cocoa powder in lieu of flour. But the recipe had a frustratingly short shelf life. Although the directions specified that the cookies could be stored for up to 3 days, they were only okay on the second and not great on the third. That is when I decided that these cookies really wanted to be ice cream cookies—staling wouldn’t be an issue, and they would make positively decadent ice cream cookies. Once you try them, I’m sure you will agree.
These cookies, which are crinkly on the top and fudgy inside, are the perfect size for an ice cream sandwich cookie. They have the taste and texture of a moist and chewy brownie. The dairy-free ice cream, which is whipped chocolate coconut cream, is one that you can make with a hand mixer and a bowl; no need to wrangle with an ice cream maker. It will drive you crazy waiting an hour for the ice cream to freeze between the two fudgy cookies, but the wait will totally be worth it.
makes 8 sandwich cookies ![]()
FOR THE COOKIES:
1¾ cups powdered sugar
2 teaspoons tapioca starch
½ cup unsweetened cocoa powder
2 large egg whites
1 teaspoon mint extract
½ cup finely chopped hulled pumpkin seeds
FOR THE ICE CREAM FILLING:
⅜ cup coconut cream (skimmed from the top of a 13.5-ounce can of full-fat coconut milk), chilled
2 tablespoons powdered sugar
1 tablespoon unsweetened cocoa powder
½ cup dairy-free mini chocolate chips (such as Enjoy Life)
1. Make the cookies: Position an oven rack in the center of the oven and preheat to 300°F. Line a baking sheet with parchment paper.
2. In a medium bowl, stir together the powdered sugar, tapioca starch, and cocoa powder. Gradually work in the egg whites and mint extract and blend by hand until totally smooth and shiny. Stir in the pumpkin seeds until they are evenly distributed.
3. With damp hands, form the dough into 16 balls and place them 2 inches apart on the baking sheet. Wash out the bowl and put it in the freezer to chill.
4. Bake for 17 to 19 minutes, or until puffy and cracked. Allow the cookies to cool completely on the pan before preparing the filling; they will flatten as they cool.
5. Make the filling: Remove the bowl from the freezer and, using a hand mixer, whip the coconut cream, powdered sugar, and cocoa powder until it reaches a mousse-like consistency. Fold in the chocolate chips.
6. Pipe the filling in a spiral motion on the bottoms of 8 cookies. Press another cookie on the top. Wrap each cookie individually in plastic wrap and place in the freezer to harden. Serve frozen.
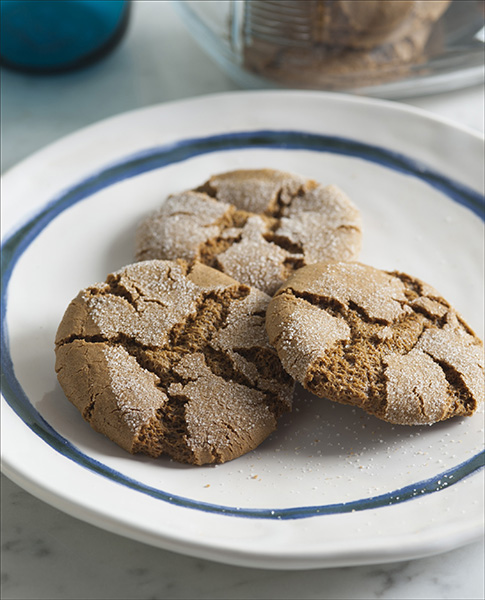
Yankee Ginger Snaps
yankee ginger snaps
THESE COOKIES are an adaptation of an old Yankee Magazine recipe. Classic ginger snaps are crispy; these are chewy and utterly addictive ginger cookies. The chewiness in these cookies comes from the fat in the canola oil. Oil also has the advantage of limiting spread, which is typically a major problem in gluten-free cookies made with butter. Corn syrup and white sugar, typical of classic Southern ginger snaps, produces crispy cookies, whereas molasses attracts moisture and contributes to chewiness. My guess is that the Yankee in the name of these cookies reflects the fact that historically molasses was more accessible than sugar in the North, and the sugar-growing regions of the United States were located in the South.
This is one of my family’s favorite cookies, so much so that it is the only recipe I have written into my copy of Joy of Cooking. In part due to the molasses, an excellent natural preservative, these cookies stay fresh and chewy long after most gluten-free baked goods would go stale.
makes 3 dozen cookies ![]()
1⅔ cups (200g) light buckwheat flour
1 cup (140g) tapioca starch
½ teaspoon salt
2 teaspoons ground ginger
1 teaspoon ground cinnamon
2 teaspoons baking soda
½ cup canola oil
1 large egg
1 cup sugar, plus 2 tablespoons for rolling
¼ cup molasses
1. Position an oven rack in the center of the oven and preheat to 350°F. Line two baking sheets with parchment paper.
2. In a large bowl, blend the buckwheat flour, tapioca starch, salt, ginger, cinnamon, and baking soda. Set aside.
3. Using a hand mixer, combine the oil, egg, and 1 cup sugar in a medium bowl until the batter is light yellow. Beat in the molasses. Working by hand—the dough will be quite stiff—stir in the dry ingredients until the dough is fully blended.
4. Form the dough into 1-inch balls and roll them in the remaining 2 tablespoons of sugar. Place the balls about 2 inches apart on the baking sheets.
5. Bake the cookies for 10 to 12 minutes, rotating the sheets halfway through. The cookies will spread a little and be soft and fragile when you remove them from the oven. Allow them to cool for about 5 minutes, then use a flexible metal spatula to transfer them to a cooling rack.
old-fashioned oatmeal cookies
I NEVER MET my husband Tom’s grandmother, but I feel like I know her after inheriting her recipe collection and old cookbooks. She was a rural Texas math teacher, born to several generations of schoolteachers, and was widowed at an early age. She also spent her life typing hundreds of scrawled recipes, making precise notes and alphabetizing everything. It probably would disappoint her to know that she died before she had those last dozen recipes typed and filed away.
I found this recipe scribbled on the back of one of her student’s homework from October 7, 1967. Tom’s grandmother had nearly a dozen oatmeal cookie recipes in her collection, but this was the one she prized. All I had to do was convert the wheat flour to gluten-free flours. Oatmeal cookies can be fickle—sometimes they’re thin, lacey layers and sometimes dry dense balls, depending on the type of shortening. This one uses both canola oil and butter: The butter makes the cookies tender, whereas the higher melting point of the canola keeps the cookies from spreading too much. Family lore is that Grandmother wasn’t the best cook, but she definitely knew a good oatmeal cookie recipe when she saw one.
makes 3 to 3½ dozen cookies
1⅓ cups (185g) tapioca starch
1⅓ cups (160g) light buckwheat flour
⅓ cup (65g) potato starch
1 teaspoon ground cinnamon
1 teaspoon baking soda
½ cup canola oil
8 tablespoons salted butter
1 cup packed brown sugar
1 cup granulated sugar
2 large eggs
1 teaspoon vanilla extract
3 cups rolled oats
1 cup raisins (or 10 ounces dark chocolate chips or chunks)
1. Position an oven rack in the center of the oven and preheat to 325°F. Line three baking sheets with parchment paper.
2. In a medium bowl, blend the tapioca starch, buckwheat flour, potato starch, cinnamon, and baking soda.
3. In a large bowl, with a hand mixer, combine the oil, butter, sugars, eggs, and vanilla and mix on high until the batter is light yellow. By hand, stir in the dry ingredient mixture until it is fully blended. Fold in the rolled oats and raisins.
4. Roll the dough in small balls, just under the size of a Ping-Pong ball. Place the balls about 2 inches apart on the baking sheets. Bake the cookies, one sheet at a time, in the center of the oven for 15 minutes.
m&m cookies
IT IS SAID that the first taste is with your eyes … but with M&M’s, it’s just the opposite. Although they are rainbow-colored, they are all the same flavor. It is just that not everyone agrees: Some think the red ones taste better, and my son Alex prefers the greens. Just like I did as a kid, he sorts his M&M’s into piles by color, and he saves the greens for last.
Mars, Inc., used color to turn M&M’s into the number one selling candy in the world, with sales greater than the gross domestic products of some countries. Put two cookies side by side, one with brightly colored M&M’s, in front of most anyone, and they will choose the one with the brightly colored candies. My son Alex is no exception. In his mind, everything tastes better with M&M’s. I developed these cookies for Alex using toasted gluten-free oat flour. They are designed to spread just the right amount to make a chewy, buttery, brightly festive cookie.
makes 2 dozen cookies
4 tablespoons salted butter
¼ cup canola oil
1 cup packed brown sugar
½ cup granulated sugar
2 large eggs
1 teaspoon vanilla extract
½ teaspoon ground cinnamon
1¾ cups (175g) toasted oat flour
1¼ cups (175g) tapioca starch
½ teaspoon baking soda
1 cup M&M’s
1. Position an oven rack in the center of the oven and preheat to 325°F. Line a baking sheet with parchment paper.
2. In a large bowl, with a hand mixer, cream the butter, oil, and sugars until light and fluffy. Beat in the eggs, vanilla, and cinnamon. Mix in the toasted oat flour, tapioca starch, and baking soda until fully incorporated. Fold in the M&M’s.
3. Roll the dough in small balls, just under the size of Ping-Pong balls, making sure that 5 to 6 M&M’s get into each. Place the balls on the baking sheet, spaced about 2 inches apart.
4. Bake the cookies for 15 minutes, or until kind of puffy and very lightly browned. They will become chewier as they cool. Allow the cookies to cool for 5 minutes on the pan before transferring them to a cooling rack.
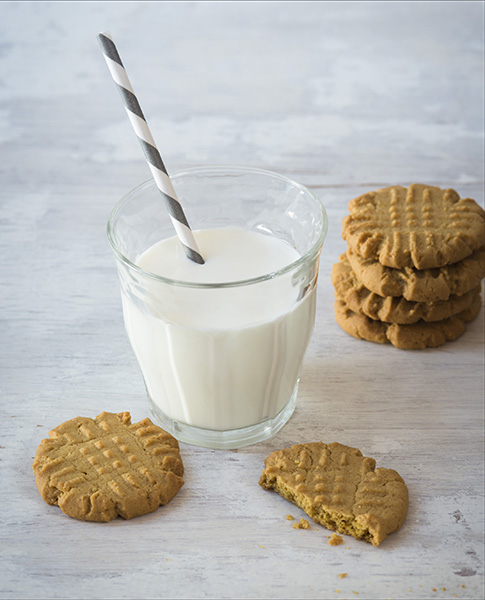
Classic Peanut Butter Cookies
classic peanut butter cookies
I’M NOT SURE when something so simple as peanut butter got complicated, but there is a dizzying array of peanut butter products to choose from. The Aztecs made a paste from nothing but roasted peanuts. In the ensuing years, peanut butter has been transformed, marketed, flavored, blended, “improved” … but at least you can still buy peanut butter made of nothing but salted, roasted peanuts, my favorite kind. Peanuts played a major role in my life: From elementary school through the end of graduate school, I lived on peanut butter, so for years thereafter I didn’t even want to look at it. That was until I discovered that peanut butter was one of the best flourless substitutes in a host of gluten-free baked goods.
These are a very traditional peanut butter cookie, with lots of whole-grain buckwheat goodness. These cookies are also chewy and sandy, like a good peanut butter cookie should be, without an oily taste. In this recipe, I used an organic peanut butter, which contained nothing but salted, roasted peanuts and none of the other commercial additives. I believe you can taste the difference.
makes 20 cookies
4 tablespoons salted butter
¼ cup coconut oil
½ cup packed brown sugar
½ cup granulated sugar
2 teaspoons vanilla extract
1 large egg
½ cup organic natural peanut butter
¾ teaspoon baking soda
½ teaspoon salt
1½ cups (180g) light buckwheat flour
½ cup (70g) tapioca starch
1. Position an oven rack in the center of the oven and preheat to 350°F. Line a baking sheet with parchment paper.
2. In a bowl, use a hand mixer on high to cream the butter, coconut oil, sugars, vanilla, and egg until the dough is light and creamy. Mix in the peanut butter until thoroughly blended. Beat in the baking soda and salt.
3. Beat in the buckwheat flour and tapioca starch. The dough will become very stiff; use your hands to gather it into a ball.
4. Roll the dough into 1½-inch balls and place them on the baking sheet. Using the tines of a fork, press down each ball until it is between ¼ and ½ inch thick. (The cookie will spread some as it bakes.) Turn the fork 90 degrees and press down the tines again to create a crosshatched pattern on the top.
5. Bake the cookies for approximately 15 minutes, or until the bottoms are lightly browned. Allow the cookies to cool for 5 to 7 minutes on the pan before transferring them to a cooling rack. The cookies will be soft and fragile when removed from the oven, but will set and harden as they cool.
pumpkin seed butter spice cookies
WHEN THE BOYS WERE LITTLE, we enrolled them in a local preschool. Late one spring, the kids sprouted various vegetable seeds indoors, and by the end of the school year they were ready to be planted in the garden. Each child chose a pumpkin seedling to take home, and when I picked up my son Marty, he was proudly cradling a healthy-looking seedling. We talked on the way home about how he was going to grow a pumpkin, make a jack-o’-lantern, and roast pumpkin seeds. Marty carefully planted his seedling in our garden, and not long after, it sported a couple of little gourd-size pumpkins. On the first day of school, I joked with the director that he didn’t tell me that I was growing miniature pumpkins. Another parent looked perplexed and said that his son’s pumpkin was huge—and grew up to 120 pounds!
I particularly like pumpkins because they are native to the Americas, and you can eat the entire plant—the flesh, the seeds, and the blossoms. I love roasting pumpkin seeds; and pumpkin seeds and pumpkin seed products are wonderful additions to gluten-free baking. They have the properties of other seeds and seed butters and can be use to add balanced proteins and nutrients to less nutritious gluten-free flours and starches.
makes 2 dozen cookies
4 tablespoons salted butter
¼ cup coconut oil
½ cup packed brown sugar
½ cup granulated sugar
2 teaspoons vanilla extract
1 large egg
½ cup roasted pumpkin seed butter (see Note)
1 teaspoon baking soda
1 teaspoon salt
1 teaspoon ground allspice
1 teaspoon ground cinnamon
½ teaspoon ground cloves
½ teaspoon ground ginger
1½ cups (180g) light buckwheat flour
½ cup (70g) tapioca starch
1. Position an oven rack in the center of the oven and preheat to 350°F. Line 2 baking sheets with parchment paper.
2. In a bowl, with a hand mixer, cream the butter, coconut oil, sugars, vanilla, and egg, beating on high until the dough is light and creamy. Mix in the pumpkin seed butter until thoroughly blended. It will be an army green color at this point; the spices will correct that.
3. Beat in the baking soda, salt, and spices. Stir in the buckwheat flour and tapioca starch. The dough will be crumbly, a little oily, and will not come together into a ball unless you knead it with your hands. This is the consistency you want for forming cookie-size balls.
4. Roll the dough into balls 1½ inches in diameter. Place them on the baking sheet, 2 inches apart; they will spread to approximately 2½ inches wide.
5. Bake the cookies, one sheet at a time, for approximately 12 minutes, until the tops set. Allow the cookies to cool for 5 to 7 minutes on the pan before transferring them with a spatula to a cooling rack. The cookies will be soft and fragile when removed from the oven, but will set and harden as they cool.
NOTE: I’m not sure why pumpkin seed butter and pumpkin seed flour aren’t more popular, but you can make your own pumpkin seed butter. Roast several cups of hulled pumpkin seeds for 12 to 15 minutes on a baking sheet in a 375°F oven. Use a food processor to blend them until they are finely ground, release their oil, and become liquid like peanut butter. Roasted pumpkin seed butter is delicious for many things besides cookies.
Alex’s Chocolate-Covered Shortbread Cookies
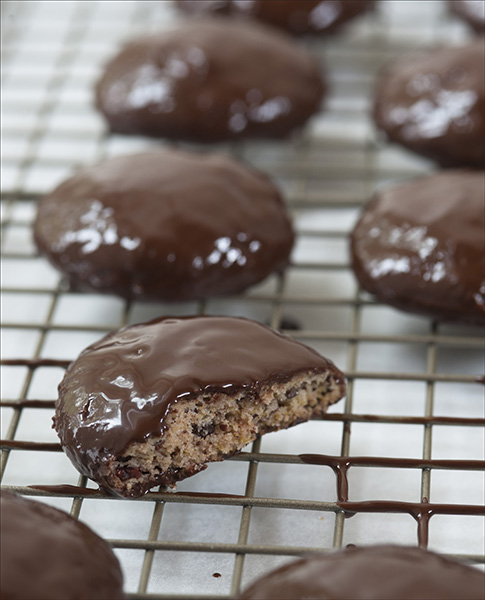
alex’s chocolate-covered shortbread cookies
IN THEORY, it shouldn’t be that hard to make gluten-free shortbread. After all, it is named “shortbread” because of its crumbly texture. The typical ratio is 1:2:3 sugar to butter to flour, and the significant amount of butter is what makes the cookie crumble. In wheat-based cookies, the fat surrounds the flour particles and hinders the formation of gluten, which makes them tender. But in gluten-free formulations, the fat surrounds the flour particles and with nothing at all to hold them together, the shortbread disintegrates.
Of course, I decided there ought to be a gluten-free and dairy-free version of shortbread. These biscuit cookies have a very different sugar to fat to flour ratio from standard shortbread, and they do contain eggs, but they have that same rich taste and crumbly texture. The cacao nibs give them an added crunch. They are called Alex’s Chocolate-Covered Shortbread Cookies because it was my son Alex who declared, “You ought to dip these in chocolate.” His instincts were right: The chocolate coating seals in a rich and crunchy interior.
makes 2½ dozen cookies ![]()
FOR THE COOKIES:
½ cup granulated sugar
½ cup powdered sugar
⅓ cup coconut oil
1 large egg
1 teaspoon salt
⅔ cup (93g) tapioca starch
1 cup (120g) light buckwheat flour
1½ teaspoons baking powder
⅓ cup cacao nibs
2 teaspoons almond extract
FOR THE DIPPING CHOCOLATE:
1 cup dairy-free chocolate chips (such as Enjoy Life)
2 tablespoons cocoa butter
1. Make the cookies: Position an oven rack in the center of the oven and preheat to 350°F. Line 2 baking sheets with parchment paper.
2. In a food processor, cream both sugars, the coconut oil, egg, and salt. Add the tapioca starch, buckwheat flour, and baking powder and pulse until the mixture becomes sand-like. Scrape down the sides frequently to ensure a smooth dough. Add the cacao nibs and almond extract. Pulse until the dough forms a ball. If the dough seems a little dry, sprinkle a tiny amount of water on it and knead it by hand until it comes together as a ball.
3. Roll the dough into balls the size of large marbles (about ¾ inch diameter). Space the balls of dough at least 1 inch apart on the baking sheets as these cookies will spread.
4. Bake the sheets of cookies, one at a time, for 17 minutes, until they begin to brown. Allow the cookies to cool completely on the pan.
5. Make the dipping chocolate: In a microwave or a heatproof glass bowl set in a heated skillet with 1 inch of water, melt the chocolate chips and cocoa butter, stirring occasionally, until the consistency is right for dipping.
6. Using a fork, lower each cookie into the chocolate, cover it completely, tap it on the side of the bowl to remove any excess chocolate, and gently slide it off onto a cooling rack set over wax paper. (To keep the chocolate from hardening as you work, heat a plate and set it under the bowl of chocolate dip.) Allow the cookies to cool fully to harden the chocolate.
date cookies
MY HUSBAND TOM’S GRANDMOTHER loved dates, or so it would seem judging from her recipe collection that I inherited because there were sweet date recipes, date pudding recipes, and savory date recipes. I grew up on Dromedary Dates, and I always thought they were a type of date like Medjool dates until I realized it was a brand of imported dates named after a camel. In the early twentieth century, date consumption was pretty much restricted to Thanksgiving and Christmas. In order to expand the market, the main importer, the Hills Brothers Company, waged an aggressive ad campaign to convince homemakers that dates were better than candy and healthier than bread. The ad campaign worked, and women like my mother-in-law and her mother baked lots of date recipes. Since I love dates and agree that they are healthier than bread, I was thrilled to have a window into her recipe collection.
One of the recipes I adapted was for these date cookies. Dates are not only sweet, but lend a chewy texture to cookies and bars. They also work well in flourless recipes because they serve as binders. This is a light but chewy flourless cookie with the added richness of walnuts and dates.
makes 2 dozen cookies ![]()
1 cup pitted dates, chopped
1¾ cups finely chopped walnuts
1 tablespoon tapioca starch
2 large egg whites
1 teaspoon vanilla extract
1 cup sugar
1. Position an oven rack in the center of the oven and preheat to 350°F. Line a baking sheet with parchment paper.
2. In a medium bowl, toss the chopped dates and walnuts with the tapioca to coat. Set aside.
3. In a bowl, with a hand mixer, beat the egg whites and vanilla on high until soft peaks form. Gradually beat in the sugar, then continue beating the whites until glossy and stiff peaks form.
4. Fold the dates and walnuts into the egg whites, taking care to retain as much loft in the egg whites as possible. Drop the dough by teaspoons about 2 inches apart on the baking sheet. With wet fingers, lightly pat down each cookie until it is approximately ½ inch thick.
5. Bake the cookies for 15 minutes, or until the bottoms begin to brown and the cookie surface puffs up. Allow the cookies to cool and set on the pan for 10 to 15 minutes before transferring them to a cooling rack to cool completely.
Fortune Cookies
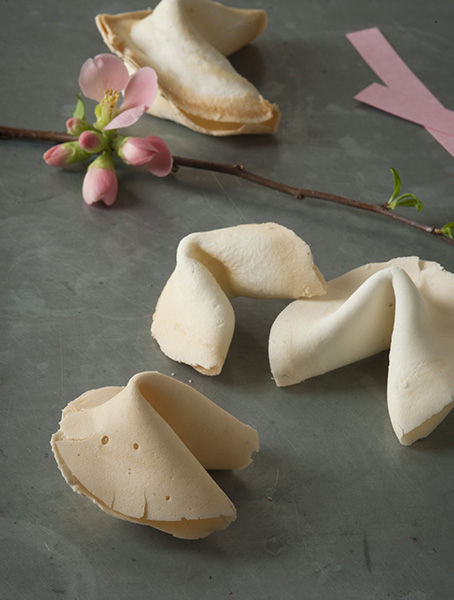
fortune cookies
WHEN I WAS IN FIFTH GRADE, the rule on Valentine’s Day was that if you give anyone a valentine, you had to give one to everyone. I figured out that I could slip candy hearts with messages into my valentines to customize them for my intended recipient. All the girls in the fifth grade, including me, thought that we were in love with Alvin. I sifted through my box of candy hearts and found the perfect “I LOVE YOU” to put in his valentine. What I hadn’t figured out was how I was going to gauge his reaction, so I stood in front of him and asked him to open it. He did and immediately started laughing. So did the gaggle of girls surrounding him.
You’d think after that humiliation I would have an aversion to messages in food for the rest of my life. I didn’t. In the pre-gluten-free days, one of my favorite parts of eating at a Chinese restaurant was the message in the fortune cookie at the end of the meal. I always found them tremendously entertaining. These fortune cookies are great for entertaining and gifts (although I wouldn’t recommend a fortune that reads I LOVE YOU unless you’ve thought out the consequences). The ingredients are so simple that you wonder why all fortune cookies aren’t gluten-free.
makes 6 to 8 fortune cookies ![]()
1 large egg white
½ teaspoon almond extract
¼ cup (35g) tapioca starch
⅛ teaspoon salt
3 tablespoons sugar
1 teaspoon canola oil
1. Use your imagination to write 6 to 8 brilliant fortunes on strips of paper about 3 × ½ inch. Set aside but have them at the ready for when you bake the cookies.
2. Position an oven rack in the center of the oven and preheat to 300°F. Grease 2 baking sheets.
3. In a bowl, with a hand mixer, beat the egg white and almond extract until they are thickened and foamy, but not stiff. On low speed, blend in the tapioca starch, salt, sugar, and oil until the batter is totally smooth (it will be somewhat runny). Let it sit for 10 minutes for the air bubbles to settle.
4. Making 2 cookies at a time, spoon about a teaspoon of batter for each cookie on opposite sides of a baking sheet. Tilt the pan over and down to allow the batter to form 3-inch rounds. It takes a little practice—they might have a couple of ears sticking out, but you can snip them off with kitchen shears before they solidify.
5. Bake for about 10 minutes, or until the edges turn a golden color but the center remains white (it will be really white because you are using tapioca starch). Check the cookies several times to be sure they don’t go too far.
6. Working as quickly as you can, open the oven door and use a metal spatula to remove 1 cookie and flip it upside down on a wooden cutting board. Place your fortune in the center and fold the cookie over into a half-moon. Gently press the edges together and bend the folded edge over the rim of a coffee mug, pulling the two pointed ends down, to produce the traditional fortune cookie shape. You have to work quickly; if the cookie cools off too much, it will lose its flexibility and break when you fold it. Repeat with the remaining batter to make more cookies. Alternate between 2 baking sheets to ensure that the baking sheet is cool for the next batch.
Chocolate Gingerbread Reindeer Cookies
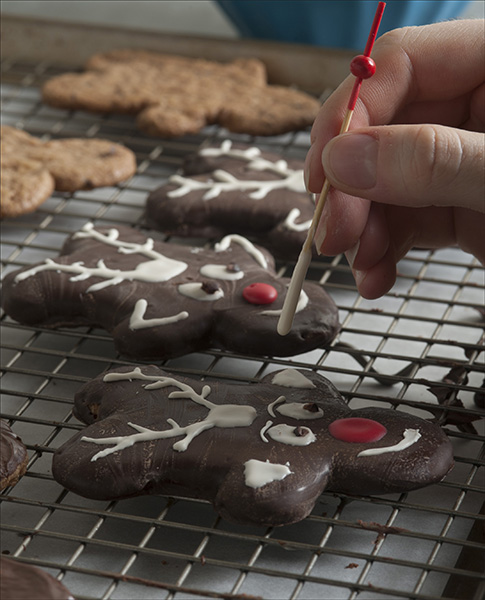
chocolate gingerbread reindeer cookies
MY MOM READ A LOT TO US when we were kids, and I loved books so much that I taught myself to read. My younger son, Marty, did the same thing. Early on, it became a Christmas tradition in my family to read The Gingerbread Man and make gingerbread men with cinnamon Red Hots and raisins. We used an old aluminum gingerbread man cookie cutter with a pointy head, and passed it from kid to kid. But it was decorating the gingerbread people that brought them to life, and it is no wonder that a story about a gingerbread man became a children’s classic.
I’ve made my share of gingerbread people with my kids. Then I saw a craft decorating project for which ginger people were turned upside down and decorated as reindeer. Even though I’m not a terribly crafty person, I had to try. Talk about the potential of bringing personalities out in cookies! I developed this twist on gingerbread cookies specifically for the reindeer. These crisp and spicy gingerbread cookies are chocolate covered. They are dotted with cacao nibs, which give the gingerbread just a hint of chocolate and unite the cookies with their chocolate coating. The dough is surprisingly easy to prepare and roll out. Just be sure that you have plenty of time to release your inner decorating self.
makes twenty to twenty-four 4-inch cookies ![]()
FOR THE COOKIES:
½ cup granulated sugar
½ cup powdered sugar
⅓ cup coconut oil
1 large egg
1 teaspoon salt
1 cup (120g) light buckwheat flour
¾ cup (105g) tapioca starch
1½ teaspoons baking powder
1 tablespoon ground ginger
1 teaspoon ground cinnamon
Scant ¼ teaspoon ground cloves
⅓ cup cacao nibs
2 teaspoons molasses
½ cup finely chopped crystallized ginger
FOR THE CHOCOLATE COATING:
2 cups dairy-free chocolate chips (such as Enjoy Life)
2 tablespoons (25g) grated cocoa butter (or coconut oil)
8 drops ginger oil (optional)
FOR THE ROYAL ICING:
2 cups powdered sugar
1 tablespoon pasteurized powdered egg whites
½ teaspoon vanilla, almond, or lemon extract
Food coloring, for coloring the icing
1. Make the cookies: Position an oven rack in the center of the oven and preheat to 325°F. Line a baking sheet with parchment paper and bake one batch at a time.
2. In a food processor, cream both sugars, the coconut oil, egg, and salt. Add the buckwheat flour, tapioca starch, baking powder, and spices. Pulse until the mixture becomes sand-like. Scrape down the sides frequently to ensure a smooth dough. Add the cacao nibs and molasses. Pulse the mixture until the dough forms a ball. By hand, knead in the crystallized ginger.
3. Divide the ball into thirds and refrigerate the dough you are not working with. Roll the dough out between two pieces of plastic wrap to an ⅛-inch thickness. Cut out ginger people with a 4-inch cookie cutter and transfer them to the baking sheet. These cookies spread, so space them at least 1 inch apart—8 to 9 cookies will fit on a standard baking sheet.
4. Bake the cookies for 15 minutes until set. Allow the cookies to cool on a cooling rack before dipping in chocolate.
5. Make the chocolate coating: Use a microwave, or a heatproof glass bowl set in a heated skillet with 1 inch of water, to soften the chips and cocoa butter (and ginger oil, if using), alternating stirring and melting until the consistency is right for dipping.
6. Using a fork, lower each cookie into the chocolate to cover it completely, tap it on the side of the bowl to remove any excess chocolate, and gently slide it off onto wax paper. (To keep the chocolate from hardening as you work, heat a plate and set it under the bowl of chocolate dip.) Allow the cookies to cool fully to harden the chocolate.
7. Make the royal icing: In a small bowl, combine the powdered sugar, powdered egg whites, and flavor extract. Add 1 tablespoon at a time of water until you get the desired thickness (or if you go too far, add more powdered sugar to thicken). Color with food coloring as desired.
8. Pipe designs onto the cooled, chocolate-covered gingerbread people. To make reindeer, turn the gingerbread man upside down and decorate his face as a reindeer, his arms as ears, and his legs as antlers.
rollout sugar cookies
EVERY YEAR, my son Alex’s therapeutic horseback riding stable has a holiday benefit party and silent auction. The big draw is a cookie swap, with cookies piled every which way on an 8-foot-long table. We always bring gluten-free cookies for that moment when Alex looks at the table, then looks at me, and I tell him the one thing he can eat—the cookies we brought.
Holiday cookies are such a ritual for many people. I believe that giving someone the gift of my time (in the form of homemade cookies) means a lot more than something I can buy. I’ve made all types of holiday cookies, but there is nothing like beautifully decorated sugar cookies for their WOW factor. Rollout cookies are usually more about the look than the taste, but these cookies are an exception. They are sweet and buttery, much like a shortbread, with a slightly exotic taste from the coconut oil. Without binders like xanthan gum, spreading can be a problem in gluten-free rollout cookies and blur the shape you hoped to achieve with cookie cutters. This is typically the case when you use an all-butter recipe, but in this recipe the coconut oil, which is 100% fat, is combined with the butter to limit spreading.
makes 4 dozen cookies
¾ cup (105g) tapioca starch
1 cup (120g) light buckwheat flour
4 tablespoons salted butter
3 tablespoons coconut oil (substitute vegetable shortening if you don’t want the coconut flavor)
½ cup sugar
1 teaspoon vanilla extract
1 large egg yolk
1. In a small bowl, blend the tapioca starch and buckwheat flour.
2. In a bowl, with a hand mixer, cream the butter, coconut oil, and sugar. Add the vanilla and egg yolk and beat on high until the mixture is light and creamy. Beat in the flour mixture. The dough will look like big curds. Using your hands, form it into a ball and refrigerate for 1 hour.
3. Meanwhile, position an oven rack in the center of the oven and preheat to 350°F. Line three baking sheets with parchment paper.
4. Divide the dough into three pieces, and return two to the refrigerator. Roll out the remaining dough on plastic wrap to a ¼-inch thickness. Cut out the desired shapes with cookie cutters and transfer them with a spatula to a baking sheet, placing them at least 1 inch apart. Repeat with the remaining dough pieces.
5. Bake the cookies for 12 minutes, until they are firm and the edges are slightly browned. The cookies will be fragile when you first remove them from the oven, so let them cool for about 5 minutes on the pan. Then use a flexible metal spatula to transfer them to a cooling rack.
microwave vegan cowboy cookie
TRY AS I MIGHT, I could not figure out the true origin of Cowboy Cookies, except that it is an old recipe, dating back to the beginning of the twentieth century. Some say the cookie had its origins as a tasty, nutritious food cowboys made to ride the trail, but I doubt the chocolate in the cookies would have traveled very well. There are also early references to Ranger (or Texas Ranger) Cookies, made with breakfast cereal like cornflakes or crispy rice cereal blended in. Others refer to similar cookies as Kitchen Sink cookies, because they are essentially oatmeal cookies with “everything but the kitchen sink.” Whatever the origins, vegan Cowboy Cookies would seem to be the best cookie to take on the trail, without any dairy or eggs to spoil.
I just love the idea that one can make a single cookie in a microwave. Sometimes you just want a few cookies without having to heat up the kitchen and make dozens at a time. And for those living in dorm rooms, this is a cookie you can fresh-bake. All those years Marty was unable to eat the college dining hall’s cookies, he could have made his own late at night while studying. Mix up the ingredients, pop it in the microwave, and let it cool. The result is a giant oatmeal cookie filled with chocolate, coconut, and pecans. It can’t get any easier than having a scrumptious cookie on a plate in under 5 minutes. You can even enjoy the authentic crunch of Ranger Cookies simply by adding 2 tablespoons of gluten-free crispy rice cereal.
makes one 5- to 6-inch cookie ![]()
1 tablespoon coconut oil
2 tablespoons packed brown sugar
1 tablespoon unsweetened applesauce
¼ teaspoon baking powder
¼ teaspoon salt
½ teaspoon vanilla extract
1 tablespoon tapioca starch
1 tablespoon oat flour
3 tablespoons rolled oats
1 tablespoon dairy-free mini chocolate chips (such as Enjoy Life)
1 tablespoon unsweetened shredded coconut
1 tablespoon chopped pecans
2 tablespoons crispy rice cereal, such as Erewhon (optional)
1. In a small bowl, use a fork to cream the coconut oil, brown sugar, and applesauce. Add the baking powder, salt, and vanilla. Mix in the tapioca starch, oat flour, and rolled oats. Finally work in the chocolate chips, coconut, pecans, and cereal (if using).
2. Cut out a 7 × 7-inch square of parchment paper and place it on a microwave-safe dinner plate. Dampen your hands and form the dough into a ball—it will be about the size of a tennis ball. Place it in the center of the parchment paper and flatten it until it is approximately 4 inches in diameter and ½ inch thick. It will look like a hamburger patty.
3. Microwave the cookie on high for 1 minute. You will see it puff all over. Check it. Microwave for another 30 seconds. If your microwave doesn’t have a turntable, turn the plate 90 degrees and microwave the cookie for another 30 seconds.
4. Transfer the cookie on the parchment paper—very carefully, as the hot cookie will be fragile and very crumbly—to a cooling rack. For a perfectly round cookie, use a dampened butter knife to push in and even up the sides around the cookie. Let it cool thoroughly before eating.
Chocolate-Covered Granola Buttons
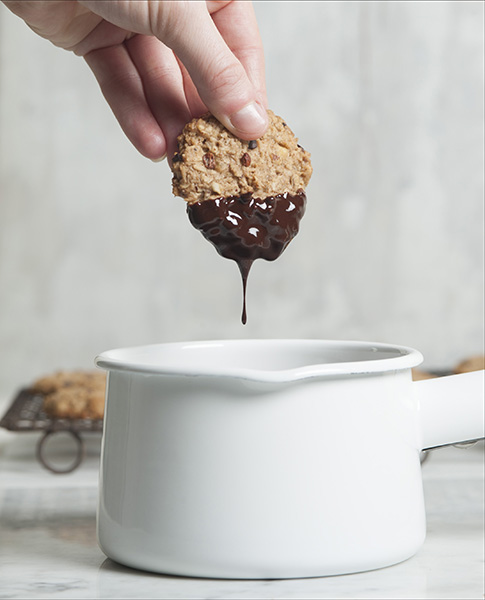
chocolate-covered granola buttons
EVER NOTICED how soy seems to be in everything? Those of us with soy intolerances know all too well. Try to find chocolate without soy lecithin. That’s a real challenge. Why is soy lecithin in most chocolates? Chocolate is a non-Newtonian fluid in which very fine solids (cacao, sugar, and sometimes milk solids) are dispersed in fat, and soy lecithin’s function is to coat each of the tiny particles so they flow through the cocoa butter or fat to create the rich, melt-in-your-mouth sensation.
I got frustrated with commercial chocolate, and the geek in me decided to learn how to make my own—not fine eating chocolate, but chocolate suitable for baking, for a coating, or for a glaze. These granola bites are dipped in a chocolate made with just three ingredients and without refined sugar. The taste of the chocolate is directly related to the quality of the cocoa you use, so you don’t want to scrimp there.
makes 1½ dozen granola buttons
FOR THE GRANOLA BUTTONS:
½ cup pecans
¼ cup chopped banana chips
4 tablespoons salted butter
⅓ cup packed brown sugar
1 teaspoon vanilla extract
1 teaspoon baking powder
½ teaspoon ground cinnamon
½ teaspoon salt
1 large egg white
¼ cup (25g) oat flour
2 tablespoons tapioca starch
½ cup rolled oats
½ cup unsweetened shredded coconut
¼ cup cacao nibs
FOR THE CHOCOLATE COATING:
⅛ cup cocoa butter (see Note)
2 teaspoons honey
¼ cup unsweetened cocoa powder
1. Make the granola buttons: Position an oven rack in the center of the oven and preheat to 350°F. Line a baking sheet and a cooling rack with parchment paper.
2. In a food processor, coarsely grind the pecans and banana chips. Set aside.
3. In a large bowl, with a hand mixer, cream the butter, brown sugar, and vanilla until light and fluffy. Add the baking powder, cinnamon, salt, and egg white and beat until fully incorporated. Beat in the oat flour, tapioca starch, and rolled oats. The dough will be pretty stiff. By hand, stir in the coconut, cacao nibs, and banana-pecan mixture.
4. Form the dough into 1½-inch balls (a little smaller than a Ping-Pong ball). Place on the baking sheet and press down slightly with damp fingers until they are about ½ inch thick. They won’t spread much, so they can be spaced within an inch of one another.
5. Bake the buttons for 15 minutes, rotating the sheets halfway through baking, or until they are set and the bottoms are lightly browned. Allow the buttons to cool for 5 minutes on the pan before carefully transferring them to the cooling rack. Allow them to cool completely before coating with chocolate.
6. Make the chocolate coating: In a small microwaveable bowl, melt the cocoa butter in the microwave. Or set a heatproof glass bowl in a heavy-bottomed skillet with 1 inch of water over low heat. Whisk in the honey until it is fully integrated into the cocoa butter. Stir in the cocoa powder until smooth.
7. One at a time, dip one side of a button into the chocolate coating and place it on wax paper to dry. Allow the chocolate coating to set for at least 2 hours (or longer depending on temperature and humidity). Store in the refrigerator during warm months.
NOTE: Cocoa butter, which is necessary for making the coating, is available in health food stores in major cities. If like me you live in a rural area, you may have to order it online. Just make sure to buy food-grade cocoa butter since it is also sold for cosmetic applications. You may also substitute the same amount of coconut oil.

Carolina Key Lime Cookies
carolina key lime cookies
MY PARENTS RETIRED TO CHARLESTON, South Carolina, over forty years ago, and my mom still lives there, as does my younger brother, Geoff. Every time I visit, I try to sample local cuisine, but it isn’t always very easy being gluten-free in a place with long-held traditions like hush puppies as a side for just about everything. On one trip we ate out downtown with my brother at a local seafood institution. The restaurant had a gluten-free menu, which was a good sign. Housed in what was once an old warehouse of exposed brick walls, studded with the original oyster shell mortar, the eatery is a busy, noisy magnet for tourists and locals alike. We killed time waiting for a table by visiting their country store next door. There among the Fried Green Tomato Breader and Hush Puppy mixes were bags of Carolina Key Lime Cookies. We were very hungry, and my son Marty commented what he would give to eat one of those. So I developed this gluten-free adaptation of Key lime cookies, both puckery, sweet, and melt-in-your-mouth.
makes 3 dozen cookies ![]()
FOR THE LIME SUGAR:
2 teaspoons powdered lemonade mix (such as Crystal Light)
½ cup powdered sugar
FOR THE COOKIES:
½ cup granulated sugar
½ cup powdered sugar
⅓ cup coconut oil
1 large egg
Zest of 1 lime, finely grated
1 teaspoon salt
1 cup (140g) tapioca starch
¾ cup (90g) light buckwheat flour
1 teaspoon baking powder
2 tablespoons fresh lime juice
1. Make the lime sugar: Measure the powdered lemonade and powdered sugar into a 1-quart sealable bag. Shake to combine and set aside.
2. Make the cookies: In a food processor, cream both sugars, the coconut oil, egg, lime zest, and salt. Add the tapioca starch, buckwheat flour, and baking powder. Pulse the mixture until it becomes sand-like. Scrape down the sides frequently to ensure a smooth dough.
3. Add the lime juice. Pulse the mixture until the dough forms a loose ball. The dough will come together but be sticky. Transfer the dough to a bowl and refrigerate for at least 15 minutes to make it easier to handle. Wet your hands if necessary so that it does not stick to your hands.
4. Meanwhile, position an oven rack in the center of the oven and preheat to 325°F. Line two baking sheets with parchment paper.
5. Remove the dough from the refrigerator and roll it into balls the size of large marbles. Place them on the baking sheets 2 inches apart (these cookies will spread to 2¼ to 2½ inches in diameter, so allow them adequate space on the baking sheet). With damp fingers, flatten them to about 1¾ inches in diameter.
6. Bake the cookies for 18 minutes, rotating the sheets halfway through, or until the bottoms are lightly browned. Allow the cookies to cool for 5 minutes on the pan. While the cookies are still warm, but cool enough to handle, place several at a time in the sealable bag with the lime sugar and shake the cookies to coat them. Allow the cookies to cool fully on a cooling rack before stacking them and storing them in an airtight container (or the freezer).
variation
Although I may upset Charlestonians with this suggestion, this basic recipe lends itself to many variations. My favorite is a Nutmeg Orange Cookie: Use orange juice and zest instead of lime juice and zest, and dust the cookies with a combination of ½ cup powdered sugar and ½ teaspoon of ground nutmeg instead of the lime sugar.
flourless double-chocolate brownies
WHEN IT COMES TO BROWNIES, there is no shortage of opinions, but they all seem to revolve around two black-and-white categories: cakey or fudgy. Some swear by a dark, moist, and dense texture. Others insist that a “real” brownie has a moist crumb with an airy interior. Basically, the cakey versus fudgy argument rests on the ratio of flour to egg. The more eggs, the fluffier, more cakey the brownie. But what if the brownies are flourless and don’t include sugar? Here’s a recipe that argues that maybe brownies can be both cakey and fudgy.
Of all baked goods, brownies probably lend themselves best to gluten-free adaptations. Brownies, like many cookies and bars, do not rely on gluten for their structure. In fact, the less gluten, the more tender the brownie—and the taste of chocolate has a way of masking nontraditional flour tastes and textures. The cocoa powder and sunflower butter serve as the flour, and the brownies are sweetened by honey and maple syrup. The brownie stays super-moist because the water-attracting honey also acts as an anti-staling agent.
makes 9 brownies ![]()
1 cup sunflower seed butter (or nut butter of your choice)
½ cup honey
2 tablespoons maple syrup
2 large eggs
⅓ cup unsweetened cocoa powder
½ teaspoon baking soda
½ cup dairy-free chocolate chips (such as Enjoy Life)
1. Position an oven rack in the center of the oven and preheat to 350°F. Line an 8 × 8-inch baking dish with parchment paper.
2. In a medium bowl, with a hand mixer, cream the sunflower butter, honey, maple syrup, and eggs on high until light and fluffy. Fold in the cocoa and mix on medium until light and fluffy. Add the baking soda and mix again until well blended. Stir in the chocolate chips by hand.
3. Scrape the batter into the baking dish and spread the batter evenly in the pan. Bake the brownie for 20 minutes, or until the center of the brownie is set; the brownie will set further as it cools. Allow it to cool completely in the pan before cutting into squares.
caramel brownies
CHOCOLATE AND CARAMEL go so well together, even though they are both strong flavors. Caramel not only balances the strong aromatic taste of chocolate, but its sweetness also magnifies the chocolate flavor. But trying to combine chocolate and caramel in a baked good can be problematic. Of course, it is easy to serve any chocolate confection with caramel sauce, and it is really good, but how do you integrate the two into something like brownies?
If you put pieces of caramel right into the batter, they melt during the baking process and pool at the bottom. If you spread caramel between two layers of batter, it still melts before the batter sets and turns into an ooey-gooey mess. Try swirling it in, same result. Finally, it occurred to me that the only way I could make it work was to create caramel chips that were caramel-like, but had enough substance to keep them intact long enough for the brownie batter to set. The major breakthrough came when I created my own caramel out of coconut cream and sugar only and I realized that I could thicken the caramel with coconut flour to make chips that wouldn’t liquefy during baking. These brownies are moist, chewy, chocolaty, and are studded with bursts of caramel. No more scraping sticky caramel off of everything in sight.
makes 9 brownies ![]()
1 cup sugar
½ cup coconut oil
½ cup unsweetened cocoa powder
1 teaspoon vanilla extract
2 large eggs
¼ cup coconut cream (skimmed from the top of a 13.5-ounce can of full-fat coconut milk)
¼ cup full-fat coconut milk
½ cup (56g) coconut flour
⅓ cup Coconut Caramel Chips
1. Position an oven rack in the center of the oven and preheat to 325°F. Grease an 8 × 8-inch baking dish on the bottom and all sides. Line the bottom and two of the sides with parchment paper that hangs over the sides.
2. In a bowl, with a hand mixer, blend the sugar and coconut oil. Add the cocoa, vanilla, and eggs. Beat in the coconut cream and coconut milk until smooth. Beat in the coconut flour until well blended. Set the bowl aside and allow the coconut flour to absorb the liquid. Fold in the caramel chips by hand.
3. Bake the brownie for 45 minutes, or until the batter is set in the center. Allow the brownie to cool completely in the pan before inserting a sharp knife around the sides to loosen the brownie. Use the parchment paper to lift the brownie from the pan onto a cutting board. Cut into squares.
coconut raisin brownies
EVER SINCE I DISCOVERED how easy it is to make Coconut Butter at home, I have been thinking of ways to best use its almost magic properties—naturally sweet, high in fiber, low-glycemic, and solid at room temperature. The inspiration for these brownies came from chocolate-covered raisins, one of my longtime favorite candies. Mostly I associate them with movie theaters, big bright yellow boxes full of raisins that always seem sweeter and plumper when enrobed in chocolate. Coconut butter is naturally sweet, but when combined with bitter cocoa it requires an additional sweetener, such as dates. In these brownies the natural fats and oils in the coconut and cocoa powder carry the flavor and provide the binder for the more fibrous coconut and dates. The raisins add texture—bursts of natural sweetness—and remind me of chocolate-covered raisins, all without any refined sugars, artificial flavors, soy lecithin, or preservatives. No baking, either.
makes 16 brownies ![]()
¾ cup Coconut Butter, store-bought or homemade
¼ cup unsweetened cocoa powder
16 Medjool dates, pitted
½ cup raisins
1. In a food processor, combine the coconut butter, cocoa powder, and dates and process until the dates are incorporated into the other ingredients. (The mixture may be crumbly, depending on the moistness of the dates, but the dough will come together when pressed. Add a teaspoon of water, if necessary.)
2. Transfer the dough to a bowl and work in the raisins by hand. On a piece of plastic wrap, use your fingers to press the dough together to form a 5 × 8-inch rectangle, squaring the sides with a dough scraper or a knife.
3. Allow the brownie to solidify in the refrigerator for at least 30 minutes. Cut into 16 bars and serve.
maple walnut squares
TOURISTS FLOCK TO VERMONT for the peak of fall foliage; just as animals bulk up for the winter, Vermont nonprofit organizations use the tourist season to raise needed funds. I’ve done my share of volunteering at roadside stands selling baked goods during the fall in Vermont, and the most memorable one was the annual cider sale for the Meetinghouse School in Marlboro. One year, I baked Maple Walnut Squares and was opening up one really cold morning when a couple from Louisiana pulled up. They asked for a hot cup of coffee, bought two maple squares, and retreated to their rental car. All of a sudden, they were back asking if they could buy the entire pan of Maple Squares. Why of course! When they drove away, we high-fived because we had only been open less than fifteen minutes, and we had already sold $20 worth of baked goods. Two years later, my kids had gone on to elementary school and I was no longer on cider sale duty, but the couple came back looking for my Maple Walnut Squares. Amazing what one pan of bars can do! These bars are that good, and I have adapted them to gluten-free with absolutely no compromises. I can’t think of any baked good more fitting of pure Vermont maple syrup than these bars.
makes 9 squares
FOR THE CRUST:
½ cup (70g) tapioca starch
¼ cup (48g) potato starch
½ cup (80g) brown rice flour
¼ cup packed brown sugar
12 tablespoons cold salted butter, cut into pieces
FOR THE WALNUT TOPPING:
1 large egg
1 large egg yolk
⅓ cup packed brown sugar
½ cup maple syrup
1 teaspoon vanilla extract
1½ tablespoons salted butter, melted
¾ cup chopped walnuts
1. Make the crust: Position an oven rack in the center of the oven and preheat to 350°F. Butter an 8 × 8-inch baking dish.
2. In a food processor, combine the tapioca starch, potato starch, brown rice flour, brown sugar, and butter and pulse just until it is the texture of sand (it should hold together when squeezed).
3. Press the crust mixture evenly over the bottom and one-quarter of the way up the sides of the baking dish. Bake the crust for 10 minutes. Remove and set aside to cool slightly. Leave the oven on.
4. Make the topping: In a bowl, with a hand mixer, beat the whole egg and egg yolk until light and foamy. Beat in the brown sugar, maple syrup, and vanilla until the sugar is dissolved. Stir in the melted butter until uniformly blended. Pour the topping onto the crust and scatter the walnuts over the top.
5. Bake for 20 to 25 minutes, or until the center looks set. Allow to cool completely before cutting into squares. Refrigerating for 30 minutes after cooling will make it easier to make clean cuts.
energy bars
AFTER A WORKOUT, your body needs protein. But while you are exercising or engaging in endurance activities, you need energy. These energy bars do just that, with lots of nutrition from the coconut, sesame, pumpkin, chia, and sunflower seeds, along with the powdered milk. Chock full of whole foods, they give you just the right amount of kick when you need it. My son Alex and I tried out these bars on our first tandem bike ride of the season. We decided on an ambitious first ride, out of Brattleboro, up and over Black Mountain, and back along the West River. By the time we reached the halfway point, that bar couldn’t have come at a better time, and had just the right amount of crunch from the cacao nibs and a burst of sweetness from the raisins. It was as satisfying as a high-end chocolate bar. Fortified, we powered up to the peak and went screaming down the other side, through the long, cool covered bridge that spans the West River, and back to Brattleboro. Not bad for the first ride of the season. I’d like to think that the energy bars were responsible, but the sheer vitality of Vermont coming alive after so many months of snow and ice couldn’t have hurt.
makes 16 bars
1 cup Coconut Butter, store-bought or homemade
¼ cup cocoa butter
½ cup honey
1 cup dried fat-free milk powder
½ cup unsweetened cocoa powder
½ cup chopped dates
½ cup chopped fruit-sweetened dried cranberries
½ cup sunflower seeds
½ cup chopped hulled pumpkin seeds
¼ cup sesame seeds
¼ cup chia seeds
½ cup golden raisins
½ cup cacao nibs
1. Position an oven rack in the center of the oven and preheat to 350°F. Grease a 9 × 13-inch baking dish and line with parchment paper.
2. In a heatproof glass bowl, soften the coconut butter and melt the cocoa butter using either a microwave or by placing the bowl in a skillet over low heat. Stir in the honey.
3. In a food processor, combine the milk powder, cocoa powder, dates, cranberries, sunflower seeds, pumpkin seeds, sesame seeds, and chia seeds. Add the cocoa-coconut butter mixture to the chopped ingredients and pulse to combine them. Transfer the mixture to a medium bowl and fold in the raisins and cacao nibs.
4. Spoon the mixture into the baking dish and bake for 30 minutes, or until it is set in the center. Allow to cool before cutting into bars. It may be placed in the refrigerator to cool faster.
cranberry-date bars
IMAGINE MY SURPRISE when I learned that Date Bars, a recipe I grew up with, was also known as “Matrimonial Cake.” How in the world could date bars be the same as a matrimonial cake? What I found was a great article by Carol Wilson in the journal Gastronomica on the history of wedding cakes, where she explains that seventeenth-century “bride cakes” were the precursors of the modern-day wedding cake. She describes one recipe in which currants were sandwiched between two rounds of shortcake pastry sprinkled with sugar. How we got from humble, fruited bride cakes to towering, fondant-laden works of art is a bit of a mystery to me, but at least I now understand the peculiar name.
These date bars are an adaptation of a date bar made by my mom. Dried cranberries are combined with the dates to create a sweet filling. It is a surprising and pleasing texture in an otherwise meld-together type of bar. The rolled oats soak up much of the moisture, and the combination of toasted oat flour, light buckwheat flour, and tapioca starch binds it all together. This is a perfect dessert bar for the long winter months, served warm with a small scoop of vanilla ice cream.
makes 20 bars
1½ cups rolled oats
½ cup (50g) toasted oat flour
¾ cup (90g) light buckwheat flour
½ cup (70g) tapioca starch
1 cup packed dark brown sugar
½ cup unsweetened shredded coconut (optional)
1 teaspoon salt
½ teaspoon baking soda
8 tablespoons salted butter, sliced
2 cups pitted dates (about 24 large dates)
¼ cup honey
1 cup fruit-sweetened dried cranberries
1. Position an oven rack in the center of the oven and preheat to 350°F. Grease a 9 × 13-inch glass baking dish with butter.
2. In a large bowl, combine the oats, oat flour, buckwheat flour, tapioca starch, brown sugar, coconut (if using), salt, and baking soda. Work in the butter until the mixture is crumbly. Sprinkle with 1¼ cups warm water to moisten it. Set aside.
3. In a medium saucepan, combine the dates, honey, and 2 tablespoons warm water and bring the mixture to a boil. Keep stirring until it is just thickened, about 3 minutes. Remove the mixture from the heat, stir in the cranberries, and allow it to cool for 10 minutes.
4. Press half of the oat mixture into the bottom of the prepared baking dish. Using a rubber spatula, spread the date filling over the base as evenly as possible. Sprinkle the other half of the oat mixture on the top and, with wet fingers, press down until the topping is integrated into the filling.
5. Bake the bar for 40 to 45 minutes, or until the top is lightly toasted. Allow the bar to cool at room temperature. Chill in the refrigerator before cutting into individual bars.

Peanut Butter Bars
peanut butter bars
EVERY SUMMER, we meet up with a family from Rochester, New York, at our summer cottage on the St. Lawrence River. Half of the family, it seems, has spent their careers working for Wegmans, a well-regarded family supermarket chain in Rochester, New York. Lynn, the matriarch, is a huge fan of Wegmans and simply loves their brand of peanut butter. When she spends summers at the river, she brings a case with her. I learned about Lynn’s peanut butter habit not long after I began experimenting with peanut butter as a flour substitute. I had been making peanut butter brownies for a while when I told Lynn about them, and her eyes got round. Just peanut butter in brownies? Could it be possible? So I did what any good neighbor would do: I baked her these peanut butter brownies, and she guarded them until the very last bite.
According to the National Peanut Board, Americans consume over 1.5 billion pounds of peanut butter and peanut products a year. If they all knew about these brownies, it wouldn’t surprise me if that number doubled. There are a multitude of ways to customize these brownies with add-ins such as chocolate chips, crumbled banana chips, shredded coconut, and raisins.
makes 9 bars ![]()
1 cup smooth or chunky peanut butter
½ cup honey
1 large egg
½ teaspoon baking soda
¼ cup shredded coconut (optional)
1. Position an oven rack in the center of the oven and preheat to 350°F. Grease an 8 × 8-inch baking dish, then line it with parchment paper, allowing the parchment paper to overhang two sides of the dish.
2. In a bowl, with a hand mixer, blend the peanut butter, honey, egg, baking soda, and 3 tablespoons coconut (if using) until thick and creamy. Scoop the batter into the baking dish and use a rubber spatula to spread the batter until it is even.
3. Bake the bar for 18 to 20 minutes, or until set and the edges are just barely starting to brown (the center will be slightly lower than the edges when set). This batter has a tendency to overbake very quickly, so be sure to check for doneness at around 18 minutes. Remove the bar from the oven, sprinkle on the remaining tablespoon coconut for garnish, and allow to cool fully in the pan before cutting.
fig bars
OF ALL THE PRODUCTS I MISS, I may miss fig bars the most. Opening the cellophane columns of cookies, prying several off the stack, and twisting the cellophane back is burned into my brain. I think the design is brilliant, from the taste and texture of the cookie and filling to the illusion that you are indulging responsibly. There is a reason that fig bars have been produced commercially for over 120 years.
Making fig bars at home is a multistep process, but the end result is worth the effort. Since you don’t have a million-dollar cookie extrusion line, you have to roll out the dough, fill it, and fold it over to create a seamless bar. The individual cookies are cut and stored while the dough is still warm, to create the soft, moist exterior. Apple cider in the filling heightens the fig taste, and adds pectin as a binder. Just a little unsweetened apple butter in the cookie dough retains moisture and makes the dough pliable without altering the taste.
makes 20 to 24 bars
FOR THE FILLING:
1 cup chopped dried figs, with stems removed
1 cup apple cider
¼ cup packed brown sugar
FOR THE COOKIE DOUGH:
8 tablespoons cold salted butter, cut into pieces
½ cup packed brown sugar
1 teaspoon orange zest
1 large egg white
2 tablespoons unflavored, unsweetened apple butter
1 teaspoon vanilla extract
¾ cup (105g) tapioca starch
1 cup plus 2 tablespoons (140g) light buckwheat flour
1. Make the filling: In a medium saucepan, combine the figs, cider, brown sugar, and 1 cup water and bring to a boil. Reduce the heat and simmer covered for 20 minutes, or until the figs are softened. Increase the heat, uncover, and boil the filling for approximately 50 more minutes, or until the liquids are reduced to a paste.
2. Blend the filling in a food processor until it is a smooth paste. Refrigerate the filling until ready to use.
3. Make the cookie dough: In a food processor, combine the butter, brown sugar, and orange zest and pulse to blend. Pulse in the egg white, apple butter, and vanilla. Then add the tapioca starch and buckwheat flour and blend until the dough comes together in a ball. Wrap the dough in plastic wrap and refrigerate for 2 hours.
4. Position an oven rack in the center of the oven and preheat to 350°F. Line a baking sheet with parchment paper.
5. Divide the dough into quarters and roll each one between your hands into a log shape. Work with one log at a time and refrigerate the others. Use your fingers to flatten the log a bit, lightly dust it with tapioca starch, and roll it out on a layer of plastic wrap to a thickness of between ⅛ and ¼ inch (your preference) and a width of roughly 4 inches. Using a dough scraper, knife, or pizza wheel, trim the edges of the dough into a 4-inch-wide rectangle, squaring the ends.
6. Spread a layer of fig paste lengthwise down the center of the rectangle. (It should be about 1½ inches wide and ¼ inch thick.) Using the plastic wrap, fold one long side of the rectangle over the filling into the center and peel back the wrap. Then repeat the process for the other side, rolling it to the center and just overlapping the already folded side. Gently pat the seam to seal the fig bar. Use the plastic wrap to transfer the formed bar to the baking sheet and flip it onto the parchment, seam side down. Repeat the process for the remaining three logs.
7. Bake the fig bars for 20 minutes, or until they are just beginning to brown. While still warm, cut each bar crosswise into individual cookies about 2 inches long and use the parchment paper to transfer them to a cooling rack. While still slightly warm, store the bars in an airtight container, separating layers of cookies with parchment paper. (Storing the cookies before they are fully cooled will assist in moisture retention to keep the crust soft.)

Chocolate-Orange Bark
chocolate-orange bark
IT’S 7 P.M., I just put dinner on the table, and my youngest son says, “I need to bring something to school tomorrow for a bake sale.” Really? I ask him how long he’s known this, and he answers, “Since last week.” This was a scene repeated over and over when my kids were younger, and perhaps the reason I love simplicity: the fewer ingredients in a recipe, the better. I particularly love simplicity when I have to think on my feet to create a mouthwatering creation with whatever I have in my pantry.
I don’t think there is any baked good recipe that beats this one for simplicity and impressive outcome. This recipe was inspired by the popular Cracker Candy or Saltine Toffee recipe that uses saltine crackers as the base, with a layer of brown sugar toffee, topped with melted chocolate chips. In this recipe, you significantly improve on the saltine crackers by creating your own buttery gluten-free base before topping it with melted chocolate chips. In just over a half hour, you’ll have gourmet gluten-free bark in the freezer, guaranteed to be one of the first things to disappear from the bake sale table. Actually, it may take you a little longer since you’ll want to make one sheet for you, and one for the bake sale.
makes 25 to 30 pieces
8 tablespoons salted butter (or substitute 100g coconut oil)
½ cup packed brown sugar
2 teaspoons orange extract
1 large egg yolk
½ cup (70g) tapioca starch
⅔ cup (80g) light buckwheat flour
1¼ cups semisweet chocolate chips
2 tablespoons chopped candied orange peel
1. Position an oven rack in the center of the oven and preheat to 350°F.
2. In a large bowl, with a hand mixer, beat the butter, brown sugar, orange extract, and egg yolk until well blended.
3. Fold in the tapioca starch and buckwheat flour until they are moistened, and then beat the dough again until it is well blended. The dough may seem crumbly, with the texture of oatmeal, but it will come together when spread and compressed.
4. Spread the dough evenly in an ungreased 10½ × 15½-inch rimmed baking sheet. Using a rolling pin and your fingers, press down while rolling out the dough until the dough is evenly spread over the entire pan. Make sure there are no holes. At first, it will seem like you have way more surface area than dough, but it will eventually cover the entire pan.
5. Bake for 12 to 15 minutes, or until the crust is set and lightly browned. It will look like a gigantic cookie.
6. Remove the crust from oven, sprinkle it evenly with the chocolate chips, and return it to the oven. Bake the bark for 3 to 4 more minutes, or until the chocolate chips are softened.
7. Remove the bark from the oven. Working quickly, spread the chocolate chips with a spatula until the surface is evenly and completely coated with chocolate. While the chocolate is still soft, sprinkle the top with candied orange peel; pat the pieces lightly into the chocolate to anchor them and allow the bark to cool fully.
8. Place the baking sheet in the freezer for 15 minutes to allow the bark to become brittle. Break it into uneven pieces of bark and store in a cookie tin or any airtight container.
variations
Although this recipe is for orange bark, there are many possibilities for flavor substitutions and garnishes. Some of my favorites include:
✵ Cherry bark: use 1 teaspoon almond extract and top with ½ cup chopped dried cherries.
✵ Peppermint bark: use 2 teaspoons peppermint extract and top with 1 cup of crushed candy canes or peppermint candies.
✵ Pecan bark: use 1 teaspoon vanilla extract and top with ½ cup chopped pecans.
cashew chews with cacao nibs
CACAO NIBS are little chunks of pure cacao beans, and are chocolate in its purest form. They are produced during the lengthy chocolate-making process after the pods have been fermented, dried, and cracked open. In order to more efficiently remove the outer shell of the cocoa bean, the chocolate is broken into little chips rather than ground down to powder. If you’ve ever bitten into unsweetened baking chocolate, you’ll be surprised by how different cacao nibs are in taste and texture. Although unsweetened, they’re not nearly as bitter and acidic. Cacao nibs come roasted and unroasted—some believe that roasting reduces the bitterness a tad, whereas others tout the health benefits of raw nibs. Either way, cacao nibs draw out subtle flavor notes in anything they are paired with, particularly processed chocolate.
Cashews have a relatively high starch content of about 10%, making them more flour-like than many other nuts. The cacao nibs add a crunchy and bittersweet contrast to the cashew flavor. Although the cacao nibs are unsweetened, cashews give cocoa nibs the illusion of sweetness.
makes 20 cookies ![]()
1 cup cashew butter
1 cup powdered sugar
1 large egg
½ teaspoon baking soda
½ teaspoon salt
½ cup cacao nibs (or mini dairy-free chocolate chips)
1. Position an oven rack in the center of the oven and preheat to 350°F. Line a baking sheet with parchment paper.
2. In a bowl, use a hand mixer to beat together the cashew butter, powdered sugar, egg, baking soda, and salt until the mixture is smooth (though still sticky). Fold in the cacao nibs by hand.
3. Roll the dough into balls the size of small marbles, wetting your hands if necessary. Place the balls 2 inches apart on the baking sheet. (They will spread significantly as they bake.)
4. Bake the cookies for 10 minutes, or until the tops are cracked and set. Allow the cookies to cool before lifting them from the baking sheet. As the cookies cool, they will flatten somewhat.
Cranberry-Pistachio Biscotti
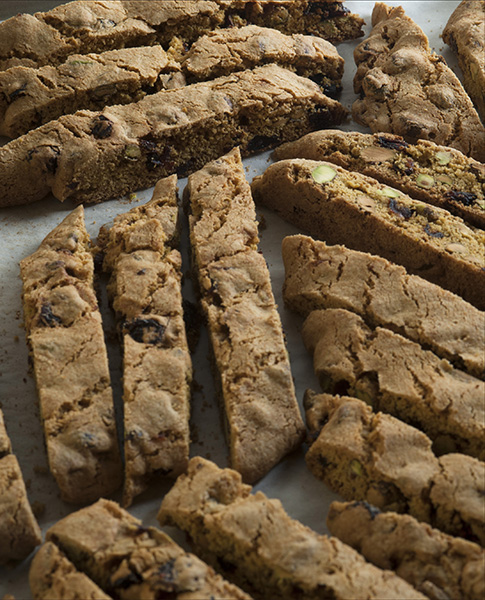
cranberry-pistachio biscotti
ONE DAY you’re scraping your knees learning to ride your first two-wheel bike. The next thing you know, some of the things you’ve acquired have practically become vintage. That’s the case with my wooden recipe box, which is retro in an age of online recipes, kitchen apps, and the like. But inside the box is a culinary trip through my life, harboring some of the best recipes I’ve ever encountered. I have similar recipe boxes assembled by my late mother-in-law, as well as by her mother. Some of the recipes in the latter box are nearly a hundred years old. I like fingering the worn recipes, deciphering their notes, taking a trip down their culinary paths, and making them my own.
This cranberry-pistachio recipe from a 1995 New York Times article by Suzanne Hamlin first caught my eye because I liked the festivity of the red and green colors in the biscotti, but I have made a half-dozen variations on it since that first inspiration. Making biscotti is a very rewarding process. Having family members ooh and aah over the biscotti is even more so. When we began eating a gluten-free diet, this was one of the first recipes I adapted and, honestly, because they are twice-baked, biscotti make an excellent gluten-free cookie recipe.
makes 30 biscotti ![]()
½ cup granulated sugar
½ cup powdered sugar
⅓ cup coconut oil
1 large egg
½ teaspoon salt
¾ cup (105g) tapioca starch
1 cup (120g) light buckwheat flour
1½ teaspoons baking powder
2 teaspoons vanilla extract
½ teaspoon almond extract
1½ cups coarsely chopped unsalted pistachios
½ cup chopped fruit-sweetened dried cranberries
1. Position an oven rack in the center of the oven and preheat to 325°F. Line a baking sheet with parchment paper.
2. In a food processor, blend the sugars, oil, egg, and salt until smooth. Add the tapioca starch, light buckwheat flour, and baking powder and blend until uniformly moistened. The dough will be crumbly. Add the vanilla and almond extracts and blend until the dough comes together in a ball.
3. Transfer the dough to a medium bowl and work in the pistachios and cranberries. Form into a ball, then divide and form 2 flat logs, 12 inches long by 2 inches wide. Set the logs side by side on the baking sheet, separated by 4 inches—they will spread during baking. Bake for 40 minutes.
4. Remove the logs from the oven and let the logs cool for about 10 minutes on the pan until you can handle them. While still on the pan, slice the logs crosswise into 1-inch-thick slices. Separate the slices from one another. Bake the slices (standing upright) for an additional 20 minutes. The biscotti should be dry and crumbly. Store in an airtight container.
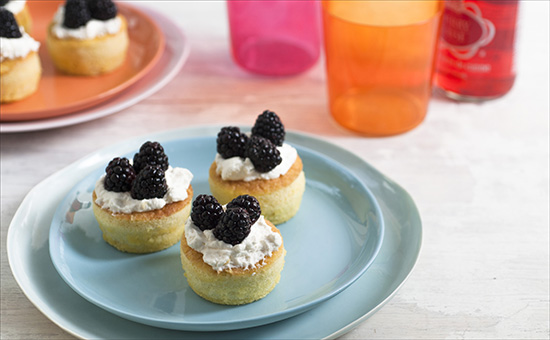
ladyfingers
LADYFINGERS AREN’T VERY LADYLIKE. But, oh my, are they delicate, sponge-like delicacies. In actuality, ladyfingers probably got their name from early recipes that directed the home baker to pipe out a strip of sponge cake batter the length of one’s finger.
Gluten-free sponge cakes, which rely on air beaten into eggs for leavening and minimal amounts of flour, are virtually indistinguishable from wheat-based ones. Unlike breads and heavier baked goods, the idea in sponge cakes is to restrict gluten development. So this ladyfinger recipe is quick to assemble and bakes for a very short period of time. Like traditional ladyfinger recipes, the fingers are piped onto parchment paper. The result is a delicate, spongy cake to use in tiramisus, charlottes, and semifreddos (see Fresh Peach Semifreddo).
makes 12 to 15 ladyfingers ![]()
2 large egg whites
½ cup granulated sugar
2 large egg yolks
1 teaspoon vanilla extract
⅓ cup plus 1 tablespoon (50g) light buckwheat flour
Powdered sugar, for dusting
1. Position an oven rack in the center of the oven and preheat to 400°F. Line a baking sheet with parchment paper.
2. In a medium bowl, with a hand mixer, beat the egg whites on high until soft peaks start to form. Gradually add 2 tablespoons of the granulated sugar and continue beating until glossy and stiff peaks form.
3. In a separate bowl, beat the yolks, the remaining 6 tablespoons granulated sugar, and vanilla on high until they are light in color and foamy, about 3 minutes.
4. Using a rubber spatula, fold half the egg whites into the egg yolks, then fold in the buckwheat flour. Finally, fold in the remaining egg whites. (The idea behind the folding is to minimize deflation of the batter.) Pour the batter into a pastry bag fitted with a ½-inch plain tip. (You can also use a quart-size sealable plastic bag with a corner cut off to pipe the batter.)
5. Pipe the batter into 4-inch-long strips onto the baking sheet. Place the fingers about 1 inch apart. Sift powdered sugar over the top of the fingers before baking to product a soft crust.
6. Bake the ladyfingers for 12 minutes. While they are still hot, slide a pastry knife under the ladyfingers to release them and transfer them to a cooling rack; they will be soft until they cool. Use the ladyfingers immediately after they cool, or freeze them. They will keep frozen for several weeks, but will soften over time in the freezer if kept longer.
variation
chocolate ladyfingers ![]()
Before incorporating the flour into the eggs, blend the flour with ¼ cup unsweetened cocoa powder and ¼ teaspoon baking soda.

Benne Wafers
benne wafers
ANYONE WHO HAS EVER WORKED with sesame seeds can tell you that they are pesky little devils. They are so tiny and light that they fly everywhere—except on the bread and pastry where you want them. Sesame seeds have an interesting history in this country. Also called benne, they were brought over from Africa by slaves to coastal South Carolina and Georgia. Sesame seeds grow in pods called capsules on 2- to 4-foot-tall flowering plants, and the early cultivars were as tricky to harvest as the seed is to work with. As a result, sesame seeds were never grown in the South as an agricultural crop. Instead, they were grown by slaves for their own use, a practice that was taken up by their white owners.
In antebellum times, benne were added to breads, soups, oyster stew, grits, and greens … and benne wafers, thin disks of brown sugar-sweetened sesame cookies. These cookies have been associated with the South Carolina Low Country for over 100 years. Benne wafers may be extremely thin or somewhat thicker, depending on the amount of flour. For a gluten-free adaptation, I developed a thin recipe, using as little flour as possible. The result is sweet and crunchy cookies, with a rich, nutty taste.
makes 80 thin wafers
⅓ cup white sesame seeds
¼ cup (35g) light buckwheat flour
¼ cup (35g) tapioca starch
½ teaspoon baking powder
¼ teaspoon baking soda
¼ teaspoon salt
4 tablespoons salted butter
¾ cup packed brown sugar
2 large egg whites
½ teaspoon vanilla extract
1. Position an oven rack in the center of the oven and preheat to 350°F. Line a baking sheet with parchment paper.
2. In a skillet, toast the sesame seeds over medium heat until they are browned, stirring them to prevent overheating. Remove them from the skillet and set aside to cool.
3. In a bowl, combine the buckwheat flour, tapioca starch, baking powder, baking soda, and salt and blend well.
4. In a separate large bowl, with a hand mixer, cream the butter and sugar until the mixture is light and creamy. Add the egg whites and vanilla and continue beating until the mixture is completely smooth. Add the dry ingredients to the dough and beat just until the batter is smooth. Fold in the sesame seeds.
5. Drop the dough by ½ teaspoon (like little buttons) onto the baking sheet. The wafers will spread to about three times their diameter so allow 2 inches between wafers.
6. Bake the wafers for 6 minutes, or until the cookies are golden brown and beginning to crisp around the edges.
7. Carefully slide the entire piece of parchment paper to a cooling rack and allow the wafers to cool for 5 to 8 minutes before attempting to peel them off the parchment paper; they will crisp as they cool. Once completely cooled, store the wafers in an airtight tin. They should last 1 to 2 weeks.