Against the Grain: Extraordinary Gluten-Free Recipes Made from Real, All-Natural Ingredients (2015)
cakes
basic yellow cake
IN OUR FAMILY, birthday celebrations are fairly ritualized. I have always made birthday cakes from scratch, with a candle for each year and “one to grow on.” Yes, I even make them for my own birthday, because who doesn’t need an excuse to eat cake? The first birthday after beginning a gluten-free diet was my younger son, Marty’s. That year, Marty was way into snowboarding and wanted a cake that looked like a snowboard jump. Okay, that didn’t seem too hard since a few slip-ups could easily make my cake look like a jump when covered with white icing. I worked for days to get the right balance of loft and moisture, and while I produced a really tasty, moist cake, it had a sinking tendency. No problem, as my friend said, “it just gives you more spaces to fill with icing,” which is what I ultimately did.
As I learned more about gluten-free baking I figured out how to fix my sinking cake problem (more eggs, less fluid) and I became interested in working with coconut flour. This naturally sweet and highly absorbent flour makes the lightest, moistest, and most flavorful yellow cake. It is the perfect platform for any type of icing.
makes one 9-inch 2-layer cake
1½ cups sugar
½ cup canola oil
1 cup sour cream
6 large eggs
1 cup (112g) coconut flour
1 cup (140g) tapioca starch
1 teaspoon baking powder
½ teaspoon baking soda
2 teaspoons vanilla extract
Basic Vanilla Buttercream Frosting (optional, recipe follows)
1. Position an oven rack in the center of the oven and preheat to 350°F. Generously grease two 9-inch cake pans and line with rounds of parchment paper.
2. In a large bowl, with a hand mixer, blend the sugar, oil, sour cream, and eggs. Beat the batter for approximately 4 minutes.
3. In a separate bowl, stir together the coconut flour and tapioca starch. Gradually beat them into the egg mixture. Beat several more minutes, making sure to scrape down the sides. Allow the batter to rest for 5 minutes to let the mixture thicken. Add the baking powder, baking soda, and vanilla, mixing them thoroughly into the batter.
4. Fill the cake pans approximately two-thirds full with batter. Bake for 30 to 35 minutes, or until the cake pulls away from the sides of the pan and the center springs back when touched. Allow the cake layers to cool in the pans on a cooling rack for 10 minutes before turning them out onto a piece of parchment paper on the cooling rack to cool completely before frosting.
basic vanilla buttercream frosting
makes enough to frost one 9-inch 2-layer cake
There are many variations of this classic vanilla buttercream frosting. My favorite is made with a combination of coconut oil and butter. I think it adds a natural sweetness from the coconut that pairs well with the delicate taste of coconut flour in the Basic Yellow Cake. Coconut oil has a low melting point, however, and becomes liquid on a hot summer day, so it is best used in colder temperatures. Icing consistency is a matter of preference, and I suggest that you add the cream 1 tablespoon at a time. If you find your icing is still thicker than you would like, try adding additional cream (or milk) in teaspoon increments. The flavor of this basic frosting can be changed by simply changing the flavor extract.
8 tablespoons salted butter
½ cup coconut oil (or ½ cup palm oil solid shortening, such as Spectrum)
2 teaspoons vanilla extract
1 pound (464g) powdered sugar
2 tablespoons heavy (whipping) cream
1. In a bowl, with a hand mixer, cream the butter and coconut oil until well blended. Add the vanilla and stir to combine. Add the powdered sugar 1 cup at a time, beating well between additions. At this point the frosting will be stiff and dry.
2. Begin adding the cream 1 tablespoon at a time, beating the frosting on high until the icing is light and creamy. If necessary, put the frosting in the refrigerator for a few minutes if it becomes too soft from the mixing.
carrot cake
THE FIRST CARROT CAKE I ever tasted was sent to me by my sister, Lynn, during my first week of college. Because my birthday falls at the end of August, it was the first of my life away from home. It was a touching gesture by my sister. It was also a chance to try out a really cool way she had read about to ship a cake to someone—smother it in popcorn, not those clingy Styrofoam things, but fresh, air-popped popcorn. She baked and iced the cake with a delicious cream cheese frosting, packed it up and sent it to New Orleans, where despite the heat and humidity it arrived in perfect shape. Since that time, I’ve always associated carrot cakes with birthdays. For Tom’s last birthday, he requested a cake with no caffeine (so no chocolate), and it seemed to me to be the perfect occasion for a carrot cake.
This is a pretty foolproof, moist, and delicious cake—the hardest and most time-consuming part is shredding the carrots. Since oranges are featured prominently in this cake, the recipe calls for both baking soda and baking powder, which interact with the acid in the oranges to produce a good rise. The combination of orange pulp and carrots is unbeatable for the flavor and texture it produces.
makes one 9-inch 2-layer cake
1 cup (140g) tapioca starch
1⅓ cups (160g) light buckwheat flour
1 teaspoon ground cinnamon
1 teaspoon baking powder
½ teaspoon baking soda
1½ cups sugar
4 large eggs
½ cup canola oil
¼ cup orange juice
1½ cups shredded carrots
½ cup orange pulp (see Note)
Cream Cheese Frosting (recipe follows)
1. Position an oven rack in the center of the oven and preheat to 350°F. Generously grease two 9-inch cake pans and line with rounds of parchment paper.
2. In a large bowl, blend together the tapioca starch, buckwheat flour, cinnamon, baking powder, and baking soda.
3. In a separate bowl, with a hand mixer, beat together the sugar and eggs. Beat in the oil and then add the dry ingredients, 1 cup at a time. Beat in the orange juice. Then beat in the carrots and orange pulp. Beat the batter for 2 additional minutes. Divide the batter between the two pans.
4. Bake the cakes for 35 minutes. Allow the cakes to cool in the pans for 10 minutes before turning them out onto cooling racks to cool completely before frosting.
NOTE: Orange pulp is the by-product of juicing an orange in a juicer. If you don’t have any orange pulp lying around, you can substitute 1 tablespoon grated orange zest with ⅓ cup orange juice. Another alternative is adding the same amount of crushed, drained pineapple. Pineapple produces a different flavored cake, but carrots and pineapple are also a tasty and moisture-retaining combination.
cream cheese frosting
makes enough to frost one 9-inch 2-layer cake
This is a basic sweet and velvety cream cheese icing that pairs well with any type of cake, including red velvet and carrot, to name a couple. A tablespoon of freshly grated orange zest adds a distinctive counterpoint to the sweetness of the frosting.
4 tablespoons salted butter
8 ounces cream cheese
2 teaspoons vanilla extract
1 tablespoon grated orange zest
3 cups powdered sugar
In a bowl, with a hand mixer, cream the butter and cream cheese. Beat in the vanilla and orange zest. Beat in the powdered sugar 1 cup at a time until the frosting is smooth and fluffy.
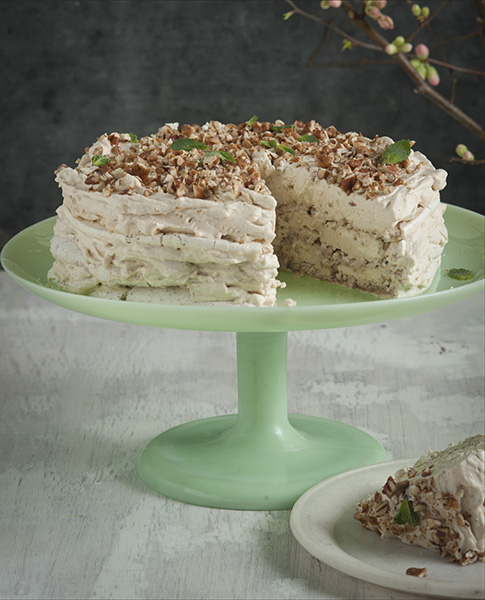
Bourbon-Laced Kentucky Derby Cake
bourbon-laced kentucky derby cake
WHEN MY SISTER, LYNN, and her husband, Joe, lived aboard their 40-foot sailboat, Sunshine, sailing from the Caribbean to the tip of Maine, it didn’t take much for an excuse to have a party—like the running of the Kentucky Derby. My sister created this cake for just such an occasion, and it was such a sensation that the next year a guest showed up wearing a homemade hat that looked just like it.
Meringue cakes provide a nice, light follow-up to any dinner. This cake is inspired by the mint julep, the official Kentucky Derby drink, combining the crunchy sugar of the meringue with a hint of bourbon and a mint garnish. The recipe illustrates how eggs alone can provide a flourless structure for a rich and showy cake. Note also how the meringue is prepared; beating the egg whites to the soft peak stage before adding any sugar provides the meringue with greater stability and loft. Do not let the lengthy recipe be off-putting. Every step is very forgiving and the result is a stunning 5-star restaurant-quality dessert.
makes one 8-inch 3-layer cake
¾ cup pecans
¾ cup powdered sugar
4 large egg whites
1 tablespoon granulated sugar
1 cup heavy (whipping) cream
¼ cup packed dark brown sugar
8 ounces cream cheese
1 ounce bourbon
Fresh mint, for garnish
1. Trace and cut out three 8-inch-diameter rounds of parchment paper.
2. In a heavy-bottomed skillet, toast the pecans over medium heat for several minutes, stirring to keep them from scorching. Remove them from the heat when they just start to turn brown. Transfer the toasted pecans to a bowl and allow them to cool.
3. Coarsely chop ¼ cup of the toasted pecans, place them in a small bowl, and set aside to use as a decoration.
4. Transfer the remaining ½ cup toasted pecans to a food processor and coarsely chop. Add the powdered sugar and pulse until the nuts are uniformly covered and any lumps have been reduced to powder. Do not overprocess.
5. In a bowl, with a hand mixer, beat the egg whites on high until soft peaks form. Gradually add the granulated sugar and continue beating until glossy and stiff peaks form. Fold in the pecan and powdered sugar mixture, taking care not to deflate the meringue.
6. Position the oven racks in the upper and lower thirds of the oven and preheat to 225°F.
7. Fill a 1-gallon sealable plastic bag with the meringue and expel most of the air. Snip ¼ inch off one of the corners. Place a round of parchment paper on a cutting board and pipe one-third of the meringue onto the parchment round starting at the center and spiraling outward until you are within ½ inch of the edge of the round. Try to create a continuous layer without overlapping the piping; you can fix any holes using the back of a spoon. Slide the parchment paper and lining onto a baking sheet. Repeat this process two more times until you have three layers on 2 baking sheets.
8. Bake the meringue layers for 1½ hours. Turn off the oven and allow the layers to cool in the oven without opening the oven door, about 1 hour. Gently peel off the parchment paper. Store the layers in an airtight container if not using immediately.
9. In a medium bowl, with a hand mixer, whip the cream until it reaches the stiff peak stage.
10. In a medium bowl, and using the same beaters, cream the brown sugar, cream cheese, and bourbon until the brown sugar is no longer granulated and the cream cheese is whipped. Fold the whipped cream into the cream cheese mixture.
11. To assemble the cake, place a layer on a cake plate, flat side down. Spread one-third of the cream cheese filling over the layer. Do not frost the sides. Add a second layer, check for evenness, and spread another one-third of the filling. Add the third layer, this time with the flat side up, and spread with the final third of the filling. Sprinkle the top of the cake with the reserved chopped pecans and garnish with several sprigs of mint.
12. Refrigerate the cake for no longer than 1 hour for crisp layers. The filling and meringue will meld for a delicious effect if the cake is refrigerated longer. Slice with a serrated knife.
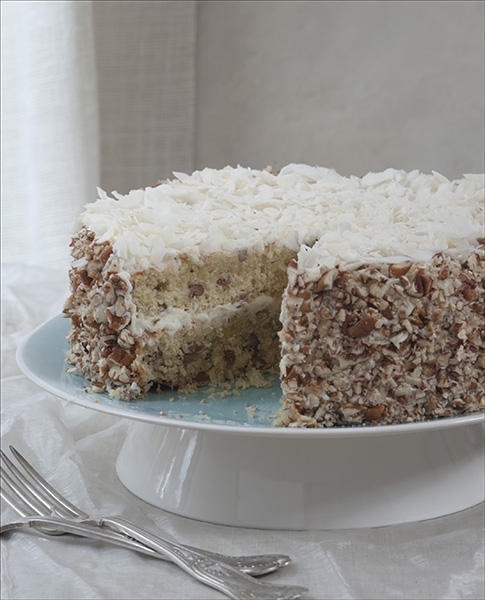
Italian Cream Cake
italian cream cake
IN OUR EIGHTH YEAR OF BUSINESS, many of the original employees who began Against The Grain with us still work here. It was a really big deal when the first employee reached the one-year mark. I made a cake for the occasion, and we sat around the table in the break room and celebrated his anniversary. I had no idea at the time that I was establishing a tradition. For several years thereafter, I baked a unique gluten-free cake from scratch for each person’s anniversary. Then we started growing so fast that I was baking cakes all the time, and I couldn’t keep up.
But any event is always a good excuse to bake a cake. I’m not sure where I got the idea for this Italian cream cake, but I knew I wanted to make a cake with coconut, toasted pecans, and cream cheese icing. Unlike many Italian cream cakes, this one does not contain buttermilk. Rather, it includes sour cream, which works extremely well in gluten-free cakes to add tenderness and retain moisture. Like buttermilk, sour cream is acidic, so it also optimizes the leavening effect of the baking soda. The addition of coconut oil reinforces the taste of the toasted coconut, and the overall Italian-ness of the cake is enhanced by the amaretto liqueur.
makes one 9-inch 2-layer cake
FOR THE CAKE:
1 cup chopped pecans
8 tablespoons salted butter
⅓ cup coconut oil
2 cups granulated sugar
4 large eggs, separated
1 cup sour cream
½ cup amaretto liqueur
1 cup (140g) tapioca starch
1⅓ cups (160g) light buckwheat flour
1 teaspoon baking powder
½ teaspoon baking soda
½ cup unsweetened shredded coconut
FOR THE FROSTING AND GARNISH:
8 ounces cream cheese
6 tablespoons salted butter
1 pound powdered sugar
2 tablespoons amaretto liqueur
1 cup chopped pecans
½ cup unsweetened shredded coconut
1. Make the cake: In a heavy-bottomed skillet, toast the pecans over medium heat for several minutes, stirring to keep them from scorching, until they are lightly browned (or bake on a baking sheet for about 7 minutes in a 350°F oven, stirring several times). Set aside.
2. Position an oven rack in the center of the oven and preheat to 350°F. Generously grease two 9-inch cake pans and line with rounds of parchment paper.
3. In a bowl, with a hand mixer, cream the butter, coconut oil, and sugar. Add the egg yolks, sour cream, and amaretto. Add the tapioca starch and buckwheat flour gradually until they are well blended. Beat in ¼ cup water to thin the batter, then beat in the baking powder and baking soda. Fold in the pecans and coconut by hand. Set the batter aside.
4. In a clean bowl with clean beaters, beat the egg whites until stiff peaks form. Gently fold the whites into the batter and divide the batter between the cake pans.
5. Bake for 35 to 40 minutes, or until the cake layers are set and spring back when touched in the center. Allow the cakes to cool in the pans for 15 minutes before turning them out on a parchment-lined cooling rack. Cool the layers completely before frosting.
6. Make the frosting: In a bowl, with a hand mixer, cream the cream cheese and butter. Gradually beat in the powdered sugar, alternating with the amaretto (1 tablespoon at a time). Frost the cake as desired. For garnish, press chopped pecans into the sides of the cake and sprinkle the top with the coconut.
variations
For a festive summer cake, add coarsely chopped cherries instead of the coconut garnish between the cake layers and on top of the icing.
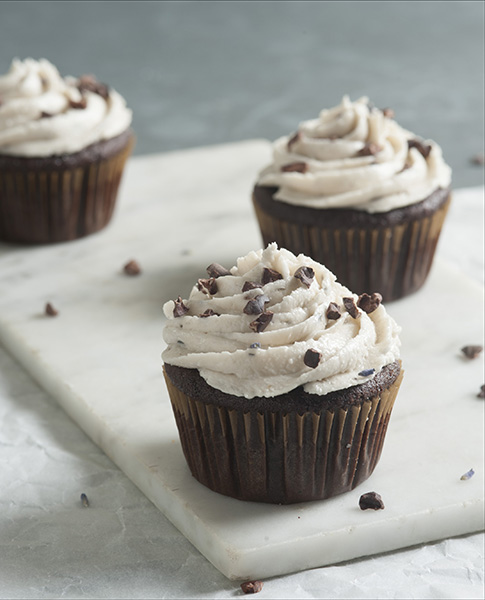
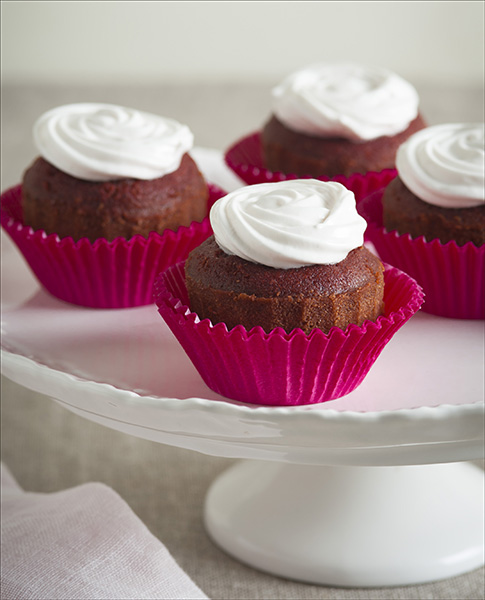
Cocobean Cupcakes
cocobean cupcakes
I’M NOT SURE whether it is a curse or an asset, but I have a very sensitive sense of smell. When I was a child, the milkman delivered the milk once a week in clear glass bottles, and I used to drive my parents nuts at the dinner table because I would announce that the milk smelled sour to me. My siblings regarded me as the canary in the coal mine, and none of them would touch their glass of milk after my declaration. So I totally understand when wheat-eaters taste some gluten-free products and declare they taste “weird.”
I must confess that I approached this recipe with a great deal of trepidation. For some time I had been reading about black beans as a “secret” ingredient in cakes, cookies, and breads. I first tried a black bean brownie recipe many people raved about. It was pretty good, but the chocolate taste was a tad dull, and the texture was kind of dense and chalky. But my breakthrough was pairing the black beans with coconut oil. Coconut oil, which by itself has a distinctive taste, enhances the chocolate flavor, and its mouthfeel and aroma alter your taste perception of the high-fiber black beans. For simple, gluten-free chocolate cupcakes, I always use this recipe.
makes 10 to 12 cupcakes![]()
⅓ cup coconut oil
1 can (15 ounces) black beans, drained and rinsed
½ cup unsweetened cocoa powder
4 large eggs
1 cup sugar
½ teaspoon baking soda
White Chocolate Lavender Icing (recipe follows)
1. Position an oven rack in the center of the oven and preheat to 350°F. Line 12 cups of a standard muffin tin with paper liners (for taller cupcakes, line 10 instead of 12).
2. In a food processor, blend the coconut oil and beans until they are smooth and creamy. Blend in the cocoa powder. The batter will become stiff.
3. Blend in the eggs and sugar until the sugar crystals dissolve. The batter will become very creamy and look just like chocolate pudding. Scrape down the sides frequently as you blend. Blend in the baking soda.
4. Spoon the batter into the muffin cups until they are two-thirds full. Bake the cupcakes for 30 minutes, until the tops are set and firm. The cupcakes will rise about ½ inch above the paper liner. Allow the cupcakes to cool completely on a cooling rack before icing.
white chocolate lavender icing
makes enough to frost 12 cupcakes ![]()
This is a white icing with a hint of chocolate provided by chocolate extract. It is a light and refreshing topping for the Cocobean Cupcakes, the Decadent Chocolate Cake, or the Basic Yellow Cake. The cacao nibs provide an interesting contrast to the slight floweriness of the icing and add a surprising crunch.
3 tablespoons vegetable shortening (such as Spectrum All Vegetable Shortening)
1 cup powdered sugar
1 teaspoon chocolate extract (such as Nielsen-Massey)
1 teaspoon dried lavender blossoms
1 to 2 teaspoons cacao nibs, for garnish (or substitute chocolate sprinkles)
1. In a bowl, with a hand mixer, cream the vegetable shortening, powdered sugar, and chocolate extract.
2. Beat in the dried lavender and continue beating until the frosting is smooth. Add 1 teaspoon of warm water at a time until you reach a spreadable consistency.
3. After frosting your cupcakes, garnish with cacao nibs.
Red Velvet Cake
red velvet cake
I’VE NEVER DECIDED whether it is the “red” or the “velvet” of Red Velvet Cake that makes it so alluring. When I was growing up in the South, it was considered the queen of all cakes. Most often, though, it was a disappointing devil’s food cake mix with ounces of red food coloring. Being a whole-foods, bake-from-scratch kind of person, I decided to make a naturally colored version from beets (which would also help retain the cake’s moisture). Instead of buttermilk, which is an acidic ingredient in many red velvet recipes, I sought to make this a dairy-free red velvet cake using coconut milk.
My first version of this recipe came out very tasty but hardly red velvet—it was perfectly chocolate in color. I then learned that beets have a reddish hue because they contain the plant pigment betanin (or beetroot red) which is sensitive to pH, temperature, and light. When baked in a red velvet cake, the acidic pigment is neutralized by an alkaline compound like baking soda and loses its color. But I couldn’t totally eliminate the chemical leavener—so I used baking powder, which balances the acidity but still leavens the cake, and added lemon juice to significantly increase the acidity. I made this final version into cupcakes and brought them to work for the staff on Valentine’s Day. They were iced with Simple Boiled White Icing, and the crumb was reddish-mahogany. One of my staff members, a self-proclaimed red velvet cake expert who insists on it for every birthday, deemed the cupcakes his best red velvet cake yet.
makes one 9-inch 2-layer cake or 20 cupcakes ![]()
1 can (15 ounces) whole beets, drained and blotted with paper towels
1½ cups sugar
½ cup canola oil
6 large eggs
1 cup (112g) coconut flour
1 cup (140g) tapioca starch
¼ cup unsweetened cocoa powder
½ cup full-fat coconut milk
1 teaspoon baking powder
3 tablespoons lemon juice
2 teaspoons vanilla extract
Simple Boiled White Icing (recipe follows)
1. Position an oven rack in the center of the oven and preheat to 350°F. Grease two 9-inch cake pans and line them with rounds of parchment paper. (Or grease 20 cups of 2 standard muffin tins or line with paper liners.)
2. Puree the beets in a food processor until they reach the consistency of applesauce.
3. In a large bowl, with a hand mixer, blend the sugar, oil, pureed beets, and eggs. Beat for approximately 4 minutes.
4. In a separate bowl, combine the coconut flour, tapioca starch, and cocoa. Gradually add the dry ingredients to the egg mixture and beat until fully blended, making sure to scrape down the sides. Add the coconut milk and thoroughly incorporate it into the batter. Beat in the baking powder, lemon juice, and vanilla, mixing them thoroughly into the batter.
5. Spoon the batter into the cake pans (or muffin cups). Bake for 28 minutes (or 22 to 25 minutes for cupcakes), or until the center of the cakes or muffins spring back when touched. Transfer to a cooling rack and let cool completely before icing.
simple boiled white icing
makes enough to frost one 9-inch 2-layer cake or 20 cupcakes ![]()
This is your basic fat-free icing, a recipe that has been around since my grandmother’s time. You can make it chocolate-flavored by adding ¼ cup cocoa powder and increasing the sugar by ¼ cup and the water by 1 tablespoon. It is a very neutral and dairy-free icing that would highlight the colors and flavors of red velvet and chocolate cakes alike.
1 cup sugar
2 large egg whites
1½ teaspoons vanilla extract
¼ teaspoon cream of tartar
1. In a saucepan, stir together the sugar and ⅓ cup water and heat over medium heat until the sugar is dissolved and the mixture comes to a boil. Boil the mixture uncovered for 3 minutes (or to 240°F if you have a candy thermometer). Remove the pan from the heat.
2. In a medium bowl, with a hand mixer, beat the egg whites on high until soft peaks form. Beating constantly, gradually add the sugar syrup. Stiff peaks will form after about 7 minutes.
3. Beat in the vanilla and cream of tartar last. The cream of tartar will stabilize the egg white foam.
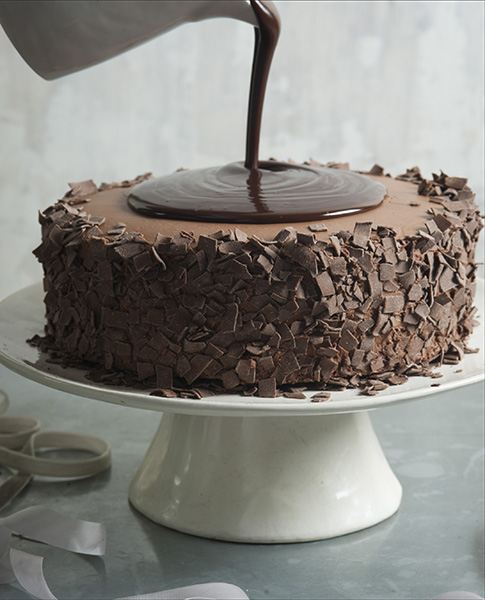
Decadent Chocolate Cake
decadent chocolate cake
FOR MY TWENTY-FIRST BIRTHDAY in New Orleans, my husband, Tom, gave me a cornstalk dracaena plant. When we left New Orleans and moved to Philadelphia, the plant weathered the trip just fine, and four more moves after that. It grew and flourished until it was 12 feet tall and smashed against the ceiling of our Brooklyn brownstone. Tom outdid that present when he baked a cake for my fiftieth birthday: a rich, two-layer chocolate cake with a buttery chocolate ganache, topped by an insanely chocolaty glaze. No one had ever baked me such a wonderful cake.
Once we began following a gluten-free diet, that cake became the “gold standard” by which I measured all gluten-free cakes. I am happy to report that this cake finally measures up; it is a rich and moist cake in which the sensuality of the chocolate is the star. I have now baked it for all kinds of occasions and people uniformly tell me that it may be the best chocolate cake they have ever eaten. Who cares if it is gluten-free … it’s chocolate. I just may have to strategically place the recipe somewhere obvious for my next birthday.
makes one 9-inch 2-layer cake or 20 cupcakes
1 cup (160g) brown rice flour
⅓ cup (64g) potato starch
1 cup (140g) tapioca starch
⅔ cup unsweetened cocoa powder
1 teaspoon baking soda
1⅔ cups sugar
4 large eggs
½ cup canola oil
⅔ cup orange juice
Chocolate Buttercream Ganache and Chocolate Glaze (recipe follows)
1. Position an oven rack in the center of the oven and preheat to 350°F. Generously grease two 9-inch cake pans and line with rounds of parchment paper. (Or grease 20 cups of 2 standard muffin tins or line with paper liners.)
2. In a separate bowl, blend the flours, cocoa powder, and baking soda. Set aside.
3. In a large bowl, with a hand mixer, cream the sugar and eggs. Beat in the oil, then add the dry ingredients, 1 cup at a time. Add the orange juice, and beat the batter for 2 minutes. Spoon the batter equally into the baking pans or muffin cups.
4. Bake the cake layers for 25 minutes (18 to 22 minutes for cupcakes) until the center of the cakes spring back when pressed. Allow the cakes to cool in the pans for 10 minutes before turning them out onto cooling racks. Cool the cakes completely before icing.
chocolate buttercream ganache and chocolate glaze
makes enough to frost one 9-inch 2-layer cake or 20 cupcakes
The cooled cake is first iced with the chocolate ganache, then the chocolate glaze is poured over the top. As the glaze cools, it finishes the cake with a silky smooth, semisolid topping.
FOR THE GANACHE:
4 ounces dark chocolate, chopped into small pieces
8 tablespoons salted butter
1 tablespoon heavy (whipping) cream
2 teaspoons vanilla extract
2 cups powdered sugar
FOR THE GARNISH AND GLAZE:
1 cup chocolate shavings, for garnish
1 cup (240g) semisweet chocolate chips
4 tablespoons salted butter
¼ cup amaretto or coffee liqueur
1. Make the ganache: In a heatproof bowl set in a skillet, heat the dark chocolate over medium heat until it is just melted. Remove the bowl from the skillet and allow the chocolate to cool for 5 minutes.
2. By hand, stir the butter and cream into the melted chocolate, then stir in the vanilla. Using a hand mixer, beat in the powdered sugar until the ganache is smooth and creamy.
3. Ice the bottom layer of the cake with the ganache. Then put on the top layer and ice the sides. The ganache left for the top will make a thin layer, but the glaze will cover the top. Press the chocolate shavings into the sides of the cake while the ganache is still soft.
4. Make the glaze: In a heatproof bowl set in a skillet, heat the chocolate chips over medium heat until they are just melted. Remove the bowl from the skillet. Quickly stir in the butter and then the liqueur, stirring until completely blended.
5. While the glaze is still warm and liquid, pour it on the top of the cake. Smooth it to the edges if necessary.
wedding cake
MEMORIES OF OUR WEDDING are mostly a blur, but I’ll never forget the collective gasp of our guests when we cut into the cake and it was—drumroll—chocolate, not a very traditional cake for an East Coast wedding in the early 1970s. I also remember my going-away outfit, a pair of white denim short-shorts. As we ran through a rain of rice I heard some guests tut-tutting!
Here I’ve perfected a recipe for an entirely gluten-free wedding cake, and not just the easy-to-make top layer. This recipe will feed all your guests—not counting the top layer, which will be saved for the bride and groom’s first anniversary. Getting married is a joyous occasion for all, and so there is no need to get stressed out over dietary requirements. Having a cake that is safe for dietary-restricted guests and tastes great for everyone is just what you need. This gluten-free wedding cake delivers on both accounts. People often ask me if we make wedding cakes (we don’t), and though there are a growing number of regular bakeries that make custom gluten-free cakes, it is always a bit dicey to ensure that there is no cross-contamination with regular flours. This recipe isn’t for a whopping 500-pound, 4-foot-tall gluten-free wedding cake like Chelsea Clinton’s, but it won’t cost you as much as hers did either.
makes one 3-tiered (6-layer) wedding cake (enough for 100 guests)
I based this gluten-free wedding cake on the Basic Yellow Cake and consulted Wilton’s Wedding Cake Data Chart on their excellent site (www.wilton.com). Careful planning has to go into how much cake batter you can realistically make at a time, how you apportion that batter into the cake pans, the baking times, and the capacity of your home oven.
In order to create a 3-tiered cake, you need to use 3 different cake pan sizes (each 2 inches deep) and bake 2 layers for each size; you will be baking a total of 6 layers.
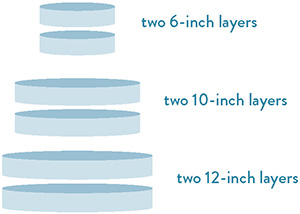
Basically, you will be baking the 6 layers in 4 separate batches in order to fit the pans in the oven. I have outlined below a plan that works with the dimensions of a home oven. (I have also included a recipe for the full amount of batter required to make the cake in the event that you or someone making the cake has access to professional baking equipment.) The completed, un-iced cake will weigh almost 22 pounds.
FOR ONE BATCH:
3 cups sugar
1 cup canola oil
2 cups sour cream
12 large eggs
2 cups (224g) coconut flour
2 cups (280g) tapioca starch
2 teaspoons baking powder
1 teaspoon baking soda
4 teaspoons vanilla extract
FOR ALL LAYERS:
12 cups sugar (about 5.3 pounds)
4 cups canola oil
8 cups sour cream (about 4.2 pounds)
48 large eggs
8 cups (896g) coconut flour (about 2 pounds)
8 cups (1,120g) tapioca starch (about 2.5 pounds)
2 tablespoons plus 2 teaspoons baking powder
1 tablespoon plus 1 teaspoon baking soda
⅓ cup vanilla extract
BAKE PLAN ORDER (each batch will produce about 10 cups of batter):
Batch 1: 6 × 2-inch round pan and 10 × 2-inch pan
Batch 2: 12 × 2-inch round pan
Batch 3: 6 × 2-inch round pan and 10 × 2-inch pan
Batch 4: 12 × 2-inch round pan
WEDDING CAKE BAKING TABLE
|
PAN |
BATTER |
USE HEATING CORE |
TIME AT 325°F |
TOTAL COOLING TIME BEFORE REMOVING FROM PAN |
|
6 × 2-inch round |
2 cups |
no |
40-44 min |
15 min |
|
10 × 2-inch round |
6 cups |
yes |
45-49 min |
20 min* |
|
12 × 2-inch round |
9 cups |
yes |
48-52 min |
25 min* |
|
*Remove the heating core after 10 minutes of cooling time and unmold the cake plug inside the core. |
||||
1. Position an oven rack in the center of the oven and preheat to 325°F. Prepare the baking pans by greasing them well with butter and tracing the bottoms to cut out two sets of parchment paper rounds for each pan size. Place the parchment paper round in the bottom of the greased pan.
2. In a large bowl, with a hand mixer, blend the sugar, oil, sour cream, and eggs. Beat the batter for 4 minutes.
3. In a separate bowl, blend the coconut flour and tapioca starch together and gradually add them to the egg mixture. Beat 2 more minutes, making sure to scrape down the sides. Allow the batter to rest for 5 minutes. The mixture will thicken as the coconut flour absorbs the liquid.
4. Beat in the baking powder, baking soda, and vanilla, mixing them thoroughly into the batter.
5. Ladle the batter into the pans. Fill the pans approximately two-thirds full using the table as a guide. (There will be leftover batter; save it to make cupcakes.) When using the heating core, fill it just over halfway full and place it in the very center of the pan before ladling the batter around it.
6. Bake the pans according to table Bake Plan Order, removing each layer from the oven after the prescribed baking time in the Baking Table. The layers are done when the center springs back when touched.
7. Allow the cake(s) to cool in the pan on a cooling rack for the listed amount of time before turning out of the pan onto a piece of parchment paper on the cooling rack to cool. (You may need to use an inverted pizza pan to cool the 12-inch layers if you don’t have a rack large enough.) Cool the cake completely before icing. The un-iced layers will freeze and thaw well, if desired.
8. Wash and dry the pans, then re-grease them for the next batch.
9. Refer to the Wilton site for the icing recipes of your choice and detailed instructions on how to level, ice, and assemble your layers into tiers.
NOTE: This is one cake where having specialty baking equipment on hand helps. You will need a heating core to use in the 10-inch and 12-inch pans. A heating core is a cone-shaped insert that is placed in the center of the cake pan and filled with batter. It is used to distribute the heat evenly over the entire layer. Without a heating core, you run the risk of having the bottom and edges brown before the center is baked. Heating cores are available online or at cake decorating stores.
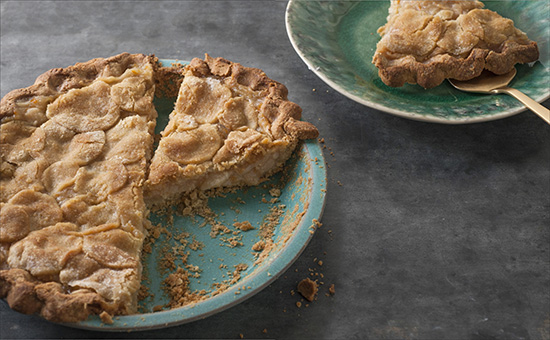
a fruitcake to be proud of
EVERY CHRISTMAS EVE it is a Vermont Public Radio tradition to have the author Willem Lange read his story Favor Johnson. It’s about fruitcakes and small-town Vermont life. After gagging on a “fancy, boxed fruitcake” given to him by a flatlander doctor who saves his beloved hound, Hercules, Favor declares, “Pfah! I can do better’n that!” The old-time Vermont farmer shows his gratitude by baking and distributing homemade fruitcakes every Christmas to his entire town. It is such a Vermont story!
I’ve always thought that fruitcake gets unjustly maligned. Sure, we’ve all politely choked down dry fruitcake, used fruitcake gifts as doorstops, or eaten fruitcake with so much candied fruit that it made our teeth hurt. But fruitcake from a good recipe, in my opinion, can’t be beat. This fruitcake is mostly about holding high-quality dried fruit together with just enough flour, butter, and sugar to make it a loaf. I added Triple Sec, an orange liqueur, for flavoring, but I also make some versions in which I use a homemade lavender liqueur (vodka, lavender blossoms, and sugar). Subtle variations in flavorings like these take an ordinary fruitcake and make it outstanding. I encourage you play around with the flavorings of your choice.
makes two 8-inch loaves
1 cup chopped dates
1 cup raisins
1 cup chopped apricots
1 cup chopped prunes
1 cup dried cranberries
1 cup chopped dried pineapple
¾ cup (105g) tapioca starch
¾ cup (90g) light buckwheat flour
1½ teaspoons baking powder
1 teaspoon ground allspice
3 large eggs
8 tablespoons salted butter
3 tablespoons unflavored, unsweetened apple butter
½ cup packed brown sugar
½ cup granulated sugar
½ cup Triple Sec (or orange juice, for a nonalcoholic version)
1 teaspoon vanilla extract
1. Position an oven rack in the center of the oven and preheat to 300°F. Grease two 4½ × 8-inch loaf pans.
2. Combine all the fruits in a large bowl and toss with the tapioca starch, buckwheat flour, baking powder, and allspice until completely coated.
3. In a separate bowl, with a hand mixer, beat the eggs and butter until smooth. Add the apple butter, sugars, Triple Sec, and vanilla and beat until well blended.
4. Pour the batter over the fruit mixture and toss until fully combined. The flours will thicken the liquid somewhat. Divide the batter between the loaf pans.
5. Bake for 1½ hours, or until a toothpick inserted in the center comes out clean. Allow the loaves to cool fully in the pans before turning them out and wrapping them individually in foil. Store long-term in the refrigerator or freezer.
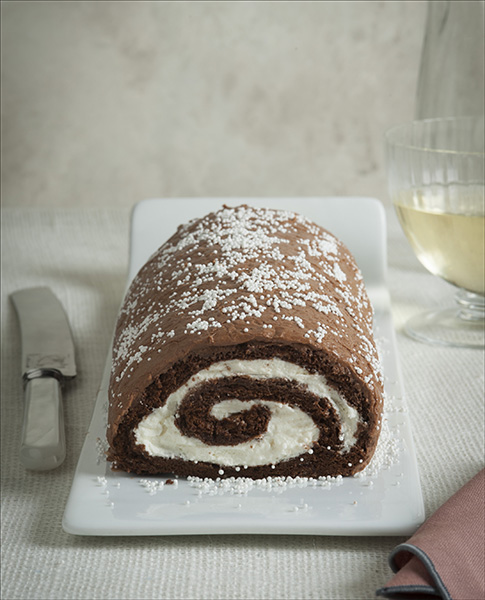
Flourless Chocolate Sponge Roll
flourless chocolate sponge roll
CAKE AND ICING GO TOGETHER. The best part of my birthday as a child was that I always got the piece of cake with the rose, or whatever extra icing decoration adorned the top. Growing up, we only had cake on birthdays, so I still remember some of them quite well. One I have never forgotten was a train cake that my mom made for my brother Martin for his sixth birthday. The boiler part of the train was a sponge roll cake smothered with coconut. That was my first sponge roll cake, and I couldn’t believe there was a cake with icing in every bite, with a cake-to-icing ratio of 1:1.
Sponge cakes need to be both delicate and robust at the same time—moist and spongy, yet flexible enough to roll without cracking. I’ve been trying all my gluten-free life to perfect a light sponge that would roll with ease. This flourless sponge roll was yet another attempt at making a flexible sponge, but this time I was attracted by the idea of a flourless cake. In this recipe, the cocoa powder serves as the flour and lots of eggs provide the structure and make it easy to roll; balsamic vinegar stabilizes the egg whites. The icing seals in the flavor and keeps the sponge cake tender and moist. I call it my “experimental” birthday cake—cake with icing and amaretto-flavored whipped cream in every bite. You can’t go wrong with that!
makes one 10-inch roll cake
FOR THE SPONGE CAKE:
6 large eggs, separated
¼ cup plus 2 tablespoons granulated sugar
½ cup powdered sugar
¼ cup unsweetened cocoa powder
3 tablespoons canola oil
1 teaspoon vanilla extract
3 drops balsamic vinegar
FOR THE FILLING:
1 pint heavy (whipping) cream
2 tablespoons granulated sugar
2 teaspoons amaretto liqueur
FOR THE ICING AND GARNISH:
4 tablespoons salted butter
⅓ cup unsweetened cocoa powder
2 cups powdered sugar
2 tablespoons amaretto liqueur
4 tablespoons milk
2 tablespoons white nonpareils (optional)
1. Make the sponge cake: Position an oven rack in the center of the oven and preheat to 325°F. Butter a 10 × 15-inch rimmed baking sheet and line it with parchment paper.
2. In a large bowl, with a hand mixer, beat together the egg yolks and ¼ cup of the granulated sugar. Beat in the powdered sugar, cocoa powder, canola oil, and vanilla.
3. In a separate bowl, with clean beaters, beat the egg whites until soft peaks form. Add the vinegar and remaining 2 tablespoons granulated sugar and beat until glossy and stiff peaks form. Fold the egg white mixture into the yolk mixture and barely blend.
4. Lightly spread the batter in the pan. Bake the cake for 15 minutes. The cake will be puffy and deflate some as it cools. Remove the baking pan from the oven and cover the cake with a damp tea towel. Let the cake cool completely.
5. Make the filling: With a clean bowl and clean beaters, whip the cream, adding the granulated sugar and amaretto after it reaches soft peaks. Continue whipping the cream until it is thick and close to a butter consistency.
6. Remove the sponge cake on the parchment paper from the baking sheet. Use a spatula to spread the filling evenly over the sponge cake.
7. Using the parchment paper, gently roll up the log, peeling back the parchment paper as you roll. Position the roll seam side down on the baking sheet. Use two wide spatulas to transfer the roll to a serving platter.
8. Make the icing: In a clean bowl with clean beaters, beat together the butter, cocoa powder, powdered sugar, and amaretto until smooth. Add the milk 1 tablespoon at a time until you reach a spreadable consistency.
9. Ice the log, sprinkle with the nonpareils (if using), and put it in the refrigerator to cool for 1 hour before serving.
brazilian roll cake (rocambole)
I’VE ALWAYS BEEN INTERESTED IN BRAZILIAN FOOD, particularly because tapioca is a staple in many Brazilian diets. This rolled sponge cake is a Brazilian favorite. It is traditionally filled with either guava marmalade or dulce de leche, a rich, caramelized milk sauce made from boiled-down condensed milk. Rocambole, unlike other sponge cakes (see Flourless Chocolate Sponge Roll), is based on a batter that begins with whipped egg whites, to which the other ingredients are added. In other sponge cake recipes, the egg whites are folded in last to prevent them from being deflated and to create a light and airy batter.
It is believed that this cake originated during the colonization of northeastern Brazil by the Portuguese, who brought with them a very thin-layered roll cake, or bolo de rolo. Although the Portuguese traditionally filled their cake with nuts, in Brazil they began filling it with a sweetened guava spread because of the abundance of guava and sugar factories. The rocambole layers are much thicker than the paper-thin layers of the bolo de rolo. And instead of equal proportions of sugar, butter, flour, and eggs, the rocambole is made with far more eggs and water rather than butter. The resulting cake has somewhat fluffier or spongier layers and resembles more what we would think of as a jelly roll.
serves 8 ![]()
5 large eggs, separated (see Note)
5 tablespoons granulated sugar
5 tablespoons tapioca starch (or 3 tablespoons tapioca starch and 2 tablespoons light buckwheat flour)
½ teaspoon baking powder
1 cup Coconut Dulce de Leche (recipe follows) or guava or quince jelly
Powdered sugar, for dusting
1. Position an oven rack in the center of the oven and preheat to 350°F. Grease a 10 × 15-inch rimmed baking sheet and then line with parchment paper.
2. In a bowl, with a hand mixer, beat the egg yolks until they are light and fluffy. Beat 5 tablespoons water into the egg yolks. Set aside.
3. In a large bowl, with clean beaters, beat the egg whites on high until soft peaks form. Beat in the granulated sugar until the mixture is glossy and stiff peaks form. The whites should double in volume.
4. Add the egg yolk mixture to the egg whites and beat well. Sprinkle the tapioca starch and baking powder on the top of the batter. Using a rubber spatula, fold in the flours without deflating the eggs. Lightly spread the batter in the pan.
5. Bake the cake for 18 minutes, or until the cake is golden brown and springs back when touched. Make sure the edges are loose by running a sharp knife along the edges of the baking sheet.
6. While it is still warm, lift the entire cake and parchment paper up and place it on a cutting board. Spread the dulce de leche on the cake and roll it up, peeling back the parchment paper as you roll it. Place the cake seam side down on a serving platter. Sprinkle the cake lightly with powdered sugar to serve.
NOTE: Egg whites that have been at room temperature for at least 30 minutes will increase at least sixfold in volume over cold egg whites when whipped.
coconut dulce de leche
makes 1 cup ![]()
This versatile gluten-free and dairy-free sauce can be used with sponge cakes, ladyfingers, and chocolate confections. Adapted from a Bon Appétit magazine recipe, it pairs particularly well with bananas, and makes an excellent ice cream topping. Make the sauce ahead of time and store it in the refrigerator for several weeks.
1 can (13.5 ounces) full-fat unsweetened coconut milk (such as Native Forest Organic)
½ cup (100g) coconut palm sugar
¼ teaspoon salt
1. Measure all the ingredients into a 12-inch skillet. Stir them together over medium heat until the sugar dissolves.
2. Bring the sauce to a boil (vigorous bubbling over the entire surface). Allow the sauce to boil uncovered for 15 minutes, stirring it several times to check the consistency. This process should reduce the volume to 1 cup and thicken the sauce. Remember, the sauce will seem thinner when hot.
3. Pour the sauce into a heatproof glass container and allow it to cool at room temperature for 30 minutes. Cover and refrigerate the sauce until needed.

Mohnstrudel
mohnstrudel
WHEN DOROTHY and the Cowardly Lion fall asleep in a field of poppies on their way to the Emerald City, they’re soundly snoozing surrounded by the featured ingredient in this strudel: poppy seeds (Mohn means poppy in German). Mohnstrudel is a traditional rolled cake filled with a thick, sweet poppy seed filling that has been around since the eighteenth century in Austria and Hungary. I first learned about Mohnstrudel at the 2012 America’s Best Raisin Bread Contest, where one individual’s entry was a Mohnstrudel with raisins.
Poppy seeds are very aromatic, but their taste is often lost when we simply sprinkle them as seed toppings on breads, rolls, and bagels. In this sweet poppy seed filling, you can actually taste the poppy seeds; the filling is sweet and fragrant, with the characteristic crunch. I added a small amount of rum to bring out the flavor of the poppy seeds and raisins, but you may substitute another teaspoon of vanilla extract instead. The contrast of the black filling against the yellow strudel is both attractive and yummy-looking.
makes two 12-inch strudels
FOR THE POPPY SEED FILLING:
½ cup milk
2 tablespoons rum
¼ cup golden raisins
¾ cup poppy seeds
½ cup sugar
2 tablespoons salted butter
1 teaspoon vanilla extract
1 tablespoon honey
2 tablespoons lemon juice
FOR THE DOUGH:
1½ cups (210g) tapioca starch, plus ¾ cup (105g) for kneading in
1 cup (120g) light buckwheat flour, plus ½ cup (60g) for kneading in
½ cup milk
4 tablespoons salted butter
1 teaspoon salt
¼ cup plus 1 teaspoon sugar
1 tablespoon active dry yeast
3 large egg yolks
½ cup sour cream
1. Make the filling: In a small bowl, whisk together the milk and rum. Stir the raisins and poppy seeds into the liquid. Let them soak for 1 hour.
2. In a food processor, combine the soaked poppy seed mixture and sugar and process for about 5 minutes, or until the poppy seeds and raisins are chopped up.
3. Transfer the poppy seed mixture to a medium saucepan and add the butter, vanilla, honey, and lemon juice and bring to a slow boil, stirring frequently. Allow it to boil for 5 minutes. Remove from the heat and cool for 10 minutes, then refrigerate to continue cooling while you make the dough.
4. Make the dough: Clean out and dry the food processor and measure the 1½ cups tapioca starch and 1 cup buckwheat flour into the work bowl.
5. In a saucepan, combine the milk, butter, salt, and ¼ cup of the sugar and bring to a boil. Immediately pour the hot mixture into the food processor and pulse until the dough is completely combined. This will happen very quickly, and the dough will have a texture like hot icing. Allow it to cool for 20 minutes.
6. Meanwhile, in a small bowl, combine the yeast, remaining 1 teaspoon sugar, and ¼ cup warm water and allow it to proof for 15 minutes.
7. Whisk the egg yolks and sour cream into the yeast mixture until they are well blended. Pour the combined mixture over the dough in the food processor and process until the dough is smooth.
8. Transfer the dough to a medium bowl, cover with plastic wrap, and allow it to rise for 45 minutes. It will thicken some and double in size.
9. Using a rubber spatula, work in the ¾ cup tapioca starch and ½ cup light buckwheat flour. Let the dough rest for another 30 minutes to absorb the additional flour.
10. Divide the dough in half and roll each half out into a 12 × 10-inch rectangle on a piece of parchment paper dusted with tapioca starch. The dough should not be so sticky that it won’t roll. If it is, dust it with a little tapioca starch. Divide the poppy seed filling in half and spread each rectangle with the filling to within 1 inch of the edges. Butter a 9 × 13-inch baking dish.
11. Pull up on the parchment paper and use it to roll the dough, starting at one of the longer ends, until you have a log 3 to 4 inches in diameter and 12 inches long. Trim the parchment paper around the log and transfer the log on the paper to the baking dish. Set the two logs seam side down and side by side in the baking dish. Cover the logs with plastic wrap and allow them to rise for 45 minutes.
12. Meanwhile, position an oven rack in the center of the oven and preheat to 350°F.
13. Unwrap and bake the loaves for 35 minutes, or until golden brown. Transfer the loaves on the parchment paper to a cooling rack.
NOTE: The greatest challenge here is creating a tender, moist bread that can be rolled out, yet retains its shape. This is accomplished by creating a well-hydrated dough that is given ample time to rest, absorb the liquids, and rise. Dry flour is kneaded in after the dough is fully hydrated to allow you to roll the dough into its signature poppy seed spiral. This dough also has a tendency to spread and flatten as it rises and bakes. To produce more rounded loaves, bake them in a 2-channel baguette pan lined with parchment paper.

Sour Cream Coffee Cake
sour cream coffee cake
I REMEMBER HOW LOST I WAS when my family members were first diagnosed with celiac disease, so I find it one of the most rewarding aspects of my job to teach about the science of gluten-free baking—introducing newbies to gluten-free flours and how proteins and starches create structure. Just at the point that their heads may be swimming with all the facts, I whip out my hand mixer and show them how to bake their knowledge into a cake.
This sour cream cake is the cake we make together to put all the information into action. Just as in the cooking shows on television, we go through the work of making the cake, and when we are done discussing how the process and ingredients come together in this recipe, we all have a piece of an already finished cake. I see the “Aha, I get it” looks on their faces. They may go home and bake this coffee cake for breakfast or dessert for the next month, but I know that I have made their lives easier. This recipe illustrates the fundamentals of gluten-free baking so well, and it is a really good, simple cake. It can be made with a mixture of gluten-free flours, or simply by measuring out a multipurpose gluten-free mix like the one made by King Arthur.
makes one 9-inch Bundt cake
FOR THE CINNAMON SWIRL:
2 teaspoons ground cinnamon
2 tablespoons salted butter
3 tablespoons sugar
FOR THE CAKE:
¾ cup (120g) brown rice flour
1 cup plus 2 tablespoons (157g) tapioca starch
1 teaspoon baking soda
1 teaspoon baking powder
1 cup sugar
4 large eggs
1 cup sour cream
1 teaspoon vanilla extract
½ cup canola oil
1. Position an oven rack in the center of the oven and preheat to 350°F. Grease a 9-inch Bundt pan with butter.
2. Make the cinnamon swirl: In a small bowl, combine the cinnamon, butter, and sugar. Blend until fully incorporated. Set aside.
3. Make the cake: In a medium bowl, whisk together the rice flour, tapioca starch, baking soda, and baking powder.
4. In a large bowl, with a hand mixer, cream the sugar and eggs until they are well aerated and light yellow. By hand, stir in the sour cream, vanilla, and oil until the mixture is well blended. Fold in the dry ingredients until they are fully moistened.
5. Pour two-thirds of the batter into the Bundt pan. Sprinkle the cinnamon swirl filling on the batter. Top the cake with the remaining batter.
6. Bake for 40 to 45 minutes, or until the top springs back when lightly pressed. Allow the cake to cool in the pan for 5 minutes before turning it out (top side down) onto a parchment-lined cooling rack.
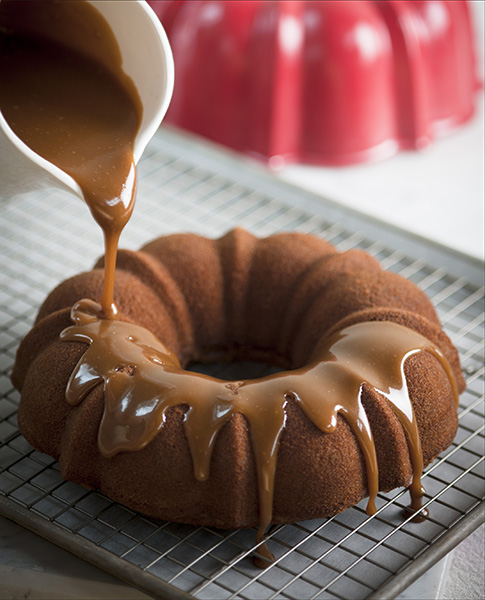
Applesauce Cake with Brown Sugar Caramel Glaze
applesauce cake with brown sugar caramel glaze
MY FAVORITE CAKE growing up was an applesauce cake—and the reason I probably liked the cake so much is that it was the only cake I ever had as a child that was made from scratch. Cake mixes were introduced as convenience foods in the 1920s, and though the mixes didn’t produce a knock-off of a homemade cake, they were touted as modern conveniences for saving time. The biggest obstacle for manufacturers of early cake mixes was how to incorporate shortening in a boxed mix; but that changed in 1947 when Beatrice Creamery Company patented a powdered shortening. By the 1960s, cake mix advertisements touted a “wonderful new way to pre-cream” ingredients with “a new rich creamy shortening.” Fast-forward to today and there are just about as many varieties of cake mixes as there are models of cars. You can even buy a basic applesauce cake mix, with 46 ingredients and enriched with factory vitamins, dough conditioners, and food coloring to make it all look normal and appetizing, and not even a single real spice. One of the biggest benefits of having to eat a gluten-free diet is that you can gracefully step off the packaged food carousel.
This applesauce cake recipe is shamefully simple: pretty much flour, sugar, eggs, oil, and applesauce with leaveners and spices. This cake is sweet enough to serve with a simple dusting of cinnamon and powdered sugar, but the Brown Sugar Caramel Glaze makes it even more special. It also freezes and thaws nicely, so it is always a nice backup cake to have in the freezer.
makes one 9-inch Bundt cake
FOR THE CAKE:
¾ cup (120g) brown rice flour
1 cup plus 2 tablespoons (157g) tapioca starch
¼ cup (48g) potato starch
1 teaspoon baking powder
1 teaspoon baking soda
¾ teaspoon ground cinnamon
½ teaspoon ground allspice
½ teaspoon ground ginger
¼ teaspoon ground cloves
1 cup granulated sugar
4 large eggs
½ cup canola oil
1 cup unsweetened applesauce
¼ cup apple cider
FOR THE BROWN SUGAR CARAMEL GLAZE:
4 tablespoons salted butter
½ cup packed brown sugar
⅓ cup heavy (whipping) cream
½ teaspoon vanilla extract
1. Make the cake: Position an oven rack in the center of the oven and preheat to 350°F. Grease a 9-inch Bundt pan with butter.
2. In a medium bowl, blend the rice flour, tapioca starch, potato starch, baking powder, baking soda, and spices.
3. In a large bowl, with a hand mixer, beat together the sugar and eggs. Beat in the oil and applesauce. Beat in the dry ingredients, 1 cup at a time. Add the apple cider and beat the batter for 2 minutes.
4. Spoon the batter into the Bundt pan and bake for 50 to 55 minutes, until the top springs back when touched and the cake pulls away from the sides.
5. Allow the Bundt pan to cool enough so that you can handle it, then turn the cake out, top or flat side down, onto a parchment-lined cooling rack. Allow the cake to cool for about 30 minutes. It will still be warm.
6. Make the glaze: In a medium saucepan, bring the butter, brown sugar, cream, and vanilla to a boil. Once it reaches a boil, allow it to boil for 3 minutes. Remove it from the heat.
7. Pour the glaze on the cake while both are still slightly warm. The cake may be served warm or cooled to room temperature.
harvey wallbanger cake
A HARVEY WALLBANGER CAKE was the first cake I made as an adult and brought to a party, and people went nuts over it. Now a retro drink, Harvey Wallbangers were popular in the 1960s and were made from vodka, orange juice, and Galliano liqueur. Actually, I’ve never tasted the drink, but at the time, to a twenty-something-year-old, it looked like a classy cake. The manufacturers of Galliano describe their secret recipe as “a medieval elixir of herbs, plants, roots, barks, spices and flower seeds” with 30 herbs, spices, and plant extracts. To say the least, it makes a unique-tasting cake.
The original recipe called for a package of instant vanilla pudding. It is not easy to make substitutions for instant puddings since they are “instant” because they contain modified food starches that have unique gelling properties. However, by increasing the proportion of tapioca starch relative to the other flours and increasing the amount of potato starch, these two starches can be used to the same effect. The starches retain moisture as well as contribute to a tight, velvety smooth crumb. This cake is plenty sweet and is served without any icing or glaze.
makes one 9-inch Bundt cake ![]()
¾ cup (120g) brown rice flour
1¼ cups (175g) tapioca starch
¼ cup (48g) potato starch
½ cup canola oil
1¼ cups sugar
4 large eggs
1 cup orange juice
¼ cup Galliano liqueur
1. Position an oven rack in the center of the oven and preheat to 350°F. Grease a 9-inch Bundt pan.
2. In a large bowl, with a hand mixer, blend together the rice flour, tapioca starch, and potato starch. Add the oil, sugar, eggs, orange juice, and Galliano and beat on high until well blended, about 2 minutes.
3. Spoon the batter into the Bundt pan and bake for 35 minutes, or until the top springs back when touched and the cake pulls away from the sides. Allow the cake to cool in the pan for 10 minutes and then turn it out onto a cooling rack. Cool to room temperature to serve.
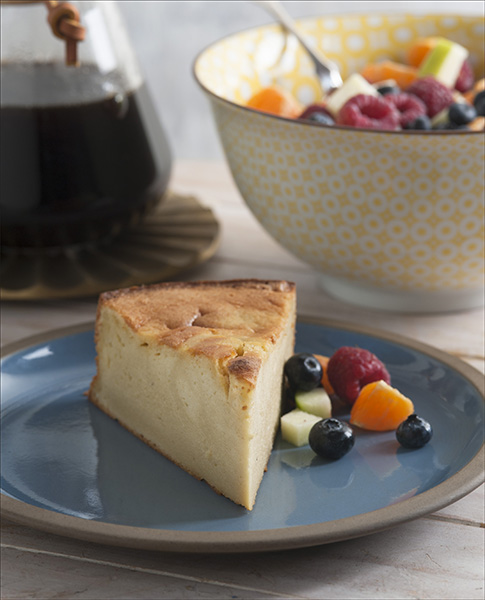
Cashew “Cheesecake”
cashew “cheesecake”
SOMETIMES MY HUSBAND, TOM, AND I eat dessert for breakfast. It’s not that we wake up craving sugar; we wake up craving this creamy cheesecake—it is without a doubt my favorite dessert recipe in this book. There are some desserts that are probably far better for you than a bowl of cereal, and this cashew “cheesecake” is one of them. Made from only a few ingredients and no refined sugar, it is a sweet, protein-filled dessert that keeps us going most of the day.
With almost four times the starch content of most tree nuts, cashews meld with water and are highly effective as a thickener. Cashews are also lower in fat than most other nuts; their oil content is similar to that of heart-healthy olive oil. This is one dessert that you too will be eating for breakfast, and not just because it tastes so darn good.
makes one 9-inch cake ![]()
2 cups raw cashews
4 large eggs, separated
⅛ teaspoon cream of tartar
½ cup maple syrup
½ cup coconut cream (skimmed from the top of a 13.5-ounce can of full-fat coconut milk)
2 teaspoons vanilla extract
1. To make the cashew “cheese,” combine the cashews and 1 cup water in a food processor or high-speed blender and process until silky smooth (see Note). (Blend in several batches if you are having difficulty attaining a smooth texture.)
2. Position an oven rack in the center of the oven and preheat to 375°F. Grease the bottom and sides of an 8- or 9-inch springform pan with coconut oil.
3. In a medium bowl, with a hand mixer, beat the egg whites until stiff peaks form, adding the cream of tartar near the end. Set aside.
4. In a separate bowl, with the hand mixer, beat the maple syrup and yolks together. Add the cashew cheese and beat it until light and foamy; add the coconut cream and vanilla and beat for 2 minutes. Gently fold in the egg whites by hand.
5. Pour the batter into the pan and bake for 55 minutes, or until the center of the cake is set and the top is lightly browned. Allow the cake to cool for 10 to 15 minutes on a cooling rack before releasing the sides of the springform pan. Use a sharp knife to gently loosen the sides if you find they are sticking. Chill the cheesecake completely, preferably overnight, before serving.
NOTE: If you want to increase the cheese’s tanginess, add either 2 teaspoons lemon juice or 4 capsules acidophilus.
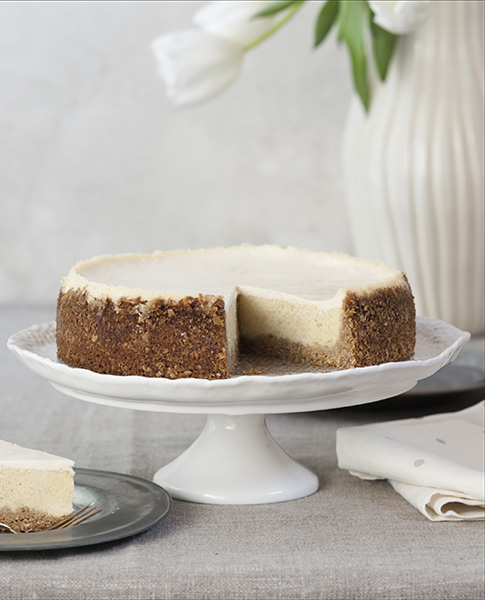
lavender ricotta cheesecake with lemon curd
MY MOM was part of the wave of Italian immigrants who urbanized Brooklyn and settled in multifamily homes along Flatbush Avenue. She grew up there in the 1920s and ′30s when the Dodgers ruled Ebbets Field, and you could go to Nathan’s in Coney Island and buy a frankfurter, hamburger, or roast beef sandwich for 5 cents. For years, I heard her rave about “Brooklyn cheesecake,” so when we moved to Brooklyn in 1981, one of the first eating establishments we visited was Junior’s to sample their famous cheesecake. Although Brooklyn cheesecake is synonymous with Junior’s, my mom insisted that Junior’s cream cheese-based cheesecake is not the cheesecake of her youth. To her, real cheesecake is made with ricotta cheese. I finally understood that my mom’s memories were of classic Italian cheesecake, not New York cheesecake.
The combination of ricotta cheese and sour cream is astoundingly light and flavorful. There is no need to put a crust on this one. I finished this cheesecake with a homemade lemon curd, which plays extremely well with the lavender and ricotta. This one is for you, Mom, and I do believe that this may be the best cheesecake I have ever eaten.
makes one 10-inch cheesecake
FOR THE CHEESECAKE:
4 large eggs, separated
1 cup sugar
15 ounces full-fat ricotta cheese
½ cup sour cream
½ teaspoon salt
1 teaspoon lemon extract
2 teaspoons dried lavender
FOR THE LEMON CURD:
4 tablespoons salted butter
¾ cup sugar
2 large eggs
Grated zest of 2 lemons
¼ cup lemon juice
¼ teaspoon salt
1. Position an oven rack in the center of the oven and preheat to 375°F. Generously butter the bottom and sides of a 10-inch springform pan.
2. Make the cheesecake: In a bowl, with a hand mixer, beat the egg whites until stiff and shiny peaks form.
3. In a separate bowl, with the hand mixer, cream the sugar and egg yolks. Add the ricotta and beat it until it is light and foamy. Add the sour cream, salt, lemon extract, and lavender, and beat for an additional 2 minutes. Gently fold in the egg whites by hand, a portion at a time.
4. Pour the batter into the springform pan and place the pan on the center rack. Put a baking sheet on the rack under the cheesecake in case of leakage. Bake the cake for 1 hour, or until the center of the cake is set and the top is lightly browned. Remove the cake from the oven and let it cool for 10 to 15 minutes on a cooling rack before releasing the sides of the springform pan. Use a sharp knife to gently loosen the sides if you find the cheesecake is sticking to the pan. Allow the cake to cool fully—as the cake cools, the center will sink, leaving a higher rim around the edges (the sunken center will contain the lemon curd).
5. Make the lemon curd: In a bowl, with a hand mixer, cream the butter and sugar. Add the eggs, lemon zest, lemon juice, and salt. Pour the mixture into a medium saucepan and heat over low heat, stirring constantly for about 4 minutes, or until the mixture starts bubbling and thickens. Watch the curd closely since it is easy to scorch the bottom of the pan. Pour the thickened curd into a heatproof glass bowl and allow it to cool for 20 minutes.
6. Pour the lemon curd into the depression on the top of the cheesecake. Chill the cheesecake completely, preferably overnight, before serving.
Fresh Banana Cheesecake
fresh banana cheesecake
SOME OF MY FAVORITE COOKBOOKS are Junior League cookbooks. The Junior League is one of the oldest and largest women’s volunteer organizations, with over 150,000 members in four countries. These are women who are civic leaders, tireless volunteers … and often really good cooks and hostesses.
I discovered this recipe for Fresh Banana Cheesecake in The Junior League Centennial Cookbook, a compilation of over 750 regional recipes. This one came from the Junior League of Honolulu cookbook, Another Taste of Aloha. What caught my eye was not the fresh bananas but the oatmeal crust, calling for rolled oats, butter, brown sugar, and chopped pecans. I modified it to be more consistent with the tropical theme: I toasted the oats and substituted toasted coconut for the pecans and coconut oil for the butter. I was stunned by how well it paired with the filling and how beautifully it rose up inside the springform pan. Believe me, this is a cheesecake that will draw stares and leave mouths watering. It requires 24 hours in the refrigerator to realize its full flavor potential, but we could only wait until it was barely chilled. As is the case with many cheesecakes, it was even better the next day.
makes one 9-inch cheesecake
FOR THE CRUST:
1½ cups rolled oats
1 cup unsweetened shredded coconut
½ cup packed brown sugar
¼ cup coconut oil
FOR THE FILLING:
2 8-ounce packages cream cheese
1 cup mashed ripe bananas (about 2 large)
¾ cup granulated sugar
2 tablespoons Kirsch (or lemon juice, for a nonalcoholic version)
4 large eggs
FOR THE TOPPING:
1 cup sour cream
2 tablespoons granulated sugar
1 teaspoon vanilla extract
1. Make the crust: Position an oven rack in the center of the oven and preheat to 350°F. Measure the oats and coconut onto a baking sheet and toast for 12 minutes. Set the pan aside to cool. Leave the oven on.
2. Transfer the oats and coconut to a food processor and pulse the mixture 4 to 5 times until it is coarsely chopped. Add the brown sugar and coconut oil. Blend it until the dough is fully moistened.
3. Using your fingers, press the crust into the bottom and ½ inch up the sides of a deep 9-inch springform pan (the crust will rise up along the sides of the pan as the cheesecake filling bakes and expands). The crust will not pack tightly, but will be sort of loose and crumbly.
4. Prebake the crust for 15 minutes. Allow it to cool completely. Leave the oven on.
5. Make the filling: In a large bowl, with a hand mixer, beat together the cream cheese, bananas, granulated sugar, and Kirsch until well blended and smooth. Beat in the eggs one at a time. Continue beating the filling until it is smooth and creamy and there are no lumps of cream cheese.
6. Pour the filling into the crust and bake the cheesecake for 55 minutes.
7. Meanwhile, make the topping: About 5 minutes before the cake is done, in a small bowl, beat together the sour cream, granulated sugar, and vanilla until well blended.
8. Remove the cheesecake from the oven, pour the topping over the cake and smooth it to the edges. Return the cheesecake to the oven and bake for 10 more minutes.
9. Remove the cheesecake from the oven and allow it to cool for 15 minutes. Loosen the sides of the springform pan, using the blade of a sharp knife to release the cake, and remove the ring. Cool the cake at room temperature for 1½ hours. Cover the cake with plastic wrap and refrigerate overnight before serving. The longer the banana melds into the filling, the creamier and more flavorful the cake becomes.
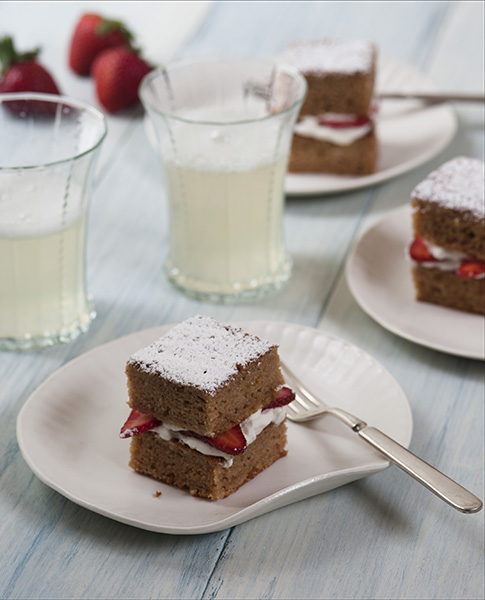
biscuit shortcake
MY BEST FRIEND growing up was from a family of nine children. Her father had retired from the federal government to become a gentleman farmer, and his passion was strawberries. They grew acres upon acres of strawberries, and every one of her siblings who was old enough to handle a hoe had a summer job weeding, maintaining, and planting more strawberry beds. Living right down the road from their farm was such a treat—fresh-picked strawberries every day for nearly a month. As far as I’m concerned there is no fresh fruit as tasty as a sun-ripened strawberry, still warm from the sun and just plucked from the plant. Now I have my own strawberry patch, a small one, and the Vermont strawberry season is fleeting. But it really feels like summer has finally arrived when we pick our first berries and make strawberry shortcake.
Unlike my dad, who insisted on Bisquick, I like several kinds of shortcake. Sometimes it is biscuit-like with a hint of honey. Other times, I enjoy sweeter and simpler homemade sponge shortcake. You don’t have to worry about making tough biscuits unlike wheat-based shortcake. This shortcake is a bit more involved than Bisquick’s “90 seconds from package to oven,” but not much more. Even my dad might have agreed that these were just as good or better than his old standard.
makes 8 biscuits
1½ cups (180g) light buckwheat flour
1¼ cups (175g) tapioca starch
1 teaspoon baking soda
3 large eggs, separated
½ cup sugar
3 tablespoons salted butter
¼ cup light cream
1 tablespoon honey
1 teaspoon almond extract
1. Position an oven rack in the center of the oven and preheat to 375°F. Line a baking sheet with parchment paper.
2. In a bowl, combine the buckwheat flour, tapioca starch, and baking soda until they are fully blended. Set aside.
3. In another bowl, beat the egg whites on high until stiff and shiny peaks form. Set aside.
4. In a medium bowl, with the mixer, cream the sugar and butter until light and fluffy. Beat in the egg yolks, light cream, honey, and almond extract until light and foamy. By hand, stir in the flour mixture until it is completely moistened. Gently fold in the egg whites until they are fully incorporated.
5. Turn the sticky biscuit dough out onto plastic wrap dusted with tapioca starch. Dust your hands and the top of the dough with tapioca starch to handle, and gently pat down the dough to about ¾ inch thick and cut out biscuits. Reroll the scraps into biscuits, as necessary.
6. Use the plastic wrap to transfer the biscuits to the baking sheet. The biscuits will flatten and spread some as they bake, so place them 1 inch apart on the baking sheet.
7. Bake the biscuits for 18 minutes, or until they are lightly browned. Transfer to a cooling rack.
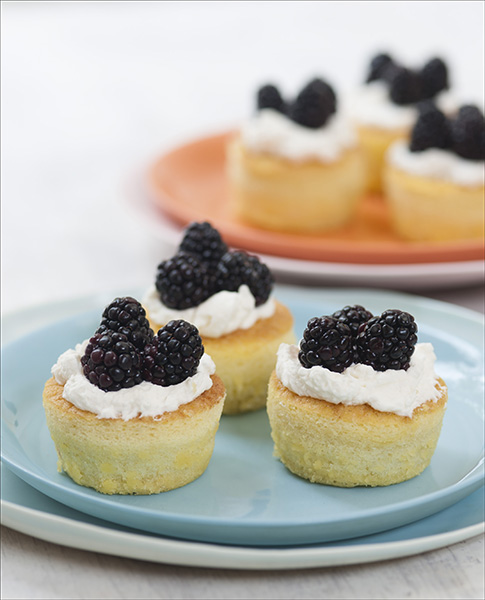
Sponge Shortcakes
sponge shortcakes
THIS IS ABOUT THE EASIEST and most versatile shortcake you can make. It is definitely sweeter and richer than the traditional shortcake, but it freezes and thaws extremely well. This shortcake also can be used as a platform for many other desserts in the same way that you might use ladyfingers. It holds up well to juicy strawberries and is ideal for soaking up simple syrups and liqueurs.
makes 8 medium or 16 small shortcakes
1 cup sugar
8 tablespoons salted butter
1 teaspoon almond extract
4 large eggs
1 cup (140g) tapioca starch
1 teaspoon baking powder
½ teaspoon salt
1. Position an oven rack in the center of the oven and preheat to 375°F. Grease eight 2½-inch individual brioche molds (or 16 cups of 2 standard muffin tins for smaller cakes) with salted butter.
2. In a bowl, with a hand mixer, cream the sugar and butter. Beat in the almond extract. Beat in the eggs, one at a time, until the mixture is light and fluffy. Beat in the tapioca starch, baking powder, and salt until they are fully moistened.
3. Spoon the batter into the individual brioche molds (or muffin tins), filling them up about halfway.
4. If using brioche molds, place the filled molds on a baking sheet. Bake the shortcakes for 18 minutes. The shortcakes will initially rise way up, then fall back as they continue to bake, creating a depression in the center. (This is the “well” that you fill with berries when preparing berry shortcake.)
5. Transfer the individual molds (or muffin tins) to a cooling rack. Allow them to cool enough that you can handle the molds. Gently turn the shortcakes out onto a parchment-lined cooling rack. You may need to use a butter knife to loosen the edges around the fluting of the molds. Allow them to cool completely before assembling the shortcakes.
Fresh Strawberry Cake
fresh strawberry cake
ABOUT A FIFTH OF OUR SUMMER GARDEN is my strawberry patch. The first year the plants produced fruit, but some chipmunks had a strawberry festival one night and cleaned out the entire patch. Luckily, this past year there were strawberries in abundance, so much so that we couldn’t keep up with them. We ate strawberries for breakfast, strawberry shortcake for dessert, and I finally decided to make a fresh strawberry cake.
There are tons of recipes for strawberry cake using Jell-O, but hardly any with fresh strawberries. The reason may be that strawberries weep when they come in contact with sugar because of osmosis: a higher concentration of sugar on the outside of the berries draws out their internal moisture. Making a strawberry cake without sugar obviously doesn’t work, so I use highly absorbent coconut flour combined with tapioca starch to soak up and thicken any extra strawberry juice. The result is a beautifully colored, fragrant cake that is sweet, yet not soggy. The sour cream pairs extremely well with the strawberries, creating a cake with a strawberries ’n’ cream flavor. This strawberry cake can be iced with Cream Cheese Frosting, Simple Boiled White Icing, or Basic Vanilla Buttercream Frosting.
makes one 9-inch 2-layer cake or 20 to 24 muffins
1 cup fresh strawberries
1½ cups sugar
½ cup canola oil
½ cup sour cream
5 large eggs
1 cup (112g) coconut flour
1 cup (140g) tapioca starch
1 teaspoon baking powder
½ teaspoon baking soda
2 teaspoons vanilla extract
1. Position an oven rack in the center of the oven and preheat to 350°F. Generously grease two 9-inch cake pans and line with rounds of parchment paper. (Or line 20 to 24 cups of 2 standard muffin tins with paper liners.)
2. In a food processor, puree the strawberries until they are smooth. Set aside.
3. In a large bowl, with a hand mixer, blend the sugar, oil, sour cream, and eggs. Beat the mixture for approximately 4 minutes.
4. In a separate bowl, blend the coconut flour and tapioca starch. Gradually add the dry ingredients to the egg mixture and beat until fully blended, scraping down the sides as necessary. Add the strawberry puree and beat for 2 minutes. Let the batter rest for 5 minutes for the flours to absorb the liquid.
5. Beat in the baking powder, baking soda, and vanilla, mixing them thoroughly into the batter. Ladle the batter into the pans (or muffin cups) until they are two-thirds full.
6. Bake for 40 minutes (27 to 28 minutes for cupcakes), until the tops spring back when touched. Allow the cakes to cool in the pans for 10 minutes, then turn them out onto cooling racks. Cool the cakes completely before icing.

Madeleines
madeleines
MADELEINES ARE SMALL, buttery French teacakes baked in a shell shape. Good madeleines are hard to come by in this country, great ones are rare, and gluten-free ones are virtually nonexistent. Traditionally made with nothing but flour, sugar, butter, and eggs, great madeleines are a perfect example of an artisan baker’s passion for the finest ingredients and attention to detail. If you want great madeleines, you need to bake them yourself. Although you don’t have to bake madeleines in their molds (you could use mini muffin tins), without them you won’t get the delicate shell-shaped teacakes textured on one side with the characteristic hump on the other.
This recipe—adapted from Annemarie Conte’s recipe for an authentic madeleine in the New York Times—bears a similarity to Julia Child’s recipe in From Julia Child’s Kitchen. Julia would be upset with a few liberties I took, including using baking powder in this recipe, but she never had to bake gluten-free. But she would be pleased that I adopted her technique for preparing the molds by painting them with a mixture of melted butter and flour. To achieve the classic madeleine hump, the batter is refrigerated to harden the butter, which produces a higher rise.
makes 12 madeleines
½ cup plus 2 tablespoons sugar
½ cup (60g) light buckwheat flour
⅓ cup (50g) tapioca starch
½ teaspoon baking powder
2 large eggs
½ teaspoon orange extract
7 tablespoons salted butter, melted and cooled
For the madeleine pan: 1½ tablespoons melted butter, 2 teaspoons light buckwheat flour, 1 teaspoon tapioca starch
1. In a large bowl, stir together the sugar, buckwheat flour, tapioca starch, and baking powder. Slowly stir in the eggs and orange extract until all the flour is moistened. Add the melted butter and stir gently until the butter is evenly mixed throughout the batter. Cover and refrigerate the batter for at least 1 hour.
2. Position an oven rack in the center of the oven and preheat to 400°F. To prepare the madeleine pan, stir together the 1½ tablespoons melted butter, 2 teaspoons buckwheat flour, and 1 teaspoon tapioca starch. Using a small pastry brush, paint the insides of the molds, as well as a thin margin around the molds.
3. Spoon about 1 tablespoon of batter into each mold. (It will seem underfilled, but it will spread on its own to fill the mold.)
4. Bake the madeleines for 15 minutes, or until the edges of the madeleines turn golden brown and the rounded top springs back when lightly touched. Using a butter knife, gently release the madeleines from the molds and cool, rounded side down, on a cooling rack. The outsides will crisp slightly as they cool.
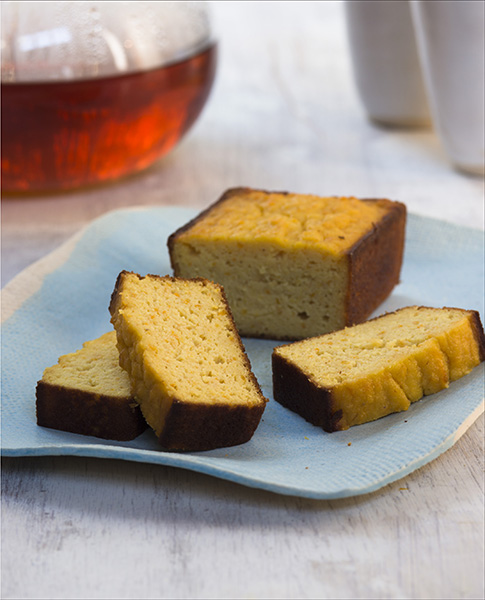
Mini Orange Teacakes
mini orange teacakes
LAST YEAR, I GAVE MY HUSBAND, TOM, a juicer for his birthday, and I surprised him by making fresh orange juice for breakfast. It was our first juicer and, honestly, I had no idea it would produce so much pulp. Just before I whisked the pulp away to the compost bucket, I decided I was going to make an orange pulp-based baked good. Mini Orange Teacakes were the result.
For a while Starbucks offered an individually wrapped gluten-free Valencia Cake that was discontinued after several months in favor of a shelf-stable gluten-free offering. The ingredients included eggs, Valencia orange pulp, almonds, and sugar, in addition to flavorings and leavening agents. This is a similar orange cake, although it is based on coconut flour rather than almonds and is lighter and less calorically dense. It is a moist and tender cake, perfect with coffee and tea. And I’ve given you instructions here for making your own orange pulp, in case you don’t have juicer pulp to spare. (Though if you do happen to have orange pulp, substitute 1 cup of pulp plus ¼ cup orange juice for the homemade pulp and skip step 1.)
makes 8 teacakes ![]()
2 juice oranges
1 cup powdered sugar
¼ cup coconut oil
6 large eggs
½ cup (56g) coconut flour
1 teaspoon baking powder
1. To make the orange pulp, wash the oranges and cover them with water in a medium saucepan. Bring the water to a boil and simmer for 15 minutes. Remove the pan from the heat, run the oranges under cold water, and coarsely chop them, making sure to remove any seeds. Transfer the oranges to a food processor and blend them until smooth. Set aside.
2. Position an oven rack in the center of the oven and preheat to 350°F. Generously grease 8 mini-loaf pans.
3. In a bowl, with a hand mixer, beat together the powdered sugar and coconut oil until well blended. Add the eggs and beat on high until light and fluffy, about 2 minutes.
4. Add the orange pulp and beat an additional 2 minutes. Beat in the coconut flour and allow the batter to absorb for 5 minutes. Beat in the baking powder.
5. Spoon the batter into the prepared loaf pans. Bake the cakes for 35 minutes, or until the centers spring back and the cakes are lightly browned around the edges. Allow the cakes to cool for about 10 minutes in the pans, then turn them out onto a platter to continue cooling.