DIY Nut Milks, Nut Butters, and More (2014)

If you have certain dietary limitations (such as being gluten- or dairy-free), finding an affordable store-bought ice cream can be almost impossible—and very expensive. Here’s a good alternative: make scrumptious frozen treats in the comfort of your own home. Most of these recipes require an ice cream machine, which will pay for itself after only a few batches, plus you'll have the power to control the ingredients and create whatever flavor your heart desires. Once you begin making ice cream and see how fun it is, you’ll find yourself constantly thinking of new variations to try. This was by far one of my favorite sections to put together, especially when it came to sampling the results!
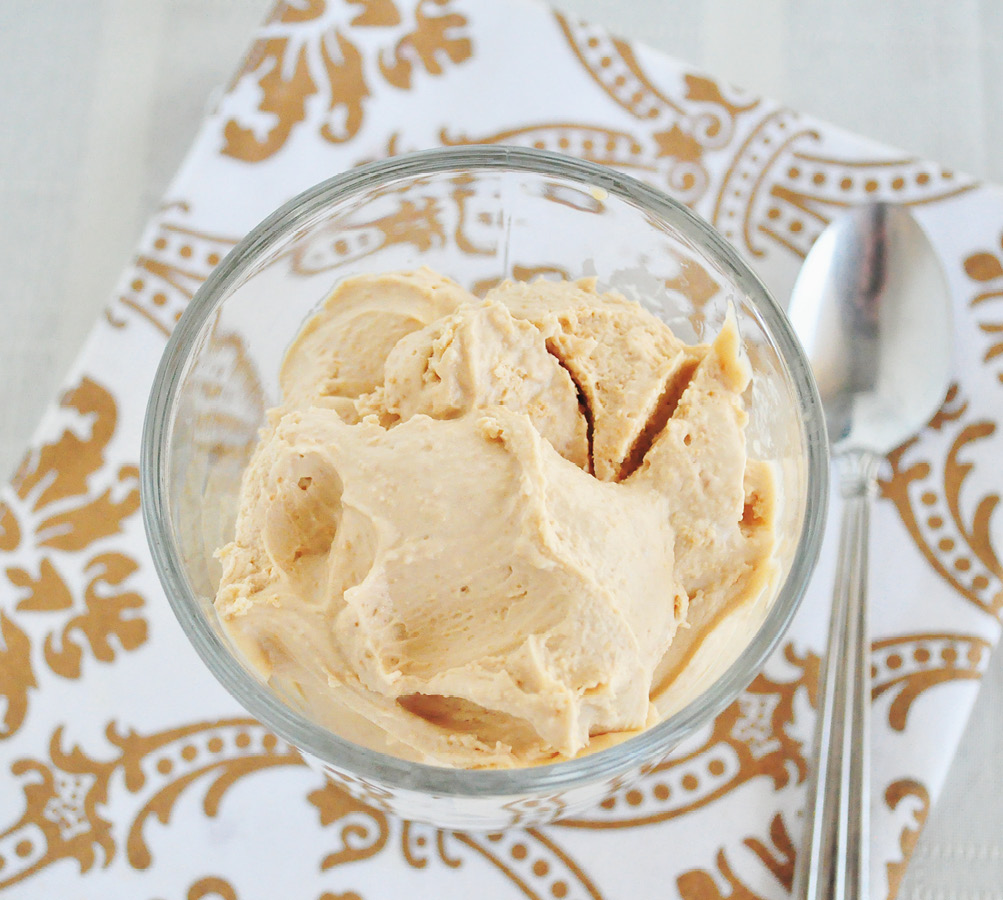
Three-Ingredient Peanut Butter Ice Cream
THIS RECIPE PROVIDES a great intro to making your own ice cream. It’s simple, with very few ingredients, yet comes out tasting superb.
MAKES FOUR ½-CUP (120 ML) SERVINGS
One 14-ounce (400 ml) can full-fat coconut milk (see Note below)
1 cup (250 g) Classic Peanut Butter
3 tablespoons pure maple syrup
Optional add-ins: 2 tablespoons chocolate chips, nuts, or dried fruit
1. Chill your ice cream machine’s bowl in the freezer for at least 18 hours before making this recipe.
2. Combine all the ingredients in a blender and blend for 1 to 2 minutes.
3. Pour the mixture into your ice cream machine and follow the manufacturer’s instructions. It should take about 20 minutes until the ice cream is ready. When the ice cream has about 5 minutes left, add the optional add-ins of your choice if desired. This ice cream will have a soft-serve consistency. If you like a harder ice cream, stick the mixture into the freezer for another hour or two before you eat it.
4. Eat the ice cream immediately, or store it in the freezer for up to 6 months. Since it doesn’t contain any emulsifiers or additives, homemade ice cream will get very hard when frozen. If you plan to eat it after storing it in the freezer, pull it out about 45 minutes before serving to make sure it’s soft enough to scoop.
NOTES
· Make sure to use canned coconut milk, not the coconut milk that comes in a carton. The milk in cartons has a far lower fat content, so the ice cream will come out rather icy (see coconut milk).
· Sunflower Seed Butter or any other nut butter can be substituted for peanut butter in this recipe.
· If you don’t have an ice cream machine, you can mix everything in a blender, pour it into ice cube trays, and then blend it again once the mixture is frozen.
PREP AND CHILL TIME: About 25 minutes, or up to 2 hours for a harder ice cream (not counting the 18 hours the ice cream machine’s bowl needs to chill beforehand)
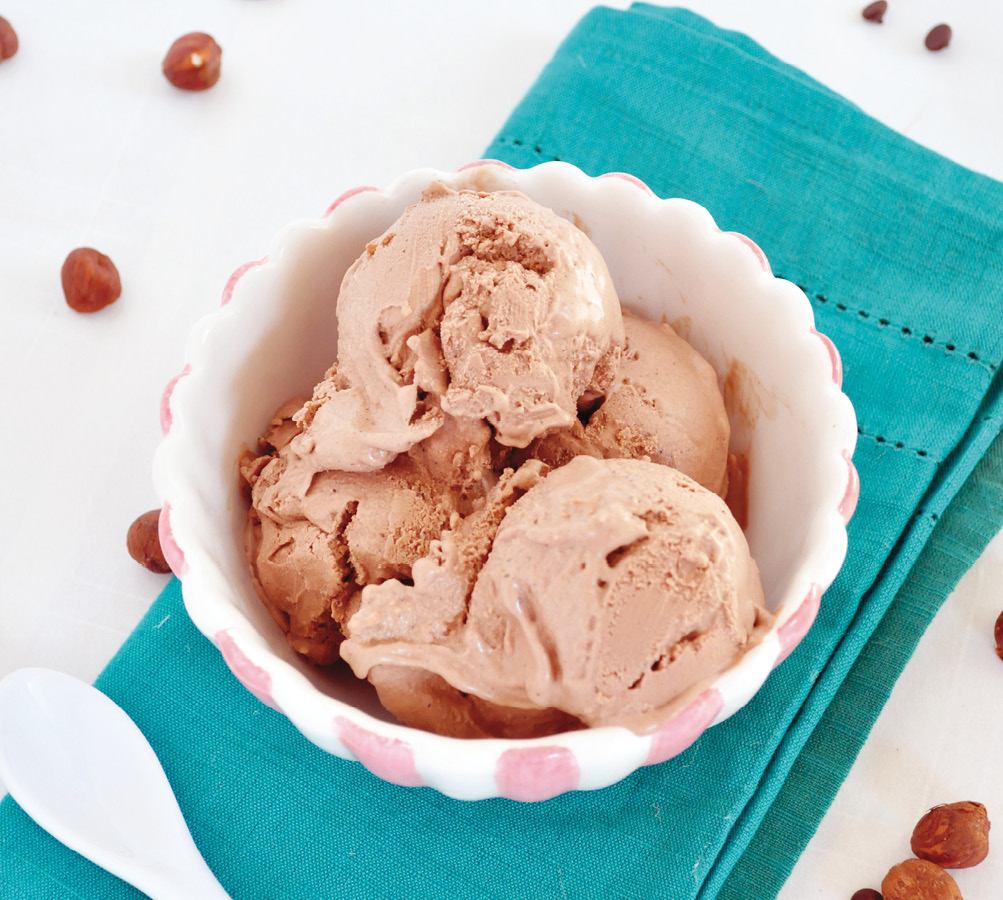
Chocolate Hazelnut Ice Cream
CHOCOLATE AND HAZELNUTS are always a winning combination. As soon as I mention those two words together, I’ll bet your mind instantly conjures up an image of that famous chocolate hazelnut spread. What if you could have that taste without all the additives, in the form of a decadent ice cream? Well, here you go! You’ll never believe there’s only 2 tablespoons of added sugar in this entire batch.
MAKES FOUR ½-CUP (75 G) SERVINGS
One 14-ounce (400 ml) can full-fat coconut milk (Note below)
1 cup (240 g) Chocolate Hazelnut Spread
2 tablespoons pure maple syrup
½ teaspoon sea salt
1. Chill your ice cream machine’s bowl in the freezer for at least 18 hours before making this recipe.
2. Mix all the ingredients together in a high-powered blender for 2 to 3 minutes.
3. Pour the mixture into your ice cream machine and follow the manufacturer’s instructions. It should take about 20 minutes until the ice cream is ready. This ice cream will have a soft-serve consistency. If you like a harder ice cream, stick the mixture into the freezer for an extra hour or two before you eat it.
4. Eat the ice cream immediately, or store it in the freezer for up to 6 months. Since it doesn’t contain any emulsifiers or additives, homemade ice cream will get very hard when frozen. If you plan to eat it after storing it in the freezer, pull it out about 45 minutes before serving to make sure it’s soft enough to scoop.
NOTE
Make sure to use canned coconut milk, not the coconut milk that comes in a carton (see coconut milk).
PREP AND CHILL TIME: About 25 minutes, or up to 2 hours for a harder ice cream (not counting the 18 hours the ice cream machine’s bowl needs to chill beforehand)
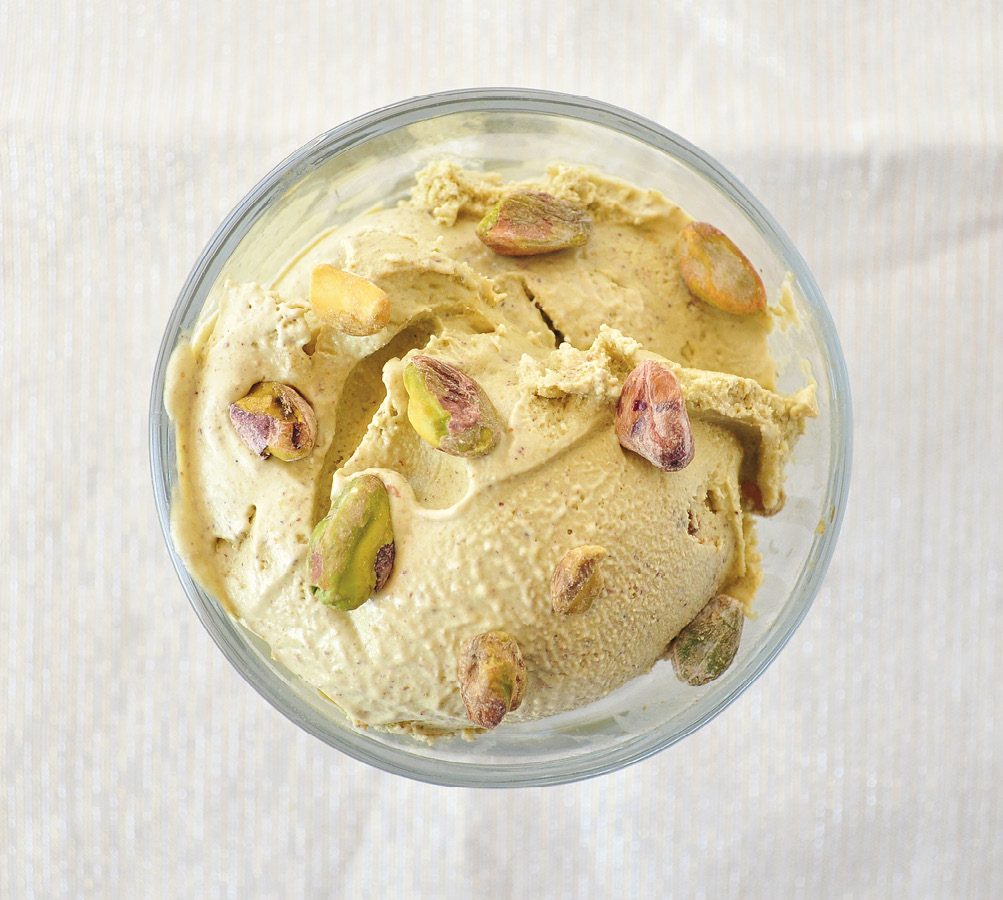
Pistachio Ice Cream
NO MATTER THE weather, sometimes a girl just needs a bowl of ice cream, and pistachio is an excellent flavor to choose. Eating the little nuts all by themselves can be like a game of hide-and-seek—if you can get that darn shell off, you’ve won. So for this recipe, even though they cost a bit more, I suggest buying pistachios that have already been shelled. It will drastically reduce your preparation time and save your fingers for spooning up this delicious ice cream.
MAKES FOUR ½-CUP (75 G) SERVINGS
One 14-ounce (400 ml) can full-fat coconut milk
1½ cups (190 g) raw, unsalted pistachios, plus 2 tablespoons for mixing into the ice cream for crunch
2 to 3 tablespoons pure maple syrup
½ teaspoon sea salt
1. Chill your ice cream machine’s bowl in the freezer for at least 18 hours before making this recipe.
2. Mix together the coconut milk, 1½ cups (190 g) of pistachios, maple syrup, and sea salt in a high-powered blender for 2 to 3 minutes.
3. Pour the contents into your ice cream machine and follow the manufacturer’s instructions. It should take about 20 minutes until the ice cream is ready.
4. When the ice cream has about 5 minutes left, sprinkle the 2 tablespoons of extra pistachios into the ice cream to add some crunch. You might need to gently guide the ice cream as it spins in the machine to make sure the pistachios are thoroughly mixed in. I use a silicone spatula for this. This ice cream will have a soft-serve consistency. If you like a harder ice cream, stick the mix into the freezer for another hour or two before you eat it.
5. Eat the ice cream immediately, or store it in the freezer for up to 6 months. Since it doesn’t contain any emulsifiers or additives, homemade ice cream will get very hard when frozen. If you plan to eat it after storing it in the freezer, pull it out about 45 minutes before serving to make sure it’s soft enough to scoop.
NOTE
If you don’t have an ice cream machine, try blending everything together in a blender and then pouring the mixture into ice cube trays. Once the ice cube trays are frozen, blend them in the blender for a treat similar to soft-serve ice cream.
PREP AND CHILL TIME: About 30 minutes, or up to 2 hours for a harder ice cream (not counting the 18 hours the ice cream machine’s bowl needs to chill beforehand)
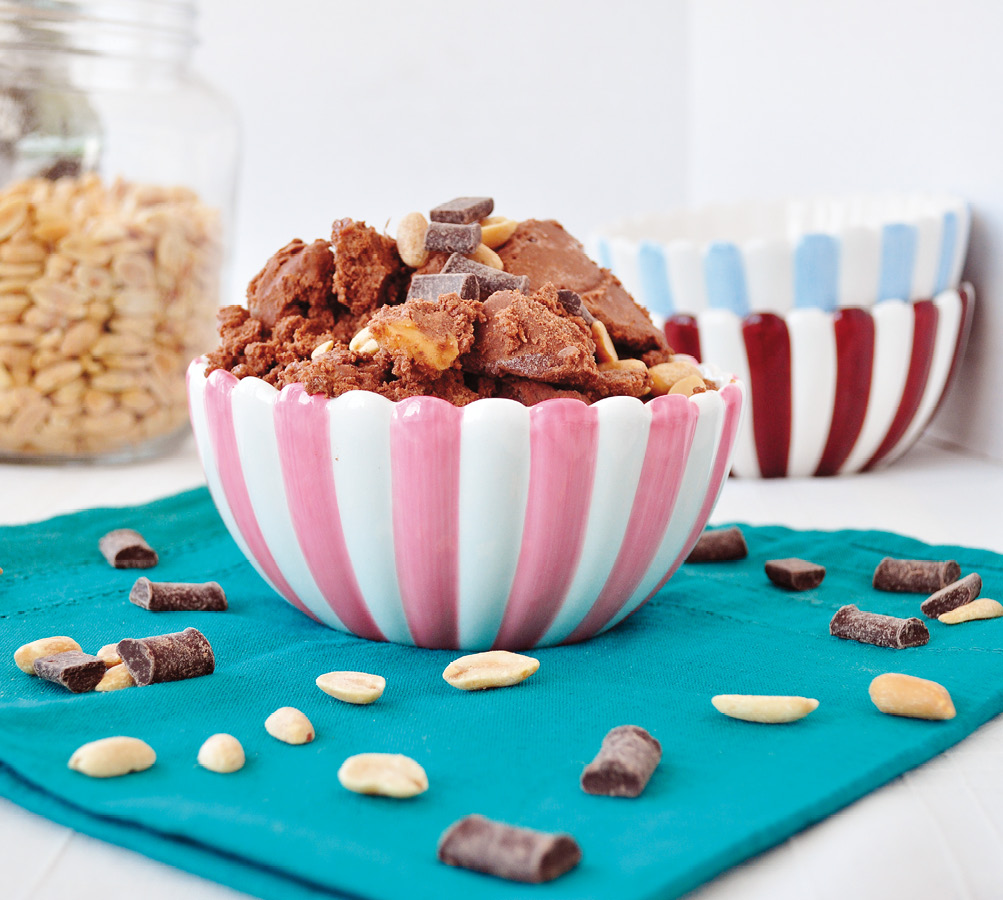
Chocolate Peanut Butter Chunk Ice Cream
I TYPICALLY MAKE all of my ice creams using full-fat coconut milk as a base, but this recipe is a bit different. Since homemade Brazil nut milk is so creamy, I decided to try it in an ice cream recipe. The texture is a little different from ice cream made with coconut milk; it’s rather similar to a sorbet. The flavor definitely isn’t lacking, with a big chocolate punch and peanut butter chunks scattered around like little bites of heaven.
MAKES FOUR ½-CUP (75 G) SERVINGS
2 cups (480 ml) Brazil nut milk (see Basic Nut Milk)
1 cup (160 g) dark chocolate chips
2 to 3 tablespoons unsweetened cocoa powder or cacao powder
2 tablespoons pure maple syrup
1 teaspoon vanilla extract
½ cup (125 g) Classic Peanut Butter
1. Chill your ice cream machine’s bowl in the freezer for at least 18 hours before making this recipe.
2. Combine the Brazil nut milk, chocolate chips, cocoa powder, maple syrup, and vanilla in a high-powered blender. Blend for 1 to 2 minutes on high, until well mixed.
3. Pour the mixture into your ice cream machine and follow the manufacturer’s instructions. It should take about 20 minutes until the ice cream is ready. When the ice cream has about 5 minutes left, start dropping chunks of peanut butter into the machine as it runs. There’s really no measurement for this; it just depends on how big or small you like your chunks to be. You might need to help guide the ice cream as it spins in the machine to make sure that all the chunks of peanut butter are distributed evenly; I use a silicone spatula for this. When the ice cream is ready, it will have a soft-serve consistency. If you like a harder ice cream, stick the mixture into the freezer for another hour or two before you’re going to eat it.
4. Eat the ice cream immediately, or store it in the freezer for up to 6 months. Since it doesn’t contain any emulsifiers or additives, homemade ice cream will get very hard when frozen. If you plan to eat it after storing in the freezer, pull it out about 45 minutes before serving to make sure it’s soft enough to scoop.
NOTE
Feel free to substitute another nut butter for the peanut butter if you wish. You can also try Sunflower Seed Butter.
PREP AND CHILL TIME: About 25 minutes, or up to 2 hours for a harder ice cream (not counting the 18 hours the ice cream machine’s bowl needs to chill beforehand)
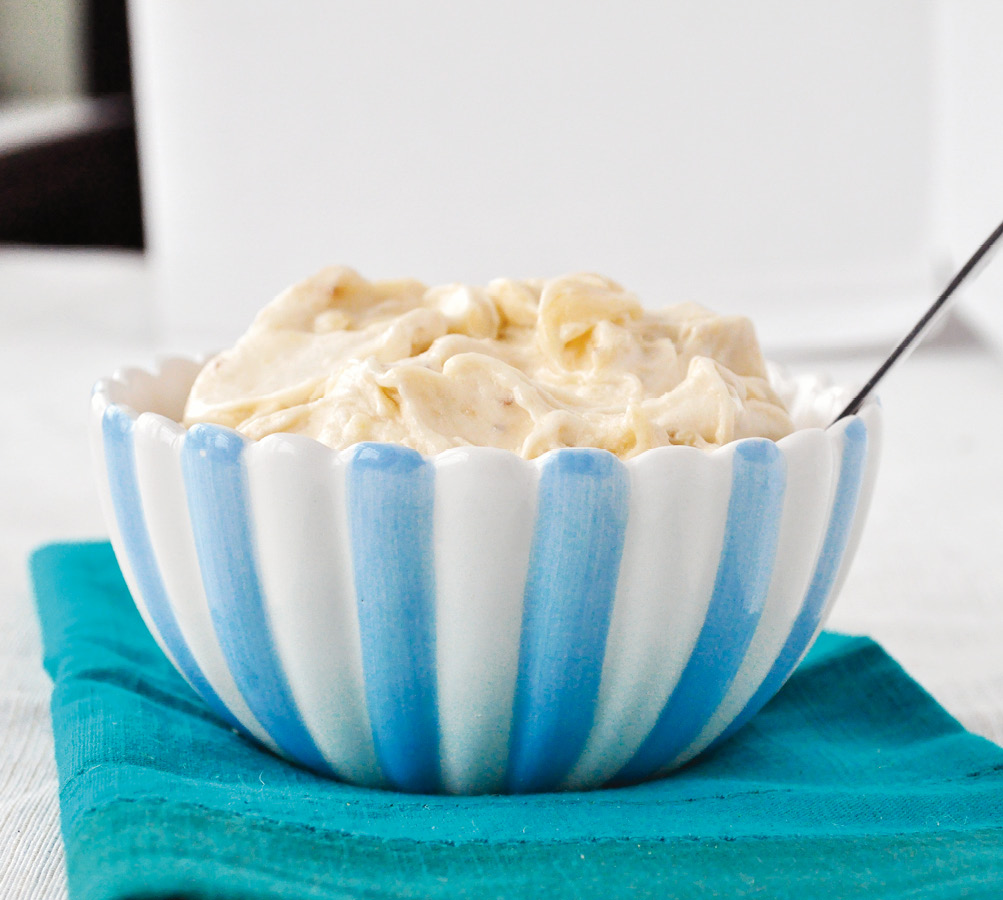
Banana Macadamia Ice Cream
I LOVE MAKING ice cream with bananas, especially since there are several benefits: less fat and sugar, and no ice cream maker is necessary. For those who have allergies, rest assured that this recipe is also dairy-free. When you freeze a banana, it becomes incredibly rich and silky in texture. It’s actually quite amazing. I buy two bunches of bananas each week, and one goes directly into the freezer for smoothies and ice cream.
MAKES THREE ½-CUP (75 G) SERVINGS
3 frozen bananas (see Note below)
2 tablespoons macadamia nut butter (see Basic Nut Butter)
1 to 2 tablespoons almond milk (see Basic Nut Milk)
1. Slice the frozen bananas into thin slices. Put them in a high-powered blender with the other ingredients. Blend for 1 to 2 minutes, scraping down the sides a few times. You might need to add a bit more almond milk to achieve the consistency you desire.
2. Once you see the mixture become a soft-serve consistency, it’s ready. If you like a harder ice cream, stick it into the freezer for about an hour or two before serving.
3. Eat the ice cream immediately, or store it in the freezer for up to 6 months. Since it doesn’t contain any emulsifiers or additives, homemade ice cream will get very hard when frozen. If you plan to eat it after storing in the freezer, pull it out about 45 minutes before serving to make sure it’s soft enough to scoop.
VARIATIONS
· Feel free to add whatever toppings you like: chopped nuts, cacao nibs, dried fruit, chocolate chips. The possibilities are endless.
· A fun thing to do with the kids is create your own sundae bar. Spoon a scoop of ice cream into each bowl and set out some toppings for them to choose.
PREP AND CHILL TIME: About 5 minutes, or up to an hour for a harder texture