DIY Nut Milks, Nut Butters, and More (2014)

I love to bake. In fact, I’ve enjoyed baking since I was a kid, mainly because I love sweets. Over the years I’ve refined my craft, and the little girl inside me still enjoys eating the goodies I create. The following recipes represent some of my favorite things not only to bake, but also to devour. None of them are difficult to make, and nut butters always satisfy my sweet tooth. All of the delectable treats in this chapter will fill your kitchen with great aromas and will taste even better than they smell. Don’t forget to wash them down with a glass of nut milk!

Almond Joy Cookies
IF YOU’RE A fan of Almond Joys, you’ll love these cookies. They’re even much better than the candy bar, because they won’t spike your blood sugar and cause you to come crashing down, craving more sugar. These cookies include all the flavors of an Almond Joy—without the guilt. Naturally sweetened and gluten-free, they’re worth every bite. Try them out and see for yourself.
MAKES TWELVE 2-INCH (5 CM) COOKIES
1 tablespoon flax meal
3 tablespoons warm water
1½ cups (135 g) gluten-free oat flour
½ cup (45 g) shredded unsweetened coconut
1 teaspoon baking powder
1 teaspoon sea salt
½ cup (120 g) almond butter (see Basic Nut Butter)
⅓ cup (80ml) pure maple syrup
¼ cup (60ml) coconut oil
1 teaspoon ground vanilla bean or vanilla extract
½ teaspoon almond extract
1.75 ounces (50g) dark chocolate, roughly chopped, or ½ cup (80 g) dark chocolate chips
1. Preheat the oven to 350°F (175°C).
2. Whisk together the flax meal and water in a small bowl. Place it in the refrigerator for a minute to set. It will become gummy, like an egg.
3. Mix the oat flour, coconut, baking powder, and sea salt in a large bowl. Set it aside.
4. Mix the almond butter, maple syrup, coconut oil, vanilla, and almond extract in a small saucepan. Stir over medium heat until smooth, about a minute or so.
5. When the almond butter mixture is smooth, add it to the bowl of dry ingredients. Mix well, 1 to 2 minutes, using either a handheld or stand mixer (both work well).
6. Add the flax/water mixture and stir the ingredients until they are well combined. Fold in the chocolate.
7. Using a small cookie scoop or rolling the dough into bite-size balls, place the dough on a parchment-lined baking sheet at least 1 inch (2.5 cm) apart from one another. Bake for 12 minutes, or until the cookies start to brown around the edges.
8. Let the cookies completely cool on the baking sheet before storing them in an airtight container. Store in the refrigerator for up to 3 weeks or in the freezer for up to 6 months. If frozen, let them thaw at room temperature for about 5 minutes before eating.
PREP AND BAKE TIME: About 20 minutes
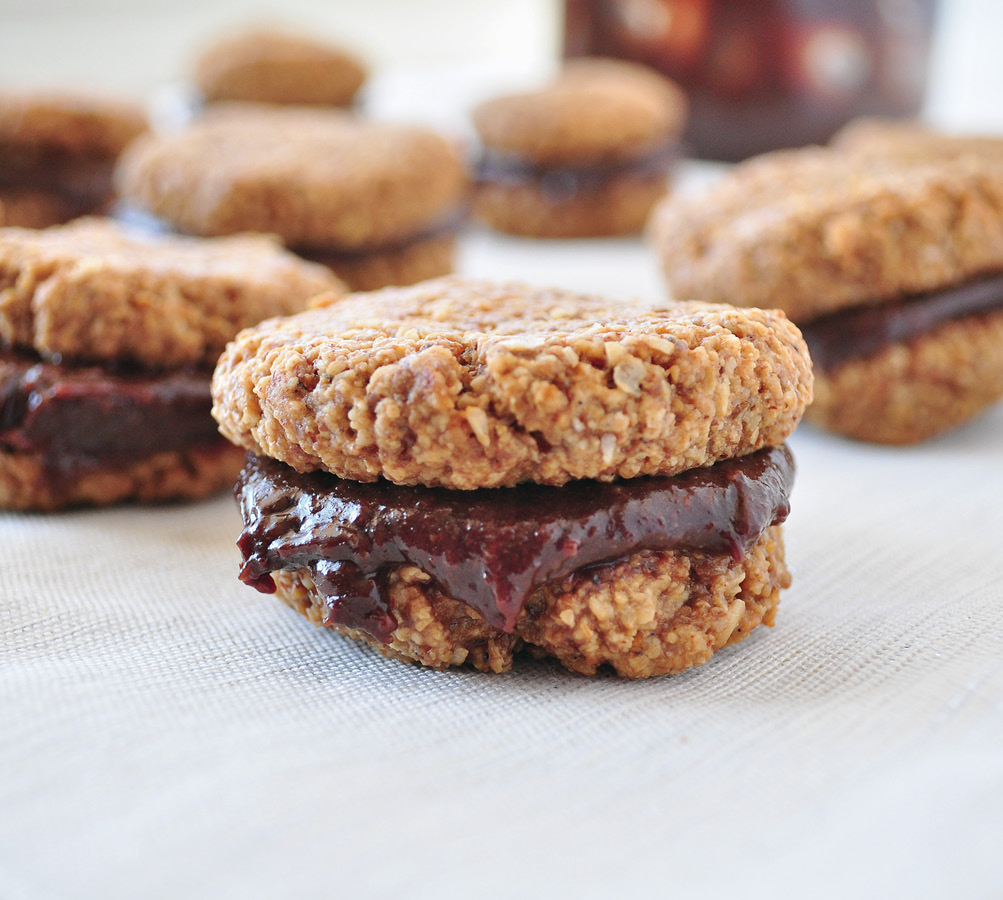
Almond Butter Sandwich Cookies
SANDWICH COOKIES COME in many shapes and forms. When you make your own, you can create whatever flavor combos come to mind. In this case, I combined my beloved almond butter with a decadent chocolate spread. The outcome is pure heaven in your mouth. Once you see how easy this is, you’ll want to make even more new flavor fusions.
MAKES SIXTEEN 1-INCH (2.5 CM) COOKIES
1 tablespoon flax meal
3 tablespoons warm water
2 cups (180 g) gluten-free oat flour
½ cup (115 g) coconut sugar
1 teaspoon ground vanilla beans
½ teaspoon sea salt
1 cup plus 2 tablespoons (270 g) almond butter (see Basic Nut Butter)
¾ cup (180 ml) almond milk (see Basic Nut Milk)
½ cup (125 g) Chocolate Peanut Butter Spread
1. Preheat the oven to 350°F (175°C).
2. Whisk together the flax meal and water in a small bowl. Place it in the refrigerator for a minute to set. It will become gummy, like an egg.
3. Mix together the oat flour, coconut sugar, vanilla, and sea salt in a large bowl. Set it aside.
4. Mix the almond butter and milk in a small saucepan. Stir over medium heat until the ingredients are well combined, 1 to 2 minutes. Remove from the heat.
5. Add the almond butter mixture to the bowl of dry ingredients and mix for 1 to 2 minutes, until the ingredients are well combined, using either a handheld or stand mixer (both work well).
6. Add the flax/water mixture and continue to mix for another minute.
7. Form the cookies into bite-size balls, using either your hands or a cookie scoop, and place them on a parchment-lined or greased baking sheet, about ½ inch (1.3 cm) apart. You should have 32 balls. Flatten each cookie with your palm.
8. Bake for 10 to 11 minutes. It’s hard to visually tell when these are done, so I lightly press my finger into a cookie to feel if it’s firm enough. Let the cookies completely cool before removing them from the baking sheet.
9. Once the cookies are cool, spread some Chocolate Peanut Butter Spread onto one, and then make a sandwich by putting another cookie on top. Repeat these steps until all the sandwich cookies are made.
10. Set the cookies in the fridge to firm up, about 30 minutes.
11. Store them in the refrigerator for up to 2 weeks, or in the freezer for up to 6 months.
NOTES
· You can substitute vanilla extract for the ground vanilla beans. I just happen to love the strong, fresh flavor of the vanilla beans.
· You can use a regular large egg in place of the flax meal and water if you like.
VARIATIONS
· A fun flavor combination is to use your favorite Homemade Jam instead of the chocolate spread.
· Coconut butter (see shredded coconut) works well in the middle, too.
PREP AND BAKE TIME: About 50 minutes
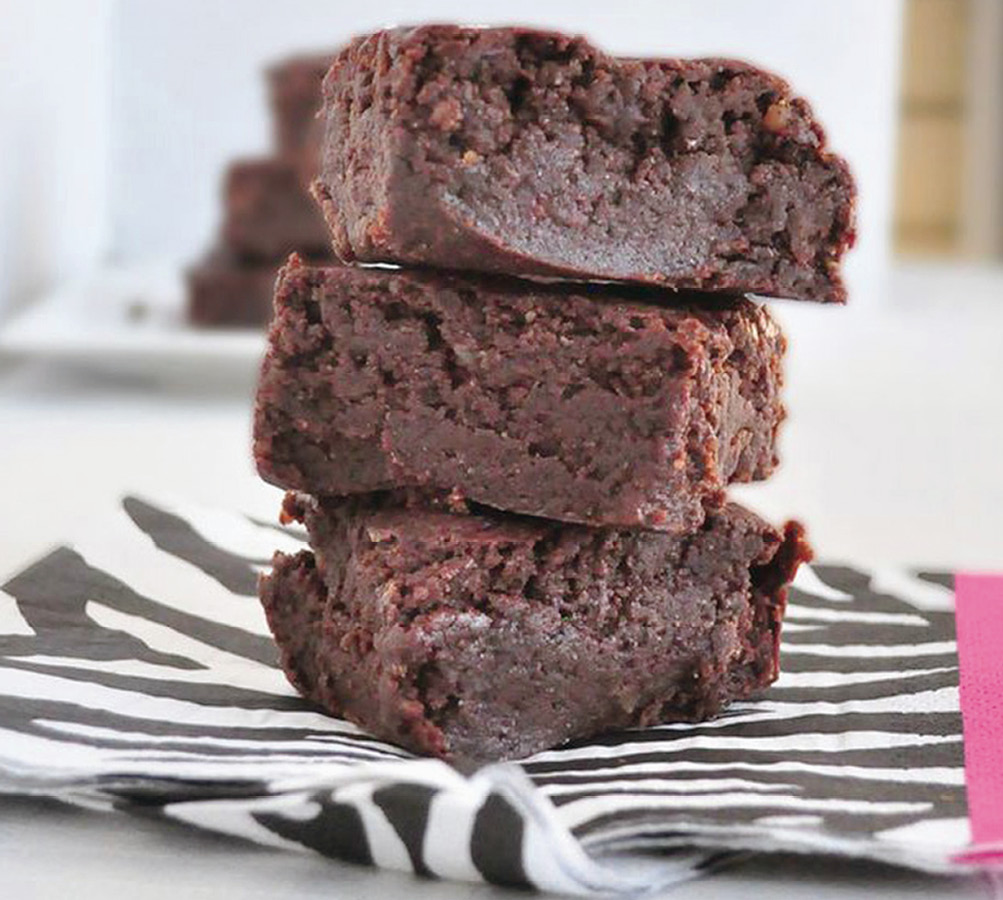
Peanut Butter and Chocolate Brownies
THESE THICK, FUDGY brownies are the ultimate indulgence. I call for dark chocolate as well as unsweetened cocoa powder to make them extra-rich. When you add cashew butter to the mix, it takes these brownies to the next level.
MAKES NINE 2-INCH (5 CM) BROWNIES
1 tablespoon flax meal
3 tablespoons warm water
2 cups (180 g) gluten-free oat flour
½ cup (60 g) unsweetened cocoa powder
1½ teaspoons baking powder
½ teaspoon sea salt
1 cup (250 g) Classic Peanut Butter
1.75 ounces (50g) dark chocolate or ½ cup (80 g) dark chocolate chips
½ cup (120 ml) almond milk (see Basic Nut Milk)
½ cup (120 ml) pure maple syrup
½ cup (120 ml) coconut oil
¼ cup (60 ml) unsweetened applesauce
1 teaspoon ground vanilla bean or vanilla extract
1. Preheat the oven to 350°F (175°C).
2. Whisk together the flax meal and warm water in a small bowl. Place it in the refrigerator for a minute to set. It will become gummy, like an egg.
3. Mix the oat flour, cocoa powder, baking powder, and sea salt in a large bowl and set it aside.
4. Mix the remaining ingredients in a small saucepan. Stir constantly with a silicone spatula over medium heat until the ingredients are well combined, about 5 minutes.
5. Add the mixture from the saucepan to the bowl of dry ingredients and mix until well combined, 1 to 2 minutes, using either a handheld or stand mixer (both work well).
6. Add the flax/water mixture and mix until the ingredients are well combined, about 1 minute.
7. Line an 8 x 8-inch (20 cm x 20 cm) glass baking dish with parchment paper. Make sure there is enough paper hanging off the sides so that you can easily remove the brownies after baking.
8. Spoon the batter evenly into the baking dish, pressing it down firmly. Bake for 15 minutes, or until a toothpick inserted into the middle comes out clean. I like mine extra-moist so that they’re a little gooey in the middle, but if you prefer a more cake-like brownie, you can bake them for an additional 5 minutes.
9. Wait until the brownies are completely cooled before removing them from the baking dish. To remove the brownies, simply grab the extra parchment paper at the sides and lift them out of the baking dish. Cut the brownies into nine even squares using a pizza cutter or a sharp knife.
10. Store the brownies in an airtight container in the refrigerator for up to 2 weeks or in the freezer for up to 6 months. When I’m ready to eat one out of the freezer, I let it thaw at room temperature for an hour or two. You can also thaw them in a microwave using the defrost setting.
NOTE
If this recipe calls for more oil than you care to use, you can cut it down to ¼ cup (60 ml) and add an extra ¼ cup (60 ml) of applesauce or nondairy plain yogurt.
PREP AND BAKE TIME: 25 to 30 minutes

Chocolate Chip Macadamia Cookies
WHEN I SWITCHED to a healthier diet, I thought chocolate chip cookies were out of my reach. Well, my friends, I’m here to tell you that’s not true. Macadamia butter is so naturally buttery that it does a superb job of mimicking the taste and texture of dairy in a more traditional chocolate chip cookie recipe. There’s very little oil in this recipe, but it’ll never taste dry, thanks to the macadamias.
MAKES TWENTY-TWO 1-INCH (2.5 CM) COOKIES
2 tablespoons flax meal
¼ cup plus 2 tablespoons warm water
2¾ cups (248 g) gluten-free oat flour
½ cup (47 g) shredded unsweetened coconut
2 teaspoons ground vanilla beans
1 teaspoon baking powder
1 teaspoon baking soda
½ teaspoon sea salt
¾ cup (180 g) macadamia butter (see Basic Nut Butter)
½ cup (120 ml) pure maple syrup
2 tablespoons coconut oil
½ cup (80 g) chocolate chips
1. Preheat the oven to 350°F (175°C).
2. Whisk together the flax meal and water in a small bowl. Place it in the refrigerator for a minute to set. It will become gummy, like an egg.
3. Mix the flour, coconut, vanilla, baking powder, baking soda, and sea salt in a large bowl and set it aside.
4. Mix the macadamia butter, maple syrup, and coconut oil in a small saucepan. Stir over medium heat with a silicone spatula until the ingredients are well combined, about 5 minutes. Add the mixture to the bowl of dry ingredients.
5. Add the flax meal/water mixture and mix until the ingredients are well combined, about 1 minute, using either a handheld or stand mixer (both work well).
6. Fold in the chocolate chips using a spatula, then place the bowl of dough in the fridge for 20 minutes to firm up.
7. Drop tablespoons of the dough onto a parchment-lined baking sheet about 1 inch (2.5 cm) apart from one another. Bake for 10 to 12 minutes, or until the edges look slightly golden. Make sure the cookies are completely cooled before removing them from the baking sheet.
8. Store the cookies in the refrigerator for up to 2 weeks, or in the freezer for up to 6 months.
PREP AND BAKE TIME: About 45 minutes
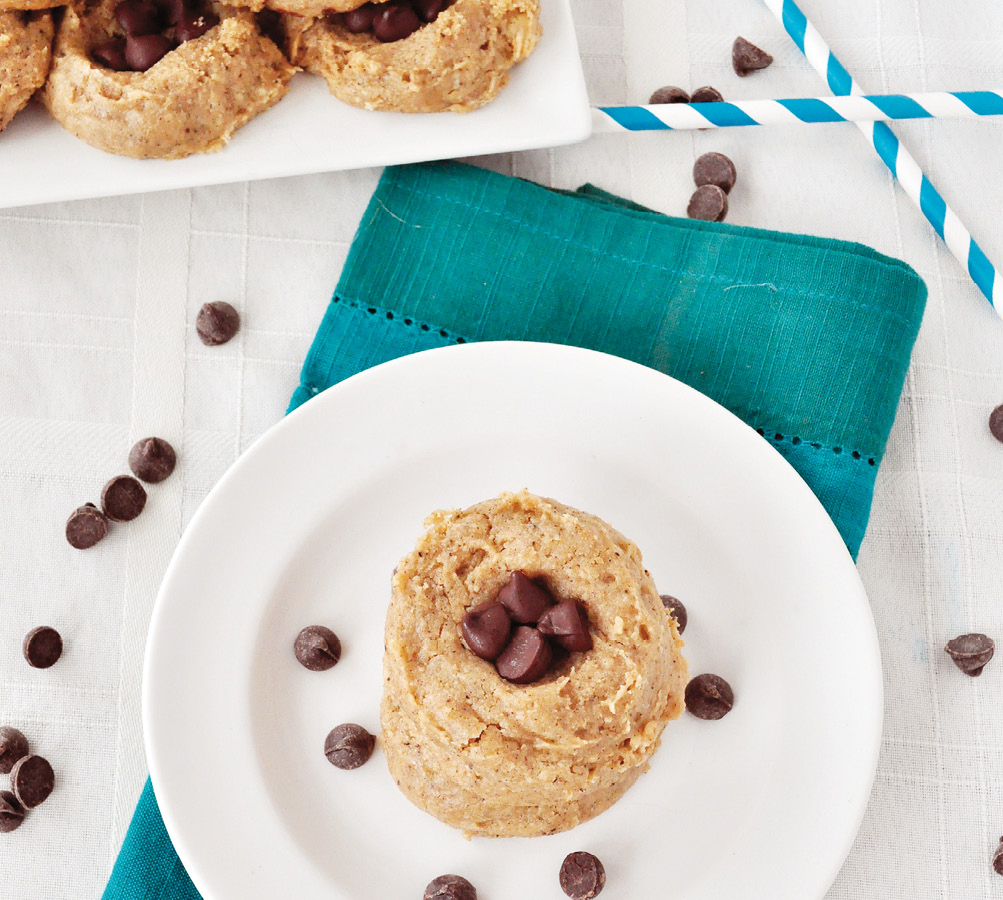
Chocolate Cashew Butter Thumbprint Cookies
WHEN I THINK of thumbprint cookies, I picture a buttery cookie with a crisp outside and a chewy center. Cashew butter is very rich and creamy in texture, making it the perfect ingredient to use in these thumbprint cookies. I filled them with chocolate here, but you can also use homemade jam or even a different nut butter.
MAKES EIGHTEEN 1-INCH (2.5 CM) COOKIES
1 cup (135 g) cashew butter (see Basic Nut Butter)
½ cup (120 ml) pure maple syrup
¼ cup (60 ml) almond milk (see Basic Nut Milk)
2 tablespoons coconut oil
2 teaspoons ground vanilla beans or vanilla extract
1½ cups (135 g) gluten-free oat flour
½ teaspoon baking powder
½ teaspoon sea salt
½ cup (80 g) dark chocolate chips (see Note below)
1. Preheat the oven to 350°F (175°C).
2. Mix the cashew butter, maple syrup, almond milk, coconut oil, and vanilla in a small saucepan. Stir over medium heat until the ingredients are smooth and well combined, 2 to 3 minutes. Remove the mixture from the heat and let it cool to room temperature.
3. While the mixture in the saucepan cools, mix together the oat flour, baking powder, and sea salt in a medium bowl.
4. Once the cashew butter mixture is cooled, add it to the bowl of dry ingredients. Using either a handheld or stand mixer, mix until the ingredients are well combined, about 2 minutes, You might need to scrape down the sides of the bowl a few times.
5. Drop bite-size dollops of batter onto a parchment-lined baking sheet about 1 inch (2.5 cm) apart, using either two spoons or a cookie scoop. Since this batter is thick and sticky, I prefer the cookie scoop.
6. Press your thumb into the center of each cookie, then add the chocolate chips into the indentation. I put 5 to 6 chocolate chips into each thumbprint. This step provides a great opportunity for small children to help—my kids love to do this. They also love to sneak chocolate chips!
7. Bake the cookies for 10 to 12 minutes, until slightly golden around the edges. Let them cool completely before removing them from the baking sheets.
8. Store the cookies in an airtight container in the refrigerator, where they should last 7 to 10 days, or in the freezer for up to 6 months.
NOTE
For the dark chocolate in this recipe, I use 63 percent cacao as opposed to my normal 72 percent (see cacao powder), since I think the slightly sweeter taste works better here, but you can use any kind you like.
VARIATION
To switch up this recipe, you can substitute ¼ cup (85 g) of your favorite jam for the chocolate. Homemade Jam is perfect to use in these thumbprint cookies.
PREP AND BAKE TIME: 20 to 25 minutes

Flourless Almond Butter Blondies
MUCH LIKE THE Chocolate Chip Macadamia Cookies, these blondies have a rich and buttery taste without any oil, flour, or dairy products. They also have a surprise element: chickpeas, which work really well in sweet dishes. My kids were totally fooled—they had no idea that a secret healthy ingredient was hiding in these treats. Neither did my husband. I actually use chickpeas quite often in the kitchen, sometimes roasting them with a touch of maple syrup and cinnamon for a quick sweet treat.
MAKES NINE 2-INCH (5 CM) SQUARES
1 cup (200 g) dried or one 14-ounce (480 ml) can chickpeas
1 tablespoon flax meal
3 tablespoons warm water
1 cup (100 g) gluten-free rolled oats
½ teaspoon sea salt
1 cup (250 g) almond butter (see Basic Nut Butter)
½ cup (120 ml) pure maple syrup
½ cup (50 g) shredded unsweetened coconut
1 teaspoon vanilla extract
½ cup (80 g) dark chocolate chips
1. Preheat the oven to 350°F (175°C).
2. If you’re using dried chickpeas, soak them overnight, rinse them, and then boil them until they are soft. If you are using canned chickpeas, drain them, then rinse well and pat them dry.
3. Whisk together the flax meal and water in a small bowl. Place it in the refrigerator for a minute to set. It will become gummy, like an egg.
4. Combine the chickpeas, oats, and sea salt in a food processor. Mix them slightly, about 1 minute.
5. Add the almond butter, maple syrup, coconut, vanilla, and flax/water mixture. Continue to pulse the food processor until the ingredients are well mixed, 2 to 3 minutes. You might have to stop and scrape down the sides of the canister a few times.
6. Line an 8 x 8-inch (20 cm x 20 cm) glass baking dish with parchment paper. Make sure there is enough paper hanging off the sides so that you can easily remove the blondies after baking.
7. Carefully spoon the batter into the baking dish. You might need to wet the spatula, because the dough will be very sticky. Make sure the batter is pressed down evenly.
8. Sprinkle the chocolate chips on top and gently press them into the blondies. Bake them for about 20 minutes. To tell when these are done, carefully touch your finger to the top to see if they’re firm, which means they’re ready to come out of the oven.
9. Let the blondies cool completely before removing them from the baking dish. To remove them, grab the parchment paper that’s sticking out and carefully lift the whole thing out of the pan. Cut the blondies into nine even squares using a pizza cutter or a sharp knife.
10. Store them in an airtight container in the refrigerator for 7 to 10 days, or in the freezer for up to 6 months. When you want to enjoy some blondies that have been frozen, it’s best to thaw them at room temperature. Because of the chocolate chips on the top, reheating them in the microwave might make a mess.
NOTE
You can use white beans in place of chickpeas if you prefer the taste; both work well in this recipe.
PREP AND BAKE TIME: About 30 minutes, not including the overnight soak if using dried chickpeas
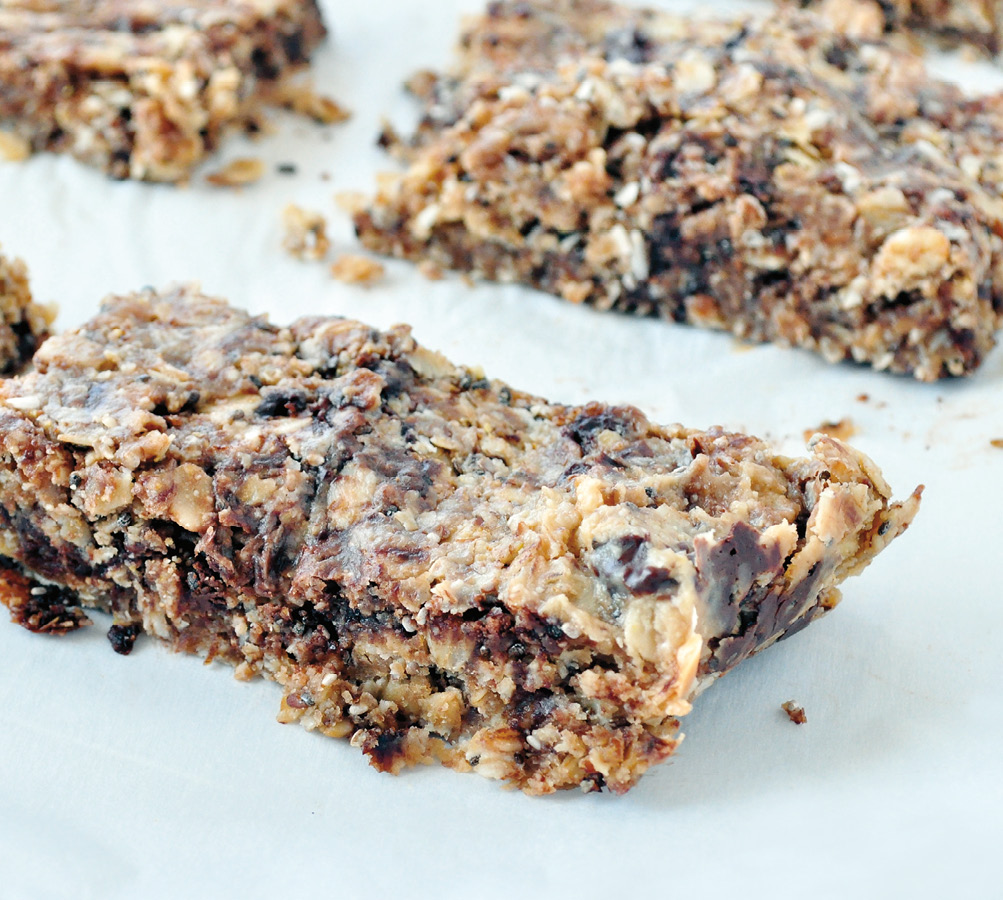
Slow Cooker Peanut Butter Granola Bars
THE SLOW COOKER shouldn’t be reserved just for soups and chili; you can actually use it for many other things, such as these granola bars. Cooking food slowly allows for far greater flavor to develop. In the summer the slow cooker can come in quite handy when you don’t want to heat up your whole kitchen with the oven. The best part? You don’t even need to be home to make these soft and chewy granola bars!
MAKES TEN 3 X 1-INCH (7.5 X 2.5 CM) BARS
1 cup (250 g) Classic Peanut Butter
½ cup (120 ml) pure maple syrup
2 tablespoons almond milk (see Basic Nut Milk)
2 teaspoons vanilla extract
2 cups (200 g) gluten-free rolled oats
¼ cup (35 g) flax meal
¼ cup (25 g) unsweetened shredded coconut
2 tablespoons chia seeds
½ teaspoon sea salt
½ cup (80 g) dark chocolate chips
1. Mix the peanut butter, maple syrup, almond milk, and vanilla in a saucepan. Stir over medium heat until the ingredients are well combined, about 5 minutes. Remove from the heat and let the mixture cool to room temperature.
2. While the peanut butter mixture cools, mix together the oats, flax meal, coconut, chia seeds, and sea salt in a large bowl.
3. Add the mixture from the saucepan to the dry ingredients and stir until well combined, about 1 minute, using either a handheld or stand mixer (both work well).
4. Fold in the chocolate chips using a spatula or wooden spoon.
5. Line the slow cooker with parchment paper, making sure there is enough paper to hang off the sides so that you can easily lift out the bars once they’re cooked. Brush the parchment paper with a little coconut oil.
6. Spoon the mixture into the bottom of the slow cooker, pressing it down evenly. It’s important to pack the mixture down firmly to make sure the bars hold together.
7. Set the slow cooker on low and cook for 1½ to 2½ hours. Everyone’s slow cooker seems to run at a different temperature, and older ones are known to run hotter. You’ll know that the granola bars are done when the middle no longer seems mushy. When they’re done, lift them out by grabbing the parchment paper that’s hanging off the sides. Set them aside to cool for about 25 minutes. If you cut the bars before they’ve fully cooled, they might crumble.
8. Once the mixture is completely cooled, use a pizza cutter or a sharp knife to make 3 x 1-inch (7.5 cm x 2.5 cm) bars.
9. Store these in a container with a sheet of parchment paper in between each bar. If you want to be thrifty, you can use the same parchment that you cooked them in. They will last at room temperature for up to 4 days, in the refrigerator for up to 3 weeks, or in the freezer for up to 6 months.
VARIATIONS
There are lots of variations for this recipe. You can add any kind of dried fruit, seeds, chopped nuts, or even cacao nibs. I suggest ¼ cup of any of those items for a change of taste.
PREP AND COOK TIME: About 3½ hours