Explosive Calisthenics, Superhuman Power, Maximum Speed and Agility, Plus Combat-Ready Reflexes--Using Bodyweight-Only Methods (2015)


4
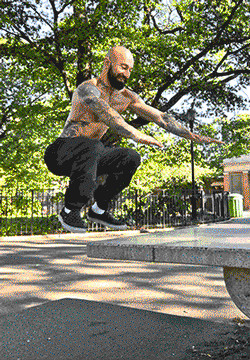
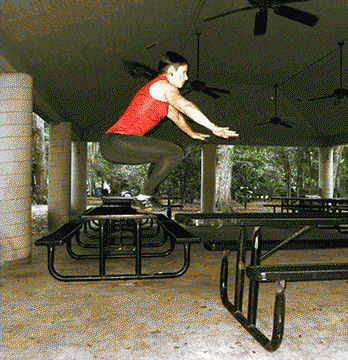
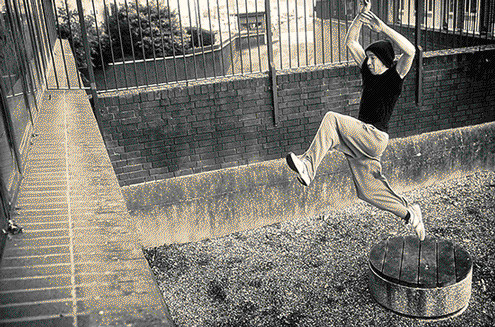
POWER JUMPS
ADVANCED LEG SPRING
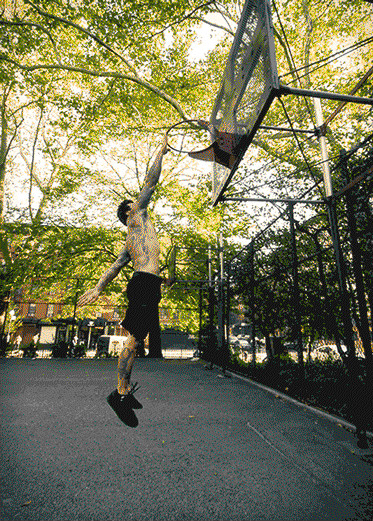
If you speak to most coaches and athletes about true power training—moving force at the highest possible speeds, as opposed to the heavy-load work of weight-lifting—then most of them will immediately think about jumps: those explosive leaps—upwards or horizontal (a.k.a. bounds)—using the body’s own weight as resistance.
There are some real compelling reasons why so many coaches make jump training central to any explosiveness program: powerful, fast legs are pretty much useful for everything sports or movement related. The Ancients believed that the leg “spring” was the source of a man’s youth and athleticism, and—as ever—they were right. Without explosive power in the legs, running is impossible. High power acrobatic movements—flips, rotations, dives—all depend on getting height, which can only happen through optimal leg power. Basketball, football, hurdling, soccer, martial arts, parkour—it’s pretty tough to name a sport which doesn’t hugely depend on having springy legs.
A lot of guys talk about gaining leg “power” through exercises like heavy squats, or even deadlifts, but this is a fallacy. True power is strength x speed, and adding a load like a big barbell effectively kills the athlete’s ability to move at faster-than-normal levels. For maximum power, bodyweight is the only way to go. It’s also just more realistic to stick to bodyweight—can you think of any sports when you need to jump while carrying hundreds of pounds?
DECONSTRUCTING POWER JUMPS
Jump training has seen an interesting resurgence in the last ten or twenty years. These days, it’s tough to go into a commercial gym without seeing someone jumping up and down onto some kind of over-priced box. A lot of this has happened as the “functional” movement has invaded gyms, previously monopolized with slow, un-natural looking movements on machines. Some of it has been to do with the dominance of CrossFit as a training method.
Whatever the source, I think it’s mostly a good thing that athletes are jumping again. But I would add two provisos to this. First up, athletes and coaches should understand that simply jumping up and down on a box must not become the be-all end-all of this kind of training. (You don’t need a box—or anything at all—to jump, but people do love their equipment, don’t they?) As a second point, I would add that correct bodyweight jump training is about more than just gaining height over time. As well as gradually building linear power—in the form of jump height—all jump training should include drills which develop the following four basic skills:
LAUNCHING
Most athletes don’t know the optimal way to squat down (you have been performing your bodyweight squats, haven’t you?), let alone how to explode up for height. The keys are body symmetry, leading with the hips (as if sitting down, rather than bowing down) and exploding up using total-leg and hip power. The best way to acquire these qualities are by lots and lots of thoughtful reps on the basic jumps.
TUCKING
A correct jumping course must teach the athlete how to tuck correctly—that is, to pull the knees up (and, ultimately, into the chest). In real-life, tucking is an essential part of functional jumping—imagine jumping on, or over something—you need to bring your knees up, right? This is difficult without powerful hip flexors, but the steps in the power jump chain will get you there gradually.

LANDING
It’s ironic that landing is something many coaches give little or no thought to—they only see the jump as the “up” part. It’s ironic because so many athletes—especially newbies, the overweight, older athletes or those with joint injuries—find landing the most difficult and intimidating aspect of the exercise. You can learn to be a truly great jumper despite these factors; you just have to teach your body how to land. As with launching, the keys are symmetry, a hip-led squat bend, and the absorption of force with the entire leg and body, not just the feet and ankles. Beginning slowly with small jumps (and hops) will also condition the soft tissues well.
MYOTATIC REBOUND
One of the reasons that our tendons possess some strong elasticity is to allow them to absorb and redirect forces. We see this turned up to the max in the huge leg tendons of a kangaroo; these beasts leap, and on landing the elasticity in their legs makes the next jump easier. This phenomenon also involves the nervous system making the stretched muscles contract at just the right time to support the elastic effect, and this is called the myotatic reflex—it is the myotatic reflex which is at the heart of modern “plyometric” training (which is not the same as explosive training—see: Utilize the Plyometric Edge! On page 315). Learning to exploit this skill is easy, in the case of jumping: don’t pause in between jumps. The second you land, allow yourself to “bounce” back up, rhythmically. This technique can be employed with most steps in the chain. (It also works in some of the small space drills peppered around this manual. Experiment.)
Athletes who wish to explore more dynamic, acrobat movements should also be looking at building a fifth jumping skill:
BLOCKING
Blocking involves the transformation of horizontal momentum into vertical momentum. If you watch an acrobat preparing to perform a flip, you’ll notice that they take a little run-up first, followed by planting the feet together and jumping up. This run/foot-plant maneuver—which most athletes perform instinctively—is called blocking. Performed correctly, it also exploits the myotatic rebound.
Blocking, at its most fundamental level: you run a few steps, plant both feet together (in a little “skip”) and jump directly upwards.
All these skills are essential if you wish to progress to the back and front flip chains. It might be obvious to non-athletes why launching, landing and blocking may be essential to perform a flip—but in fact tucking is even more important. It is so central to the techniques, that gymnasts still call the front and back flip the front and back tuck. So there.
THE POWER JUMP CHAIN
Careful, intelligent progress through all the steps of the jump chain will impart all five of the above essential jumping skills. It will also develop joint integrity and ensure that the athlete has enough raw power to get a good level of height—the Master Step (the suicide jump) is impossible without a high level of launch power.
Athletes begin with the simplest, easiest of all jumping drills: the straight hop (step 1). Hopping requires no space, and develops the elastic rebound of the lower legs, without placing much stress on the knees and back. The hop also teaches good foot and ankle positioning for landing.
The next step is to integrate the knee and hip joints into the jump pattern. The squat jump (step 2) strengthens the knees and begins to build more rounded power. Once this movement has been mastered, the arms are trained to come into play with the vertical jump (step 3). Vertical jumps teach the athlete to coordinate lower and upper-bodies for increased power and momentum. Once static vertical power has been established, the athlete adds in a run-up and works with block jumps (step 4), exploring blocking (turning horizontal momentum into vertical momentum). As mentioned earlier, this is an essential skill for any would-be acrobat to nail.
The next four steps are devoted to mastering a proper tuck (see page 39). The tuck requires strong hip flexors to bring the knees up into the chest. We start gently with butt-kick jumps (step 5) which teach good height and leg speed—you need to get high enough to kick your butt with your heels, and fast enough to whip your legs down before gravity forces you down. Because (in a correctly performed butt-kick) the knees are brought up a little—but still below the level of the waist—this exercise is also the perfect means to begin conditioning the hip flexors for the harder tucks to come. Next up are slap tuck jumps (step 6), where your slap your knees during the jump. This involves a higher tuck than before—around waist level. The process continues in regular tuck jumps (step 7), where the knees are bought even higher, as close to the chest as possible. Catch tuck jumps (step 8) represent a good basic mastery of the tuck—you have to fully pull your knees into your chest in mid-air (you may have seen Olympic divers do this).
The thread jump (step 9) is a unilateral “trick” jump where the athlete holds their own foot and jumps over it. It’s challenging for most people, but it shouldn’t pose a problem for any athlete who has attained the previous steps—it’s really just a neurological warm-up to help athletes approach the next, and final step. The tenth step—the Master Step—of the jump chain is the suicide jump, so called because you jump over a bar or broomstick which you are holding—and if you screw up, a faceplant is a serious possibility. If you can perform this Master Step, you’ll have achieved a great level of height, leg speed, and impressive tension-flexibility in the hips, enough to make tucks second nature. You are now a master jumper.
DO YOU NEED PLYO BOXES?
Many athletes begin their jump training by jumping up onto something. Gym boxes are the most popular choice. In fact, I’d say 90% of jump training in gyms is done on those damn boxes!
Box jumps are great, but I think using them exclusively is a mistake. I advise my students to begin their training with free-standing jumping drills, to build important skills like bounding, tucking and catching. Free-standing work also allows athletes to unlock and express maximum power without worrying about tripping over anything. If you want to explore box jumps as a variant once you have the basics under your belt, go for it. But always remember, you don’t really need a box (or any plyometric gym equipment) to become super-explosive. There were incredibly explosive athletes—tumblers, acrobats, martial arts masters—for centuries before metal boxes were manufactured and placed in gyms.
![]()
STEP ONE: STRAIGHT HOP
PERFORMANCE
· Stand with feet around shoulder-width, with your body flexed for action.
· Dip down slightly. (You only want a slight flexion in the knees—less than a quarter squat position).
· Without pausing, explode upwards, using the power of your lower legs plus all the total-body spring you can muster.
· “Pull” up with the shoulders, but keep the arms reasonably neutral.
· Land softly, catching most of your weight on the balls of your feet.
· Use the elastic rebound to immediately repeat the technique.
EXERCISE X-RAY
Simple hops should be the first phase of any explosive jump training, particularly for neophytes. Hops teach take-off and landing patterns, and strengthen the ankles and knees in preparation for more intense jump work. Due to the limited movement at the knee, jump height is naturally limited, making for an excellent, safe, foundation drill.
REGRESSION
This is one of the easiest basic jumping exercises. Making it less vigorous is done simply by jumping less intensely. Keeping the body “loose” rather than “flexed” (coiled like a spring), will also lessen the difficulty.
PROGRESSION
Make the hops total body movements by swinging the arms up with the hop, and bending slightly more at the knee. Don’t bend too much though, or you will be performing squat jumps (step 2).
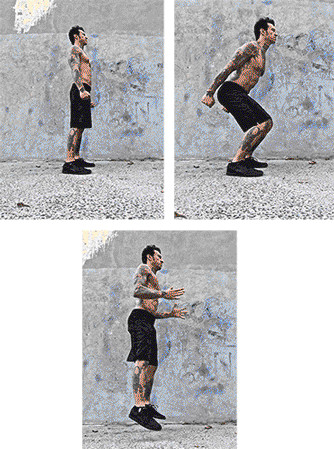
![]()
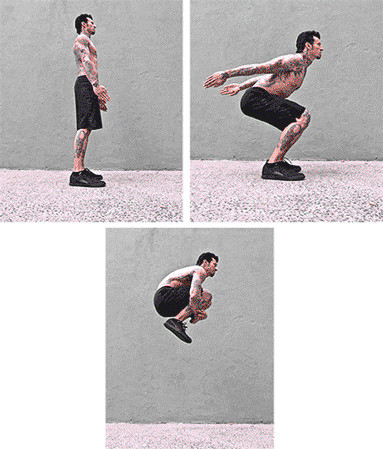
STEP TWO: SQUAT JUMP
PERFORMANCE
· Stand with your feet a little wider than shoulder-width, with your body flexed for action.
· Dip down into a squat. For most people, the peak knee-bend for maximum height will be not quite a half squat—around a third of the way down. Stronger athletes can explore greater depth, dipping until the thighs are parallel to the ground (see photos).
· Explode upwards, using the power of your lower body plus all the total body spring you can muster.
· Try to keep the arms reasonably neutral at first.
· After take-off, let the legs move naturally; don’t pull them up or thrust them down.
· Land softly, catching most of your weight on the balls of your feet.
· Use the elastic rebound to immediately repeat the technique.
EXERCISE X-RAY
The squat jump is the cornerstone of all jumping techniques. Ask a novice to “jump” and this is what they will instinctively do. Due to the knee-bend, greater height is achieved, and this results in more work for the knees on take-off, and for the knees and ankles on landing.
REGRESSION
A less acute bend of the knees will make this exercise easier. Focus on quarter squat jumps as a mini-step between pogo hops and squat jumps.
PROGRESSION
To work the knees more, you can bend to below parallel. This will strengthen the knees and gluteal muscles, but beware that bending the knees too acutely will reduce your explosive potential. Using a closer stance will also make most jump drills tougher.
![]()
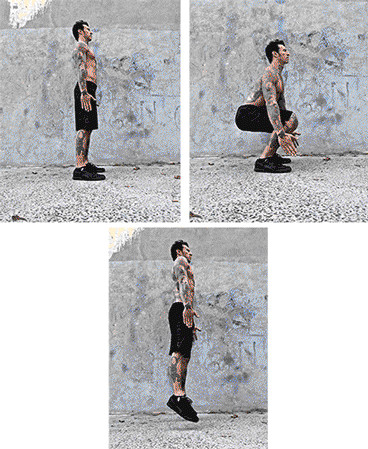
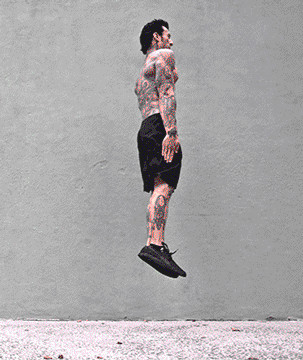
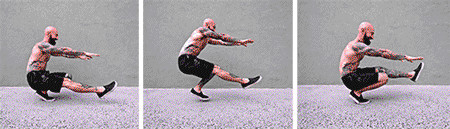
STEP THREE: VERTICAL LEAP
PERFORMANCE
· Stand with your feet a little wider than shoulder-width, with your body flexed for action. Keep your arms by your sides.
· Dip down into a squat. For most people, the peak knee-bend for maximum height will be not quite a half squat—around a third of the way down. Stronger athletes can go deeper.
· Explode upwards, using the power of your lower body plus all the total body spring you can muster.
· As you lift off, swing your arms up above you for maximum momentum.
· After take-off, let the legs move naturally; don’t pull them up or thrust them down.
· Land softly, catching most of your weight on the balls of your feet. Allow your arms to fall by your sides again.
· Use the elastic rebound to immediately repeat the technique.
EXERCISE X-RAY
Hops teach athletes to unlock the natural elastic forces inherent in the feet and ankles, a major fundamental of jumping ability through all mammal species. Squat jumps combined that with the power of the hips, legs and knees. With vertical leaps, you bring the arms into the mix, also. Many high-level agility movement patterns require optimal arm explosiveness to complete—look at front and back flips, and you’ll see what I mean.
REGRESSION
Begin this exercise slowly, with moderate swinging movements of the arms. Over time swing your arms to the fully overhead stretch position.
PROGRESSION
The vertical leap is a favorite of athletics coaches because you can easily record progress over time by measuring reach height.* This can be done as simply as reaching for a chalk-line on a wall.
*To learn more about this kind of measuring protocol, Google Sargent Jump Test.
TIP: You can still perform this exercise if you have limited ceiling space—just bend your arms.
![]()
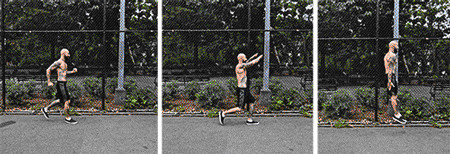
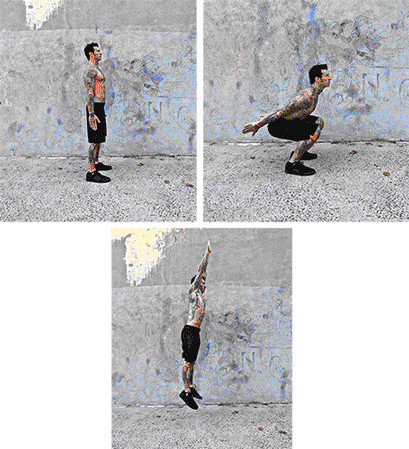
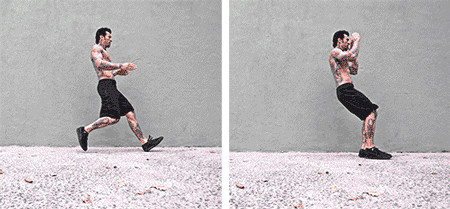
STEP FOUR: BLOCK JUMP
PERFORMANCE
· Take a short run-up—a handful of steps is better than too many.
· Swing your arms up and take one big step, then plant both your feet together.
· Your knees can bend a little as you dip down then immediately use your total body to “punch” down through the floor with both feet; swing down with your arms as you go.
· This “punching” down is designed to transfer your momentum into the floor, to push you up.
· Take off vertically, extending the body as you jump as high as you can.
· Land softly, catching most of your weight on the balls of your feet. Allow your arms to fall by your sides again.
· Reposition and repeat the technique.
EXERCISE X-RAY
Once an athlete has built a good level of ability in the basic vertical leap (step 3), it’s time to master the skill of blocking. Blocking involves taking horizontal momentum—generated from running a few steps—and turning it into vertical momentum—an upwards jump. (You “block” your running momentum by punching the floor with your feet, hence the term “blocking”). This kind of force-transference is useful in developing a good level of ability and explosive strength, and blocking specifically is an essential skill pattern to absorb if the athlete wishes to explore more advanced explosive drills such as front flips.
REGRESSION
An athlete can learn this drill slowly. Begin with only a couple of steps and master the feet-together transition at low speed first. It might help to think of the final big step before the block as a skip.
PROGRESSION
Instead of jumping into a linear air-position, advance by jumping into a tuck position (step 7) or a catch tuck (step 8).
Run up…
…plant both feet…
…and jump straight up, thrusting your hands down!
![]()
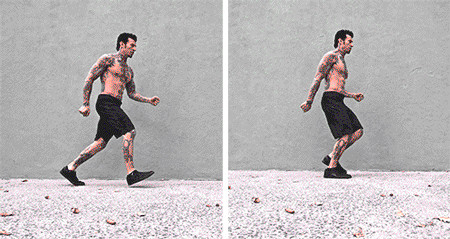
STEP FIVE: BUTT-KICK JUMP
PERFORMANCE
· Stand with your feet around shoulder-width, with your body flexed for action.
· Dip down into a squat, as for squat jumps (step 2).
· Explode upwards, using the power of your lower body plus all the total-body spring you can muster.
· At the peak of the jump, explosively bend your legs, driving your heels up and back, kicking yourself in the butt.
· After the kick, throw your legs back down for landing.
· Land softly, catching most of your weight on the balls of your feet.
· Use the elastic rebound to immediately repeat the technique.
EXERCISE X-RAY
Although your goal is to kick your glutes with your heels, the butt-kick jump is the first drill in the chain which requires you to lift your knees during airtime. If you look at the photos, you’ll see that the knees are pulled slightly forward by the hips. This will condition the hips to allow you to perform even more explosive tuck jumps, which come next in the chain. This is also the first step which places objective performance criteria onto the athlete: if you don’t jump to a certain height, or move with enough leg speed, you will not be able to kick your butt and release your legs in time for landing.
REGRESSION
Some athletes just can’t find the speed to kick their backside—at least, at first. They either can’t jump high enough, or can’t contract their hamstrings with enough force. It can help to begin unilateral butt-kick jumps: jump, but only kick yourself with one leg.
PROGRESSION
As ever, the arms can help with explosive momentum—taking them out of the picture will make this technique tougher. Place your hands behind your head—but keep the fingers loose and remember not to pull on your neck.
![]()
STEP SIX: SLAP TUCK JUMP
PERFORMANCE
· Stand with your feet around shoulder-width, with your body flexed for action. You can place the hands a little in front of the chest, palms down, or keep them by your sides (see photos).
· Dip down into a squat, as for squat jumps (step 2).
· Explode upwards, using the power of your lower body plus all the total body spring you can muster.
· At the peak of the jump, explosively draw up your knees up to slap your hands. (If you began with your hands by your sides, you’ll have to move them even quicker than your legs.) If you do it right, your knees will be about level with your hips at the top of the movement.
· After the tuck, throw your legs back down for landing.
· Land softly, catching most of your weight on the balls of your feet.
· Use the elastic rebound to immediately repeat the technique.
EXERCISE X-RAY
The slap tuck jump is an important step in learning a true tuck (bringing the thighs close to the chest) while jumping—which is beyond the abilities of the average athlete. The best way to learn any difficult bodyweight movement pattern is gradually. In step 4 (butt-kick jumps) you learned to lift your knees slightly during jumps. In this step, you’ll be lifting your thighs to about parallel, to touch your hands. In the next step you will learn to go beyond even that. Step-by-step progressions are always the way to go.
REGRESSION
This is an easy drill to regress—if you can’t raise your knees to the level of your hips, drop your hands to slap your knees at a lower point.
PROGRESSION
If slapping the knees is easy, you can explore harder variations with greater hand/arm movement, such as slapping the side of the calves, the insteps or your feet.
![]()
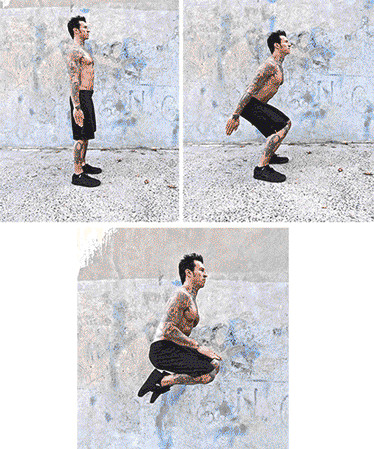
STEP SEVEN: TUCK JUMP
PERFORMANCE
· Stand with your feet around shoulder-width, with your body flexed for action.
· Dip down into a squat, as for squat jumps (step 2).
· Explode upwards, using the power of your lower body plus all the total-body spring you can muster.
· At the peak of the jump, explosively draw up your knees as close to your chest as you can. (This is called a tuck.) Your trunk will naturally lean forward, but try not to bend over excessively.
· After the tuck, throw your legs back down for landing.
· Land softly, catching most of your weight on the balls of your feet.
· Use the elastic rebound to immediately repeat the technique.
EXERCISE X-RAY
Tuck jumps confer some serious explosive power to the lower body. The calves and ankles, glutes, thighs and even the lower back need plenty of crisp speed to reach the height required for the movement, and the hips and abdomen must have great explosiveness to pull the knees up horizontally during the jump. Tuck jumps may seem simple, but they are an essential movement skill for more advanced explosive feats. Simply put, if you can’t tuck properly, you can forget becoming really fast.
REGRESSION
Form is everything on tuck jumps. If you can’t get your knees up close to your chest, try at least bringing them up to hip level. Increased knee height will come with practice.
PROGRESSION
If regular tuck jumps are no problem, increase your height. The classic way to test this is by adding a hand clap under your hamstrings at the peak of the movement. This also accentuates midsection involvement, and builds in some hand speed.
![]()
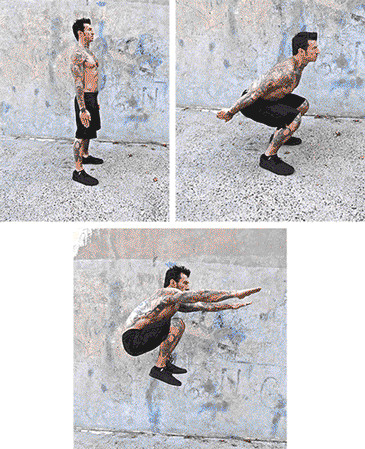
STEP EIGHT: CATCH TUCK JUMP
PERFORMANCE
· This bullet-point description is wrong. It has been drawn from the previous exercise. The correct description is found on p64 of my manuscript, and should read:
· Stand with your feet around shoulder-width, with your body flexed for action.
· Dip down into a squat, as for squat jumps (step 2).
· Explode upwards, using the power of your lower body plus all the total-body spring you can muster.
· Explosively draw up your knees as close to your chest as you can.
· At the peak of the jump, pull your shins into your body with your hands. Your thighs should be completely compressed against your chest at this point.
· Release your shins and, throw your legs back down for landing.
· Land softly, catching most of your weight on the balls of your feet.
· Use the elastic rebound to immediately repeat the technique.
EXERCISE X-RAY
Tuck jumps (step 7) require explosive power in the legs and hips to bring the knees up high. To be able to perform the Master Step of this chain—suicide jumps—an athlete also requires some forward power generated by the trunk, to really compress the legs into the abdomen tightly. Mastery of this exercise will develop this quality. “Pulling in” the legs with the arms during a tight tuck is also a very useful pattern in more complex explosive movements, like front and back flips. You may have seen gymnasts performing flips this way.
REGRESSION
At first don’t try to pull the tuck too tightly—just perform the best tuck you can, and try to get your arms to meet beyond the legs. Over time, wrap the arms around the legs, and finally pull the legs in tightly with the arms.
PROGRESSION
Once your tuck is tight—with a strong hug of the arms—focus on bringing the knees higher and higher, until they are under the chin.
![]()
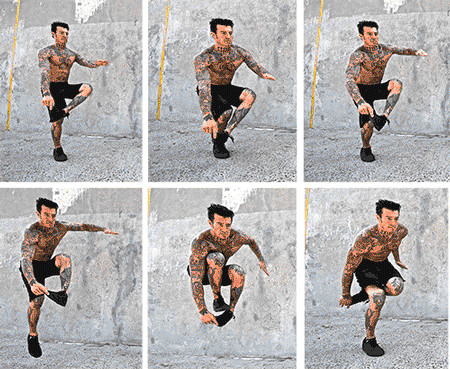
STEP NINE: THREAD JUMP
PERFORMANCE
· Grip the end of one foot with the opposite hand. Keep your standing leg straight, and your trunk as upright as you can.
· Dip slightly with the loaded leg, and explode upwards with that leg, tucking the knee as high, and close to your chest, as you can while staying upright.
· At the peak of the leg movement, whip your linked hand and foot under your jumping foot, so it’s behind you. Many athletes go wrong by trying to jump their foot through the hole; this is incorrect—you should lift your jumping leg up, and then pull the hole back.
· After the thread, throw your leg back down for landing.
· Upon landing, catching most of your weight on the ball of your foot.
· Reposition and repeat the technique, or immediately perform a reverse thread jump.
EXERCISE X-RAY
The term thread comes from breakdancing; you might even recognize the move from an old hip-hop video. It’s pretty obvious why it’s called what it is—you thread your foot through the gap like you’d put thread through the eye of a needle. This is a great unilateral way to safely prepare for the technical demands of suicide jumps. If you screw up, you can just release your foot and land safely.
REGRESSION
Always begin exploring this exercise with a very loose grip around your foot, in case you have to bail quickly. You should begin with a wider-angled hole by gripping the very end of your toes, but if you really need to you can sling a slim towel or belt around your ankle and hold that instead of your foot. That’s more forgiving to thread through as you learn the move.
PROGRESSION
Gripping the outside of your foot instead of the toes makes this move tougher. An even harder version of the thread jump involves beginning with your linked hand/foot behind your jumping leg. You then jump up and pass your hand/foot forward as your jumping leg threads through (the reverse thread jump). Eventually you will be able to perform the front and back thread versions back-to-back.
![]()
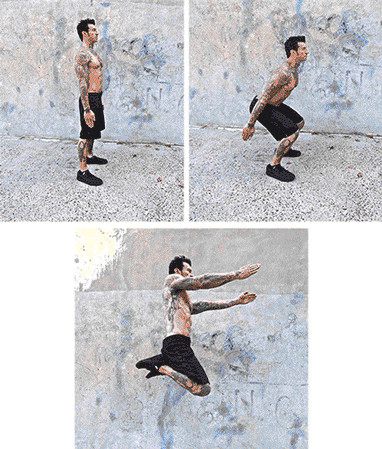
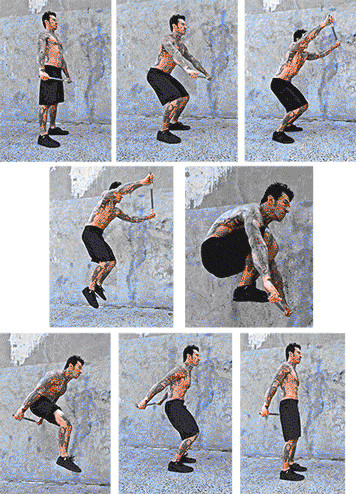
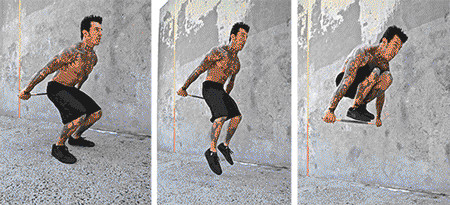
MASTER STEP: SUICIDE JUMP
PERFORMANCE
· Stand with feet around shoulder-width, with your body flexed for action. Hold a length of dowel (a broomstick works well) with a wide grip, in front of your hips. (If you are scared of falling at first, you can use a lightly-gripped rope or belt in place of the stick.)
· Stand up straight. (Beginners seem to think that bending/squatting to hold the bar lower will help. It won’t!)
· Dip down slightly. You only want a slight flexion in the knees—less than a quarter squat position.
· Without pausing, explode upwards, tucking your knees up to your chest.
· At the peak of the leg movement, whip the bar under your jumping feet, so it’s behind you.
· After the thread, throw your legs back down for landing.
· Upon landing, catching most of your weight on the balls of your feet.
· Reposition and repeat the technique, or immediately perform a reverse suicide jump (See page 64).
EXERCISE X-RAY
Any athlete can practice simple jumps—like steps 1-3—to build maximum jumping power. This chain is designed to give you more than that. From step 5 (butt-kick jumps) onwards, you will have been gaining the strength, power and technique to tuck perfectly—to jump up, bringing the knees up to the chest. Suicide jumps represent the ultimate tucking drill: if you can’t bring your knees very high—and quickly—it’s impossible to pass the bar. The exercise also requires mastery of all the basic components of explosive jumping; a powerful lift-off, hip and waist integration, the capacity to quickly throw down the feet (faster than gravity), and expert force-absorption upon landing. Once this drill is second nature to you, more impressive explosive techniques—kip-ups, but also the front and back flips, in particular—will come much easier than you would otherwise imagine.
GOING BEYOND
Once an athlete can consistently perform smooth, clean suicide jumps, he or she will have—by necessity—developed the skills of launching, landing, and especially tucking to a high level. These are the most important abilities required to excel in more complex explosives, flips in particular. That doesn’t mean your time performing power jumps is over. Jumps are an essential movement to build—and maintain—power in the lower body. Just like a karate master must continue performing their basic forms in order to drill the fundamentals, so all athletes desiring power must keep working with jumps.
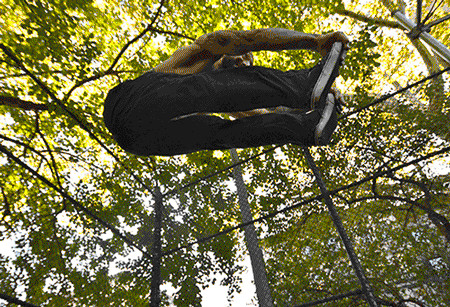
So where do you go, once the suicide jump is easy? First things first—the suicide jump is easy, right? Simple way to tell—do it backwards! Hold the bar behind your back, and jump up, pulling the bar under your feet in mid-air, and in front of you.
In fact, I’m teasing. The reverse suicide jump is much, much harder for most athletes than the basic suicide jump. The awkward position of the bar, combined with the fact that humans almost never jump backwards over an object, makes this version very tricky. But if you’re really looking to master the suicide jump, this is a must-do. Try it, at least—but be careful not to crash!
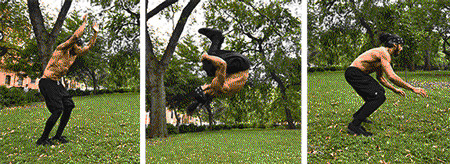
As ever, you can increase difficulty with calisthenics movements simply by manipulating leverage. In a tuck, for example, the knees are bent, transmitting less load to the hip flexors and midsection—extending the legs will increase the workload, and the challenge. You can do this by gradually decreasing your knee-bend until the legs are locked, or you can start with your legs locked, and increase the angle of your legs. This second method is shown below; start with the angled pike jump, and move to a full pike jump, where the straight legs wind up parallel to the floor.

The angled pike jump…
…The full deal!
An alternative way of moving forward in your jumping ability is to perform more explosive mid-air stunts, requiring more height and total-body power. Of course, this is exactly what you are doing by moving onto the front and back flip chains in this manual: what is a standing front flip if not one of the hardest jumping techniques you can perform?
You launch, you tuck, you land. The flips can be seen as an advanced continuation of the jump series.
It could be argued that if you are at a high level on the back or front flip chain, you no longer need to perform simple jumps to build power, as the flips themselves require power-jumping. I personally think that retaining some basic training on jumps is a great idea; simply because flips and similar techniques require a lot of energy to focus on agility, equilibrium and coordination. Basic up-and-down jumps require very little—all your energy and focus can be devoted to power and height (or length), making jumps more efficient for building base power. Many athletes begin their jump training with box jumps, but I am convinced that if you’re going to explore jumping up onto objects, this is best tackled after some basic proficiency. Box jumps add variety and also allow for height measurement. They also require a different mindset than regular jumps. Remember though, as long as the object you jump onto is dry and sturdy, you don’t need a gym plyo box. Take a tip from those parkour guys...they use anything. Now that’s functional jumping!
Always keep building power! Linear progression can be measured in plenty of ways; with vertical reach exercises, standing bound (i.e., horizontal) jumps, and box jumps.
SMALL SPACE DRILLS
Following are three useful speed and power techniques you can utilize in your routine for variety, as ancillary work or to train your muscles from different angles. They are all solo drills, and they require zero equipment. Unlike the progressive exercises in the chains, most of the following drills can be performed rhythmically for higher reps, and can work well when used with any of the chains in this book. In this sense, they can also work as warm-ups or finishing exercises in an explosives session.
COSSACKS
Jump training tends to build power in a shallow range of motion. To power-up the knees, hips and ankles on the stretch, you need Cossacks. Named after the traditional dance of the Cossack people, assume a low stance and bob up and down slightly, stretching your legs out in an alternate manner. Also builds tension-flexibility (supple strength) and balance.
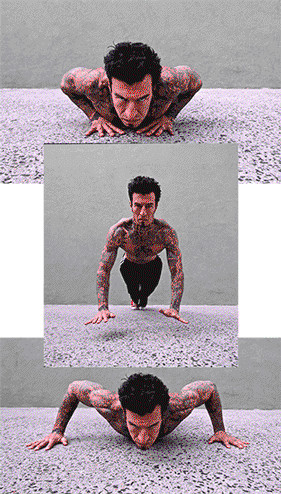
WIDE-TO-CLOSE POP-UPS
Fast legs must be paired with fast arms to unlock total-body power. From a close pushup position, dip and explode your body up so that your hands leave the floor. Quickly spread them so that you “catch” yourself in a wide pushup position. Without pausing, dip down and repeat for reps.
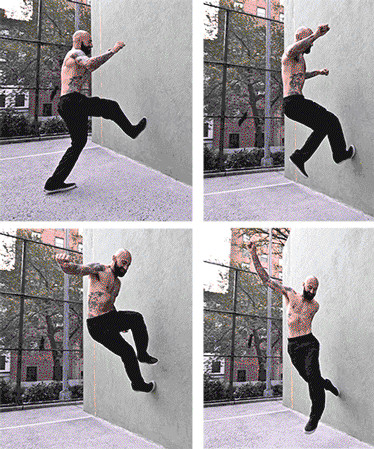
WALL THREADS
This one’s similar to the two threads in the preceding chain (Step 9 and 10), so it works well with jumps, although like all these drills you can mix and match. Place one foot on a sturdy vertical base, and jump over it, keeping the foot in place as long as you can. Awesome for fast feet.
LIGHTS OUT!
If you really want to become explosive, your legs are the source of it all—and the best way to train them is with progressive power jumps. Weights or slow movements just won’t do it. All athletes should learn the five basic skills of jumping, which will impart power on their own, but which are indispensable if the athlete wishes to move forward in acrobatics.
Although I talk about the “skills” required in jumping, these skills are simple and easy to learn, and are very closely connected to simple power (strength x speed). For this reason—although there is some overlap—jumps should be primarily thought of as a basic power movement, rather than a complex skill movement (like a kip-up). The different types of drills must be approached differently, as I explain in Part III of the manual.
When utilized correctly, the jump chain will build maximum speed-power in the hips and lower body. To round out a basic power training regime, the athlete should pair up jumps with a movement chain which performs a similar job for the upper-body and arms. The best drills for this are power pushups: they’re up next.