The Complete Chess Course From Beginning To Winning Chess! (2016)
Book Six
How to Fight Back
Chapter Two
Resourceful Defense - How to Simplify
No sooner have I convinced you of the value of active defense than I must add a word of caution.
Alert, aggressive defense is fine, but it isn’t always possible. What do you do when it isn’t possible? Do you just allow the attack to overwhelm you? Do you give up hope, resigning yourself to the inevitable? Or do you look for some resource against your opponent’s attack?
Simplify!
Few of us realize that one of the best weapons against an attack is to play for an exchange of pieces. An attack flourishes on complications, on the efforts of powerfully posted pieces aimed at cramped positions.
Every time you simplify, you remove a hostile piece that might have done a great deal of damage. You’re also removing a unit of your own that might have been idle or useless. But above all, you’re whittling down the force of your opponent’s attack; you’re reducing the danger to which you’re exposed.
And remember this: if you’re ahead in material, simplifying is even more useful to you. For you not only smother the attack, you also bring the game to the ending stage where you can make the best use of your extra material.
To see how quickly simplifying puts an end to an attack, let’s study some particularly effective examples. (D)
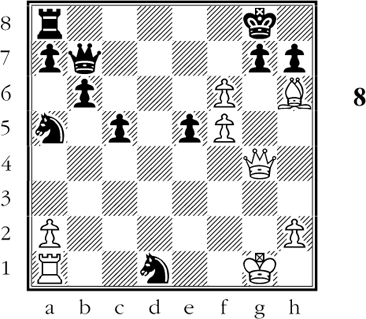
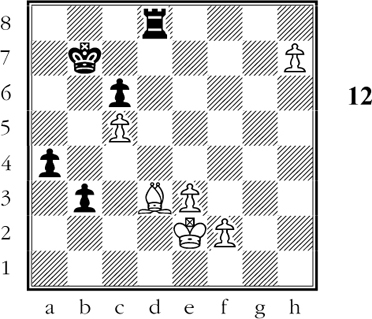
Black to move
Black is well ahead in material, but his position is uncomfortable. What is his most forcing line?
In Diagram 8 Black breaks the force of the attack once and for all by playing:
1…Qh1+!
This neat resource leaves White no choice.
2.Kxh1 Nf2+
And Black continues with 3…Nxg4. With the queens gone, Black has nothing to fear. He wins easily, thanks to his extra material.
The situation in Diagram 9 is much more puzzling. Black has a piece for a pawn, but one of his rooks is attacked and cannot move. But this attacked rook is the key to his defensive position, guarding his attacked bishop! In short, Black has a baffling problem. How is he to solve it? (D)
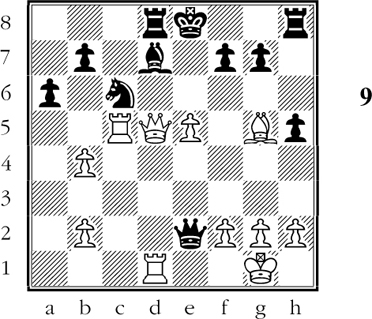
Black to move
In this difficult defensive situation, Black can easily go wrong. For example, if 1…Be6?? 2.Qxd8+! Nxd8 3.Rxd8#.
Should Black try 1…Ne7 the sequel might be 2.Qd6 Nf5 3.Qxd7+! Rxd7 4. Rc8+ and mate next move.
Or 2.Qd6 Nc8 3.Rxc8! and wins.
For such picayune defensive tries, we can only comment pityingly, “Black isn’t using his head.”
No, such uninspired moves will never do. The right way is a drastic simplifying move:
1…Qxd1+!!
This breaks the attack.
2.Qxd1 Bg4!!
Splendid play.
If now 3.Bxd8 Bxd1 and Black is a piece ahead with an easy game.
Or 3.Qxd8+ Nxd8 with the same result.
Or 3.Qxg4 hxg4 4.Bxd8 Kxd8 - again with the same result.
In each case Black has a clear win with his extra material. And he has smashed White’s attack.
How to Prepare Simplification
Though simplifying may be desirable in certain positions, it may sometimes require some preparation. This is the case, for example, in Diagram 10. (D)
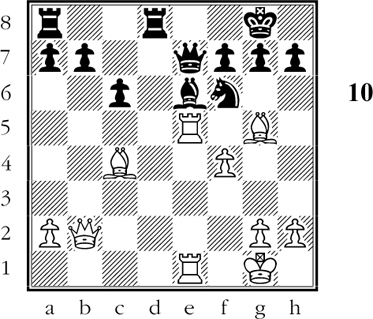
Black to move
Though two pawns ahead, Black is in difficulties. How can he steer into a favorable endgame?
Black is subjected to a double pin, and in addition he must guard against the menace of f4-f5. The fact that he is two pawns ahead indicates the course he should adopt.
It’s well worthwhile giving up one of his extra pawns if he can thereby simplify the position. In that way he will no longer be subjected to attack; and, what is equally desirable, he will be able to win the endgame with his extra remaining pawn.
Black’s course is therefore clear:
1…Qc7!
Black unpins his bishop. He thereby threatens …Bxc4 - not to mention …Qb6+ forcing the exchange of queens.
2.Bxe6 fxe6
See how nicely Black’s plans have developed. If now 3.Rxe6 Qb6+ 4.Qxb6 axb6 5.Bxf6 gxf6 6.Rxf6 Rxa2 and Black wins the endgame with his extra pawn.
3.R1e3
Momentarily preventing the exchange of queens as …Qb6 will not be a check.
3…Rf8!
Well played. He unpins the knight, threatening …Nd5. This would drive away White’s rook from e3, thus preparing the way for …Qb6+ and the exchange of queens.
Black has left his opponent at a loss for a good continuation. White feels there is nothing better to do than to regain one of the pawns. So:
4.Bxf6 Rxf6 5.Rxe6 Rxe6 6.Rxe6 Qb6+! 7.Qxb6 axb6
Black has achieved his purpose. By simplifying, he has relieved the pressure on his game. The attack is over, and Black will win the endgame with his extra pawn.
In Diagram 11 Black is faced with a much more difficult defensive task. He is a pawn down, his king is insecure, and there is an immediate threat of Rxb7. (D)
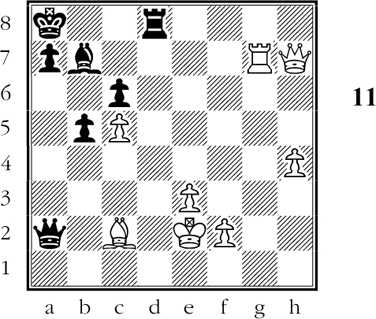
Black to move
What move satisfactorily guards Black’s menaced bishop in this difficult situation?
1…b4!!
This threatens …b3 and thus induces White to simplify. But what is this? - isn’t Black’s bishop attacked??
2.Rxb7 Qa6+!
The other point of Black’s previous move. By opening up the diagonal for this check, he made it possible to win the rook.
3.Bd3 Qxb7 4.Qxb7+ Kxb7 5.h5 b3! 6.h6
An exciting ending. Black has calculated well, having foreseen that if 6.Kd2 (instead of White’s last move), then 6…b2! wins at once!
6…a5! 7.h7 a4 (D)
White to move
Black’s rook is more agile than White’s bishop; and Black’s connected passed pawns are more menacing than White’s h-pawn.
Black has shown splendid judgment in playing for simplification. Though the ending is close, it favors him in all variations.
Consider this possibility: 8.Kd2 a3 9.Kc3 a2 10.Kb2 Rxd3!! 11.h8Q Rd1!. If now 12.Qh7+ Ka6 and Black wins with the coming …a1Q+. Beautiful play!
8.Bc4
Now Black can win by 8…b2 9.Ba2 a3 10.Bb1 Rh8 11.Kd2 Rxh7! for if 12.Bxh7 a2 and the pawns queen.
But Black has had enough excitement, and decides on a simpler course which is just as convincing:
8…Rh8
Black’s idea is that if now 9.Bg8, then 9…b2 forces the bishop to return to a2, allowing …Rxh7 in reply.
9.Bd3 a3
White resigns, for if 10.Bb1 a2 is deadly. Black’s incisive timing has made this endgame a pleasure to play over. But even more admirable was his foresight in playing for simplification. In this way he neutralized all attacking possibilities on White’s part and prepared for a winning endgame.
Patient Defense
Aggressive defense is good - if you can achieve it. Simplifying is good - if you can achieve it. But what do you do where neither of these methods is possible? In that case you must bide your time - not with passive squirming, but by constantly remaining on the lookout for aggressive counterplay and useful simplification.
How the defender can work toward these goals is shown in the following play, which is more difficult than in the previous examples. (D)
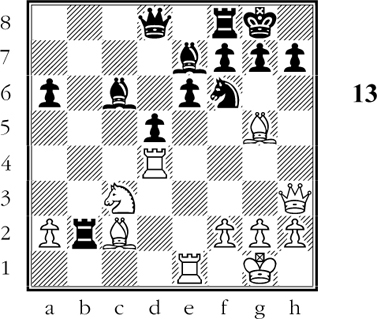
White to move
Black is two pawns ahead with a solid position. But when White hits out boldly, Black cannot depend on his material advantage alone.
Many players in Black’s position (Diagram 13) would think, “It’s all over but the shouting.” They would therefore be unprepared for the vicious attack now unleashed by White.
Of course, White gets nowhere with 1.Bxf6 (hoping for 1…Bxf6???? 2.Qxh7#) 1…Rxc2! with nothing to fear. But White has a different way:
1.Bxh7+
This is not sound. But Black, as you will see, must be wary.
1…Nxh7
Black is not afraid of 2.Bxe7 Qxe7 3.Rh4 despite its deadly appearance. For then he interpolates 3…Qf6! (threatening mate in two) and thereby gains time to protect the knight with 4…Qf5.
2.Rh4 Bxg5 3.Rxh7 Bh6 4.Rxh6 gxh6 5.Qxh6
White threatens a murderous attack with 6.Re3 followed by Rg3+ and mate. Luckily, Black has provided against this seemingly decisive attack.
5…Rb7!!
But not 5…f6?? 6.Qg6+ Kh8 7.Re3 and Black can resign.
6.Re3 f6!
Now that Black has guarded the seventh rank with his previous move, Black need not fear 7.Qg6+. (He has the convincing reply 7…Rg7.)
7.Rg3+ Kf7
Note how artfully Black has combined the details of his defensive plan. He is safe against 8.Rg7+ (or similar moves), because his rook at b7 is guarded by his bishop.
Black has defended successfully; White has shot his bolt. The rest is easy.
8.f4 Qb6+
If now 9.Kh1 Qb1+!!.
9.Kf1 Ke8 10.f5 e5 11.Rg6 Bb5+
White resigns. An impressive example of resourceful defensive play by Black.
In Diagram 14 Black’s problem is just as difficult, though somewhat different. He is a piece and a pawn to the good, but his king is uncastled and condemned to an exposed position in the center.
Worse yet, White’s pieces are all developed and aggressively placed, whereas Black’s development has been greatly delayed. (D)

White to move
Black’s problem is: can he defend himself successfully despite his arrears in development?
If Black is left in peace for a move or two, he can play …d6 and …Be6 - or else he can simplify with …Nxd5 etc. Consequently, if White is to achieve anything with his attack, he must try to force the pace right now. Thus the next few moves will be critical for both sides.
1.Bc3 Rg8 2.Bf6 Bg5
Black must get rid of the pin at once.
3.Rxe7!?
White hopes for the following tricky variation: 3…Nxe7 4.Nxe7 Qxf6 5.Nxg8 Qg7 6.h4! Bxh4 7.Qxf4 Bg5 8.Qxf7 and White has regained the lost piece.
3…Bxf6!
Alert defensive play, after which White must beat a retreat. Meanwhile, the exchange of pieces has eased Black’s game.
4.Re4 Bg5 5.g4 Qg6 6.h4 Bxh4 7.Qxf4 d6
Now Black is ready for …Qxg4+. This threat - for it is a threat - forces White to gobble a pawn or two. But the result is the exchange of queens, whereby Black eases his position still more.
8.Qxf7 Qxf7 9.Rxf7 Ne5! 10.Rxh7 Nxc4 11.Rxc4 c6
Black’s game is still unwieldy - but in no danger. With the queens off the board, he has nothing to fear.
12.Nc7 Rb8 13.Rf4 Be7 14.Rff7 Kxc7 15.Rxe7+ Kb6
We need not follow the play any further. With a piece to the good and his king in perfect safety, Black is sure to win.
We have so far learned a number of valuable defensive techniques. We have seen that the defender must strive to be alert and aggressive. We have noted the value of simplifying in order to break up the strength of the attack.
Nor is this all. We have seen that sometimes the defender must hold out for a number of moves, patiently but resourcefully biding his time until he is safe from danger.
In the next chapter we turn to another important facet of defensive play. This coming chapter stresses the point that the defender can sometimes succeed only by drastically limiting his goals. If you understand this paradox and put it to good use, you will avoid many a lost game.