The Complete Chess Course From Beginning To Winning Chess! (2016)
Book Five
How to Win When You’re Ahead
Chapter One
Superior Force Should Win
The basic proposition of this book is that you can win when you’re ahead because, in chess, superior force should win! There may have been times in your own games when you have been ahead in material without being able to win. If that is the case, this book should help you greatly. Once you have adequate force, you must be able to win with it.
It is easy to see that when you’re a queen ahead, or a rook, or even a bishop or knight ahead, the win is easy. In master games, when a player loses a piece the end is a foregone conclusion and he generally resigns.
But suppose you’re “only” a pawn ahead? To win a pawn is much more common than to win a piece. And, as you will see, most master games are decided by an extra pawn.
Most games of amateurs could likewise be decided by the advantage of a pawn if - and this is a very big if - the ordinary chessplayer knew how to make use of his extra pawn.
That is what most of this book is about - how to make use of a pawn ahead. Here you will see how the pawn becomes increasingly important as we come to the endgame stage. In the opening, when there are a great many pieces on the board, an extra pawn may seem a trifling matter. But in the endgame, with perhaps only a king and pawn left against a king, the extra pawn looms very large indeed as it proceeds inexorably on its way to the queening square.
There, in a single sentence, you have the secret of the extra pawn’s power - its power to become a queen on reaching the eighth (or first) rank. In this book you will have many examples of the pawn’s power. By studying these examples you will learn to win many more games. You will learn to win when you’re ahead.
The Elements of Cheskmate
The most basic examples of the use of superior force are the elementary checkmates:
king and queen vs. king
king and rook vs. king
king and two bishops vs. king
king, bishop, and knight vs. king
These checkmates are achieved on the open board. That is, no forces are present other than the units named.
Why are these checkmates important?
They represent the minimum force necessary for checkmate; but with such force it is possible to achieve checkmate no matter how the opponent plays. The player who is familiar with these checkmates can see that there is a purpose in chess. The player who is not familiar with these checkmates is necessarily at a loss in understanding how to bring a game to a satisfactory end.
Knowing these checkmates, then, is the first step toward playing decisive chess with a clear goal before you.
Checkmate with the Queen (D)
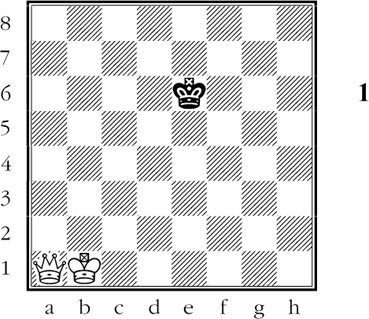
White to move
White brings his king towards the center, cuts down the mobility of Black’s king, and then drives him to the side of the board where the checkmate will take place.
1.Kc2 Kd5 2.Kd3 Kc5 3.Qf6 Kd5 4.Qe7 Kc6 5.Kc4 Kb6 6.Qd7 Ka6 7.Kc5 Ka5 8.Qa7# (D)
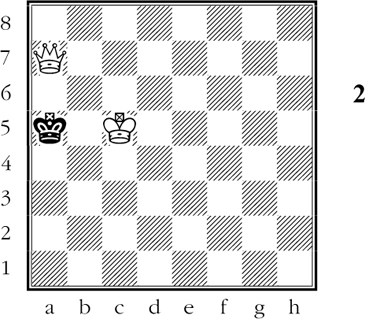
Black is checkmated.
Another standard checkmate position would have arisen if White had played 8.Qb5#.
Starting from Diagram 1, the black king had a great many alternative possibilities. However, the standard procedure, as outlined under Diagram 1, would have been exactly the same.
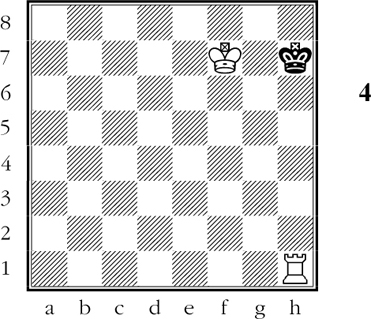
Checkmate with the Rook
Checkmate with the rook is not quite so easy. This stands to reason, as the queen has the combined powers of the rook and bishop. (D)

White to move
Again White brings his king to the center and then cuts down the black king’s mobility, forcing him to a side row.
1.Kb2 Kd4 2.Kc2 Ke4 3.Kc3 Ke5 4.Kc4 Ke4 5.Re1+! Kf5 6.Kd4 Kf4
Note what happened at move 4; when the kings face each other horizontally or vertically, a rook check greatly limits the king’s mobility.
(White’s next move will repeat the maneuver.)
As a result, the black king is now limited to three files.
7.Rf1+! Kg5 8.Ke4 Kg6 9.Ke5 Kg5 10.Rg1+! Kh5
Now Black’s king is marooned at the side of the board. The end is neigh.
11.Kf4 Kh6 12.Kf5 Kh7 13.Kf6 Kh8 14.Kf7 Kh7 15.Rh1# (D)
Black is checkmated.
This rook checkmate ended with the same type of position as the queen checkmate in Diagram 2. There is one important difference, however: the extra power of the queen gives it an alternative checkmate position. This is not true in the case of the rook.
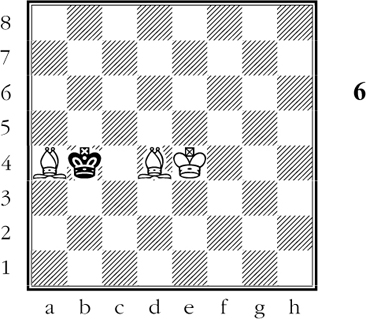
Checkmate with the Two Bishops
Just as the rook is weaker than the queen, the bishop or knight is weaker than the rook.
A single bishop or a single knight cannot enforce checkmate. In fact, even two knights cannot enforce checkmate.
Two bishops, however, can force checkmate. The process, though a bit lengthy, is fascinating because it gives us a glimpse of the power of the two bishops on the open board. (D)
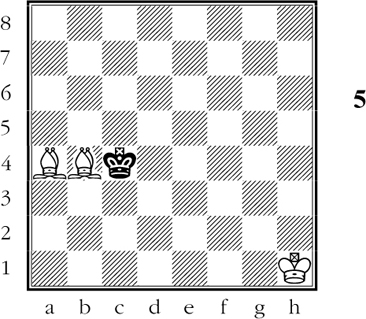
White to move
Unlike the queen or the rook, the two bishops can give checkmate only on one of the four corner squares. The black king is well situated here for a prolonged resistance.
1.Be1 Kd3 2.Kg2 Ke2 3.Bf2 Kd3 4.Kf3 Kc3 5.Ke4 Kc4 6.Bd4 Kb4 (D)
White to move
White has brought his king into action, and his next job is to drive the black king to a side row. The process is slow but sure.
7.Bd1 Kc4 8.Bc2 Kb4 9.Kd5 Kb5 10.Bc5 Ka6 11.Kc6 Ka5 12.Bd6 Ka6 D)
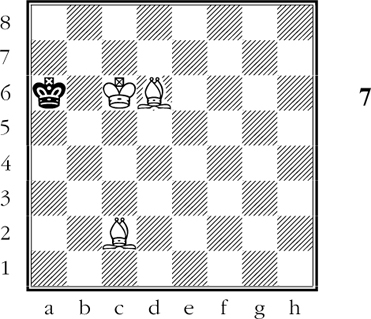
White to move
White has driven the black king to the side. Note how powerfully the bishops cooperate. The final phase is to drive the black king to a8, where he will be checkmated.
13.Bb4 Ka7 14.Kc7 Ka6 15.Bd3+ Ka7 16.Bc5+ Ka8 17.Be4# (D)

Black is checkmated.
White brought his king to the center, drove Black’s king to the side, and was then ready for the kill. His smoothly cooperating bishops finally checkmated the black king on a corner square.
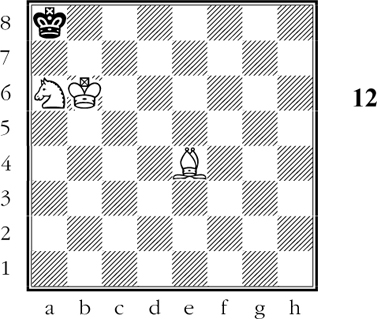
Checkmate with the Bishop and Knight
This mate is really difficult, and even experienced players have been embarrassed by the requirement of forcing the checkmate in 50 moves. (D)
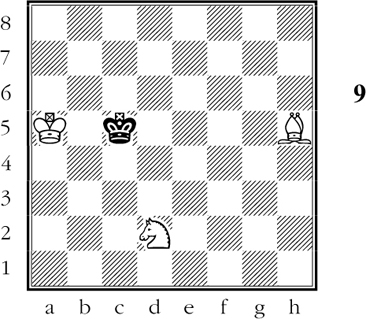
White to move
To bring about this checkmate requires the highest degree of cooperation of the checkmating forces. The mate can only take place on a corner square of the same color as those on which the bishop travels.
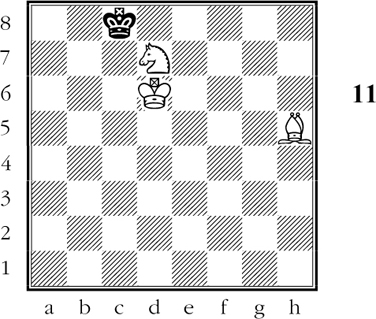
1.Nb3+ Kc6 2.Kb4 Kd5 3.Bf3+ Kd6 4.Nd4 Ke5 5.Kc4 Kf6 6.Kd5 Kf7 7.Nf5 Kf6 8.Nd6 Kg6 9.Ke5 Kg7 10.Be4 Kg8 (D)

White to move
The hard-working white pieces have at last driven the black king to the side. Next comes the task of forcing him to a light corner square - a8. This requires patience!
11.Kf6 Kh8 12.Nf7+ Kg8 13.Bf5 Kf8 14.Bh7 Ke8 15.Ne5 Kf8 16.Nd7+ Ke8 17.Ke6 Kd8 18.Kd6 Ke8 19.Bg6+! Kd8 20.Bh5 Kc8 (D)
White to move
White has accomplished the hardest part of his task. Yet, though the black king is only two squares away from the corner, it will still take nine moves to finish the job.
21.Nc5 Kd8 22.Nb7+ Kc8 23.Kc6 Kb8 24.Kb6 Kc8 25.Bg4+ Kb8 26.Bf5 Ka8 27.Nc5 Kb8 28.Na6+ Ka8 29.Be4# (D)
Black is checkmated.
One of the best ways to get an insight into the powers of the pieces is to practice these checkmates alone or with a friend.
Why Superior Force Should Win
From these basic checkmates we learn, then, that there are certain material advantages which enable us to force checkmate.
However, an advantage in material has many other uses. Nor do we have to wait to remove all the pieces from the board in order to win the game.
For example: you have seen how to check-mate a lone king with your king and queen. Now, suppose you have White in a game which starts like this:
Petroff’s Defense
White - Black
1.e4 e5 2.Nf3 Nf6 3.Nxe5 Nxe4? 4.Qe2! Nf6?? 5.Nc6+! Be7 6.Nxd8 Kxd8
You have won Black’s queen, and given up a mere knight in return.
How will the game proceed from this point? The superior power of the queen is bound to tell in your favor. Think of all the long-range swoops the queen is famous for; all the double attacks; all the divergent checks.
Clearly you will be able to make all sorts of attacks that Black, with his disadvantage in material, won’t be able to meet adequately. After all, there will be more power in your attacks than he can muster for defense.
In short: your initial material advantage will lead to greater material advantage.
You can also make use of your material advantage in another way. The more you swap down, the nearer you bring Black to that dreaded endgame stage where he cannot hope to escape checkmate. So, sometimes when you threaten to exchange, he will evade the transaction even if it costs him some material.
Of course, he may not be content to let you whittle down his forces more and more. Realizing the hopelessness and dreariness of his situation, he may resign - conceding that “superior force should win.”
Now let’s suppose you win a rook early in the game. Here again, by threat of exchange or by overwhelming force, your material advantage will help you to win.
Suppose you win a bishop or a knight?
The picture is still the same, despite the fact that neither of these pieces can force checkmate. In the earlier part of the game they can exert their superior force for many purposes, such as winning pawns.
Winning pawns? Surely that means very little. Most players lose pawns without a qualm. And of course it’s absurd to think of a pawn forcing checkmate. Yet this attitude of contempt, widespread though it is, is based on a serious fallacy. Because the pawn has the potential power of becoming a queen through promotion at the eighth (first) rank, the pawn is actually of great value.
Among masters, the advantage of a pawn habitually decides the fate of a game - of championship tournament and title matches. To take one example, the great 34-game struggle between Alekhine and Capablanca in 1927 made Alekhine world champion when he scored the decisive win through the advantage of a “mere” pawn!
The same advantage would also be decisive in the games of lesser players, if only they knew how to make use of it. It is the purpose of this volume to deal with this vitally practical problem. By learning how to win when you’re ahead, you will greatly increase the number of your victories.
Before we turn to some of the important features of utilizing a material advantage, we need to be very clear about the value of each piece in relation to the others.
The Relative Value of the Pieces
|
Queen |
9 points |
|
Rook |
5 points |
|
Bishop |
3 points |
|
Knight |
3 points |
|
Pawn |
1 point |
For most readers this table of values will be in the nature of review, but let’s dwell briefly on what it tells us.
The queen is by far the strongest of the forces, not to be parted with unless you obtain heavy compensation.
Two rooks, worth ten points, are somewhat stronger than a lone queen.
Bishop and knight, know as “minor pieces,” are each valued at 3 points. You may therefore readily exchange a bishop for a knight or a knight for a bishop.
A rook is definitely worth more than a minor piece (5 points vs. 3 points).
A rook is worth more than a minor piece plus a pawn (4 points).
Two minor pieces (6 points) are worth more than a rook (5 points).
To play chess well, it is absolutely essential to have a thorough grasp of the relative values of the forces.
Without this knowledge, you cannot even know whether you are ahead or behind in material. You are also at a loss, without this knowledge, when it comes to exchanging pieces. A player who does not know the values of the pieces has no way of knowing whether an exchange is desirable or not.
Again, a player who lacks this knowledge is greatly limited in his use of threats. To be able to threaten your opponent’s forces, you need an exact notion of what you propose to capture and what you may be called upon to give up.
We have said that superior force should win, by and large. It should win most of the time, or generally. There are important reasons for using these limited phrases so repetitiously.
The painful fact is that superior force does not always win. Why?
In the first place, there are certain rare theoretical positions - stalemate situations, for example - in which superior force does not win. As a rule, however, the player who has his wits about him can avoid such disappointments.
A second exception to the rule that superior force should win lies in the possibility of sacrifices. These are brilliant moves that give up material purposely, with a view to obtaining adequate, or more than adequate, compensation.
Take the following position as an example: (D)
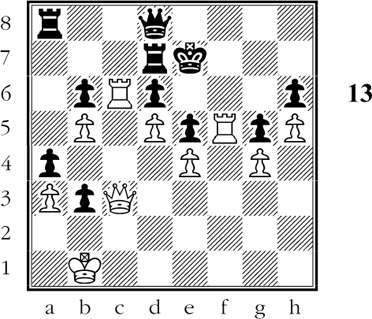
White to move
White plays 1.Qxe5+!!, a beautiful move that forces 1…dxe5. White has either sacrificed or blundered - which is it? The answer: 2.Re6#! It was a sacrifice!
Diagram 13 is a fine example of a sacrifice. Ordinarily, when a player loses his queen for a pawn, we say the move is idiotic. When a player gives up his queen for a pawn - and knows what he is doing - we say he is inspired.
If you think about it carefully, you will see that sacrifices are not really an exception to the rule that superior force should win. Sacrifices aim at achieving (a) checkmate or (b) superiority in material. So, although they often shock us, there is indeed method in their seeming madness.
The third exception to the rule that superior force should win is a very sad one. A player with a material advantage ought to win. But if he blunders away his advantage, or doesn’t know how to make use of it, or lets his opponent slip out of his difficulties, he may very well end up by not winning.
Later on we will pay some attention to the exceptions, just by way of precaution.
But first, let’s study the techniques for winning with superior force.