The Complete Chess Course From Beginning To Winning Chess! (2016)
Book Four
How to Play the Black Pieces
Chapter One
How to Exploit White’s Weaknesses
Because Black does not have the first move, we are prone to think of him as being forced onto the defensive from the very start. You often hear extreme views, expressed about “White’s initiative” and “White’s birthright of the first move.”
You can be reassured about Black’s chances from the very start. All the statistical analysis we have about the results of games show that Black breaks even or else is very slightly in the red.
In fact, some modern theorists went to the other extreme and announced ominously that “White’s game is in its last throes!”
However, this is definitely going too far. All that we want to establish in this book is that with best play on Black’s part, White’s theoretical advantage will disappear with astonishing rapidity.
And remember this: all talk about White’s theoretical advantage presupposes that White will play flawlessly - the first-class chess shown in Third Book of Chess, the previous book to this. In actual practice, White often goes wrong in one way or another, giving Black his chance to seize the initiative.
In this volume it is our purpose to study the ways in which Black seizes the initiative. We begin with his methods of exploiting weaknesses created by White.
Weaknesses in the King’s Position
It often happens that White, in his eagerness to press a real or imagined advantage, allows a weakness to be formed in his position. Black must be alert in observing such weaknesses and pouncing on them. The following two games show how it is done.
Queen’s Gambit Declined
White - Black
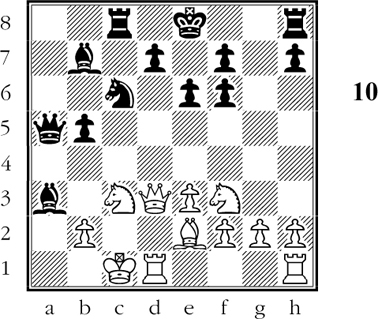
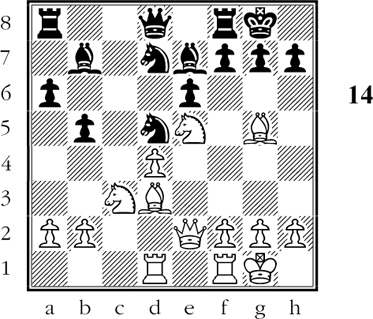
1.d4 d5 2.c4 e6 3.Nc3 Nf6 4.Bg5 Be7 5.e3 0-0 6.Nf3 h6 7.Bh4 Ne4 8.Bxe7 Qxe7 (D)
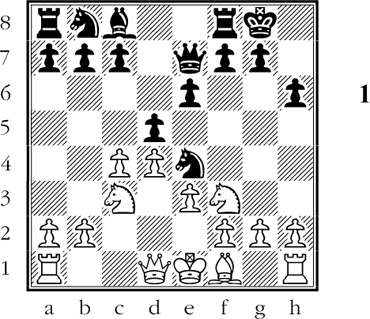
Black plays to simplify the position.
Black’s handling of the opening deserves close study. His position is cramped, and his bishop on the light squares has no scope. He therefore exchanges some pieces in order to create elbow rook for his remaining forces.
In the position of Diagram 1 he has already achieved a promising set-up. Thus, if 9.Nxe4 dxe4 10.Nd2 e5! and Black actually wins a piece after 11.Nxe4? exd4 12.Qxd4?? Rd8 etc. (In any event, after 10…e5! Black has an open diagonal for his bishop.)
Again, after 9.Bd3 Nxc3 10.bxc3 dxc4 Black has freed himself and can play …b6 and …Bb7 with a splendid diagonal for his bishop.
9.cxd5 Nxc3 10.bxc3 exd5 11.Qb3 Rd8 12.c4 dxc4 13.Bxc4 Nc6 14.Qc3 Bg4 (D)
Black is already operating with threats.
Black has achieved a splendid development, and White finds himself in difficulties. (Black’s threat is 15…Bxf3 16.gxf3 Nxd4 - or 16…Rxd4.)
White can meet the threat with 15.Nd2, but then he loses more time and allows Black to get further ahead in development. So White retreats his bishop, but Black has a brilliant resource in reserve.
15.Be2 Bxf3! 16.gxf3
The point of Black’s exchange is that the seemingly safe 16.Bxf3 is answered by 16…Nxd4 17.Bxb7 Rab8! 18.Ba6 Qf6! (threatens …Nf3+ or …Nc2+) 19.exd4 Qxa6.
In that case, Black’s command of the open lines would decide the game quickly in his favor.
16…Rd6 17.Rg1
White wants to attack! His threat is 18.d5 (menacing mate) 18…Ne5 19.f4 Ng6 (forced) 20.f5 Ne5 21.f4 winning the knight.
But Black has a masterly reply.
17…Nxd4!! (D)

Black is counterattacking.
The point of Black’s sacrifice is that if 18.exd4 Re8 19.Qe3 Re6 regaining the piece with a winning game.
18.Rd1 Ne6 19.f4
Now Black must watch out for 20.f5 Ng5 21.h4, winning the knight because of the mating threat.
19…Rxd1+ 20.Bxd1 Rd8!
This looks like a blunder. It isn’t!
21.f5 (D)
Has Black blundered?
21…Qd6!
A powerful thrust which sends White reeling. If 22.fxe6?? Qxd1#.
22.Bh5 Qxh2
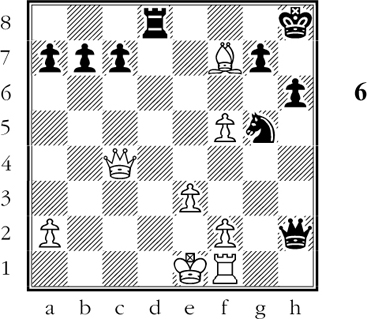
Now Black attacks two pieces, which reduces White to desperation. (D)
Black is well prepared for White’s active counterplay.
23.Bxf7+ Kh8!
Of course Black does not play 23…Kxf7, allowing White to capture the knight with CHECK.
24.Rf1 Ng5! 25.Qc4 (D)
Or 25.Bc4 Nf3+ 26.Ke2 Qh5! and Black’s threat of …Ng1+ is crushing.
How does Black exploit the disorganized state of White’s pieces?
25…Qd6! White resigns.
The threat is 26…Qd1# or 26.Qd2#. To parry this threat he must move his queen, allowing Black to win the bishop.
Black played very ably to neutralize his initial inferiority in development. White moved his queen too much in the opening. Black cleverly exploited this mistaken policy by organizing a rapid-file attack against the white king stranded in the center.
Weaknesses in the Castled Position
Nimzo-Indian Defense
White - Black
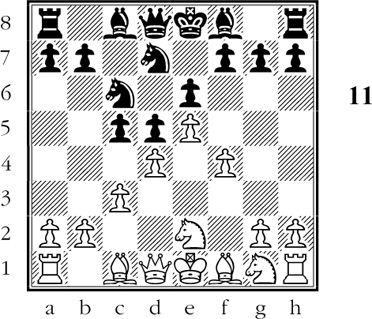
1.d4 Nf6 2.c4 e6 3.Nc3 Bb4 4.e3 (D)
Black intends to play an aggressive game.
Black’s third move tells us that he means to develop his pieces actively. White’s last move, on the other hand, points to a slow or noncommittal development on his part.
4…b6 5.Nf3 Bb7 6.Qc2 Ne4 7.Bd3
Somewhat belatedly White realizes that Black has a good development and as a result he tries to fight for control of the vital e4-square. But Black has entrenched himself too well.
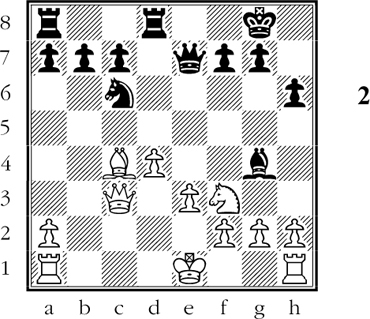
7…f5! 8.a3 Bxc3+ 9.bxc3 0-0 10.0-0 Rf6! 11.Nd2 Rh6! 12.g3??
Black has set a little trap which White has avoided. The trap was: 12.Bxe4 fxe4 13.Nxe4 Qh4, attacking the knight a second time and threatening mate.
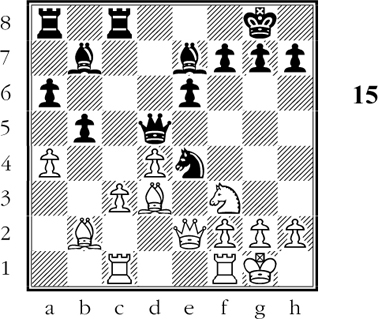
By playing 12.g3?? White has avoided the trap; but he has opened up the long diagonal for Black’s light-square bishop. Black recognizes the possibilities and takes advantage of White’s weakened kingside with a final, smashing attack. (D)
Black can now demolish White’s kingside.
12…Qh4!!
First point: if 13.gxh4 Rg6+ 14.Kh1 Nxf2#!. Throughout the proceedings Black’s sinister bishop at b7 plays an effective role at long distance.
13.Nf3 Ng5!!! 14.gxh4
A delightful possibility prepared by Black is 14.Nxh4 Nh3#.
14…Nxf3+
Black is fully prepared for 15.Kh1, to which his answer will be 15…Rxh4 16.Kg2 (else …Rxh2#) 16…Ne1++! 17.Kg3 Rg4+ 18.Kh3 Bg2#.
15.Kg2 Ne1++ 16.Kg3 Rg6+ 17.Kf4 Rg4+ 18.Ke5 Nf3#
Another way was 18…Nc6#.
Black took superb advantage of White’s weakening of the castled position. Despite the general opinion that Black’s play must necessarily be defensive, there are frequent opportunities for aggressive play on his part.
In the following game, for example, Black realizes that White goes badly astray when he castles on the queenside in the face of an open c-file. When White aggravates his foolhardiness by presenting a target, in the form of an advanced a-pawn, Black is alert to his opportunities. He soon unleashes an attack that rakes White’s castled position.
Nimzo-Indian Defense
White - Black
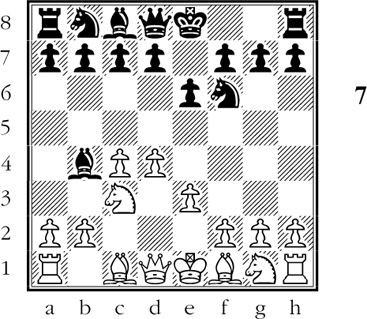
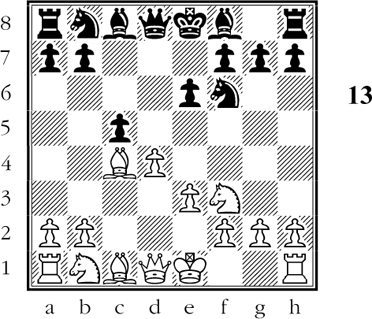
1.d4 Nf6 2.c4 e6 3.Nc3 Bb4 4.Qc2 (D)
Black must fight back in the center.
Black has a serious problem here. White threatens e2-e4 with an overwhelming position in the center.
4…c5
With this wing thrust at the center, Black restrains his opponent from monopolizing the center.
5.Nf3 Nc6 6.dxc5 Bxc5 7.Bg5 Be7 8.0-0-0?
Gaining time for placing a rook on the d-file to press down on Black’s backward d-pawn.
Yet Black realizes that he gains more than White does by this move; any strategical advantage that White may have is canceled out by Black’s attacking chances against the exposed white king.
8…Qa5! 9.a3?
Now Black has a new target to aim at.
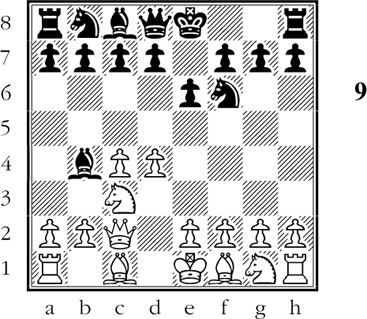
9…a6 10.e3 b6 11.Be2 Bb7 12.Nb1 b5!
Black is well aware that open lines against White’s king are all-important in this game.
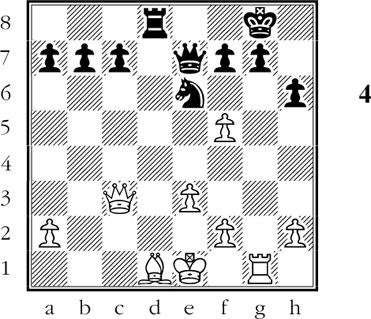
13.cxb5 axb5 14.Qd3 Rc8! 15.Nc3 Bxa3!! 16.Bxf6 gxf6
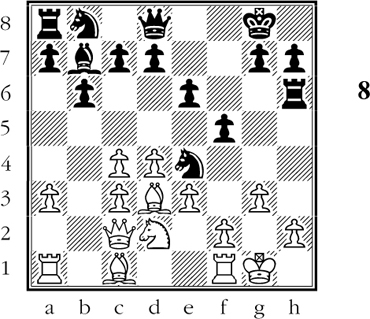
Now that Black has scored a bull’s-eye on the target, he does not fear White’s counterattack. (D)
Black’s pieces are admirably posted for attack.
Black sees that after 17.Qxd7+ Kf8 18.Qxb7?? he has a mate in two: 18…Qxc3+ etc. As we’ll see in a moment, Black has more sparkling attacking ideas in mind. If 17.bxa3 Qxa3+ 18.Kb1 Nb4 wins.*
17.Kb1 Bxb2!!
Proving that the white king’s flight from the “hot” c-file did him no good.
18.Na2
Black has worked out this pretty variation after 18.Kxb2: 18…Qb4+ 19.Kc2 Ne5! 20.Nxe5 Be4!! winning the queen by a double pin.
18…Ne5! 19.Nxe5 Bd5!
White resigns, as he has no good parry to the threat of …Qxa2#.
With this dashing game we take our leave of attacks against the castled king and turn to attacks on strategical weaknesses - a very important subject.
Strategical Weaknesses
In the following game Black plays steadily, waiting for a “break.” Then, realizing that White has made a serious error, Black repulses the attack with cool judgment and calm, accurate appraisal of the situation.
French Defense (in effect)
White - Black
1.e4 Nf6 2.Nc3
As indicated in Third Book of Chess (pages 74-107) White’s best chance of obtaining an advantage lies in the forthright 2.e5 etc.
2…d5 3.e5 Nfd7 4.d4 e6 5.Nce2 c5 6.c3
After White’s timid second move the game has turned into a French Defense in which Black stands rather well. Note that Black has some initiative in the center, for his last move has put White’s pawn under pressure.
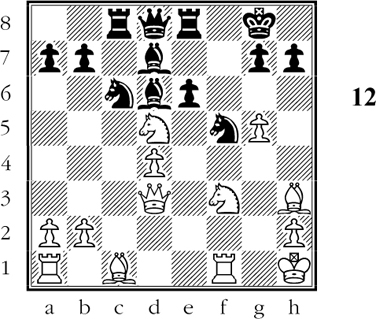
6…Nc6 7.f4 (D)
Black is developing more rapidly than White!
Black can now put more pressure on White’s center with …Qb6. But he prefers to continue his development in straightforward fashion. In fact, Black never moves his queen throughout this game!
7…Be7 8.Nf3 0-0 9.g3 cxd4 10.cxd4 Nb6! 11.Bh3? Bd7! 12.0-0 Rc8!
The harmonious development of Black’s forces is a thing of beauty. His tenth move made room for his 11th; his 11th for his 12th.
And the object of these moves? Black wants to post his pieces powerfully on the queenside, with such moves as …Nc4. He sees that White’s 11th move has sadly weakened his control of the c4-square.
The play will unfold along these lines: Black brings the bulk of his forces to the queenside to increase his pressure there. White seeks a counterattack by pressing forward on the kingside.
Who will succeed? Black’s plans have a sound basis, while White’s “attack” is a delusion.
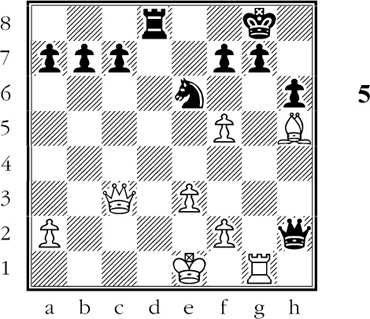
13.g4 f6! 14.exf6 Bxf6 15.g5 Be7 16.Kh1 Nc4 17.Nc3 Bb4! 18.Qe2 Re8
Since the last note Black has made further progress. He has improved the position of his pieces, and White has forfeited command of another important light square by playing 15.g5.
19.Qd3 Nd6!
Directed against White’s next move, and also played with a view to …Na5 followed by …Bxc3 and …Bb5.
20.f5 Nxf5 21.Nxd5 Bd6!
Now Black has distinctly the upper hand, for example: 22.Nf4 Nb4! 23.Qd1 Nc2 24.Rb1 Nce3, winning the exchange, or 23.Qe2 Rxc1! 24.Raxc1 Bxf4 with the winning advantage of two pieces for a rook. (D)
Black is building up a powerful counterattack.
To avoid the variations just pointed out, White chooses a different way. But it is all one to Black, who continues with remorseless vigor.
22.Bxf5 exf5 23.Nf4 Re4! 24.Qb3+ Kh8 25.Nh4 Nxd4 26.Qh3 Rc7! 27.g6 Bc6!
Presumably White is doing the attacking - but see with what power Black’s pieces press down on the kingside! White makes a pathetic gesture toward a mating attack, but Black repulses the attempt with brutal counterstrokes.
28.Nf3 h6 29.Ne6 Nxe6 30.Bxh6 Rh4! White resigns.
White is of course unable to capture the imprudent rook, and his position is about to topple. Black has shown his contempt for the ill judged “attack” by not even bothering to move his queen. It would be difficult to find a more convincing example of the proposition that the attack does not always pay.
In the next game, too, White saddles himself with a positional weakness. Apparently he has compensation in the form of a more aggressive position; and yet Black single-mindedly concentrates on taking advantage of White’s real weakness.
Queen’s Gambit Accepted
White - Black
1.d4 d5 2.c4 dxc4 3.Nf3 Nf6 4.e3
Black’s acceptance of the gambit on the second move has temporarily cost him control of the center. It is therefore important for him to strike at the center with …c5.
4…e6 5.Bxc4 c5 (D)
Black’s last move fights for control of the center.
Black looks forward to having a comfortable position. He will play …a6 and …b5, developing his light-square bishop very favorably at the b7-square.
6.Nc3 a6 7.0-0 b5 8.Bd3 cxd4! 9.exd4
This exchange of pawns has opened a good diagonal for White’s dark-square bishop. Yet Black very well knows what he is about, for he has created an isolated d-pawn in White’s camp. (An “isolated” pawn is one which lacks protection from pawns of the same color on adjacent files. In this particular case, White’s c-pawn and e-pawn have disappeared.)
An isolated pawn is always a potential weakness, for it may require defending by valuable pieces. This, then, is why Black isolated the pawn.
But Black has another reason for the pawn exchange. When a pawn is isolated, there are no pawns left to control the square immediately in front of the pawn. This square becomes a “strong point” for the enemy pieces, for they can never be dislodged by pawns. In this case, the d5-square is a strong point for Black.
9…Bb7 10.Bg5 Be7 11.Qe2 0-0 12.Rad1
Black will now bring his queen knight into play, and will then be ready to occupy the strong point at d5.
12…Nbd7 13.Ne5 Nd5!
Foreseeing that White will seek the opening of more attacking lines with f2-f4-f5, Black plays for simplifying exchanges.
There are two reasons for such exchanges. One is that the fewer pieces there are on the board, the harder it will be for White to complicate the play. The other point is that the fewer pieces on the board, the easier it will be for Black to menace the white pawn weakness. (D)
Black has occupied the strong point on the d5-square.
14.Bc1
A strange-looking move that enables Black to maintain a clear positional advantage. But this would also be true after 14.Bxe7 Qxe7 15.Nxd5 Bxd5. (Remember that simplifying is detrimental to the player with the isolated pawn.)
14…Nxc3! 15.bxc3 Nf6
Black’s exchange of knights is hard to understand. For now White has acquired a new c-pawn all over again and his d-pawn is no longer isolated.
The explanation is that White’s c-pawn is backward on an open file. It is subject to attack by black pieces and can be defended only by pieces, not pawns.
16.a4?! Qd5!
Threatening mate on the move.
If White parries the mate threat by 17.f4 or 17.f3, Black has a powerful reply in 17…b4!, again isolating the d-pawn and in some cases winning a pawn.
17.Nf3 Rfc8!
Hitting at the weak pawn - so that if 18.axb5 axb5 19.Bxb5 Rxc3. In that case Black again remains with pressure against the isolated pawn, and the position of his forces is more aggressive.
White tries for something better, and ends up with something worse.
18.Bb2
Black has reason to be gratified at this wretched position of the enemy bishop for purely defensive reasons.
18…Ne4!
White defends, Black attacks.
If now 19.Bxe4 Qxe4 20.Qxe4 Bxe4 and Black’s bishops have enormous scope while White’s positional weakness persists.
Furthermore, Black is well satisfied with the possibilities in 19.axb5 axb5 20.Bxb5 Nxc3 21.Bxc3 Rxc3 for then he again has the two-bishop advantage plus pressure on White’s isolated pawn.
Even more desirable for Black is 20.Bxe4 Qxe4 21.Qxb5 Ba6 winning the exchange.
19.Rc1
As we have seen from the previous note, Black has forced his opponent to make another unattractive defensive move. (D)
Black now establishes a winning advantage.
19…Ng5!
This knight cannot be captured because of Black’s mate threat along the diagonal. And 20.Ne1 Nh3+ 21.Kh1 Nf4 leaves Black with a positionally won game.
20.axb5 axb5 21.Bxb5 Nxf3+ 22.gxf3 Qg5+! White resigns.
For after 23.Kh1, Black has 23…Qg4! when White will have to give up his queen to stop mate.
Black did a very effective job in stamping White’s pawns as weaknesses and in refuting White’s attempts to obtain an attacking position.
In the first three games of this chapter we saw how Black lashed out at weaknesses in the white king’s position; in the last two games Black succeeded by hammering away at White’s positional weaknesses.
But suppose White has no weakness? How do you proceed? The next chapter deals with this problem.