The Complete Chess Course From Beginning To Winning Chess! (2016)
Book Three
How to Play the White Pieces
Chapter Four
How to Exploit Black’s Premature Opening up of the Position
The bane of many chess books is that they ignore the human factor. You may have read the last paragraphs of the last chapter with some skepticism. Suppose Black is not satisfied to be trussed up; suppose he fights back? How does White proceed in such case?
We can approach the problem of cramped positions by dividing such positions into three parts. Those positions in which Black defends passively without any attempt to fight back have been treated in the previous chapter. Positions in which Black resorts to counterattack will be the subject matter of Chapter Five.
We start with a game in which Black is so anxious to avoid a cramped position that he opens up the game before castling. This transfers the struggle from a predominantly strategical one to a predominantly tactical one. The switch, as we shall see, favors White.
Sicilian Defense
White - Black
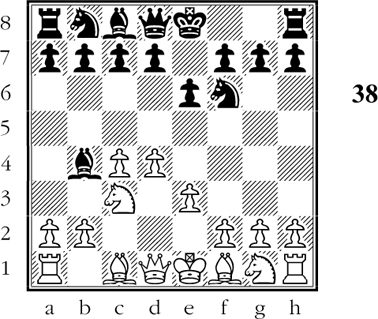
1.e4 c5 2.Nf3 Nc6 3.d4 cxd4 4.Nxd4 Nf6 5.Nc3 d6 6.Be2 e5
This reminds us of Black’s 14th move in the previous game (after Diagram 32). Black surrenders control of the important square d5. This gives White a powerful hold on the center and foreshadows a serious lack of mobility on Black’s part. (D)
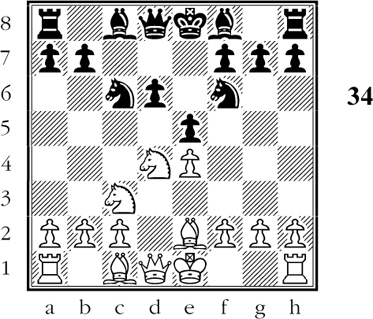
White intends to train his guns on the weakness created by Black’s last move.
7.Nf3 h6 8.Be3 Be6 9.0-0 Be7 10.Qd2 d5?
In his anxiety to get a free hand in the center, Black advances forthrightly to get rid of White’s control of the d5-square.
Strategically the advance is irreproachable. It has, however, a drawback of provoking a lasting attack by White.
11.exd5 Nxd5 12.Bb5!
By pinning Black’s queen knight, White threatens Nxe5. This forces one concession after another by Black.
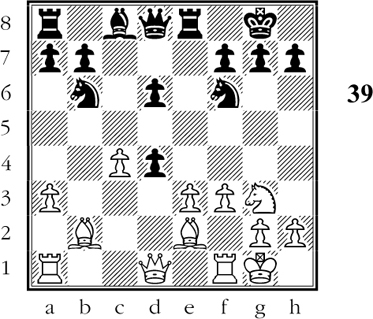
12…f6 13.Rad1 Nxe3 14.Qxe3 Qb6 15.Qd3 Rd8 16.Qg6+ Kf8 17.Rxd8+ Bxd8 (D)
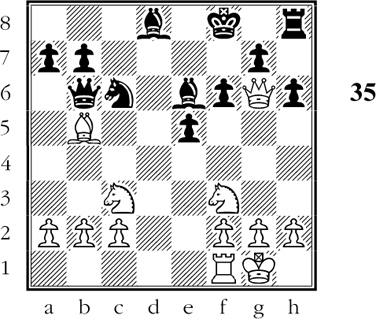
White is operating with brilliant tactical threats. If 17…Nxd8?? 18.Qe8#. If 17…Qxd8 18.Bxc6 bxc6 19.Nxe5 wins a pawn.
18.Nxe5! Bc7
White’s threats cannot be met satisfactorily: if 18…Nxe5?? 19.Qe8#. If 18…fxe5 19.Qxe6 and White has a winning game.
19.Nd5! Black resigns.
A magnificent winning move. If 19…Qxb5 20.Nxc7 attacking Black’s queen and also threatening Qe8#. If 19…Bxd5 20.Nd7+ winning Black’s queen.
Thus White faultlessly exploited Black’s premature opening up of the position. In the following game Black is strategically inconsistent. First he drifts listlessly into a critically cramped position; then, with equally poor judgment, he strikes out recklessly to achieve freedom. White hits back hard.
King’s Indian Defense
White - Black
1.d4 Nf6 2.c4 g6 3.Nc3 Bg7 4.e4 d6 5.g3 0-0 6.Bg2 Nbd7 (D)
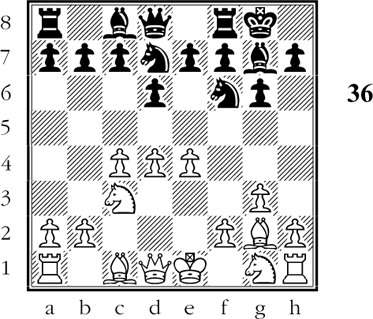
White’s pieces are likely to have more mobility than Black’s forces.
7.Nf3 e5 8.0-0 h6 9.h3 Kh7 10.Be3 Ng8 11.Qc2 Nb6 12.b3 f5?
Dissatisfied with the slight scope of his forces, Black opens up the position violently. But White, having much greater mobility, reacts with brutal effectiveness.
What makes White’s reaction all the more powerful is that Black has loosened up the pawn position in the vicinity of his king. The result is that it is relatively easy for White to penetrate the black king’s defenses.
13.dxe5 fxe4 14.Nxe4 Nd7?
Black takes advantage of the fact that White’s e-pawn is pinned on the long diagonal. But this is trifling compared to White’s smashing attack against Black’s weakened kingside.
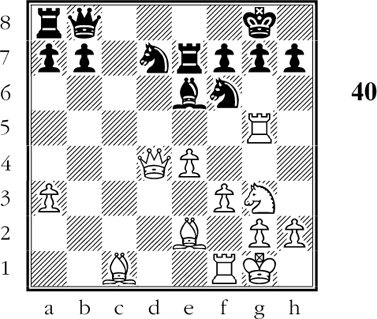
15.Neg5+! hxg5 16.Nxg5+ Black resigns. (D)
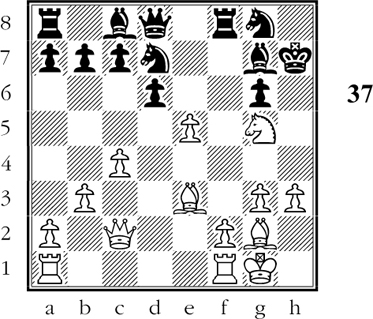
White scores a decisive win of material no matter how Black replies. If 16…Kh6 White wins the black queen with 17.Nf7++. If instead 16…Kh8 17.Qxg6 Ndf6 18.exf6 Nxf6 19.Nf7+ Rxf7 20.Qxf7 and White is two pawns and the exchange ahead. In the face of this crushing material advantage, Black resigns.
In this game White profited by Black’s cramped game in the opening. Later on, when Black tried to struggle out of his straightjacket, White opened effective lines for his action greedy pieces.
In the next game Black has a satisfactory opening position, but by thoughtlessly opening up the game he exposes himself to a decisive attack. Again White is alive to the possibilities, and quickly works up a withering attack.
Nimzo-Indian Defense
White - Black
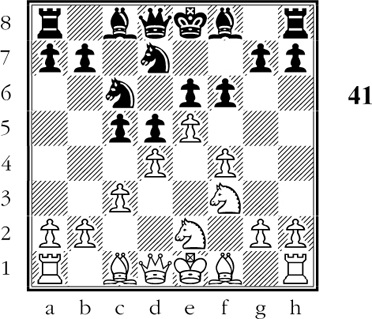
1.d4 Nf6 2.c4 e6 3.Nc3 Bb4 4.e3 (D)
In this seemingly conservative variation White’s bishops have enormous potential power.
4…0-0 5.a3 Bxc3+ 6.bxc3 Re8 7.Ne2 e5 8.Ng3 d6 9.Be2 Nbd7
There is a clash of plans here. As in Diagram 6, White wants to open up the position so that his bishops will have powerful play. Black, on the other hand, should strive to keep the position closed.
10.0-0 c5 11.f3 cxd4?
This sadly inconsistent move opens up a future for White’s dark-square bishop.
12.cxd4! Nb6 13.Bb2 exd4? (D)
White’s dark-square bishop has come to life!
White has been on the alert to increase the scope of his bishops. He is well aware that Black has gone completely astray with his 11th and 13th moves. The position is opened up for White’s pieces, and this is particularly true of White’s dark-square bishop. As you will see, White knows just how to derive the maximum benefit from this.
14.e4! Be6 15.Rc1 Re7 16.Qxd4 Qc7 17.c5!
As a result of White’s masterly 14th move he has created a magnificent diagonal for his dark-square bishop and powerfully centralized queen at d4. Thus White is supreme in the center and in the general mobility of his forces. All this may be traced back to Black’s mistake in prematurely opening up the position on move 11.
With the last move White increases his mobility and prepares to switch a rook to the kingside. This will lead to a surprisingly quick decision.
17…dxc5 18.Rxc5 Qf4 19.Bc1! Qb8 20.Rg5! Nbd7
White was threatening Qxf6. (D)
White is ready for a bombshell finish.
21.Rxg7+!! Kxg7 22.Nh5+ Kg6
On 22…Kh8 23.Nxf6 Qe5 24.Bb2! Qxd4+ 25.Bxd4 Nxf6 26.Bxf6+ winning a rook.
23.Qe3! Black resigns.
White has foreseen that Black will be helpless against the double threat of 24.Qh6# or 24.Qg5#. He has made Black pay a high price for prematurely opening up the position.
The next game shows a still further refinement of this type of mistake. Black prematurely opens up the position for his opponent without even seeking any real or imaginary compensation. White’s resulting attack, as we might expect, is devastating.
French Defense
White - Black
1.e4 e6 2.d4 d5 3.Nc3 Nf6 4.e5 Nfd7 5.Nce2 c5 6.c3 Nc6 7.f4 f6 8.Nf3
The very nature of this opening gives White a much freer position. His pieces have more scope, and Black’s light-square bishop is hemmed in for good.
However, White does not have a completely free hand; Black is keeping the white center under pressure by attacking it with his f- and c-pawns. Since this is all the pressure that Black has, he ought to increase it by playing 8…Qb6. By keeping White’s center under observation, Black would distract White’s attention from his attacking intentions. (D)
White is now greatly relieved as Black deprives himself of his only counterplay.
8…cxd4? 9.cxd4 Bb4+ 10.Nc3 fxe5? 11.fxe5 0-0 12.Be3 Nb6 13.Bd3 Nc4 14.Bxc4 dxc4 15.0-0 Ne7
White has the better development and superior mobility. Black is limited to a passive role.
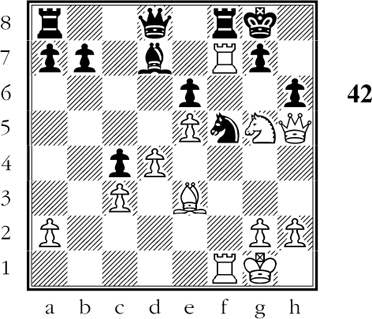
16.Qe2 Bxc3 17.bxc3 Qc7 18.Ng5! Bd7 19.Qh5 h6
White has suddenly built up a powerful attack. Black’s last move seems to give him respite, but White has a surprising reply.
20.Rf7!!
Apparently a losing move in view of the possible reply 20…Be8. But White has a remarkable resource in answer to 20…Be8, namely 21.Rxg7+!! Kxg7 22.Nxe6+ Kg8 23.Qg4+ with a crushing material advantage for White.
20…Qd8 21.Raf1 Nf5 (D)
White has a brilliant concluding combination.
Black has managed to block the open f-file, but White is not impressed. He has concentrated his forces so powerfully on the kingside that he can afford spectacular sacrifices.
22.R1xf5! exf5 23.Rxg7+! Kxg7 24.Ne6+! Bxe6 25.Bxh6+ Kh7 26.Bg5+ Kg7 27.Qh6+ Kf7 28.Bxd8 Raxd8 29.Qf6+ Kg8 30.Qxe6+ Kg7 31.Qe7+ Black resigns.
White will advance his passed pawns in the center to achieve a quick victory by queening a pawn. Thus White has made a magnificent use of the open f-file presented him by Black’s premature opening up of the position.
In each of the games in this chapter Black has opened up the position prematurely. Through this opening up he has made it possible for White to develop an overwhelming attack. This type of mistake is frequently made in over-the-board play. Consequently the methods adopted in these games by White are of the greatest practical value. By refuting these premature actions, White successfully defends his initiative.