The Complete Chess Course From Beginning To Winning Chess! (2016)
Book Three
How to Play the White Pieces
Chapter Three
How to Exploit Your Superior Mobility
You will find, almost without exception, that when you have the better development, your pieces have more mobility than your opponent’s forces. Remember that the first move gives you a springboard for getting ahead in development - and for having more mobility than Black has.
Mobility, as you saw in the first chapter, is connected with having a powerful position in the center. The stronger your position in the center, the more mobility your pieces will have. In the following game, White emphasizes this point very strongly.
Alekhine’s Defense
White - Black
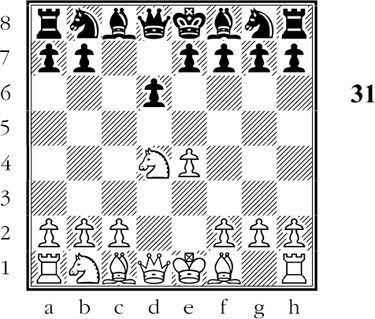
1.e4 Nf6 2.e5 Nd5 3.d4 d6 4.c4 Nb6
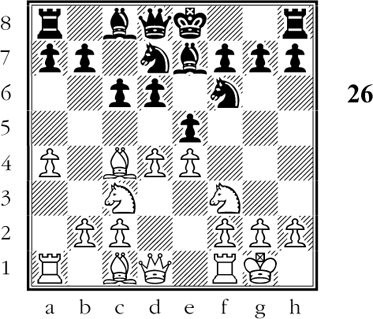
Black has developed one piece, White hasn’t developed any at all. Yet White has considerable mobility, as his center pawns dominate the center and many avenues of development are open to his pieces. (Black’s lead in development is academic, as his knight can accomplish very little from b6.) White’s immediate aim is to support his powerful pawn center by advancing his f-pawn. (D)
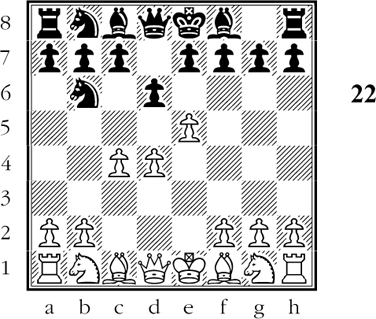
Though Black is ahead in development, White has more mobility!
5.f4 dxe5 6.fxe5 g6 7.Be3 Bg7 8.Nc3 c5
The advance of Black’s c-pawn is logical, as it breaks up the center. (On 9.d5 Bxe5 10.Bxc5 Black has a playable but clearly inferior game, as his knight at b6 is sadly lacking in mobility.)
Instead, Black tries to win a pawn outright. The attempt is disastrous because White leaves Black with an unbearably cramped position. White now makes admirably effective use of his superior mobility.
9.d5 Qc7? 10.d6! exd6 11.Nb5! Qe7 12.Nxd6+ Kf8 13.Nxc8! Nxc8 14.Bxc5!! Black resigns.
An extraordinary finish. If 14…Qxc5 15.Qd8#. Thus White wins the queen by force.
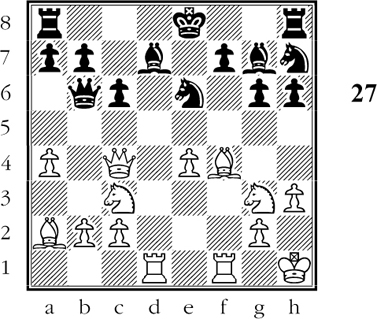
White succeeded admirably in this game because Black started an attack on White’s center and failed to follow it up. This gave White time to exploit his superior mobility to the utmost. (D)
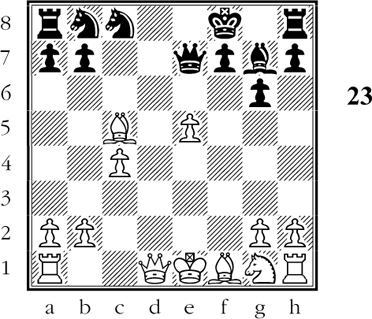
White is still behind in development and ahead in mobility.
The remaining games in this chapter are more orthodox, for White has superior development, superior mobility, and control of the center in each case.
French Defense
White - Black
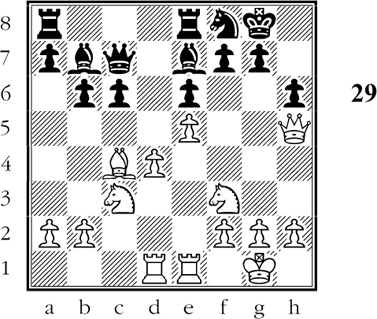
1.e4 e6 2.d4 d5 3.Nc3 dxe4 4.Nxe4 (D)
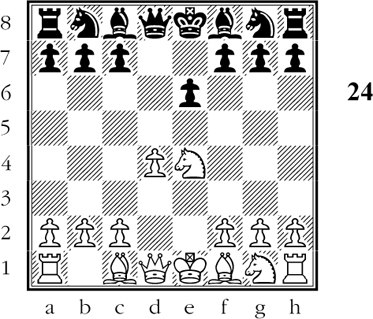
White’s dominating position in the center makes it likely that he will have vastly superior mobility in the middle game.
White has a free hand in the center, thanks to Black’s colorless third move. White’s knight is strongly centralized at e4; his d-pawn controls the important center square e5.
4…Nd7 5.Nf3 Ngf6 6.Bd3 Be7 7.0-0 Nxe4 8.Bxe4 Nf6 9.Bd3
White’s game is noticeably freer.
9…b6?
Black’s position is cramped, but he can at least make a fight out of it by playing 9…c5.
10.Ne5! 0-0 11.Nc6 Qd6 12.Qf3!
Very cleaver. White threatens to win a rook by 13.Nxe7+.
If 12…Bb7? 13.Nxe7+ and White wins a piece. Black must therefore develop his queen bishop to d7, where it has no mobility. Thus White’s lead in mobility becomes even more pronounced.
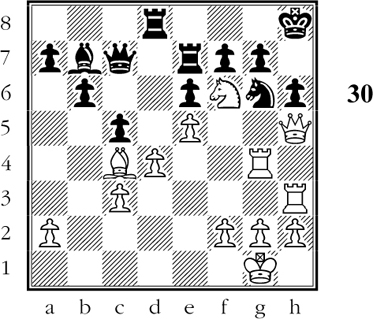
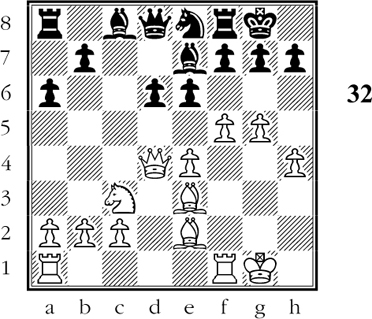
12…Bd7 13.Nxe7+ Qxe7 14.Bg5 Rac8 15.Rfe1 Rfe8 16.Qh3! (D)
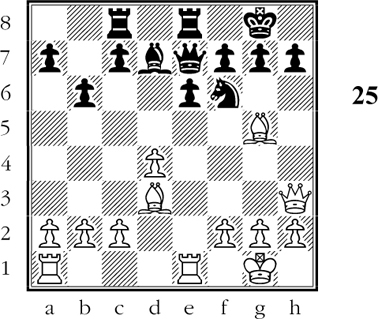
White’s pressure against Black’s kingside is irresistible. Now White threatens 17.Bxf6 followed by 18.Qxh7+.
White’s superior mobility has provided him with a devastating kingside attack. If 16…h6 17.Bxh6! gxh6 18.Qxh6 and Black is helpless against the coming 19.Re5 and 20.Rg5+. And if 16…g6 17.Qh4 Kg7 18.Re4! and White’s pin leads to Black’s downfall after 19.Rf4.With his next move Black admits his despair.
16…Qd6 17.Bxf6 gxf6 18.Qh6! f5 19.Re3 Qxd4 20.c3! Black resigns.
If Black retreats 20…Qg7 or 20…Qd6, he must give up his queen after 21.Rg3(+). Otherwise, White forces checkmate with 21.Rg3+ etc. White had an overwhelming advantage in mobility from the third move on as a result of Black’s passive play.
In the following game Black fights hard to maintain his grip on the center. But his development is slow and cramped, And White plays with masterly consistency for domination of the open lines.
Philidor’s Defense
White - Black
1.e4 e5 2.Nf3 d6 3.d4 Nf6 4.Nc3 Nbd7 5.Bc4 Be7 6.0-0 c6 7.a4 (D)
White has an advantage in the fact that Black’s bishops have very little scope.
White has already put his finger on the weakness of Black’s position: The development selected by Black is slow, clumsy, and cramped. White notes especially the lack of mobility of Black’s bishops. His king bishop is blocked by his d-pawn; his queen bishop is blocked by his queen knight.
White’s policy from now on will be to create more open lines for his own forces and at the same time to restrain Black from freeing himself.
7…Qc7 8.Qe2 h6 9.Ba2 Nf8 10.Qc4! Ne6 11.dxe5 dxe5 12.Nh4! Nh5 13.Nf5 Bf8 14.Be3 g6 15.Rad1!!
White’s last move looks like an oversight, but it isn’t. He loses no time occupying the open d-file, even though his knight is attacked.
This is how White reasons: As Black has not yet castled, he is unable to bring a rook to the d-file to dispute White’s occupation of that open line.
Furthermore, because Black’s king is still in the center, he cannot hope to win a piece with impunity. Thus if 15…gxf5 16.exf5 Nd8 17.Nd5! Qa5 18.Nb6!! axb6 19.Rxd8+! Kxd8 20.Qxf7 and Black’s king perishes in the crossfire of the enemy pieces.
This fascinating variation, which deserves the most careful study, is a magnificent example of White’s power of superior mobility.
15…Bd7 16.Ng3 Nf6 17.h3 Bg7 18.f4! exf4 19.Bxf4 Qb6+ 20.Kh1 Nh7
White has increased his mobility still more by opening the f-file. Thus he is ready for action on two open files. (D)
White can now win by a very brilliant combination.
21.Rxd7! Kxd7 22.Be3!! Raf8
He might just as well resign. If 22…Qxe3 23.Rxf7+ Kd8 24.Qxe6 forces mate.
23.Rxf7+!! Black resigns.
For if 23…Rxf7 24.Qxe6+ Kd8 25.Bxb6+ axb6 26.Qxf7 and Black is hopelessly behind in material.
White’s play was a masterpiece of consistently utilizing superior mobility. From the very start White took merciless advantage of Black’s lack of mobility. He never gave Black a chance because he never allowed Black’s pieces to cooperate properly.
In the next game White neatly combines superior mobility with control of the center and lasting kingside attack.
Queen’s Gambit
White - Black
1.d4 d5 2.c4 dxc4 3.Nf3 Nf6 4.Nc3 e6
White now seizes on the fact that with his second move Black has given up his hold on the center. Black should therefore play …c5 as soon as possible in order to fight for a foothold in the center. Because Black holds back timidly, White gains an overwhelming position in the center by energetic play.
5.Bg5! Be7 6.e4! h6? 7.Bxf6 Bxf6 8.Bxc4 Nd7 9.0-0 0-0 10.e5! Be7 (D)

White’s formation is aggressive, while the outlook for Black’s pieces is very poor.
White has driven a wedge into Black’s position by advancing his e-pawn to e5. One important consequence is that he has prevented Black from bringing his knight to f6. This is the best square for a knight defending the kingside. It follows that the combination of White’s aggressive position in the center, plus the aggressive position of his pieces, foreshadows a powerful attack by White.
Note in the following play how White uses the square e4 as a steppingstone for transporting his pieces to the kingside. We know from the start that his onslaught will be successful because Black has so little maneuvering space for defensive purposes.
11.Qe2 Re8 12.Rad1! c6 13.Qe4! Qc7 14.Rfe1 Nf8 15.Qg4 b6 16.Qh5 Bb7
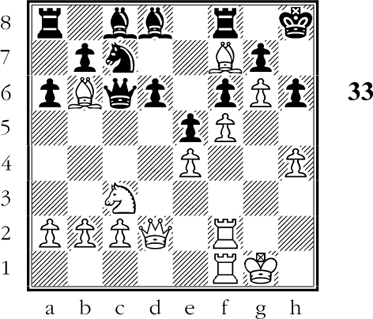
The position begins to look very threatening for Black. White now proceeds to bring more pieces to the kingside. Because of the cramped position of his forces, Black cannot defend with equal vigor. (D)
White again gets more pieces into the attack using the e4-square.
17.Re4! Bb4 18.Rg4 Bxc3 19.bxc3 Kh8 20.Ng5! Re7 21.Ne4! Rd8 22.Rd3! c5
At last Black plays the move he should have played early in the opening. But White is now ready for the final attack, having maneuvered his knight into position for a deadly stroke. He has also moved his queen rook into position for the final attack.
23.Nf6!
With the brutal threat of 24.Qxh6+!! gxh6 25.Rg8#. White’s superior mobility has become overwhelming. Of course if Black tries 23…gxf6 then 24.Qxh6+ and 25.Qg7#.
23…Ng6 24.Rh3 Black resigns. (D)
White has left Black no move to hold the position.
White’s overwhelming plus in mobility has left Black without any satisfactory defense. Thus if 24…gxf6 25.Qxh6+ Kg8 26.Qh8#. Or 24…cxd4 25.Qg5!! Qxc4 26.Rxh6+! gxh6 27.Qxh6#. White never gave Black a chance after Black’s all too passive handling of the opening.
In the following game White again triumphs after dominating the center and preventing Black from getting his pieces into action. White’s pawn-storming attack follows with crushing - and logical - effect.
Sicilian Defense
White - Black
1.e4 c5 2.Nf3 d6 3.d4 cxd4 4.Nxd4
White has a well-centralized knight established at d4. Black cannot imitate this maneuver. Note also that White controls the important center square d5 with his e-pawn.
On these two grounds it seems likely that White will dominate the center and will therefore enjoy superior mobility. (D)
There are already strong indications that White may achieve an overwhelming plus in mobility.
4…Nf6 5.Nc3 Nc6 6.Be2 e6 7.Be3 Be7 8.0-0 0-0
How has the situation developed as regards mobility? Both white bishops have free diagonals; both black bishops are hemmed in by pawns. The outlook for Black’s game is very unpromising.
In such positions White always has a practical problem: How can his superior mobility be increased still further? White solves this problem by a general advance of his kingside pawns, which will achieve the following:
(1) He will congest Black’s position more than ever.
(2) He will drive away Black’s king knight - his best defensive piece - from f6.
(3) He will subject Black’s position, already cramped unbearably, to a devastating pawn-storming attack.
9.f4 Qc7 10.g4! a6 11.g5 Ne8 12.f5 Qd8 13.h4 Nxd4 14.Qxd4
White’s plan has made considerable progress. As a result of Black’s unpromising opening line of play, White has deprived Black of any constructive plan. The continuation …Bd7 and …Bc6 is about the best Black has. (D)
The formidable centralization of White’s queen provokes Black to lose his foothold in the center.
14…e5?
Very shortsighted. He drives away to queen, but at the cost of permanently losing pawn control of d5. This vital center square now becomes a “hole,” completely at the mercy of the white pieces.
15.Qd2 Nc7 16.Bb6! Qd7 17.Rf2 Bd8 18.Raf1
White menaces a decisive breach with 19.f6 g6 20.h5. Black stops this, but White penetrates in a different way.
18…f6 19.Bc4+ Kh8 20.g6! h6 21.Bf7 Qc6 (D)
There is no defense against White’s coming attack.
22.Bxc7
White can now win by 22.Be3 and 23.Bxh6!. He plans a much more striking finish.
22…Bxc7 23.Rg2! d5
Desperation.
24.Qxh6+!! Black resigns.
For if 24…gxh6 25.g7+ Kh7 and now White captures the rook, promoting to a knight (!) and giving checkmate after 26.gxf8N+ Kh8 27.Rg8#!
The games in this chapter teach a lesson of the greatest practical importance - that when White gets the initiative through superior mobility, he has a lasting advantage that he can increase systematically until he achieves victory.
The first step is to pinpoint Black’s faulty strategy. Once you see how he has committed himself to a cramped position, you can find ways to increase your command of the board. You must not swerve from your determination to keep him in a vice; one thoughtless move will often allow the enemy to escape. All five games in this chapter show how you maintain and increase the pressure until Black’s position collapses.