The Complete Chess Course From Beginning To Winning Chess! (2016)
Book Three
How to Play the White Pieces
Chapter Two
How to Exploit Your Superior Development
One of our most important tasks in the opening stage is bringing out our pieces so they will play an active and aggressive role. This process is called “development.”
Because White enjoys the theoretical advantage of moving first, there is always a likelihood that his development will proceed more rapidly than Black’s. For White, neglected development may mean nothing worse than losing the initiative. For Black, the same sin may mean losing the game.
How do players go wrong in the opening? There are certain failings that we observe in game after game. One player moves the same piece again and again, neglecting to develop his other forces and neglecting to get his king into a safe haven.
Another player injudiciously spends time capturing a relatively unimportant pawn, losing priceless time in the chase.
Other players develop hesitantly and with lack of foresight, moving pieces to squares from which they will be driven away. Soon, to their great astonishment, they find themselves in a straitjacket position which developed inexorably from their poor opening play.
In the first illustrative game White proves that Black’s faulty development is definitely a case of too little and too late:
Four Knights’ Game
White - Black
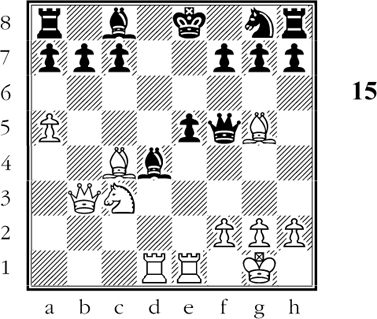
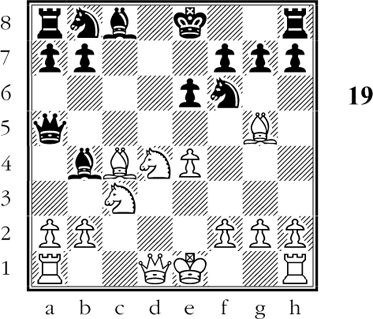
1.e4 e5 2.Nf3 Nc6 3.Nc3 Nf6 4.Bb5 Nd4 5.Nxe5 Qe7 6.Nf3 (D)
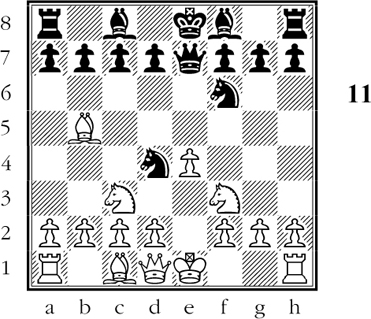
White has given his opponent the choice between 6…Nxe4 and 6…Nxb5. Which is right and which is wrong?
At first glance we feel rather suspicious about Black’s procedure. He has moved his queen knight twice, and he has played out his queen very early.
These moves are not quite so bad as they seem. The repeated moves of White’s king knight have canceled out the black knight’s loss of time.
The position of the black queen is definitely bad. Black should therefore play 6…Nxb5 7.Nxb5 Qxe4+. This forces the exchange of queens, so that Black no longer suffers form the disadvantage of having developed his queen too early.
6…Nxe4? 7.0-0! Nxc3 8.dxc3 Nxf3+
If 8…Nxb5 White wins the queen by 9.Re1.
9.Qxf3 Qc5 10.Re1+ Be7 11.Bd3
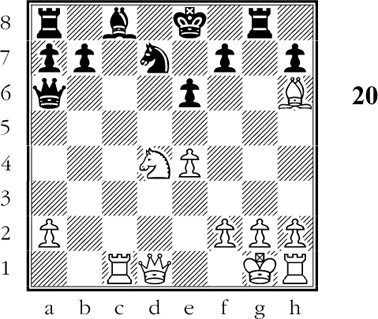
White has powerful pressure. He is ahead in development, and if Black castles, White replies 12.Qe4! winning a piece because Black has no time to guard his menaced bishop on account of the mating threat.
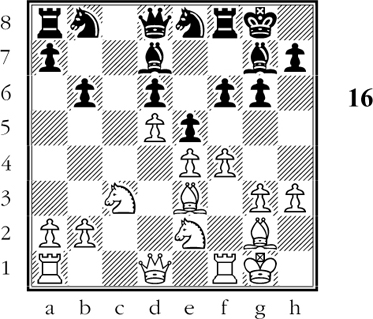
11…d5 12.Be3 Qd6 13.Bf4 Qf6 14.Qxd5!! (D)
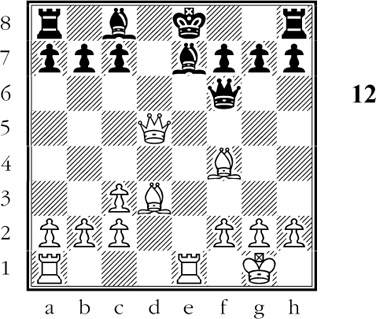
Can White afford to offer the bishop? The capture 14…Qxf4? would lead to disaster because of 15.Bb5+!. Thus if 15…Kf8 16.Qd8+!! and mate next move. Or 15…c6 16.Bxc6+ bxc6 17.Qxc6+ winning the queen rook with easy victory in sight.
White has a powerful attack because Black’s botched development has exposed the black king to frightful dangers.
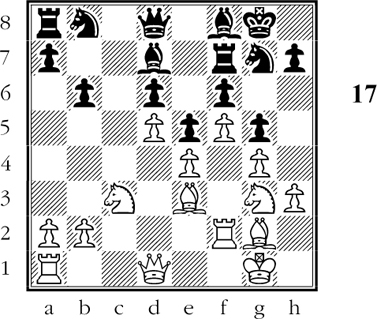
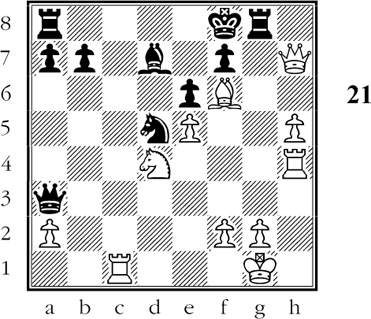
14…c6 15.Qe4 Be6 16.Rad1! 0-0-0? (D)
White has set an incredibly sly trap! White has disguised his attacking plan so subtly that Black is lulled into a false sense of security.
17.Qxc6+!! bxc6 18.Ba6#
In this game White brought about Black’s downfall by exploiting his thoughtless development or no development. In the following game, Black goes pawn hunting, while White goes king hunting. In this unequal struggle, White naturally holds all the trumps.
Evans Gambit Declined
White - Black
1.e4 e5 2.Nf3 Nc6 3.Bc4 Bc5 4.b4!? Bb6 5.a4 (D)
White threatens to win a piece with a4-a5 etc.
The opening moves are extremely interesting. On move 4 White offered a pawn in order to divert Black’s pieces and gain time. (The further course of the game will show what White had in mind.)
But Black was not obliging. He simply retreated his attacked bishop, wisely avoiding complications that might prove exceedingly troublesome.
However, in playing 5.a4 White poses a new problem. If Black keeps his wits about him, he can react calmly with 5…a6! so that if 6.a5 Ba7. In that case his bishop is perfectly safe and White has made no headway.
Instead, Black becomes rattled and goes in for an orgy of pawn captures. This is just what White was waiting for.
5…Nxb4? 6.a5 Bc5 7.c3 Nc6 8.d4 exd4 9.0-0 dxc3 10.Qb3 Qe7 11.Nxc3 d6 12.Bg5 Qd7
White is considerably ahead in development as a result of Black’s time-wasting pawn captures. Black’s position is already seriously compromised. Thus, if he tries 12…f6 White wins by 13.Bxg8 fxg5 14.Nd5 Qd8 15.Nb6!!. Another unpleasant possibility is 12…Nf6 13.Nd5 Qd8 14.Nxf6+ gxf6 15.Bxf7+ etc.
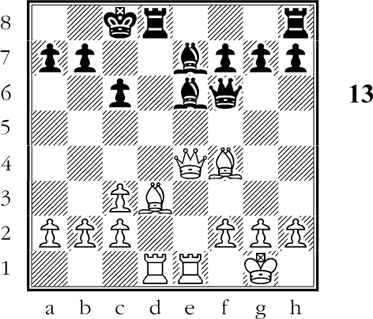
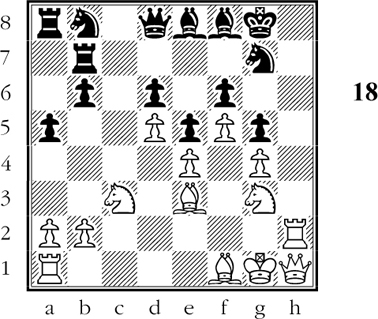
13.e5! dxe5 14.Rad1! Nd4 15.Nxd4 Bxd4 16.Rfe1 Qf5 (D)
White’s rooks are all-powerful on the center files.
Black intends to answer 17.Rxd4 with 17…Qxg5. With all his pieces in action against only two black pieces, White must win. White’s king is quite safe, Black’s king is in mortal danger.
17.Bxf7+! Qxf7 18.Rxe5+! Black resigns.
For if 18…Bxe5 19.Rd8#. And if 18…Kf8 19.Qb4+ c5 20.Rxd4! cxb4 21.Rd8+ Qe8 22.Rexe8+ Kf7 23.Ne4. White comes out at least a piece ahead.
White’s vigorous reaction to Black’s ill judged pawn-grabbing was very instructive.
In the next game White demonstrates that thoughtless moves ruin Black’s prospects of achieving a satisfactory development.
King’s Indian Defense
White - Black
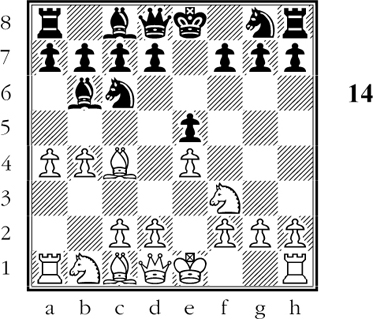
1.d4 Nf6 2.c4 g6 3.Nc3 Bg7 4.e4 d6 5.g3 0-0 6.Bg2 c6 7.Nge2 e5 8.h3 Be6? 9.d5 cxd5 10.cxd5 Bd7 11.0-0 Ne8 12.Be3 b6? 13.f4 f6? (D)
What are the factors that have provided White with such a splendid position? White has brilliant encirclement plans - Black’s pieces face a dreary prospect.
Black has played thoughtlessly. His eighth move was a futile provocation which lost time. The retreat 11…Ne8 makes sense if followed up by …f5, fighting for a foothold in the center.
But Black completely overlooks the possibility of playing …f5. First he wastes more time with 12…b6? and then he plays the timid, self-blocking 13…f6?. His pieces have no future and no scope.
White’s indicated strategy is to tie up Black’s position still more, and that is exactly what he does.
14.f5! g5 15.g4 Rf7 16.Ng3 Bf8 17.Rf2 Ng7 (D)
White can go ahead with his plan, for though Black has rearranged his pieces, they have become even more ineffectual than before.
When you have an advantage in space and mobility - as White has here - the indicated course is to increase that advantage. White therefore plays to open up the h-file, which will become his exclusive property.
18.Bf1! Be8 19.Rh2 a5 20.h4! h6 21.hxg5 hxg5 22.Qf3! Rb7 23.Qh1! (D)
White’s attack must succeed. Black’s pieces are posted too awkwardly to have any defensive value.
23…Nd7 24.Rh8+ Kf7 25.Qh7 Ke7 26.Nh5 Black resigns.
For if 26…Bxh5 27.gxh5 and there is no defense against White’s coming h5-h6 which still wins a piece. White’s logical and consistent play in this game is a perfect example of how to demolish a cramped position.
In this game White’s prime task was to refute a development that was planless. White’s hard-hitting play left Black with a middlegame position which offered no hope of unscrambling his pieces.
In the next game Black embarks on a devilishly plausible counterattack. But White has a surprising refutation.
Queen’s Gambit Declined
White - Black
1.d4 d5 2.c4 e6 3.Nf3 Nf6 4.Bg5 Bb4+ 5.Nc3 dxc4 6.e4 c5 7.Bxc4 cxd4 8.Nxd4 Qa5 (D)
Does White have a lost game as a result of Black’s powerful-looking queen move? Black threatens to win a piece by …Qxg5 or …Bxc3+. But White has an extremely subtle defense!
9.Bxf6! Bxc3+ 10.bxc3 Qxc3+ 11.Kf1 Qxc4+ 12.Kg1
Now we can appreciate the depth of White’s plan:
Black is just on the point of playing 12…gxf6 with a piece to the good. But he realizes that White would continue 13.Rc1, attacking the queen with decisive effect.
So Black concludes he must refrain from “winning a piece” as he fully perceives the far-reaching effect of White’s resourceful ninth move.
Black thought he was seizing the initiative. Actually it is White who is doing the attacking, and he presses his advantage vigorously.
12…Nd7 13.Rc1! Qa6 14.Bxg7 Rg8 15.Bh6 (D)
White has shattered Black’s position.
Thanks to White’s ingenious play, the result of Black’s queen moves is that his queen is shunted off to the side. White has seen to it that Black’s king cannot possibly find a safe haven, and that his pieces cannot cooperate effectively.
White’s king is quite safe and his king rook will soon be developed in unorthodox fashion. Meanwhile White has his eye on the more serious weakness in Black’s game: his isolated and indefensible h-pawn.
15…Nf6 16.e5 Nd5 17.h4! Bd7 18.Qc2! Rg6 19.h5! Rg4
White has left Black no choice, for if 19…Rxh6 20.Qd2 wins the rook!
Thus White succeeds in capturing the weak h-pawn, which in turn gives him a menacing passed pawn. Black cannot put up proper resistance because his faulty development has split his forces.
20.Qxh7 Ke7 21.Rh4! Rgg8 22.Bg7! Qa3 23.Bf6+! Kf8
White’s coming attack, which relies on the power of the mighty passed pawn, cannot be stemmed by Black’s disorganized forces. (D)
White can now play 24.Rc7!! for if 24…Nxc7 25.h6!! and Black is helpless against 26.Qxg8+!! and 27.h7+ etc.
24.Rc7!! Nxf6 25.exf6 Qd6 26.h6!! Black resigns.
There is no defense to the coming 27.Qg7+!!.With this sparkling example we conclude the study of faulty development on Black’s part and how White exploits it. The faulty development has taken different forms, but in each case White’s resulting initiative has led to a quick decision. Study White’s procedure in each of these games and you will find opportunities to use similar methods in your own games.