The Complete Chess Course From Beginning To Winning Chess! (2016)
Book Three
How to Play the White Pieces
Chapter One
How to Control the Center
You are about to start playing a game of chess. The pieces and pawns are all set up in their proper opening positions. You are playing White. What is the basic thought that will guide you through the opening during the first few moves?
You know that it is important to bring out your pieces quickly and effectively. You have been told that it is a good idea to begin by moving one of your center pawns. You have been advised to control the center.
“Control the center” - that is the basic idea of opening play. But just what is the center? How do you control it? And why is it important to control it? (D)
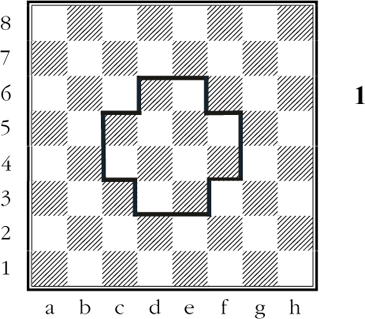
The squares inside the heavy lines make up the center. The center, as you can see from Diagram 1, is made up of the squares e3, d3, f4, e4, d4, c4, f5, e5, d5, c5, e6, d6.
When you post (“centralize”) your pieces in the center, they have their greatest range and power. Once you play them to the center during the opening, they can be moved quickly to other sectors as the course of the game requires.
We often use the term “center” in a restricted sense, referring only to the inner four squares: e4, d4, e5, and d5. These are the most effective squares for center pawns. Why? Because the pawn at e4 or d4 prevents hostile pieces from establishing themselves at the center squares controlled by that pawn.
“Controlling the center,” then, means posting your pawns and pieces in such a way that you have a decidedly more powerful grip on the center than your opponent has.
White has the first move. Consequently his chance of controlling the center is a pretty good one. Now let us turn to some examples which show what you should do to Black if you get to control the center.
Giuoco Piano
White - Black
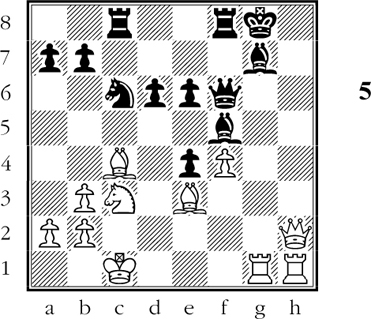
1.e4 e5 2.Nf3 Nc6 3.Bc4 Bc5 4.c3 (D)
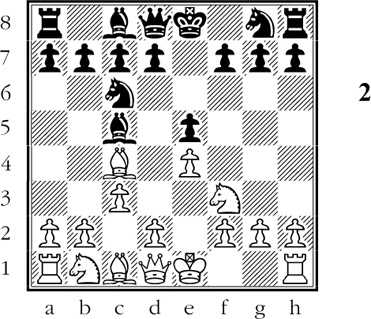
White intends to form a broad pawn center with d2-d4.
Black must fight for the center here by playing 4…Nf6, attacking White’s e-pawn. Then, after 5.d4 exd4 6.cxd4 Bb4+ 7.Bd2 Bxd2+ 8.Nbxd2 d5! Black has successfully achieved a foothold in the center.
Instead, Black loses his way in a clumsy line of play:
4…Qe7 5.d4 Bb6 6.0-0 Nf6 7.Re1 d6 8.a4 a6 9.Na3 Bg4 10.Nc2 0-0 11.Ne3!
White’s powerful pawn center stifles Black’s pieces and deprives them of adequate scope. (Note how effectively White’s knight has reached the center by a roundabout route.)
If now 11…Bh5 12.Nf5! drives back the black queen. And if 11…Bxf3 12.gxf3 exd4 13.Nf5! again drives back the queen. So Black’s light-square bishop makes a sorry retreat all the way back.
11…Bc8 12.Nd5! Qd8 13.Bg5 exd4 14.cxd4 Bg4 (D)
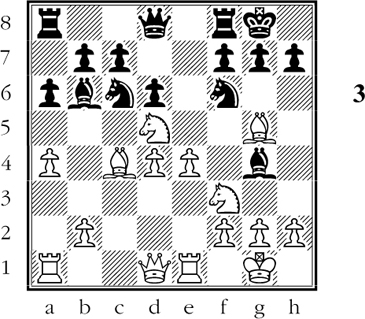
Black desperately hopes to consolidate his position with …Bxd4.White’s pin on Black’s king knight threatens to rip up Black’s kingside with fatal effect. In order to get the most out of the pin, White advances his e-pawn thus making use of his overwhelming pawn center:
15.e5! Bxf3 16.Qxf3! Nxd4 17.Qh3 dxe5 18.Bxf6 gxf6 19.Qh6 Black resigns.
Black surrenders because after the coming 20.Nxf6+ he will have to give up his queen to stop checkmate.
White won this game by exploiting Black’s failure to enforce a timely …d5, which would have given him a fair share of the center (See the first note.)
In the next game, Black again neglects to fight for the center with …d5. White soon crushes him in an even more brutal manner.
Sicilian Defense
White - Black
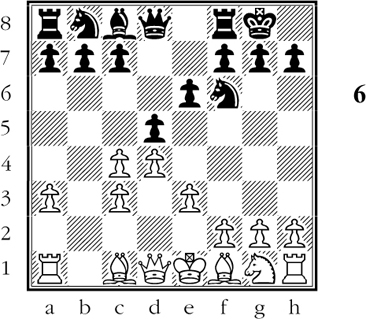
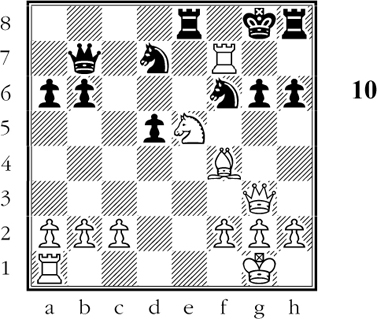
1.e4 c5 2.Nf3 d6 3.d4 cxd4 4.Nxd4 Nf6 5.Nc3 g6 6.Be2 Bg7 7.Be3 0-0 8.f4 Nc6 9.Nb3 Be6 10.g4! (D)
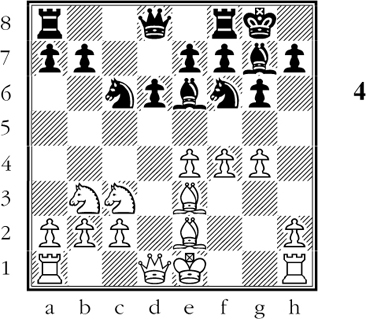
White will get an overwhelming position unless Black counters energetically with …d5!.
10…Nd7??
White can now start a savage pawn-storming attack which opens up lines of attack against Black’s king. After 10…Nd7?? White is not hampered by any black counterplay.
11.h4! f5 12.h5! Nc5 13.hxg6 hxg6 14.gxf5 gxf5 15.Qd2! fxe4 16.0-0-0 Nxb3+ 17.cxb3 Rc8 18.Rdg1 Bf5 19.Bc4+ e6 20.Qh2! Qf6 (D)
White is ready for the final attack. White’s brilliant sacrifices make the most of his open lines.
21.Nd5!! exd5 22.Bxd5+ Be6 23.Bxe6+ Qxe6 24.Rxg7+! Kxg7 25.Qh7+ Kf6 26.Rh6#
In this game we have seen how White punished Black for neglecting the center.
In the game that follows, White builds up an overwhelming center that is the keystone of a winning attacking formation. Black’s opening lapses contribute to the formation of this center.
Nimzo-Indian Defense
White - Black
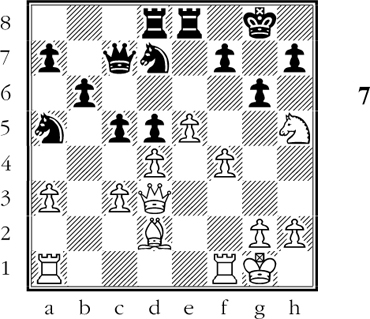
1.d4 Nf6 2.c4 e6 3.Nc3 Bb4 4.e3 d5 5.a3 Bxc3+? 6.bxc3 0-0 (D)
White has the makings of a mighty center formation.
Thanks to Black’s faulty exchange on the fifth move, White has a pawn on c3. This pawn strengthens White’s center formation by giving additional protection to White’s d-pawn.
As a result of White’s fourth move, his e-pawn had the function of guarding White’s d-pawn. But now the e-pawn can disregard its defensive job. White therefore forms the plan of advancing e3-e4 (move 16!).
In order to play e3-e4 White needs several preparatory moves. In the following play, he supports the intended e3-e4 with moves 8, 9, 10, 11, 12, and 14.Once the white pawn arrives at e4, White will have a strong pawn center that will batter down Black’s weakened resistance.
7.cxd5 exd5 8.Bd3 b6 9.Ne2 Ba6 10.0-0 c5 11.Ng3 Re8 12.f3 Qc7 13.Bxa6 Nxa6 14.Qd3 Nb8 15.Bd2 Nc6 16.e4!
A very difficult situation for Black. If he captures White’s e-pawn with his d-pawn, then White recaptures with his f-pawn. This maintains White’s overwhelming center and opens up the f-file for White’s attack.
Black therefore stands pat in the center. White continues powerfully with e4-e5, chasing away Black’s last protective piece on the kingside.
16…Rad8 17.e5! Nd7 18.f4! Na5 19.Nh5 g6 (D)
The stage is set for a dynamic concluding attack by White.
20.f5!! gxh5 21.Bh6! Kh8 22.f6 Rg8 23.Bg7+ Rxg7 24.fxg7+ Kg8
After 24…Kxg7 White has the same winning reply.
25.Rxf7!! Qc6
After 25…Kxf7 26.Qxh7 White threatens to obtain a new queen with discovered - and double! - check. On 26…Rg8 27.Rf1+ wins easily.
26.Raf1 Qh6 27.Qf5 Nc6 28.Rxd7 Black resigns.
For if 28…Rxd7 29.Qf8#.
A wonderfully instructive game. A comparison of Diagram 6 with Diagram 7 shows clearly how the formation of White’s overwhelming center left Black with a steadily deteriorating game.
In the next game White wins convincingly when Black runs into trouble by mistakenly giving up a snug defensive position in the center.
Queen’s Indian Defense
White - Black
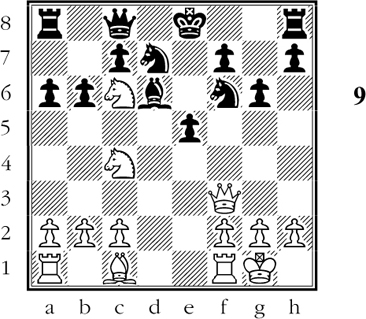
1.d4 Nf6 2.Nf3 b6 3.e3 Bb7 4.Bd3 d6 5.0-0 Nbd7 6.Nbd2 e5 7.e4 exd4? 8.Nxd4 g6?
White has the makings of a powerful attacking position, thanks to two serious blunders by Black.
Black’s seventh move has opened up the game and brought a white knight to a good post in the center. Black’s eighth move is another lapse. White’s knight at d4, cooperating with his bishop at d3, is now able to invade Black’s territory with menacing effect.
Black should have played 8…a6 in order to prevent the following invasion by White’s bishop.
9.Bb5! a6 10.Bc6 Qc8 (D)

White now follows up with an astonishing advance in the center, made possible by Black’s faulty seventh move.
11.e5!! dxe5 12.Qf3! Bxc6 13.Nxc6 Bd6 14.Nc4! (D)
White has prevented 14…0-0, which loses the black queen after 15.Nxd6 cxd6 16.Ne7+ etc.
14…e4 15.Re1 h6 16.Qc3! Qb7 17.Nxd6+ cxd6
As a result of the surrender of the center on move 7, White has completely disorganized Black’s game. White now wins back his pawn.
18.Rxe4+! Kf8 19.Re7! Kg7 20.Bf4 Rac8 21.Qb3
White threatens mate on the move.
21…d5 22.Ne5 Rce8 23.Rxf7+ Kg8 24.Qg3! (D)
Again White menaces mate on the move. White sees that Black cannot guard against the mate by 24…Nxe5. That would lose Black his queen, so he tries a last desperate resource, but White winds up brilliantly.
24…g5 25.Bxg5! Rxe5 26.Bxf6+ Kxf7 27.Qg7+ Ke6 28.Bxe5 Black resigns.
White threatens Qxh8 as well as Re1 with devastating effect. Black has paid a heavy price for giving up the center at move 7.
In each of the games in this chapter we have seen how White has punished Black for giving up control of the center. Throughout the rest of this book you will see repeatedly how important it is to maintain a foothold in the center.