The Literature Book (Big Ideas Simply Explained) (2016)
FIVE
A movement can be described as hip-driven when the predominant action involves the thigh bone moving within the pelvis. The lower back should resist both flexion and extension, remaining neutral through all movements. In standing hip-driven exercises, the shin bone (tibia) remains vertical, while in floor exercises, the knee stays mostly static, making your glutes and
![]()
HIP
DRIVEN
![]()
hamstrings do the majority of the work of moving your hips. Control of this area is extremely important, because the tilt of your pelvis has a huge effect on the stability and safety of your highly vulnerable lower spine, as well as your abdominals’ ability to engage properly. If you don’t develop healthy movement patterns in your hips, you’re likely to end up with lower-back pain. The exercises in this chapter will help you develop those patterns so you can build your core and legs without injuring yourself.
BRIDGE
![]()
Primary muscle groups: Glutes, Hamstrings
Secondary muscle group: Abdominals
34
BASE
FLOOR BRIDGE
35
INTERMEDIATE
ONE LEG FLOOR BRIDGE
36
ADVANCED
ELEVATED BRIDGE
The most basic of the hip-driven exercises are the bridges. You do them from a supine position (lying on your back) with your knees in a relatively fixed position so that most of the movement comes from your hips. It’s easy to accidentally start using your lower back to help generate some of the motion, so pay close attention to your pelvic tilt and don’t let it change throughout the entire exercise. These exercises target hip extensors, like the glutes and hamstrings for movement, and core muscles for stabilization. The three variations covered here are the basic floor bridge, the one leg floor bridge, and the elevated bridge.
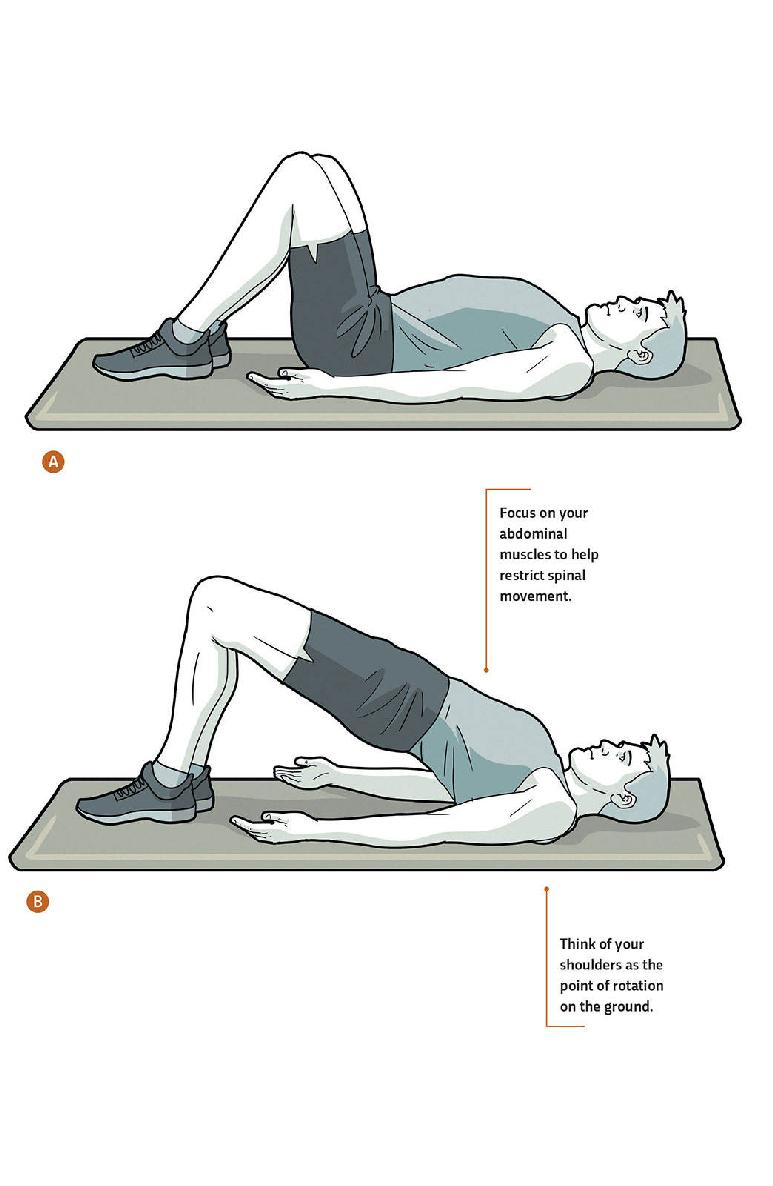
34 / FLOOR BRIDGE
The basic floor bridge puts your body in a stable position, leaving your nervous system available to fully focus on the task at hand instead of using it to fight gravity and stay balanced. It’s a great way to learn the fundamentals of hip-driven movements: Once you’ve figured out how to work your pelvis and femur together properly while restricting motion in your lower back, you’ll be able to use that proper form for all hip-driven exercises. The basic floor bridge uses a relatively small range of motion, but it’s a great bodyweight exercise and learning opportunity.
GOAL: You’ll know you’ve mastered the basic floor bridge when you can perform the motion with no spinal movement. Aim to do 20 perfect repetitions before progressing to the One Leg Floor Bridge (35).
1Lie on your back with your knees bent and your feet on the ground. Your heels should be just within reach of your fingertips. ![]()
![]()
2Making sure your lower spine is neutral, drive up through your heels, pushing your pelvis up toward the sky. ![]()
![]()
3Once your hips are fully extended, slowly return to the starting position. ![]()
35 / ONE LEG FLOOR BRIDGE
The one leg floor bridge will challenge the strength and stability of your hip muscles on one side of your body, as well as your ability to extend one hip while the other is bending. This is a movement pattern most people have lost in modern-day life, so you’ll probably need to retrain yourself to do it. You should not attempt this variation until you’re proficient with the basic floor bridge (34) and can restrict the movement in your spine while allowing your femur and pelvis to work together in proper alignment.
GOAL: Eventually you should be able to fully extend the working hip while your hips remain parallel with ground. Work toward doing 20 repetitions on each side.
1Lie on your back with your knees bent and your feet on the ground. Your heels should be just within reach of your fingertips. Grab one knee, and pull it up toward your chest. ![]()
![]()
2Making sure your lower spine is neutral, drive up through the heel that’s still on the floor, pushing your pelvis toward the sky and making sure not to rotate your hips in either direction. ![]()
![]()
3Once your down hip is fully extended, slowly return to the starting position.

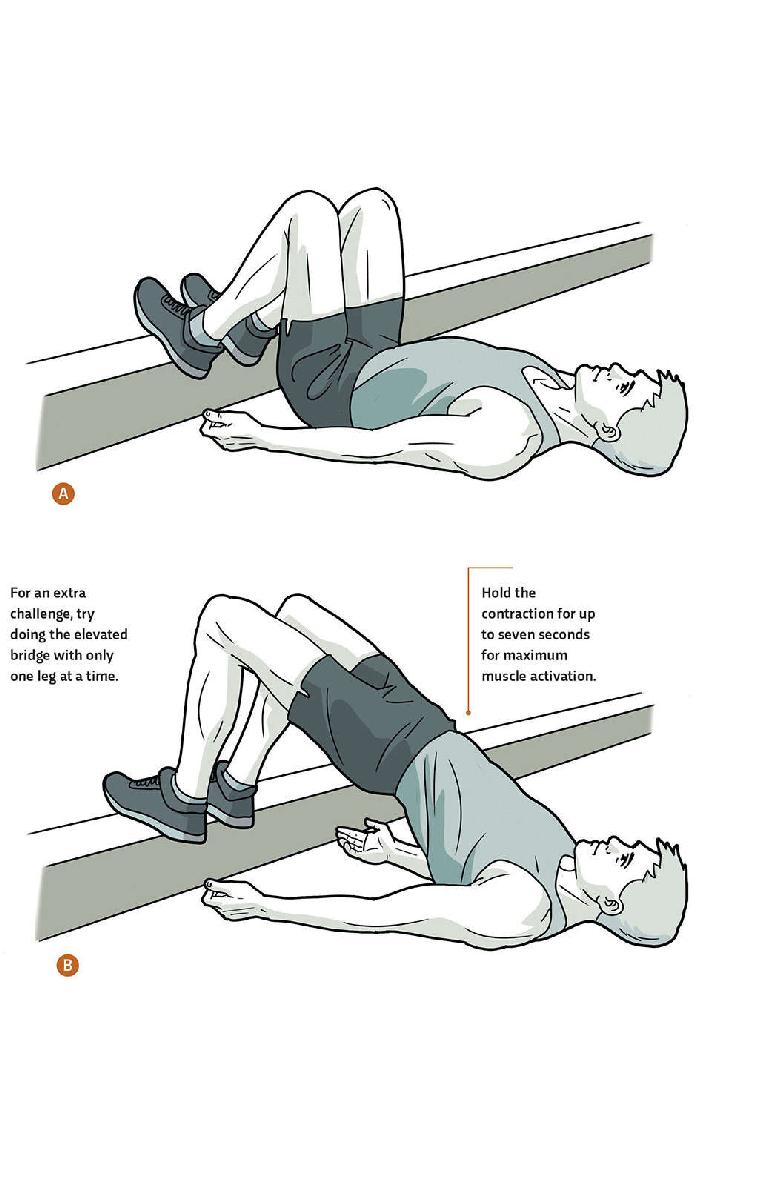
36 / ELEVATED BRIDGE
In this variation, you elevate your feet on a small step to allow your hips a slightly larger range of motion. The same rules about unwanted spinal movement apply: Your femur and pelvis should work together in proper alignment without moving your spine. Make sure you finish the elevated bridge with your pelvis neutral, not stuck in a forward tilt with your lower back arched.
GOAL: 20 repetitions
1Lie on your back with your knees bent and your feet on a small step about curb height (4 to 8 inches high). Your heels should be just within reach of your fingertips. ![]()
![]()
2Making sure your lower spine is neutral, drive up through your heels, pushing your pelvis toward the sky. ![]()
![]()
3Once your hips are fully extended, slowly return to the starting position. ![]()
SHOULDER-ELEVATED
BRIDGE
![]()
Primary muscle groups: Glutes, Hamstrings
Secondary muscle groups: Abdominals, Deltoids
37
BASE
SHOULDER-ELEVATED BRIDGE
38
INTERMEDIATE
ONE LEG SHOULDER-ELEVATED BRIDGE
39
INTERMEDIATE
ONE ARM SHOULDER-ELEVATED BRIDGE
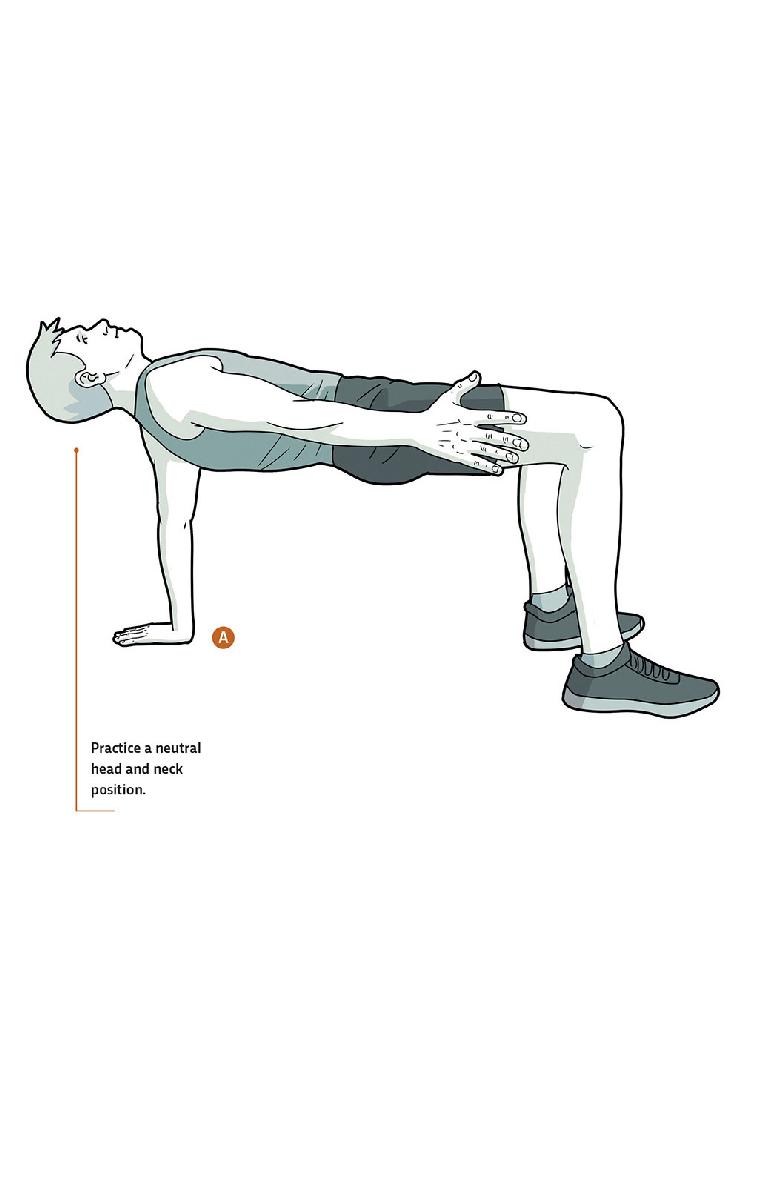
In this variation on the bridge, elevating your shoulders gives your hips a larger range of motion. To elevate your shoulders, place your hands on the ground with your arms rotated outward so the insides of your elbows are pointing down toward your hips. You can also place your shoulders on a knee-height step or bench if one is available, but performing this movement from your hands provides a good dynamic stretch through your biceps and the front of your shoulders if you can handle it. It’s important to master control of your lumbo-pelvic hip complex (the area of your body comprising the hip joint, lower spine, and pelvis) before attempting these variations. All the movement must be in the hips and shoulders—not the spine.
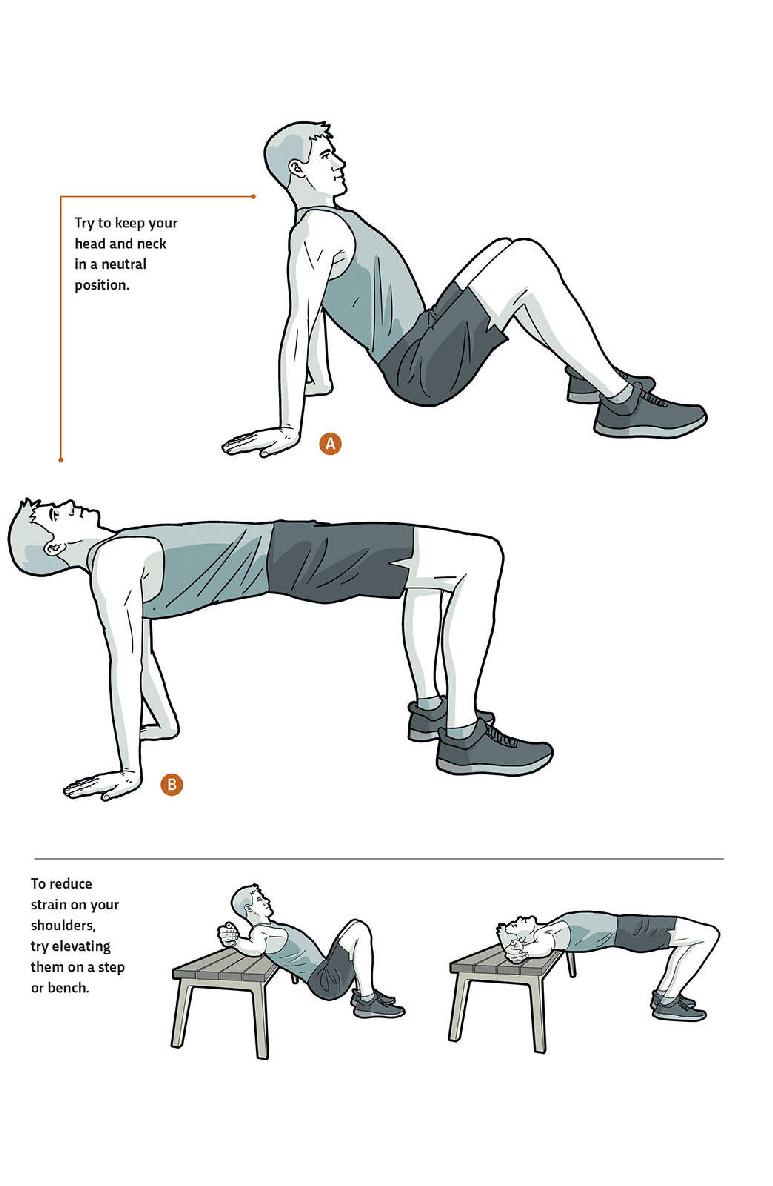
37 / SHOULDER-ELEVATED BRIDGE
The basic shoulder-elevated bridge uses both hands and both legs. You work your glutes and hamstrings by extending your hips to bring yourself up into a tabletop position, then returning to your resting position with your hips on the ground. Make sure your spine maintains its neutral relationship with your pelvis and that you don’t recruit it to help with the motion. If this exercise is too painful on your shoulders, use a step or bench to elevate your shoulders instead of holding yourself up with your hands.
GOAL: Once you can do 20 repetitions with your spine completely neutral, you’re ready to try the One Leg Shoulder-Elevated Bridge (38).
1Start by sitting on the ground with your knees bent and your feet flat on the floor in front of you. Place your hands on the ground with your fingertips pointing behind you. ![]()
![]()
2Keeping your chest tall and your spine neutral, drive up through both heels and fully extend your hips, bringing your body into a tabletop position. ![]()
![]()
3Using your abdominals to keep your lower spine and pelvis in a neutral position, slowly lower your body back to its starting position. ![]()
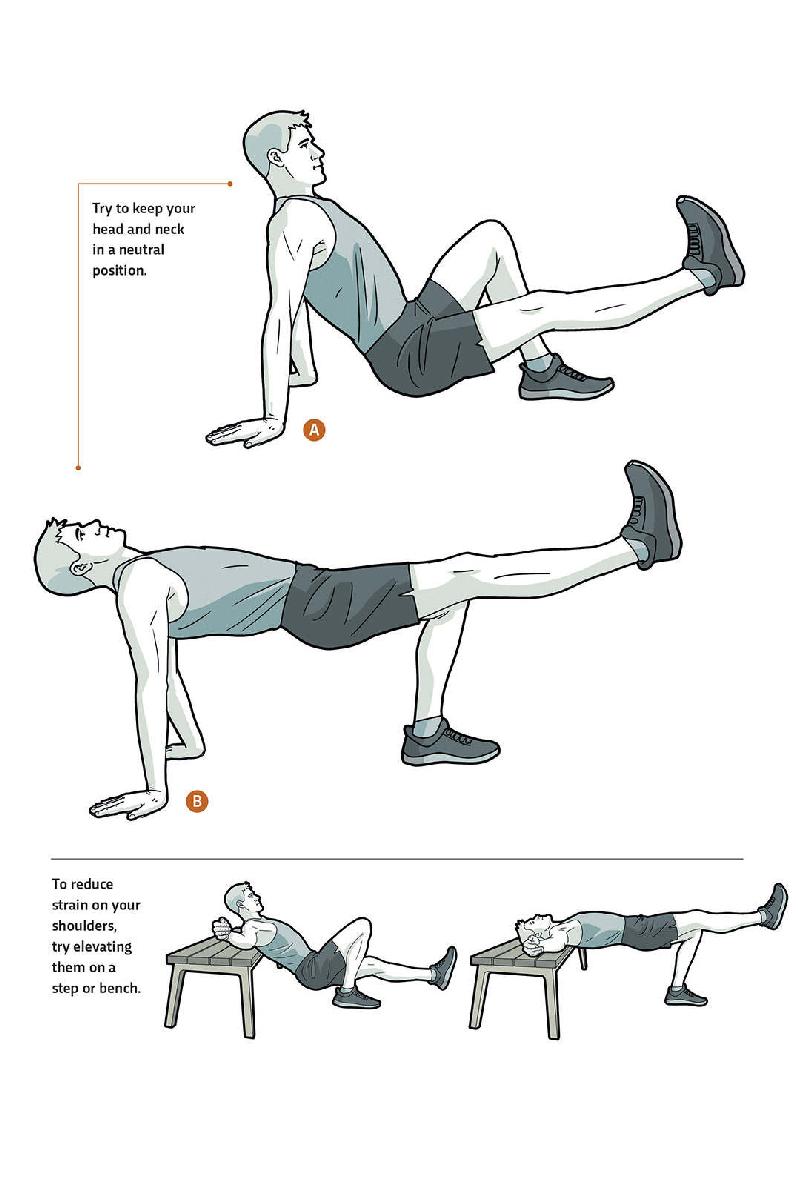
38 / ONE LEG SHOULDER-ELEVATED BRIDGE
This variation challenges one hip at a time. By lifting one leg, you greatly reduce your base of support for the exercise, which forces you to use your core and hip stabilizers to resist your body’s natural tendency to rotate as compensation for the reduction in contact points.
GOAL: When you can do 20 repetitions on each side with your spine completely neutral, you’re ready to move to the One Arm Shoulder-Elevated Bridge (39).
![]()
1Start by sitting on the ground with your knees bent and your feet flat on the floor in front of you. Place your hands on the ground with your fingertips pointing behind you.
![]()
2Keeping your chest tall and your spine neutral, straighten one knee, fixing that leg in an extended position. ![]()
![]()
3Drive up through the heel that’s still on the floor and fully extend your hips, bringing your body into a three-legged tabletop position. ![]()
![]()
4Using your abdominals to keep your lower spine and pelvis in a neutral position, slowly lower your body back to its starting position.
39 / ONE ARM SHOULDER-ELEVATED BRIDGE
The one arm shoulder-elevated bridge challenges your core stabilization from the top down rather than from the bottom up. It requires a great deal of shoulder mobility and stabilization, so don’t attempt this variation if you have any tightness in your shoulders that causes pain or affects your ability to keep your upper spine straight.
GOAL: Work toward doing 20 repetitions on each side without any rotation through your hips.
![]()
1Start by sitting on the ground with your knees bent and your feet flat on the floor in front of you. Place your hands on the ground with your fingertips pointing behind you.
![]()
2Keeping your chest tall and your spine neutral, raise one hand off the ground and place it out to one side. ![]()
![]()
3Drive up through both heels and fully extend your hips, bringing your body into a three-legged tabletop position. ![]()
![]()
4Using your abdominals to keep your lower spine and pelvis in a neutral position, slowly lower your body back to its starting position.
STRAIGHT LEG
HIP
EXTENSION
![]()
Primary muscle group: Glutes
Secondary muscle group: Hamstrings
40
BASE
SIDE LYING LEG RAISE
41
INTERMEDIATE
QUADRUPED STRAIGHT TAP
42
ADVANCED
QUADRUPED OBLIQUE TAP
In these hip-driven movements, you focus on control of the hip joint alone, allowing no other joints to move at the same time. They can be done lying on your side or on all fours, and they all focus on extending the hips with the knee locked. This means you’re using only the many fibers of the glutes to drive the motion, which is why straight leg hip extensions are a great way to strengthen and tone your backside. Here you’ll start with a side lying leg raise to activate the stabilizing glute fibers, a chronically underactive muscle often responsible for collapsing your knees during ankle-driven movements. Then you’ll move on to a variation that targets the meat of the glutes, and end with one that works the whole gluteal complex.
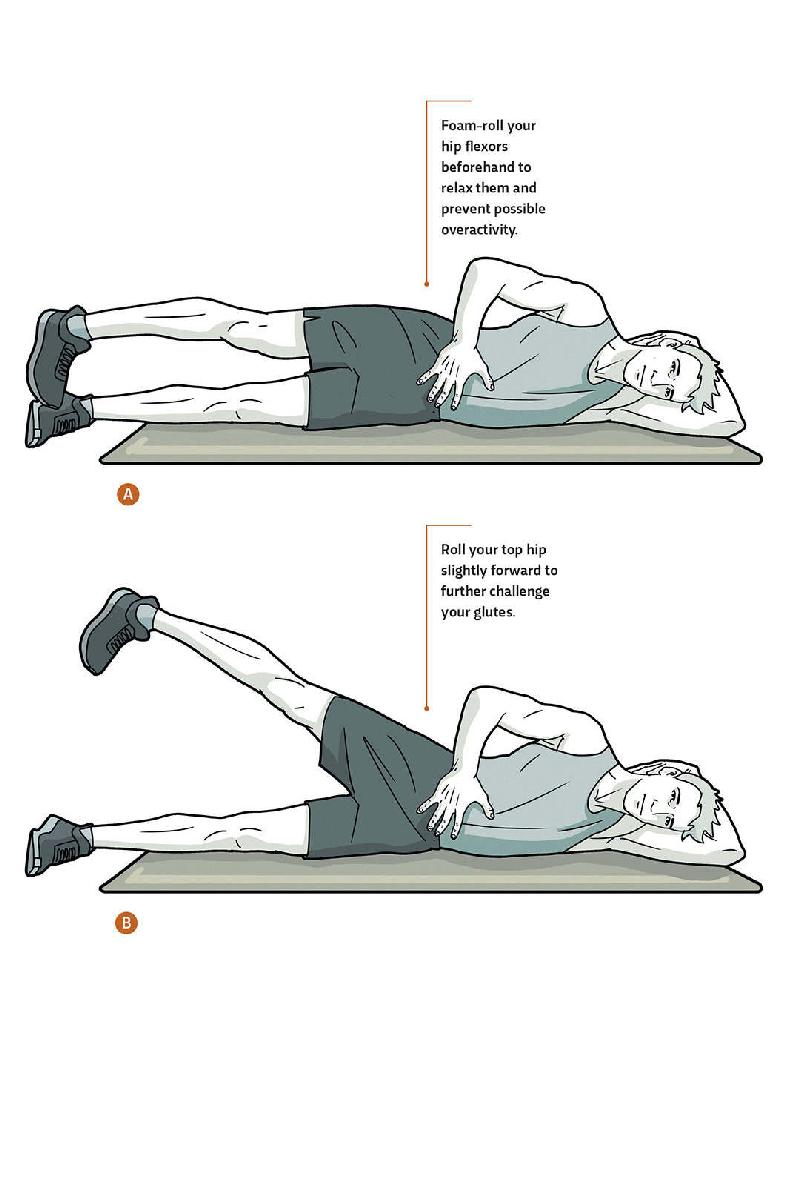
40 / SIDE LYING LEG RAISE
This exercise focuses on activating the gluteus medius, the stabilizing muscles of the hip. As you perform the motion, make sure your toes are pointed down toward the ground, and let your upper body lie flat on its side. Don’t prop yourself up on your elbow—that only causes your spine to bend from side to side.
GOAL: 20 repetitions on each side
1Lie flat on your side with your hips lined up vertically. Do not prop your upper body up on your elbow.
![]()
2Point the toes of your top foot down toward the ground, and place your top hand on your abdominals to feel for any unwanted movement. ![]()
![]()
3While keeping your knee locked and toes pointed down, elevate your top foot as high as possible ![]() without bending your spine from side to side to assist in the motion.
without bending your spine from side to side to assist in the motion.
![]()
4Once your foot is as high as it can go, slowly return it to its starting position. ![]()
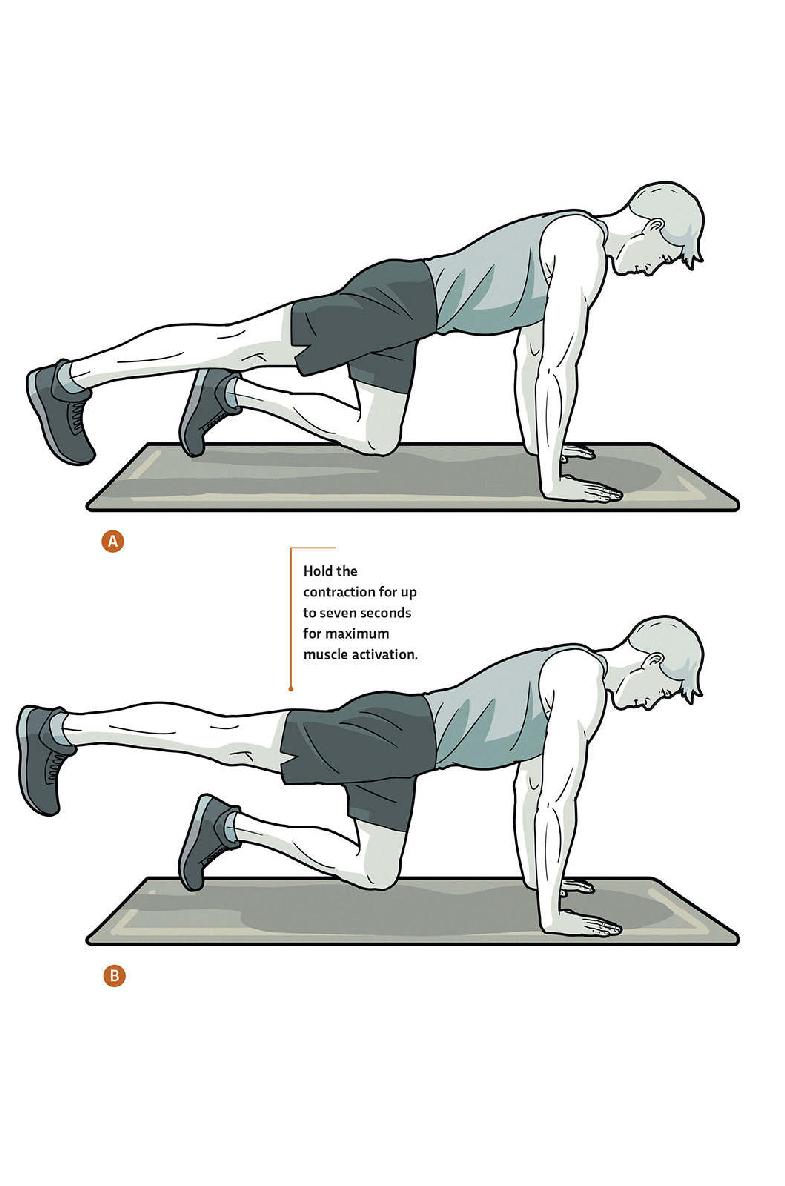
41 / QUADRUPED STRAIGHT TAP
Done on all fours (quadruped), this variation challenges the bulk of the glutes to perform isolated hip extensions. It’s important to activate your abdominals to prevent any unwanted lower-spine extension. Keep your knee locked and your quad active to inhibit hamstring function and leave your glutes fully responsible for creating the motion. If your hip flexors are tight, contracting your glutes will be difficult. If that’s the case, focus more on mobility work during your cooldowns. Spend more time in the half-kneeling position to train your hip flexors to get longer.
GOAL: As you get stronger, you can try to get your leg slightly higher than parallel with your spine (but still in a neutral position). Work up to doing 20 repetitions on each side.
1Start on all fours with your hands directly below your shoulders and your knees directly below your hips.
![]()
2Straighten one leg out behind you, leaving just the toes in contact with the ground.
![]()
3While keeping your quad tight to maintain a locked knee ![]() , squeeze your glutes to raise your back leg up as high as you can without using your low back.
, squeeze your glutes to raise your back leg up as high as you can without using your low back. ![]() Be sure to use your abdominals to prevent your lower spine from assisting in the leg raise.
Be sure to use your abdominals to prevent your lower spine from assisting in the leg raise.
![]()
4Slowly lower your leg to the ground, lightly tapping your toes on the ground before going straight into the next rep.
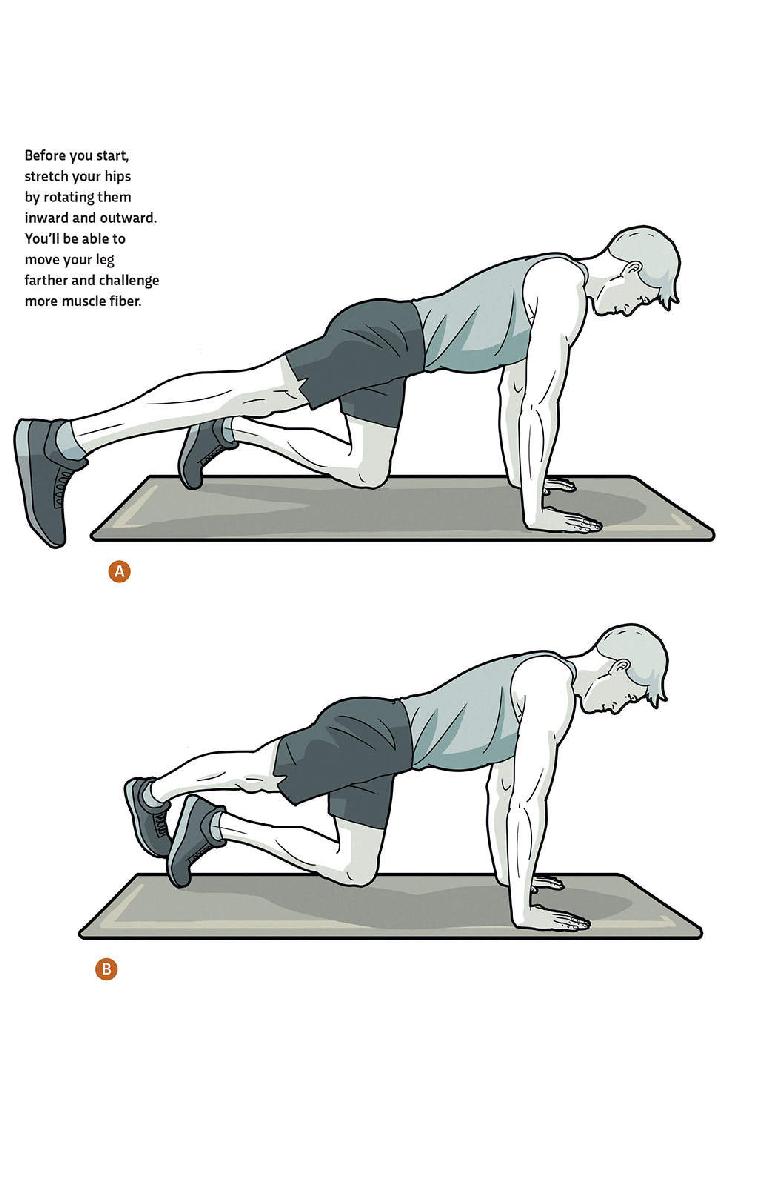
42 / QUADRUPED OBLIQUE TAP
In this variation, you challenge your hip extension in three positions: abducted (away from your body’s midline), adducted (toward your body’s midline), and neutral. Try to keep your toes pointed directly downward as you do each tap (to the outside, straight back, and to the far side of the opposite leg). A tap in each position counts as one repetition. Stabilizing your lower spine and your pelvis is crucial to performing this exercise correctly.
GOAL: Work toward doing 21 repetitions (7 cycles of 3 taps in different directions) on each side.
1Start on all fours with your hands directly below your shoulders and your knees directly below your hips. Straighten your right leg out behind you, leaving just the toes in contact with the ground. ![]()
![]()
2While keeping your quad tight to maintain a locked knee, squeeze your glutes to raise your right leg up as high as you can. Then, slowly lower your leg to its starting position, lightly tapping your toes on the ground.
![]()
3On the next rep, instead of tapping your toes straight back down again, tap the ground slightly to your right. On the rep after that, tap the ground slightly to the left of your left leg. ![]()
![]()
4Continue tapping in cycles of three: once straight back, once slightly to the outside of the active leg, and once slightly to the outside of the stationary leg.
![]()
5Switch to your left leg and repeat.
HIP HINGE
![]()
Primary muscle groups: Glutes, Hamstrings
Secondary muscle groups: Spinal erectors, Abdominals
43
BASE
TWO LEG HIP HINGE
44
INTERMEDIATE
STAGGERED HIP HINGE
45
ADVANCED
ONE LEG HIP HINGE
The hip hinge is the most functional of the hip-driven exercises because it mimics a movement most of us use multiple times a day: bending over. The hip-hinge variations here require you to use your motor control to restrict motion in your spine while still allowing motion in your hips. They’re all forward-bending patterns that test your hips’ full range of motion and reinforce healthy movement habits. Keep in mind that a healthy bending pattern has you push your hips and butt backward as you bend. And because this is a hip-driven activity, not an ankle-driven one, try to restrict the bending of your ankle.
43 / TWO LEG HIP HINGE
The hip hinge is an extremely important human movement pattern. It forms the foundation for all sorts of lower-body movements, from bending over to pick up the keys you dropped to performing flawless burpees. The idea is to lower your upper body while keeping your knees positioned over your ankles and not flexing your spine at all. You can soften your knees to allow your hips to move backward into the posterior weight shift that is necessary for a healthy bend, but don’t let your knees come forward.
GOAL: When you can do 20 repetitions while keeping your spine perfectly neutral and stable, you’re ready to try the Staggered Hip Hinge (44).
1Stand with the insteps of your feet shoulder-width apart, your arms down at your sides.
![]()
2Soften your knees and shift your weight backward as you lower your torso forward toward the ground, ![]() maintaining a neutral spine the whole time.
maintaining a neutral spine the whole time.
![]()
3Keep bending until you feel a stretch in your hamstrings or your spine becomes parallel to the ground, then squeeze your glutes and return to your starting position.
44 / STAGGERED HIP HINGE
This variation works on hip stability one leg at a time. Your other leg helps you balance but doesn’t really do any work. Your feet are much closer together than they were for the basic two leg hip hinge (43), and they’re staggered, with the back foot up on its toes. Be careful not to rotate the working hip outward—this is caused by lack of activity of your hip stabilizers. By keeping your hips parallel with the ground, you’ll train your stabilizers to fire earlier and work in cooperation with the rest of your glutes.
GOAL: 20 repetitions on each side without rotating your working hip outward at all
1Stand with your feet hip-width apart and slightly staggered—one foot in front of the other, aligning the toes of the back foot with the heel of the front foot. Keep the front foot flat on the ground, but lift the heel of the back foot.
![]()
2Soften your knees and shift your weight backward as you lower your torso forward toward the ground. ![]() Maintain a neutral spine, and be careful not to rotate out through your hips.
Maintain a neutral spine, and be careful not to rotate out through your hips.
![]()
3Keep bending until you feel a stretch in your working hamstring or your spine becomes parallel to the ground. Squeeze your working leg’s glutes, and return to the starting position.
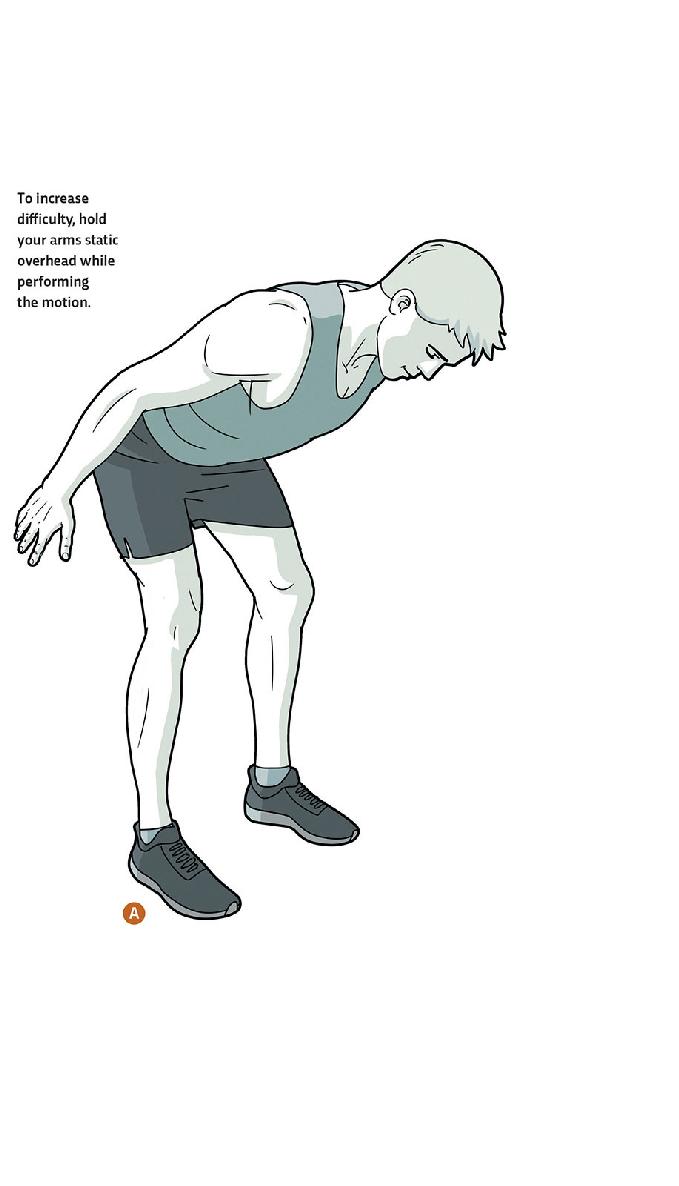
45 / ONE LEG HIP HINGE
The one leg hip hinge is just what it sounds like—a hip hinge performed on one leg—and it’s the ultimate functional hip-driven bodyweight movement. It challenges balance, hip stability, and core stability as well as controlled mobility of the hip joint. It’s the last step in the hip-hinge progressions, and everyone should master it. Shifting your center of gravity over such a small base of support demonstrates great strength and balance control. Make sure your hips stay square with the ground and aren’t rotating outward because of weak stabilizers. Keep an eye on the toes of your nonworking leg: If they start to point outward, that’s a good indicator that your hips are rotating outward. Activate the glutes of the nonworking leg to help stabilize the motion.
GOAL: 20 repetitions on each side without rotating your working hip outward at all
1Stand with your feet hip-width apart and slightly staggered, one foot in front of the other, aligning the toes of the back foot with the heel of the front foot. Keep the front foot flat on the ground, but lift the heel of the back foot.
![]()
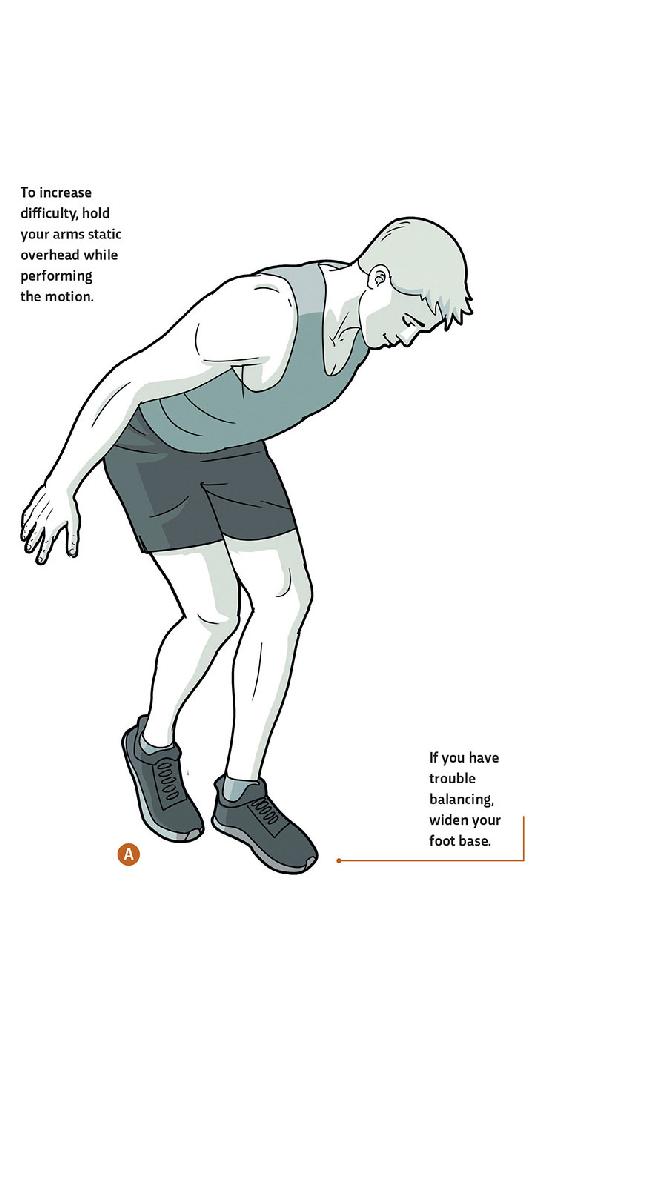
2Soften your knees and shift your weight backward as you lower your torso forward toward the ground and extend your back leg out behind you. ![]() Maintain a neutral spine, and be careful not to rotate through your hips.
Maintain a neutral spine, and be careful not to rotate through your hips.
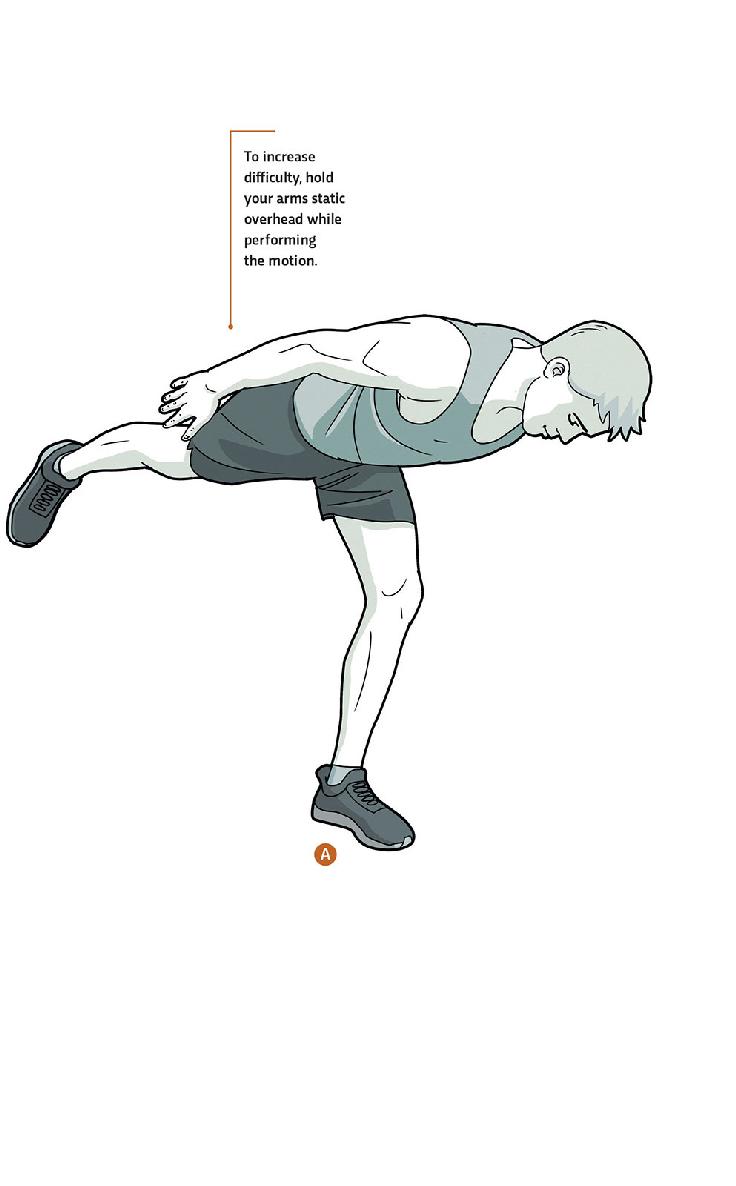
![]()
3Keep bending until you feel a stretch in your working hamstring or your spine becomes parallel to the ground. Squeeze your working leg’s glutes, and return to the starting position.
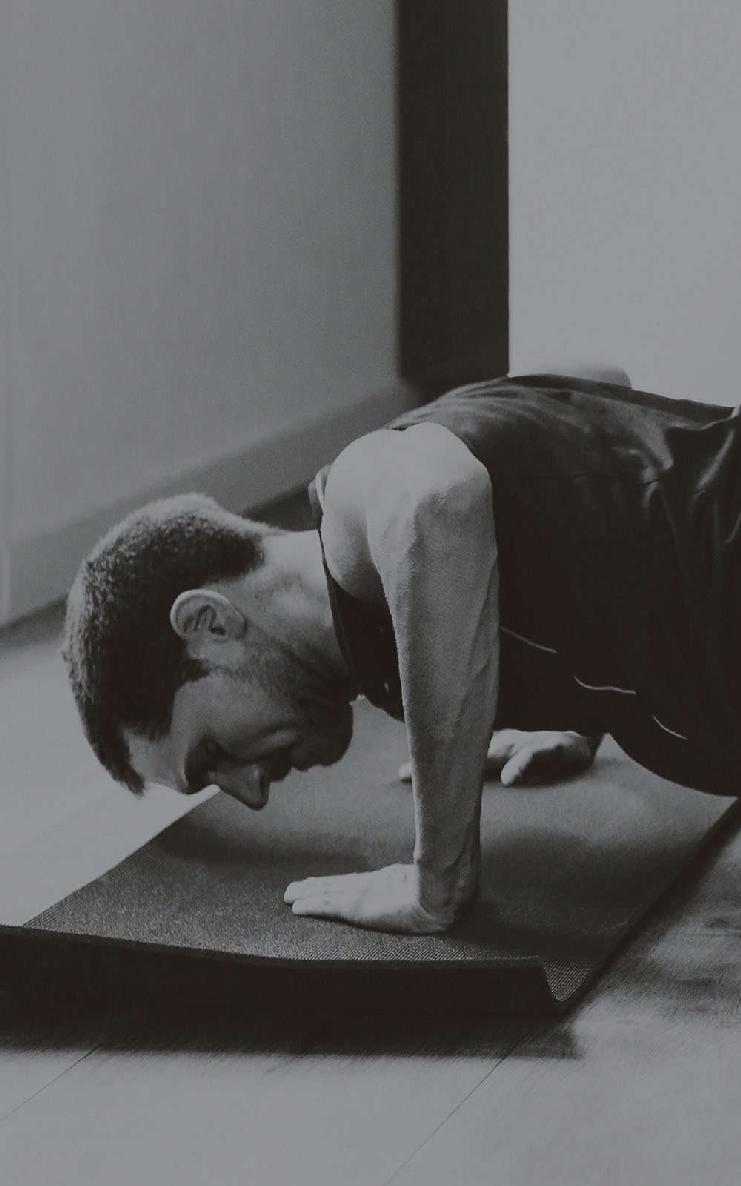
PUSH-UP
SLIDING PUSH-UP
PIKE PUSH-UP
DYNAMIC PUSH-UP
DIP