The Literature Book (Big Ideas Simply Explained) (2016)
THREE
Think of your core as all the muscles between your knees and your chest—not just your abs. That includes the muscles around your pelvis, along your spine, and down your sides, as well as internal muscles you can’t see in the mirror. Although your quadriceps aren’t technically part of your core, many core exercises focus on the quadriceps, too, because they play a big role in
![]()
CORE
![]()
supporting core strength. Core musculature is important in many ways. It not only protects your vital organs but also provides an incredible amount of support and stability for all sorts of movement, from walking to leaning over to sitting up straight. When you lift heavy objects, it may seem like your arms are doing all the work, but your core is doing a lot, too. Trying to lift something heavy with a weak core is like trying to push a broken-down car while wearing roller skates: You can’t generate the leverage you need. If you work on all your core muscles, instead of just your abs, you’ll be stronger overall and less prone to injury. These exercises will help you do just that.
PLANK
![]()
Primary muscle groups: Abdominals, Obliques
Secondary muscle groups: Glutes, Quadriceps
01
BASE
CLASSIC PLANK
02
INTERMEDIATE
SIDE PLANK
03
ADVANCED
PLANK WALK-UP
The plank is an excellent exercise for making your spine more stable by fighting against gravity as it tries to pull your midsection down to the floor. There are many variations on the plank, but the goal is always the same: Use your abdominals to prevent your spine from arching, and use your glutes to prevent your pelvis from tilting forward. This plank series includes a classic plank to work the ab muscles that make up the six pack (rectus abdominis), a side plank to challenge the obliques, and finally, a plank walk-up to develop reactive core stability—the ability of your core to react to changes in demand or environment and continue to provide stability.
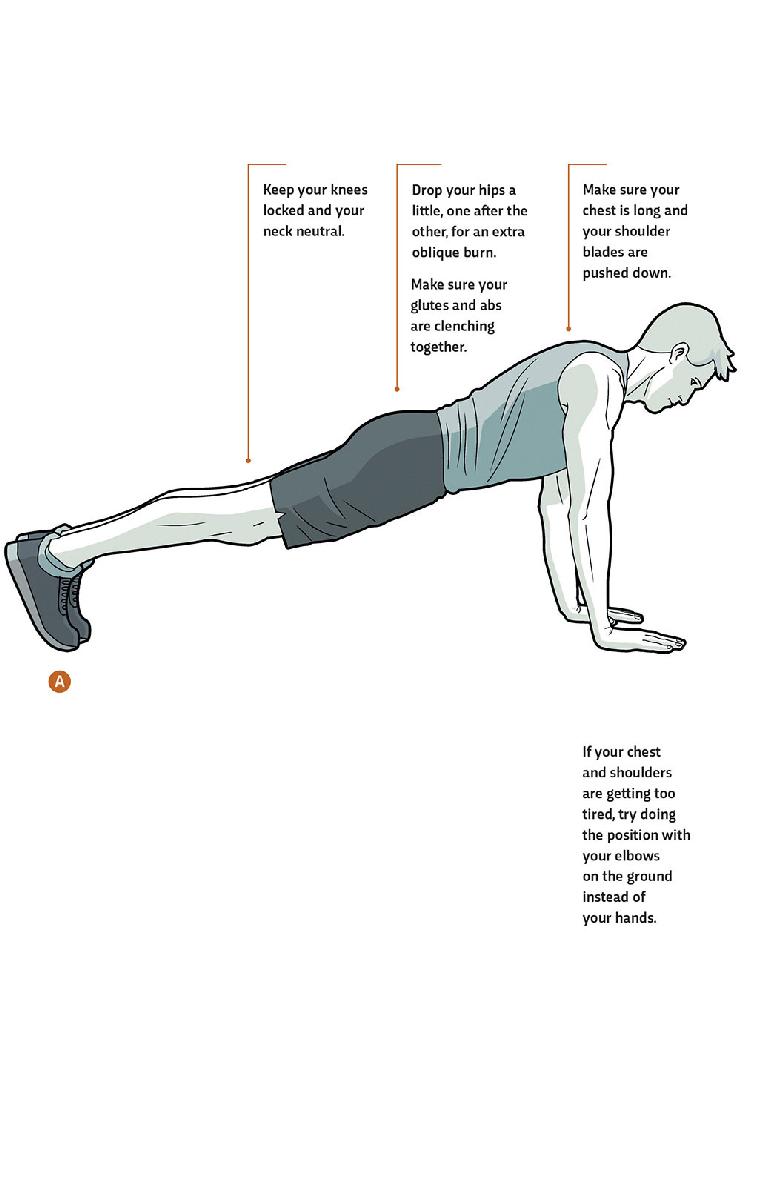
01 / CLASSIC PLANK
When your body is in a plank position, gravity tries to pull you to the floor. You feel its pull most strongly on the parts of your body that are farthest away from your feet and hands, which act as stable contact points with the ground. Because of this, your hips and lower back are the parts most vulnerable to gravity, and as they sag, your lower back increases its arch and your pelvis tilts forward. By engaging the abs and squeezing your glutes in a plank position, you can prevent the extension in your spine and the forward (anterior) tilt in your pelvis.
GOAL: Hold this position for at least 1 minute before moving to Plank Walk-Up (03).
1Drop to the ground, and position yourself as if you were about to do a push-up: feet together, knees locked, and arms out straight in front of you. Your arms should be rotated outward with the insides of your elbows facing forward, and your shoulder blades should be pressed down toward your hips, not up around your ears. Your head should be neutral, not slumped down or extended back.
![]()
2Squeeze your abdominals and glutes, and at the same time, tilt the top of your pelvis backward, rounding your lower back and taking any stress off of it by keeping your pelvis neutrally tilted. If you feel stress in your lower back, you don’t have the right tilt to your pelvis yet. Your body should form a straight line from the top of your head through your shoulders, hips, knees, and ankles. ![]() Hold this position for 30 seconds, gradually working up to be able to hold it for 1 minute.
Hold this position for 30 seconds, gradually working up to be able to hold it for 1 minute.
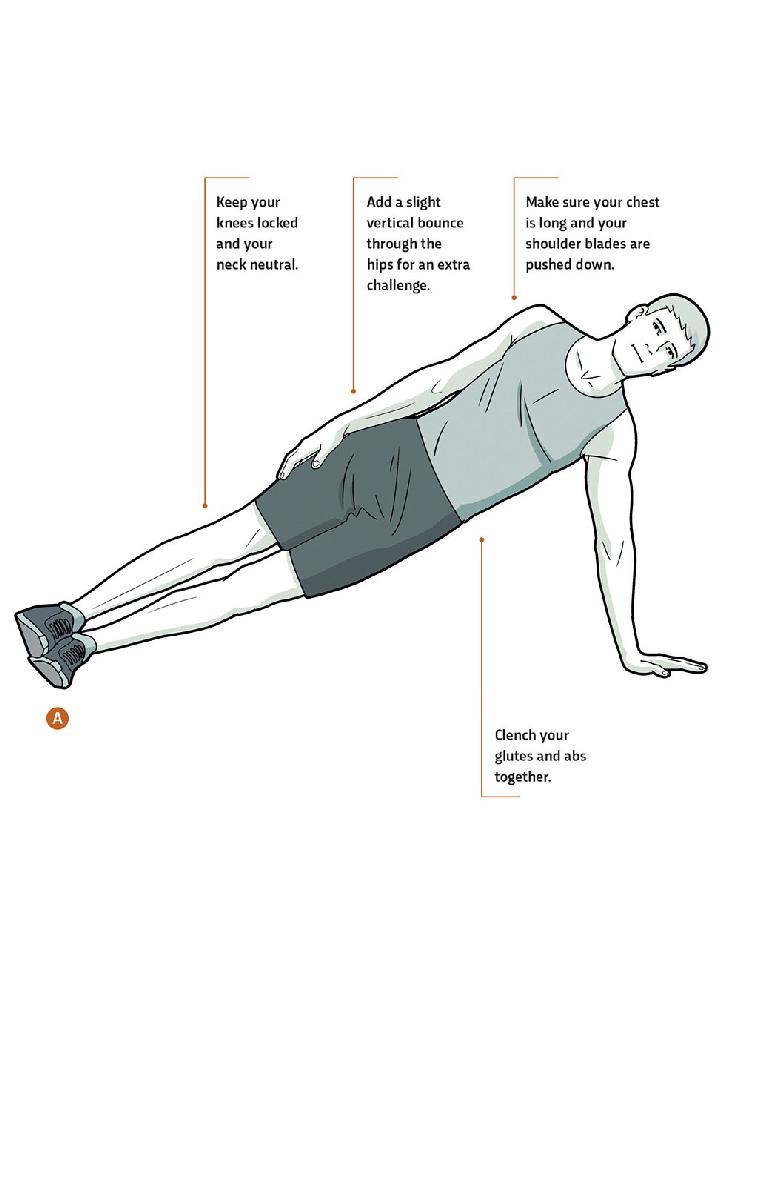
02 / SIDE PLANK
In this variation on the plank, you’ll again use resistance to gravity to build strength in stability, but this time you’ll be trying to keep your spine from bending sideways at the waist (lateral flexion). Engage your obliques and glutes to keep your pelvis and bottom leg in place.
GOAL: Hold this position for 30 seconds on each side before moving to Plank Walk-Up (03).
1Lie on your side with your legs straight and one foot on top of the other.
![]()
2Using both arms, push yourself up until your bottom arm is stretched out straight, supporting all your upper body weight, and your top arm is lying on the upper side of your body. Make sure that both shoulder blades are pulled down toward your hips and that the supporting arm is rotated outward, with the inside of the elbow facing out in front of you.
![]()
3Fully extend your hips by pushing them forward and squeezing your glutes. Your body should be a straight line from your ear through your shoulder, hips, knees, and ankles. ![]()
![]()
4Hold this position for 30 seconds, and repeat on the other side, gradually working up to be able to hold it for 1 minute on each side.
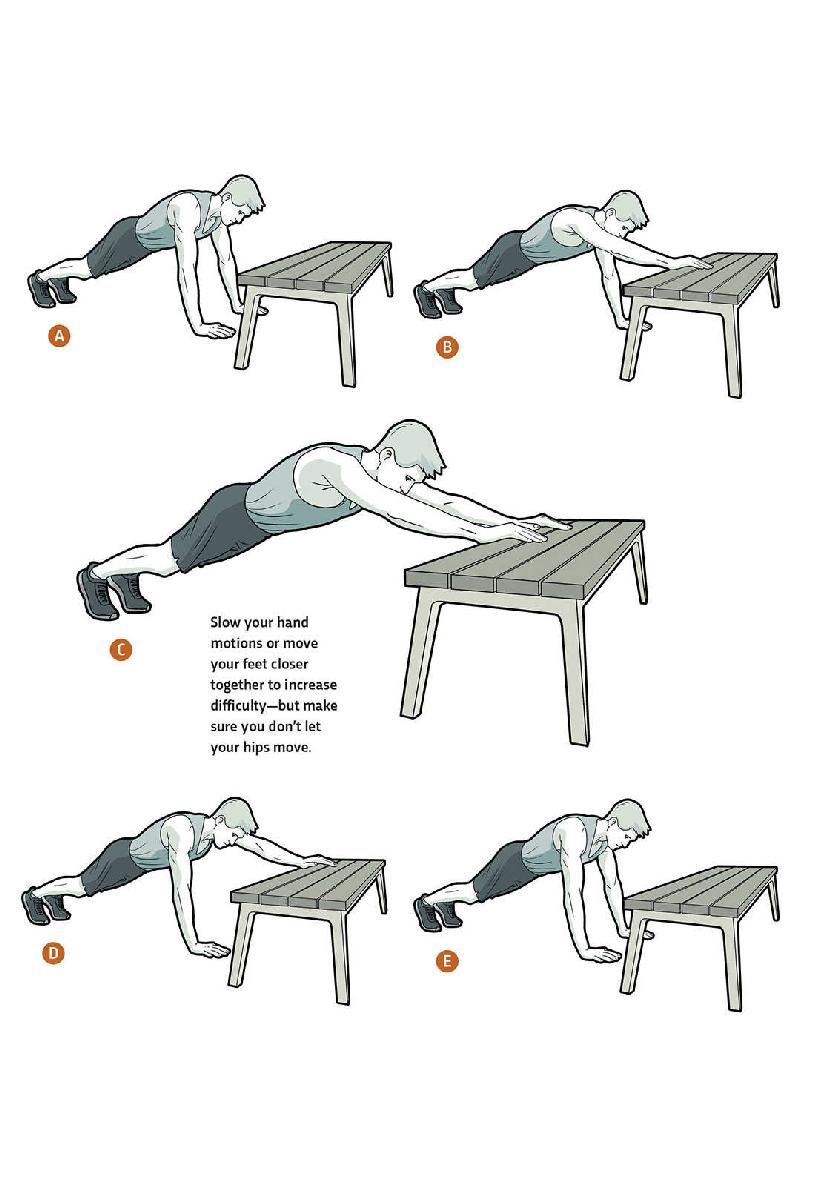
03 / PLANK WALK-UP
This plank variation challenges your reactive core stability and your ability to keep your spine and hips from twisting or rotating (antirotation). For a plank walk-up, you reduce your base of support by lifting one hand and placing it up on a step in front of you. This lack of support makes it easier for gravity to pull your spine into extension, and your core has to work extra hard to hold your spine in place. As you follow with the second hand, a whole new section of your trunk becomes more unstable and vulnerable to gravity.
GOAL: With practice, be able to perform at least 10 cycles on each side.
1Start in a plank position with your hands 12 to 18 inches away from a sturdy step or curb. ![]() (The higher the step, or the farther the distance, the more difficult the exercise.)
(The higher the step, or the farther the distance, the more difficult the exercise.)
![]()
2Lift your right hand, and place it on the step. ![]() Then lift your left hand, and place it next to your right hand on the step, making sure not to rotate or tilt through the hips.
Then lift your left hand, and place it next to your right hand on the step, making sure not to rotate or tilt through the hips. ![]()
![]()
3Return your right hand to its original position, followed by your left hand. ![]()
![]()
![]()
4Switch, and lead with the left hand. Repeat each side for five reps.
BEAR
CRAWL
![]()
Primary muscle groups: Deltoids, Hip flexors, Abdominals
Secondary muscle groups: Obliques, Hamstrings
04
BASE
FORWARD BEAR CRAWL
05
INTERMEDIATE
LATERAL CRAB WALK
06
ADVANCED
GLANIMAL CRAWL
You probably mastered this fundamental movement pattern before you learned to walk, but you may have forgotten it by now. The bear crawl challenges your core to prevent unwanted movement as you use your limbs in contralateral (opposite-side) unison. Here you’ll practice crawling forward with your spine neutral, then progress to a more difficult variation where you’ll switch up your movement and crawl laterally from side to side. For the hardest variation, you’ll return to a forward bear crawl with longer strides and some rotation allowed through the hips and shoulders.
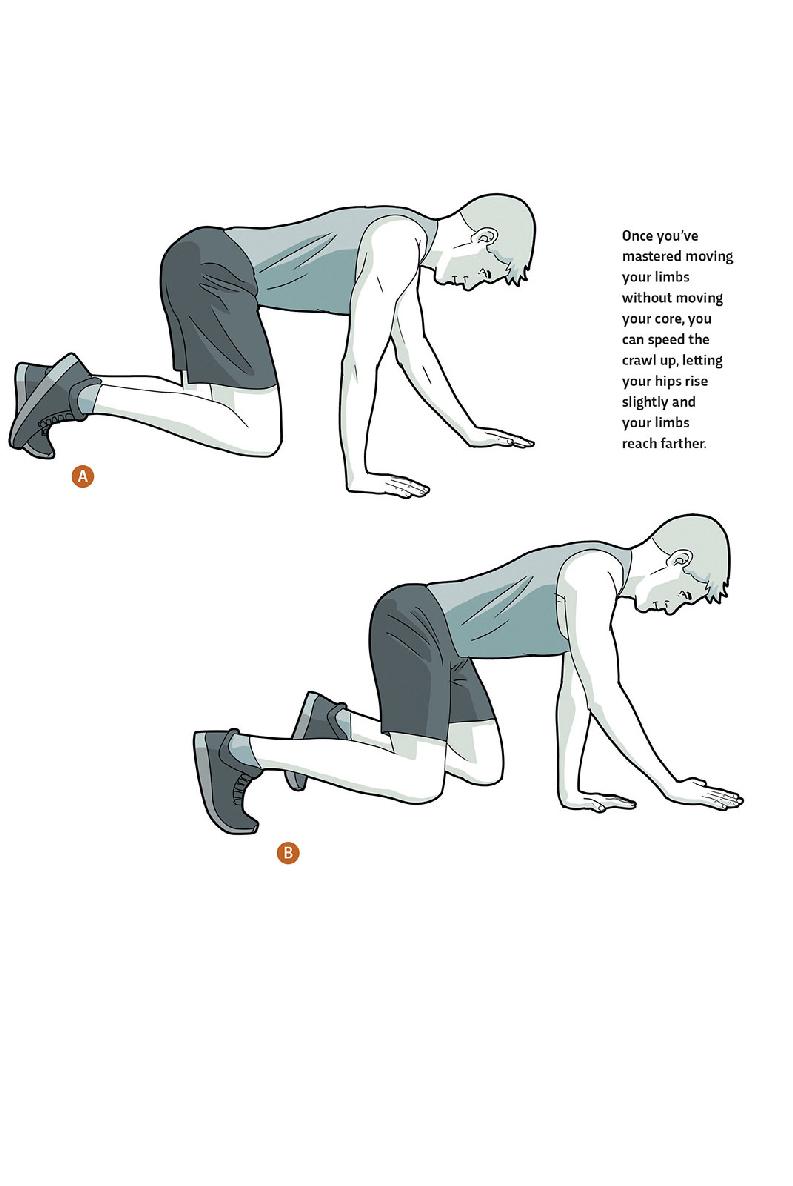
04 / FORWARD BEAR CRAWL
The goal of a basic bear crawl is to crawl forward while preventing any motion in your spine. Your right arm always moves at the same time as your left leg, and vice versa. Your hips and knees drive your motion forward, while your arms absorb the impact with the ground, slowing your motion and providing extra stability. Your spine, pelvis, and head remain neutral.
GOAL: Strive to be able to complete 20 to 30 repetitions on each side.
1Drop to the ground on all fours with your hands below your shoulders and your knees below your hips.
![]()
2Position your pelvis so the lower region of your spine is in neutral, then lift your chest and activate your lower-trapezius muscles by pressing your shoulder blades down toward your hips.
![]()
3Lift your knees 1 inch off the ground, and when you’re ready, move your left arm and right leg forward together 4 to 5 inches. ![]() Then do the same thing but with your right arm and left leg.
Then do the same thing but with your right arm and left leg. ![]() Repeat 10 times.
Repeat 10 times.
05 / LATERAL CRAB WALK
This variation of the bear crawl starts from a plank position (01) instead of on all fours. As in the forward bear crawl (04), you move your arms and legs opposite each other in unison, but this time, you make your way from side to side instead of forward. Engage your abdominals to prevent your spine and hips from sagging and to provide stability for your moving limbs.
GOAL: Work to be able to complete 10 to 15 repetitions in each direction.
1Start in a plank position, with your hands shoulder-width apart and your feet together. Make sure there’s enough space clear to your left for you to travel in that direction. ![]()
![]()
2Lift your right arm and left leg at the same time, bringing your hands together and moving your left leg to create a space roughly equal to shoulder width. ![]()
![]()
3Now with your hands together and your feet apart, move your left arm and your right leg at the same time to complete one repetition. ![]() This movement will return you to the starting plank position, except now you’re a couple of feet to the left. Repeat five times, performing the movement in the opposite direction for five reps.
This movement will return you to the starting plank position, except now you’re a couple of feet to the left. Repeat five times, performing the movement in the opposite direction for five reps.
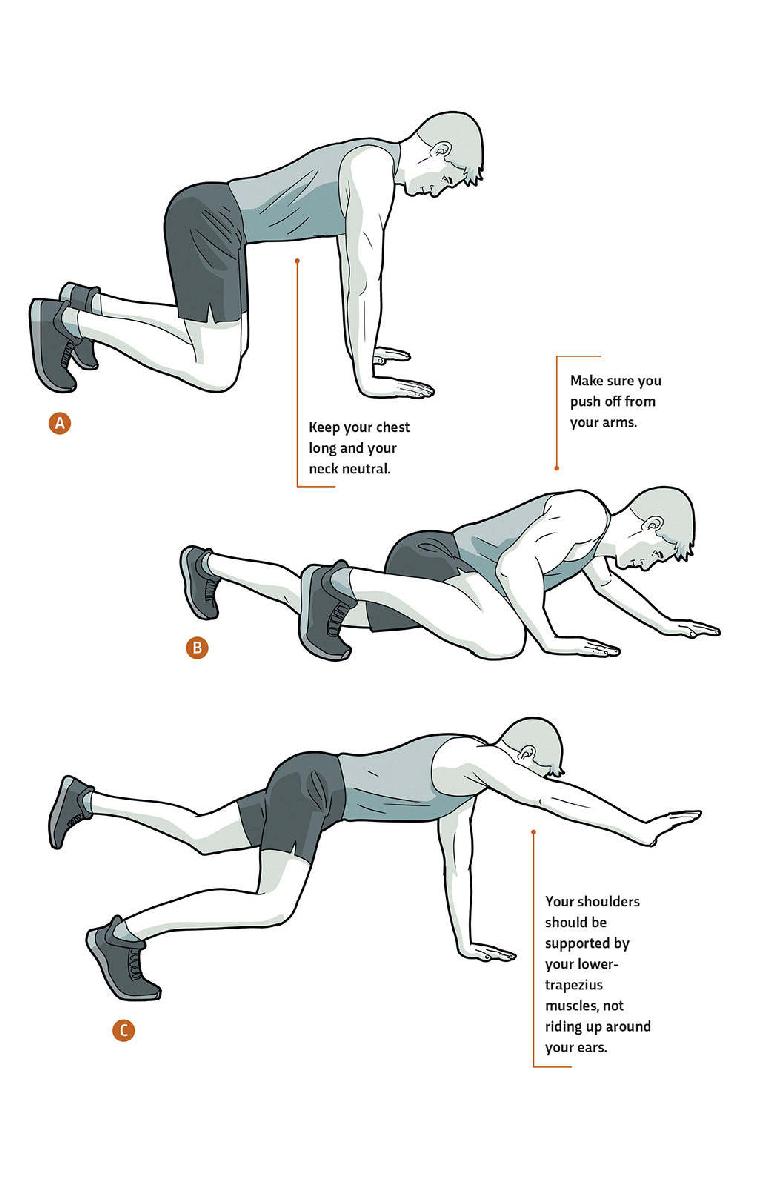
06 / GLANIMAL CRAWL
In this harder version of the bear crawl—named after my friend Glen, who is a total animal—you still move your arms and legs opposite each other in unison, but with much more exaggerated motions, dropping your body down almost to the ground. When you drive your weight off your hands to initiate the motion forward and backward, you work the pushing muscles in your upper body. The real challenge is the reverse portion of the set, when you try to retrace your steps without having to reposition any of your limbs.
GOAL: Try for 20 to 30 repetitions on each side.
1Drop to the ground on all fours with your hands below your shoulders and your knees below your hips. ![]()
![]()
2Bring your right foot closer to your right hand, and extend your left arm and left leg as far as they can go, dropping your torso to within a few inches of the ground. ![]()
![]()
3Lift your right arm and left leg together, and press off the right leg and left arm, ![]() covering as much ground as you can.
covering as much ground as you can.
![]()
4Start with five repetitions on each side, then retrace your steps backward, trying not to make extra contact with the ground.
CRUNCH
![]()
Primary muscle groups: Abdominals, Hip flexors
Secondary muscle group: Obliques
07
BASE
CLASSIC CRUNCH
08
INTERMEDIATE
OBLIQUE CRUNCH
09
ADVANCED
V-UP
Typically you use your core to prevent motion, not create it. But besides helping you drop body fat, crunches can be one of the best ways to create muscle definition and build a six- or eight-pack. There are many schools of thought these days that say you can achieve a six-pack without crunches and that crunches may actually do more harm than good, because if your form isn’t perfect, they can put a lot of strain on your spine. Defined abs aren’t worth a herniated disc. I tend to agree with these criticisms to some extent, but I still see a point in including them in this book. I won’t be including any crunches in the workout programs (chapter 8), but if you understand the risks and have a low enough body-fat percentage to see definition in your abs, feel free to substitute crunches for any of my core exercises.
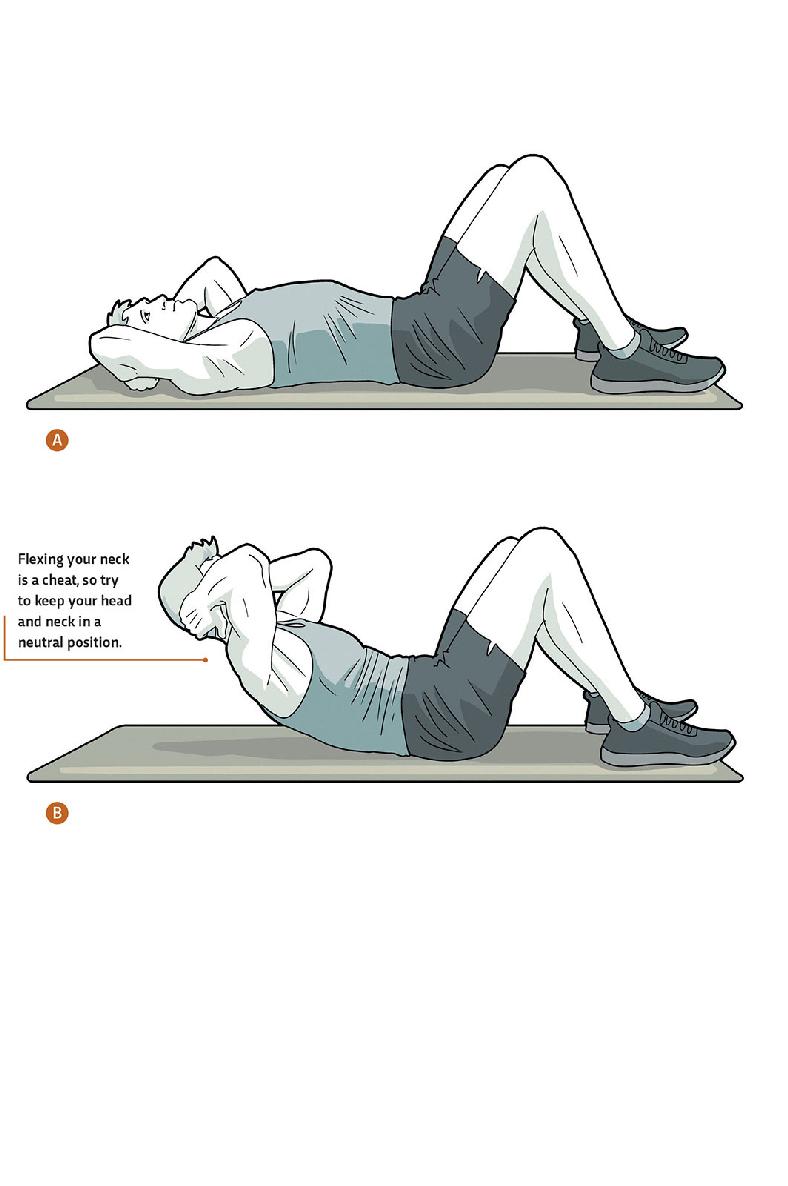
07 / CLASSIC CRUNCH
The classic crunch can be done in many ways. For our purposes, you’ll do it with your knees bent and your feet on the ground, targeting your abs as you raise your chest up toward the ceiling. Remember that it’s just as important to control the elongation of your abs as you return to the starting position as it is when crunching upward, so make sure you’re in control throughout the entire motion.
GOAL: 20 repetitions with perfect form
1Start on your back with your knees bent and your feet flat on the ground. Place your hands behind your ears (so you’re not tempted to pull on the back of your head). ![]()
![]()
2Sit up, trying to bring your chest toward the ceiling rather than toward your knees. ![]() Exhale sharply to fully evacuate your lungs.
Exhale sharply to fully evacuate your lungs.
![]()
3Once you’ve come up as high as you can, slowly inhale and return to your starting position in a controlled manner until your head is back on the ground.
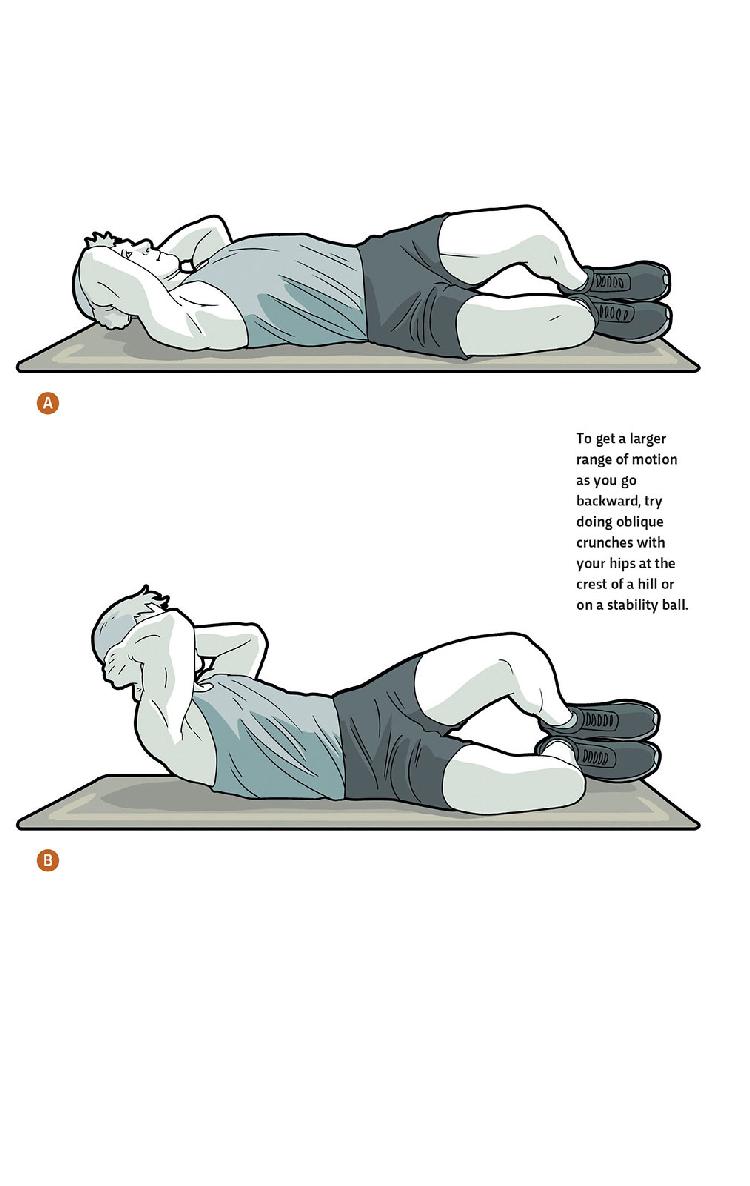
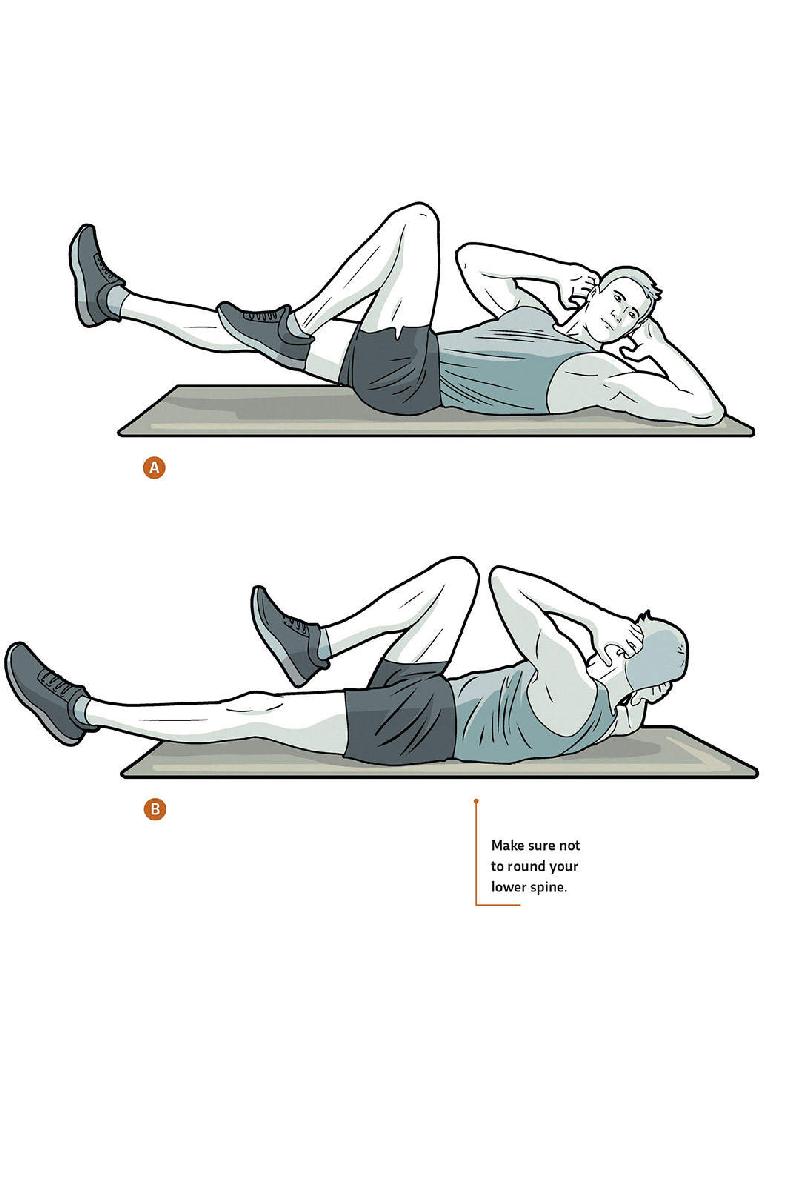
08 / OBLIQUE CRUNCH
This crunch variation targets the oblique muscles located on the outside of the abdominals. The obliques are those diagonal, finger-shaped muscles that complement the six-pack so well, and they help you rotate your torso, too. This exercise targets one side at a time, so don’t alternate with each rep. Continue working one side until it’s exhausted.
GOAL: 20 repetitions on each side
1Start by lying on your back with your knees bent and your feet flat on the ground. Turn your lower body to the right so the bottom knee is on the floor, while keeping both shoulders on the ground. Place your hands behind your ears (so you’re not tempted pull on the back of your head). ![]()
![]()
2Crunch upward toward the ceiling, exhaling sharply to fully evacuate your lungs. ![]() Slowly inhale, and return to your starting position in a controlled manner.
Slowly inhale, and return to your starting position in a controlled manner.
![]()
3Start by repeating on the same side 10 times, then switching to the other side.
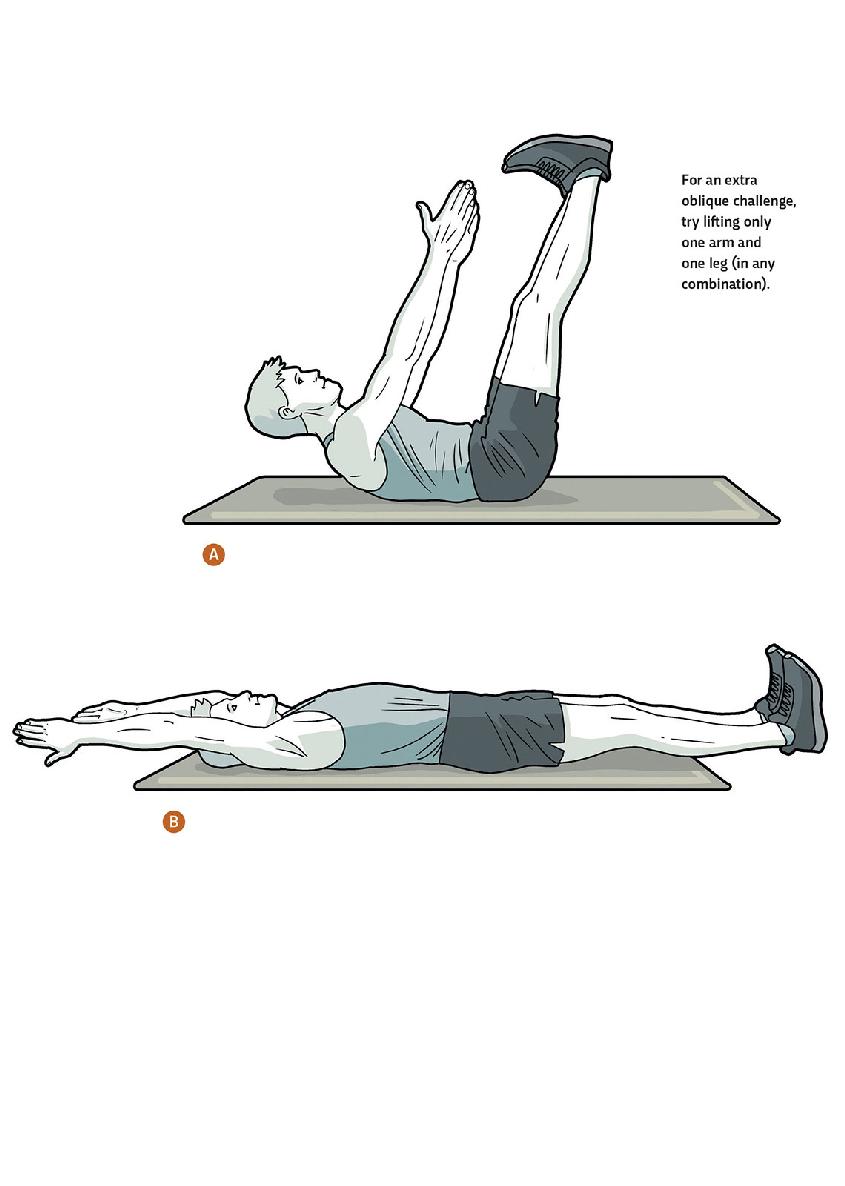
09 / V-UP
The V-up is a cross between a leg raise and a crunch, and it’s a huge challenge for your abdominal muscles. Because of the modified V-shape you use as your starting position, your abs have to fight for stability as you lower your limbs toward the ground and then bring them back up. It also requires you to bring your arms overhead, which is a great way to maintain shoulder mobility.
GOAL: Aim to get your legs within a few inches of the ground and/or do 20 repetitions.
1Start by lying on your back with your arms and legs pointed up toward the ceiling so that your body is roughly in the shape of a V. ![]()
![]()
2Keeping your legs straight, slowly lower them toward the ground while at the same time lowering your arms toward the ground over your head. ![]() Keep your abs tight so that your lower back never arches up off the ground.
Keep your abs tight so that your lower back never arches up off the ground.
![]()
3When your abs can no longer hold your back to the ground and it starts to arch upward, stop the descent and crunch your arms and legs back up to the starting position, keeping them straight the whole time.
ROTATION
![]()
Primary muscle groups: Abdominals, Obliques
Secondary muscle group: Hip flexors
10
BASE
BICYCLE
11
INTERMEDIATE
WINDSHIELD WIPER
12
ADVANCED
PLANK WITH ROTATIONAL KICK-THROUGH
One major function of the core muscles is to keep you stable and strong both when your torso is turning (rotational) and when it resists turning and stays still (antirotational). For these exercises, you want to be rotating from the middle, or thoracic, region of the spine—the section where your ribs attach—not the lower, or lumbar, region. Strive to keep your lower spine and pelvis neutral. These exercises will build your controlled rotational stability with progressively harder movements, finishing with a plank-based exercise for an extra stability challenge.
10 / BICYCLE
Bicycles challenge your obliques by rotating one shoulder toward the opposite hip. You guide the motion by reaching your elbow toward the opposite knee, keeping your hands positioned behind your head. Bicycles do work your abs, but don’t think of them as crunches. Instead, focus on the rotation of your spine.
GOAL: Work up to 20 repetitions on each side before attempting the Windshield Wiper (11).
1Lie flat on your back with your hands behind your ears and your knees bent. Lift your feet, keeping your abs tight, so that your hips form a 90-degree angle and your knees form a 45-degree angle.
![]()
2Extend your right leg out as if straightening it. (You don’t have to get it perfectly straight.) At the same time, rotate through your core to bring your right elbow toward your left knee. ![]()
![]()
3Slowly retract your right leg while simultaneously extending your left leg and bringing your left elbow toward your right knee as it arrives back at its starting position. ![]()
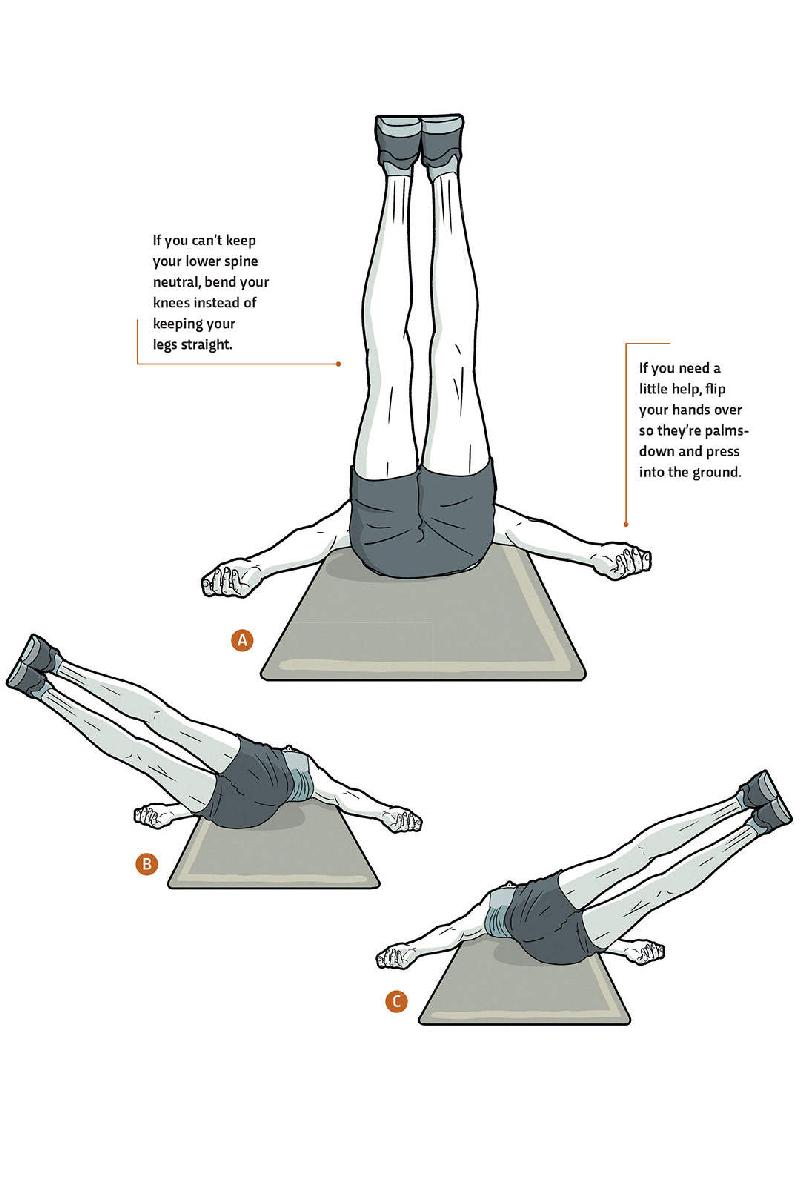
11 / WINDSHIELD WIPER
In this exercise, you’ll develop your obliques by lying on your back and moving your legs from side to side like windshield wipers. Try not to push off the ground with your arms—instead, rely only on your core’s strength and control. Make sure you’re getting all your rotation from the middle of your spine. Your spine’s lower region should maintain its natural curve, even if that means you have to keep your knees bent. Straighten your legs only if you can maintain your lower spine’s curve through the entire motion.
GOAL: Try for 20 repetitions on each side.
1Lie flat on your back with your legs straight up in the air. Put your arms out to your sides with your palms up. ![]()
![]()
2Keeping your feet together, slowly lower your legs to the right, as if your legs were slow, controlled windshield wipers. ![]() Stop when your opposite shoulder starts to rise up off the ground.
Stop when your opposite shoulder starts to rise up off the ground.
![]()
3In a controlled motion, reverse direction and bring your legs back to the starting position. ![]() Repeat on the left.
Repeat on the left. ![]()
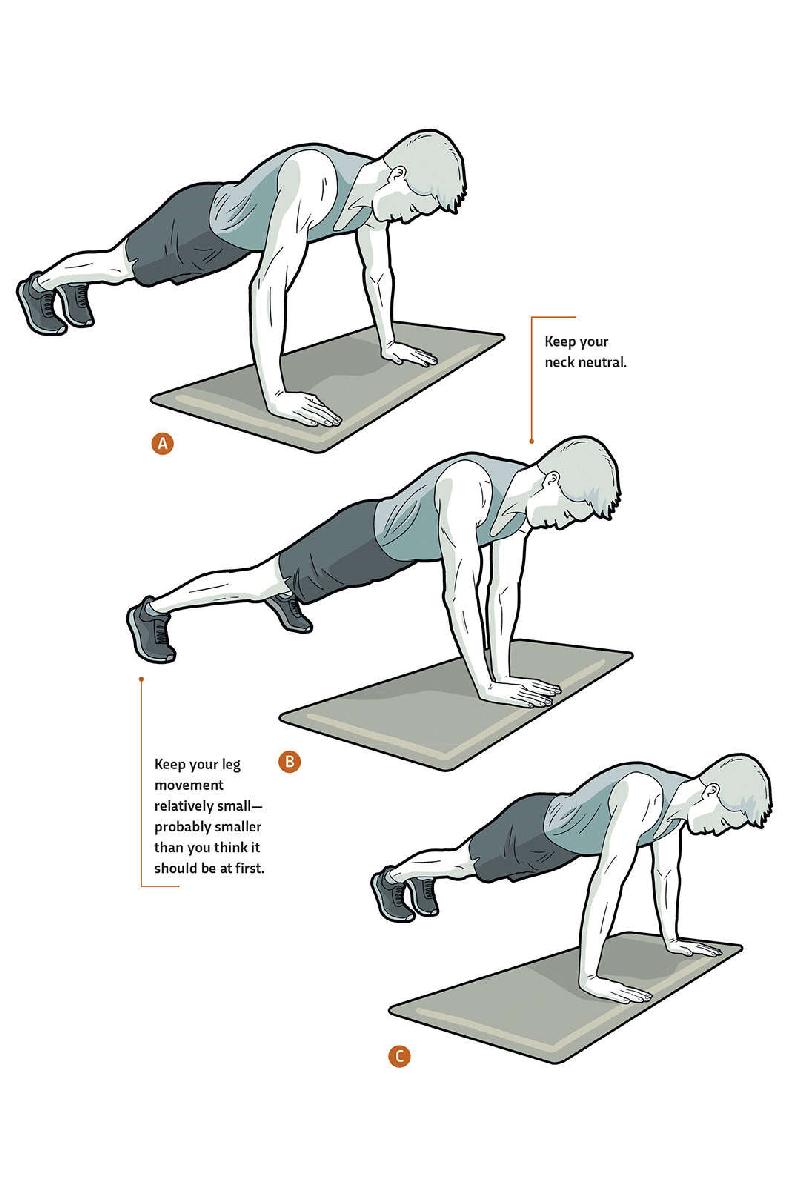
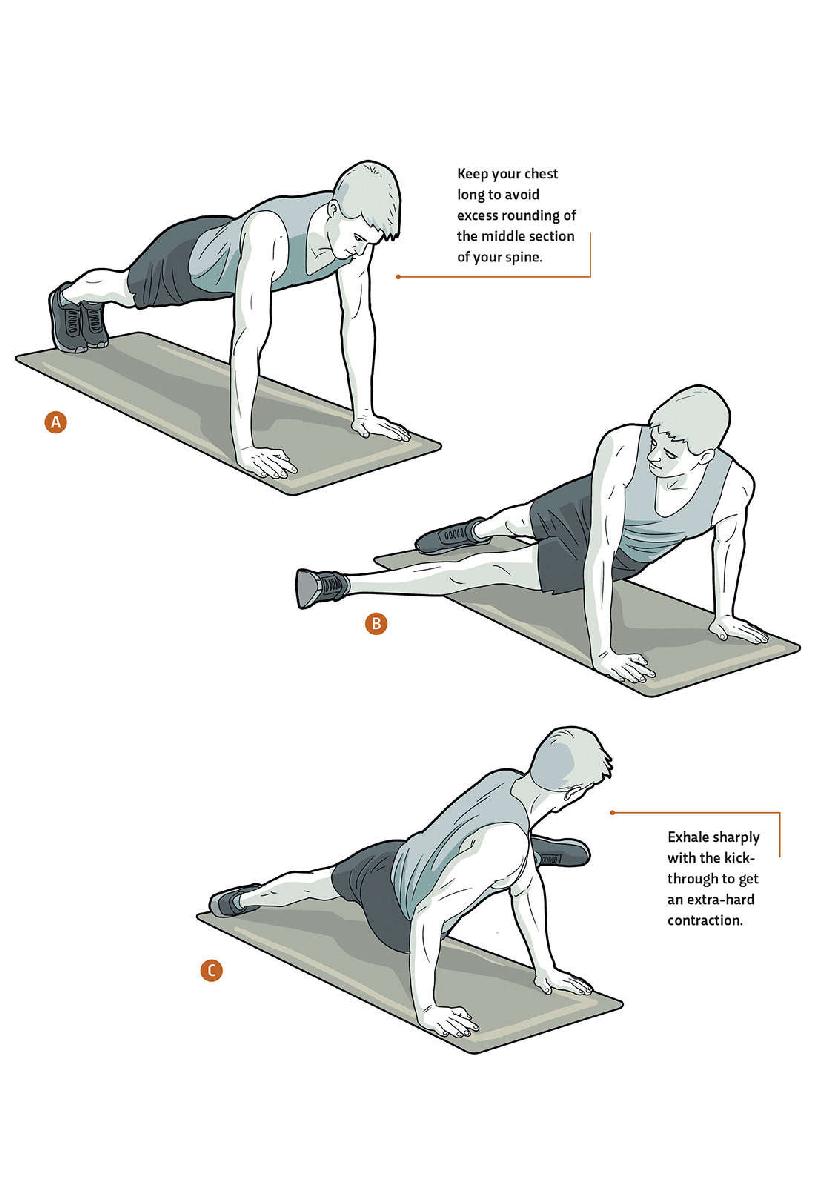
12 / PLANK WITH ROTATIONAL KICK-THROUGH
This move combines a rotational exercise with the stability challenge of a plank (01) to work your entire core. You start in a plank position, then slowly kick one leg under the other and out the other side. The kick doesn’t have to be particularly high, but the higher you get it, the more of a squeeze you’ll feel in your obliques. Make sure your glutes and abs are firing to keep any pressure from reaching the lower back, and let your shoulders and shoulder blades move a little to ensure you’re rotating through the middle of your spine.
GOAL: 20 repetitions on each side
1Start in a plank position. ![]() Drop your left hip and shoulder as you start to kick your left leg under your right leg and straight out the other side.
Drop your left hip and shoulder as you start to kick your left leg under your right leg and straight out the other side.
![]()
2As you rotate, drop the inside edge of your right leg and kick through with your left heel, locking your left knee. ![]()
![]()
3Slowly rotate back to the plank position, bringing your left leg back from under your right leg to its original position. ![]() Repeat on the right side.
Repeat on the right side. ![]()
LEG LIFT
![]()
Primary muscle groups: Abdominals, Hip flexors
Secondary muscle group: Obliques
13
BASE
SUPINE LEG RAISE
14
INTERMEDIATE
HANGING LEG RAISE
15
INTERMEDIATE
PLANK WITH ROTATIONAL KNEE TUCK
Raising and lowering your legs is a great way to challenge the stability of your abs and your lower spine. As you raise or lower your legs, either when you start on the ground or from a hanging position, you can feel the lower portion of your spine start to arch into extension as your legs pull your pelvis into a forward tilt. It’s your abdominals’ job to prevent that extension and tilt from happening. Here you’ll start by doing leg lifts while lying on the floor, progress to doing them while hanging from a bar, and eventually work up to doing them from a plank position. All three variations require tons of abdominal activation to keep the lower spine stable, so no matter which exercise you’re on, you’ll be building muscle and improving your core strength.
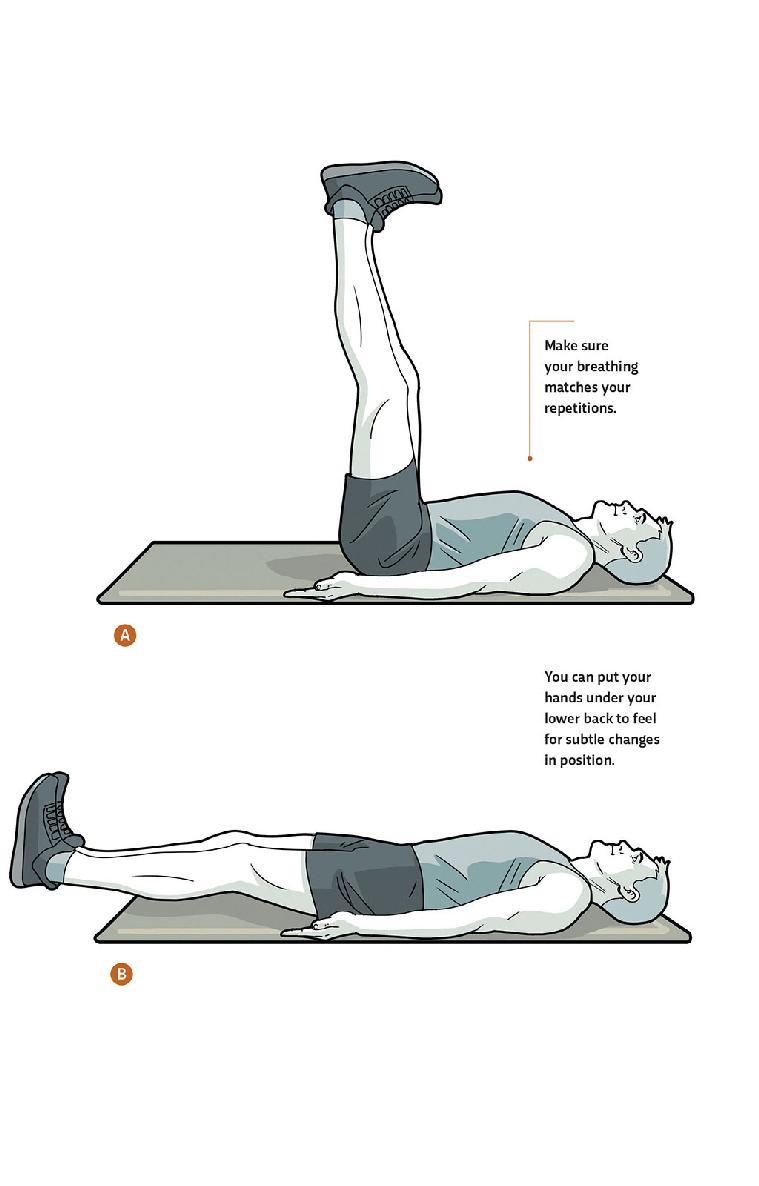
13 / SUPINE LEG RAISE
Supine simply means “lying flat on your back.” In this particular exercise, you’ll start by lying down with your legs straight up in the air, then lowering them as comfortably as you can until they’re parallel to the ground. Make sure your abdominals do their job and keep your lower spine neutral against the floor. Try not to press your arms into the floor for added stability—this move is for your abs, not your arms. If you feel your back coming up off the floor, stop your legs where they are. You don’t need to get your legs perfectly horizontal on your first try. Just work the range of motion under your control until you have the strength to take it further.
GOAL: Increase your range of motion until you can lower your feet to a point just above the floor. You want to be able to do 20 repetitions before you try the Hanging Leg Raise (14).
1Lie flat on your back with your legs pointed straight up in the air. ![]() Inhale as you slowly lower your legs
Inhale as you slowly lower your legs ![]() until your lower spine starts to rise up off the floor.
until your lower spine starts to rise up off the floor.
![]()
2Exhale as you raise your legs back up to the starting position. Repeat 10 times.
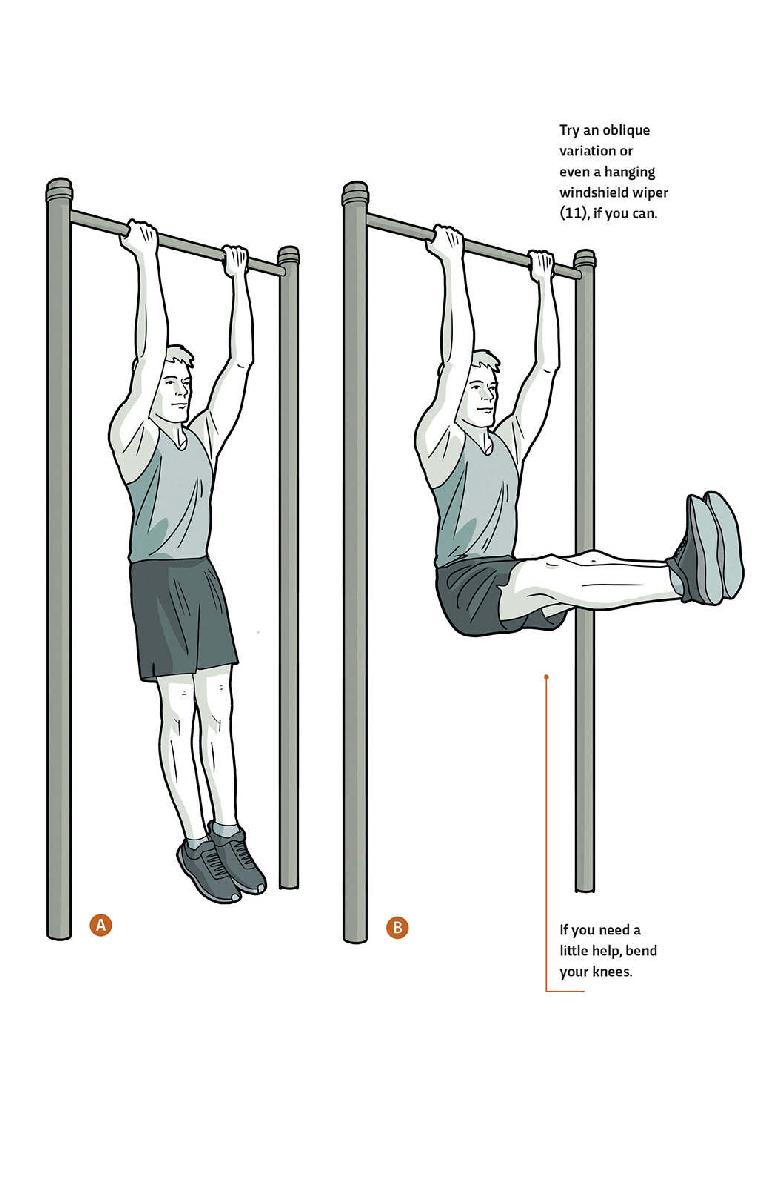
14 / HANGING LEG RAISE
The hanging leg raise works best when the bar you’re hanging from is high enough that you can fully extend your arms and legs. For this exercise, you’ll try to raise your legs to horizontal (or higher) and then return them to their starting position without letting your body swing backward. You can use an open, closed, or mixed grip, whichever is more comfortable for you. Just make sure you grip hard enough with your hands to activate your shoulders, and keep your shoulders pulled down toward your hips to protect your shoulder joints.
GOAL: As you get stronger, try to raise your legs past horizontal—all the way to the height of the bar, if you can.
1Hang from the bar while lowering your shoulder blades toward your hips to engage your lower-trapezius muscles. ![]()
![]()
2Exhale as you raise your legs as high as you can in front of you with your knees locked. ![]()
![]()
3Inhale as you lower your legs in a controlled manner to prevent swinging. Engage your abdominals to prevent extension in your lower spine.
15 / PLANK WITH ROTATIONAL KNEE TUCK
To give you an extra stability challenge, this version of the leg raise is done in a plank position (01) on a smooth floor with a towel under your feet. If you don’t have a towel on hand, you can use a paper towel, a paper plate, or anything else that will slide along the floor. From the plank position, you drop one hip slightly and tuck both your knees up toward your chest. Try to exhale completely as you finish the tuck and inhale as you return to the plank position.
GOAL: 20 repetitions on each side
1Start in a plank position on a hard, smooth surface with a towel under your feet. ![]()
![]()
2Slightly drop your left hip, and pull both your knees up toward your chest on the right side. ![]() The towel lets your feet slide so you can keep the movement smooth and controlled.
The towel lets your feet slide so you can keep the movement smooth and controlled.
![]()
3Keeping your abs engaged, level out your hips and straighten your legs back into a plank position. ![]() Repeat on the left side.
Repeat on the left side. ![]()

BURPEE
![]()
Primary muscle groups: Abdominals, Pectorals, Deltoids, Quadriceps, Glutes, Hamstrings
16
BASE
ELEVATED BURPEE
17
INTERMEDIATE
CLASSIC BURPEE
18
ADVANCED
ONE ARM BURPEE
The burpee in all its forms is one of the best full-body bodyweight exercises out there. With its wide range of movements—hip-hinging, squatting, planking, and pushing—it works almost all the muscle groups in your body, but it’s particularly great for your core. With so many motions, there’s a lot that can go wrong, so it’s important to learn the correct form. Here you’ll start with a slightly easier version so you can master the right movements. Then you’ll move on to the classic burpee, and then to something a little more difficult if you want to really challenge yourself.
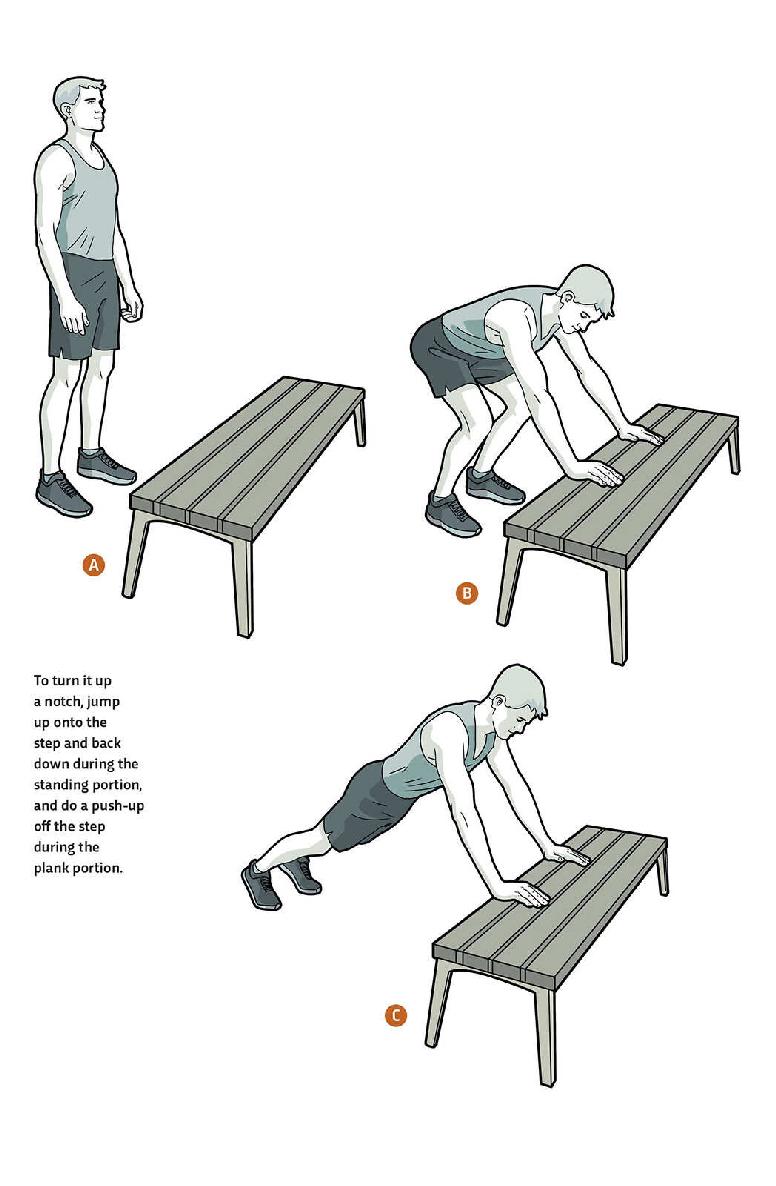
16 / ELEVATED BURPEE
A slightly easier version of the classic burpee, the elevated burpee is performed in front of a step, so you don’t need as much ankle and hip mobility for the squat (19) or as much core strength to stabilize you during the plank phase (01). Instead of bringing your hands all the way to the ground while hinging and squatting, you’re just bringing them down far enough to reach the elevated step. This lets your lower (lumbar) spine remain more neutral, rather than forcing it into flexion repeatedly. The higher the step, the easier the burpee, so make sure you’re challenging yourself appropriately.
GOAL: Maintain a neutral lower spine through the entire range of movement. Once you can do 20 repetitions, move on to the Classic Burpee (17).
1Start by standing about 12 inches in front of your chosen step with your feet hip-width apart. ![]()
![]()
2While maintaining a neutral spine, drop into a squat, put your arms straight out in front of you, and place your hands on top of the step. ![]()
![]()
3Once your hands are securely on the step, hop your feet out behind you, landing in a plank position. ![]()
![]()
4Hop your legs forward, returning to the spot in front of the step that you started with, landing in a squat position. ![]()
![]()
5Keeping your chest tall and your back straight, press through your legs and return to a standing position. ![]()
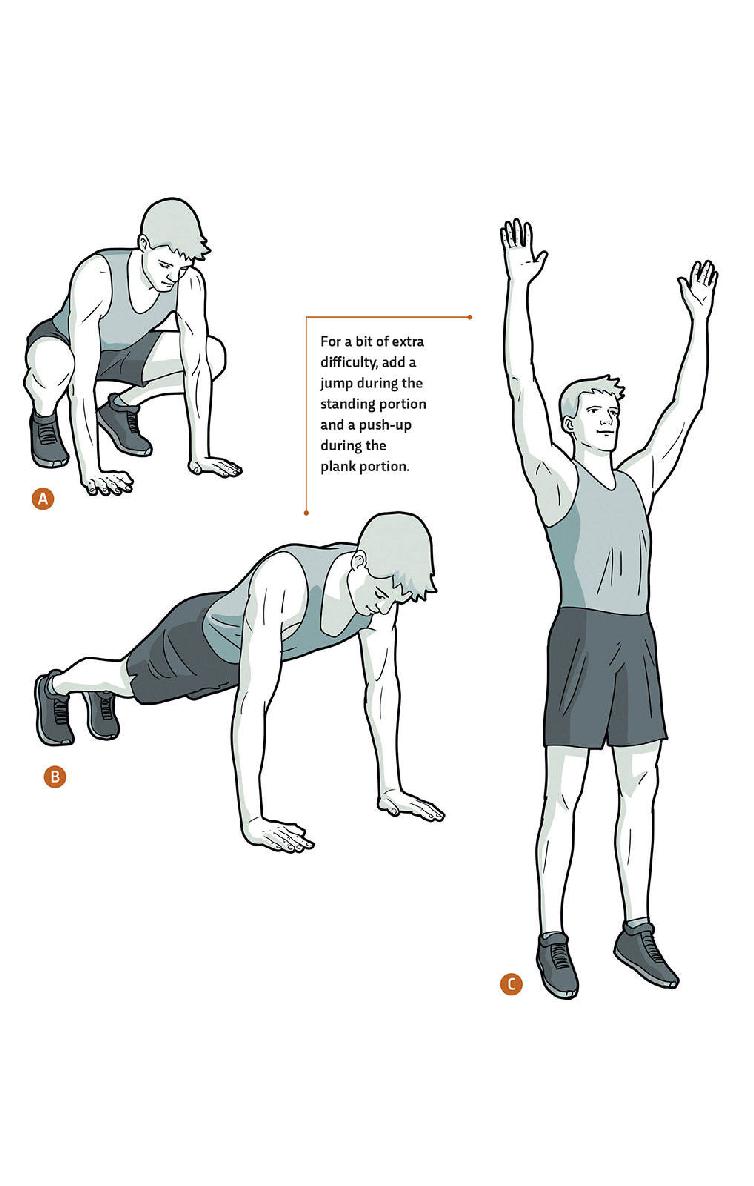
17 / CLASSIC BURPEE
This burpee is done without the assistance of an elevated surface, so you have to hinge and squat (19) all the way to the ground. Remember that on the way down and the way up, your knees must stay out over your feet and not collapse inward. This collapse is a dangerous compensation and can lead to serious injury. If this is something you do without thinking, you should train yourself out of the habit immediately. Your hips and ankles need to be properly stabilized to perform any ankle-driven or explosive movements, and the burpee involves both. For proper squat form, see illustration B here.
GOAL: 20 repetitions
1Squat with your feet hip-width apart. Bend forward with your arms straight below you, keeping your back straight until your hands reach the ground. ![]()
![]()
2Once your hands are secured, hop your feet out behind you, landing in a plank position. ![]()
![]()
3Hop forward from the plank position, returning to a deep squat position, ![]() and lift your hands so they’re no longer on the floor.
and lift your hands so they’re no longer on the floor.
![]()
4Keeping your chest tall and your back straight, press through your legs to a standing position with your arms raised above your head. ![]()
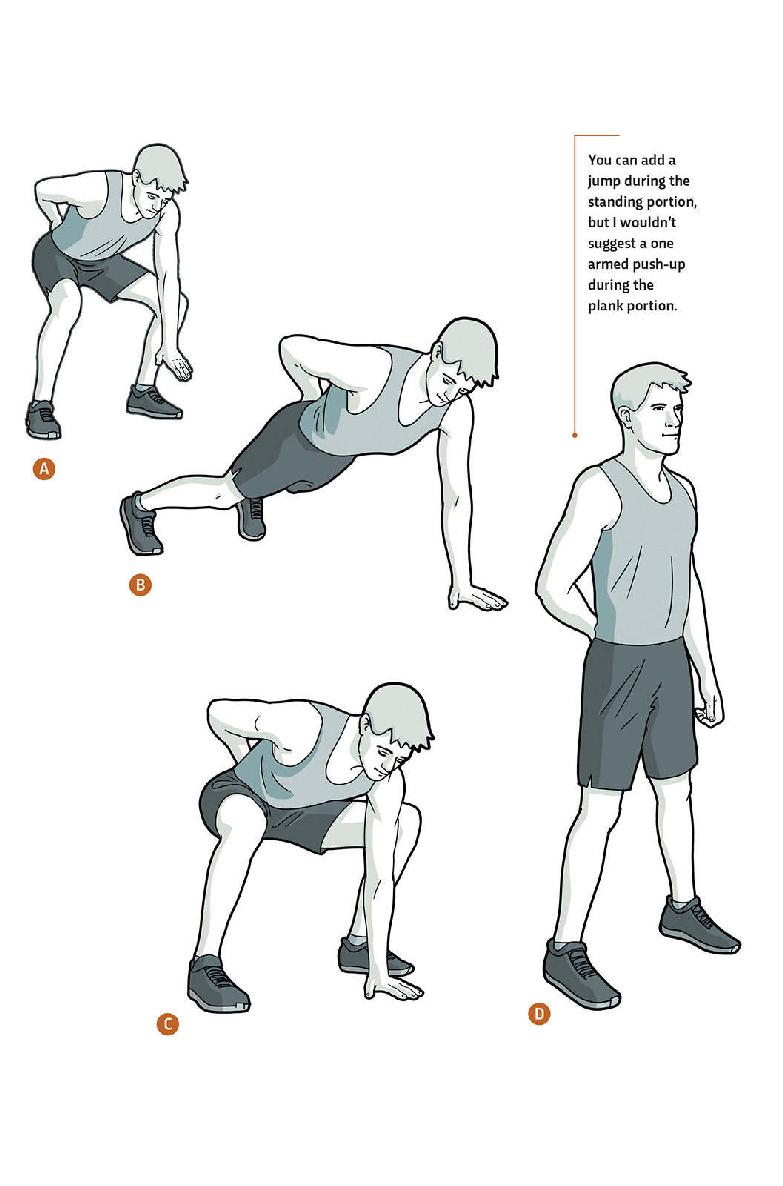
18 / ONE ARM BURPEE
The one arm burpee is exactly what it sounds like. It involves the same motions as a classic burpee (17), but instead of using both arms during the plank portion (01), you use only one. Because you’re decreasing your support base from two hands to one, your core has to work harder to keep you stable. (The one arm you’re using has to work harder as well since it has no help from the other arm.) You can start with the elevated variation or go straight to the ground. Just make sure you follow all the requirements for a burpee: Keep your knees over your feet, and keep your lower spine as neutral as possible.
GOAL: 10 repetitions on each arm
1Stand with your feet hip-width apart. Squat and bend forward with your left arm straight below you, keeping your back straight until your left hand reaches the ground. ![]()
![]()
2Once your hand is secure, hop your feet out behind you, landing in a one-handed plank position. ![]()
![]()
3Hop forward from the plank position, returning to a deep squat position, ![]() and lift your hand so it’s no longer on the floor.
and lift your hand so it’s no longer on the floor.
![]()
4Keeping your chest long and your back straight, press through your legs and return to a standing position. ![]() Repeat using your right hand.
Repeat using your right hand.
SQUAT
LUNGE
STEP-UP
JUMP
DYNAMIC JUMP