Survival Guide: The Book All Survivalist and Preppers Need ( 3 in 1 ) (2016)
Book 3
SURVIVAL
Essential Survival Skills
Like your early ancestors, you can be able to harness the great qualities of ingenuity and adaptability that will come in handy in a survival situation.
#12. Making Rope
*Find some fibrous material, like the yucca plant husks, and split them into strands.
*Twist every piece in a clockwise motion between 2 fingers, and then twist the 2 pieces in an anticlockwise direction.
*Collect enough strands to make the rope as thick as necessary. Rough up or roll the strands together to acquire separate pieces.
*When you are done, the final product will be a strong rope you can use for several purposes.
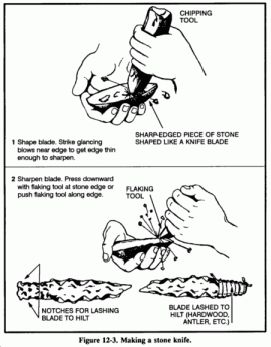
#13. Making Knives
Knives From Rock
You can be able to design a knife-edge using rock that can be effective in getting you through most situations.
*Look for a hard, suitable rock, and hammer it using a larger rock
*With the right material, you can use a split rock effectively as a scraping or cutting edge, which can be sharpened by rubbing against another rock.
*Keep your rudimentary knife safe, as it will have many uses.
Knives From Metal
The biggest challenge here is finding a metal that is the right shape and size.
*Sharpen the blade and point by rubbing the metal against a rigid surface.
*You will need a handle for your hands’ protection. Use rope, cloth, or tape for this purpose.
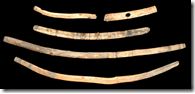
Knives From Bone
Bones are more effective at puncturing than scraping or cutting, since they don’t have the capability to hold an edge.
*Place the bone on a rigid object, and strike it with a heavy material to shatter it. Pick a fittingly pointy bit from the shattered pieces.
*Rub the bone against a rough rock to refine its shape.
Knives From Wood
Wood can be very difficult to form a sharp edge, so they are mostly used for scraping and puncturing.
*Look for a piece of hardwood, roughly 30 cm (12 inches) long and 5cm (2 inches) in diameter, with a blade of 15 cm (6 inches) in length.
*Rub the wood against a hard, rigid surface, like a rock, to shave it down
#14. Staff
*Look for a relatively straight piece of hardwood, which can reach eye level from the ground.
*Use this as a weapon, to prevent brush from affecting your eyes, to check for snakes, to help with sharp hikes. It is best to find one that’s strong and thick enough to fit in your hand.
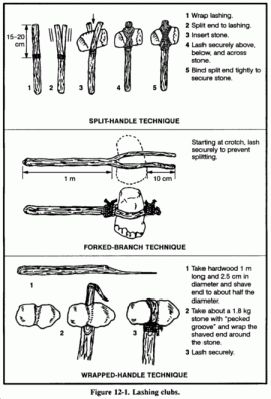
#15. Club
These are smaller when compared to the staff, but much easier to handle.
Simple Club
This is just a simpler version of a staff, which is easier to handle since it is shorter. However, it needs to be longer in order to cause and withstand damage. The best material to use is straight-grained hardwood.
Weighted Club
This is a simple club with an attached weight at one end. You can make wrapped-handle clubs, forked-branch clubs, and split-handled clubs.
Sling Club
This is a weighted club with the weight hanging about four inches from the club through strong lashing that creates an impact multiplier on contact.
#16. Making A Spear
ü Find the right stick
Select hardwood species such as osage, maple, locust, ash, hickory, oak, and anything else that is dense, as opposed to soft woods such as aspen, pine, and poplar that tend to break easily.
Choose a ready-to-go size that’ll save you plenty of carving work.
ü Point and bake
Carve a point at one end, and make it as sharp as you can.
Dry out the wood by passing and rotating the carved part just above a small fire. Do this until it starts looking “toasted” at the heated end.
Once you are done, rub some animal or plant oil on the pointed end, which you should sharpen again after fire hardening.
#17. Making A Throwing Stick
*Go for a heavy hardwood, like the oak, and choose a stick with a suitable angle, typically 12 to 24 inches long.
*If you can’t find a stick with the desired angle, you can warp green wood. Just heat it to make it pliable, and then bend it and place the arched stick between 2 rocks until it has dried and cooled off.
*You can decide to either flatten the throwing stick or make it round. To flatten it, shape the stick like a boomerang by shaving off 2 opposite sides. This is a lot more aerodynamic and concentrates the area of impact on a smaller surface area. In any case, you should remove the bark, and smooth the surface to enhance aerodynamics.
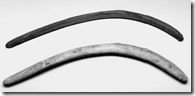
*The shape of the throwing stick can vary significantly. It is very rare to find straight sticks, with the most common ones being Z shaped, L shaped, and V shaped.
Throwing A Rabbit Stick
For speed and accuracy, you need to practice your throwing technique.
*First, align your non-throwing arm with the target at its middle to lower section
*Slowly and continually lift up your throwing arm and back until the stick crosses your back at approximately 45 degrees.
*Bring your throwing arm forward to place it in parallel and slightly above the other arm. This will be the release point of your throwing stick.
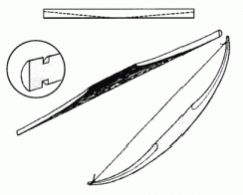
#18. Making A Quick Bow Stick
When you need to shoot right away, you should go for a hardwood stick, which is dead & dry. Some of the options to choose from include Osage orange, locust, maple, ash, elm, and hickory.
Crafting a long bow is another trick you can use to start shooting immediately. A stave made from a dead sapling or dead branch that’s 6 feet in length will be more forgiving, as compared to a shorter bow that will need to bend more in order to achieve the draw length, which could subsequently break the bow, lead the limbs flying back, and injure you.
During construction, tillering is involved to make most bows out of a single piece of wood. This is basically slimming down the wood in order for all the limbs of the bow to bend equally. It also helps provide the bow with the appropriate draw weight.
To make a quickie bow, just carve down the inner side of your bow using your handmade knife, and then scrape and/or sand the wood. However, if you are in a hurry, and there’s no significant difference in the limbs’ diameter, just string it up.
Finding A String
Traditionally, bowstrings are made from dried intestine strips, rawhide strips, plant fiber, and other natural substances. However, for now, you could use a 550-length cord from your pack, which should have a good diameter and enough strength to serve as a bowstring. You can use the paracord in your survival bag if you still have it.
When tying the second knot of the string to your bow, make sure the distance between the string and the grip is approximately 8 - 9 inches.
#19. Making An Arrow Tip
For this, follow the procedures we used to make a stone knife. Chert or flint is best for this. However, you can also use broken glass.
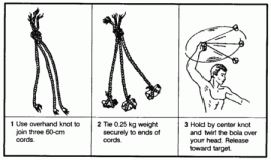
#20. Bola
This is extremely effective at capturing running game. To make it, tie 3 cords of the same length together, and attach an eight-ounce rock at the ends. Whirl from the connecting knot to your overhead, and release to your target.