Survive: Mountains (2016)
FIRE
If you are carrying a lighter or matches, it is crucial to pack it well so it won’t get wet. That will help bypass some of the next steps, which can be time-consuming and unnerving. If I am cold and wet, I want to know that I will be able to start a fire on a dime. Being comfortable making a fire can get you out of trouble and is one of your last lines of defense against the elements. The warmth of a fire can be the difference between life and death.
It can take a lot of effort and calories to even get close to the point where you are able to start a fire, without having any modern-day tools to aid the process. Making fire without a lighter or matches takes practice and should be nailed down before any life-threatening situation actually happens. Plus, it is fun and empowering to make a fire the old-fashioned way.
+Tip: It’s much easier to keep a fire active than to restart it, so try to keep it going once you have started it. If you need to leave your shelter site for a long time, you can put hardwood on the fire, which will take longer to burn. Another option is while the coals are still fairly large, gather them into a pile so they will burn slower or put on a larger log that will take a while to burn through. Keep in mind that limiting the available air by putting the fuel closer together will also slow the burning process.
I have included descriptions of a bow-drill set and the fire plow technique. If you need to choose between the two, I recommend the bow-drill set. Both methods require energy, persistence, and practice; however, the bow adds mechanical advantage to the system and helps create additional friction.
BOW-DRILL SET
This is the easiest way to get a coal going so you will be able to start a fire, though it takes time to build. I have built bow-drill sets on occasion for fun and to kill time. However, it only makes sense if your matches or lighter have stopped working and you are in an emergency situation where you are stationary and waiting for help. Otherwise, it is too time-consuming, and you’ll likely be traveling to seek help or an exit out of the backcountry.
✵ Equipment needed: knife, wood from forest, parachute cord or buckskin or moistened rawhide
✵ Drill: best with cottonwood, birch, alder, sycamore, and willow
✵ Fire board: best with cottonwood or dead willow
✵ Tinder: inner bark of cottonwood or dry flammable material like shredded tree bark, bird’s nest, or leaves
✵ Handhold: a wood harder than the drill, like juniper or oak, or you can use antler or bone
+Tip: If you would like to bring a coal with you because you are traveling to a new site, you can surround a large coal with smaller coals and tinder and create a protective shell using rocks or bark to carry the coal. It should remain active for several hours if the weather is decent and it isn’t too cold. Depending on your location, you can also use the female flower head of the cattail, the true tinder fungus, or false tinder fungus as slow matches that will burn for a couple of hours.
Here are the basics of how to make this primitive fire starter:
Socket: Should be an easily gripped piece of hardwood, rock, or bone with a depression in one side. It is used to hold the drill in place and put downward pressure onto the drill.
Drill: A straight piece of seasoned hardwood about 2 centimeters in diameter and 25 centimeters long. The top end is pointed and the bottom end is blunt in order to focus the friction onto the fire board.
Fire board: Can vary in size based on available wood. Shoot for 2.5 centimeters thick and 10 centimeters wide. It could be a seasoned softwood or of the same material as the drill. Cut a depression about 2 centimeters from the edge on one of the long sides of the board. On the underside, opposite the depression, cut a V-shaped notch from the edge of the board to the depression. This will help channel the punk (hot black powder) into a pile and create a coal. You can put a leaf or piece of paper underneath the notch to help transfer the coal to your tinder.
Bow: The bow should be made of a tough green stick. This will help it last longer and hold up to abuse. Look for one about 2.5 centimeters in diameter. It can be made of any resilient type of wood. The bowstring can be any type of cord. Tie the bowstring from one end of the bow to the other, with minimal slack. When you wrap the drill into the bow string, you want it to be tight, but if the bow string is tied too tight, it will be difficult to loop the drill into the system.
Step 1: Place some dry tinder, a leaf, or paper underneath the notch in the fire board.
Step 2: Place one foot on the fire board. Loop the bowstring over the drill, and place the drill in the depression on the fire board.
+Tip: If you are getting cold, you have a few options to stay warm: (1) Keep moving/hiking. (2) Do jumping jacks to get your blood moving. (3) Make a fire. (4) Eat something with a high calorie content; your body needs calories to stay warm. On cold, rainy days, it is tempting to push through without stopping. Your body needs to refuel. Keep snacks and a lunch handy so that you can take quick breaks or eat while you are walking.
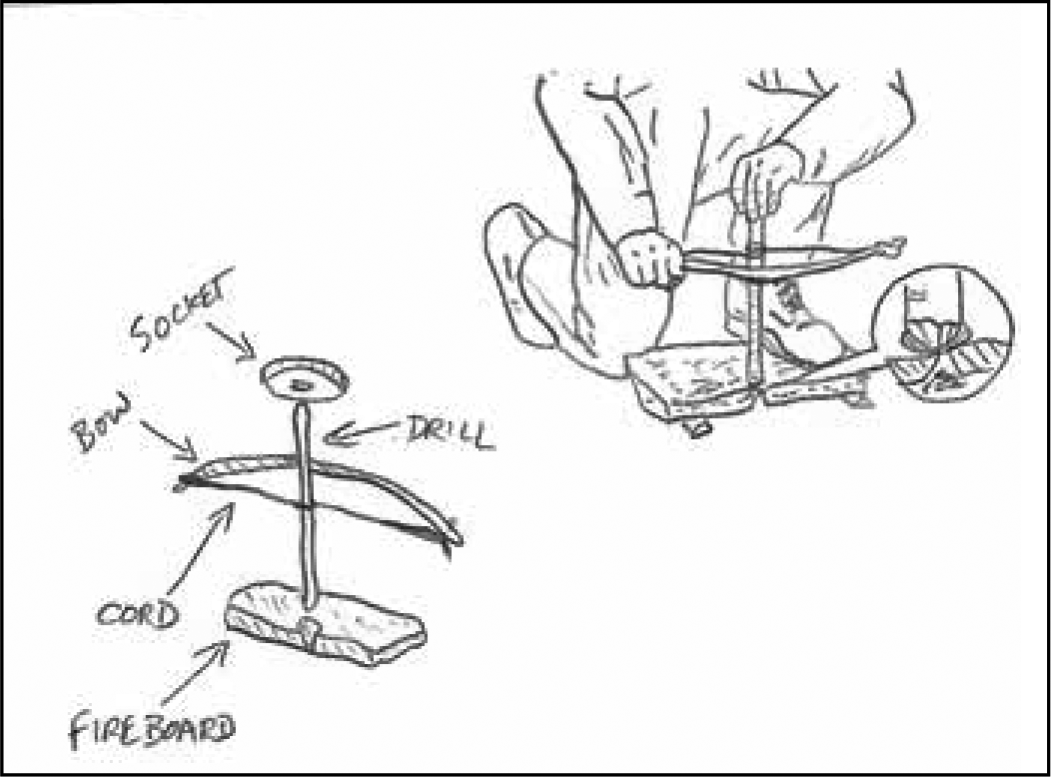
Step 3: Place the socket in your other hand on top of the drill to hold it in position.
Step 4: Press down on the drill and move the bow back and forth, spinning the drill.
Step 5: Once you have the routine and a smooth motion, increase the downward pressure and the speed of the bow. It can help to place the wrist of the hand that is holding the socket directly against the shin of your leg that is stepping on the fire board. This will add stability to the system as you increase the pace. The resulting increase in friction will cause punk to carry into the notch. Enough punk will result in a coal.
Step 6: When you get a coal, or a glowing ember, collect the punk and place it in the “nest” of tinder. Blow on the tinder until it ignites.
If you don’t have any cordage, you might have to use the hand-drill or fire plow technique to start a fire. It is a bit harder, as there is no mechanical advantage. The hand-drill technique is the same as the bow-drill but instead of using the bow to create the mechanical advantage, you are rubbing your hands together around the spindle to create the movement. The same principles apply, as friction and speed are going to create the coal.
FIRE PLOW TECHNIQUE
Following is how you would get the fire plow going:
Step 1: Use the same type of wood as mentioned in the bow-drill set, but you should make your fire board a bit wider.
Step 2: Cut a small channel down the middle of the fire board, extending all the way to the end of the board.
Step 3: Place some dry grass or tinder below the end of the fire board.
Step 4: Start running the drill down the channel on the fire board. Once you have the routine, increase speed and pressure only pushing in the downward direction on the fire board. The resulting increase in friction will cause punk to carry into the notch at the bottom. Enough punk will result in a coal.

Step 5: When you get a coal, or a glowing ember, collect the punk and place it in a “nest” of tinder. Blow on the tinder until it ignites.
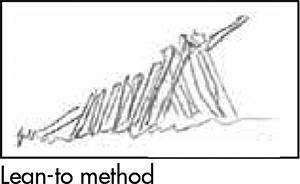
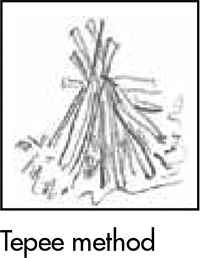
Once you get your tinder to catch, you will then have to increasingly add sticks and twigs of larger diameter. It can be difficult to get these to catch, and it is important to have this set up beforehand and have some good, dry tinder ready. The tepee or log cabin method to get the fire rolling works well. Here’s how …
HOW TO BUILD A FIRE
Fires are the essence of camping and a key tool for survival, but under normal circumstances, I never build them. I can count on one hand all the times I have built a campfire. The majority of those times, the campfire was a miniscule twig smudge to create smoke to keep the mosquitoes at bay.
HOW TO BUILD A FIRE WITH WET WOOD
Step 1: Accumulate some small pieces of wood, twigs, or dry leaves to get started. This may entail searching under trees, digging into lower layers of the duff, or using an inner layer of tree bark. Depending on your location, the optimal fuel sources for starting a fire will vary, but always try to find dry, downed wood.
+Tip: If you have some dry cotton material, like a bandanna, you can make a char cloth to help you start a fire. Turn your stove on and place 2-by-2-inch squares of cotton in your pot and cover it. In a few minutes you should start to see a decent amount of smoke. When the smoke stops, shut off your stove and let it cool down. You should have charred squares of fabric that will easily catch a spark and burn slowly. When you blow on the char cloth, it should help your tinder burn. You can also use any petroleum-based product, such as ChapStick, DEET, or Vaseline, or your toilet paper stash to help get your fire started.
Step 2: Make a tepee with small sticks, and put some twigs and dry debris in the middle. Light the debris and small sticks using your lighter. If necessary, pour a little bit of your stove fuel onto the debris and sticks. You can also soak a stick or dip it into your fuel bottle before adding it to the fire. Don’t go too heavy with the stove fuel; you don’t want to use it all on the first try. You might need to add some more fuel if the first attempt doesn’t work.
Step 3: If the fire catches, let the sticks burn a bit and create some coals before you start adding more wood and slightly larger pieces. Build up the size of the additional wood so that you don’t smother your fire. If need be, add a little more stove fuel to get things going. White gas is very volatile; it flares up and quickly dies down. Alcohol burns for a longer time but at a lower temperature. Both can be beneficial. Fire travels upwards, so it can help to put the fuel below things that you are attempting to make catch.
Step 4: If your fire still isn’t lighting, remember to start small. Use small pieces of dry tinder. It can also be helpful to use your knife and strip off the wet outsides of the pieces of wood you are using. Try to get down to dry areas, and keep your fuel in a dry place. An abandoned bird’s nest can make great tinder, as can dead lower limbs on evergreen trees. In western forests, some coniferous trees accumulate large amounts of sap on the outside of the bark. Tree sap can also help you get your fire started. It catches easily and burns well.
If the fire isn’t starting no matter what you do, you need to set up your shelter and put on dry clothes or head for the car or for civilization, depending on the time of day. Know when to cut your losses and keep moving to stay warm. You need to prevent hypothermia, and moving will keep you warm. Plan to head lower in elevation, and hopefully the bad weather will pass quickly. For now you must think about your immediate well-being. Keep moving and eat occasionally, even if you are not feeling hungry. Make sure to reference the map or your navigation strategies to keep on target as you head for civilization.
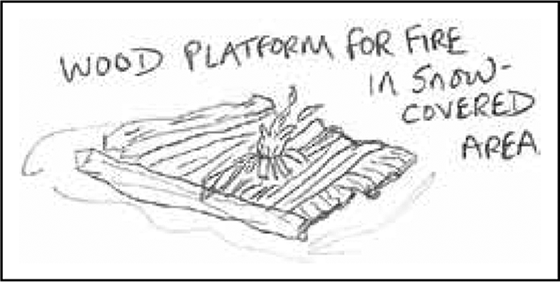
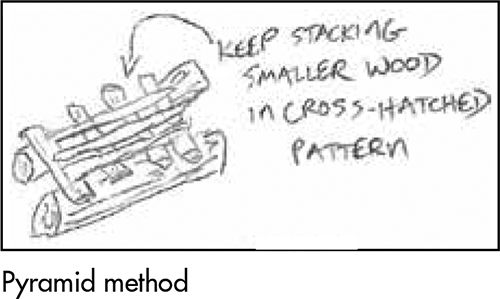
+Tip: To build a fire on snow-covered ground, you need to create a platform of wet wood on top of the snow. Make a solid platform using wet or rotten wood in one direction and then cross-hatch it in the opposite direction. This will prevent the snow from melting underneath your fire and wetting the wood and coals. Using moist wood will prevent it from burning out rapidly or catching fire.