Survive: Mountains (2016)
TRAVEL CONSIDERATIONS AND SKILLS
Generally, in the mountains, people say “follow a river or watercourse to civilization.” This is typically a relatively good idea since you will likely have water at all times, and a pretty consistent direction of travel and path for descent into a warmer and more comfortable climate. However, this isn’t the ultimate end all, do all strategy. If you have an idea of your whereabouts, this will also play into your game plan. A few reasons following a river to civilization is not always the best option:
✵ Sometimes rivers peter out in an inland basin, as is often the case in the Intermountain West of the United States or Namibia, and you will likely not come across civilization before running out of water.
✵ Water courses can be very steep, slippery, and cliff-laden and can lead to added travel woes.
✵ In some mountainous locations that are prone to flooding or have very steep terrain, like the Nepal Himalayas, the villages are often on a small flat area, well above the steeply gorged bottom of the river valley. Once the rivers mellow a bit as they descend out of the mountains, you begin to get villages along the floodplains of the rivers, but getting to these areas could entail considerable distance depending on where your situation originates.
Most of the time you will at least roughly know your location or region that you are lost in. If in a plane crash in the mountains, you may have a lot less background. Consider the options and where you are. Evaluate if there are any emergency injuries and if anybody is likely to come looking for you, and if so, how long until they would be notified based on the emergency system in place (e.g., if you are on a hike, did you tell somebody where you are going and if not heard from by such and such a date to contact SAR?). Then build some signaling devices. Determine whether you should stay put based on evaluating your expected timeline for SAR notification and how far/ long you estimate you might have to travel to find help.
Figure out which directions are north, south, east, and west. Determine a game plan based on your knowledge of the area, if you have any. For example, in the Himalayas, if you are lost on the southern side of the crest you will be much better off heading down toward the lowlands of Nepal or India to find civilization rather than heading up toward the crest and into a more harsh environment and the sparse habitation of the Tibetan Plateau. If you don’t know much about your surroundings, it can be wise to gain a high point so you can gather information and a view of any nearby villages, obstacles you might encounter using various paths of travel, possible food and water sources, avalanche slopes to avoid, and good signaling locations to leave clues in.
In the mountains you may encounter a variety of difficult situations to travel through or across. Here are some skills that will help you mitigate these potentially dangerous situations.
FORDING DANGEROUS RIVERS
Fording a swift river is one of the most dangerous situations you can encounter. You can’t always tell a river’s depth, flow, or undertow by looking at its surface, and if you get swept down it, your chance of survival can quickly end. Always approach creeks and rivers with respect and caution.
Depending on the size of the crossing, you can sometimes use downed trees to get across without even getting wet. That’s always my go-to option if I can find it. My next favorite option is rock-hopping across. Keep in mind that in some rivers, rocks may be glazed with moss, which can make them very slippery. Look for a greenish or brownish color on the upward end of the rock; this can warn you of perilous conditions. Sometimes when the temperature is below freezing, the tops of rocks in a creek can be slick and icy from the splatter of the water. In both of these cases, rock-hopping is still possible, but trekking poles or grabbing a branch to use as a support can be very helpful. So is scaling down the size of each maneuver between steps.
General river dynamics are also good to know. Here are a few helpful hints:
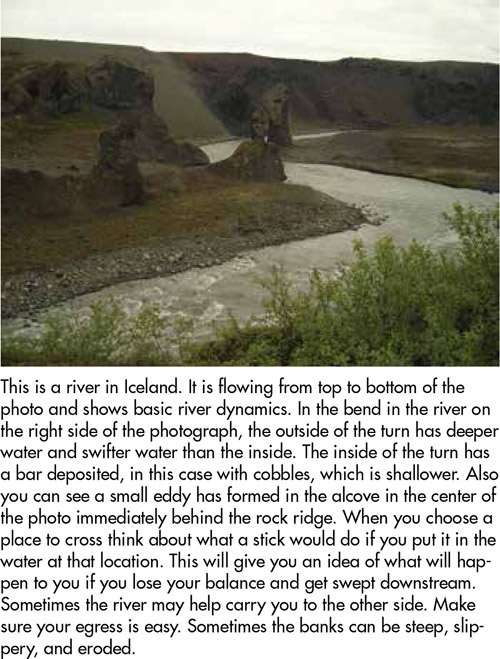
✵ Rivers are deeper under a steep bank and on the outside of a turn.
✵ They are shallower on the inside of a turn.
✵ Eddies behind rocks can help break the constant push of the river.
✵ Rivers typically meander slowly through meadows, and although the water may be deeper, the current is usually gentler, often making meadow areas safe places to cross.
Fast-moving water above the knee can knock someone over. Using trekking poles or a stick is very helpful both for balance and to test the depth of the water and obstacles underneath the surface.
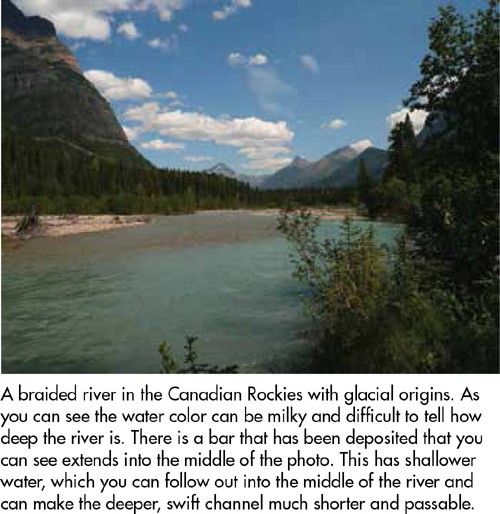
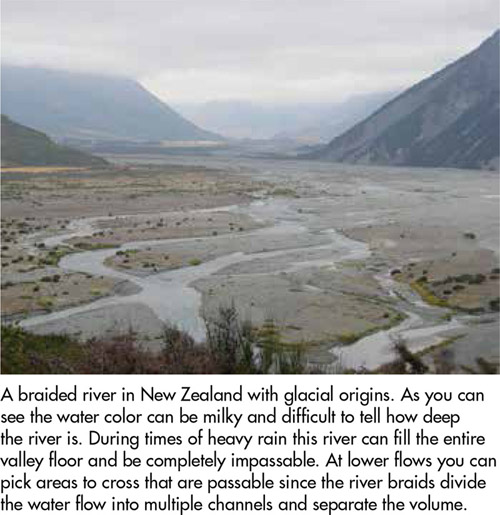
Glacial rivers are sometimes tough to cross because they are silty and you often can’t see the bottom. On the other hand, they can also be braided and separated into various paths, helping diminish the intensity of the channel, and the flow can be very diurnal, with significantly less flow in the morning than in the afternoon.
Do not do a tough ford barefoot! Unless the river is really gentle, wear shoes when fording a river. They help with traction and protect your feet in case there are jagged rocks in the water you can’t see.
If the river looks too swift and is wide, look for a log across. If that isn’t an option, scope out upstream to cross it. Sometimes that means miles upstream. But there’s often less volume upstream, making the river easier to cross.
When crossing a river, I leave my backpack’s sternum and hip belt straps buckled. Some people say you should unbuckle them so that you can get out of your pack quickly if you fall. I have done it both ways, and I find that I really don’t like unexpected load shifts when I am in a precarious situation, which can happen when you’re not strapped in. So I leave the straps buckled. If I do get submerged, I’m prepared to immediately unbuckle and ditch my pack. Also, I feel that people who say you should unbuckle straps are retelling tales from big, heavy packs or external-frame packs. With a trim, streamlined, ultralight setup, your movements are not affected nearly as much.
If you think someone is going to fall and you have an extra person in the group, you can have the extra person wait downstream. Make sure the catcher has something to help the person get to the shore, such as a solid tree branch, pole, or rope, just in case.
How to Ford a Tough Crossing
Rivers can be crossed in many different ways. While there are other options, the following has worked really well for me in some very tough situations.
Step 1: Scout for a good place to cross the river before starting to cross. Rivers are dynamic and change often. Don’t just assume that where the trail crosses the river is the best and safest place to do so. Make sure exit and entry points are safe by looking for places where you will be able to ease into the water without losing your balance, stepping precariously, or stepping directly into fast-moving water. Also make sure you will be able to get out of the water without a struggle. Try to pick a spot where there are no visible rapids downstream, particularly with any downed trees strewn across—known as strainers. Getting swept into a strainer is one of the worst things that can happen. The branches dangling off the tree trunk down into the water can catch and keep you underwater and make it difficult or impossible to get out against the force of the rushing water.
Step 2: Take off anything extra that is baggy, like rain pants, that can catch current. Tie your shoelaces and anything else you could trip over.
+Tip: Creeks and rivers rise and fall throughout the day. Often the most difficult crossings are raging from seasonal snowmelt or glacial runoff. If the body of water stems from snowmelt or a glacier, morning is the time of lowest flow and the easiest time to ford. Sometimes the difference is substantial. I have seen creeks rise more than 6 feet between morning and afternoon—basically from fordable to deadly.
Step 3: Sidestep across, without crossing your feet. Sidestepping helps prevent the push of the water from crossing up your legs and getting you off balance. Use your trekking poles for extra balance and also to test the depth of the water. Walk at a slight downstream angle while facing upstream. These tricks will make the river’s current more manageable, making it easier to cross and less likely that you will lose your footing.
When Things Take a Turn for the Worse
If you get swept downstream, ditch your backpack immediately and swim for shore, whichever is closer or more manageable to reach. If you are caught in the current, float feet downstream and stomach up, using your feet and legs to cushion and bounce off rocks in your path. The only time you don’t want to float in this fashion is when there is a strainer approaching. In this circumstance you want to go head first, stomach down, as though you are doing the butterfly stroke. As you near the strainer, try to lift yourself out of the water by putting your hands over the strainer, pushing yourself up, and kicking your feet. Do this to try to prevent yourself from going underneath it, where you might get pinned.
HIKING ON STEEP SNOWFIELDS
Snow creates unique hiking conditions. Snow conditions can change dramatically depending on recent weather, elevation, and time of year. You can bomb through a dusting of fresh, powdery snow or slog through miles of deep powder. Spring conditions are much different and vary throughout the day. Trekking poles or a tree branch used as a staff can be very handy for these situations.
Snowshoes generally aren’t worth their weight for spring snow conditions. In spring the snow often has an icy crust in the morning. The crust can be treacherous on steep slopes, particularly when you can’t kick steps into it. But it also makes travel fast and efficient. You can often take a shorter, more direct path.
If you need to make snowshoes, you can fashion a pair by tying flexible, green tree branches together into fairly large ovals. Make cross-supports from the outside oval so your shoe will have something to rest on, and then tie your shoe to those supports. This will help create some floatation in deep snow and expend a bit less energy. Progress can still be painfully slow, though.
On winter hikes and in spring snow conditions, plan where you camp and wake up early in the morning to take advantage of the best snow/hiking conditions. This will help you make good time. Traveling in the morning on firm snow will be faster, since you are on top of the snow rather than sinking into it like you will do in the afternoon, when you’re postholing and expending a lot of energy in rotten snow. Also, try to walk in shady areas in the afternoon. The shaded snow isn’t as rotten, and you won’t posthole as much.
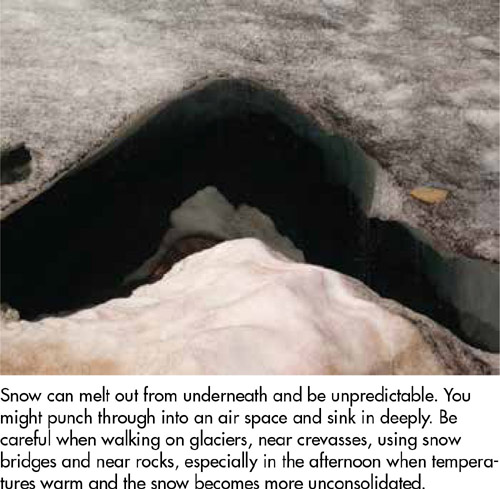
Although it is tempting to walk on rocks and get off the snow, keep the following in mind: Snow often melts from underneath, meaning you can sink deeper or even poke through an air pocket under the snow that’s deeper than expected. Either take a big step on and off the rocks or give them a wide berth. Also watch out for thin snow bridges with water running underneath.
Take big steps when walking on and off snowfields. Snow is often slushy or punchy near the edges, and those are commonly the first places to soften with daytime warming. Areas that are firm and solid in the morning may require postholing in the afternoon.
How to Ascend Steep Snowfields
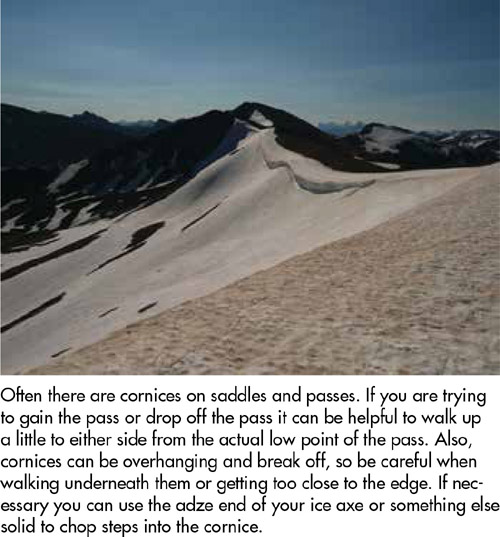
Step 1: When you’re on snow and don’t have crampons with you, route selection is very important. Snow can take the natural contours of the rocks underneath or completely cover them up. In some circumstances, snow can fill in ledges and cliffs and make them scalable. Most important, when you look at the slope you will be ascending, consider two things: (1) If you have the option, ascend someplace with low exposure and low risk if you were to slip and slide down the slope. (2) Look all the way up to your goal. Does the pass have a cornice? Is it overhanging? Are there less-steep areas, rocks showing through, or ledges you can use to help you ascend more easily?
Ascend so that you can attain your desired location to reach the pass/summit. Often cornices are like smiley faces. They are overhanging in the middle of the pass but can meet the ridgeline toward the corners. You can get on top of them without the hassle of chopping steps by simply ascending a bit higher and toward one of the corners. It is not always best to follow the route that the trail would have ascended up the headwall.
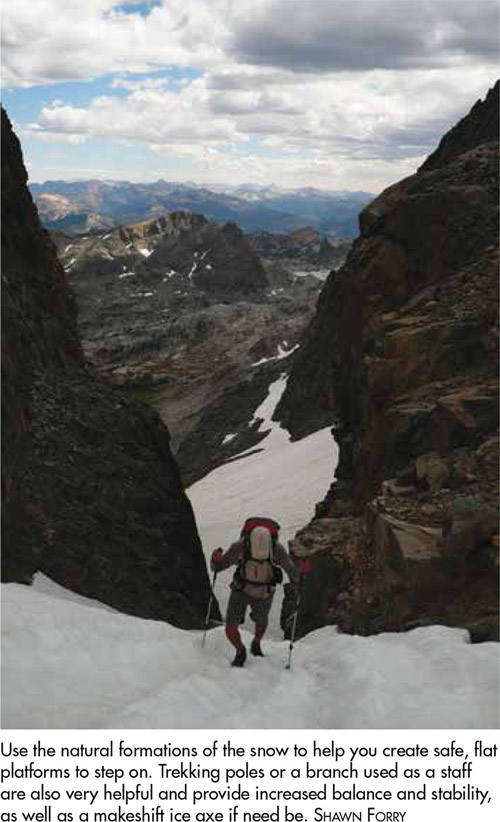
Step 2: Since you don’t have crampons with you, try to kick in steps on steeper terrain. Spring snow often naturally has little dimples and divots, like a golf ball. Use these natural platforms to your advantage, and kick steps into the snow in these natural depressions. Create a flat area by stamping your foot up and down and moving it from side to side or kicking your toe in sharply on tricky, firm slopes. This helps you get a good, flat position and creates something to anchor one foot on as you craft your next perch. If the snow is softening up, you can easily kick your toe in and ascend straight up the face or kick in the inside or outside of your foot to create a platform and ascend at an angle.
How to Traverse Steep Snowfields
Step 1: Traversing a snowfield can be harder than ascending or descending. Eye the area where you want to go to. It may be where the snow ends, where the pitch mellows out, or where you can see the trail breaking out of the snow. It can be difficult to hold your line across the snow and move perfectly across.
Step 2: Kick steps with the outsides and insides of your feet, making sure each foot is stable before planting to kick the next step. It can be helpful, especially on steep terrain, to traverse at a slightly ascending or descending angle.
How to Descend Steep Snowfields
Step 1: Check your map, and look toward your descent. Pick out landmarks that will serve as guides and keep you on track. For example, go to the right of the first lake, to the left of the second lake, to the outlet of the third lake, on the right side of the creek, and/or below that ridgeline. Since descents can be very fast on snow and you won’t be seeing signs of the trail, this will help you find the trail and continue making good time once the snow peters out.
Step 2: If you have an ice ax, you can use the pick end to help control your speed. However, for a lot of hikes, you won’t be carrying an ice ax. In these circumstances it can be tricky to control your speed, especially if the snow is still icy and firm. You need to try to traverse to an open area for the descent so that there’s less consequence if you slip and speed down out of control. If you can, find an open bowl with a single fall line, no rocks, and a smooth, gentle run-out. Traverse to that area using the techniques described above.
Step 3: If the snow is getting softer, you may be able to safely butt-slide down the slope and stay in control. If you are worried about staying in control, you can collapse your trekking pole and use it to help slow you down, as explained below. Another technique I often use when the conditions are softening is to boot-ski down, basically just skiing on the soles of my shoes. It can be really fun but hard to check your speed. You can also walk down fast using the “plunge step” method. This entails stepping down and digging your heels into the soft snow as you descend. You can move pretty fast this way, and gravity helps make it minimal effort. On the other hand, if the snow is still icy, you want to make sure your descent stays completely under control. This can be a much slower process.
+Tip: The last place snow refreezes overnight is under trees. If the temps are not dropping below freezing or are near freezing, open areas such as meadows and bowls can still refreeze due to radiational cooling. Tree cover prevents long-wave radiation from escaping, keeping such areas warmer. Snowpack is more solid and frozen in open areas and can still be punchy beneath trees. If you are below tree line, look for places where pine needles and plant debris have been deposited in the snow. These areas often stay icier and firmer throughout the day. Also keep this same premise in mind when looking for camping locations, as you will be significantly warmer camping under a tree instead of out in the open.
+Tip: When hiking in the snow, always consider avalanche danger. Travel in low-angle areas, and try not to walk below steep slopes. Slopes of 30 degrees or greater are more prone to sliding. If hiking in a group through a dangerous spot, move one at a time from safe area to safe area, keeping your eyes on the person going through the treacherous spots.
Travel gently. Don’t stand on the edge of cornices or try to break them off—unless you’re intentionally trying to see if a slope will slide under the weight.
If you’re traveling where avalanche danger is high, take all necessary precautions. Travel with a partner; carry a beacon, probe, and shovel, and know how to use them efficiently.
A sign of increasing instability during the typical freeze-thaw cycle of spring days is when you begin to posthole deeper than your boot top. This means the snowpack is becoming unconsolidated and notbonding or adhering well. In spring, this is usually due to daytime warming and the amount of free water in the snowpack.
You can wait and take a break if you think the sun will hit the slope and warm up the snow. If there are multiple aspects around, you may be able to traverse a slope that has received more sun and will be softer, or you can just deal with it and pick your way down. Trekking poles can be very helpful. Use the dimples of the snow, and kick steps to create platforms for your feet. Do not try to go straight down; instead, move back and forth across the slope, traversing and creating switchbacks.
In spring, avalanche danger dramatically increases when there’s fresh snow. These are usually wet slides, which are slower and start as a point release and spread from there. Rainfall can add weight to the snowpack, and snow is further destabilized from wider changes in temperature during the day and strong solar radiation.
Also, when the snow starts melting in spring, there’s typically a lot of rockfall from the added water and freeze-thaw cycles. Stay clear of rock bands and below rock faces.
If you suspect glaciers or see any blue ice, keep in mind the possibility of crevasses. Make sure to avoid these areas at all costs. Without proper safety equipment, crevasses are best left a wide berth.
When Things Take a Turn for the Worse
You tried traversing the steep snowfield but slipped and are heading down the slope, what should you do? You need to self-arrest, but you don’t have an ice ax. Here’s what to do:
Get your body oriented so that your feet are downhill.
If you are using trekking poles, flip a trekking pole around, as you would if you were walking with an ice ax, so that the tip is facing down. Hold the trekking pole near the tip or at the basket so you don’t place too much torque on the pole and snap it. Get the pole so that it is at the base of your neck and your shoulder. Roll your body so it is face down, and put all your weight onto the pole tip, digging it firmly into the snow. At the same time, start kicking your toes into the snow repeatedly, one foot at a time. It can also help to crouch your body so that you can get more of your body weight onto your pole and your toes. This should stop you or at least decrease your speed so that it will get easier to stop as you continue these actions.
If you aren’t using trekking poles, do the same things as above, but instead of digging a trekking pole into the snow, you will be using your elbow. As you roll over onto your stomach, bend your arm and bring your hand up to your head. Dig your elbow into the snow and put all your weight onto your elbow. Follow the rest of the directions the same as above.
HIKING ACROSS TALUS AND BOULDER FIELDS
When walking cross-country across talus and boulder fields, scope out your route and your ultimate goal on the opposite side. Look for flat areas and rocks to step on. Try not to step in between rocks with narrow gaps. Stash or carry your poles in one hand so you can use your hands and arms as additional points of balance. Using your poles in boulder and talus fields greatly increases the chance of snapping your poles.
WHITEOUTS
If you are in a really bad whiteout, often your best bet is to set up camp and stay put until the weather improves. It is always better to stop early than to continue and put yourself in danger. It is easy to get off track when you can’t see, especially if the ground is snow-covered and you can’t see or follow a trail. If you have a GPS unit with waypoints programmed in, it can be a great aid to allow you to “connect the dots” and keep moving, even though you can’t see where you are headed. If you are trying to navigate with map and compass, it is very difficult when you are in a true whiteout.
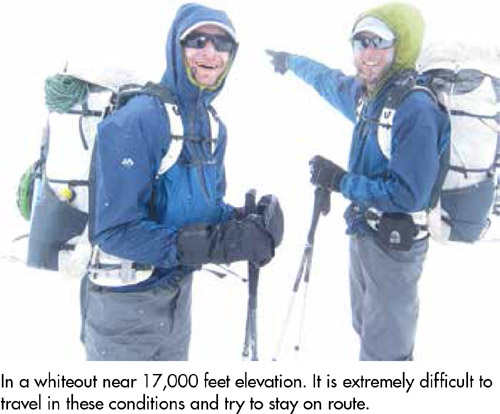
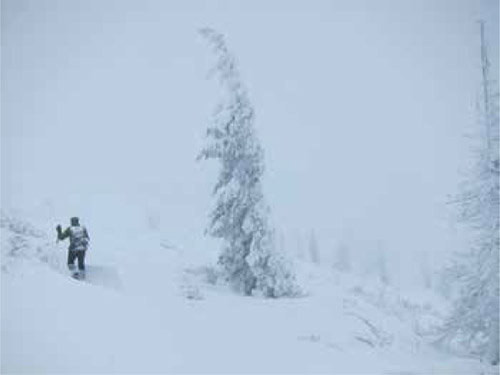
Before you get lost, set up camp and wait it out. If you think you will be in a potentially life-threatening situation if you wait out the storm, head lower in elevation immediately before it gets too late. Follow a safe course of travel and avoid steep slopes. In big mountains the weather often gets significantly better as you drop in elevation.