Solar Electricity Handbook 2011: A Simple Practical Guide to Solar Energy - Designing and Installing Photovoltaic Solar Electric Systems - Michael Boxwell (2011)
Surveying Your Site
The site survey is one of the most important aspects of designing a successful solar system. It will identify whether or not your site is suitable for solar. If it is, the survey identifies the ideal position to install your system, ensuring that you get the best value for money and the best possible performance.
What we want to achieve
For a solar electric system to work well, we need the site survey to answer two questions:
· Is there anywhere on the site that is suitable for positioning my solar array?
· Do nearby obstacles such as trees and buildings shade out too much sunlight?
The first question might at first sound daft but, depending on your project, it can make the difference between a solar energy system being viable or not.
By answering the second question, you can identify how much of the available sunlight you will be able to capture. It is vitally important that you answer this question. The number one reason for solar energy failing to reach expectations is obstacles blocking out sunlight, which dramatically reduces the efficiency of the system.
To answer this second question, we need to be able to plot the position of the sun through the sky at different times of the year. During the winter, the sun is much lower in the sky than it is during the summer months. It is important to ensure that the solar array can receive direct sunlight throughout the day during the winter.
What you will need
You will need a compass, a protractor, a spirit level and a tape measure.
Inevitably a ladder is required if you are planning to mount the solar array on a roof. A camera can also be extremely useful for photographing the site. If you have an iPhone or an Android cell phone, you can also download some cheap software that will help you identify the path of the sun across the sky and assist with obstacle analysis.
I also find it useful to get some large cardboard boxes. Open them out and cut them into the rough size of your proposed solar array. This can help you when finding a location for your solar panels. It is far easier to envisage what the installation will look like and it can help highlight any installation issues that you might otherwise have missed.
If you have never done a solar site survey before, it does help if you visit the site on a sunny day.
Once you have more experience with doing solar site surveys, you will find it does not actually make much difference whether you do your site survey on a sunny day or an overcast day. As part of the site survey, we manually plot the sun’s position across the sky, so once you have more experience, sunny weather actually makes little difference to the quality of the survey.
First impressions
When you first arrive on the site, the first thing to check is that the layout of the site gives it access to sunlight.
We will use a more scientific approach for checking for shade later, but a quick look first often highlights problems without needing to carry out a more in-depth survey.
If you are in the Northern Hemisphere, look from east, through south and to the west to ensure there are no obvious obstructions that can block the sunshine, such as trees and other buildings. If you are in the Southern Hemisphere, you need to check from east, through north to west for obstructions. If you are standing on the equator, the sun passes overhead, so only obstructions in the east and west are important.
Be very careful not to look directly at the sun, even for a few moments, whilst you are carrying out this survey. Even in the middle of winter, retina burn can cause permanent damage to your eyesight.
Look around the site and identify all the different options for positioning the solar array. If you are considering mounting your solar array on a roof, remember that the world looks a very different place from a roof-top, and obstructions that are a problem standing on the ground look very different when you are at roof height.
Drawing a rough sketch of the site
It can be helpful to draw up a rough sketch of the site. It does not have to be accurate, but it can be a useful tool to have, both during the site survey and afterwards when you are designing your system.
Include all properties and trees that are close to your site and not just those on your land. Include trees that are too small to worry about now, but may become a problem in a few years’ time. Also make a note of which way is north.
Positioning the solar array
Your next task is to identify the best location to position your solar array. Whilst you may already have a good idea where you want to install your solar panels, it is always a good idea to consider all the different options available to you.
As we discovered in the last chapter, solar arrays perform at their best when tilted towards the sun.
If you are planning to install solar energy for a building, then the roof of the building can often be a suitable place to install the solar array. This is effective where the roof is south-facing or where the roof is flat and you can fit the panels using angled mountings.
Other alternatives are to mount solar panels on a wall. This can work well with longer, slimmer panels that can be mounted at an angle without protruding too far out from the wall itself. Alternatively, solar panels can be ground-mounted or mounted on a pole.
When considering a position for your solar array, you need to consider how easy it is going to be to clean the solar panels. Solar panels do not need to be spotless, but dirt and grime will reduce the efficiency of your solar system over time, so while you are looking at mounting solutions it is definitely worth considering how you can access your panels to give them a quick wash every few months.
Roof-mounting
If you are planning to mount your solar array on a roof, you need to gain access to the roof to check its suitability.
Use a compass to check the direction of the roof. If it is not directly facing south, you may need to construct an angled support in order to get the panels angled correctly.
You will also need to find out the pitch of the roof. Professionals use a tool called a Roof Angle Finder to calculate this. Roof angle finders (also called Magnetic Polycast Protractors) are low-cost tools available from builders’ merchants. You press the angle finder up against the rafters underneath the roof and the angle finder will show the angle in degrees.
Alternatively, you can calculate the angle using a protractor at the base of a roof rafter underneath the roof itself.
Solar panels in themselves are not heavy: 15-20 kilograms (33-44 pounds) at most. Yet when multiple panels are combined with a frame, especially if that frame is angled, the overall weight can become quite significant.
Check the structure of the roof. Ensure that it is strong enough to take the solar array and to ascertain what fixings you will need. It is difficult to provide general advice on roof structures and fixings. There are so many different roof designs it is not possible for me to provide much useful information on this subject. If you are not certain about the suitability of your roof, ask a builder or an architect to assess your roof for you.
Roof-mounting kits are available from solar panel suppliers. Alternatively, you can make your own.
If it does not compromise your solar design, it can be quite useful to mount your solar panels at the lowest part of the roof. This can make it considerably easier to keep the panels clean: most window cleaners will happily wash easily-accessible solar panels if they are situated at the bottom of the roof, and telescopic window cleaner kits are available to reach solar panels at the lower end of a roof structure.
Measure and record the overall roof-space available for a solar array. It is also a good idea to use the cardboard cut-outs you made earlier and place these on the roof to give a ‘look and feel’ for the installation and help you identify any installation issues you may have with positioning and mounting the solar array.
Ground-mounting
If you want to mount your solar array on the ground, you will need a frame onto which you can mount your solar panels. Most solar panel suppliers can supply suitable frames or you can fabricate your own on site.
There are benefits for a ground-mounted solar array: you can easily keep the panels clean and you can use a frame to change the angle of the array at different times of year to track the height of the sun in the sky.
Take a note of ground conditions, as you will need to build foundations for your frame.
Incidentally, you can buy ground-mounted solar frames that can also move the panel to track the sun across the sky during the day. These Solar Trackers can increase the amount of sunlight captured by around 15-20% in winter and up to 55% in summer.
Unfortunately, at present, commercial solar trackers are expensive. Unless space is at an absolute premium, you would be better to spend your money on a bigger solar array.
However, for a keen DIY engineer who likes the idea of a challenge, a solar tracker that moves the array to face the sun as it moves across the sky during the day could be a useful and interesting project to do. There are various sites on the internet, such as instructables.com, where keen hobbyists have built their own solar trackers and provide instructions on how to make them.
Pole-mounting
Another option for mounting a solar panel is to affix one on a pole. Because of the weight and size of the solar panel, you will need an extremely good foundation and a heavyweight pole, in order to withstand the wind.
You can mount up to 600-watt arrays using single-pole mountings. Larger arrays can be pole-mounted using frames constructed using two or four poles.
Most suppliers of solar panels and associated equipment can provide suitable poles.
Splitting the solar array into several smaller arrays
It may be that when you get to the site, you find that there is no one space available that will allow you to install all the solar panels you need. If this is the case, it is possible to split your single solar array into several smaller arrays. This means, for instance, that you could have two sets of panels mounted on different roof pitches, or some mounted on a roof and some from a pole.
If you do this, you are creating two separate solar energy systems, which you then have to link together. For a grid-tie system, you would require either a micro-inverter system or an inverter that can accept inputs from more than one solar array. For a stand-alone system, you would require a battery controller for each separate solar array.
Identifying the path of the sun across the sky
Once you have identified a suitable position for your solar array, it is time to be a little more scientific in ensuring there are no obstructions that will block sunlight at different times of the day, or at certain times of the year.
The path of the sun across the sky changes throughout the year. This is why carrying out a site survey is so important: you cannot just check to see where the sun is shining today. The height and position of the sun constantly changes throughout the year.
Each year, there are two days in the year when the day is exactly twelve hours long. These two days are 21 March and 21 September, the solar equinoxes. On these equinoxes the sun rises due east of the equator and sets due west of the equator. At solar noon on the equinox, exactly six hours after the sun has risen, the angle of the sun is 90° minus the local latitude.
In the Northern Hemisphere (i.e. north of the equator), the longest day of the year is 21 June and the shortest day of the year is 21 December. These two days are the summer and winter solstices respectively.
On the summer solstice, the angle of the sun is 23.5° higher than it is on the equinox, whilst on the winter solstice the angle is 23.5° lower than on the equinox.
These two extremes are due to the tilt of the earth, relative to its orbit around the sun. In the Northern Hemisphere, the summer solstice occurs when the North Pole is tilted towards the sun, and the winter solstice occurs when the North Pole is tilted away from the sun.
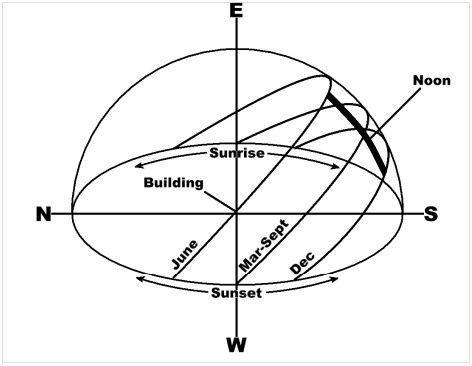
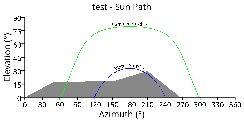
Figure 4: This chart shows the different paths of the sun from sunrise to sunset at different times of the year from the Northern Hemisphere. The intersection between N, S, E and W is your location.
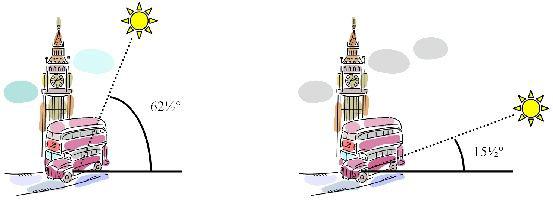
We will take London in the United Kingdom as an example. London’s latitude is 51°. On the equinox, the angle of the sun at noon will be 39° (90° - 51°). On the summer solstice, the angle will be 62.5° (39° + 23.5°) and on the winter solstice, it will be 15.5° (39° - 23.5°).
London in mid-summer, compared to London in mid-winter
As well as the solar irradiance figures, Appendix B shows the height of the sun in the sky at noon at different times of the year and the optimum tilts for solar panels for the United States, Canada, Australia, New Zealand, United Kingdom and Ireland.
For more detailed information on sun heights on a monthly basis, or for information for other countries, visit www.SolarElectricityHandbook.com and follow the link to the solar panel angle calculator.
Shading
As mentioned in a previous chapter, shading can have a very significant impact on the performance of your solar energy system. Even a tiny amount of shading can have a huge impact on the amount of energy that your system is able to generate. Therefore, it is important that your solar array remains shade-free whenever possible.
You can carry out this analysis in various ways. You can use a professional obstacle analysis tool, you can download an obstacle analysis tool onto your cell phone or you can use paper and pencil to come up with a rough plan.
Professional tools for obstacle analysis
In the past, a product called a Solar Pathfinder was one of the best tools you could get. This was a plastic unit with an angle chart mounted on the top. A glass dome was then placed on top of the chart. You would mount the unit onto a tripod at the desired location. Obstacles were reflected in the glass bubble and this would allow you to manually plot the obstacles on the chart and then manually work out your shading issues.
The Solar Pathfinder is surprisingly effective, as it can be easily moved around in order to find the best location for solar panels. Many professional solar installers still use a Solar Pathfinder for quick checks, despite also using the more expensive and advanced electronic equipment to provide a more detailed analysis.
Some solar suppliers can rent you a Solar Pathfinder for a small daily or weekly fee and can do the manual calculations for you once you have plotted the obstacles.
Today there are electronic systems that use GPS, tilt switches and accelerometers to do this work electronically. They are expensive to buy or rent on a daily basis. They do provide extremely comprehensive solar analysis, however, and if you plan to take up solar installations professionally, they are a worthwhile investment.
The best known is the Asset from Wiley Electronics and the SunEye from Solmetric. My personal preference is SunEye, as I find the unit simpler, but both products do a similar job.
Cell phone applications
Whilst they are very good, these tools are overkill for smaller solar installations and are often very complicated to use. Thankfully, modern smart phones provide the processing power and functionality to do a similar job. A few companies have now developed solar shade analysis software to run on these mobile phones. These use the phone’s built-in GPS, compass, accelerometer and camera to record a complete shade analysis in a matter of a few moments.
If you have an iPhone, you can download a product called Solmetric IPV. Costing $29.99, this application handles your obstacle tracking, automatically providing charts showing your shading analysis throughout the year. The detail of reporting is not as great as some of the other electronic tools, but more and more professionals are now using this software. It provides most of the functions that you get with a more expensive system, but in a package that is easier to use and far cheaper to buy.
You can find out more about Solmetric IPV from www.solmetric.com and the software can be downloaded from the iTunes website.
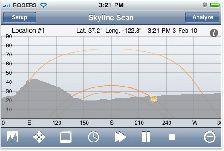
Alternatively, there is an Android phone download called Solar Shading, produced by Comoving Magnetics. Costing $15 on the Android Market, this application provides you with a complete shading analysis throughout the year, presenting the information in easy-to-read charts.
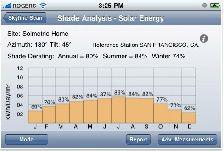
Above: Examples of on-screen reports from Solmetric IPV running on the iPhone.
Below: Screen-shots from Solar Shading, running on Android phones.
Using paper and pencil
Finally, if you do not have access to a professional tool or a suitable mobile phone, you can use the old-fashioned method of paper and pencil. Go to the position where you are planning to put your solar array and find due south with a compass. Looking from the same height as your proposed location, and working from east to west, check there are no obstacles, such as trees or buildings, that can shade the sun at different times of the day or when the sun is at its lowest winter height.
To do this, you will need to find out what position the sun rises and sets at different times of the year. Thankfully, this is easy to find out. The solar angle calculator which you can find at www.SolarElectricityHandbook.com includes this information, making it easy to identify the path of the sun at these different times of the year.
For a simple one-off site survey, the easiest way to identify potential obstructions is to use a protractor and pencil. Tape the pencil to the centre of the protractor where all the lines meet, in such a way that the other end of the pencil can be moved across the protractor. You can use this protractor to check the field of view, using the pencil as an ‘aimer’ to show the angle of the sun in the sky based on different times of the year.
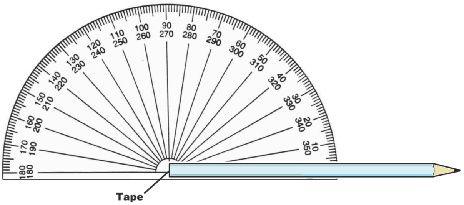
Be very careful not to look directly at the sun, even for a few moments, whilst you are carrying out this survey. Even in the middle of winter, retina burn can cause permanent damage to your eyesight.
Your survey needs to ensure there are no obstacles in the depths of winter, when the sun is only a few degrees up in the sky.
In the case of London, on the 21 December the sun will be only 15½° high at midday (at due south) and lower than that for the rest of the day.
If there are obstacles that are blocking visibility of the sun, find another location. Alternatively, find other ways around the obstacle, such as mounting the solar array higher up on a frame.
Of course, if you do not need your solar system to produce much power during the winter months this may not be a problem for you. However, make sure obstacles do not shade your system for the times of year when you need power.
Future proof your system
You do need to consider the future when installing a solar electric system. The system will have a lifetime of at least 20 years, so as far as possible you need to ensure that the system will be effective for that length of time.
When scanning the horizon, take into account that trees and hedges will grow during the lifetime of the system. A small spruce in a nearby garden could grow into a monster in the space of a few years, and if that is a risk, it is best to know about it now, rather than have a nasty surprise a few years down the line.
See if there is any planned building work nearby that may overshadow your site and try to assess the likelihood of future building work that could have an impact on shading.
It is also worth finding out if fog or heavy mist is a problem at certain times of the year. The efficiency of your solar array will be compromised if the site has regular problems with heavy mist.
What if there are shading obstructions?
If there are obstructions that shade your proposed location, and there are no other locations that are suitable for solar, you need to ascertain at what point during the day the obstructions occur.
Anything due south (or due north in the Southern Hemisphere) is a major problem, as this will be the position of the sun when the intensity of the sunlight is at its highest. Core power generation occurs between 9am and 3pm. If you have shading either before 9am or after 3pm, you will lose around 20% of your capability in the summer, or 40% of your capability if you have shading both before 9am and after 3pm.
During the winter, the difference is not so great. If you have shading before 9am or after 3pm during the winter, you will probably lose only around 5-10% of your generating capabilities during this time.
If you have shading during your core power generation times, you need to give serious thought as to whether you should continue with a solar implementation: the performance of your solar system will be severely compromised.
If you do have significant shading issues and you want to find out the exact impact of these obstructions on your solar array, you are going to need to use a professional tool for obstacle analysis. The electronic tools will be able to quantify exactly what the impact of the shade is on your system at different times of the year.
If obstructions occur for part of the day, such as during the morning or during the afternoon, you can consider increasing the number of solar panels you purchase and angling them away from the obstruction in order to increase their collection of sunlight during the unobstructed parts of the day.
Alternatively, you may be better off investigating other energy options, such as wind power or fuel cells, either instead of using solar or in combination with a smaller solar electric system.
Appendix A looks at the issue of shading in a lot more detail and explains how you can work around obstruction issues. It is always best to avoid shade as far as possible, because workarounds can become costly. However, if you cannot eliminate shade altogether, it need not write off solar as a solution that can work for you.
Positioning batteries, controllers and inverters
You need to identify a suitable location for batteries. This could be a room within a building, in a garage or garden shed, or in a weatherproof battery housing.
It is important to try to keep all the hardware close together, in order to keep the cable lengths as short as possible. By ‘hardware’, I am referring to the solar array itself, batteries, controller and inverter.
For the batteries, inverter and controller, you are looking for a location that fits the following criteria:
· Water- and weather proof
· Not affected by direct sunlight
· Insulated to protect against extremes of temperature
· Facilities to ventilate gases from the batteries
· Protected from sources of ignition
· Away from children, pets and rodents
Lead acid batteries give off very small quantities of hydrogen when charging. Hydrogen is explosive. You must ensure that, wherever your batteries are stored, the area receives adequate external ventilation to ensure these gases cannot build up.
Because of the extremely high potential currents involved with lead acid batteries, the batteries must be in a secure area away from children and pets.
For all of the above reasons, batteries are often mounted on heavy-duty racking, which is then made secure using an open-mesh cage. Alternatively, you can purchase purpose-built battery enclosures from solar or battery suppliers.
Controllers and inverters need to be mounted as close to the batteries as possible. These are often wall-mounted, but can also be mounted to racking.
Large inverters can be extremely heavy, so if you are planning to wall-mount one, make sure that the wall is load-bearing and able to take the weight.
Cabling
While you are on site, consider likely routes for cables, especially the heavy-duty cables that link the solar array, controller, batteries and inverter together. Try to keep cable lengths as short as possible, as longer cables mean lower efficiency. Measure the lengths of these cables so that you can ascertain the correct specification for cables when you start planning the installation.
Site survey for the holiday home
Back to our holiday home example: based on our previous calculations, our holiday home needs a solar array capable of generating 320 watt-hours of energy, if we angle the array towards the sun. This solar array will take up approximately 2m² (18 sq. ft) of surface area.
Our site survey for the holiday home showed the main pitch of the roof is facing east to west. This is not ideal for a solar array. The eastern side of the roof has a chimney. There is shade from a tall tree that obscures part of the west-facing part of the roof. There is no space on the gable end of the roof to fit the required solar panels.
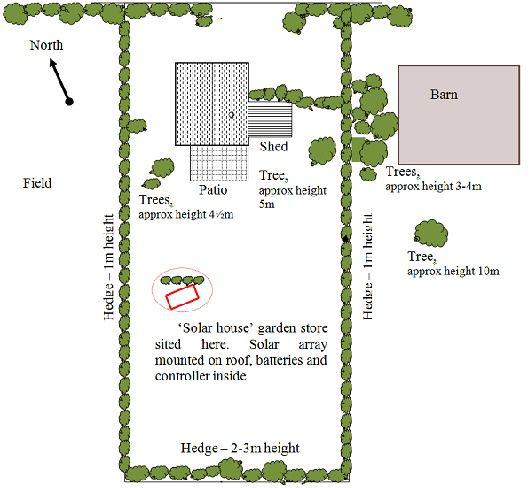
Map of the holiday home, identifying likely obstacles and a suitable position for the solar array
An old shed close to the house has a south-facing roof, but only a 20° pitch. A tree shades the shed for most of the mornings for nine months of the year. Furthermore, the condition of the shed means that it would need significant remedial work should we decide to use it.
There is a farm to the east of the house, with a large barn and a number of trees bordering the house, the tallest of which is approximately 30 feet (10m) tall. One of these trees provides shade to the shed and part of the rear of the house during the winter, and may provide more shade during the rest of the year if it continues to grow.
The garden is south-facing and receives sunlight throughout the year.
We decide to install the solar array in the rear garden, constructing a suitable 1.2m (4 feet) tall garden store with a south-facing pitched roof of approximately 52° (allowing us to tilt the solar array at 38° from vertical for best year-round sunshine). Our solar house will hold the batteries and controller and will have adequate ventilation to ensure that the small amounts of hydrogen generated by the batteries can escape. By building our own structure, we can install the solar array at the optimum tilt to capture as much sunlight as possible. This means our solar array is compact and keeps our costs to a minimum.
The solar house will be located around 10m (33 feet) from the house and shielded from the house by a new shrubbery.
The cable lengths between the solar array and the solar controller are approximately 2m (6½ feet). The cable length between the solar controller and the batteries is less than 1m (3 feet). The cable length between the solar house and the home is 12m (40 feet). There is a further 10m (33 feet) of cabling inside the house.
These longer cable lengths are not ideal. Cable runs should be as short as possible in order to reduce power losses through the cable. However, we cannot position the solar array any nearer to the house. We will have to address this particular problem through our design.
In conclusion
· There is a lot to do on a site survey. It is important. Spend time; get it right.
· Drawing a map and taking photographs can help with the site survey and are invaluable for the next stage, when we start designing our new system.
· Solar panels can be roof-mounted, mounted with a frame on the ground or on a pole.
· Once you have identified a location for the panels, check for obstructions that will shade the panels throughout the year.
· These obstructions are most likely to be an issue during the winter months, when solar energy is at a premium.
· Identify a suitable space for batteries, controller and inverter.
· Plan the cable runs and the measure the length of the required cables.
· Cables should be as short as possible, in order to reduce the voltage losses through the system. If long cable lengths are necessitated by the positioning of the solar array, we may need to run our system at a higher voltage to compensate.