Solar Electricity Handbook 2011: A Simple Practical Guide to Solar Energy - Designing and Installing Photovoltaic Solar Electric Systems - Michael Boxwell (2011)
Components for Stand-Alone Systems
If you are designing a stand-alone system, there is a lot more design work and planning involved than there is for a similarly-sized grid-tie system. It is more critical to make sure your stand-alone system works: while a grid-tie system will not let you down if you do not generate enough energy, a stand-alone system will.
As well as considering and planning all the physical side of fitting the solar panels, routing the cabling and handling the safety aspects, you will also need to consider the voltage that your system will run at and design a battery system to store your energy.
Calculate your optimum voltage
Solar panels and batteries are normally both 12 volts, so logically you would think that it would make the most sense to run your system at 12 volts.
For small systems, you would be right. However, there are some limitations of 12-volt systems. Therefore, we now need to identify the optimum voltage for your system.
If you are still not comfortable with volts, watts, currents and resistance, now would be a good time to re-read Chapter 2: A Brief Introduction to Electricity.
Voltages and currents
Current is calculated as watts divided by volts. When you run at low voltages, your current is much higher than when you run at higher voltages.
Take a normal household low-energy light bulb as an example. A 12W light bulb running from grid-level voltages is consuming 12 watts of power per hour. The current required to power this light bulb at 230 volts is 0.05 amps (12W ÷ 230V = 0.05 amps) and at 110 volts is 0.1 amps (12W ÷ 110v = 0.1 amps).
If you run the same wattage light bulb from a 12-volt battery, you are still only consuming 12 watts of power per hour, but this time the current you require is 1 amp (12W ÷ 12V = 1 amp).
If you run the same wattage light bulb from a 24-volt battery, you halve the amps. You now only require ½ amp (12W ÷ 24V = ½ amp).
“So what?” I hear you say. “Who cares? At the end of the day, we’re using the same amount of energy, whatever the voltage.”
The issue is resistance. Resistance is the opposition to an electrical current in the material the current is running through. Think of it as friction on the movement of electrons through a wire. If resistance is too high, the result is power loss. By increasing your voltage, you can reduce your current and thereby reduce resistance.
You can counter the resistance by using thicker cabling, but you soon get to the point where the size of the cabling becomes impractical. At this point, it is time to change to a higher voltage.
What voltages can I run at?
For either a stand-alone or a grid fallback system, the most common voltages to run a solar electric system at are 12 volts, 24 volts or 48 volts.
As a rule, the most efficient way to run an electrical circuit is to keep your voltage high and your current low. That is why the grid runs at such high voltages: it is the only way to keep losses to a minimum over long distances.
However, you also need to factor cost into the equation: 12-volt and 24-volt systems are far cheaper to implement than higher voltage systems, as the components are more readily available, and at a lower cost. 12-volt and 24-volt devices and appliances are also easily available, whereas 48-volt devices and appliances are rarer.
It is unusual to go beyond 48 volts for stand-alone systems. Whilst you can go higher, inverters and controllers that work at other voltages tend to be extremely expensive and only suitable for specialist applications.
For a grid-tie system, you do have the option to run your solar array at a much higher voltage, by connecting lots of solar panels together in series. Grid-tie inverters are available that work anywhere from 12 volts up to 1,000 volts. In grid-tie systems, the voltage you run at depends on the number of solar panels you use.
How to work out what voltage you should be running at
Your choice of voltage is determined by the amount of current (amps) that you are generating with your solar array or by the amount of current (amps) that you are using in your load at any one time.
To cope with bigger currents, you need bigger cabling and a more powerful solar controller. You will also have greater resistance in longer runs of cabling, reducing the efficiency of your system, which in turn means you need to generate more power.
In our system, we are proposing a 12m (40 feet) long cable run from the solar array to the house, plus cabling within the house.
Higher currents can also reduce the lifespan of your batteries. This should be a consideration where the current drain or charge from a battery is likely to exceed / of its amp-hour rating.
We will look at battery sizing later on, as current draw is a factor in choosing the right size of battery. It may be that you need to look at more than one voltage option at this stage, such as 12-volt and 24-volt, and decide which one is right for you later on. Finally, if you are planning to use an inverter to convert your battery voltage to a grid-level AC voltage, 12-volt inverters tend to have a lower power rating than 24-volt or 48-volt inverters. This can limit what you can achieve purely with 12 volts.
To solve these problems, you can increase the voltage of your system: double the voltage and you halve your current.
There are no hard and fast rules on what voltage to work on for what current, but typically, if the thickness of cable required to carry your current is over 6mm (and we’ll calculate that in a minute), it is time to consider increasing the voltage.
How to calculate your current
As explained in Chapter 2, it is very straightforward to work out your current. Current (amps) equals power (watts) divided by volts:
Power ÷ Volts = Current
P ÷ V = I
Go back to your power analysis and add up the amount of power (watts) your system will consume if you switch on every electrical item at the same time. In the case of our holiday home, if I had everything switched on at the same time, I would be consuming 169 watts of electricity.
Using the holiday home as an example, let us calculate the current based on both 12 volts and 24 volts, to give us a good idea of what the different currents look like.
Using the above formula, 169 watts divided by 12 volts equals 14.08 amps. 169 watts divided by 24 volts equals 7.04 amps.
Likewise, we need to look at the solar array and work out how many amps the array is providing to the system. We need a 320-watt solar array. 320 watts divided by 12 volts equals 26.67 amps. 320 watts divided by 24 volts equals 13.33 amps.
Calculating cable thicknesses
I will go into more detail on cabling later, but for now, we need to ascertain the thickness of cable we will need for our system.
For our holiday home, we need a 12m (40 feet) cable to run from the solar controller to the house itself. Inside the house, there will be different circuits for lighting and appliances, but the longest cable run inside the house is a further 10m (33 feet).
That means the longest cable run is 22m (72½ feet) long. You can work out the required cable size using the following calculation:
(L x I x 0.04) ÷ (V ÷ 20) = CT
L Cable length in metres (one metre is 3.3 feet)
I Current in amps
V System voltage (e.g. 12V or 24V)
CT Cross-sectional area of the cable in mm²
So calculating the cable thickness for a 12-volt system:
(22m x 14.08A x 0.04) ÷ (12V ÷ 20) = 20.65mm²
Here is the same calculation for a 24-volt system:
(22m x 7.04A x 0.04) ÷ (24V ÷ 20) = 5.15mm²
And just for sake of completeness, here is the same calculation for a 48-volt system:
(22m x 3.52A x 0.04) ÷ (48V ÷ 20) = 1.63mm²
Converting wire sizes:
To convert cross-sectional area to American Wire Gauge or to work out the cable diameter in inches or millimetres, use the following table:
|
Cross- Sectional Area (mm²) |
American Wire Gauge (AWG) |
Diameter (inches) |
Diameter (mm) |
|
107.16 |
0000 |
0.46 |
11.68 |
|
84.97 |
000 |
0.4096 |
10.4 |
|
67.4 |
00 |
0.3648 |
9.27 |
|
53.46 |
0 |
0.3249 |
8.25 |
|
42.39 |
1 |
0.2893 |
7.35 |
|
33.61 |
2 |
0.2576 |
6.54 |
|
26.65 |
3 |
0.2294 |
5.83 |
|
21.14 |
4 |
0.2043 |
5.19 |
|
16.76 |
5 |
0.1819 |
4.62 |
|
13.29 |
6 |
0.162 |
4.11 |
|
10.55 |
7 |
0.1443 |
3.67 |
|
8.36 |
8 |
0.1285 |
3.26 |
|
6.63 |
9 |
0.1144 |
2.91 |
|
5.26 |
10 |
0.1019 |
2.59 |
|
4.17 |
11 |
0.0907 |
2.3 |
|
3.31 |
12 |
0.0808 |
2.05 |
|
2.63 |
13 |
0.072 |
1.83 |
|
2.08 |
14 |
0.0641 |
1.63 |
|
1.65 |
15 |
0.0571 |
1.45 |
|
1.31 |
16 |
0.0508 |
1.29 |
|
1.04 |
17 |
0.0453 |
1.15 |
|
0.82 |
18 |
0.0403 |
1.02 |
|
0.65 |
19 |
0.0359 |
0.91 |
|
0.52 |
20 |
0.032 |
0.81 |
|
0.41 |
21 |
0.0285 |
0.72 |
|
0.33 |
22 |
0.0254 |
0.65 |
|
0.26 |
23 |
0.0226 |
0.57 |
|
0.2 |
24 |
0.0201 |
0.51 |
|
0.16 |
25 |
0.0179 |
0.45 |
|
0.13 |
26 |
0.0159 |
0.4 |
From these figures you can see the answer straightaway. Our cable lengths are so great that we cannot practically run our system at 12 volts. The nearest match for 20.65mm² cables is 21.14mm². This is AWG 4 cable, with a cable diameter of 5.19mm. Cable this size is thick, heavy, inflexible, hard to source and very expensive.
This means we would need to lay extremely thick AWG 4 cables from the solar array and around our house to overcome the resistance. This would be expensive, inflexible and difficult to install.
Realistically, due to cable sizing, we are going to need to use either 24 volts or 48 volts for our solar electric system.
Mixing and matching solar panels
When specifying your solar array, you should keep to one type of panel rather than mixing and matching them. If you want a 100-watt array, for example, you could create this with one 100-watt solar panel, two 50-watt solar panels or five 20-watt solar panels.
If you do wish to use different solar panels in your array, you can do so by running two sets of panels in parallel with each other and either connecting them into a controller that can handle more than one feed, or by using more than one controller. This can be a useful way of creating the right wattage system, rather than spending more money buying bigger solar panels that generate more power than you actually need.
The result is slightly more complicated wiring, but it is often a more cost-effective solution to do this than to buy a larger capacity solar array than you actually need.
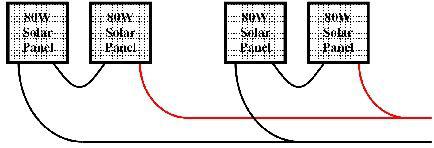
The two diagrams below show different ways of connecting two solar panels of different sizes to the same system. Both these systems are running at 12 volts, using two different sized panels to create a 140 watt system
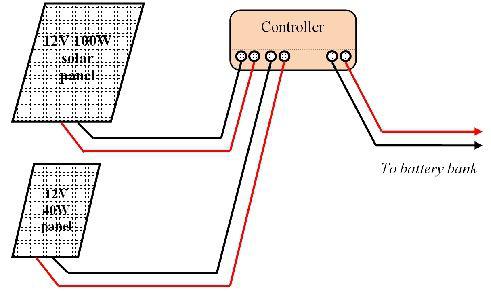
This first system uses a single controller. The controller has two separate input feeds. The two solar panels work independently of each other and the controller handles the mismatch in power output
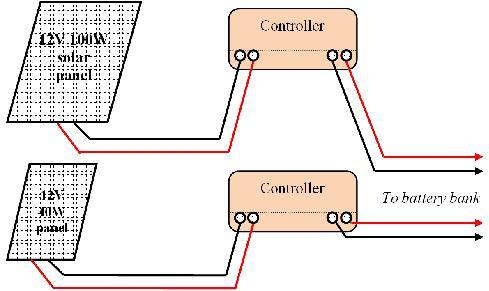
This second system uses two controllers. The second controller is used to provide additional power to the batteries for the smaller solar panel.
These solutions are effective if you are planning to start small and add to your solar energy system when needs and budget allows. It means that you can collect an assortment of solar panels over time and put them to good use within your one solar energy system.
If you end up with two different makes of solar panels with identical ratings, put them on their own separate circuits. Solar panels from different manufacturers are not all identical in their operating voltages or performances, so putting two different makes and models of solar panel on the same circuit is likely to compromise the performance of both panels, even if the specification of the two panels is similar.
If you buy multiple controllers for your solar energy system, to handle different makes, models and sizes of solar panel, you only need one main controller to handle the power output from the batteries. Your other controllers can be much cheaper and simpler pieces of equipment as they are only handling the power feed into the batteries. If you wish, you can even use a simple solar regulator that simply cuts off charging when the batteries are full, although these are usually not as efficient as a proper solar inverter.
Not all solar panels are 12-volt panels. Many solar panels are now designed predominantly for grid-tie installation only and are available in many different voltage configurations. Solar panels with voltage ratings of up to 120 volts are on the market, although the most common are 12-volt, 24-volt and 48-volt.
12-volt panels remain the most commonly available panels and are the most popular for stand-alone applications. If your stand-alone solar electric system runs at a voltage other than 12 volts, you can either install multiple solar panels in order to boost the system voltage, or choose higher-voltage solar panels. For example, if you wanted a 200-watt 24-volt solar array, you could achieve this in various ways, including:
· Using two 12-volt, 100-watt solar panels, connected in series
· Using one 24-volt, 200-watt solar panel
When choosing a solar array, you need to consider:
· The physical size: will it fit into the space available?
· The support structure: ready-made supports may only fit certain combinations of panels
· How much cabling you will need to assemble the array
· The system voltage: if you are not running at 12 volts, you will need multiple solar panels in order to build the system to the correct voltage as well as wattage
Batteries
There are a number of different options when it comes to batteries, and a number of specialist battery suppliers who can advise you on the best options for your solar installation.
Lead acid batteries usually come as either 6-volt or 12-volt batteries, although other voltages are also available. Batteries can be connected together in series to increase the voltage, or in parallel to keep the same voltage but increase the capacity.
The capacity of a battery is measured in amp-hours. The amp-hour rating shows how many hours the battery will take a specific drain: for instance, a 100-amp-hour battery has a theoretical capacity to power a 1-amp device for 100 hours, or a 100-amp device for 1 hour.
I say theoretical, because the reality is that lead acid batteries provide more energy when discharged slowly: a 100-amp-hour battery will often provide 20-25% less power if discharged over a five-hour period, compared to discharge over a twenty-hour period.
Secondly, a lead acid battery must not be run completely flat. A minimum of 20% state of charge (SOC) should be maintained in a lead acid battery at all times to ensure the battery is not damaged. For best overall battery life, you should design your system so that the battery charge rarely goes below 50%.
Types of batteries
There are three types of lead acid battery:
· ‘Wet’ batteries require checking and topping up with distilled water, but perform better and have a longer lifespan than other batteries
· AGM batteries require no maintenance but have a shorter overall life
· Gel batteries are also maintenance-free, do not emit hydrogen during charging and provide a reasonable overall life. They can be placed on their side or used on the move
In the past, most installers have recommended industrial quality ‘wet’ batteries for all solar installations. These provide the best long-term performance and the lowest cost. Often called traction batteries (as they are heavy-duty batteries used in electric vehicles), they can often have a lifespan of 8-10 years for a solar installation.
A lower cost option to the industrial-quality traction battery is the leisure battery, as used in caravans and boats. These are typically either wet batteries or AGM batteries. Their lifespan is considerably shorter than traction batteries, often requiring replacement after 3-4 years and significantly less in intensive applications.
The third option is the gel battery. These have the benefit of being entirely maintenance-free. They are also completely sealed and do not emit hydrogen gas. In the past, gel batteries have not been particularly reliable in solar installations, tending to require replacement after 1-2 years. However, more recently, smaller gel batteries have seen significant improvements in lifespan and they now are comparable to AGM batteries. The price has also dropped significantly.
Gel batteries are not suitable for big solar applications with a power drain of more than around 400 watt-hours, but they can provide an excellent, zero-maintenance alternative to wet batteries for smaller applications.
If your solar project requires batteries of 50 amp-hour capacity or less, gel batteries are a very good alternative to traction batteries.
Not all battery makes are the same. From my experience, the very best battery manufacturers for solar energy installations are Crown and Trojan, both of whom have excellent batteries specifically designed for solar installations. If only the very best will do and you are prepared to pay the premium, the Optima ‘yellow top’ batteries provide the benefits of AGM batteries in a smaller, lighter battery with some of the best overall performance figures of any battery available today.
Battery configurations
You can use one or more batteries for power storage. Like solar panels, you can wire your batteries in parallel in order to increase their capacity or in series in order to increase their voltage.
Unlike solar panels, which you can mix and match to create your array, you need to use the same specification and size of batteries to make up your battery bank. Mixing battery capacities and types will mean that some batteries will never get fully charged and some batteries will get discharged more than they should be. As a result, mixing battery capacities and types can significantly shorten the lifespan of the entire battery bank.
Battery lifespan
Batteries do not last forever, and at some stage in the life of your solar electric system, you will need to replace them. Obviously, we want to have a battery system that will last as long as possible and so we need to find out about the lifespan of the batteries we use.
There are two ways of measuring the lifespan of a battery, both of which tell you something different about the battery.
· Cycle Life is expressed as a number of cycles to a particular depth of discharge
· Life in Float Service shows how many years the battery will last if it is stored, charged up regularly, but never used
Cycle life
Every time you discharge and recharge a battery, you cycle that battery. After a number of cycles, the chemistry in the battery will start to break down and eventually the battery will need replacing.
The cycle life will show how many cycles the batteries will last before they need to be replaced. The life is shown to a ‘depth of discharge’ (DOD), and the manufacturers will normally provide a graph or a table showing cycle life verses the depth of discharge.
Typical figures that you will see for cycle life may look like this:
CYCLE LIFE
20% DOD 1600 cycles
40% DOD 1200 cycles
50% DOD 1000 cycles
80% DOD 350 cycles
As you can see, the battery will last much longer if you keep your depth of discharge low.
For this reason, it can often be better to specify a larger battery, or bank of batteries, rather than a smaller set of batteries. Most experts recommend that you install enough batteries to ensure that your system does not usually discharge your batteries beyond 50% of their capacity.
The second benefit of a larger bank of batteries is that this gives you more flexibility with your power usage. If you need to use more electricity for a few days than you originally planned for, you know you can do this without running out of energy.
Holdover
When considering batteries, you need to consider how long you want your system to work while the solar array is not providing any charge at all. This time span is called holdover.
Unless you live inside the Arctic or Antarctic Circles (both of which provide excellent solar energy during their respective summers, incidentally), there is no such thing as a day without sun. Even in the depths of winter, you will receive some charge from your solar array.
You may find there are times when the solar array does not provide all the energy you require. It is therefore important to consider how many days holdover you want the batteries to be able to provide power for, should the solar array not be generating all the energy you need.
For most applications, a figure of between three days and five days is usually sufficient.
In our holiday home, we are deliberately not providing enough solar energy for the system to run 24/7 during the winter months. During the winter, we want the batteries to provide enough power to last a long weekend. The batteries will then be recharged when the holiday home is no longer occupied and the solar panel can gradually recharge the system.
For this purpose, I have erred on the side of caution and suggested a five-day holdover period for our system.
Calculating how long a set of batteries will last
Calculating how long a set of batteries will last for your application is not a precise science. It is impossible to predict the number of discharges, as this will depend on the conditions the batteries are kept in and how you use the system over a period of years.
Nevertheless, you can come up with a reasonably good prediction for how long the batteries should last. This calculation will allow you to identify the type and size of batteries you should be using.
First, write down your daily energy requirements. In the case of our holiday home, we are looking at a daily energy requirement of 695 watt-hours.
Then, consider the holdover. In this case, we want to provide five days of power. If we multiply 695 watt-hours a day by 5 days, we get a storage requirement of 3,475 watt-hours of energy.
Batteries are rated in amp-hours rather than watt-hours. To convert watt-hours to amp-hours, we divide the watt-hour figure by the battery voltage.
If we are planning to run our system at 12 volts, we divide 3,475 by 12 to give us 290 amp-hours at 12 volts. If we are planning to run our system at 24 volts by wiring two batteries in series, we divide 3,475 by 24 to give us 145 amp-hours at 24 volts.
We do not want to completely discharge our batteries, as this will damage them. So we need to look at our cycle life to see how many cycles we want. We then use this to work out the capacity of the batteries we need.
On a daily basis during the spring, summer and autumn, we are expecting the solar array to recharge the batteries fully every single day: it is unlikely that the batteries will be discharged by more than 10-20%.
However, during the winter months, we could have a situation where the batteries get run down over a period of several days before the solar panels get a chance to top the batteries back up again.
So for four months of the year, we need to take the worst-case scenario where the batteries may get discharged down to 80% depth of discharge over a five day period and then recharged by the solar array.
The batteries will allow us to do this 350 times before they come to the end of their useful life.
350 cycles multiplied by 5 days = 1,750 days = 58 months
As this scenario will only happen during the four months from November to February, these batteries will last us for around 14½ years before reaching the end of their cycle life.
In reality, the Life in Float Service figure (i.e. the maximum shelf-life) for batteries is likely to be around ten years, which means that, for this application, they will fail before they reach their cycle life.
Based on our energy requirements of 145 amp-hours at 24 volts, and a maximum discharge of 80%, we can calculate that we need a battery capacity of 145 ÷ 0.8 = 181.25 amp-hours at 24 volts.
Second-hand batteries
There is a good supply of second-hand batteries available. These are often available as ex-UPS batteries (UPS = Uninterruptable Power Supplies) or ex-electric vehicle batteries.
Whilst these will not have the lifespan of new batteries, they can be extremely cheap to buy, often selling at their scrap value. If you are working to a tight budget and your power demands are not great, this is a very good way to save money.
Do not ‘mix and match’ different makes and models of batteries. Use the same make and model of battery throughout your battery bank. I would also advise against using a mixture of new and used batteries. This is a false economy as the life of your new batteries may be compromised by the older ones.
If you are considering second-hand batteries, try and find out how many cycles they have had and how deeply they have been discharged. Many UPS batteries have hardly been cycled and have rarely been discharged during their lives.
If buying ex-electric vehicle batteries, remember these have had a very hard life with heavy loads. However, ex-electric vehicle batteries can continue to provide good service for lower- demand applications: if your total load is less than 1kW, these batteries can provide good service.
If possible, try and test second-hand batteries before you buy them. Ensure they are fully charged up, and then use a battery load tester on them to see how they perform.
If your second-hand batteries have not been deep cycled many times, the chances are they will not have a very long charge life when you first get them. To ‘wake them up’, connect a solar controller or an inverter to them and put a low-power device onto the battery to drain it to around 20% state of charge. Then charge the battery up again using a trickle charge and repeat.
After three deep cycles, you will have recovered much of the capacity of your second-hand batteries.
If using second-hand batteries, expect them to provide half of their advertised capacity. So if they are advertised as 100-amp-hour batteries, assume they will only give you 50 amp-hours of use. In the case of ex-electric vehicle batteries, assume only one-third capacity.
The chances are, they will give you much more than this, but better to be happy with the performance of your second-hand batteries than to be disappointed because they are not as good as new ones.
Building your battery bank
Because we are running our system at 24 volts, we will need two 12-volt batteries connected in series to create our battery bank.
We therefore need two 12-volt batteries of 181.25 amp-hours each in order to create the desired battery bank.
It is unlikely that you are going to find a battery of exactly 181.25 amp-hours, so we need to find a battery that is at least 181.25 amp-hours in size.
When looking for batteries, you need to consider the weight of the batteries. A single 12-volt battery of that size will weigh in the region of 50kg (over 110 pounds)!
Safely moving a battery of that size is not easy. You do not want to injure yourself in the process. A better solution would be to buy multiple smaller batteries and connect them together to provide the required capacity.
Because batteries contain acid, they should be installed in a battery tray, so that any acid leaks may be contained. In Australia and Canada, regulations state that batteries must be enclosed in a ventilated, lockable and vermin-proof enclosure.
As it is not possible to buy 181.25 amp-hour batteries, I have decided to use four 100-amp-hour 12-volt batteries, giving me a battery bank with a total capacity of 200 amp-hours at 24 volts.
12-volt, 100-amp-hour batteries are still not lightweight. They can easily weigh 30kg (66 pounds) each, so do not be afraid to use more, lighter-weight batteries, if you are at all concerned.
To build this battery bank, you can use four 100-amp-hour, 12-volt batteries, with two sets of batteries connected in series, and then connect both series in parallel, as shown below:
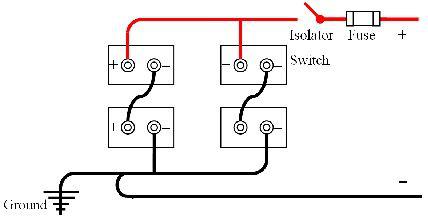
Four 100-amp-hour 12V batteries. I have paired up the batteries to make two sets of 100-amp-hour 24V batteries, and then connected each pair in parallel to provide a 200-amp-hour capacity at 24 volts.
If I were putting together a 12-volt battery system instead of a 24-volt battery system, I could wire together multiple 12-volt batteries in parallel in order to provide the higher capacity without increasing the voltage:
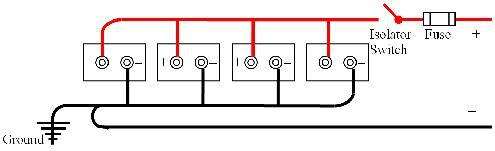
Four 100-amp-hour 12V batteries connected in parallel to provide a 400-amp-hour 12V battery bank.
Battery safety
When choosing batteries, you need to consider the safety aspects of batteries. With the exception of gel batteries, all lead acid batteries produce hydrogen, which needs to be ventilated. Batteries can also be very heavy and care is needed when lifting or moving them. Finally, due to the highly acidic nature of batteries, protective clothing should be worn whenever batteries are being worked on, and a chemical clean-up kit should be kept nearby.
I will go into more detail about handling batteries during the chapter on installation.
Solar controller
The solar controller looks after the batteries and stops them either being overcharged by the solar array or over-discharged by the devices running off the batteries.
Many solar controllers also include an LCD status screen so you can check the current battery charge and see how much power the solar array is generating.
Your choice of solar controller will depend on four things:
· System voltage
· The current of the solar array (measured in amps)
· The maximum current of the load (measured in amps)
· The level of detail you require from the status display
Some solar experts will sometimes add a fifth item to that list: battery type. To be fair, this was a problem with some older solar controllers, which only worked with specific battery types. Modern solar controllers work with all types of lead acid battery without a problem, although you may need to tell your solar controller what type of batteries you are using when you are setting up the system.
All but the very cheapest solar controllers provide basic information on an LCD screen that allows you to see how much power you have generated compared to how much energy you are using, and can also show the current charge stored in the battery. Some solar controllers include more detailed information that allows you to check on a daily basis how your power generation and usage compares.
Balancing the batteries
Another important function of a solar controller is to manage the charge in each battery and to ensure each battery is properly charged up.
As batteries get older, the charge of each battery will start to vary. This means that some batteries will charge and discharge at different rates to others. If left over time, the overall life of the batteries will deteriorate.
Intelligent solar controllers can manage these variations by balancing, or equalizing, the batteries they are charging. On most controllers, you need to manually activate a balance as part of a routine inspection.
Allow for expansion
When looking at solar controllers, it is worth buying one with a higher current rating than you actually need.
This allows you extra flexibility to add additional loads or additional panels to your solar array in the future without having the additional expense of replacing your solar controller.
Maximum power point tracking
More expensive solar controllers incorporate a technology called maximum power point tracking (MPPT). An MPPT controller adjusts the voltage being received from the solar array to provide the optimum voltage for charging the batteries without significant loss of watts from the voltage conversion.
If you have an MPPT controller, you can capture around 20% more of the power generated by the solar array compared to a more basic controller.
If you have less than 120W of solar panels, it can work out cheaper to buy extra solar panels rather than spend the extra money on an MPPT controller. However, prices continue to fall and, if you have the choice, a controller with maximum power point tracking is a worthwhile investment.
Ground fault protection
Many solar controllers include ground fault protection. In the case of a short from the solar array, a Residual Current Device (RCD) will cut off the current flow between the solar array and the controller, thereby averting the risk of damage to either the controller or the solar array.
In the United States and Canada, RCDs are also known as Ground Fault Interrupters (GFIs).
For anything larger than 100-watt solar panel systems, and for all systems mounted to a building, you need to incorporate a separate RCD/GFI into your system if you do not have ground fault protection built into your controller.
Backup power
Some controllers have one extra useful feature: the facility to start up an emergency generator if the batteries run too low and the solar array is not providing enough power to cope with the load.
This can be a useful facility for sites where the system must not fail at any time, or for coping with unexpected additional loads.
Whilst this may not seem so environmentally friendly, many generators are now available that run on bio-diesel or bio-ethanol. Alternatively, you can use an environmentally friendly fuel cell system instead of a generator. These tend to run on bio-methanol or zinc and only emit water and oxygen.
Using multiple controllers
Sometimes it is desirable to have multiple controllers on your solar energy system. For instance, you may want to install solar panels in different locations or facing in different directions, or you may have mismatched solar panels that you want to use. If you need to have multiple controllers, only one needs to have the expensive features such as battery balancing. The other controllers can be much simpler regulators that simply provide an additional charge to the batteries and switch off when the batteries are fully charged.
Inverters
We are not using an inverter with our holiday home, but many solar applications do require an inverter to switch up the voltage to grid-level AC current.
An inverter for stand-alone systems is a different piece of equipment to a grid-tie solar inverter. With a grid-tie inverter, your power is feeding into the grid and has to work in conjunction with the grid. The inverter connects directly to your solar panels and switches off when the solar panels no longer produce enough energy.
With a stand-alone system, your power is entirely separate from the grid. The inverter connects to your battery bank and switches off when the battery bank is running low on charge.
There are three things to consider when purchasing an inverter:
· Battery bank voltage
· Power rating
· Waveform
Battery bank voltage
Different inverters require a different input voltage. Smaller inverters, providing up to 3kW of power, are available for 12-volt systems. Larger inverters tend to require higher voltages.
Power rating
The power rating is the maximum continuous power that the inverter can supply to all the loads on the system. You can calculate this by adding up the wattages of all the devices that are switched on at any one time. It is worth adding a margin for error to this figure. Inverters will not run beyond their maximum continuous power rating for very long.
Most inverters have a peak power rating as well as a continuous power rating. This peak power rating allows for additional loads for very short periods of time, which is useful for some electrical equipment that uses an additional burst of power when first switched on (refrigeration equipment, for example).
As a general rule of thumb, go for a bigger power rating than you actually need. Inverters can get very hot when they get close to their maximum load for long periods of time. Many professionals recommend that you buy an inverter that has a continuous power rating that is at least one third higher than you plan to use.
Waveform
Waveform relates to the quality of the alternating current (AC) signal that an inverter provides.
Lower-cost inverters often provide a modified sine wave signal (sometimes advertised as a quasi-sine wave). More expensive inverters provide a pure sine wave signal.
Modified sine wave inverters tend to be considerably cheaper and also tend to have a higher peak power rating.
However, some equipment may not operate correctly with a modified sine wave inverter. Some power supplies, such as those used for laptop computers and portable televisions, may not work at all, while some music systems emit a buzz when run from a modified sine wave inverter.
These faults are eliminated with a pure sine wave inverter, which produces AC electricity with an identical waveform to the standard domestic electricity supply provided by the grid.
Installation options and operating environment
Small inverters with a continuous power rating of less than 3kW are lightweight units and are often simply placed on a shelf or a desk. Medium-sized inverters tend to be heavy units that need to be mounted securely on a wall. Larger inverters, rated at 10kW or above, may need to be bolted to a floor.
All inverters generate a significant amount of heat, especially when running close to their rated output, and require good airflow around the unit.
Most off-grid inverters are designed to be installed inside. Outdoor inverters are available, but they are expensive and may be difficult to source. If you are looking at installing an inverter outdoors, check that the inverter is sealed against dust and water ingress, rated to at least IP64.
Overheating inverters is the number one reason for any solar system failing. As an inverter gets hotter, they provide less power, and if the temperature continues to rise they will eventually shut down to avoid permanent damage. When choosing an inverter, check its operating temperatures and consider how you can ensure your system remains within these limits.
Inverters should always be installed in a well-ventilated area, away from the ceiling and with a clearance around each side, the top and the bottom. They cannot be installed in a sealed cupboard. Some inverters have the option of an external heat sink, or temperature-controlled cooling fans to help keep the inverter cool.
If your inverter is producing more than around 500 watts of power, it is likely to make a very small amount of noise. This is typically a continuous low-level hum. This is usually only noticeable if the surrounding area is quiet. However, for this reason, inverters are not usually installed inside the living space in a home or in an office environment. Instead, consider installing your inverter in a garage, or on an outside wall of your building.
Occasionally, with larger inverters, the sound made by the inverter has been known to resonate with the wall, amplifying the sound and making it quite unpleasant to live with, even if the inverter is mounted to an outside wall or the wall of a garage. This is a very rare occurrence, but is most likely to occur if you are planning to mount your inverter onto a wall made out of solid concrete. The solution is to dampen the mounting between the inverter and the wall or floor that the inverter is mounted onto. There is a very effective product called Green Glue, produced by the Green Glue Company (www.GreenGlueCompany.com) that is applied between the wall and the inverter. When it is compressed by remounting the inverter, the glue spreads out to form a sound isolation barrier that is particularly effective at blocking out low-resonance vibrations.
Ground fault protection
Most inverters now include ground fault protection. All inverters must always be grounded. If your chosen grid-tie inverter does not incorporate ground fault protection, you need to incorporate this into your system using a Residual Current Device (RCD). RCDs are known as Ground Fault Interrupters (GFIs) in the United States and Canada.
Cables
It is easy to overlook them, but cables have a vital part to play in ensuring a successful solar electric system.
There are three different sets of cables that you need to consider:
· Solar array cables
· Battery cables
· Appliance cabling
Solar array cabling has already been discussed. For stand-alone systems, the battery and appliance cabling also needs to be correctly specified.
For all cabling, make sure that you always use cable that can cope with the maximum amount of current (amps) that you are planning to work with.
Take into account that you may wish to expand your system at some point in the future, and use a higher ampere cable than you actually need in order to make future expansion as simple as possible.
Battery cables
Battery cables are used to connect batteries to the solar controller and to the inverter. They are also used to connect multiple batteries together.
Battery interconnect cable is available ready-made up from battery suppliers, or you can make them up yourself. You should always ensure that you use the correct battery connectors to connect a cable to a battery.
Appliance cabling
If you are using an inverter to run your appliances at grid-level voltage, you can use standard domestic wiring, wired in the same way as you would wire them for connection to domestic AC power.
If you are running cabling for 12-volt or 24-volt operation, you can wire your devices up using the same wiring structure as you would use for grid-level voltage, although you may need to use larger cables throughout to cope with the higher current.
In a house, you would typically have a number of circuits for different electrical equipment: one for downstairs lighting, one for upstairs lighting and one or two for appliances, depending on how many you have. This has the benefit of keeping each individual cable run as short as possible, as well as reducing the amount of current that each circuit needs to handle.
As we have already learnt, low-voltage systems lose a significant amount of power through cabling. The reason for this is that the current (amps) is much higher and the power lost through the cable is proportional to the square of the current. You therefore need to keep your cable runs as short as possible, especially the cable runs with the highest current throughput.
I have already mentioned how you can calculate suitable cable thicknesses for your solar array earlier in this chapter. You use the same calculation for calculating cable thicknesses for appliance cabling.
Plugs and sockets
For 12-volt or 24-volt circuits with a current of less than 30 amps, you can use the same standard switches and light sockets as you do for normal domestic power.
However, you must not use the standard domestic plugs and sockets for attaching low-voltage devices to your low-voltage circuit. If you do, you run the risk that your low-voltage devices could accidentally be plugged into a high-voltage circuit, which could have disastrous consequences.
Instead, you have the choice of using non-standard plugs and sockets or of using the same 12-volt plugs and sockets as used in caravans and boats.
These low-voltage sockets do not need to have a separate earth (ground) wire, as the negative cable should always be earthed (grounded) on a DC circuit system.
Appliances
So far, I have talked a lot about 12-volt appliances, but you can buy most low-voltage appliances for either 12-volt or 24-volt and a lot of them are switchable between 12 and 24 volts.
Compared to appliances that run from grid-level voltages, you often pay more for low-voltage appliances. This is not always the case, however, and with careful shopping around, items like televisions, DVD players, radios and laptop computers need not cost any more to buy than standard versions.
Lighting
12-volt and 24-volt lighting is often chosen for off-grid solar electric systems, due to the lower power consumption of the lower-voltage lighting. You can buy low-voltage, energy-saving bulbs and strip lights, both of which provide the same quality of light as conventional lighting. Filament light bulbs are also available in low-voltage forms, and although these are not very energy-efficient, they do provide an excellent quality of light.
You can buy a lot of 12-volt lighting from ordinary hardware stores. Many kitchen and bathroom lights work at low voltage and will work just as well from a 12-volt battery supply as they will from the 12-volt AC transformers typically used with this lighting. Diachronic flood lamps, halogen spot lamps, strip lamps and LED lights often run at 12 volts, giving you an excellent choice. Buying these from a hardware store rather than from a specialist solar supplier can also save a considerable amount of money.
Refrigeration
A good selection of refrigerators and freezers are available that will run from 12-volt and 24-volt power supplies. Some refrigerators will run on both low-voltage DC and grid-level AC voltage, and some can run from a bottled gas supply as well.
Unlike most other devices that you will use, refrigerators need to run all the time. This means that, although the power consumption can be quite low, the overall energy consumption is comparatively high.
There are three types of low-voltage refrigerator available:
· Absorption fridges are commonly found in caravans and can often use 12-volt, grid-level voltage and bottled gas to power the fridge. These are very efficient when powered by gas, but efficiency when powered on lower voltages varies considerably for different models
· Peltier effect coolers are not really fridges in their own right; they are portable coolers, of the type often sold in car accessory shops and powered by the 12-volt in-car accessory socket. Whilst these are cheap, most of them are not very efficient. Avoid using these for solar applications
· Compressor fridges use the same technology as refrigerators in the home. They are the most efficient for low-voltage operation. They are more expensive than other types but their efficiency is significantly better: many models now consume less than 5 watts of electricity per hour
You can choose to use a standard domestic fridge for your solar electric system, running at grid-level voltages. However, they are typically not as efficient as a good 12-volt/24-volt compressor fridge. Domestic fridges also tend to have a very high starting current, which can cause problems with inverters.
A number of manufacturers now produce refrigerators that are specifically designed to work with solar power. Companies such as Waeco, Sundanzer and Shoreline produce a range of refrigerators and freezers suitable for home, medical and business use.
If you wish to use a standard domestic fridge, speak to the supplier of your inverter to make sure the inverter is suitable. Many refrigerators have a very high start-up current and you may need to buy a larger inverter that can handle this sudden demand.
Microwave ovens
Standard domestic microwave ovens consume a lot more power than their rated power: their rated power is output power, not input. You will find the input power on the power label on the back of the unit, or you will be able to measure it using a watt meter.
Typically, the input power for a microwave oven is 50% higher than its rated power.
Low-voltage microwave ovens are available, often sold for use in caravans and recreational vehicles (RVs). They tend to be slightly smaller than normal domestic microwaves and have a lower power rating, so cooking times will increase, but they are much more energy-efficient.
Televisions, DVDs, computer games consoles and music
Flat screen LCD televisions and DVD players designed for 12-volt or 24-volt operation are available from boating, camping and leisure shops. These tend to be quite expensive, often costing as much as 50% more than equivalent domestic televisions and DVD players.
However, many domestic LCD televisions (with screens up to 24-inch) and DVD players often have external power supplies and many of them are rated for a 12-volt input. Some investigations at your local electrical store will allow you to identify suitable models.
If you want to use one of these, it is worth buying a 12-volt power regulator to connect between the television and your battery. Battery voltages can vary between 11.6 volts and 13.6 volts, which is fine for most equipment designed for 12-volt electrics, but could damage more sensitive equipment. Power regulators fix the voltage at exactly 12 volts, ensuring that this equipment cannot be damaged by small fluctuations in voltage.
Many power regulators will also allow you to run 12-volt devices from a 24-volt circuit, and are much more efficient than more traditional transformers.
Power regulators also allow you to switch from one voltage to other low voltages, if required. For example, the Sony PlayStation 3 games console uses 8.5 volts, and with a suitable power regulator you can power one very effectively from 12-volt batteries.
Power regulators can step up voltages as well as step down. A suitable power regulator can switch the voltage from a solar battery bank to an output voltage of between 1½ volts and 40 volts, depending on the specification of the regulator.
This means that many normal household items with external power supplies, such as smaller televisions, laptop computers, DVD players, music systems and computer games, to name but a few, can be connected directly to your solar power system.
Music systems
Like televisions and DVD players, many music systems have an external power supply, and a power regulator can be used in place of the external power supply to power a music system.
Alternatively, you can build your own built-in music system using in-car components. This can be very effective, both in terms of sound quality and price, with the added benefit that you can hide the speakers in the ceiling.
Using a music system with an inverter which has a modified sine wave can be problematic. Music systems designed to run at grid-level voltages expect to work on a pure sine wave system and may buzz or hum if used with a modified sine wave inverter.
Dishwashers, washing machines and tumble dryers
Dishwashers, washing machines and tumble dryers tend to be very power hungry.
There are small washing machines, twin tubs and cool-air dryers available that run on low voltage, but these are really only suitable for small amounts of washing. They may be fine in a holiday home or in a small house for one person, but are not suitable for the weekly washing for a family of four.
If you need to run a washing machine from a solar electric system, you are going to need an inverter to run it. The amount of energy that washing machines consume really does vary from one model to the next. An energy-efficient model may only use 1,100 watts, whereas an older model may use almost three times this amount.
The same is true for dishwashers. Energy-efficient models may only use 500 watts, whereas older models may use nearer 2,500 watts. If you need to run a dishwasher, you will need to use an inverter.
Tumble dryers are hugely energy inefficient and should be avoided if at all possible. Most of them use between 2,000 and 3,000 watts of electricity and run for at least one hour per drying cycle.
There are various alternatives to tumble dryers. These range from the traditional clothes line or clothes airer to the more high-tech low-energy convection heating dryers that can dry your clothes in around half an hour with minimal amounts of power.
If you really must have a tumble dryer, you may wish to consider a bottled gas powered tumble dryer. These are more energy-efficient than electric tumble dryers and will not put such a strain on your solar electric system.
Air conditioning systems
Over the past couple of years, a number of manufacturers have been launching solar powered air conditioning and air cooling systems.
Air conditioning has traditionally been very power hungry. For this reason, solar powered air conditioning has been unaffordable, as a large solar array has been required simply to run the compressors.
In response, manufacturers have developed more efficient air conditioning systems, designed to run from a DC power source.
Companies such as Austin Solar, Solar AC, Securus, Sunsource, Sedna Aire, Hitachi and LG have all announced air conditioning units designed to work with solar energy.
Other manufacturers have developed evaporative air coolers that use a fraction of the power of an air conditioning unit. Whilst these air coolers do not provide the ‘instant chill’ factor of a full air conditioning system, by running constantly when the sun is shining, they can provide a very comfortable living and working environment at a fraction of the cost of full air conditioning.
Reputable brand names
Most solar manufacturers are not household names, and as such it is difficult for someone outside the industry to know which brands have the best reputation.
Of course, this is a subjective list and simply because a manufacturer does not appear on this list, it does not mean the brand or the product is not good.
Solar panel manufacturers and brands
Atlantis Energy, BP Solar, Canadian Solar, Clear Skies, EPV, Evergreen, Conergy, G.E. Electric, Hitachi, ICP, Kaneka, Kyocera, Mitsubishi, Power Up, REC Solar, Sanyo, Sharp, Solar World, Spectrolab, Suntech, Uni-solar.
Solar controller and inverter manufacturers and brands
Apollo Solar, Blue Sky, Enphase, Ever Solar, Exeltech, Fronius, Kaco, Magnum, Mastervolt, Morningstar, Outback, PowerFilm, PV Powered, SMA, Solectria, Sterling, Steca, SunnyBoy, Xantrex.
Battery manufacturers and brands
East Penn, Chloride, Crown, EnerSys, Exide, Giant, GreenPower, Hawker, ManBatt, Newmax, Odyssey, Optima, Panasonic, PowerKing, Tanya, Trojan, US Battery, Yuasa.
Shopping list for the holiday home
Because our solar electric system is being installed in the garden, 10 metres (33 feet) away from the house, we have worked out that we need to run our system at 24 volts rather than 12 volts, due to the high levels of losses in the system.
I have already calculated that I need 320 watts of power from my solar array at 24 volts. To achieve this, I will need to connect 12-volt solar panels in series to make a 24-volt system.
There are various different options available to make a 320-watt, 24-volt solar array. After checking with a number of suppliers, I have come up with the following options:
· Buy two 160-watt panels for a total of 320 watts of power - total cost £499 ($768 US)
· Buy four 80-watt panels for a total of 320 watts of power - total cost £434 ($668 US)
· Buy eight 40-watt panels for a total of 320 watts of power - total cost £640 ($985 US)
· Buy six 60-watt panels for a total of 360 watts of power) - total cost £580 ($893 US)
It is really worth shopping around and finding the best price. Prices can vary dramatically from one supplier to another and I have seen many cases where one supplier is selling a solar panel for over twice the price it is available from elsewhere.
Depending on what configuration I buy (and where I buy it), solar panel prices for the different combinations vary between £434 ($668 US) and £640 ($985).
Based on price and convenience, I have decided to go for the cheapest option and buy four Clear Skies 80-watt polycrystalline solar panels.
Because I am running at 24 volts and at a relatively low current, I have a good choice of solar controllers without spending a fortune. I decided to buy a Steca MPPT controller, which incorporates a built-in LCD display so I can see how much charge my batteries have at any one time. The cost of this controller is £225 ($350).
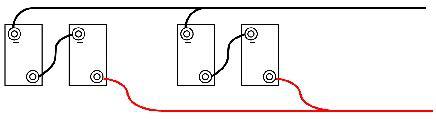
This drawing shows how I intend to wire up my solar array. I will pair two sets of panels together in series to bring the voltage up from 12 volts per panel to 24 volts per pair. I then connect the pairs together in parallel to maintain the 24 volts but to increase the power of the system to a total of 320 watts
I calculated that I needed 181Ah of 24-volt battery storage. I have decided to go for four Trojan 12V, 105Ah batteries, which I will connect together in pairs to provide me 210 Ah of power at 24 volts. The cost of these batteries is £560 ($860).
This drawing shows how I intend to wire up my batteries. I will pair two sets of batteries together in series to bring the voltage up to 24 volts per pair. I then connect the pairs together in parallel to maintain the 24 volts but to increase my storage capacity to 210 amp-hours at 24 volts
My Steca controller incorporates Ground Fault Protection, but I have decided to install a separate RCD (GFI) unit as well. It is a ‘belt and braces’ approach, but RCDs are extremely cheap and I feel it is worth the extra money. I still need a way of isolating the solar array manually. I choose to install three DC isolation switches: one between my controller and the solar array, one between my solar controller and my batteries and one between my controller and my distribution box. This allows me to isolate each part of my system separately, for maintenance or in case of an emergency.
For lighting, I have decided on 24-volt energy saving compact fluorescent light bulbs for inside use and a 24-volt halogen bulkhead light for an outdoor light. The energy saving compact fluorescent light bulbs look identical to grid-powered energy saving light bulbs and provide the same level of lighting as their grid-powered equivalents. Bulbs cost around £8/$13 each and I can use the same light switches and fittings as I would for lights powered by the grid.
I have decided to use a Shoreline RR14 battery-powered fridge, which can run on either 12-volt or 24-volt power supplies. This has a claimed average power consumption of 6 watts per hour and costs £380 ($610).
For television, I have chosen a Meos 19-inch flat screen TV with built-in DVD player. The Meos TV can run on 12-volt or 24-volt power and has an average power consumption of 45 watts. This is slightly higher than I was originally planning for (I was planning to buy a model with a 40 watt power consumption), but not by enough to be of any great concern.
At this stage, I now know the main components I am going to be using for my holiday home. I have not gone into all the details, such as cables and configuration. We need to complete that as we plan the detailed design for our solar energy system.
In conclusion
· When choosing solar panels, buy from a reputable manufacturer. The performance of the high-quality panels, especially in overcast conditions, is often better than the cheaper panels, and the improved build quality should ensure a longer life
· Lead acid batteries come in various types and sizes. You can calculate the optimum size of battery based on cycle life when operating on your system
· The voltage you run your system at will depend on the size of current you want to run through it. High-current systems are less efficient than low-current systems, and low- current inverters and controllers are inevitably cheaper
· Allow for future expansion in your system by buying a bigger controller and inverter than you currently need, unless you are absolutely certain your requirements are not going to change in the future
· Many appliances and devices are available in low-voltage versions as well as grid-level voltage versions. Generally, the low-voltage versions tend to be more efficient
· When wiring in 12-volt or 24-volt sockets, do not use standard domestic power sockets. If you do, you are running the risk of low-voltage devices being plugged into grid-level voltage sockets, which could have disastrous consequences