Solar Electricity Handbook 2011: A Simple Practical Guide to Solar Energy - Designing and Installing Photovoltaic Solar Electric Systems - Michael Boxwell (2011)
Components for Grid-Tie systems
Before discussing the components required for a grid-tie system in more detail, it is useful to look at how a grid-tie system is configured.
There are three basic designs for grid-tie solar energy systems:
· High-voltage in-series systems
· Low-voltage systems
· Micro-inverter systems
High voltage in-series
This is the most popular configuration for a grid-tie system today. Solar panels are connected together in series, producing a high-voltage DC power. This is then fed into a central inverter to convert the power into an AC source, which in turn is connected into the standard building electrical system:

A simplified block diagram showing the basic layout of a high voltage in-series solar energy system
This design is the most cost-effective design for grid-tie systems. It is relatively straightforward to install, simple to maintain, and components are readily available. By running the solar array at high voltage, it is also very efficient, with minimal losses through the array itself and allowing the inverter to run at a very high level of efficiency. This is why this design is currently so popular within the grid-tie solar industry.
This high-voltage DC power has the benefit of great efficiency, but comes with a number of very significant safety risks. Voltages as high as 600 volts in North America and 1,000 volts in Europe are common: voltages that can very easily be fatal on contact.
These high voltages can also cause significant problems if there is damage to the wiring between solar panels, either due to a mistake during installation, through animal damage, or simply through wear over time. If a damaged cable generates a high-voltage, direct current electric arc whilst the panels are in direct sunlight, the immensely high temperatures can easily melt metal and are a potential fire hazard.
Connecting solar panels in series also has a significant disadvantage: when connected in series, the solar array is only as strong as its weakest link. If you have a damaged solar panel, shade blocking light to a few solar cells, or a damaged cable, the output of the entire solar array drops to the output of that weakest link.
Low voltage systems
It is for these reasons that, in previous editions of this book, I have advocated lower-voltage solar arrays for many grid-tie systems. This was achieved by running shorter series of solar panels and having multiple strings running in parallel. These are much safer than the very high voltage systems usually installed, lose little in efficiency and are inherently more tolerant of shade.
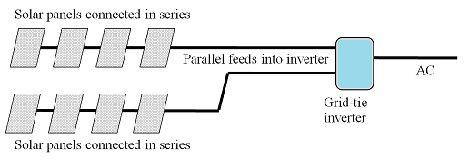
A simplified block diagram showing the basic layout of a low-voltage solar energy system where multiple strings of solar panels are connected in parallel
This design tends to be more expensive to install than an in-series design. You will either need to buy a grid-tie inverter that can accept multiple strings of solar panels, or buy a separate inverter for each string.
I no longer advocate this approach, because there is now another alternative available that, in my opinion, renders both high-voltage in-series and low-voltage systems redundant:
Micro-inverter systems
Micro-inverter systems have been around for a few years now, but until very recently had not gained popularity, mainly due to their higher cost.
However, with the huge growth in the popularity of grid-tie systems around the world, micro-inverter systems have become far more widespread as the benefits of this technology have become more apparent. Prices for micro-inverter systems are dropping fast and are now comparable to high-voltage in-series systems.
In a micro-inverter system, each solar panel has its own inverter, converting its output to AC power. In effect, each solar panel becomes its own independent solar energy system.
In the majority of micro-inverter systems, the inverter itself is mounted outside, bolted to the frame that also holds the solar panel in place. The individual solar panels are connected to an AC power cable that runs alongside the solar array and then feeds directly into the building’s electrical system.
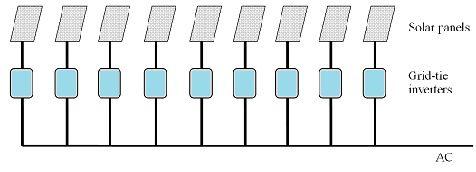
A simplified block diagram showing the basic layout of a micro-inverter system
There are some very significant benefits of micro-inverter systems over other forms of grid-tie systems:
· As each solar panel runs as an independent unit, if one panel is under-performing, either because of damage or simply because it is shaded, it does not affect the output from any of the other panels
· Because there is no high-voltage DC power running from one panel to the next, safety is less of an issue
· Installation, fault-finding and maintenance also become significantly easier
· It is easy to expand your grid-tie system in the future, as budget allows
· More flexible solar panel installation - you can have solar panels mounted in different locations and facing in different directions
Whilst today, series-connected solar systems with a central inverter are still the standard model for installing grid-tie systems, the industry is moving towards micro-inverter technology as a far better model.
Now you have a clearer idea of how a grid-tie system is put together, it is time to look at the components available in more detail.
Grid-tie solar panels
In the past, when most solar energy systems were stand-alone systems, almost every solar panel you could buy was rated for a 12-volt output. Whilst this is still true for smaller panels, there are now higher-voltage configurations available for larger solar panels.
As grid-tie systems have become more popular, higher-voltage solar panels have become available. Many solar panels of 150Wp capacity and over are rated for a 24-volt output and some manufacturers are now building solar panels with rated outputs of between 48 volts and 120 volts.
These higher voltages are well suited to grid-tie installations. By running your solar array at a higher voltage, you can keep the current flow low, which improves the efficiency of the overall system. Using high-voltage solar panels also gives you the option to connect multiple solar panels in parallel rather than in series, whilst retaining the benefit of the high-voltage current.
The 24-volt and 48-volt solar panels can work with many micro-inverter systems, too. Theoretically, this would allow a micro-inverter system to run more efficiently, although in practice the differences seem to be marginal.
Grid-tie inverters
Grid-tie inverters convert the DC power from your solar energy system into AC power, and convert the voltage to the same as the grid. This allows you to connect your system into the grid, enabling you to become a mini power station and supply your electricity to the electricity companies.
You cannot use an ordinary inverter for grid-tie applications. There are a number of reasons for this:
· Grid-tie inverters have to work in conjunction with the grid, in order to be able to export electricity to it. The AC pure sine waveform generated by the inverter has to be perfectly coordinated with the waveform from the grid
· There is an additional safety feature with grid-tie inverters to cut off power from the solar array if the grid shuts down
· Grid-tie inverters are connected directly to the solar panels. In an in-series system, this means the input voltage from the panels can fluctuate wildly, often jumping or dropping by several hundred volts in an instant. Non grid-tie inverters cannot cope with such massive voltage jumps
· In many countries, grid-tie inverters have to be certified for use with the grid
There are a number of things to consider when purchasing a grid-tie inverter:
· Input voltage
· Power rating
· Power tracking
· How many strings the inverter can support
· Diagnostics and reporting information
· Inbuilt safety systems
· Installation options and operating environment
· Certification and local regulations
Input voltage
Your choice of inverter will have a large voltage range in order to cope with the huge fluctuation of voltage that a solar array can provide. From this voltage range, you will be able to identify how many solar panels the inverter can cope with, when connected in series.
You need to remember that the rated voltage of a solar panel is not the maximum voltage that the solar panel can generate. The voltage from a single 12-volt solar panel can fluctuate anywhere from 12 volts on a very dull day, up to around 20 volts in intense overhead sunlight. If you have a 48-volt solar panel, or four 12-volt solar panels connected together in series, the voltage swing can be between 48 volts and 88 volts.
In addition to this, a solar panel can produce significantly higher voltages in an open circuit - i.e. when the solar array is generating power but the power is not being used. Depending on your solar panel, it is possible for a single 12-volt solar panel to generate 26 volts in an open circuit.
As you can see from the table below, the higher the nominal voltage from your solar array, the greater the voltage fluctuation can be:
|
Number of 12-volt solar panels |
Nominal solar array voltage |
Low voltage on dull day |
Peak voltage in intense sunlight |
Maximum open-circuit voltage |
|
1 |
12-volt |
12 volts |
20 volts |
26 volts |
|
2 |
24-volt |
24 volts |
40 volts |
52 volts |
|
4 |
48-volt |
48 volts |
80 volts |
104 volts |
|
6 |
72-volt |
72 volts |
120 volts |
156 volts |
|
8 |
96-volt |
96 volts |
160 volts |
208 volts |
|
10 |
120-volt |
120 volts |
200 volts |
260 volts |
|
15 |
180-volt |
180 volts |
300 volts |
390 volts |
|
20 |
240-volt |
240 volts |
400 volts |
520 volts |
|
25 |
300-volt |
300 volts |
500 volts |
650 volts |
|
30 |
360-volt |
360 volts |
600 volts |
780 volts |
|
35 |
420-volts |
420 volts |
700 volts |
910 volts |
|
40 |
480-volts |
480 volts |
800 volts |
1,040 volts |
Note: the maximum open-circuit voltage allowable in the United States for grid-tied systems is 600 volts, whilst in Europe it is advisable that your system does not exceed 1,000 volts. You must ensure that your system never exceeds this.
As you can see from this table, if a heavy cloud blocks the sun on an otherwise clear day, you can see a voltage drop of several hundred volts in an instant. When the cloud passes over, the voltage shoots back up again.
It is important to ensure that the solar panel will work with the peak voltage of your solar array and not just the nominal voltage of your array. If you exceed the peak voltage of your inverter, the inverter will shut down to avoid damage. In extreme cases, you could damage or destroy your inverter by exceeding the input voltage rating.
In addition to the standard input voltage range, your inverter will also show a maximum voltage rating. This maximum voltage rating relates to the maximum open circuit voltage of your solar array. You must ensure that the open circuit voltage of your array does not exceed the maximum voltage of your inverter.
Power rating
There are two power ratings on a grid-tie inverter:
· Input power rating - the minimum and maximum amount of power the inverter can accept from the solar array
· Output power rating - the maximum amount of power and current the inverter can generate as an AC output
Input power rating
The input power rating shows the minimum and maximum wattage range the inverter can work with. In the main, the wider the range, the more efficient your inverter is.
The specification on an inverter will typically show three figures for input power rating:
· A nominal power rating, shown in watts
· A minimum and maximum power range
· A start-up power rating
The nominal power rating shows the maximum amount of power that the inverter can convert into an AC output. If you exceed this figure on your solar array, the additional power will be lost and converted into heat. Exceed this figure for long and your inverter may shut down to avoid overheating.
The minimum power rating shows the minimum amount of power that your solar array must generate in order for the inverter to start producing power. The maximum power rating shows the maximum amount of power that can be fed into the inverter before you risk damaging your inverter.
The start-up power rating is the minimum amount of power the solar inverter requires to power itself. If the solar array produces less than this amount of power, the inverter will switch off.
Because of the wide variation in the power a solar panel can produce, it is good practice to buy a bigger grid-tie inverter than you actually need. Remember that whilst a solar panel has a watt-peak (Wp) rating, in ideal conditions the panel itself may slightly exceed this rating in a real world environment.
Output power rating
The output power rating is the maximum continuous AC power that the inverter can generate. The output power information will show voltage, nominal output power in watts, the maximum output current in amps and the alternating current frequency.
For North America, the grid voltage is nominally set at 110 volts, with a frequency of 60 Hz. For the majority of the rest of the world, the grid voltage is nominally set at 230 volts, with a frequency of 50 Hz. In both cases, it is normal to get some variation in voltage and frequency.
The output power rating will also show the maximum efficiency rating of the inverter, given as a percentage. This rating is usually in the region of 90-94% with modern grid-tie inverters. If you are shopping on a budget, you must check this rating: some very cheap grid-tie inverters may be significantly less efficient.
Power tracking
As discussed on previously, the efficiency of the solar array depends on how efficiently the fluctuating voltage is handled by your inverter.
If you are purchasing a grid-tie inverter, you should invest in one that incorporates maximum power point tracking (MPPT). Maximum power point tracking can provide an additional 15-20% of energy when compared to a non-MPPT inverter.
Today, MPPT is the norm, but there are a few older designs of inverter still on the market, often sold at bargain prices online. No matter how cheap these inverters are, the performance loss rarely makes them a worthwhile investment.
Multiple strings
A ‘string’ of solar panels is simply an array of solar panels connected in series. Some inverters allow you to connect more than one string of solar panels. These two strings then work as separate arrays, but feed the power through the same inverter.
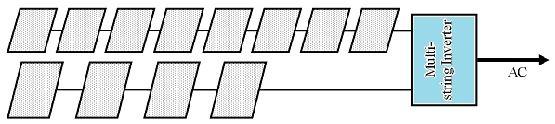
With multiple strings, you can mix and match solar panels and locate them in physically separate areas if you so wish. The two strings run completely independently of each other
With a multiple string system, your two solar arrays work independently from each other. This means that you can have two different sizes of array with different solar panels, or have the two arrays mounted at different orientations. If one array is partially shaded, the performance does not affect the second array.
This is different to connecting multiple strings together to create a serial/parallel hybrid. If you have multiple strings connected together, the two strings are still linked. You need to have identical setups on both strings and the panels need to be facing the same way. Failure to do this will result in lower solar performance.
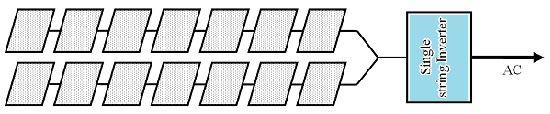
Here we have two strings of solar panels, connected together in parallel to feed a single string inverter. The two strings have to match each other. If one string is compromised, for instance due to shading, the second string is also affected. (Note: you would not normally wire a grid-tie solar array in this way. Instead, you would connect everything in series on a single string.)
Multiple strings are of benefit in the following situations:
· Where you wish to fit two different sizes of solar panel
· Fitting solar panels facing at different orientations, such as on a roof that has two different pitches
· Resolving shading issues. Solar panels that are in shade at certain times of the day can be put onto a separate string so as not to affect the output of the rest of the system
Whilst an inverter that can handle multiple strings does have its benefits, there is usually an additional cost for multi-string inverters. If you are considering a multi-string inverter, you are probably better off choosing a micro-inverter system where every solar panel has its own inverter.
Diagnostics and reporting information
Almost all inverters provide a level of diagnostics and reporting information, either using a small display built into the inverter itself, a series of LEDs on the front panel of the inverter, a separate monitoring unit that plugs into the inverter, or by allowing you to connect a PC to the inverter.
Some inverters even have a built-in internet connection, allowing them to connect to a wireless network. This means your system can provide you with updates via e-mail, via a built-in website, or even send updates to your mobile phone. In some cases, these systems can be remotely monitored by the solar inverter supplier, who can then notify you if there are any potential issues with your system.
If you have a micro-inverter system with multiple inverters, the diagnostics and reporting system is usually a separate box, which is either connected to the AC power at the point where the solar array connects to your distribution panel, or it communicates wirelessly with the micro-inverters. This ensures that you have one central information point for your inverters.
As a bare minimum, you want an inverter that can tell you if your system is working and provide you with an indication of what may be the problem if a fault is detected. The diagnostics should be able to give you enough information to enable to you identify a fault with your system, such as:
· Insufficient or excess power from the solar array
· Grid connection issues
· Grid voltage or frequency issues
· Overheating
Most solar inverters will provide you with much more information, allowing you to see the voltage and current from your solar array and the amount of AC power being generated at that moment. They will also be able to show the amount of energy generated by the system, both for that day and since the system was installed.
Built-in safety
Most inverters incorporate safety shutdown systems as part of the inverter itself. It is common for inverters to have ground fault protection built in. As mentioned in the previous chapter, even if your inverter does provide this, it is still good practice to install additional ground fault protection when you design your system. This is incorporated into your system using a Residual Current Device (RCD). RCDs are known as Ground Fault Interrupters (GFIs) in the United States and Canada.
A grid-tie inverter will also monitor the power from the grid and shut down if it detects a power cut (sometimes referred to as ‘Island Protection’).
This power shutdown ensures that your solar energy system does not continue to feed power into the grid if there is a power cut. This is a necessary safety requirement: if workers are attempting to repair a power outage, they risk electrocution if power is being fed into the grid from your solar array while they are working.
Inverters should also shut down or derate if the internal temperature gets too high, in order to avoid permanent damage.
Installation options and operating environment
Inverters tend to be heavy units. They need to be mounted securely on a wall or bolted to the floor. They can generate a significant amount of heat, especially when running close to their rated output, and require good airflow around the units to keep them cool.
You can purchase inverters for either indoor or outdoor installation. If you are looking at installing an inverter outdoors, check that the inverter is sealed against dust and water ingress, rated to at least IP64.
Overheating inverters is the number one reason for grid-tie systems failing. As an inverter gets hotter, it provides less power, and if the temperature continues to rise, it will eventually shut down to avoid permanent damage. When choosing an inverter, check its operating temperatures and consider how you can ensure your system remains within these limits.
Inverters should always be installed in a well-ventilated area, away from the ceiling and with a clearance around each side, the top and the bottom. They cannot be installed in a sealed cupboard. Some inverters have the option of an external heat sink or temperature-controlled cooling fans to help keep the inverter cool.
Most inverters do make a small amount of noise. This is typically a continuous low-level hum. It is usually only noticeable if the surrounding area is quiet. However, for this reason, inverters are not usually installed inside the living space in a home or in an office environment. Instead, consider installing your inverter in a garage or on an outside wall of your building.
Occasionally, the sound made by the inverter has been known to resonate with the wall, amplifying the sound and making it quite unpleasant to live with. This can occur even if the inverter is mounted to an outside wall. This is a very rare occurrence, but is most likely to occur if you are planning to mount your inverter onto a wall made of solid concrete. The solution is to dampen the mounting between the inverter and the wall or floor that the inverter is mounted on. There is a very effective product called Green Glue, produced by the Green Glue Company (www.GreenGlueCompany.com) that is applied between the wall and the inverter. When it is compressed by remounting the inverter, the glue spreads out to form a sound isolation barrier that is particularly effective at blocking out low-resonance vibrations.
Buying from eBay
Some companies and individuals have been selling non-approved grid-tie inverters online, most commonly on eBay. These are often sold at a bargain price, bundled with a cheap solar panel and often advertised as a ‘micro grid-tie system’.
The sellers claim that these systems are designed for amateur installation. The inverter plugs into the household electricity supply through a normal domestic power socket, and the systems look exceptionally easy to install and use. The sellers often claim that you can use these systems to sell power back to the utility companies and that they can be used to run the meter backwards.
These systems are highly dangerous and must be avoided. For a start, the equipment has inevitably not been certified for grid-tie use in any country. More importantly, the use of these systems is illegal in the United States, Canada, Australia and most of the European Community, because of the way the inverters connect to the household electricity supply, using a domestic power plug in reverse.
This means that the household plug has grid-level AC power running through it. This is extremely high risk and directly contravenes basic electrical safety legislation. In the UK, for instance, this is directly in contravention with BS7671:2008 (amd 1, 2011) 551.7.2 (ii). The catastrophic and potentially fatal results should somebody unplug the cable and accidentally touch the unshielded plug do not bear thinking about.
Never design any electrical system that risks grid-level AC power running through exposed connectors. The lives of the people around you are worth far more than saving a few pounds.