Poppet Magick: Patterns, Spells & Formulas for Poppets, Spirit Dolls & Magickal Animals - Silver RavenWolf 2018
A Plethora of Poppets
Working with Various Mediums
Clay, rock, birdseed, salt—all these and more can be molded into a magickal poppet. We’ll explore various mediums in this chapter.
Working with Clay
Clay provides a marvelous blend of thought and action, allowing you to easily manipulate the energy field of the doll. Done in sacred space, the power of the poppet begins to grow as the shape takes form. You can listen to music, burn a scented candle or incense, and let your mind and fingers work together in beautiful synergy. Many people worry about their skill when it comes to fashioning a clay poppet and fear that if the doll doesn’t look like a particular person, then it won’t work. This isn’t the case. I’ve found that your skill level is not an issue; it is your intent and how you employ the energy that is important. Many practitioners talk to their poppets while they are making them, whispering chants and charms associated with the intent, as well as addressing the poppet by name. In this book I’ve used polymer clay, as I’ve found it to be the most easily manipulated. When the finished item is placed in an oven, the polymer hardens and retains its shape.
A polymer clay poppet doesn’t have to be baked; there are times when you will want the clay to be malleable throughout the intended spellwork. If you don’t whip the poppet over your head (unless you want to), it should stay together without baking until your working is finished. Since polymer clay is a plastic compound that won’t rot, you may not want to bury it, and it shouldn’t be burned due to caustic fumes. Once baked, wherever you put it, it will stay there without disintegrating. It can, however, be broken, which works well in spells where you wish to break negativity or disease.
While massaging the clay to make it workable, I often add magickal oils, a very tiny amount of liquid fluid condenser, and herbal powders—not too much, as the clay may not adhere properly or it may crack before the poppet is completed. With today’s array of beautiful clay colors, you can choose the perfect match for your intent.
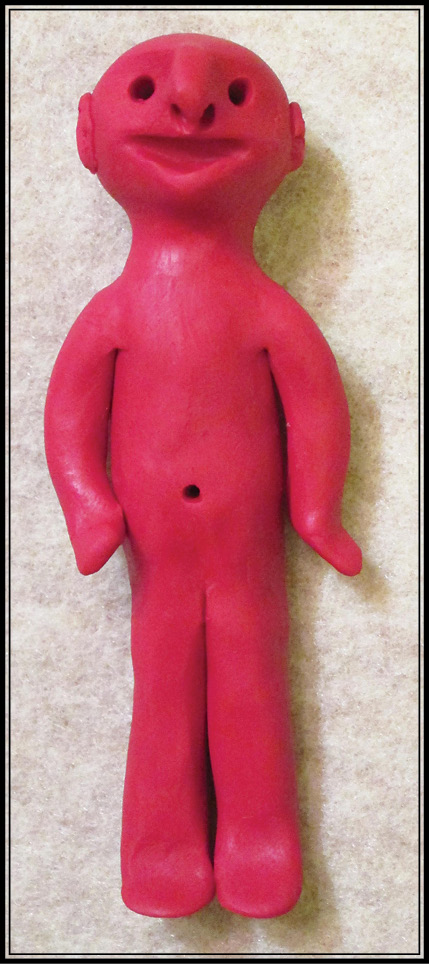
The partially completed red poppet shown at the beginning of the chapter is for drawing love, so I chose a fire-engine-colored clay, added orange blossom oil, a touch of rose oil, and powdered rose petals mixed with a bit of sugar. If you plan to bake the poppet, be careful how much sugar you add because sugar burns. Only a tiny bit is necessary. I always make a hole for the navel as a ritual representation of the poppet’s connection to the earth plane.
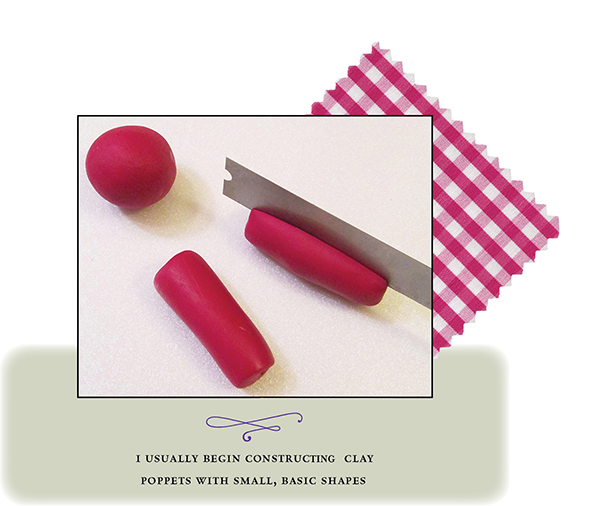
Although some practitioners like to form their poppet out of one large ball of clay, I usually begin with small, basic shapes—a ball for the head and rounded rectangles for the body, legs, and arms. I use a clay cutter to slice two tubes in half (one for the legs and one for the arms).
The black poppet is a sin eater, designed to absorb negativity that enters the home or the office. The black represents the void, or the still point from which all things are birthed or transformed. I created a cavity in the poppet’s head to hold a tiny amethyst crystal and angelica, frankincense, myrrh, and rosemary herbs.
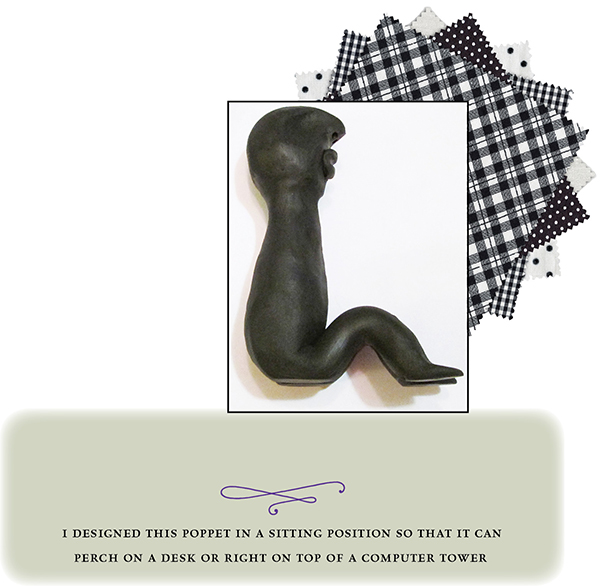
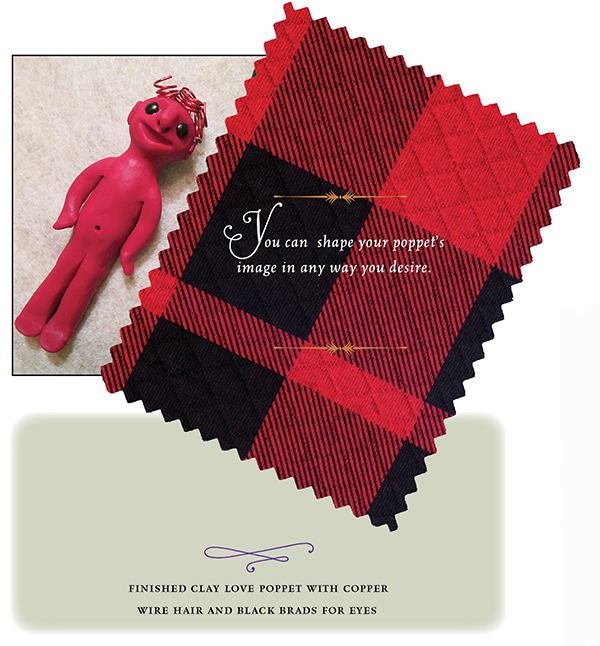
Once I have all the pieces rolled, cut, and ready to form, I work on the face. I try to get the expression to match my intent. With the love doll above, I wanted him to be happy—after all, he’s found the love of his life! The sin eater holds a different expression. If you are having trouble smoothing the body parts together, you can insert toothpicks for more stability. As shown here, your poppet doesn’t have to be in the prone (gingerbread) position; you can shape the image in any way you desire.
For oven-baked clays, you might like to try a binding liquid such as Liquid Sculpey that solidifies during the baking process, ensuring that all the body parts will stay together. The liquid binder can also be used to hold embellishments during the baking process. Plastic, cloth, and paper embellishments will not normally survive the oven and have to be glued on after the piece has cooled. Glass beads, however, normally take the heat without issue.
Additional embellishments to the love poppet shown here include coil wire for hair and black brads inserted into the eye cavities. These items were metal so I could add them before baking the doll. The sin eater has several amethyst chips that were added with the binding liquid before baking.
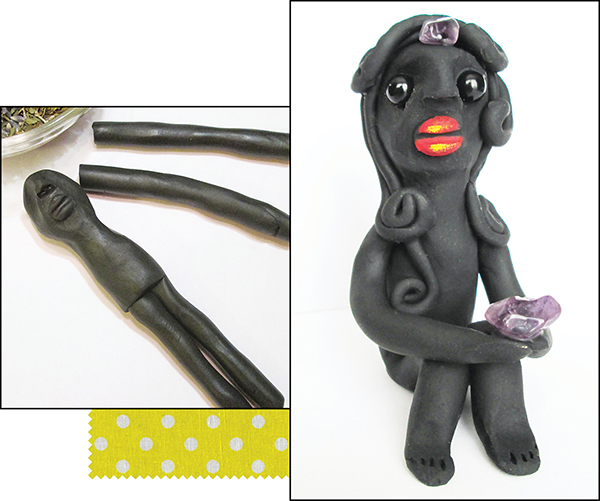
(ABOVE) THIS POPPET WAS CONSTRUCTED USING A SERIES OF ROLLED CLAY PIECES
![]()
(RIGHT) FINISHED SIN EATER POPPET HOLDING AN AMETHYST CHIP
Although clay poppets can be strikingly beautiful to behold, I’ve found the more unusual the doll, the odder it is—and the more unique it becomes. Neither the love poppet nor the sin eater will win any art contests or beauty pageants for dolls; they will, however, perform their function quite well.
Seven-Herb Color Dolls
Over the years I have formulated several recipes for clay and wax poppets that friends and family have requested for specific needs. After choosing a color of clay to match the individual’s personality, I then create a spirit dolly to help them heal or change in a positive way. To choose the color of the clay, sit quietly and think of that individual. Say quietly: “Mind to mind, heart to heart, soul to soul. Reveal thy needed color to me.” The first color that comes to mind is the color you should use. Sometimes you will see the person in your mind’s eye bathed in a specific color; sometimes you won’t see anything. Don’t panic. Try the request again. If nothing comes to you, choose a different type of magick. The seven-herb color doll is not suitable for their needs.
I don’t take a lot of time to mold this image—it roughly looks like a person, although sometimes it looks like something from another galaxy—whatever! The point is that the doll is to work for the individual in a positive way. As I create the doll, I massage the seven herbs directly into the clay, adding a touch of magickal oil and usually ten drops of liquid universal fluid condenser. When the doll is nearly finished, I take a bamboo skewer and create an opening in the doll from the top of the head to the feet (being careful to not punch through the feet). This cavity can be filled with additional herbs and a sigil or petition in the fashion of Franz Bardon and the creation of his “elementaries” (see Bardon 1956). When you have inserted the desired material, seal the opening and proceed with the normal birthing procedure for the doll.
When the difficulty, problem, issue, or circumstance has passed out of their lives, I instruct them to break the doll (to break their connection to the doll) and then burn the pieces.
Seven-Herb Insomnia Dolly: Vervain, dill, violet fragrance and flowers, chamomile, thyme, rosemary, woodruff
Seven-Herb Weight Loss Dolly: Buckthorn, ivy, nettle, sassafras, St. John’s wort, celery seed, birch bark
Seven-Herb Stop Smoking Dolly: Catnip, hyssop, peppermint, angelica, cohosh (black or blue), echinacea, hot peppers
Seven-Herb Surgery/Wound Healing Dolly: Vervain, chamomile, dandelion, flax seed, lemon peel, onion peel, marigold
Seven-Herb Money Dolly: (for emergencies and survival—rent, food, utilities) Yellow dock, peppermint, dried orange peel, sassafras, grains of paradise, hot peppers, allspice
Seven-Herb General Healing Dolly: White sage, hyssop, rosemary, lavender, lemon verbena, basil and nine acorns. The acorns are strung on a red thread and tied around the dolly’s waist. Each day for nine days an acorn is removed and given back to nature off the property of the sick person. On the tenth day, regardless of the health of the individual, the doll is decommissioned and scattered off the property. If the sickness is severe, make one dolly per month until the individual has returned to full health.
You can also make these dolls using beeswax. I have found that you can microwave beeswax a minute or less at a time. Be careful, however, as the wax can catch fire. You can also melt the wax in a double boiler (still a fire hazard, so take care). Melt the wax to just about liquid, then watch as it cools for the right time for easy manipulation. Do a few trial runs with the wax until you are familiar with its consistency and handling.
Working with Found Stones
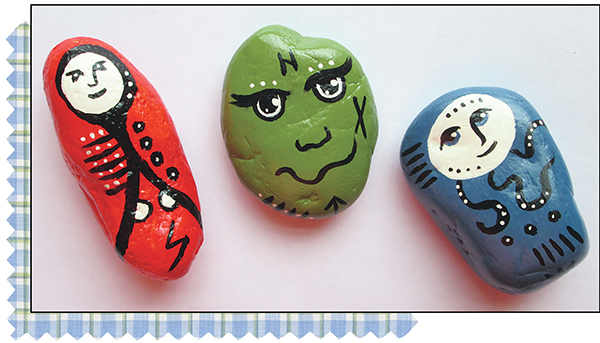
There is something very sacred about walking in the woods or by the sea and finding stones that speak to you. They seem to whisper—beauty, perhaps, or serenity. Maybe you feel strength or a sense of personal power when you hold the stone. In Braucherei and Granny Magick, plain stones (nothing fancy) are used both in attraction and banishing magick, and are employed as talismans, amulets, and poppets. Poppet stones can be carried in the pocket, used in conjuring bags, placed on the altar, hidden in dark places to affect the environment, left in a graveyard or a sacred place where you wish to forge a connection—their uses are only inhibited by your mind.
Before painting my stones I baptize them in a ritual fire, asking that all negativity be removed. Many times I will call upon a particular fire god or goddess or ask for the assistance of the angels of fire. Sometimes I invoke the planetary spirits. My choice is determined by my intention. After the stones have cooled, I submerge them in blessed water for twenty-four hours or from dawn to dawn. After the twenty-four hours, I remove the stones, dry them off, and place them in a plain brown paper bag until I am ready to paint them.
![]()
SMOOTH STONES FROM NATURE MAKE MARVELOUS POPPETS AND SPIRIT DOLLS
Painting stones is a very easy craft as long as you have patience and good brushes. After all my supplies have been cleansed and blessed, I begin by painting three base coats of gesso on the stones; this allows the finished color to visually pop and also cuts down on the number of color coats you will need. During this process be careful not to scratch the gesso with your fingernails or other objects. To help speed the drying process, I use a heat gun on low setting. Just as with the clay, I often add magical oils and a bit of herbal powder to the colored acrylic paint before application. Depending upon the opacity of your paint, your stones may need up to seven or eight coats to achieve the color vibrancy you desire. Using a heat gun or a hair dryer on low can speed the process along. Once the base color coats are completely dry, I focus on my intent and let the stone “tell” me how it wants to be decorated. When I’m finished painting and the stone is completely dry, I use an acrylic sealer to protect the paint from scratches, moisture, and dirt. I’ve found that an indoor/outdoor varnish is best, which can be brushed or sprayed on the stone. I let the sealer dry for at least twenty-four hours before placing the stone in the birthing pot.
Sacred Motherstone
The Sacred Motherstone is a physical connection to the Divine Mother in whatever form you see her. It is a link, a pathway, a road, a way to access the divine feminine energy that is always at your fingertips. This wishing spirit doll is designed to fit in the palm, small enough so that if you need to hold it in public, no one will see what is in your hand. I’ve found that the best way to choose a Motherstone is to open your mind, connect with the Sacred Mother, and ask that in your daily travels the right stone finds its way to you. Once you’ve found just the right stone, you will need gesso, paint brushes, paint, and acrylic sealer for decorating, and the following:
· 7 herbs that represent the Divine Mother to you (keep in mind that these herbs will be steeped in hot water, then left to cool overnight)
· 7 candles in color(s) that represent the Divine Mother to you (the size of the candles and their holders is up to you)
· your visualization of the Divine Mother (can be a picture, object, or just in your mind)
· an ice cube tray
· heatproof measuring cup (4-cup size)
· 4 cups spring water or water from a clean running spring or river (you can also use seawater)
· pot to warm the water on the stove
· wooden spoon
· glass bowl
· 1 ounce of vodka (optional)—this is a “spirit” linked metaphorically to both water and fire, and it is clear (therefore pure)
· find or write your own goddess chant that speaks to your heart
· double-check to make sure the varnish (sealer) that will be painted on the stone is waterproof (this is a necessity for this ceremony)
· magickal oil (optional) to dress the candles (rub a bit of oil on each candle)
The Motherstone has her own birthing process, different from those already provided. Before beginning, consider your magickal timing—what moon quarter speaks to you of the Divine Mother? What planetary energies do you associate with her? It takes three days to make your Motherstone. Once this choice is made, you are ready to create your Motherstone.
Cleanse and bless all supplies. On the first day, you will make the Motherstone elixir. On the second day, you will paint the stone. On the third day, you will empower your finished work.
On the first day, place your herb mixture in the heatproof measuring cup. Heat the water in a separate container. When it is just about to boil, remove the water from the heat and pour over the herb mixture. Stir the water/herb mixture slowly with the wooden spoon in the direction that you feel is most natural. During the stirring process, you can sing, chant, or listen to music. Allow yourself to connect with the Divine Mother, breathing deeply and blowing softly over the water as you stir. You might like to intone: “Gracious Mother, come to me.”
When you feel calm, serene, and filled with love, stop stirring and drop the unpainted stone into the water. Let the stone sit in the water overnight. At dawn remove the stone from the water and dry it off. Pour the cooled herbal water into the ice cube tray. If there is any water left over, save it. Place the ice cube tray filled with the herbal water in the freezer. Take the leftover water and put it in a clean container. Store in the refrigerator. You can use it in other magickal applications as holy water.
Paint your Motherstone in any colors you desire, using the information under the Working with Found Stones section given earlier. Before you seal the stone with waterproof varnish, blow over the mouth of the stone three times, saying softly: “Sacred Mother, come to me.” Seal the stone and allow it to dry overnight.
On the third day, when you are ready to empower the stone, place the glass bowl in the center of your altar. Fill the bowl with the herbal ice cubes. Hold the vodka up to your visualization of the Mother and ritually pour the vodka over the ice. Place the Motherstone on top of the vodka-soaked ice cubes. Surround the bowl with the seven candles. Breathe deeply three times.
Begin intoning the goddess chant that speaks to your heart. You could also play music that you feel is inspirational and helps you connect with the Divine Mother. Dress the candles, one by one. As you place each candle in its holder, say: “The Mother will appear.”
When all the candles are dressed and placed back in their holders, working from left to right around the circle (counterclockwise), begin lighting each candle. As you light each candle, whisper: “The Mother is here!”
When you have lit the last candle, stand back and take several deep breaths, running energy from the ground up through your body to the top of your head, and as you exhale, continuing to run the energy into your heart chakra and out your hands, palms pointed toward the candles.
The next part of the ritual can either be spoken in your own words or you can say:
Sacred Mother, I call thee here to instill my life with happiness, health, joy, and harmony. Please fill this wishing stone made in your image with your divine power, so that I may connect my field with that of your own. Henceforth, whenever I hold this stone I will be strong. Whenever I hold this stone I will be confident. Whenever I hold this stone I will be courageous. Whenever I hold this stone I will be able to accomplish any task with ease and joy. Whenever I hold this stone I know that what I will and what l wish will come to pass, for thou art the Queen of Magick and the Divine Mother of all! Hail to thee, O Great Mother! As this ice melts and this fire burns, I command that this image absorbs your power and will henceforth be a conduit from thee to me!
This conjuration can be used in other magick and enchantments—simply adjust the words according to what you are holding in your hands (a doll, a gemstone of a particular type, a rune, a photograph, etc.). It is an excellent empowerment for lucky pieces and gambling pursuits.
Dot the stone image with a tiny amount of magickal oil, then draw three equal-armed crosses in the air over the image to seal the work. Say:
As above, so below; this deed is done! Only the good remains!
Slap your hand (hard) on the altar.
Allow the candles to burn down and the ice to melt. When the candles are fully extinguished and the ice has completely melted, lift the image from the water and say:
By the power of the Divine Mother,
I raise thee in the name of the seven angels.
I raise thee in the name of the seven stars.
I raise thee in the name of the seven planets.
I raise thee in the name of the seven winds.
Thou art birthed to this physical world.
I command thee, energy, do my bidding—
I know thee will do this for me!
The rite is completed. Wrap your sacred Motherstone in a cloth that matches its color. Carry it with you to remind you of your connection to the Divine Mother.
To activate your Motherstone at any time, you can create your own chant or charm to be said as you softly rub the stone or you can simply memorize the chant given below, which is similar to the birthing chant. As you hold and rub the stone, state your desire—for example: “I wish for protection as I drive through the snowstorm today.” If possible, let your breath flow over the stone as you speak.
By the power of the Divine Mother,
I awaken thee in the name of the seven angels.
I awaken thee in the name of the seven stars.
I awaken thee in the name of the seven planets.
I awaken thee in the name of the seven winds.
O Great Goddess, I connect my field with thine.
My desire is birthed into this physical world
And I receive the positive benefits—
I know thee will do this for me!
The Spirit Walk Poppet
Not everyone has tons of crafty stuff on hand. Not everyone feels the need to go shopping for artful embellishments. Not everyone wants to spend hours creating a poppet. Not everyone has special herbs or oils to enhance their work. Does that mean you can’t make a poppet? Not at all! Some of the most powerful poppets can be made from items found around the house or from nature. Let’s say that your sister called and your nephew is sick. She’s taken him to the doctor, but she’s still worried. “Can you do something right away?” she asks. Of course you can! Just set in your mind who the poppet is for (your nephew) and what you want to accomplish (healing). Then, speaking aloud, ask Spirit, the universe, a particular deity or angel by name, or a beloved ancestor to help you find what you need to make a poppet so Jeremy (let’s call him that) will get better quickly.
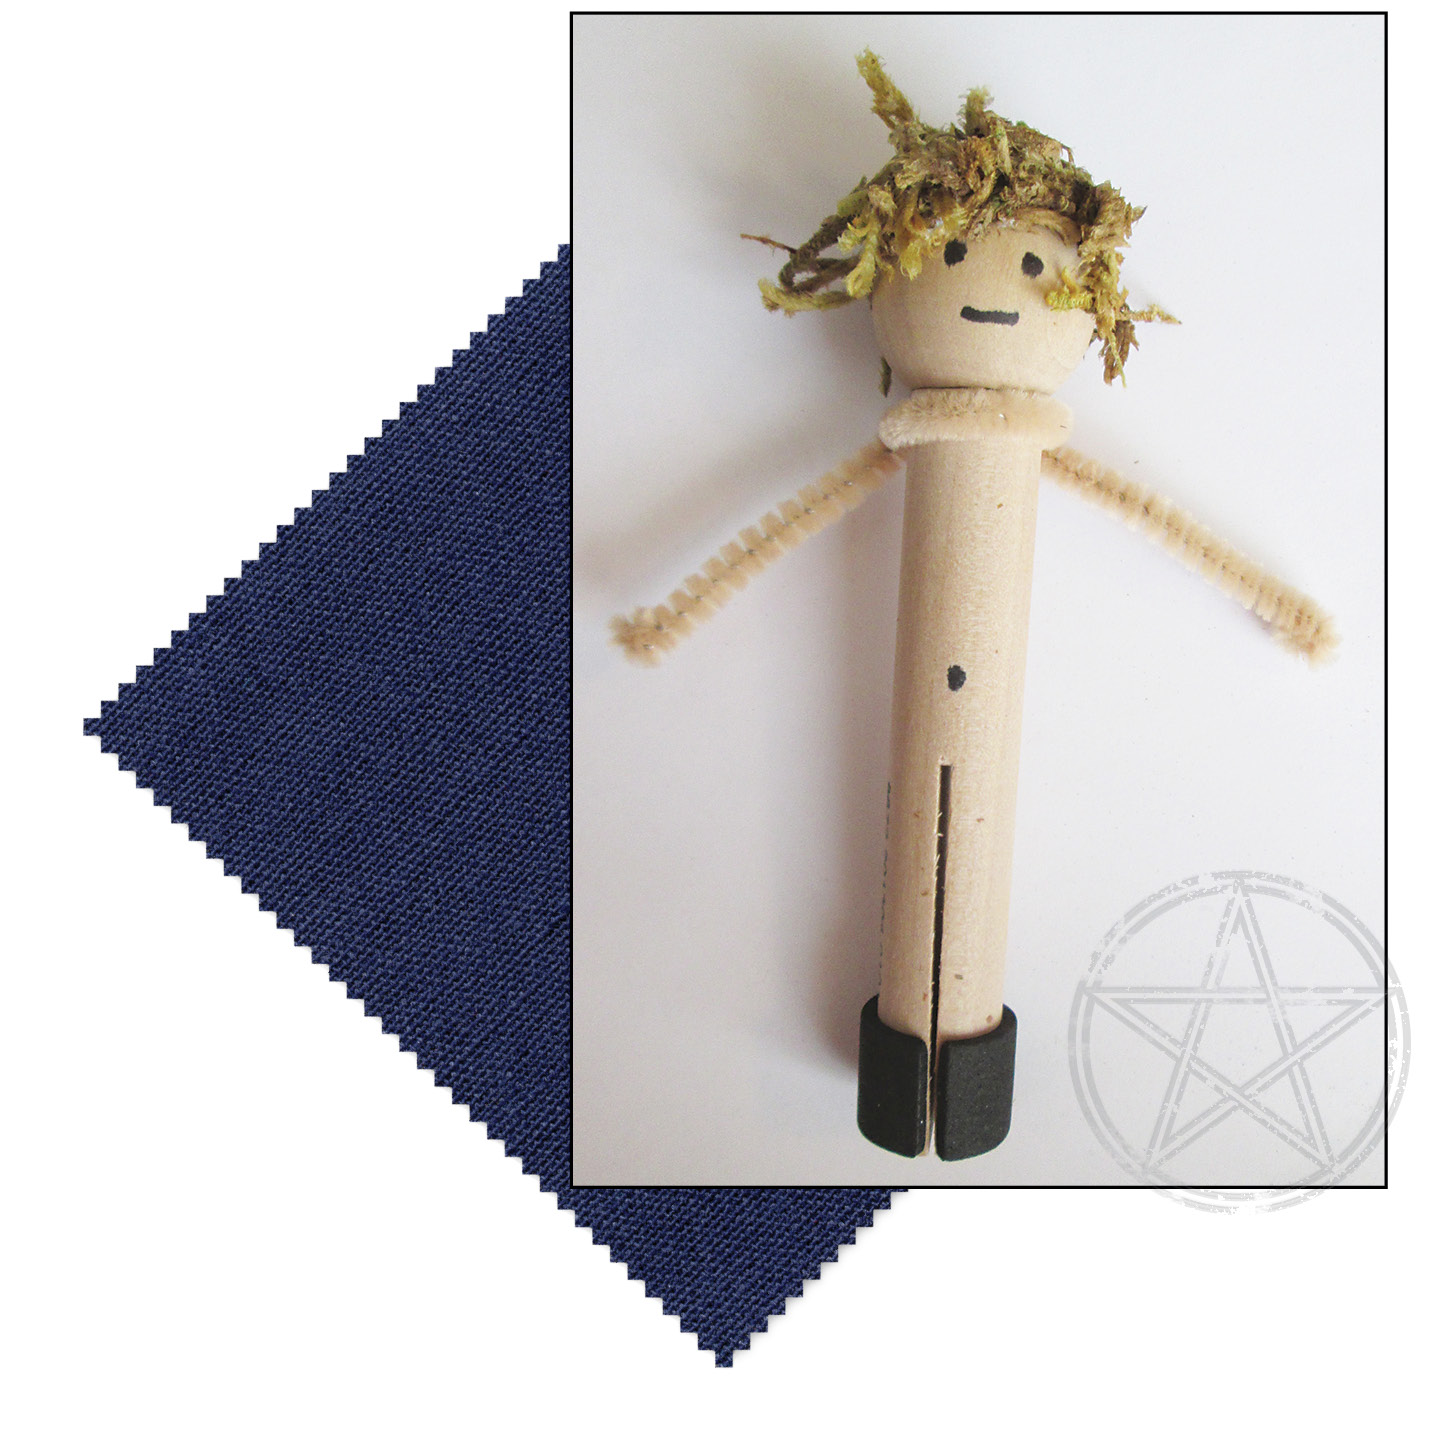
You could also make a poppet that represents Jeremy’s sickness. Your call—just be clear when you make your request. Take three deep breaths, relax, focus, and begin to walk around your living area or outdoors. Let intuition be your guide on your materials. In this example, I picked up a clothespin from the laundry room, a pipe cleaner from a drawer in the kitchen, moss from outside an old flower arrangement, electrical tape from the shed, and an indelible marker from the desk in the office. I cleansed and blessed all my supplies, then quickly put the poppet together. I only needed glue to stick the moss on the head of the clothespin. With the indelible marker, I can draw runes or other magickal sigils on the clothespin, or I can write “Jeremy be well” on the poppet. Since I found a clothespin, I could even write a petition on a piece of paper and insert it into the slit. Next, I could use the Fast Track birthing method from chapter four, which doesn’t require any tools. To lend more power to my request, I might rummage in the kitchen cabinet, where I can find several cleansing/banishing herbs—rosemary, sage, thyme, and clove. I could cleanse, bless, and empower these herbs, then pop them in a plastic bag right along with Jeremy’s poppet, or I could lay the poppet on a bed of the herbs in a glass bowl and then use the sending rite in chapter four to activate the poppet.
“Get Better” Rag Poppet
pattern on page 228
There are so many wonderful cotton colors and prints that I designed a rag poppet using the female poppet pattern. This style of doll uses machine stitching on the right sides of the doll (the doll isn’t turned), leaving ragged edges. Once all the seams are clipped at ¼ inch (like a rag quilt), the doll is stuffed and washed, which creates the unique fraying. Soft and cuddly, this doll is perfect for empowering a child or for healing, and it can be made from pieces of clothing worn by the person that the poppet is for, cut into 2½-inch strips. Only work with used clothing if the doll is intended for the individual who has worn the clothing. For example, if you wanted to banish Aunt Amy’s cancer, you wouldn’t use your husband’s old flannel shirt because his energy, not Aunt Amy’s, is imbued into the clothing. If you don’t have any clothing worn by the individual the doll is intended for, use new, freshly laundered quilting cotton for best results. The “Get Better” rag poppet is the perfect vehicle for giving positive energy.
Supplies Needed
· poppet pattern (the female gingerbread is a good choice)
· strips of 2½-inch-wide cotton approximately 16 inches long
· sewing machine (or you can hand stitch, which will take some time, or you could use Stitch Witchery strips)
· sharp scissors (I use a rotary cutter for the strips)
· pins

![]()
A FINISHED “GET BETTER” RAG POPPET
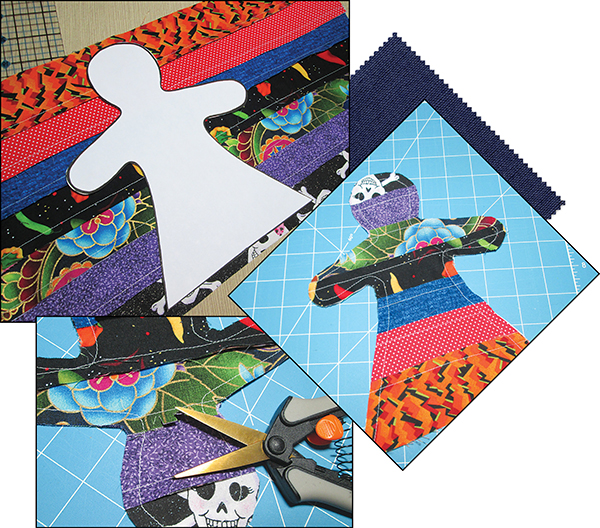
![]()
(CLOCKWISE FROM TOP LEFT) LAY THE POPPET PATTERN ON THE SEWN STRIPS; THE POPPET AFTER BEING SEWED; AND CLIPPING THE SEAMS BEFORE STUFFING
To make the doll, begin by cutting out the poppet pattern from your paper. Then cut enough 2½-inch-wide by 16-inch-long cloth strips to accommodate the size of the pattern plus about 1 inch. Lay the strips out to doublecheck sizing and color choices. I used seven strips for the female gingerbread pattern. Take two 16-inch-long strips and pin the wrong sides of fabric together (you will be sewing on the right side of the fabric). Using a ¼-inch seam, sew strips together. Continue adding strips one at a time, remembering to sew wrong sides together. Your seams will be on the outside of the finished doll.
Press all seams in one direction. Lay pattern on sewn strips to make sure you have pieced enough strips together. Fold sewn strips wrong sides together (so that you will have two poppet pieces that will match after cutting) and pin pattern to doubled fabric. Cut out poppet or use white chalk to outline the pattern directly on the strips, then sew along the white line. Finish by cutting out the doll using a ¼-inch seam allowance.
If you are going to add eyes (such as buttons or doll eyes with clip backs), consider affixing them before you sew the poppet together. Using a ¼-inch seam, sew poppet pieces (wrong sides together), leaving an edge open for stuffing. Since I loosely stuff this type of poppet, I left the entire bottom edge of the skirt open. After stuffing, it will be easy to close up with the sewing machine.
Before stuffing, I clip all seams except for the open bottom of the doll. This includes all the seams across the doll, front and back, and all the side seams. Leave about 1⁄8 inch or ¼ inch between clips, being careful not to cut your stitching.
Rag projects are meant to be washed—washing helps to create the ragged edges—so consider carefully what you will include in the poppet; polyfill or natural cotton is a good choice. If you want to add a petition, you can use indelible ink pen on pretreated muslin, then insert the piece of cloth into the doll with your chosen stuffing, or print a design on specially prepared muslin or canvas with your computer printer. You can usually find this product at a craft or sewing store. Once you have stuffed the poppet, sew the opening shut. Wash the poppet in cold water on a gentle cycle. Depending upon the type of stuffing you used, this poppet can also be placed in the dryer on a cooler setting.
If you want to put items in the doll that can’t be run through the machine, wash and dry the doll body before stuffing. As the cotton may be all jumbled, press lightly with a steam iron, stuff the doll, add your special charms or herbals, and then sew up the doll.
The Goddess Poppet
pattern on page 234
The Goddess pattern is designed specifically for paper or felt construction (where the fabric is not turned after sewing). However, if you do make the doll with fabric, once she is turned, you can fold in the edges of the arms and hand stitch. After stitching, the hands will naturally draw together. However, they are still separated. If you wish to have the continuous circle of the arms, stitch the finished edges together.
If you would like the neck and body to be a bit firmer, you can insert a stabilizer into the doll’s neck and body before stuffing. I used half a clothespin; you could also use pipe cleaners, a small natural stick, or a trimmed bamboo skewer (with sharp point filed off).
![]()
(CLOCKWISE FROM TOP LEFT) FINISHING THE HANDS; FINISHED GODDESS POPPET; USE HALF A CLOTHESPIN FOR A STABILIZER
Paper Poppets
pattern on page 228
You may not always have the time or the inclination to sit down and sew or glue a poppet together. The poppet patterns in this book can easily be used for paper; the rules of magick are the same. You can name, birth, and write your intent directly on the poppet. You can use colored pencils, crayons, markers, glitter, etc., to add your own special touch or you can use a computer program to turn your paper poppet into a work of digital art. When you are finished, roll up the poppet just as the ancient Greeks did and either tie it with thread or string or put a pin or nail through it. Your magick may be completed at that point, or you might like to use your paper poppet in a full ceremony or as a spell component in a conjuring bag.
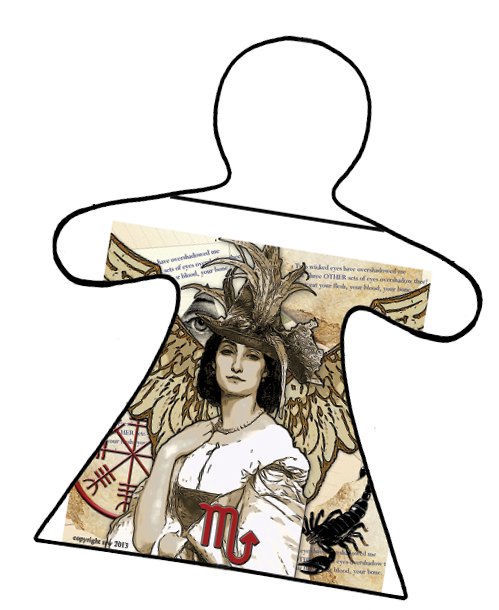
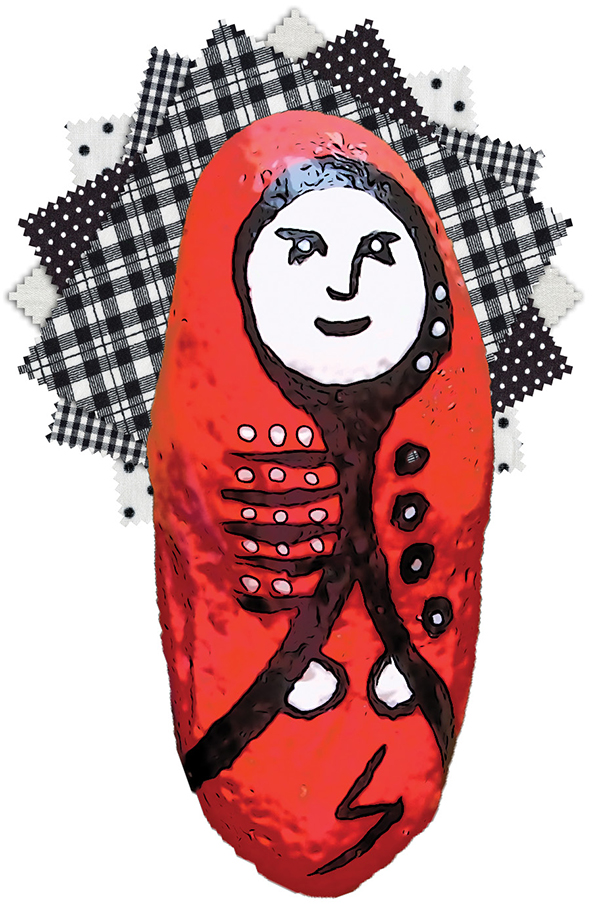
The paper poppet on this page is the TrotterHead Paper Poppet, used to banish illness, evil people, ghosts, haints, and negativity. The image is that of the Angel of Scorpio. Notice that within the image there is a picture of the Helm of Awe to protect the practitioner. The head of the poppet is where you write the Braucherei conjuration for removing evil, which is given below; just keep writing over the top of the text, like a tangle. Use the black line on the poppet to write the name of the individual or thing you wish to remove from your life.
Write the following on the paper poppet:
Trotterhead, I forbid thee in my home,
I forbid thee in my place of employment,
I forbid thee my prosperity,
I forbid thee my job,
I forbid thee my children and my spouse.
Thou shalt be banished, and thee must count
all the stars in the sky, all the hills on the earth,
all the fish in the sea, and all the birds in the air.
No peace, no rest, no sleep for thee.
Thou art banished forever from me!
Vegetable and Fruit Poppets
Poppets can be made out of potatoes, onions, carrots, or other vegetables and fruits. Because they are organic and will rot, they are a perfect banishing vehicle. The vegetable or fruit can be left whole and decorated with an indelible marker or be cut in half, gouged, stuffed with herbs and sigils, wrapped with string to put the halves back together, and then buried in the ground. “As this potato rots, so shall the lies told by Jennifer rot in her mouth, and she shall be exposed!”—or—“As this potato rots and becomes one with the earth, so shall sickness and disease leave thee forever!”
Trees and other plants can be petitioned to assist you in your magick. For example, a stuffed potato poppet can be left inside a briar patch if your aim is to catch a criminal or trip up a liar. Leave the potato in the woods in the hour of Saturn (to capture and hold the evil person). Leave an offering to the plant or tree as a thank-you for assistance.
For good fortune, love, happiness, joy—all the energies of blessing—you can create the vegetable/fruit poppet with all edible components, bake or mix with the family’s food, and distribute it among the dishes or place the dismembered poppet in just one recipe. You could also make a healthy treat, such as the applesauce poppet below. Apples are associated in magick with love, abundance, and good fortune.
Applesauce Love Poppet
Core and peel twenty-one certified organic apples. Cut into small cubes. Put into a pot with about one cup of water. Cook apples until they are tender and begin to fall apart. Remove from heat and drain if necessary. Mash cooked apples with fork or potato masher. Cool to room temperature.
Spray the inside of a cookie cutter with a small amount of olive oil. Put cookie cutter on a piece of parchment paper on a small plate. Pour some of the applesauce into the mold. Whisper love and joy over it, then pop it into the freezer.
After the remaining applesauce has cooled, place in a storage container in the refrigerator. When the poppet is completely frozen, take it out of the freezer and “send it” as you blend the poppet in with the remainder of the applesauce that you stored in the refrigerator. Alternatively, you can use the frozen poppet as an added ingredient in another dish you bake later on. If you plan to keep the frozen poppets for a while, slip them into a plastic freezer bag or container to keep them from freezer burn. This is a perfect love poppet because it can be ingested safely.
This recipe has no additives except your magick; therefore, the applesauce poppet formula can also be added as an ingredient for safe dog treats. For people, please note that you can add a small amount of sugar or cinnamon to this recipe.
Egg Poppets
Poppets made from eggs are useful for enchantments centering on birth, growth, and good fortune. They can also be used to take off illness and negative energy from one’s body. You may be familiar with the European practice of running an uncooked egg (still in its shell) over the human body to remove sickness. The egg is “cast off,” far away from the patient, usually with a statement of emphatic banishment. Some practitioners break the egg in the bowl to see if there is blood in it. If blood is there, the curse or illness continues, and more will have to be done. Unfortunately, the blood indicator doesn’t work for commercially sold supermarket chain store eggs.
The Need Dolly
The need dolly is a figure crafted by yourself out of natural objects and imbued with power by your spoken word to draw to you what you need most. The image gathers your thoughts, ideas, experiences, and feelings for a given period of time (in this example, seven days). On the eighth day the practitioner releases the doll through one of the four elements, commanding the image to bring perfect solutions to the owner or other necessities that were vocally whispered over the doll during its creation. The need dolly can be used for a variety of desires, from bringing more food into the home to accomplishing a goal to banishing a long-term block. Once constructed, the need dolly should stay with you as much as possible so that it can “see” and experience your life. The more information it has about you, the better.
In 2017 I ran a week-long magickal release program on my Word Press blog (http://www.silverravenwolf.wordpress.com). When I implement these free offerings, I usually choose one unusual type of magickal application for the participants to try. For the January session we all made need dollies. Those utilizing the program were instructed to take a Spirit Walk and collect natural items to make their need dolly. Before the participants left home, they were advised to face the open front door and indicate the purpose of the Spirit Walk. They were also to ask for protection throughout their journey because sometimes we are so focused on the spirituality of something, we forget that the real world contains dangers we should avoid—stumbling in the woods and breaking an ankle would not be good. When they returned home, they were to construct their dolly in sacred space or a ritual circle—the choice was entirely theirs. Likewise, how the doll was constructed was also their choice. Some used twine, some glue, and others worked with yarn or wire, etc. The point is not an art masterpiece but a vehicle for intense magick that you have constructed yourself.
The success of the need dolly with these students was remarkable. They loved the dolls they made, and some took to calling the dolls their “needy dolly.” I cautioned them early on not to become too attached to the spirit doll—that to keep in mind at all times that the doll would be released and not kept. Only in its release could it perform its ultimate job: that of bringing to you what you most need or want.
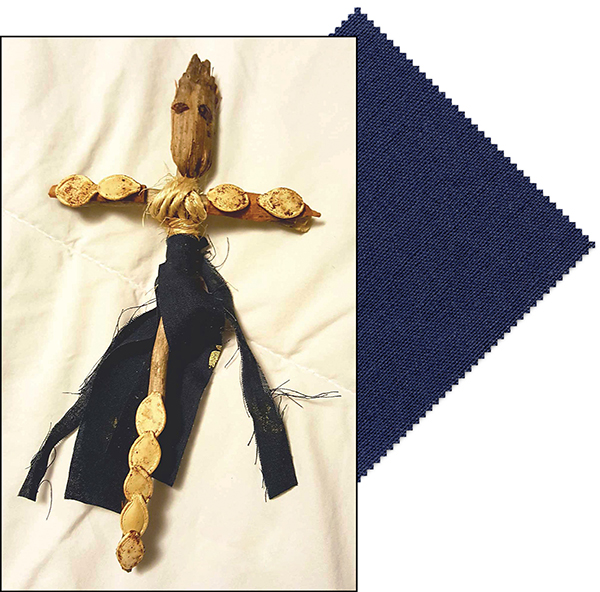
![]()
THIS NEED DOLLY WAS MADE FROM ITEMS COLLECTED FROM THE WOODS
Once the doll is constructed, you whisper or speak to it as much as possible, telling it what you feel you really need in your life. You can create the doll with the main goal already in mind or you can use the doll as solution oriented wherein the image becomes a sounding board, allowing your own mind to consider, contemplate, and eventually choose the path you wish. Either choice works. Some of the practitioners burned a candle each day beside the dolly as an affirmation/offering (depends on the mindset of the student) toward their goal. Some painted their dolls with specific fluid condensers to ramp up the power (see my book The Witching Hour for a complete discussion on how to make fluid condensers).
On the eighth day the dolly is “sent” into the universe to bring back what is desired (your goal) by the use of one of the four elements—earth, air, water, fire (or a combination of elements). The doll can be deconstructed—or not; again, this is a choice the magickal worker must make, and it relies a great deal on one’s belief system or set of limits one has imposed on one’s world. I know that sounds snooty, but that is really how it is. Your magick is boosted or hindered by yourself, your actions, and your own thoughts. Bottom line: your dolly can do anything you want it to—however, you have to believe that what you ask is possible. Where some try to micromanage the magick, others simply say “I don’t care how you do it, just get it done as long as you don’t hurt anyone” when they are commanding the dolly.
It can take from only a few hours up to thirty days for your need dolly to manifest your command. The timing depends upon a number of factors:
· Your mindset. Were you confident? Is this what you really wanted? Is your subconscious in tune with your conscious desires?
· What needs to change within yourself to receive your desire.
· What needs to change outside of yourself to receive your desire.
· Where have you placed the power for your life? With someone else? With yourself?
There are occasions when you think something is very simple—yet, in the universal pathworking of energy, it is difficult, and many alignments are necessary. Conversely, there are instances where you think your desire is incredibly difficult, but it isn’t at all! You have needlessly complicated the process with the machinations of your brain. If you always try to do the right thing and your confidence in yourself is stable, your need dolly should work just fine.
Cookie-Cutter Poppets
Metal and plastic cookie cutters shaped like humans or animals are fun and easy to work with in magick. These types of dolls usually fall into the disposable category; however, you also can use them for amazing permanent polymer clay creations that you can turn into jewelry, ritual tool decorations, or other crafty ideas. For the Kitchen Witch, making enchanted cookies is an old trick, and it’s so much fun with the cookie-cutter image! Cookies made with ginger and cinnamon can be enchanted to bring self-empowerment, health, good fortune, etc. Below are ideas for disposable poppets using cookie cutters in unique and crafty ways.
Loose Herb Poppet—Air & Earth Magick
You will need a cookie cutter of any size in the shape of a male or female human or an animal, a small piece of paper, a pen or pencil, and a selection of loose herbs that match your purpose. The herbs can be dressed with magical oils, powders, or fluid condensers that match your intent. Write your desire on the paper and then burn the paper. When the ashes are cool, add them to the loose herb mixture.
Outside, in a magick circle or sacred space, pour a glass of blessed water on the ground. Allow the water to seep into the dirt. Next, set the cookie cutter directly on the wet ground. Pour the herb mixture into the cookie cutter. Do not remove the cookie cutter just yet.
Light a match, blow the smoke across the image, then put the match out in the herbal mix. Add the match to the doll. Place one hand on either side of the herb-filled image. Blow your breath softly across the image, saying:
With breath of three you come alive.
With breath of three you come alive.
With breath of three you are alive!
Live! Live! Live!
Infuse your intent into the doll with visualization and words. All this time, your hands should still be in contact with the earth. Finally, command the doll to fulfill your desire. Seal the working by drawing an equal-armed cross in the air over the surface of the herbal mix. Remove the cookie cutter. Take up the energy of the circle and direct it into the doll. Turn and walk away. The element of air will do the rest.
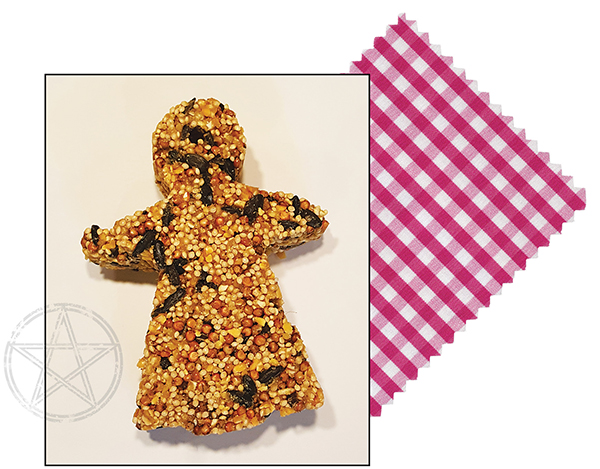
Bird Seed Love and Good Fortune Spirit Doll
Why not spend a few hours—or several hours over the course of a weekend—to make something edible for wild birds? Focusing on animals and their needs can bring that feeling of worth that is necessary for balanced happiness. It shifts our emotional state to the beauty of the earth and her gifts, and it builds unconditional love energy around us. As you create your birdseed delights, daily cares and worries slip away. Gifting the birds your treats at dawn can bring a whole new meaning to the intermingling of human and nature—you just have to allow the happiness to encompass you! As the birds eat your poppet, your desire breaks free of the image form and births into the universe. This type of poppet, to me, is one of the most fulfilling, as it meets the needs of human and animal at the same time.
When offering your poppet to the birds, you may wish to choose a god or goddess energy tuned to air or our feathered friends. Goddesses associated with birds include Rhiannon (Celtic), Isis (Egyptian), Nekhbet Vulture Goddess (Egyptian—hers was the largest cult within the City of the Dead), Hecate (Greek—she shapeshifts into an owl, as do Celtic goddesses Blodeuwedd and Arianrhod), the Morrighan (Celtic—crow/raven), etc. You may wish to spend some time doing a search on the internet for bird mythology as it relates to both male and female deities. Many shamans in a number of cultures thought that birds gifted them with second sight. Birds are often associated with creation myths, the element of air, and the ability to speak with spirits.
This formula is generous in ingredients. I used a large cookie cutter shaped like a female. Use a whisper magick chant such as:
For Love: “As surely as the birds and animals consume this cake, so love and joy will be my fate.”
For Money: “As surely as the birds and animals consume this cake, so good fortune and prosperity will be my fate!”
I whispered this second chant as I prepared the poppet cake, and then again before I took the finished poppet outside to give to nature. For good fortune, make the poppet on a Thursday (Jupiter Day) or a Sunday in the planetary hour of Venus, the sun, or Jupiter (depending upon the nature of the good fortune you desire) when the moon is waxing. For love, I would choose Friday (Venus Day) in the planetary hour of Venus when the moon is waxing.
I found the larger cookie cutters to work better than the smaller ones. If you only desire to make one poppet, put what is left of your ingredients into silicon molds sprayed with nonstick cooking spray. You can share these cakes with the birds whenever you like for a variety of other magickal activities. They are an excellent offering to the gods and goddesses of birds/air/animals during formal ritual.
The following collection of ingredients will make more than one poppet.
DELUXE BIRDSEED POPPET RECIPE
3 cups birdseed
3 tablespoons corn syrup or molasses
3 tablespoons chunky peanut butter
1 handful raisins
¾ cup stoneground cornmeal
½ cup boiling water
1 packet unflavored gelatin
Cookie cutter or silicon mold
Nonstick cooking spray
Straws cut into 3-inch lengths—use these to make holes so that you can decorate and hang your poppet
Wax paper
THE MAGICK
Pour the cornmeal onto a flat surface covered with the wax paper. Draw sigils, initials, or words in the cornmeal that represent your desire. Seal this image by drawing an equal-armed cross in the air over the cornmeal. Put the cornmeal back with your other supplies until you are ready to make the poppet. As you make the poppet, intone your favorite chant or one of the whisper chants given above.
MAKING THE BIRDSEED COOKIE CUTTER IMAGE
In a large bowl mix the birdseed, corn syrup, peanut butter, raisins, and cornmeal. Mix well; use your hands if you have to so that the peanut butter and syrup are spread throughout the birdseed. Spray the inside of your cookie cutter or mold with the nonstick cooking spray. Put the cookie cutter or mold on the wax paper on a level surface that can be transported to the refrigerator.
Boil the water and slowly stir gelatin into the water. When gelatin powder is completely dissolved, pour the warm liquid over the birdseed mixture. Mix thoroughly. Quickly spoon warm mixture into the cookie cutter or mold. Pack as tightly as you can. I use a flat wooden spatula to really press the seed into the mold. If you desire, place one straw in the center of each poppet or cake. Push it all the way to the bottom. This will make a hole for hanging the poppet when it has finished drying. Placing the straw in the center keeps the string or ribbon from tearing through the doll or cake right away. If you are using a cookie cutter (not a mold), you can carefully slide the cookie cutter up and off of the image, or you can pop the whole thing into the refrigerator and remove the cookie cutter later. No matter your choice, refrigerate the poppet for at least 2 hours.
Carefully remove the poppet from the refrigerator, checking to make sure it is fairly firm—it will still be delicate and can crumble easily. If you are in a hurry and the poppet has not fallen apart, you can use it immediately in magick (such as further spell work or ritual) and then give it to the birds. However, if you want your poppet to be more stable and not so squishy—let the poppet air dry for 48 hours or place it in a food dehydrator for 7 hours at 115 degrees. My poppet was 1.5 inches thick—if your poppet is thinner, it will need less time in the food dehydrator.
Add ribbon or twine if you wish to hang the poppet as a decoration—or you can simply crumble the image after the magick is completed and put the pieces in a flat pan birdfeeder.
Here is an alternate version using the same instructions but fewer ingredients.
SIMPLE BIRDSEED POPPET RECIPE
3 cups birdseed
1 cup boiling water
2 packages gelatin
1 teaspoon finely ground eggshell (used as grit for birds)
Nonstick cooking spray
Cookie cutter or silicon mold
Wax paper
Draw your sigils, words, or images in the finely ground eggshell.
Hounds of Hel Dog Treat Poppet
Ghostly packs of dogs pepper our magickal history and are incredibly useful in certain enchantment applications, including protection and banishment of unwanted energies. They can even be used if you feel you are being haunted by attentions of the unwanted dead—use vinegar to dispel the dead and place the dog treats in a triangle outside of the magickal circle for Cerberus, commanding him to take the offending ghost back across the River Styx to the land of the dead! Whether we desire to attune with the energies of Odin’s war hounds, Cerberus (Greek three-headed hound that guarded the entrance to Hades), the visage of the Egyptian Anubis, Herne the Hunter’s nighttime gallop, the Wild Huntsman of Dartmoor with yell hounds, Greek goddess Hecate’s faithful guardian hounds, the Nordic goddess Hel and her hellhound Garmr, Cwn Annwn, the Welsh spectral hounds of Annwn, or a multitude of other legends, you may find these safe, organic dog treats perfect for your familiar in this world or for honoring the canines of the ghostly otherworld realms. You can shape these treats into images of people or animals, and they are okay to set out in the wild as offerings in the woods. Given your imagination, there really is no end to their use!
INGREDIENTS
2½ cups garbanzo bean organic flour
2 eggs from free-range chickens
¾ cup organic pumpkin
¼ cup water or antibiotic-free chicken or beef stock that you make yourself—be sure there are no onions in your stock
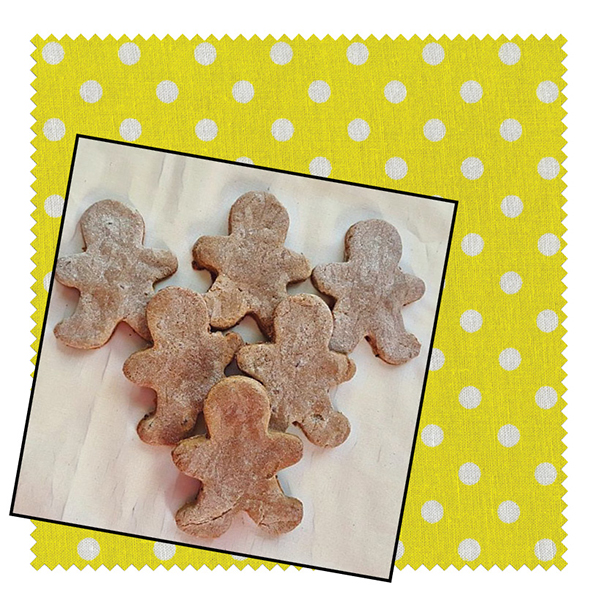
Preheat oven to 350 degrees F (175 degrees C). Whisk together the flour, eggs, and pumpkin in a bowl. Use the chicken/beef stock to make the dough workable, adding a little at a time (you most likely won’t use it all). Using brown rice flour or the garbanzo bean flour, spread a little flour on your working surface and on the dough if necessary to make the consistency workable. Roll the dough flat to ½ inch with a nonstick rolling pin. Use cookie cutters to cut out shapes in the dough (human or animal images). You could also roll the dough into a log, then cut the log into ½-inch pieces. Bless the treats before they go into the oven. If you know your purpose, instill that energy into the dough as well. Bake until hard, about 40 minutes. Allow to cool. They will keep in the refrigerator about 2 weeks; 6 months if you freeze them.
Please note that other ingredients can be added to this mixture; however, I purposefully made this formula super safe—no GMO additives, no salt, no sugar, no wheat, no corn, no gluten, no preservatives, etc. This is as basic and safe as it gets with current research.
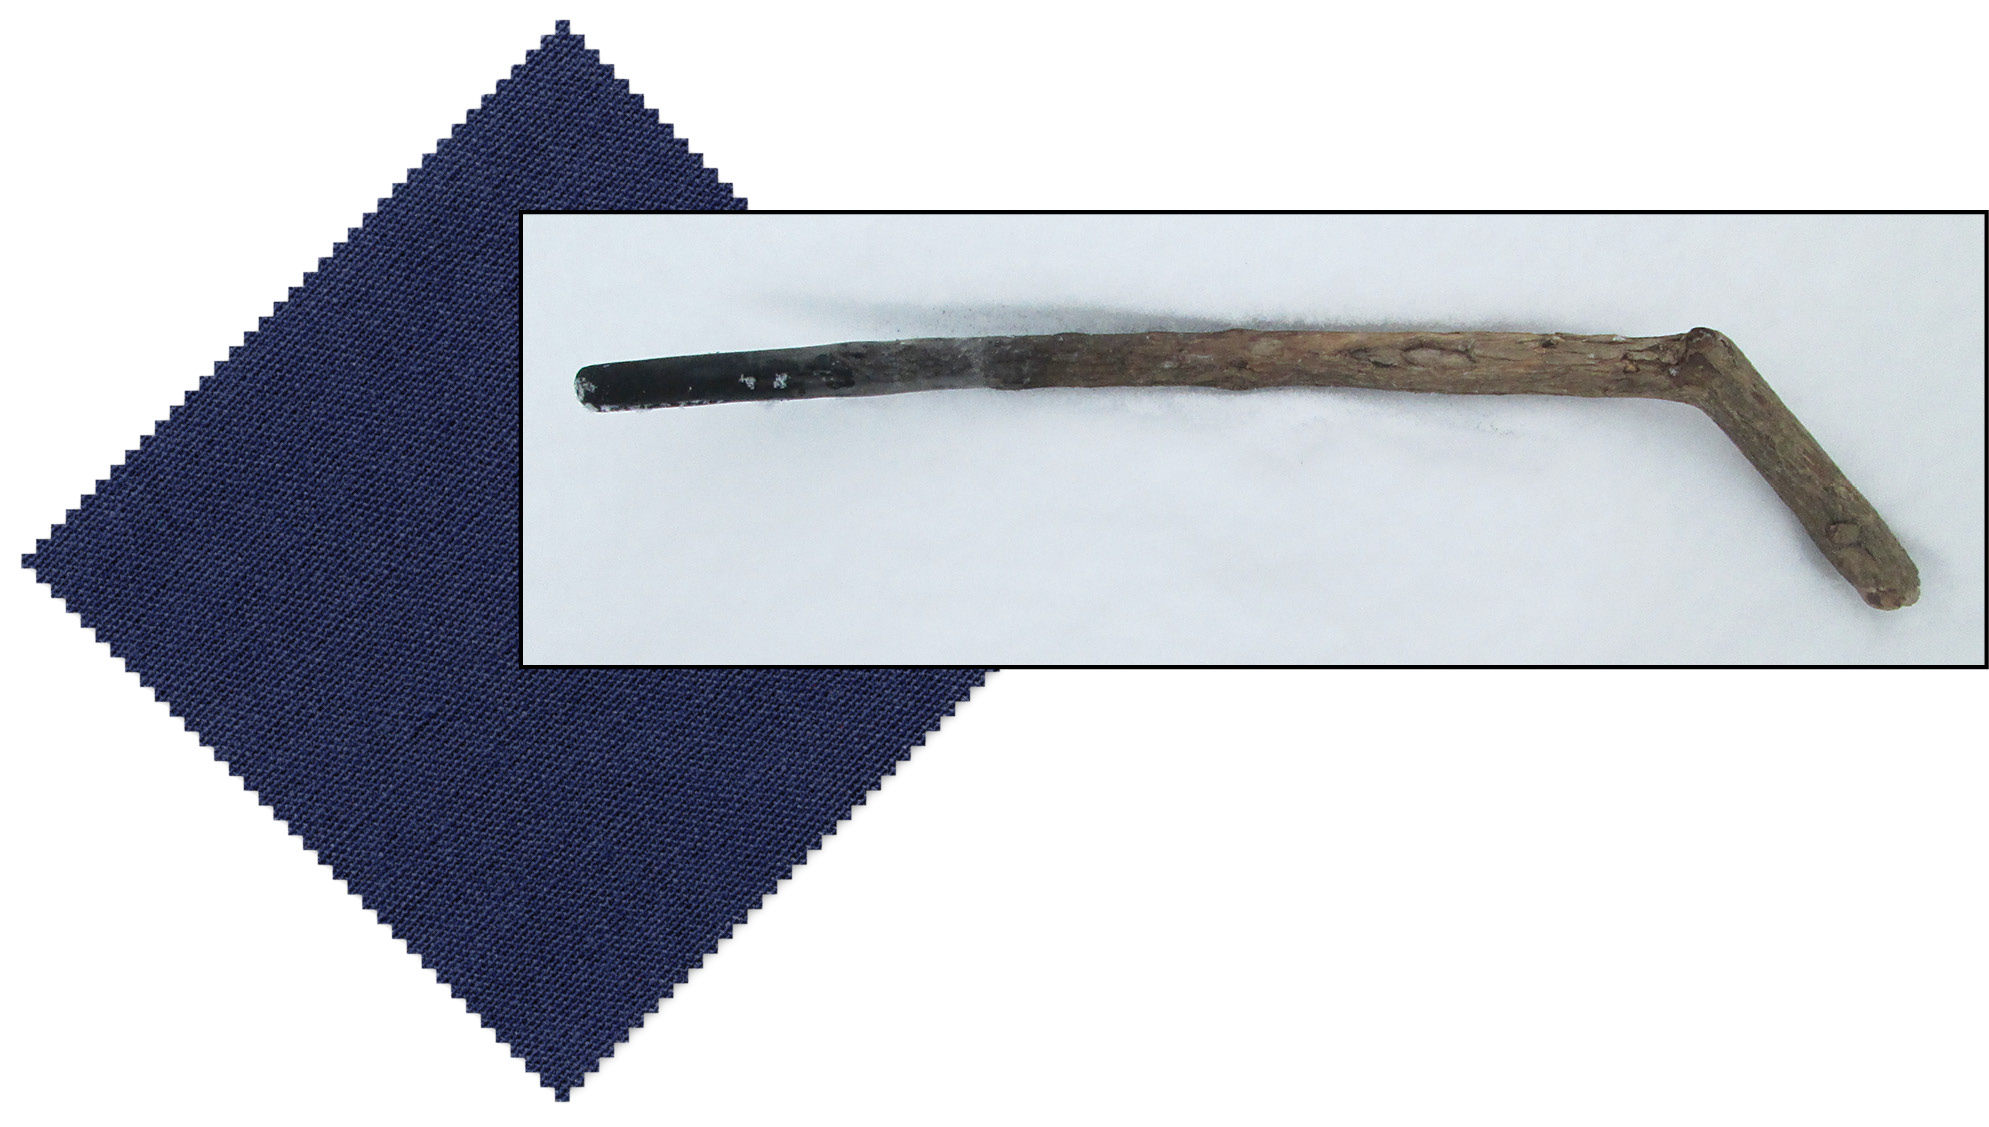
![]()
IN WHISPER MAGICK A STICK SCORCHED IN RITUAL FIRE IS USED TO “WITNESS” A MAGICKAL WORKING. THIS WITNESS STICK ALSO CAN BE EMPLOYED TO DRAW DESIGNS IN DIRT, SNOW, MUD, OR WATER. SOMETIMES THE STICK IS KEPT AND USED REPEATEDLY; ON OTHER OCCASIONS IT IS USED ONLY ONCE, AND WHEN THE DESIRED OUTCOME HAS COME TO PASS, THE STICK IS DESTROYED.
Mud Poppet
The mud poppet for sacred release or sacred birth is made of dirt or clay mixed with dirt, preferably from your local area, as you are in tune with the earth energies there. The dirt can also come from a sacred place in the woods or a graveyard (preferably from an ancestor’s grave who was a decent person). The easiest way to create an image is to mix dirt, the ashes of the person’s name (you can write the individual’s name on a piece of paper or you can write the person’s name three times on the back of their photo and burn in a fire-safe dish), and water in a bowl. Spray the cookie cutter with cooking spray or brush the cutter thoroughly on the inside with your favorite magickal oil. Magickal powders that match your intent can be added to the dirt/water mix, as well as a liquid fluid condenser if you so desire.
Once infused with the intent and given the command on the completion of the task, the doll either can be crumbled and buried in the ground (at least a foot deep for banishing activities) or placed on a mound with a cooked egg on its stomach. Animals will remove the egg (the birth of the thing), and rainwater will eventually dissolve the doll.
Beeswax Sandwich Cauldron Poppet/Spirit Doll
I originally designed this type of poppet to be burned in a cauldron. Simply cut out two poppets from a flat beeswax sheet with your cookie cutter. Use the cookie cutter to trace the third image on a piece of paper, leaving an extra inch of paper at the bottom of each foot of the image. Write your intent on the paper. Dress the paper with magickal oil, perfume, or liquid fluid condenser (remember that all three options can be flammable, depending upon the ingredients). Sandwich the paper between the two wax pieces, making sure that there is about an inch of paper exposed at the bottom of each foot. Empower the poppet. To activate the poppet, light the exposed paper pieces and blow across the poppet several times to feed the flame. Drop the poppet into the cauldron. Send the poppet as it burns. You can also use a ritual outdoor bonfire, throwing the poppet into the fire and sending as the flames rise.

Snow Poppet
Write your intent on a piece of paper with ink that will bleed. Outside, put the paper on a portable, flat surface such as your candleboard. Spread the snow on top of the paper. Use a cookie cutter to make the human image out of the snow (or if the snow is the right consistency, you can simply mold your own doll). Birth and command the doll. In most climates, the temperatures will not allow a snow poppet to live very long. Use the melting process as an integral part of your magick. You can leave the poppet outside or bring the snow spirit doll inside for an immediate ritual. You could even put your snow poppet in the freezer, if necessary; for example, put the Isa rune on its chest to stop or slow down a particular energy. Don’t forget, you can use the traditional snowman, complete with carrot nose and coal or wooden button (no plastic) eyes, as a magnificent giant poppet! As he melts, so an avalanche of good fortune and happiness will flood your property, your home, and your life!
Salt Dollies
patterns on pages 240 & 241
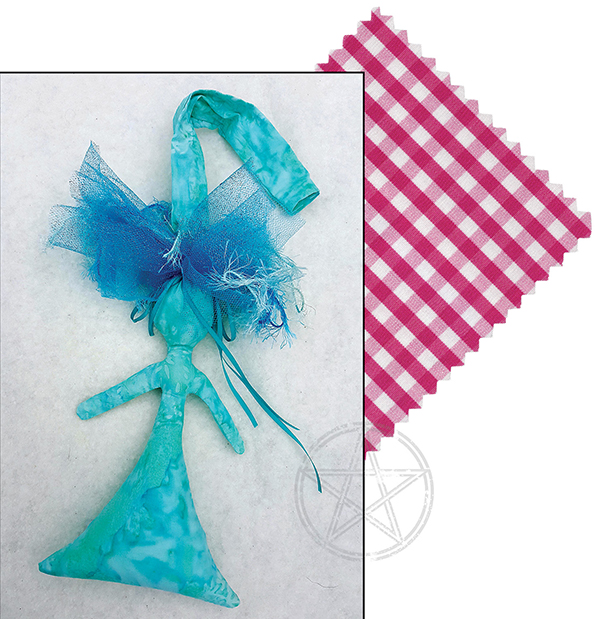
In magick, salt is the universal cleanser. No matter what you wish to banish, send away, diminish, or destroy, salt is normally a primary ingredient. I have created two types of salt dollies that I use in workings to protect or heal people in my whisper magick/Braucherei workings that can provide a powerful influence in your healing work.
Salt Dolly-Do to Banish Sickness and Nightmares
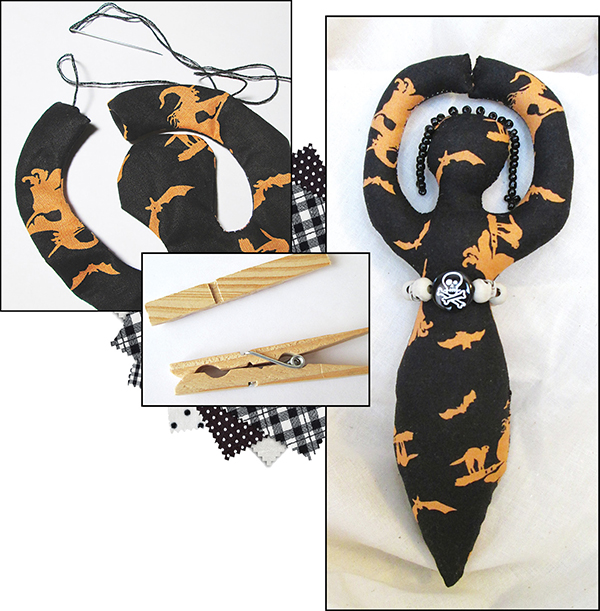
Salt Dolly-Do is to banish nightmares, sickness, and instability in the individual’s life. Salt Dolly-Do is placed in your bed for seven nights. If you have pets, you may wish to put her in your pillow case behind your pillow to keep her from being tortured by your favorite feline or canine. Salt Dolly-Do has a pointed head and an open body cavity that is filled with salt, lavender, and rosemary, then sewn shut at the bottom of the skirt. The pointed hat/head can be folded over and pinned to a pillow.
Salt Dolly-Do is made of simple, inexpensive muslin because she is burned on the eighth day. I do not recommend using felt for this type of poppet because that material is usually difficult to burn. During the seven nights/days she sleeps with you, she is busy collecting all sickness and negativity that is surrounding you or in your aura. She can be dressed with additional magickal oils if you like—just make sure the oils don’t bleed into your bedding. A favorite sigil or another item of healing can also be added to the doll if you desire.
You could also hang the image off the bedpost or place her on a shelf that is in the headboard or over the bed. Hang the doll from a suitable, temporary hook on the wall as close to the bed as possible. On the eighth day, take Salt Dolly-Do outside and burn her in a cauldron, intoning a suitable banishing chant such as:
Evil, begone; do not return!
The horse has run off and the bridges are burned!
Remember to thank Dolly-Do for her service to you and wish her well in her next incarnation. After the flames die down, seal the working by drawing an equal-armed cross in the air over the cauldron. When the ashes are cold, dump or bury them.
![]()
TO MAKE A SALT DOLLY-DO, SIMPLY ADJUST ONE OF THE PATTERNS IN THIS BOOK BY ADDING A 6-INCH CONE HAT EXTENSION
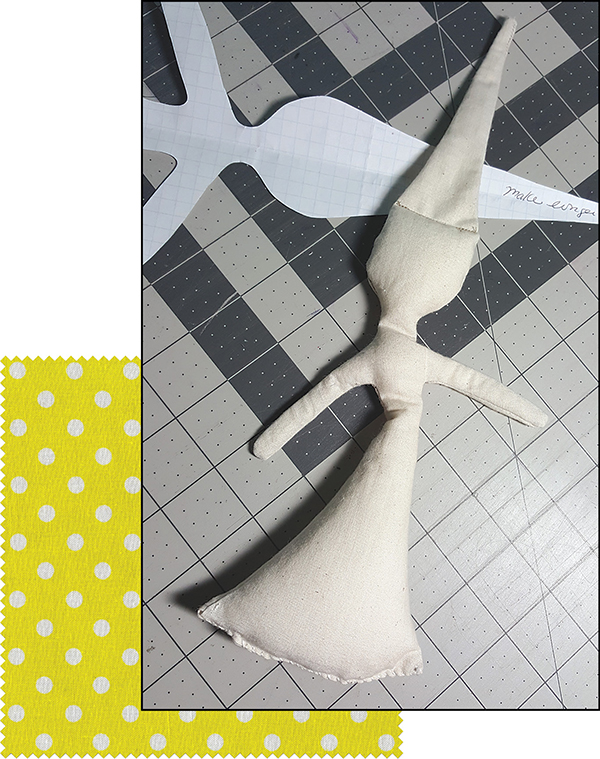
Susie Salt Healer’s Tool
I developed Susie Salt to be worn by Reiki, Braucherei, and Whisper Magick practitioners to protect them as they work with friends, family, and clients to remove illness or bring balance into their lives. Her head is elongated, and the opening to the doll is at the top of this head. Unlike Salt Dolly-Do, Susie Salt is not burned and can be used repeatedly—she is a permanent poppet and can be made from a variety of cotton materials. When completed, the doll is filled with salt, one piece of amethyst (or another gemstone), and lavender or other light, banishing dried herbs. Magickal sigils on paper can also be added.
The first Susie Salt dolls I made were completely filled with coarse blessed sea salt—however, this makes them rather heavy. I found that a salt herbal mixture is easier to handle, such as lavender, rosemary, lemon verbena, white sage (ground fine), and coarse sea salt. The top of Susie Salt is tied shut and is long enough to loop over your ritual cords or belt. That way, she hangs like a tool or decoration. She is your healing buddy and can be decorated by adding ribbons, jewels, bells, beads, etc., to make her completely unique. Her job is to remove all negativity coming toward you from other people. She is a defensive poppet. Because of the way I constructed her, she can be easily emptied, washed, dried, and filled many times again.
To make a Susie Salt doll, add a 2-inch by 11-inch extension to the head of one of the patterns in this book. When sewing, leave the top of the tube open. After turning the doll, you can fold the raw edges inward for a neater appearance. Fill the doll with a selection of salt and herbs. The more herbs, the lighter the doll.
Oppit Sandwich Dolls—Intent Dollies
patterns on pages 244 & 241
Oppit means “opportunity”! I designed these flat dolls for their easy portability. I call them sandwich dolls because they are a combination of layered fabric stabilizer and colorful material, not stuffed. The stiff design makes these spirit dolls easy to tuck in a purse, backpack, Book of Shadows, glove compartment of your car, etc. They also make the most unusual gift decoration on the outside of a wrapped box or basket. Oppits can be hung over your bed, added to wreaths on your door, wrapped around and glued to a jar—the ideas are endless! Oppit dolls are a great use for scrap cloth and even pieces from favored clothing that is no longer wearable but you would like to keep the material design and the connection to that person (if the clothing belonged to someone else). If you love quilting, use your pieced scraps to create a uniquely colorful doll with strips, blocks, and other pieced designs.
This type of doll goes together quickly with my unusual piecing method. Simply cut out three matching large squares—the fabric for the back of the doll, the stabilizer in the center, and the fabric for the front of the doll. Sandwich the squares together (right sides facing out). Lay your pattern directly on the square stack. Pin in the center so the pattern doesn’t move. Beginning at the bottom, sew around the edges of the paper pattern. Stop when you are 2 inches from completion on the bottom. Tuck an empowered sigil in the opening. I use a bamboo skewer to push the paper into the doll as far as it will go. This is a substitute for the geist bag (see chapter three). When you are satisfied with the positioning of the paper, stitch the remaining 2 inches. Take your time. Once you have sewn completely around the doll, remove the pattern. Use very sharp scissors to cut ¼ inch all the way around the outside edges.
You’re done. If you are worried about fraying, you can use a no-fray product to treat the edges of the doll. Both stabilizer and the no-fray product are available at most fabric stores. The stabilizer is available in white and black. I prefer the black.
Add embellishments such as beads, sequins, and charms, then paint on the eyes with acrylic paint. Your Oppit is good to go!
I have provided two Oppit designs for you: the Sun Goddess Oppit (also called the Chakra Oppit) and the Witch Oppit. Oppits can be made of felt as well, using a glue gun or stitching, which would be a great project for your children!
Because they are flat and soft, Oppits work extremely well as Book of Shadows/personal journal protection dolls. Simply list her/his duties on a small piece of paper and slip inside the head before stitching. I usually spray my paper with universal fluid condenser and then dot with a bit of kyphi oil.
![]()
PAINTING THE EYES IS A PROCESS OF CAREFULLY LAYERING COLORS ON TOP OF A BASIC WHITE SHAPE THAT HAS BEEN OUTLINED IN BLACK; THE MORE LAYERS, THE BETTER THE EYES WILL POP.
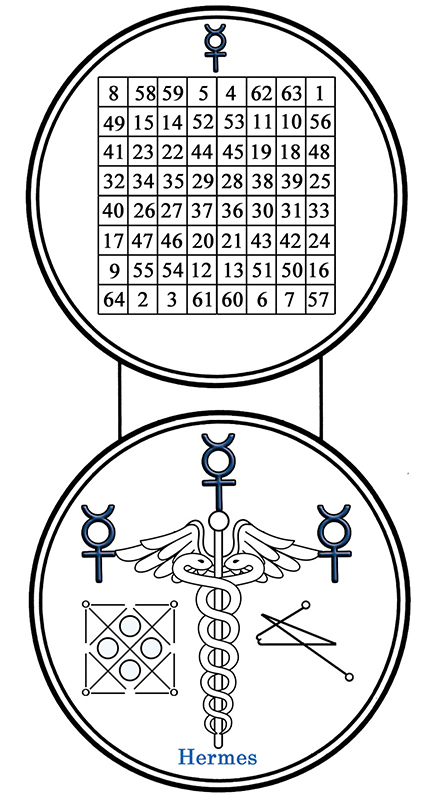
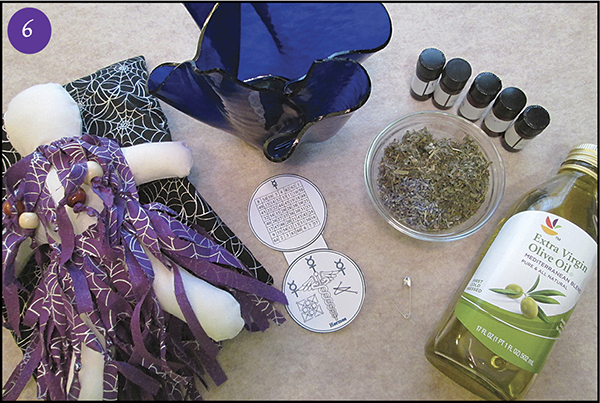
Hermes Mercury Dreaming Doll
patterns on pages 227 1 & 236
The purpose of the dreaming doll is to provide a pathway for information or solutions to come to you in dreams, just like the doll used to help the queen mentioned at the beginning of this book. This doll uses the easy male poppet pattern, but you can use any pattern you desire. I have also added a pattern for a shirt and skirt, should you wish to make your poppet a bit more ephemeral. Unique dreaming charms can be added if you like, particularly if they are silver or have associations with Hermes or Mercury. What makes the doll special is the intent, the sigil provided, and the herb selection. I also made the doll a dreaming bed (just like in the story) filled with the same herbal formula. The doll can be placed on its pillow beside your bed or you can put the pillow under your own, allowing the fragrance of the herbs to help you in dreaming magick.
The herbal combination for the dreaming doll is a blend of lavender, mugwort, peppermint, marjoram, horehound, dill, and lemongrass.
The Hermes sigil (see following page) can be activated and placed within the doll, within its dream pillow/bed, or pinned on the outside of the doll. For my dreaming doll, I placed one sigil in the doll and one in the bed, with a general call for aid from Hermes. Then, when I need specific answers, I can pin a third sigil on the outside of the doll, writing my request on the sigil’s blank side. I put the sigil in the doll and in the pillow so that if I wish, I can place the doll’s bed under my pillow and use it as a sachet. You can leave the sigil as is and simply write your desire on the back of it, dress it with oil, and fold it like a sandwich to pin to the doll (so that you can use the doll again) or you can make the intent general and place the sigil on the inside of the doll. You can use the key given in the illustration to draw a sigil on the numbered box, putting a dot at each corresponding number and then drawing a line to connect the dots.
Timing
Possible construction and activation astrological timing would include new moon; full moon; moon in Pisces, Scorpio, Cancer, Gemini, or Aquarius; on a Wednesday or a Monday in the hour of the moon or Mercury; or at midnight. As a note, Mercury rules Gemini and Virgo.
To create your specialized sigil, write out your desire on a piece of paper. Using the key provided below, match the first letter of each word with its corresponding number. For example, “inspiration in my business” would create the number sequence 9942, factored to 942. Find the 9 in the square and draw a point. Next, find the 4 and draw a line from the 9 to the 4, then find the 2 and draw a line from the 4 to the 2, with a circle denoting the endpoint. Those lines are your sigil.
KEY FOR DRAWING SIGILS FROM MAGICKAL SQUARES
|
1 |
2 |
3 |
4 |
5 |
6 |
7 |
8 |
9 |
A |
B |
C |
D |
E |
F |
G |
H |
I |
J |
K |
L |
M |
N |
O |
P |
Q |
R |
S |
T |
U |
V |
W |
X |
Y |
Z |
To Make the Dreaming Doll Shirt and Skirt
Follow the pattern provided on page 236, cutting the shirt from a single piece of fabric and the skirt from a folded (doubled) piece of fabric (so that the skirt piece is wider due to the fold). The single pattern provided functions as the pattern for both the skirt and the shirt.
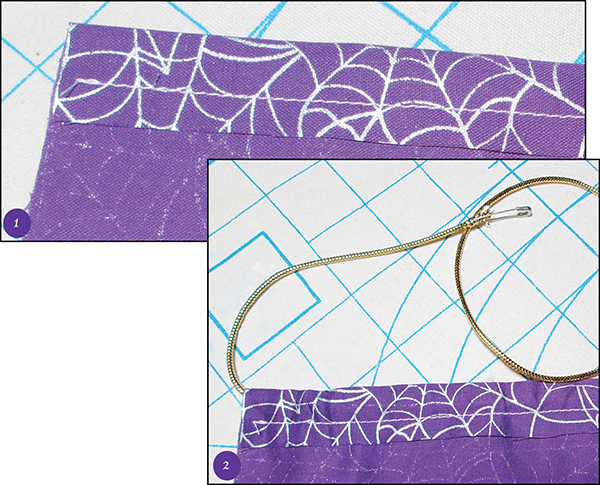
1. After you have cut both the skirt and the shirt, fold over one long side (as shown on the pattern) ¾ inch and press. Stitch a ½-inch seam to create the casing.
2. Attach a cord or ribbon to a safety pin and draw the cord or ribbon through the casing created by your stitching. Do this on both the shirt and skirt pieces. In measuring the cord or ribbon, double the length of the casing so you don’t accidentally pull the ribbon or cord out of the casing.
3. Once you have pulled the cord or ribbon through the casing on both the shirt and skirt, cut material in ¼- or 1⁄8-inch strips up to the seam line. Be careful not to cut into your stitching.
4. Gather material along cord or ribbon by pushing both sides of the casing to the center. Tie onto the doll. You can use this type of shirt/skirt for other projects or decorate other types of dolls, including a dried gourd doll, where the design becomes a unique collar around the neck of the gourd. Thread bells and beads onto the bottom of the fabric strips and tie.
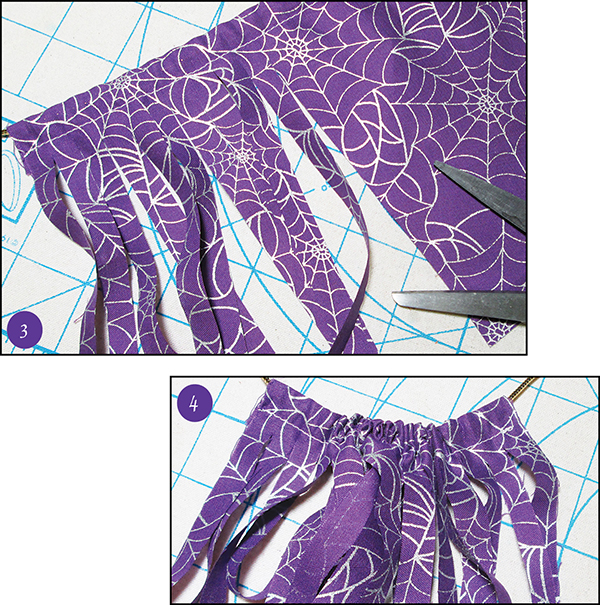
5. Add any embellishments to the clothing that you desire or simply knot the ends of the strips for a unique look.
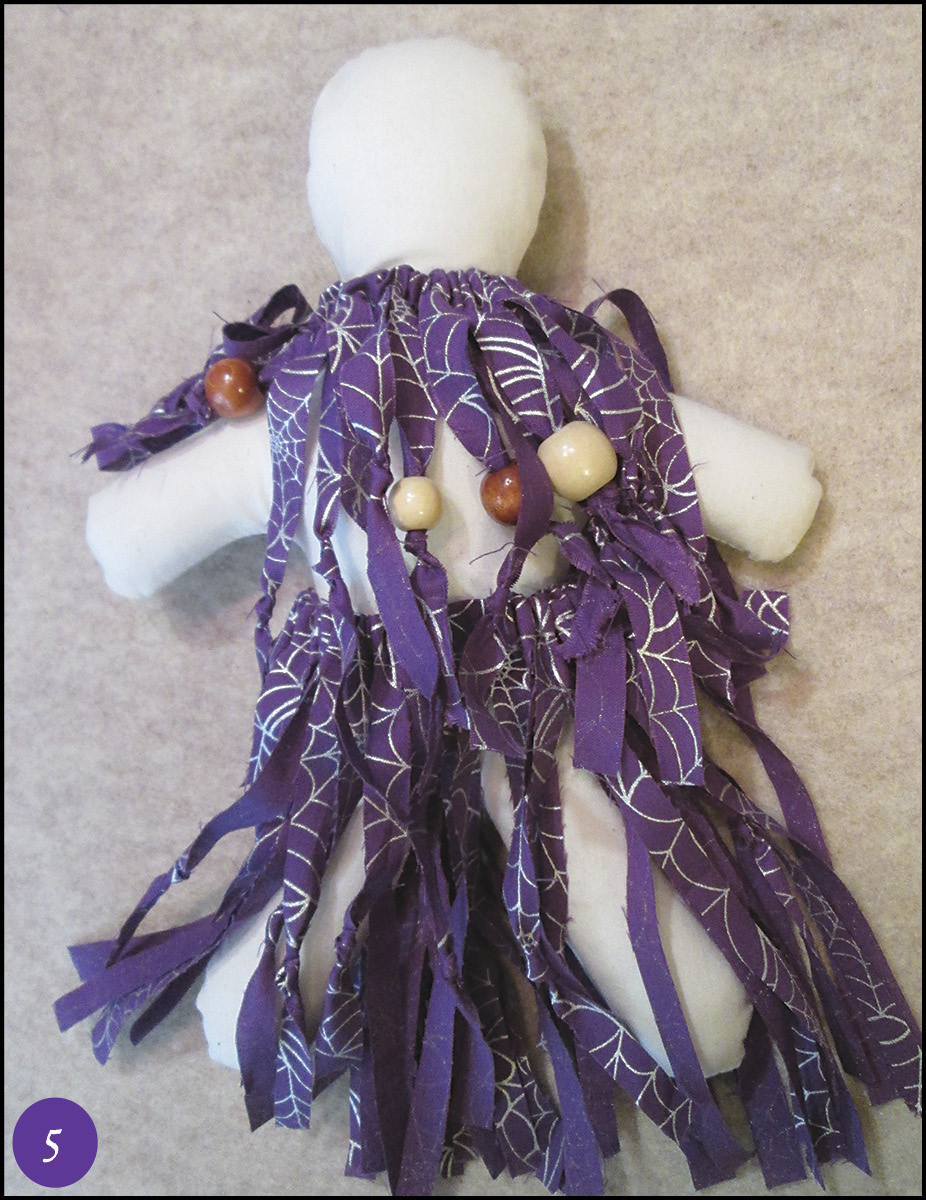
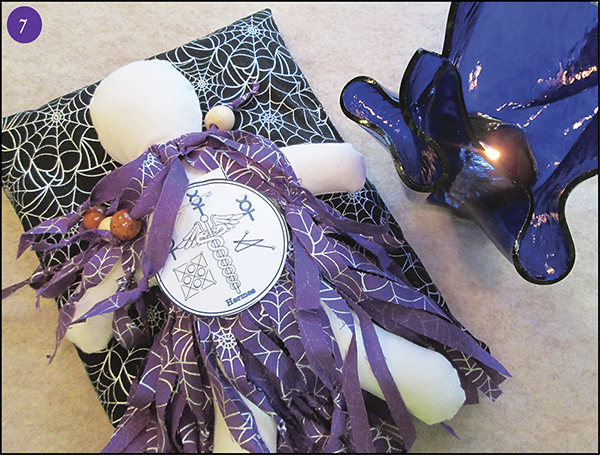
6. The photo shows the dreaming doll lying on her dream pillow. Notice I chose a spiderweb pattern for both the doll’s clothing and the dream pillow. This is to enhance the energy of capturing information in dreamtime. The blue glass is an oil lamp designed specifically for a mixture of olive oil blended with essential oils. Essential oils used in the example are lavender, lemongrass, peppermint, pine, and violet. The herbs and the sigil shown are those that are in the doll and the dream pillow.
7. The dreaming doll is birthed in the name of Hermes (Mercury), and each time she is activated, the power of Hermes is called upon to aid her in her mission. The photo shows the prepared dreaming doll with the sigil pinned to her chest. The dreaming lamp burns softly, filling the field of potential around the doll with a calm and peaceful aroma. Command the doll by whispering your request close to the head, making sure your breath flows across the doll’s face. In this picture, the dreaming doll is ready to take her journey into dreamtime and bring her owner the requested information.
![]()
The spiderweb pattern I used in this doll enhances the energy of capturing information in dreamtime. Use your fabric prints to enhance your poppet magick!
![]()
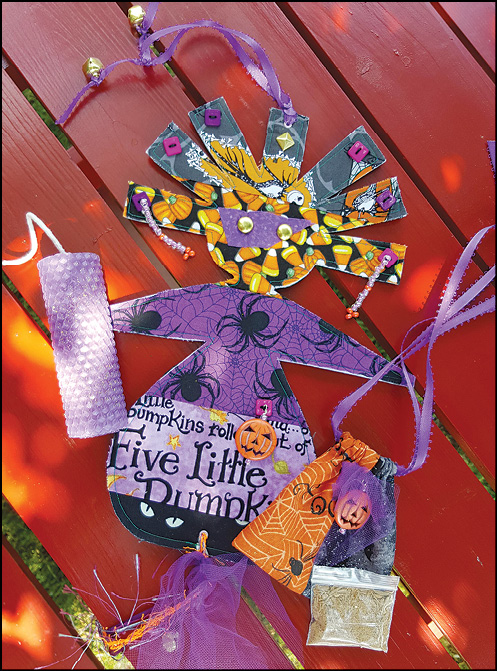
Little Spirits
pattern on page 231
Little Spirits are great vehicles for a single focus or intent, such as love, money, etc. They don’t take long to make and are wonderful gifts for children and adults alike. Think of them as an upgraded herbal sachet with eyeballs and a personality.
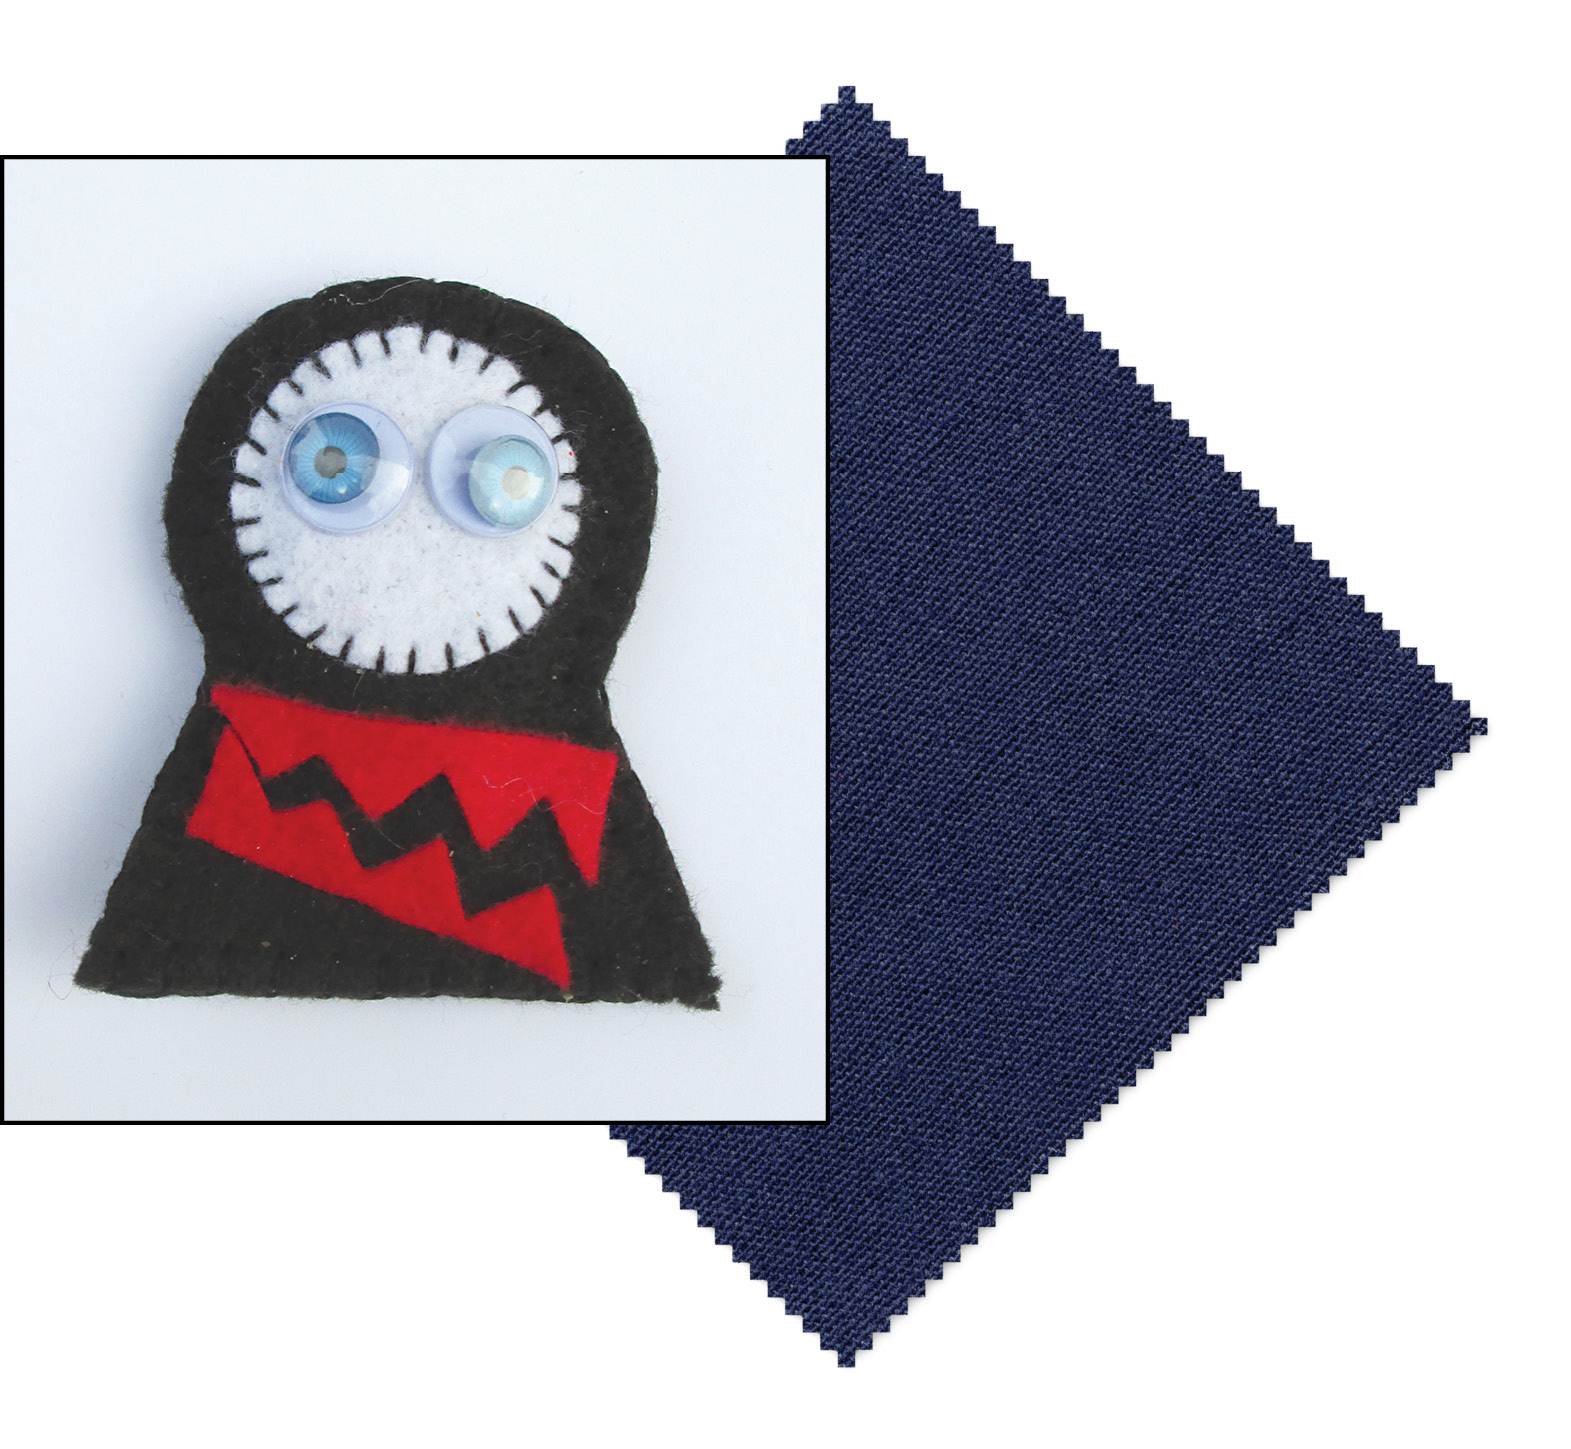
![]()
LITTLE SPIRITS PACK A LOT OF ENERGY PUNCH. SMALL ENOUGH TO CARRY IN PURSE OR POCKET, THEY CAN BE CREATED FOR GOOD LUCK, TO REMOVE A JINX, TO PROVIDE PROTECTION, OR TO PULL IN SUCCESS.
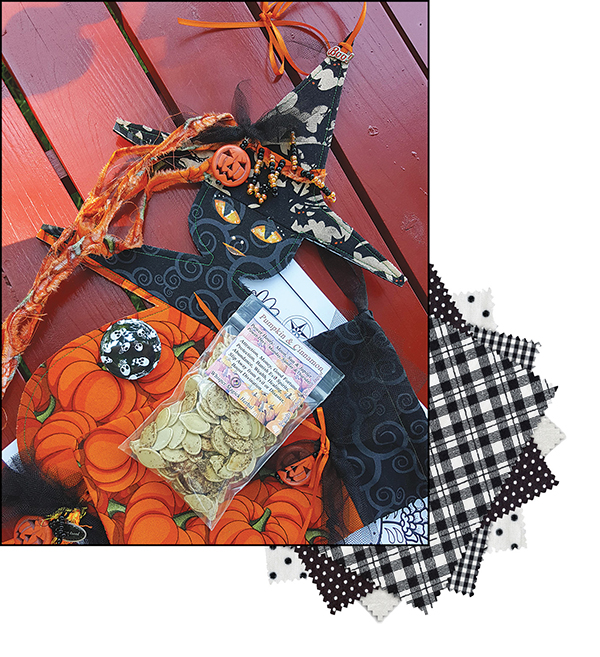
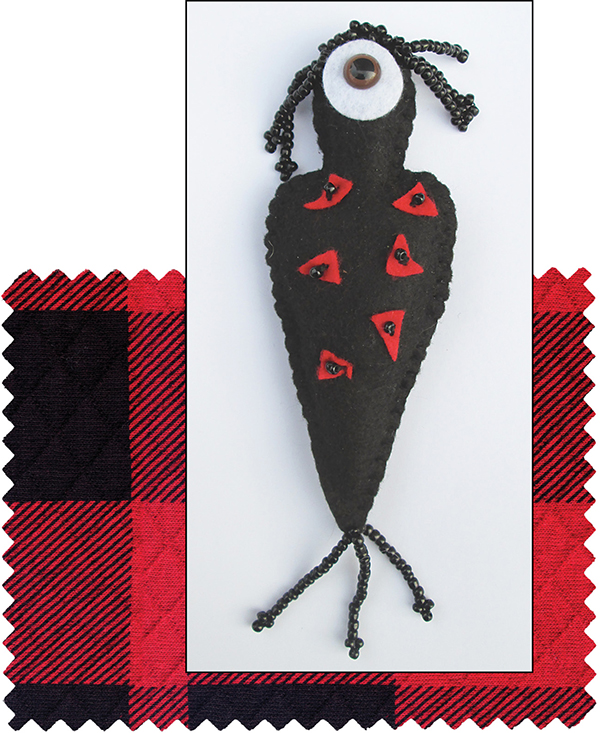
Grave Guardian for Ancestor Communication
pattern on page 233
This type of doll or spirit animal is made to connect you with your ancestors for honor, protection, and advice. The formula is thought to link the two worlds for easier communication. You can create the image several ways, celebrating the freedom to choose all aspects of the design and formula that mean the most to you. For example, you can gather grave dirt from one cemetery or from the graves of ancestors resting in several locations. You can choose those ancestors that you know a great deal about or go for the gusto and collect as many as you can. Your logic, your feelings, and your heart center can provide the answers that are right for you. A friend of mine didn’t make an image at all. Instead, she purchased a skull bottle from a local liquor store and emptied the contents on the ground as an offering to the gods. She let the bottle completely dry and stuffed it with pictures, names, mementos, dried flowers, pennies, dried coffee (for the guardian of the crossroads), and the dirt from every locally buried ancestor. Before she entered each graveyard, she gave an offering of white rum and a cigar at the gates and carried a lit white candle on her journey to and from each grave.
My favorite herbs for a grave guardian (which can be any shape: human, animal, or otherwise) are patchouli, vetiver, sandalwood, peppermint, and coffee beans mixed in ritual with a few drops of cypress oil. I empower the doll with a burgundy candle dressed with a mixture of white rum and patchouli essential oil (be careful that you don’t use too much rum or the candle could torch and cause a fire). Should you choose only one ancestor and you knew that person well, your choices of what goes into the doll might encompass the favorite aromas of the individual linked to small trinkets they once owned.
I always handle my grave guardians with respect. Prayers once a week on the day you desire should be given to the universe to bless the deceased. The grave guardian can also be buried at the gravesite to protect the dead, should you feel this is needed. Add juniper berries to the stuffing and a protective sigil if you wish to use the doll in this way.
In the photo on the next page, the grave guardian has beaded hair, which is very easy to do. The hair is usually one of the last embellishments I add to any doll. For most projects, I like glass E beads, a thin beading needle, and three strands of embroidery thread that match the color of the bead, although you can use special beading thread if you desire. I don’t work with regular thread because the weight of the beads will eventually snap that type of thread, leaving you with a bald dolly and all that beading work scattered on the floor. Your bead choices are unending—don’t be afraid to experiment! Use color, texture, and material that suit the project’s energy.
To create the beaded hair, I put a knot at the end of the thread, then shoot the needle somewhere in the top center of the head. Depending upon the type of material you used, you can actually pop the knot through the material to the inside of the doll by tugging gently—just be careful you don’t put the thread totally out of the doll. Once you hear the “snick” sound, stop. Thread as many E beads onto the combined three strands of embroidery thread to get the length of beads you feel matches the style of the doll. (They usually let you know, these dolls, if you listen.) Once you reach the desired length, add three more beads, then turn your needle and count up those three beads. Insert the needle in the fourth bead up from the bottom bead and pull gently. The last three beads will pull together in a cluster. Continue running the needle and thread back up through the strand, being careful not to miss any beads (or you will have an unsightly thread on the outside of one or more beads). When you reach the scalp, pull the thread tightly to remove any gaps in the string of beads. It is okay to run your fingers over the bead string to massage that thread taute inside the beads. Pull the thread again, then make a stitch in the head to secure the string of beads. You can run the needle back into the head and out at another spot to add another string of beads if your thread is long enough. If not, tie off and start over at a different place on the doll’s head.
Grave guardians are usually most happy to travel with you in purse or pocket (depending upon the size), on long trips, to the job when you are having a bad time, etc. You may wish to make a special bag for the dolls, including some “food” for its travel; a few pieces of hard candy work well. If you need to link a place to yourself, suck on the hard candy for several minutes, close your eyes, think of creating the link, and then spit the candy on the ground. The link can “hold” for quite some time, regardless of what happens to the candy, depending upon your previous meditative and empowerment practice.
Gnome/House Spirit
pattern on page 243
Home protectors and household deities emanate from various cultural practices and colorful folklore all over the world. From the Slavic domovoi to the Anglo-Saxon brownie, gnomes and their like are associated with the earth element, good fortune, domestic bliss, and family protection. It is not uncommon to see a particular area set aside in a Pagan household focused on honoring the deities of the home itself. This focus includes the energy pattern of the structure coupled with nature that manifests in a design the owner acknowledges (often in the shape of a gnome, fairy, or mythical animal). These special places are limited only by the imagination and often cyclic offerings are shared. Fairy gardens and gnome houses are common, particularly around potted plants and terrariums. All my porch plants in the summer have a compendium of gnome/fairy/magickal animal activity, including a tiny barn and other unusual miniatures. Porch plants just seem so bare without such decorations, you know? And gnomes love little toys.
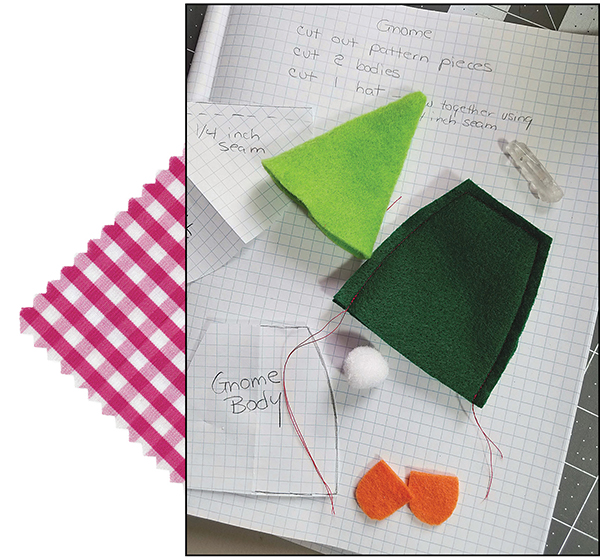
Should you wish to build your own village or family of gnomes, I have designed a fun, quick pattern out of felt for your enjoyment. These gnomes (fairies, trolls, or elves) can be filled with magickal gems and herbs and created with specific intent (love, money, good fortune, protection) or you can make them just because! These magickal beings can be any color, shape, or size. Feel free to adjust the pattern to make your little people more unique. Steps for completion are simple. All you need is a variety of felt, a good pair of sharp scissors, something for the nose (pom-pom, metal brad, wooden bead), polyester or cotton stuffing (which I used for inside the hat and some in the body to pack the herbs), a choice for hair (thick yarn or needle felting wool), and embellishments such as beads, sequins, or embroidery thread. You can use a glue gun or machine or hand stitch your gnomes. In my examples here, I used a combination of all three.
Begin by making any adjustments you would like to your pattern (a crooked hat or curled shoes, etc.). Cut out the paper pattern and then cut out your felt pieces. You do not need to add a seam allowance unless you want to. For my gnome, I cut one hat, two bodies, and four shoe pieces—one color for the top of the shoes and a different color for the bottom.
I’ve found that doing all embroidery additions before I assemble the gnome makes the project go easier and faster. However, if you will be machine stitching the hat or body, you will want to save the beadwork, charms, or sequins until after you have assembled the pieces because the pressure foot of the machine goes wonky around those objects.
![]()
PIECES OF GNOME
![]()
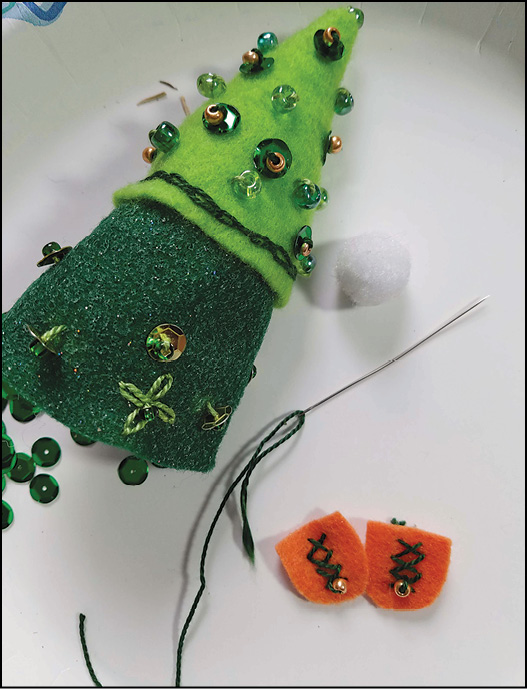
ADDING EMBELLISHMENTS
Sew the hat (right side to left side). I used the machine so I could turn the hat and hide the seam. I used a ¼-inch seam allowance and trimmed the seam before turning the hat.
Finish adding sequins and beads onto the hat. Stuff the top inch or inch and a half of the hat with poly-stuffing. This plumps out the hat. You can also add a small crystal or gemstone in the very top point of the hat for more magickal oomph.
Sew or glue three sides of the body together (two sides and top). I machine stitched the body so I could hide the seams. Trim the seams and turn the body inside-out so the seams don’t show on the outside. If you don’t want to use a machine, you can hand stitch or use a glue gun. Leave the bottom of the body open. Finish adding any beaded or sequin embellishments.
Stuff the body with your herb/gemstone blend that corresponds to the intent of the gnome. Pack the herbs into the body by adding the polyester or cotton stuffing last, leaving about ¼ to ½ inch unobstructed.
Decorate the top part of the shoes, then glue the tops of the shoes to the bottoms. Allow to cool (if you are using a glue gun). Once cool, arrange the shoes on the inside edge of the body (you want the shoes to stick out). Glue in place. When the shoes are secure, carefully glue the bottom edges of the body together. Take your time. Use a bamboo skewer to push the stuffing or any errant herbs into the body as you close it. You could also hand stitch the bottom closed if you prefer. (Oh, and as a note? Gnomes love unique shoes. Just saying…)
Cut 2 or 3 inches of thick yarn for mustache or beard. I twisted the fiber for a better hold in gluing. You can also use faux fur or felting wool. Remember that you can trim the hair and beard at the end of the project, rather than worrying about the length while you are putting all your pieces together.
Slip the hat down over the body as far as it naturally falls. There will be a little gap between the lower edge of the hat and the front/back of the body, which is good because you need to tuck the nose and the beard/mustache/hair up under the hat.
There are two ways to complete this next step. You can go ahead and tack the hat with a stitch or two on each side (don’t glue because the glue takes up too much room) and tuck the hair/beard and nose up under one at a time (start with the mustache/beard first), gluing as you go. Or you can measure where the hat will fall, then remove the hat, arrange the nose and hair, and glue them into place when you are satisfied with their positioning. Add and tack the hat last. You will understand the benefits of each method if you try both ways. If you will be making many gnomes, figuring out which assembly steps are easiest for you will make the process of putting many little people together easier.
I finished my gnome by stuffing more fiber into the hat and allowing some of the polyester or cotton stuffing to stick out for a frizzy hair look. You can glue this hair into place for a firmer hold. Trim beard and hair for the finishing touch with sharp scissors.
Remember, if you make a mess with the glue gun, don’t scrap the project out of frustration. With a pair of sharp scissors, you can easily remove unsightly blobs or even carefully shave the glue off the surface of the felt. Just take a deep breath, focus, and concentrate on your gnome glue-grooming. He will look magnificent!
![]()
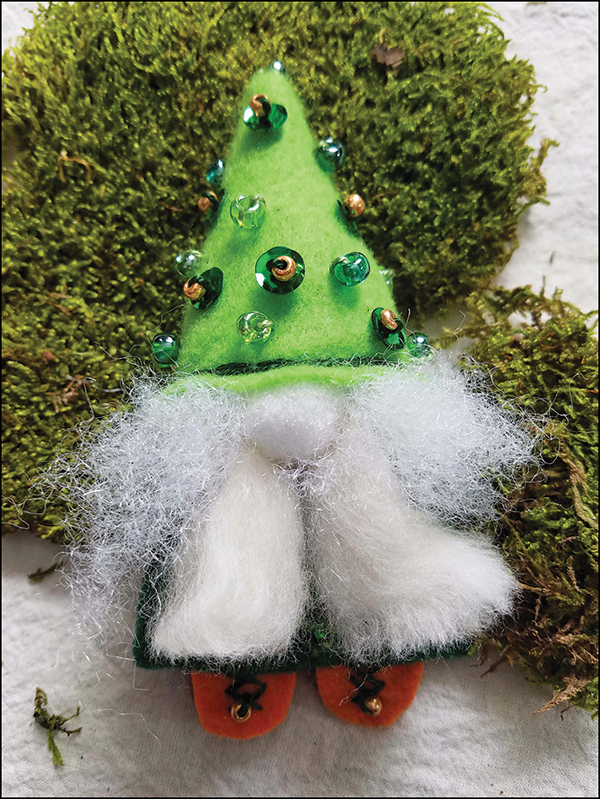
A MAGNIFICENT GNOME AT YOUR SERVICE
![]()
MANY OF MY DOLLS ALSO COME WITH LONG HAT PINS, DECORATED SAFETY PINS, OR NEEDLES DECORATED WITH BEADS SO THAT THE OWNER CAN PIN A PAPER PETITION TO THE DOLL
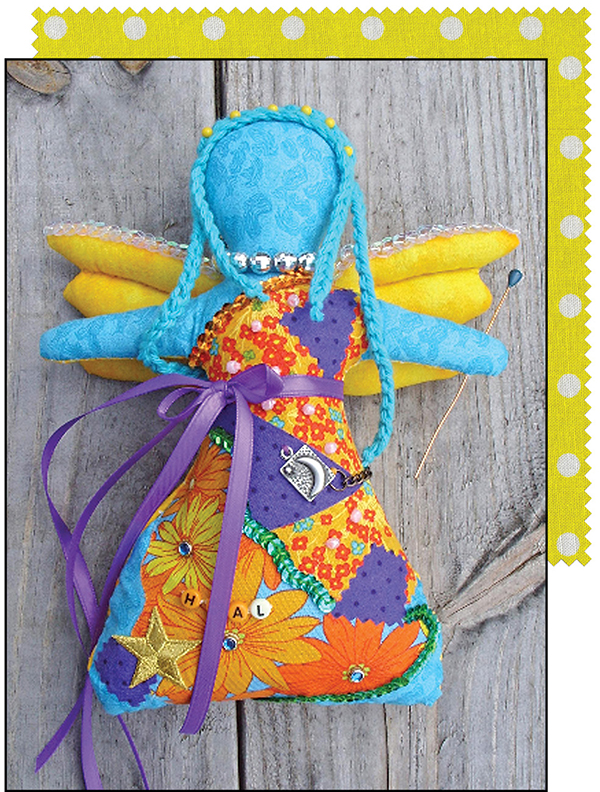
Spirit Fairy
pattern on page 228
The spirit fairy is one of my favorite enchanted dolls because the premise is a connection to the divinity in nature. You can make a spirit fairy for every plant, every tree, every weed, every stone—the choices are more than any of us could create in a lifetime. You can also make fairies for emotions: the love fairy, the healing fairy, the confidence fairy, the change fairy—again, there is no end to your creativity! You can fashion the fairy out of one fabric print, sew several prints together and then cut out the doll, or you can simply use muslin or a plain fabric, stuff the doll, and then glue printed fabric swatches on the body.
For adults who will receive the doll, I often use straight pins as part of the embellishment process as they function to hold something on (such as the hair or earrings) and look decorative as well. I take care in their placement as you don’t want them to jag the recipient of the doll; I always glue them in place, and sometimes I cut the pins down to ensure they won’t come out of the other side of the doll. I don’t use pin embellishments for dolls that go to children.
Recovery Dolly
patterns on pages 237—239
I created the recovery dolly (or spirit dolly) as an aid in the advancement of healing for someone recovering from illness, whether that be illness or disruption of body, mind, or spirit. I often choose the individual’s favorite colors and make sure that the heart packet contains healing herbs and gems specifically for the type of healing necessary.
Charms chosen for the outside of the doll usually correspond to items or activities that the individual loves or that carry the symbolism of a particular type of healing.

![]()
THERE IS NO END TO THE SELECTION OF EMBELLISHMENTS FOR ANY OF YOUR CREATIONS; THIS ONE INCLUDES METAL CHARMS (ANKH AND A HEART WITH WINGS), BEADWORK, A CHAIN BELT, A KEY TO OPEN THE WAY, A STAR FOR SUCCESS, AND A PEACOCK IRON-ON PATCH FOR PROTECTION
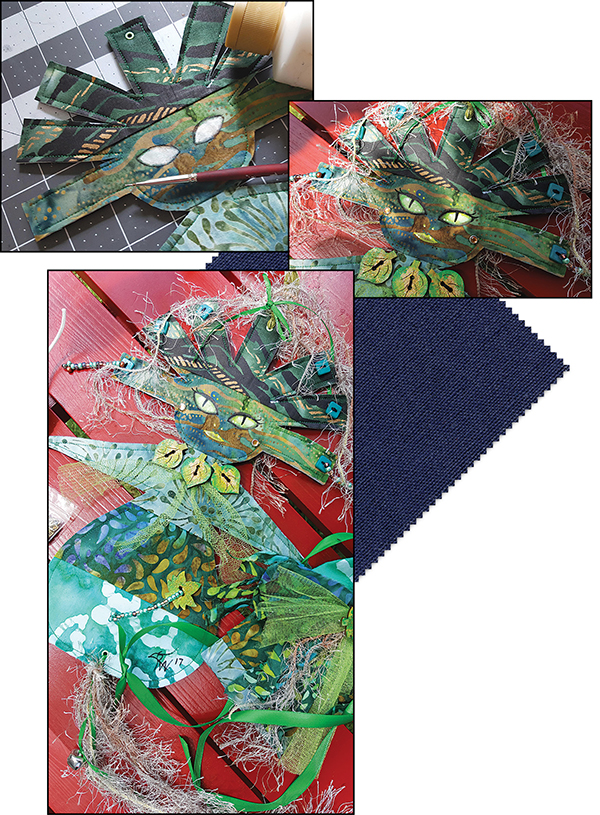
Painted Fabric Poppets and Magickal Animals
I have designed a number of unique painted and grunged dolls and spirit animals over the years. (A grunged poppet is painted with tea or coffee, rubbed with spices, and baked—I go into the grunging process in chapter two.) I have found great pleasure in creating these images and sharing them with friends, family, and customers on my website and in my Etsy store. Bats, cats, cows, ravens…I’ve sewn, painted, and decorated a number of one-of-a-kind spirit dolls.
When I create a doll or animal, I first design it on graph paper. The next step is to make a prototype out of muslin fabric. I often draw right on the muslin with a pen or pencil and just sew on the lines I have drawn, rather than cutting out pattern pieces, which is time-consuming and tedious. Once the doll is sewn, I turn it right-side out and hard-stuff it with polystuffing. In hard stuffing, you pack the doll tight with small amounts of stuffing. This takes longer but gives you a firmer, more stable product in the end. It is during this stage where I learn whether or not the doll design is a viable one, and it’s where I make changes to the pattern. What a doll looks like flat is not necessarily how the doll will appear when it becomes three dimensional. Many times I find that I have to adjust seam lines to make the poppet more pleasing to the eye. Each doll has usually gone through at least three prototypes before I settle on a design I like.
When I make and design spirit animal dolls, I spend several days or weeks on researching the animal—what it eats, where it normally lives, its general “spirit” personality, legends associated with the animal, its socialization process, etc. I have found that the animal often appears in my life in some way. I will hear about the species in the news or I might see the animal in the wild or I may be gifted with a replica of that animal. When these signs appear, I know I am on the right track and that I should continue with my creation. When I finish a spirit animal doll, I either give a food offering to nature or I contribute in some way to the welfare of that type of animal through a monetary donation.
When I finally have a design I like for any of my creations, I machine stitch most of my designs with a smaller than normal stitch length. This way, the seams don’t break loose when I’m stuffing the doll. When I first began creating my dolls, I used the normal stitch length and double-stitched all the seams, but this took way too much time. I decided to employ the smaller stitch length, which works very well. Before I sew the spirit doll shut, I always include some sort of “come alive” packet to breathe life into the doll (see chapter three). This packet might be a small bag of a different color filled with particular herbs or things I have gathered from nature for a specific intent, a material envelope I have sewed, or merely wrapping the sigil and a gemstone blessed with magickal oil and fluid condenser tightly in a strip of cloth. As I mentioned earlier, I always light a match and drop the lit match into the doll. This is to put the breath of life and the fire of love into the doll. Every packet is different because every doll is unique.
In this book I have provided you with some of my special animal designs. All of my designs were initially made out of muslin, stuffed, and painted with acrylic paints. For a softer effect on the painted muslin animals, I lightly sand the bodies with light grit sandpaper. For Painted Pony, I needle-felted merino wool onto the pony for the mane and tail. His eyes are metal brads affixed with fabric glue. To make the wool easier to handle, I twisted it tightly first and then needle-felted it in place. Painted Pony was designed for motivation, moving forward, and removing blocks in your life. I made two versions—one painted red (which I still have; see the photo on the very first page of this book) and another painted a rich, buttery golden yellow for success.
The animal designs can be as complicated or as simple as you desire. They work well with several mediums, including paper, wax, felt, and muslin. I have constructed all the animals out of muslin and grunged and painted the designs. For a faster process without the grunging, use felt. Many times I use brads or buttons for the eyes, although on occasion I paint the eyes freehand.
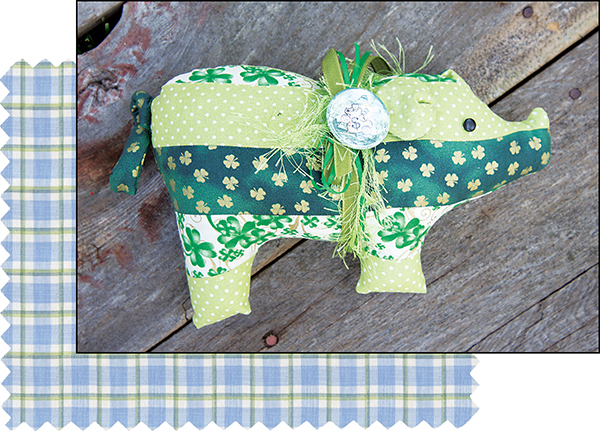
Painted Pony
pattern on page 255
This design is for movement in your life, speed, messages, transportation, and tribal matters. Painted Pony, depending upon the intent you have set for him, traverses the heavens in a shamonic state, bringing you the information and power needed to accomplish a set task or work through a problem. In lore, he/she can bring you wisdom, the power to lead, and the ability to heal.
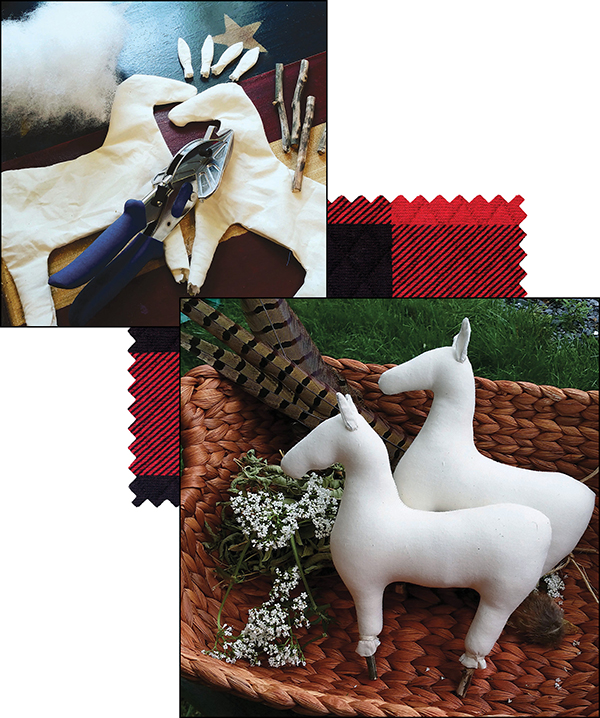
I use a hard stuffing technique on most of my animals and grunged dolls, including Painted Pony. The method requires packing the stuffing in the image very tightly. It takes much longer to fill your creature (for example it can take an hour to stuff two doll legs); but, the result is well worth it. Your creation is firm, making a pleasing appearance, and is also easier to paint. For the pony, leave the hooves open and insert sticks gathered from the woods after the animal is stuffed. Many times I carve runes on the twigs, slather the top third with glue, and then slide the sticks into the body. Once I’m satisfied with the placement, I use pearl embroidery thread, leaving 3 inches free at the beginning, and wrap the thread around the leg opening at least twenty times, or until I feel the stick is stable. Tie the two ends of thread together, knotting securely. Cut remaining thread close to the knot. Add a dab of glue on the knot so it won’t unravel. For the mane and tail, I used a needle felting technique, twisting the merino wool fibers to keep them from pulling apart, and then felting the twisted wool with the punch needle to hold mane or tail in place. To complete the magick of this design, I paint a symbol or sigil that matches the intent of the animal on its hip.
![]()
To complete the magick of this design, I paint a symbol or sigil that matches the intent of the animal on its hip.
![]()
Duck
pattern on page 253
Diaper cakes are very popular these days—the only drawback is the expense of the objects to hang from it! You can make both the bunnies on page 182 and the ducks (without the eyes) out of colorful fabric for mom to share with baby, or you can make your ducks and bunnies out of felt to place on baby shower gifts as part of the décor. If the animals go to baby, bless a heart-shaped piece of fabric and stuff in the body of the animal to ensure your creation is safe. This type of creation is considered an ornie (ornament) in the doll-making world.
The ducks in the picture are painted and grunged. Their heart packets are filled with bringing good fortune to the owner. This type of creation is often displayed in a basket or used as a decorative shelf-sitter. Ducks and swans often symbolize a happy marriage.
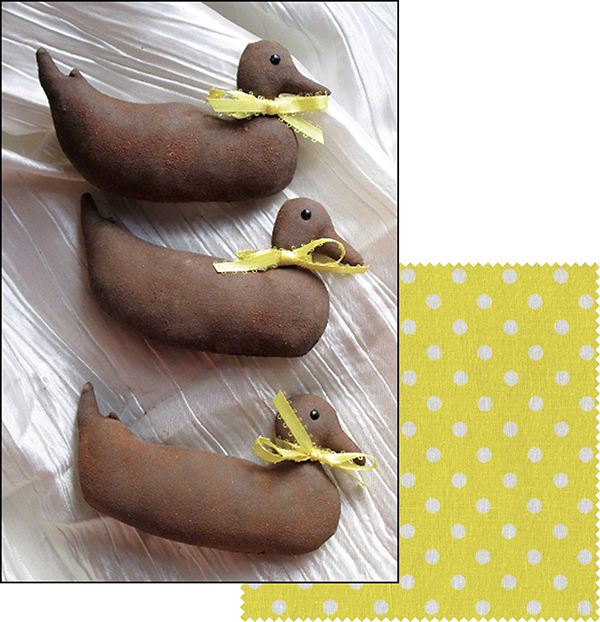
Kitten Prim
pattern on page 260
These kitties are part of my lucky black cat ornie design collection. Each kitty’s heart packet can contain good fortune herbs, a petition of luck, and a jade gemstone. Every time the bell rings, good fortune is on its way!
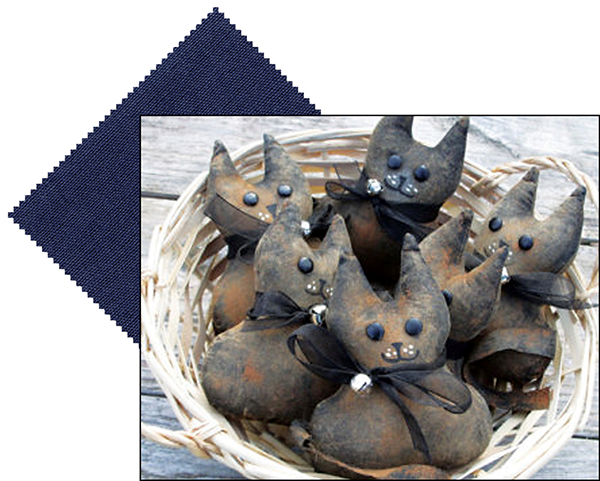
Good Fortune Magick Cat
pattern on page 249
The idea of creating good fortune magick cats (of which I have designed several different patterns) came from the lucky black cat formulas of the Hoodoo world, where the focus is drawing money through risk, gambling, and good luck. There are quite a few traditional blends, depending on the practitioner. To me, moving forward in life is always a risk (a delightful one, but a chance taken nonetheless). Cat’s energy is associated with agility and independence—two highly prized gifts in the spirit world. I use various good fortune blends and sigils in my cats, letting intuition guide the way as I construct the individual animal.
Many prosperity gemstones and crystals will fit very well in your good fortune cat. Choose those that you feel belong in the body of your creature (or in the heart packet). I personally like bloodstone, jade, and citrine. Many of my cats have a carved or paper fish, catnip, and feathers added to their heart packets, along with an herbal good fortune mixture. These are general favorites of cats, added to bring them joy. One lucky black cat herbal formula I use in my creatures, mainly if they are to bring good fortune through my own creativity, contains cinnamon, bay, allspice, nutmeg, sassafras, Jezebel root, and patchouli.
Medicine Bear
pattern on page 248
Bear energy travels through the heart and soul of healing, herbal medicine, and protection, often through travel. In January 1978 a massive blizzard hit from Philly to Boston, and I was driving in it with my yellow Camero. I was petrified. I drove from south-central Pennsylvania to Massachusets. (Did I say I was stupid? Yeah, that too.) As I drove (with a cat in the car, mind you), I passed stuck tractor trailers, wrecked and stalled cars, and pickup trucks facing the wrong way—and I motored forward, ever onward. Not only was that trip a physical nightmare, it was a massive mental terror as well. It was the first time I employed the help of spirit animals, and that is why the experience will be locked in my mind forever. I visualized six larger-than-life polar bears chuffing along on either side of my vehicle, getting me through that mess where the snow was so high that it covered the roadside signs. Years later I found myself lost and alone on a highway during another horrendous snowstorm. Once again I called upon my polar bears. They didn’t let me down. I made it home safe, albeit fingers stiff from gripping the steering wheel and my legs wobbly from hours of tense sitting while circling in the dark.
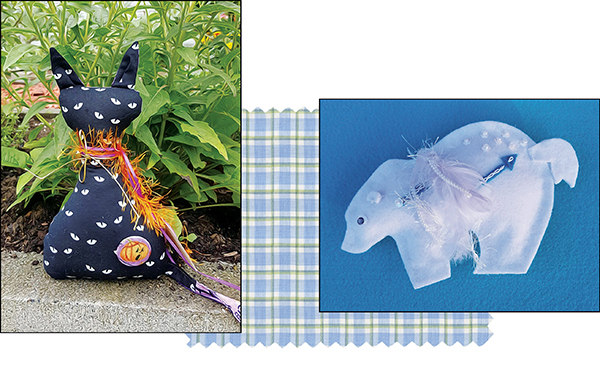
I regularly use amethyst, aquamarine, and moonstone for travel protection sachets and animals. My healing bears always have a quartz crystal either attached to the outside of the animal or in the heart packet inside the body, as quartz crystal is called the Master Healer. I also use osha root in the creature (although it smells awful), depending upon the sickness. Bears battle the pattern of illness. My herbal mix for most of my bears includes borage, white sage, peppermint, eucalyptus, cedar, and beeswax.
Bird Prim
pattern on page 252
The best way to work with the energy of spirit animals is to experience their behavior through personal observation on a repetitive basis. Those creatures that are an integral part of your habitat will share the most information if you only allow them to do so, and what you receive may not be what you’ve read in books. For example, the owl is often associated with death; however, I have not found this message in my experience. I live in the woods. There are owls. Every time an owl hoots at night or wings through the air across from my porch, someone is not going to drop dead. For me, I have found the owl to mean “the mysteries”—learning, opportunity in knowledge and wisdom, and whether or not there is magick afoot that somehow might involve myself or my loved ones. Likewise, in my world, the crow lets me know if someone is stirring up trouble. Crows are frequent visitors to my backyard and often do so quietly. They strut around in my magick circle. Sometimes they eat the peanuts I leave for them and other times they don’t. If their visit is noisy, I know that someone is plotting or attempting to bring negativity into my family unit. They are the ultimate messenger of balance—the crow/raven walks between the worlds. When the crow delivers the message, which you acknowledge, you then give them a missive in return, telling the crow/raven to carry the power to disrupt the negativity. Address the bird with honor, and you will be granted the same.
A nice mixture for inclusion with crows/ravens includes crushed peanut shells, eyebright, spearmint, dill, and vervain. If you wish information from the human spirit world, add grave dirt gathered from a favored ancestor’s resting place. Lapis lazuli, turquoise, amethyst, crystal, and moonstone are all excellent choices to adorn these powerful spirit birds.
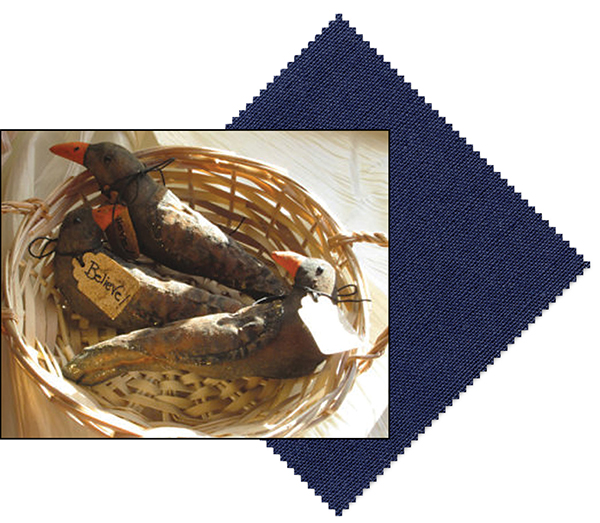
Brigid’s Bunny
pattern on page 250
Brigid’s Bunny is dedicated to the goddess Brigid and her creative and healing gifts. Brigid is also the goddess of herbal power and midwifery. A perfect gift for an expectant mother or as a protector in the room of a new baby, this rabbit is machine stitched using cotton muslin, then painted when completed.
After stitching, turn rabbit inside-out and stuff with organic cotton and offerings sacred to the goddess Brigid, such as: dried grains, 8 pennies, 9 white pebbles, oak leaves, willow bark, lambs wool, hazel nuts, hops, rosemary, dill, chamomile, and clover. Stitch closed. Paint body white. Paint the eyes. Grunge with coffee, cinnamon, and allspice. Add a fluffy white pom-pom for the tail and organza ribbon. Empower in a ceremony using red and white candles on a new moon; best on Imbolc.
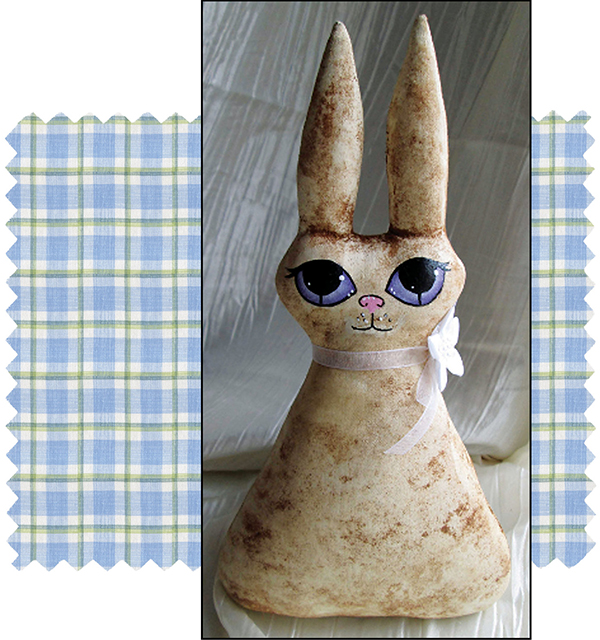
Bunnie Ornie
pattern on page 251
Although bunnies and rabbits are associated with the spring season, birth, procreation, and just downright being adorable, their medicine for survival is the most powerful of all. There is nothing that will fight harder for life (or be more creative in that instinct) than the rabbit. When stuffing your creature, don’t be deceived by the idea that something so cute and cuddly is inherently weak or consistently fearful—quite the opposite. A healer’s gift of a rabbit spirit animal to someone who is ill is an offering of strength, endurance, and creativity in survival.
Herbs for your heart packet for an adult healing might include damiana, mistletoe, bay, olive leaf, black tea, and woodruff. For a child, remove the damiana, mistletoe, and woodruff, as those should not be ingested. Turritella agate, with its pattern of fossilized shell in the stone, can be included for survival, wisdom, and overall healing.
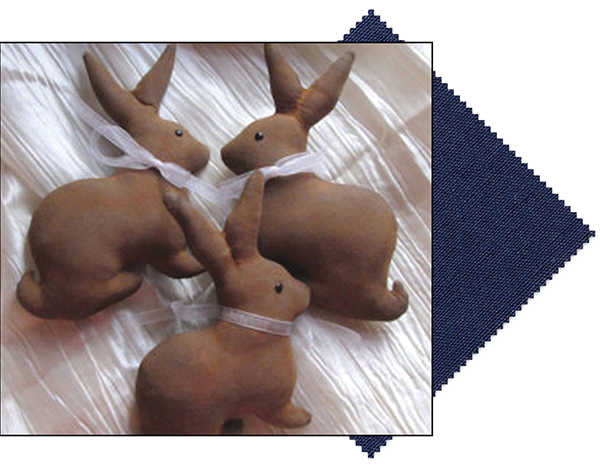
Stuff these cute little creatures with natural cotton and wishing herbs. Add a large amount of dried chocolate mint to the stuffing and paint them brown to make the chocolate bunnies you see here. Use metal brads with a bit of glue for the eyes. Finish with a bit of organza ribbon for a lovely spring gift. For an expectant mother, you could paint them blue or white, then stuff them with chamomile, cotton, and a petition for safe delivery.
Taco Cat
patterns on pages 258 & 259
My Taco Cat and his lady friend, Sriracha Cat (same pattern—you just make her a skirt; see her on the very first page of this book), have become leading figures in my poppet construction. Fun and loveable, Taco Cat took on a personality totally his own.
His name is derived from the spices I used to grunge him—taco spices! Little did I realize when I designed him just what an amazing energy he would add to my life. Larger than many of my other projects, Taco Cat has made regular appearances on my Instagram, Facebook, and Twitter feeds. Taco Cat absolutely represents the spice of life: loving adventure, having a sense of humor, being courageous. His geist bag holds toys, rose quartz, a crystal, taco spices, hot peppers from my garden, a ghost pepper that I was told was so hot it would kill a person (no kidding), coffee beans, tonka beans, 3 pennies, a match, and a “come alive” paper charm.
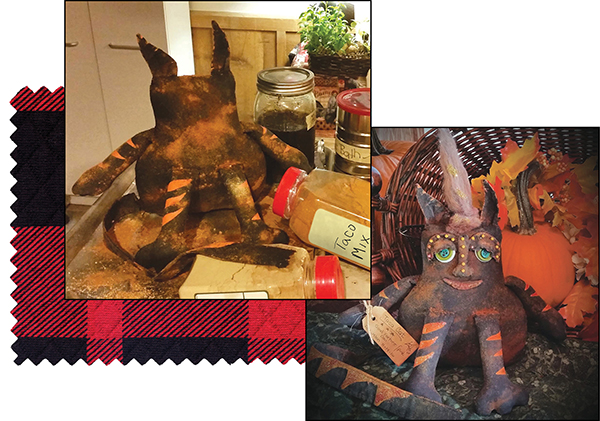
For quite a while I posted interesting pics of Taco Cat frequently, but then doubt set in and I thought, “Maybe I should stop making such a fuss over this stuffed cat.” So I did. What I didn’t expect were all the posts and emails asking me what the heck happened to Taco Cat! One email I received made up my mind about Taco Cat and sharing his pattern here. I’ll paraphrase:
“Dear Silver, I just wanted you to know how much my mother and I love seeing the pictures of Taco Cat that you post. My mother is dying of cancer, and every day she asks about Taco Cat so she can see a funny picture and laugh.”
After I got done bawling my eyes out, I posted another pic of Taco Cat having a good time. Taco Cat stands for never giving up and never giving in to stupid stuff. Eventually I posted story pics of Taco Cat looking for and meeting Sriracha Cat (his lady friend). I had so much fun thinking up ideas for their big meeting. I even had Sriracha Cat cast a spell to “catch her cat” (so to speak). Sriracha Cat is all about independence and personal empowerment. Her geist bag contains a teeny-weeny statue of Sekhmet, dragon’s blood resin, hot peppers, coffee, a tiny bottle of perfume, and a “come alive” paper charm.
Taco Cat represented a learning experience on many levels. I learned that once muslin material is painted and grunged, it is very difficult to add eyes, mouth, etc., by stitching. You’ll dance with sore fingers and several broken needles—and, if you are like me, a pointed explicative or two (or a hundred). To avoid this heightened irritation, I stitched the mouth onto the cat before I painted it and glued on the eyes and the eyelids after the cat was painted and grunged. To secure the nose and eyelids, I pinned them on with straight pins dipped in E6000 glue. I rarely use glue on my dolls (because glue is untrustworthy for a long-lasting product), but with Taco Cat using glue became part of the design structure to keep the eyes, eyelids, and nose in place. I wanted the eyes to be unusual and whimsical, so I stacked and glued together colored buttons. For both cats I used merino wool, twisting strands together and needle felting the twists to the heads with a sharp serrated needle made for this purpose.
If you make one of these cats, prepare for your life to change!
Swan Ornie
pattern on page 256
Swan’s power lies in transformation, rising above the sticky net of our own negative thoughts and swimming freely in the sea of potential. Swan reminds us that we have the inherent ability to change in a way that brings us joy and provides happiness for others. Many believe that the swan energy enhances psychic abilities and heightened perception. The swan’s association to love and partnership traces from Greek (Aphrodite) and Roman (Venus) mythology and alludes to love; however, swan’s greatest gift is the ferocity in which she protects her young, and consequently the association with protection of the general family. Double swans signify the unity of family—the power and protection of the clan.
Protective herbs for the heart packet can include juniper berries, cedar, rosemary, yarrow flowers, cinquefoil, and basil. Include labradorite if you think someone sends evil intentions, blue kyanite to stop bullies and manipulation, or black obsidian to break curses.
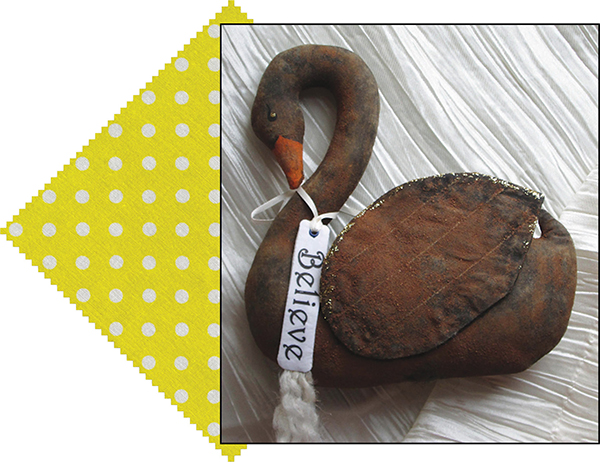
Sweet Sleep Sheep
patterns on pages 246 & 247
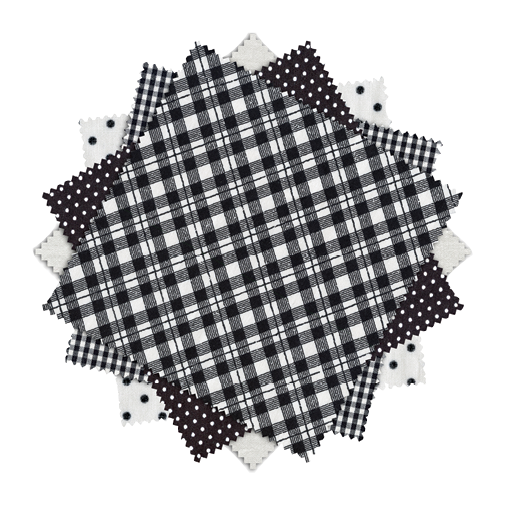
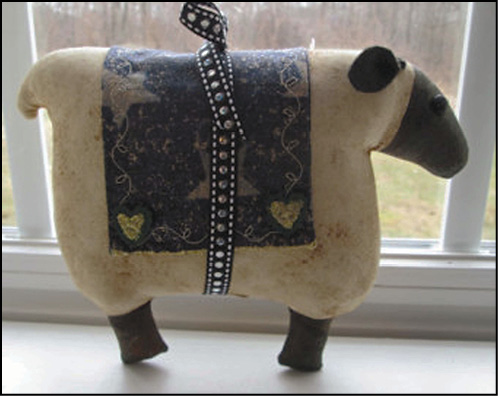
There are just some animals you adore because of their cultural or daily life associations. The sheep is one of those creatures, associated with sweet sleep, rest, peaceful surroundings, warmth, and environmental security. In the real world, if sheep are happily grazing, the dog has kept the evil away. I designed my sheep spirit animals as vehicles for restful sleep and dream solutions, experimenting with different formulas until I found the ones that were most useful to my energy vibration. Over the years I’ve learned that one herbal blend doesn’t fit the energy patterns of all people. The best way to work with the herbs is to start with the base recipe and then study the results as you add or remove different ingredients until you have something that works well for you.
This sheep pattern is easy to construct and works well with different material choices. Over the years I’ve used muslin, pieced cotton, felt, foam, and paper. My choice of supplies often rests on the amount of time available to make the project and how long I want the project to last. The sheep in the photographs were sewn out of unbleached cotton and then painted with acrylics, grunged, and baked in the oven. For years they hung over the headboard of my bed; now they travel with me to my poppet seminars. The painting and grunging process takes the most time; however, these sheep have weathered the years well! If you are using felt, foam, or paper, the sheep goes together very quickly, but it probably won’t last very long.

![]()
THESE SHEEP WERE CONSTRUCTED WITH MACHINE-STITCHED MUSLIN, ACRYLIC PAINT, AND A GRUNGING FORMULA; THEIR EYES ARE METAL BRADS INSERTED WITH A BIT OF GLUE ON THE ENDS, AND THE EARS ARE BLACK FELT
If someone is having difficulty sleeping, add a protective sigil or angel association inside the sheep. A bell can be inserted inside or stitched outside as a symbol of warning and energy clearing to keep the sleeping individual safe. One of the things I like best about this pattern is that you can make lots of little sheep or go for the gusto and make a big sheep! The design lends itself well to resizing. Another option is to add a piece of decorative cloth as a blanket for your sheep. You can slip a special petition under the blanket before you sew or glue the blanket into place.
Gemstones associated with sweet sleep include selenite, quartz crystal, rose quartz, moonstone, jade, dalmatian jasper, and celestite. Stick to tumbled stones for sleep magick rather than points. For restful sleep, try a combination of amethyst, rose quartz, selenite, and celestite. For dream solutions, combine jade, quartz crystal, danburite, and moonstone. Lepidolite, dalmatian jasper, chrysoprase, red jasper, turquoise, and black tourmaline are thought to assist in dispelling nightmares. Add these stones in any combination (or alone) to your sheep.
Enhance the power of the sheep by blending your gemstone choices with a dried herbal mix. For example, eyebright and lavender herbs combined with ametrine, strawberry quartz, and red jasper are used in dream recall.
Herbals associated with sweet sleep include aniseed, balsam fir, calendula, chamomile, cloves, hops, lavender, lemon balm, lemongrass, lemon verbena, lilac, marjoram, mimosa, mint, mugwort, passionflower, rose, rosemary, and thyme.
I have several sleep sheep herbal and gemstone combinations that you may find useful:
Sheep in the Meadow (for General Dreams of Well-Being and Restful Sleep): Lavender, kava-kava, rosemary, and vetiver with turquoise gemstone (for eliminating stress).
Sweet Sleep Sheep (for Dreams of Magick and Happiness): Mugwort, lavender, and hops combined with hematite gemstone.
Baa-Baa Bliss (for Dreams of Peace): Rose, rosemary, lavender, hops, and balsam coupled with black tourmaline and red jasper.
Healing Flock (for Recuperating Sleep During or After Illness): Lavender, mugwort, marjoram, mint, catnip, rose, hibiscus herbs, with rose quartz and howlite gemstones. I chose this gemstone combination because when you are recovering from sickness, there is wisdom gained from your illness. In my opinion, howlite will help you capture this information so you don’t have to go through it again!
Dog in Sheep’s Clothing (to Protect You During the Sleep Cycle): Lepidolite, dalmatian jasper, chrysoprase, and black tourmaline combined with juniper berries, frankincense, hops, passion flower, valerian, ginseng, skullcap, cayenne, chamomile, and lemon balm. Please remember that nightmares are signals that you have issues you need to address. Seek qualified assistance if your bad dreams are persistent or if you are feeling overwhelmed.
Loving Lamb (for Dreams of Love): Rose, rosemary, lemon verbena, mint, cloves, calendula petals, and catnip. Add cayenne peppers for thoughts of passion. Gemstone choices can include rose quartz, moonstone, and lapis lazuli.
Prosperity Pig
pattern on page 254
Often connected to women’s mysteries, the pig (swine, sow, boar) weaves its magick throughout the myths of humankind. Symbolizing abundance, fertility, and good fortune, the pig’s energy links to intelligence, endurance, wealth through agriculture, unleashing one’s inspiration, and feeding artistic ability. Piggy’s geist bag contains sunflower seeds; gold or silver coins; moonstone, carnelian, bloodstone, and chrysoprase gemstones; sassafras, chamomile, and allspice herbs; and dirt from three prosperous businesses (check out those places before you use the dirt).
Cute rounded ears for animals are easy to make if you remember to fold the bottom seam under (after you turn the ear right-side out) and then pinch the bottom closed. Secure with a stitch or two and you have a cloth piece that actually looks like an ear. I also insert a small section of pipe cleaner into the tail, then place the open end of the tail (free of pipe cleaner so you don’t break your needle) along the edge of the right side of the fabric before sewing the front and back of the pig together. Baste to hold. Put the second side of the pig on top of the first (right sides together). Stitch around the the pig. (The tail is nestled inside the body of the pig between the two pieces of fabric.) When you turn the pig right side out, the tail will be secure in the seam.
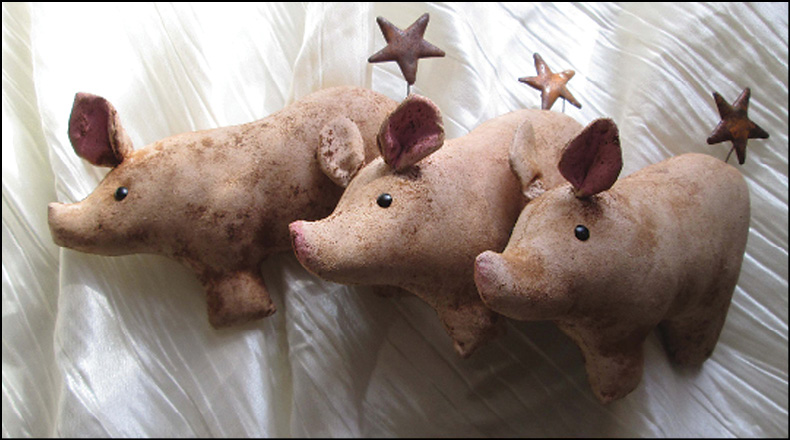
![]()
I FOUND THESE STAR TAILS AT A CRAFT STORE;
SEE PAGE 173 FOR ANOTHER STYLE OF PROSPERITY PIG
Bat
pattern on page 261
In legend, the bat is about transformation and being able to use the totality of your senses to make your way through transition. Out here in the woods, bats come with messages from the shadow realm at twilight. I was so inspired by watching them dance through the dusk my first summer here that I created this bat pattern. Over the years, the bat has become one of my favorite designs, and if I didn’t know what to make but felt crafty, I would stitch up a bat! I guarantee that he will win the hearts of everyone at Halloween!
I’ve used the bat pattern for muslin, colorful cotton, and felt. Outside stitching (after the bat has been sewn together and turned to the right side) denotes the fingers on the wings. For realistic wings, paint the muslin, allow to dry, and then lightly sand the surface. The wings gain stability and have a fantastic leathery appearance! I’ve even used this design for bedtime sachets made of quilting cotton, leaving the bottom of the bat open and gluing Velcro to the inside edges so that you can change the herbals every month or so. The bat’s geist bag contains dried moonflower leaves, moonflower seeds, dried fruit seeds (like apple, a peach pit, etc.), a wooden carved image of a bug, a match, and a “come alive” sigil. If you have pets that will grab your bat (it happens) or any of your spirit animals, you might want to fill their geist bags with food-safe ingredients rather than what I have listed here.
The bat pattern lends itself well to cotton and machine stitching or felt and a glue gun. For machine stitching, lay the pattern directly on the cloth, secure with a few pins, and stitch around the pattern using the edges of paper as your guide. Remember to leave an opening at the bottom for turning and stuffing. Wing stitching for segments is done after the bat has been turned inside right.
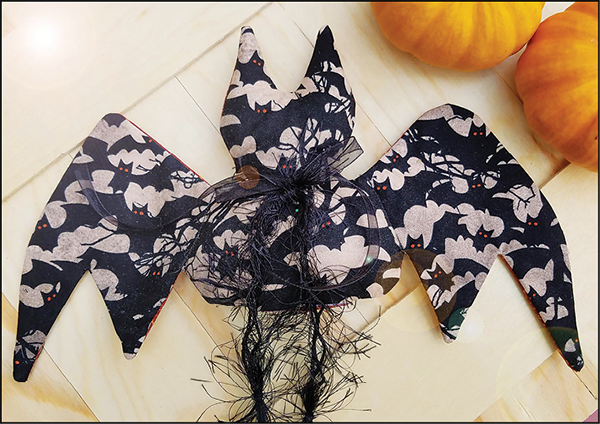
![]()
PRIMITIVE BAT (TOP) AND DREAMBAT (BOTTOM)
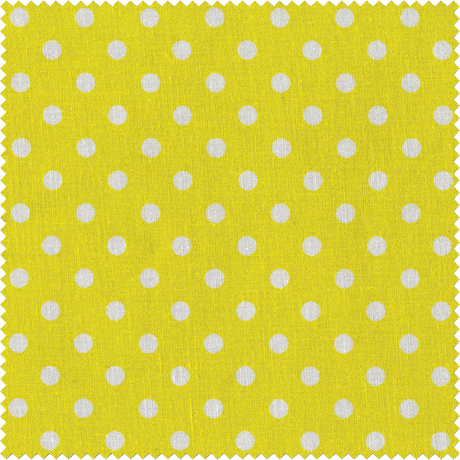
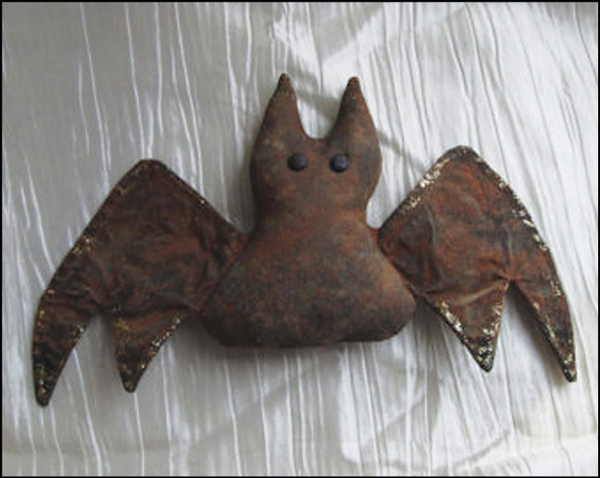
Gargoyle
patterns on pages 262 & 263
In magick and enchantments I use the gargoyle for its protective energies. The geist bag for my gargoyles often contains juniper berries, a silver pentacle, a bullet casing packed with black salt, cloves, black onyx, smoky quartz, and amethyst gemstones, and seven-cemetery dirt (dirt gathered from the graves of seven ancestors in seven different cemeteries) or the dirt from the grave of a bravely famous soldier, along with the “come alive” paper charm.
To keep the gargoyle wings stable, I insert double pipe cleaners in the wings after I have turned the animal right-side out. I then tack-stitch on the outside close to the pipe cleaner edges so they won’t slip. Once the gargoyle is painted, grunged, and sanded, you don’t notice the stitching. Like the bat, I don’t stuff the wings, preferring the leathery appearance of the painted, sanded surface. Adjust the length of the tail to your liking by extending the straight portion of the pattern.
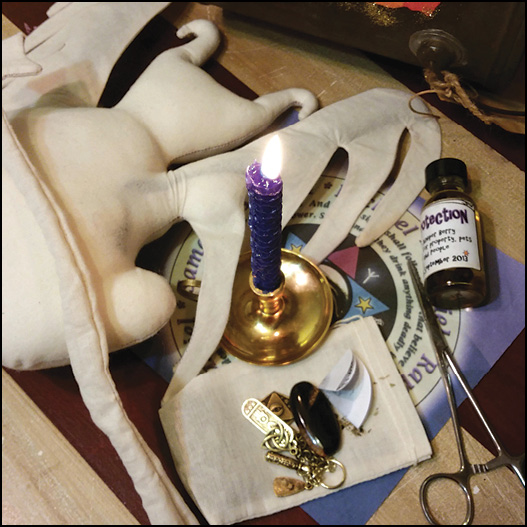
![]()
STUFFING THE GARGOYLE
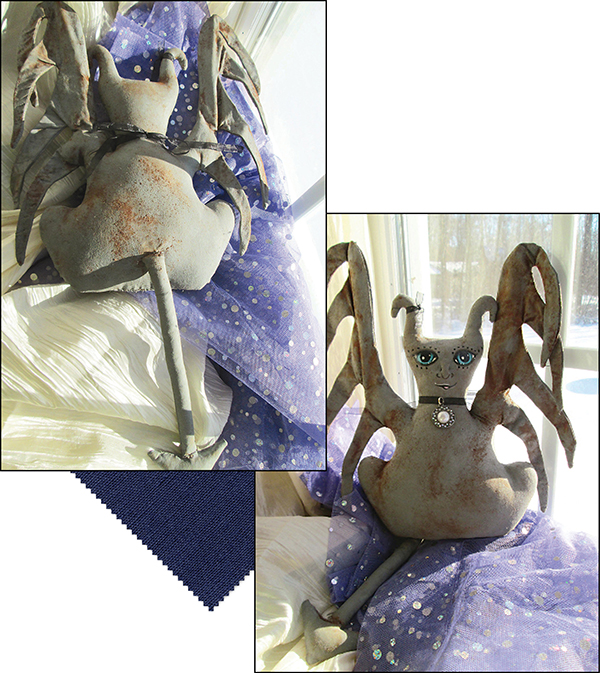
Basket of Bones Ornies
pattern on page 242
I designed the basket of bones pattern to fulfill two functions: to bring positive energies into the home during the fall season and as a divination tool for our Samhain celebrations. The skull and bones fit well into a decorative basket and can also be a centerpiece for your Halloween party and other late autumn social functions. I used the primitive grunging technique in their creation because I wanted the energies of the coffee/cinnamon solution to be part of my overall working. The result of the white paint smudged with the herbal formula makes the skull and bones look graveyard worthy.
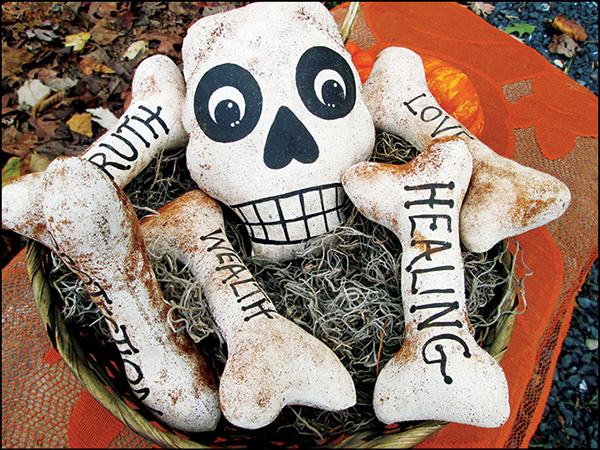
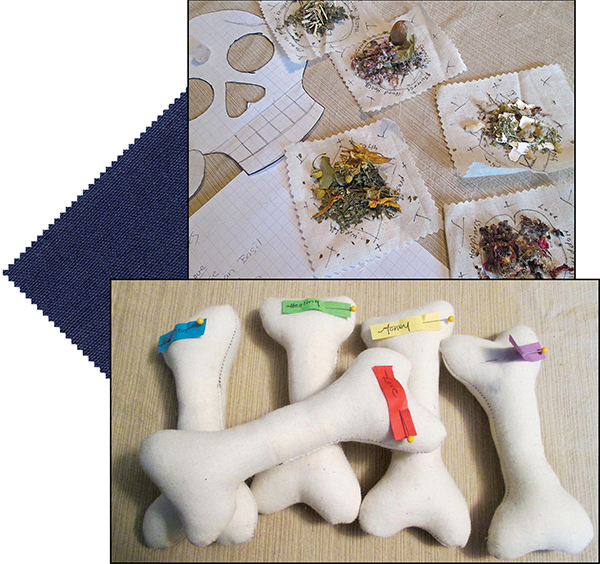
![]()
EACH BONE HAS ITS OWN PROPERTIES AND ENERGY TYPE
I began by sewing the pieces out of muslin, stuffing each one with a specialized herb sachet dipped in universal fluid condenser, then painting the bones white, adding the wording and facial design in black, and finally rubbing the skull and bones with a coffee/cinnamon solution. You can make as many bones as you desire. I made five bones and a head for the original pattern. Each bone is a magical sachet dedicated to an energy type, complete with herbal formula and specialized sigil for the energy that the bone represents.
The following ingredients are what I used in several of my projects of this type. Feel free to change the formulas to what will suit you best.
Wealth: Sunflower seeds, bay leaves with dollar signs drawn on them, chamomile, peppermint, sassafras, lavender, patchouli, and one bloodstone.
Protection: Eggshell, rosemary, lemon verbena, larkspur, white sage, and one onyx.
Love: Rose petals, African basil, ginger root, cinnamon, licorice root, orange peel, hot peppers, and one rose quartz tumbled stone.
Mysteries (Messages from the Dead): Mint, marjoram, wormwood, eyebright, grave dirt, patchouli, and one quartz crystal.
Healing: Dandelion root, rosemary, acorn, dogwood, lemon verbena, eucalyptus, kava-kava, osha root, and one amethyst stone.
The Head: Dirt of your ancestors’ graves or seven-cemetery dirt, rose petals, white sage, eyebright, sandalwood, lavender, rosemary, frankincense, and myrrh. For stones, celestite, charoite, phenacite, angelite, blue lace agate, and selenite all have spiritual associations for speaking to the beloved dead, angels, and higher energy forms.
The biggest challenge was painting the right wording on its corresponding bone, as once they were stuffed, I had no idea what herbal formula was in which bone! To keep from making a mistake, I pinned the name on the bone until I was ready to paint it. I also made a page in my magickal journal about how I created the project so I could remember what ingredients I used.
For divination purposes, the participant is asked to close their eyes and choose a bone from the basket. The bone they choose represents the energy they need most in their lives right now. You can have the same labeled herbal ingredients you used to create the project on a tray so that the person can make a conjure bag/sachet to take with them. For example, if they chose the healing bone, you would hand them the healing herbs mix you have previously prepared and a conjure bag. Instruct them to add a lock of their hair to the bag and carry it with them for healing until Yule. On Yule (Winter Solstice) they should burn the bag outdoors in a ceremony of release and healing.
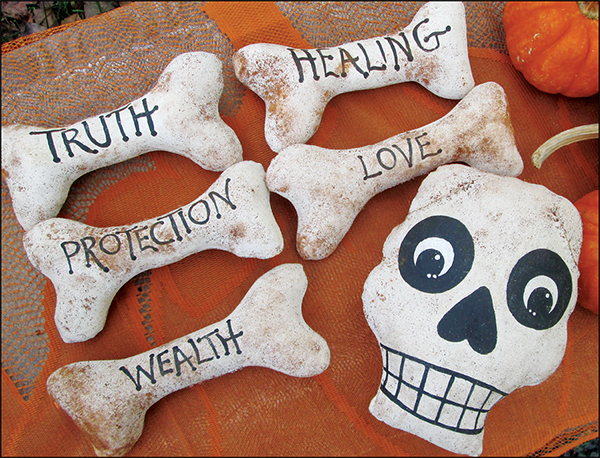
![]()
THIS SET CAN BE USED IN ANCESTRAL CELEBRATIONS FOR MANY YEARS, IF YOU SO CHOOSE—THE MORE RITUALS, THE GREATER THE POWER!
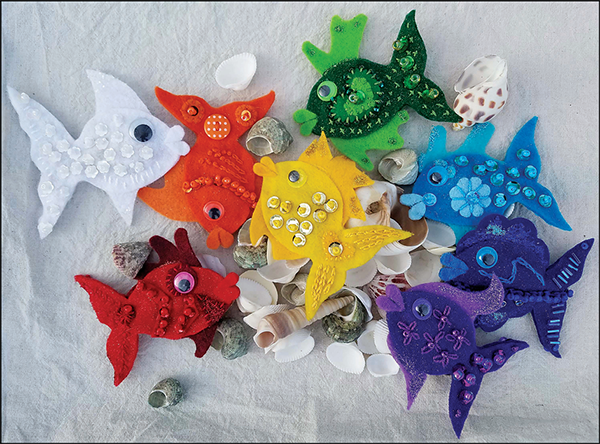
Chakra Fish
pattern on page 257
A chakra is a point of energy or energy center within the auric and physical body that is thought to spin. Each center is like a portal that can be used to heal the body and enhance our daily lives. Although popular material focuses on only seven centers (those that operate within the trunk of the body), there are many more. Even animals have a chakra system that is much like ours but carries an additional point at the shoulders. I developed chakra fish spirit animals as an aid in meditation and hands-on healing. I chose the fish vehicle because I see them as energy that flows into and through the sea of potential all around us. In my private yoga practice, I sometimes pin a fish to my clothing or line them up at the front or side of my mat. If I am ill, I hold the fish that corresponds to the blocked chakra on my body. I have also formed a ring of the spirit fish around an individual’s picture or lock of hair. These spirit dolls can be laid on the body at the matching energy point or lined up on a petition. Their uses are endless in the realm of healing and energy work. I have even used them as divination tools when I am uncertain what energy center(s) are blocked. I put all the fish in a paper bag and then concentrate on the question “Which chakra point needs to be attended to today?”—then pull out a fish. I can then tailor my work not only to the associations of that energy center, but I also use that color correspondence in candle magick.
As a note, there is also a twelve-chakra system, with four above the seven indicated here and one below—a root that communicates like the roots of a tree. Those above the crown deal with transcending time, the soul, using your mind over matter, and uniting with the All (universal spirit). For more information on using your spirit dolls as chakra healers, you may be interested in Cyndi Dale’s book The Complete Book of Chakra Healing: Activate the Transformative Power of Your Energy Centers.
In the list below, you will find suggested colors, gemstones, and herb formulas for the basic seven chakra fish and one very special fish, the ghost fish, who is the protector of all the other fish. His function is to dispel evil and negativity and to banish nasty spirits while the healer is working. Keep in mind that the formulas you use are subject to your intuition. There are many practitioners who match herbs by color rather than aroma, medicinal use, or taste—for example, the sacral chakra, which is orange, would relate to orange flowers, fruits, or spices (tiger lily, orange, etc.). Gemstones are often chosen the same way. You can select one gemstone to put in the doll or chips of several different stones. Adding an empowered “come alive” slip of paper in the doll also aids in its overall energy form. As I constructed my fish, I chanted the sound associated with that chakra point. Feel free to experiment! These little dollies/fishes are your “A” healing team!
For this project, felt, embroidery thread, glass beads, and my glue gun functioned as my go-to tools for construction. I embellished both sides of the fish separately, then loaded the herbs and gemstones in the center of one half, using the glue gun to hold the items in place. Finally, gluing a bit at a time, I placed one half of the fish over the other and slowly closed the body. The nice thing about a hot glue gun and felt is that if you have very sharp scissors, you can trim away any mess you have made during the construction.
My chakra fish collection took me seven days to complete and was begun over a new moon cycle. I didn’t plan it that way—sometimes the creative process, particularly if it is mixed with magick, moves forward at its own pace.
Ghost Fish: White. Protection, banish evil spirits, dissolve negativity. Tridarna gemstone and frankincense resin.
Crown Chakra: “I Am.” Purple. Wisdom, spirit, enlightenment and transcendence, source energy. Herbal Formula: lavender (this herb is thought to work well for all energy points of the body), dried lotus flowers, gotu kola. Gemstones: amethyst, diamond, clear quartz, selenite. Sound: Om.
Third Eye Chakra: “I Know.” Indigo. Perception, intuition, inspiration. Herbal Formula: eyebright, spearmint, juniper, mugwort, rosemary, poppy, lemon, lavender. Gemstones: amethyst, purple flourite, labradorite, black obsidian. Sound: Sham.
Throat Chakra: “I Speak.” Blue. Truth, expression, communication. Herbal Formula: clover, lemon balm, eucalyptus, salt, lemongrass, peppermint, coltsfoot, white sage. Gemstones: aquamarine, lapis lazuli, sodalite, turquoise, aventurine, amazonite, blue chalcedony. Sound: Ham.
Heart Chakra: “I Love.” Green. Heart, compassion, love. Herbal Formula: hawthorne, marjoram, rose, basil, thyme, sage, cilantro, jasmine, parsley, cayenne. Gemstones: green tourmaline, jade, rose quartz, adventurine, strawberry quartz, green calcite. Sound: Yam.
Solar Plexus Chakra: “I Do.” Yellow. Power, will, socialization, ego, impulse. Herbal Formula: lavender, bergamot, rosemary, mint, ginger, fennel, marshmallow, celery, lily, lemon balm, anise. Gemstones: orange calcite, citrine, sunstone, red agate, topaz. Sound: Ram.
Sacral Chakra: “I Feel.” Orange. Emotions, creativity, sexuality, self-worth. Herbal Formula: sandalwood, calendula, licorice, cinnamon, paprika, gardenia, sesame, coriander, hibiscus, vanilla. Gemstones: carnelian, sunstone, snowflake obsidian, citrine, coral, moonstone. Sound: Vam.
Root Chakra: “I Am.” Red. Earth connection, survival instinct, grounding. Herbal Formula: dandelion, kava kava, cloves, burdock, valerian root, elderflowers. Gemstones: red agate, bloodstone, black tourmaline, hematite, garnet, red aventurine, onyx, smokey quartz, tiger’s eye. Sound: Lam.
Chakra fish will take on their own personalities the more you use them. They like to be kept together, even if you are only using one of them. You can make individual chakra poppets to heal friends and family and give them as gifts. If, however, you make a set for a specific intention (such as healing or transformation), I’ve found that breaking them up diminishes their power. Now and then one of them may wander off—that happens. Call it back while playing “seek-and-go-find” and you should find it quickly. A missing fish means that you need to pay attention to that energy center in your own body. Once you acknowledge this, it is easier to find the fish!
Cleanse your chakra poppets after every use by sprinkling them with salt or an herbal mixture of your choice (lavender, rosemary, sage, and basil are good choices). I sage my fish on the dark of the moon and re-energize them on the new moon. Sometimes I also use a strong astrological event for a special ritual with them. I recommend that you keep your chakra poppets in a special bag or box laced with a protective herb sachet or wooden rune pieces.
Note: There are several healing charts for dogs, cats, and horses on the internet, should you be interested in that subject. Animals have eight major chakras, twenty-one minor, and six “bud” energy points. It is thought that animal chakras are far brighter than human chakras. The eighth chakra mentioned earlier is called the brachial chakra and is located around the shoulder blades. Its associated color is black. This chakra is considered the primary energy point for animals and stands for the relationship between the animal and humans. Gemstones for this point include tiger’s-eye, snowflake obsidian, carnelian, and black gemstones in general.
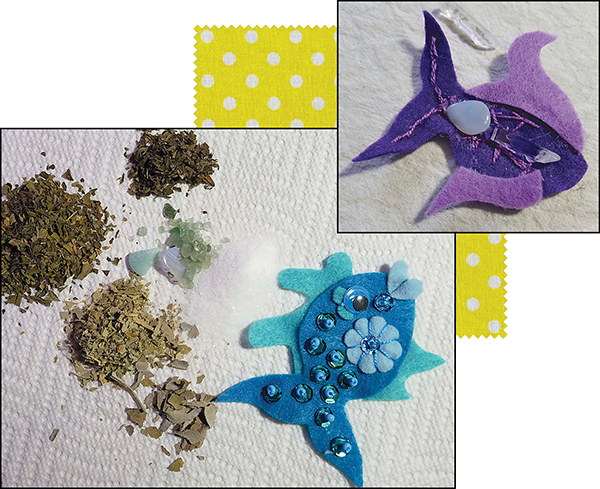
![]()
STUFFING FOR CHAKRA FISH