Magical Almanac: Practical Magic for Everyday Living - Lauryn Heineman 2018
The Witch’s Sigil: Crafting Magick Symbols for Spellcraft, Ritual, and More by Laura Tempest Zakroff
Fire Magic
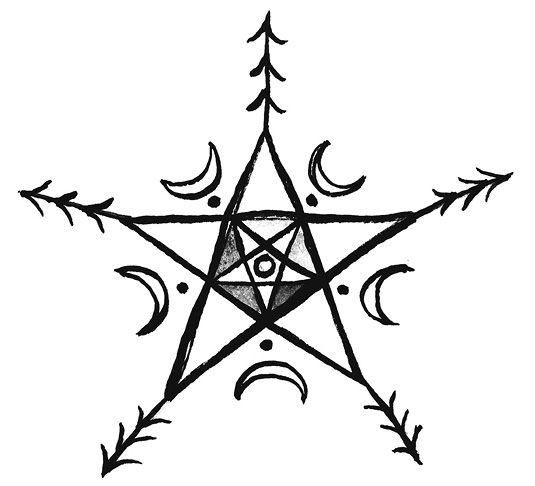
If you are new to the path of the Witch, you’ve probably noticed a wide array of mysterious symbols displayed on books and tools. Some of those markings have origins dating back centuries, their meanings complex and varying depending on the culture, tradition, or lodge using them. But it doesn’t require arcane knowledge of all signs mystical to create new symbols that are just for you. That’s where sigil witchery comes in!
What is a sigil? A sigil is a symbol, sign, or design that is believed to have magickal properties. It can be carved, drawn, painted, inked on any surface—paper, fabric, metal, wood, wax, or even skin. Sigils are essentially a kind of metaphysical shorthand; they embody a larger, complex idea and transform it into a simplified image. You can make a sigil to cast a spell, make a mark of ownership, create a tool for meditation, invoke a deity or spirit, set up a ward of protection, and much more. It can be a symbol used by a group of people or made exclusively for personal use only.
What’s wonderful about sigils is that they are relatively simple to make in terms of skill and materials. You don’t need more than a pen or pencil and some scrap paper to get started, nor do you need to be an artist. If you can write your signature, you can draw a sigil.
Create a Sigil
There are multiple methods for creating a sigil. The way I’m going to describe for you here is one that I have developed over the last two decades—combining my path as a Modern Traditional Witch with my art making. It incorporates imagery your brain responds to instinctively and emotionally with sympathetic magick. In teaching it to others, the feedback that I have received is that people find it very intuitive and easy to master.
There are four simple steps to follow:
1. Define your problem, issue, or goal.
2. Brainstorm ideas.
3. Design the sigil.
4. Apply and acknowledge.
For the first step, you are asking yourself what your goal is. What do you wish to achieve? Or what problem, situation, or issue are you looking to resolve? Your sigil needs to have a purpose. Does someone need healing of some kind? Would your home benefit from some extra protection? Are you looking to create an identifying mark for your business? Do you need to find a new job or need some additional help focusing on your studies or a project? Your purpose or issue can be physical or metaphysical.
Now, to get things started, take a blank page of paper. It can be a fresh page in your grimoire, notebook, sketchbook, or Book of Shadows. If you are working on scrap paper or loose-leaf sheets, I recommend having a folder or binder you can keep your work in so that you don’t lose it. It’s handy to keep records of your work for later down the line.
For a writing implement, my favorite tool is a basic ballpoint pen, the kind you can pick up at a hotel or bank—nothing fancy. It can be tempting to use a pencil, but it’s best not to be tempted to erase. You’re not looking to make perfect art but rather explore a process and see how it builds—in both words and lines. You can of course get fancier if you would like, but that’s strictly your personal choice. The most important thing is make sure you can write with the pen!
Once you have your paper and pen collected, it’s time to set things in motion. Write down the date (you think you will remember when you did this, but you probably won’t) and the goal or problem.
In step 2, it’s time to think about what elements are necessary to solve your problem. Take the time to consider the specific things you are looking to achieve. Magick tends to follow the path of least resistance, so it’s incredibly helpful to set boundaries and identify the terms you require. For example, “I need a new job” is too vague. You’re probably not looking for just any job. You most likely are looking for something more specific that you already have in mind. You want to make at least X amount of money. You may require having a certain number of hours, in a particular field of expertise. You could be looking for a better job, where you are respected and recognized for the work that you are doing.
This is how you brainstorm what you’ve identified in the first step. Allow yourself time to go through this process if the idea is particularly complex; it will pay off later on. You don’t have to write out paragraphs (though you could if that helps). You can just make a list of words or items and edit it as necessary when you feel you’re done. It’s incredibly helpful to physically make this list—you can really boil it down to the exact things you need—and it doesn’t have to be a long list at all. Typically, I like a minimum of three words or points, and I try to keep the maximum to ten so it doesn’t get too bogged down.
Once you have finished brainstorming, it’s time to get down to designing! Look at your list of words or highlight key points if you wrote out some paragraphs. With each word, consider what shape, mark, or symbol comes to mind when you think about that word.
You might be thinking right now, Wait, I thought I didn’t need to have arcane knowledge of mysterious symbols under my belt to do this! I mean it, you don’t. Before even involving esoteric symbols or alphabets, consider the simple language of lines around you. For example, a triangle can represent a yield sign, a mountain, a thorn, or a pyramid. The yield sign signifies caution, slowing down, or paying attention. A mountain can symbolize a pinnacle, a focal point, or an obstacle to be climbed. Thorns are designed for protection. The pyramid can speak to esoteric knowledge, inner focus, balance, and mystery. There are many more examples of what a triangle can represent to you. Consider what a circle, dot, square, arrow, star, heart, spiral, and so on mean to you. I will also bet you have associations with colors as well—does red mean anger, or does it mean love to you? The same is true for numbers. I often like to use the symbolism behind the various numbers found in the major and minor arcana of the tarot.
Don’t overthink it, and don’t be tempted to start drawing out illustrations. Just jot down what comes to mind with each word in your brainstorming list. Once you’ve assigned a shape or mark to each word, it’s time to put it together.
To start designing the sigil, I choose the word or symbol in the brainstorming list that stands out to me most. Then I add each symbol or make a combination of them until I create a design that I am happy with. If it doesn’t feel right or I mess up, I start again. This is where drawing with a pen comes in really handy, because you’re able to look back at your designs and see what works best in each of them. You might like one element from your first drawing and the rest of your third drawing and find it looks finished when you put them together. Allow yourself to trust your eye and your gut. Also, it doesn’t have to be a perfect drawing. Your star doesn’t have to be absolutely precise. Your square can be slightly off, your circle not exact. That doesn’t really matter in the larger scheme of things.
Once you have arrived at a design you are happy with, the last step is applying and acknowledging your sigil. You don’t have to do anything special to “activate” your sigil—that has already happened in the finalizing of the design. Consider it like making a candle: it’s ready to go once the wax is set. It’s a thing ready to work. Applying your sigil is like lighting that candle to put it into use.
How you apply your sigil depends on what you need to accomplish. Is the sigil to improve your work environment? You could put it on a sticky note next to your computer or by your office door. Need invisible protection for your home? Inscribe the sigil in blessed water on doors and windows. Have a project that you want to grow? Draw the sigil on a flower pot and plant something in it. Are you refocusing your spiritual path or dedicating yourself? Then you could make a piece of jewelry to wear with the sigil on it or perhaps choose a more permanent method: tattooing. As you can see, the possibilities are varied and endless for applying your sigil.
Acknowledging a sigil is another layer that can be incorporated into your practice, depending on the need and scope of the sigil. If it’s something that you need to revisit, then you can add a ritual layer to it. If you do the flower pot suggestion, then tending to the plant daily is a regular acknowledgment process. If you get a tattoo, after it is healed, you can apply an essential oil every morning to it that aligns with your purpose. If you create a sigil for meditation, you can refer to it again and again by tracing it out with your hand. If you are using a sigil to protect your home, you could “refresh” the wards on a monthly, quarterly, or yearly basis. So acknowledging the sigil can be a very simple process that refreshes and strengthens your work—if you feel that’s needed or necessary.
Sample Sigil
To help you get familiar with this process, we will create a sample sigil together.
The Scenario
Let’s say you feel you are rushing through things in your life and think you’re missing out on things and people you find important. Maybe you’re being distracted by outside influences you don’t need in your life. You want to make a sigil that helps you slow down, reduce stress, and focus on the details, while remaining goal-oriented. Being able to stop and smell the roses occasionally is better than putting it off for later—so you want to find a balance in the moment.
A Solution
In analyzing the scenario, we see the following list:
1. Slow down your pace
2. Eliminate unhelpful distractions
3. Reduce stress
4. Remain focused on your path
5. Goal-oriented
6. Balance
In assigning each point a symbol, I find the following associations:
1. Triangle (yield sign)
2. Circle (to contain/protect)
3. Wavy lines (calming energy)
4. Arrow (directional energy)
5. Star (the goal in the distance)
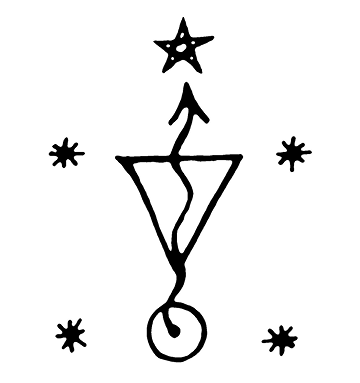
6. The number four (for balance)
I start the sigil design by drawing the triangle. Below the triangle I decide on a starting point (place of origin), and then draw a larger circle around it for protection. Out from the point and heading directly up through the center of the triangle, I draw an arrow with a gently wavy line. The wavy arrow gives direction, but slows down the pace a bit. Just above the head of the arrow, I place a five-pointed star to represent the goal. Then at four points around the design, I place asterisks. These simultaneously balance out the sigil and create an implied rectangle that also helps keep the energy focused toward the center.
After you have drawn the sigil, there are numerous ways you could apply it. It could be placed on your nightstand in a little frame by your bed or maybe embroidered on your pillow. You could put it on a sticky note on your bathroom mirror so that you see it in your periphery in the morning and evenings. It could be used as a meditation device you trace as you start your day.
I hope that you have found my method of sigil witchery helpful and put it to good use. Remember, as with all things, the more you do it, the better you will get with practice. Happy sigil crafting!