Workshop Mastery with Jimmy DiResta: A Guide to Working with Metal, Wood, Plastic, and Leather - Jimmy DiResta, John Baichtal (2016)
Chapter 5. Plastic Projects
Having worked as toymaker, I have a lot of experience using plastic in my projects. In a way, plastic is an overly broad category because bending styrene (as seen in Figure 5-1) offers a vastly different experience from casting resin or heat-bending acrylic. In this chapter, I’ll share some tips on working with styrene, a commonplace plastic sold in sheet form and used in a variety of ways. After that I’ll share two of my plastic-related projects: a chess set cast using Smooth-On, a low-viscosity casting resin, as well as a light-up sign with styrene channel letters.
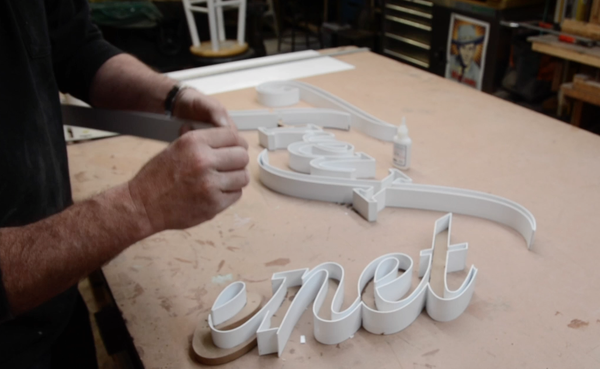
Figure 5-1. I love using Styrene in my projects
Working with Styrene
Chances are, you already use styrene on a daily basis. For instance, those white plastic lids for coffee cups? Styrene. It comes in a variety of thicknesses up to 1/4” and responds to cutting, bending, heating, and painting.
In lieu of covering a selection of plastic-working tools (which mostly have already been described), I’m going to describe some of my favorite techniques when working with styrene.
Bending
Thin enough styrene can be bent without heating. You can see me shaping a strip of styrene in Figure 5-2, bending it around a screwdriver held in a vise. The material does have a degree of tension to it, and when you try to get it to bend, you may need to clamp it into place while waiting for the glue to cure.
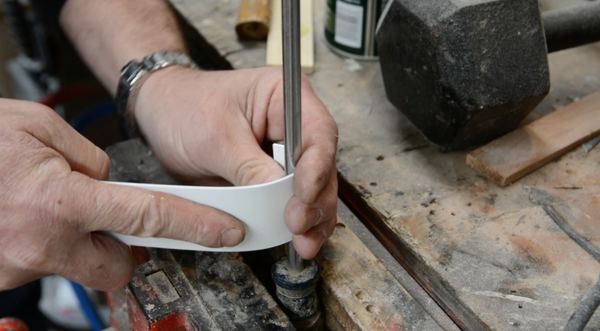
Figure 5-2. Shaping styrene with a screwdriver held in a vise
Cutting
Styrene works really easily: you slice it and snap it. For the thinner stuff I find a ruler and box cutter do the trick. You can also cut it with ordinary saws, though it is a messy job with a lot of burrs left on the cut. Figure 5-3 shows me cutting into styrene with a Dremel.
Figure 5-3. You can easily cut styrene with a Dremel
Heating
Another way to work with styrene involves heating it. This makes the styrene into a wet noodle, essentially, and most of the time it’s difficult to work with in this state. Mostly I let gravity do the work. In Figure 5-4 you can see me heating up styrene with a blowtorch to help the material hug the form underneath.
Figure 5-4. Heating styrene makes it very flexible—sometimes too much so
Joining
You can attach pieces of styrene together easily. I mostly use Weld-On methylene chloride. It’s a solvent that works as a glue by melting two surfaces and sticking them together.
I find the best way to handle solvent is a small squeeze bottle with needle applicator. It puts the solvent precisely where I want it (Figure 5-5), and if the needle gets clogged I can always loosen it up with a cigarette lighter.
Finally, you can get really clean joints by letting them overlap. Just cut off the excess and sand them smooth after the solvent cures.
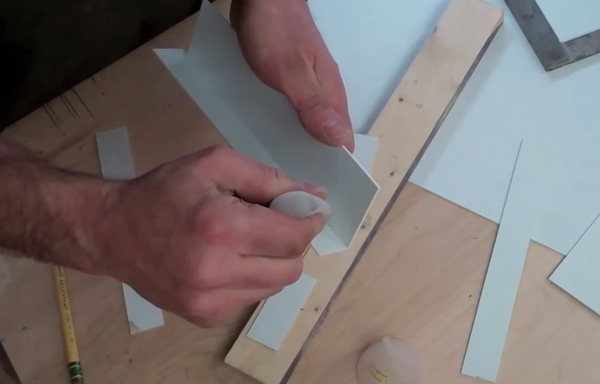
Figure 5-5. Gluing two pieces of styrene together with solvent
Patching
Filling holes in styrene can be problematic, because most fillers won’t stick to the material at all. I sometimes use acetone to soften plastic wood. When I’ve thinned the plastic wood sufficiently, I goop it on (Figure 5-6) and let it cure. Much like the Weld-On, acetone is a solvent that etches into the plastic and helps the plastic wood stick.
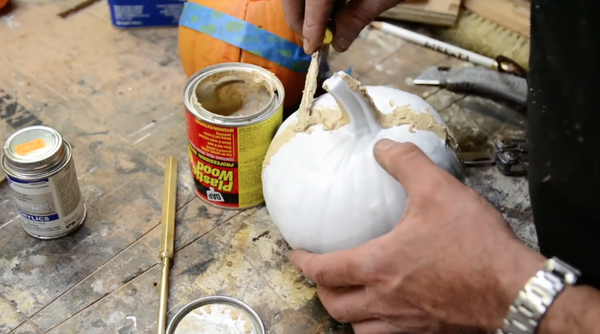
Figure 5-6. I seal up cracks in my styrene projects with plastic wood thinned with acetone
Smoothing
Styrene responds to filing and sanding, either with sandpaper or hand files. In the latter case I suggest a half-round file, though I also use flat files, as seen in Figure 5-7. If I sand away too much material, I slather on some jet acrylic. This is the stuff dentists use to make temporary crowns, and it can be used to bulk up the styrene to build up thin spots.
Figure 5-7. Filing down the edges of a styrene box
Vacuforming
One of styrene’s best uses is as a medium for a vacuum former, seen in Figure 5-8. The vacuform simultaneously heats the styrene while sucking down on it with a vacuum, causing it to coat a form. My vacuformer comfortably works up to three inches, so if I want to create bigger shapes, I need to create two or more panels, and then glue them together.
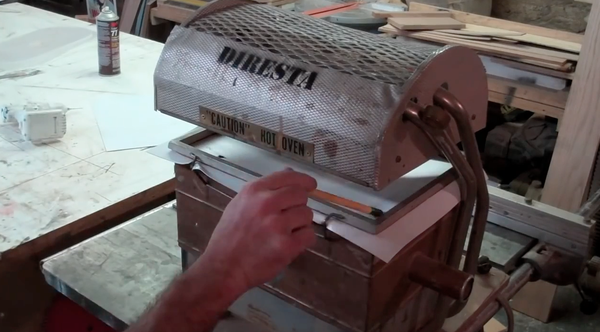
Figure 5-8. Softening and shaping a piece of styrene in a vacuum former
You can either vacuform with positive form or a negative form. With a positive shape you’re looking to coat the outside of object with the plastic.
One disadvantage of this technique is that the styrene coats the shape and softens the detail, because the surface that touches the form is on the inside. If you do vacuform over a positive, make sure the styrene gets very hot so it will coat every cranny of the shape. There’s always an annoying curve where the styrene rises tentlike to cover the form. When I think I might encounter this, I make a point to place the form on a quarter-inch piece of wood so I can cut off that curvy shape.
If you’re vacuforming a very detailed shape, I definitely suggest making a negative form out of plaster, like the one seen in Figure 5-9. The outside of the plastic coats the form, making the crispest possible impression of the original.
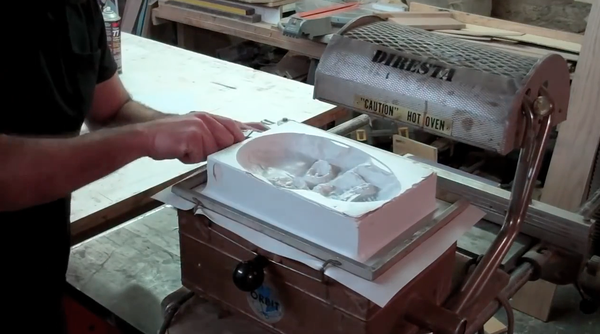
Figure 5-9. Vacuforming styrene with a negative form
Casting a Chess Set
I wanted to make the classic chess set (Figure 5-10) of dime-store lore. Think of the hollow black and white plastic pieces—only mine would be cast in solid resin. Follow along to see how I built the set.

Figure 5-10. Using brass forms to mold the classic chess set
Tools and Materials
I used the following tools to create the brass forms, silicone molds, and resin chess pieces:
§ 16” South Bend lathe
§ Push knurler
§ Bridgeport milling machine
§ Indexing head
§ Hand files
§ Hot glue gun
§ Pressure pot
§ X-Acto knife
§ 1.25” brass stock
§ Mold Max 300
§ Steel wool
Making the Chess Set
The first step was to carve the pieces out of brass stock. This was rather laborious because I wanted each one to be perfect. I would need to make many molds out of each one, so I wanted them to be durable as well as good-looking. It ended up taking me about one piece a day to design and mill each part. After the brass pieces were done I made molds out of casting silicone and then poured black and white resin to create the set. I’ll break down each task in the following steps:
1. Shape the first piece
I put a piece of 1.25” brass stock in my South Bend lathe’s three-jaw chuck and simply began free-styling to shape it into a classic chess-piece shape, going off a couple of sketched concepts I had in my mind.
I did the pawn first, because this will establish the style that the other pieces follow. From the neck down the chess pieces mostly look alike. There’s a traditional hierarchy of height, which I intended to maintain. I had a cheap set from the five-and-dime that I kept around just to reference.
Once I had carved out the pawn (Figure 5-11), I smoothed it down with a file.
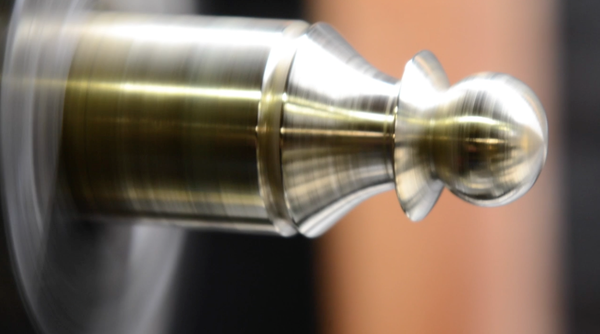
Figure 5-11. The chess pawn shape emerges from the brass
2. Make the template
Having established my pawn, I needed to create a template that would allow me to re-create the same curve on the other pieces. I cut a razor blade so that it matched the shape of the neck, and I’ll use that while shaping future pieces. I want them all to match!
3. Knurl the base
I used the push-knurler attachment on my lathe to add the cross-hatch pattern (knurling) to the base of the chess piece. You can see both the pattern and the tool in Figure 5-12.
I used the lathe’s cutoff tool to cut off the pawn, though I left a lot of stock below the knurling because I’ll need to hold on to something when I mold it. Besides, this way I can always put it back into the lathe.
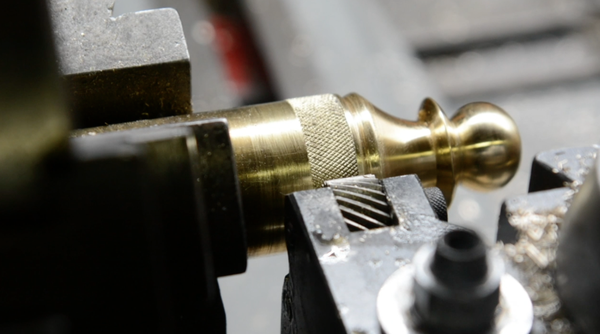
Figure 5-12. Knurling the base of the pawn
4. Carve the rook
Next I threw another length of stock in the lathe and began to carve out the rook, or castle. I free-styled the shape as I did with the pawn, then used my razor-blade template to carve the curve to match. Finally, I knurled the base and cut off the rook as I did with the pawn.
I used my Bridgeport milling machine with an indexing head to cut the “battlement” notches in the rook’s crown.
5. Make the bishop
By now I was getting very confident with how I wanted the chess set to look, and I grabbed another piece of brass stock and dived right in. I carved out the shape, using the razor blade and steel wool to finish the surface. I knurled and cut off the bishop from the length of brass stock.
As a final step, I put the bishop in my Bridgeport and used the indexing tool to cut the traditional notch (Figure 5-13) in the piece.

Figure 5-13. Cutting the notch in the bishop
6. Make the queen
I made the queen next, with it proceeding as expected with the usual curve and collar. It’s the second-highest piece in the set, so I measured it out carefully to make sure I was maintaining the hierarchy.
The queen’s crown has a number of notches in it, and I used my indexing tool to carve them precisely.
7. Make the king
The king was the biggest challenge up to that point. Hierarchically it is the tallest of the pieces, and as a consequence the piece of stock was jutting pretty far from the lathe’s chuck. Working that far from the chuck can be dangerous because the tool sometimes pushes the material off-center. This actually happened to me when working on the king, but fortunately I was able to repair the damage.
I carved, smoothed, and knurled the piece as usual, and then cut it off for finishing in the Bridgeport. I used my indexing tool to carve a cross shape into the peak of the king’s crown, as shown in Figure 5-14.
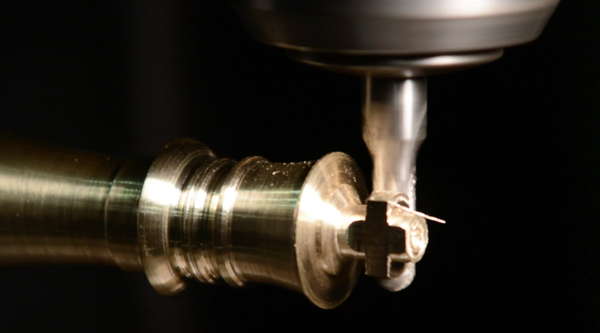
Figure 5-14. I used the Bridgeport’s indexing tool to cut the cross
8. Make the knight
This is the piece I anticipated would be the most difficult, and so I left it until the end. I made the base of the piece first, with the requisite curvature and knurling.
Then I put the piece in the band saw and basically free-styled a horse shape, cutting the stock flat, then drawing a design on the metal and cutting it into the shape I wanted, using the saw blade to carve into the brass.
Then I worked on it with the hand file, continuing to shape and smooth it into a classic knight. I finished by sanding and buffing it into a smooth sheen. The chess set is done, and you can see it in Figure 5-15. Now to cast them in plastic!
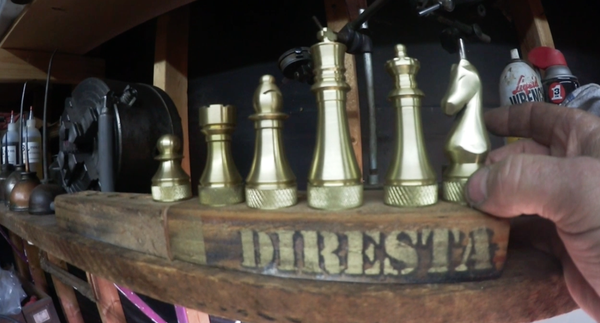
Figure 5-15. My brass forms are complete
9. Build the molds
I created eight molds using paper cups glued to sections of junk acrylic sheeting, with a chess piece placed at the bottom. You can see the prepared cups in Figure 5-16.
Then I mixed some Mold Max 30 and poured it into the cups to create the mold.
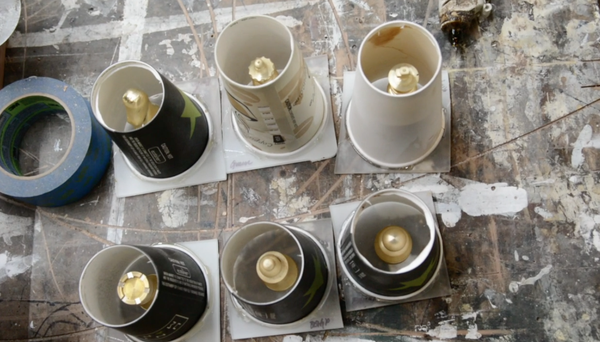
Figure 5-16. Making the molds out of paper cups
10. Finish the molds
I put three cups at a time in my pressure pot, which uses compressed air to force all the bubbles out of the silicone; otherwise, they would show up in the finished pieces. When the molds had hardened, I tore off the paper cups (Figure 5-17) to reveal the rubber mold.
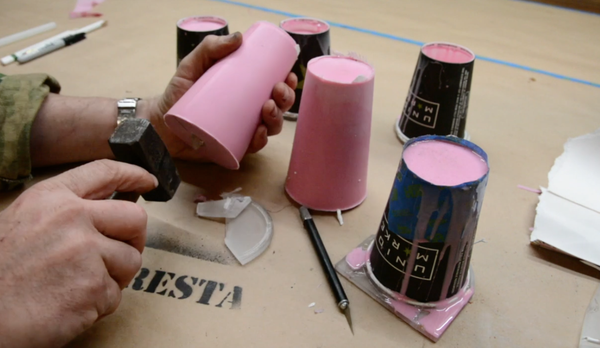
Figure 5-17. Removing the molds from the paper cups
11. Cut open the molds
The next step was to cut open the molds and remove the brass forms. I simply cut into the rubber with a X-Acto blade, making a zig-zag cut with my knife. One advantage of using this shape is the molds simply snap back again and reseal. You just cut in enough to remove the object; you don’t want to cut the mold in half.
12. Cast the pieces
Having prepared all of the molds, I mixed up some black Smooth-Cast 300 casting resin and started making chess pieces. As with the molds themselves, the castings also had to be put into a pressure pot.
When they had set, I pulled the plastic pieces out of the molds. You can see me inspecting the pieces in Figure 5-18. You may notice there is still an extended base below the knurling, and I sawed off the excess material on my band saw.
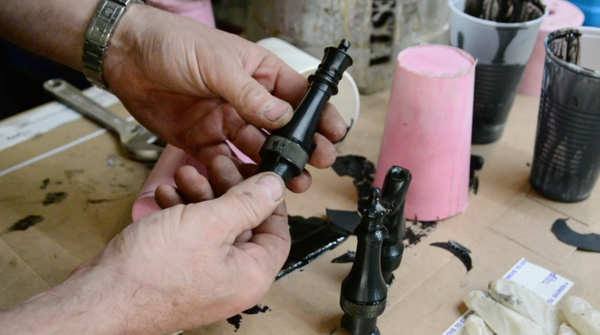
Figure 5-18. The pieces came out of the molds looking great
13. Finish the set
Having cast all the pieces I needed, I smoothed them all down on the sander and made sure that sat evenly. You can see the nearly finished set in Figure 5-19. Note that there are multiple copies; I made more than one set to ensure I got enough quality pieces.
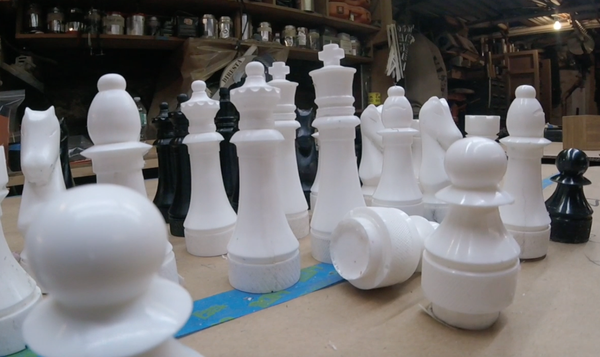
Figure 5-19. Nearly finished pieces await their first game
Summary
I always wanted to do my version of the classic plastic chess set, and I’m really pleased with how it turned out. Next up, I’ll make a sign with channel letters formed out of styrene.
Plastic Channel Letters
I made a sign for the champagne brand Freixenet, which needed a branding piece for an event. It was a big logo that would stand on a table. I made the sign using channel letters, which have an inset center and raised edges, making them light up nicely.
With Freixenet, it was more important to maintain the brand’s black-and-gold look, so I went with gold-colored LED lights on black letters. Figure 5-20 shows how the sign turned out.
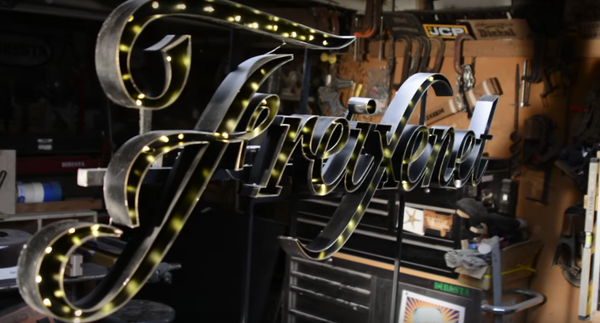
Figure 5-20. I built this sign out of plastic, MDF, and LED lights
Tools and Materials
I used the following tools to make my sign:
§ ShopBot Desktop
§ Band saw
§ Welder
§ Box cutter
§ Chisel
§ 1/2” MDF
§ Sheet of .040”-thick styrene
§ Gold LED lights
§ Black spray paint
Building the Letters
The logo consists of a series of cursive letters, milled out of MDF, then lined with 1.5” styrene. LEDs illuminate the channels to make it really pop in a dark room. Read on to learn how I built it:
1. Mill the letter backs
I got the logo vectors from the customer, and laid out a series of boards to be milled on my ShopBot Desktop CNC router, seen in Figure 5-21. I laid it out as big as possible, with the limiting factor being the trademark Freixenet X. I didn’t want to cut the X in two, so I’d be limited to a logo size based on the X fitting on a single sheet of MDF. As each shape came off the CNC, I sanded it smooth.
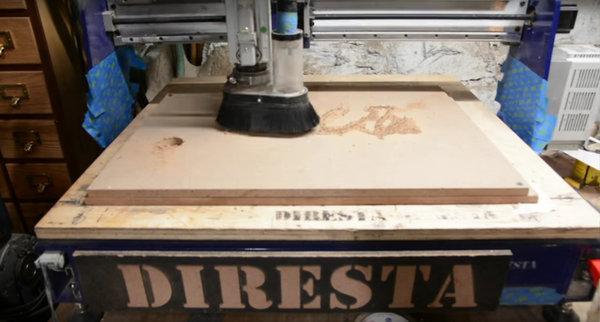
Figure 5-21. The ShopBot begins to cut the letter shapes
2. Cut plastic
While the CNC was milling, I cut strips of styrene with a box cutter, making each one about 1-1/4” wide. I chose a thickness of .040” because it was rigid enough to make straight lines, but flexible enough to curve as well. Figure 5-22 shows me cutting the strips.
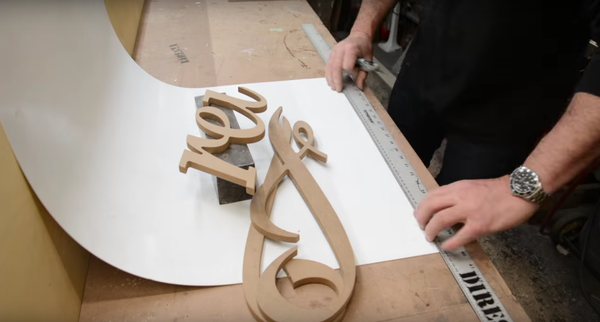
Figure 5-22. I began to cut styrene to trim the letters
4. Glue the X’s channels
Next, I started gluing in the styrene to serve as channels. I began with the trademark X and cut a couple of pieces of plastic using a square in order to keep the edges straight.
Originally I was going to use metal for the channels, but I’m glad I didn’t. For one thing, it was an interior sign and didn’t need that level of durability; and for another, it would just add weight.
Once the strips were the right size, I flexed them to fit the X’s curve, then glued them with CA (“super”) glue and clamped them into place. CA glue sticks well to both styrene and MDF, though not always instantly—sometimes it takes a few minutes to set. The plastic has a degree of tension and will pop open, particularly if it’s curved dramatically, like the pieces shown in Figure 5-23. I also used a CA accelerant that helps the CA to cure more quickly.
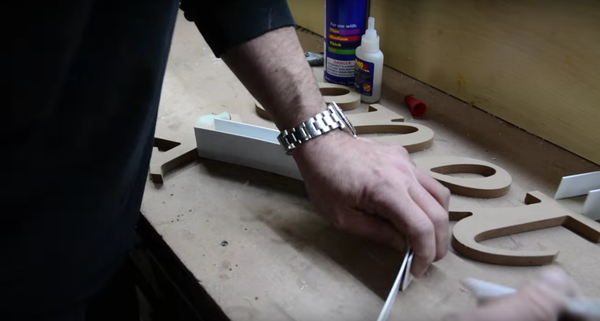
Figure 5-23. Gluing styrene channels to MDF letter shapes
5. Continue to glue channels
While the channels on the X dried, I worked on the other letters. I was conscious of the thickness of the plastic and cut to ensure that every joint was as neat as possible. If anything, I let the plastic overlap on one side because I’d be sanding it short. When the glue dried, I just cut off that edge. In any case I’m constantly using a square just to make sure everything is clean and straight.
Where there was a serif at the bottom of the letters, I carefully bent the plastic around the curve, as seen in Figure 5-24. As I mentioned earlier in the chapter, it’s easy to shape styrene so it will stay curved. I used a pencil and screwdriver as mandrels, or shaping instruments, helping to give the plastic a natural curve.
People asked why I didn’t heat up the plastic to make it bend better. When I bend the plastic around a mandrel, it bends the way I want; but when I heat up the styrene, it basically becomes a wet noodle and there’s no way to control it. There’s no reason to heat when you use the right thickness of styrene.
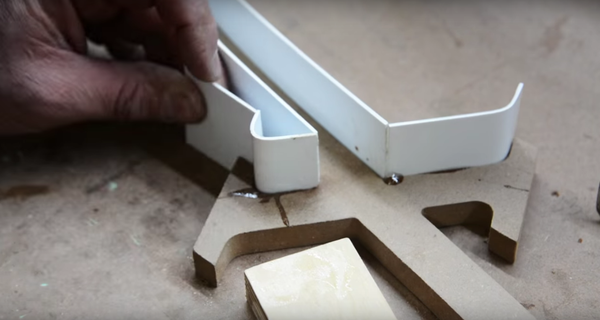
Figure 5-24. Gluing channels onto the letter shapes
6. Cut off the overlaps
While I waited for glue to dry, I took the finished channels to the band saw and cut off the overlaps as shown in Figure 5-25. Where there were overlaps inside the letters and I couldn’t saw them, I trimmed the edges with a sharp chisel.
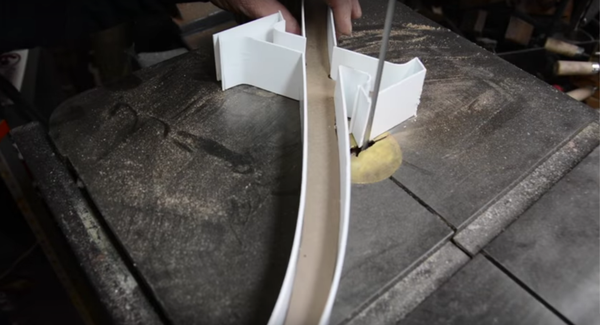
Figure 5-25. Trimming off the overlaps on the band saw
7. Smooth down the edges
The band saw left some rough edges, so I went over the channels with my file, then sanded them down with sandpaper. While the plastic will be painted, and in any event will be in a darkened room, I still wanted them as smooth as possible. Figure 5-26 shows me smoothing down the burrs.
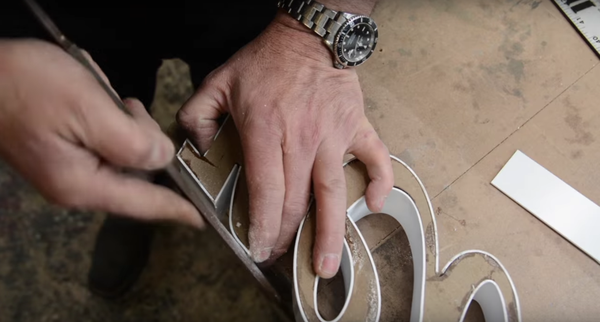
Figure 5-26. Using a flat file to smooth down the sawn edges of the styrene
8. Paint the letters
I sprayed down the letters with black spray paint. Paint works with styrene beautifully, covering up cracks and joins while not distracting from the smoothness of the plastic. I made a mistake in this sign, and should have painted the insides of the letters gold. My gut instinct was to make them gold, and after I was done I wished I had—it would have given the letters a nice pop. Figure 5-27 shows the painted sign.
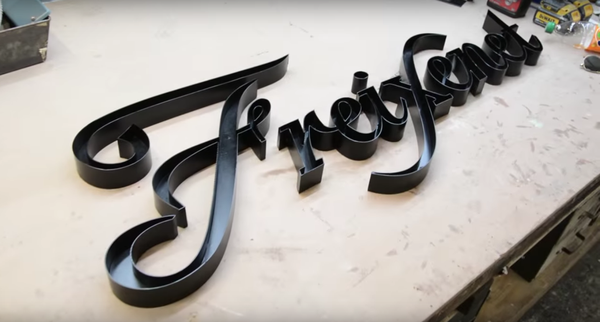
Figure 5-27. The letters with a couple coats of black spray paint
9. Drill the light-holes
Once the paint was dry, I brought the letters to the drill press (Figure 5-28) and drilled a series of holes for the LEDs. I just eyeballed the spacing, because no one will know or care that they’re not spaced with mathematical perfection.
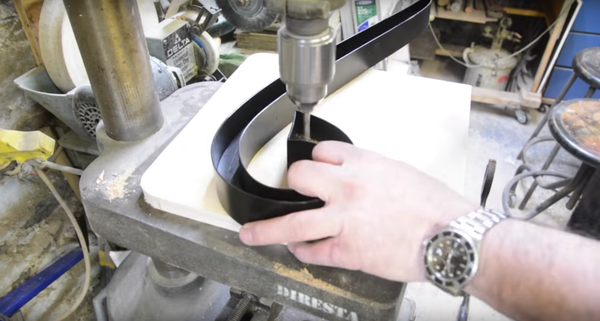
Figure 5-28. Drilling LED holes in the letters
10. Add the lights
The sign will be sitting on a table at a party, so I wanted the customer to be able to turn the lights on even if there wasn’t an outlet nearby. Therefore, I decided to use battery-powered lights, and I found strands of 20 with a light gold coloration, which matched Freixenet’s branding.
I added a few sets of battery-powered, gold-colored LED lights, shown in Figure 5-29. I inserted each LED into one of the holes I drilled, then taped and hot-glued it in place. I ended up needing six battery packs. They were pre-arranged in a strand, and I knew I’d waste some LEDs and have to cover them up.
I also had to have some wires crossing between letters, making the wires visible from the front, but since I knew the sign would be in a darkened room, I didn’t sweat it too much.
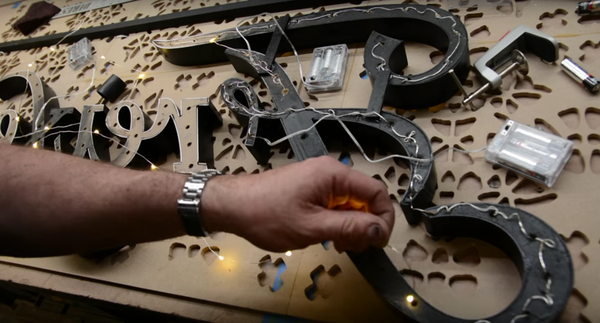
Figure 5-29. The sign ended up using six strands of gold LEDs
11. Attach the letters together
I grabbed some wooden struts, painted black to match the channels, to attach all the letter sections together to maintain the correct letter spacing. I used hot glue and screws to bolt everything together, with a single wooden bar (seen in Figure 5-30) doing most of the support. This bar has a couple of drilled holes into which the metal stand’s vertical struts will get inserted.

Figure 5-30. Attaching the letters to a wooden support bar
12. Color the channel edges
I realized the sign wasn’t popping as much as I wanted, so I used a gold paint marker to color in the edges of the channels. Figure 5-31 shows me nearly finished with the project.
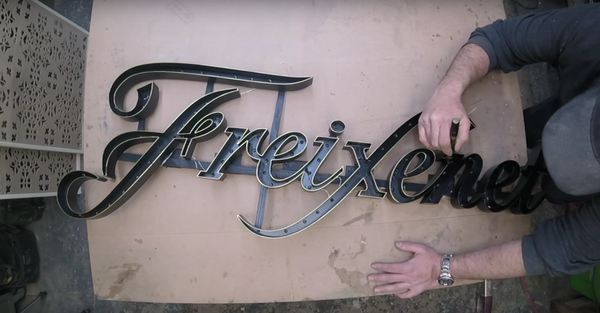
Figure 5-31. Coloring in the channel edges with a gold paint marker
13. Make the stand
The sign will be positioned on a tabletop stand, so I cut lengths of steel, forming a basic frame that will support the sign. After welding the steel together (Figure 5-32), I used a grinder to polish down the frame, then spray-painted it to match the rest. The sign slips right onto the top of the stand, making for quick assembly. It’s done!
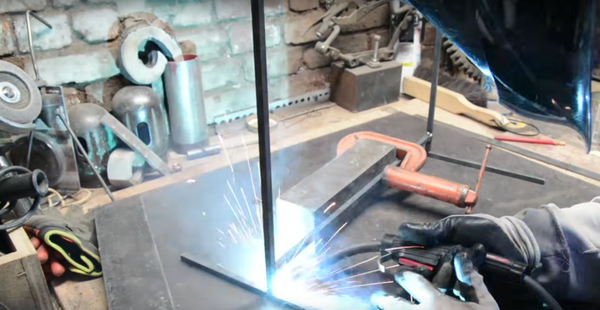
Figure 5-32. Welding together lengths of steel to create a frame
Summary
Combining CNC-milled MDF with plastic channels made for a great sign, and it was a fun project. That brings Chapter 5 to a close! I really enjoy working with plastic and I hope you do too.