Workshop Mastery with Jimmy DiResta: A Guide to Working with Metal, Wood, Plastic, and Leather - Jimmy DiResta, John Baichtal (2016)
Chapter 3. CNC Projects
I’ve done a lot of work with wood and metal. As you saw in Chapters 1 and 2, I build many different projects with a wide variety of tools. Two of my newest and potentially most useful tools are a pair of CNC routers, which move a rotary tool around a bed to grind out precise shapes on a piece of plastic, wood, or metal. Because they are ground-breaking tools compared to classic woodshop hardware, I’m giving CNC tools their own chapter.
First I’ll describe my two CNC routers along with a mention of my favorite bits. Then I’ll describe a pair of projects made with the help of CNC technology: a dart board and a sign. You can see my ShopBot Desktop in Figure 3-1.
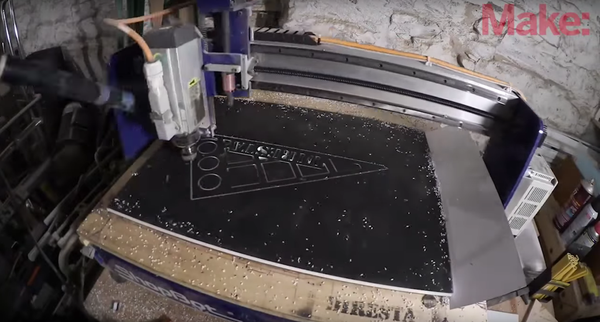
Figure 3-1. Cutting a shape out of plastic
CNC Tools and Materials
Let’s go over the two CNC routers I own, a ShopBot Desktop and an X-Carve, and then I’ll describe some of the bits I use the most.
ShopBot Desktop
If you’ve heard of a CNC router, likely you’ve heard of ShopBot, one of the industry leaders. My ShopBot Desktop (seen in Figure 3-2) was my first CNC machine, and I have to say there was a very steep learning curve for me in getting started.
I run the ShopBot on an old HP laptop, using a pair of software packages. The first of these is Partworks 3D, a design program put out by ShopBot. The other program is VCarve Pro, which is software that manages the physical operations of the CNC router.
I like VCarve especially because it has lots of menu options. For instance, you could do a lot of vector work right in the program. When manipulating the toolpaths, VCarve lets you cut, paste, and move with ease. It also has a great preview, showing you how the cuts might look along the timeline of the job, so that if the power cuts out during a cut, I can home the toolhead again and resume the cut at the same point, re-selecting the vectors that hadn’t been cut yet and creating a new cutting path.
This machine carves tiny shapes with great precision. My ice pick project (mentioned in Chapter 7) includes my logo engraved on the handles of the picks, and I use the ShopBot and a V bit to do that engraving. Part of the reason why it’s so precise is that it’s super heavy, minimizing wobble during carving. The machine weighs over 100 pounds thanks to its 3/8” steel frame and massive gantry. I also like how the ShopBot has an electric spindle instead of a router. This motor has a higher rate of speed than the router, keeps a consistent torque down to much lower speeds that the router can handle, and is generally quieter. I have a variable frequency drive (VFD) that controls the speed of the three-phase spindle, giving me an excellent amount of control over the toolhead.
The machine, while a really great unit, definitely caters more to professionals than hobbyists. It’s expensive—$7,500 delivered—but I can rely on it to get me through pretty much any job I need to do using a CNC router. Another downside is that the ShopBot has a small footprint, able to carve on only 18” × 24” pieces of material. Despite these limitations, I use my ShopBot all the time. I had a hard time learning how to use this thing, but I’m really happy I made the jump.

Figure 3-2. The ShopBot Desktop featuring the optional spindle (photo credit: Inventables)
Inventables X-Carve
The X-Carve (Figure 3-3) was my second CNC machine. It comes as a kit, and this keeps the cost down for anyone wanting to get into the world of CNC carving. Your investment is about $1,000, and you are on your way. Assembling it was not easy for me, but it was simple for my high school interns to get it up and going in a few days.
X-Carve comes in a few sizes. I have the larger unit with a cutting area of about 32” × 32”. I like the challenge of using up the entire surface of a 32” × 32” board to make all the parts of a design in one cut path.
I have come to like the Easel software for a few reasons, most of which is the ability to share your projects with other users. I have a few published projects, and it is nice to see others inspired to interpret my designs and make them their own.

Figure 3-3. The X-Carve Desktop offers an easy entry into the CNC world (photo credit: Inventables)
Router Bits
I have a bunch of bits (Figure 3-4) for my ShopBot and X-Carve, and these cut away material in different ways. Each bit has specific qualities and you need to know what you’re looking for because there are literally hundreds to choose from. Nearly everything I’ve cut just requires vector paths, because that’s just what my work requires, and this means most of my cuts are straight up and down. I’m just cutting letters, mostly, and haven’t done the type of 3D models where you angle the bit to carve out a 3D shape.
I take the following criteria into consideration in selecting a bit:
Shank diameter
I mostly use 1/4”-shank bits but 1/8” are common. However, many people swear by heavier bits, like 3/8” and 1/2”, for their resistance to vibration and quieter operation.
Cutting diameter
This governs the size of the cuts, and often, but not always, this ties into the shank diameter.
Cutting direction
Bits come in “up-cut” and “down-cut” and this describes where the waste wood goes. Up-cut forces the chips up and out of the hole, while down-cut forces them down. A third category, compression, is a combination of the two.
The following bit styles are commonly found in a CNC workshop, but this is not an exhaustive list:
Boring bit
Simply a short drill bit, used for making circular holes.
Plunge bit
These bits cut smooth grooves in the material, finishing not only the sides but the bottom as well.
Ball nose bit
These bits are used for making 3D carvings, and come in at different angles to make the shapes.
Spiral bit
These look a lot like traditional drill bits and are used for basic cutting, and I use them all the time for creating signs.
V bit
These arrowhead-shaped bits play many roles in a CNC project, but I use them for engraving. In my ice pick production run (described in Chapter 7), I used a V bit to etch my logo into brass stock. Most people say a 60-degree V bit is a great starting point for learning your CNC router, because it does have a lot of uses.
Surfacing
Used to skim the surface of the material to plane it smooth.
Insert engraving system
This product features a small carbide knife held in the bit, allowing you to make very delicate engravings.

Figure 3-4. A variety of CNC router bits (credit: Greg Flanagan)
Creating a Makerspace Sign
I designed and built a clock sign for a makerspace in New York called the Incubator (Inc. for short) and it consists of CNC-milled letters with old tools stuck in them with casting resin, as well as a digital clock beneath the letters.
The organization supplied the clock, which was very generic looking and boring, but also rather big. I came up with a solution where I painted the various parts to look like they were cast out of iron. You can see the final project in Figure 3-5. Follow along and I’ll show you how I made it!

Figure 3-5. The Inc. sign also helps disguise a boring-looking clock
Tools and Materials
I used the following power tools, hand tools, and materials to build my clock:
§ ShopBot Desktop CNC mill
§ Table saw
§ Chop saw
§ LED clock
§ MDF (medium-density fiberboard)
§ Wood glue
§ 3M Sandblaster sanding sponge
§ Brad nailer
§ Heat gun
§ Gray spray paint
§ Sophisticated Finishes iron paint
§ Throwaway tools used for decoration
§ EnviroTex Lite casting acrylic
Making the Sign
The sign consists of a decorative top spelling out the name of the makerspace as well as an electronic clock below it, telling visitors to the space what time it is. Here’s how I built it:
1. Mill the letters and edges
I started off with a sheet of MDF in my ShopBot, carving out the letters that make up the makerspace’s logo. The organization sent me a copy of its logo as an Adobe Illustrator file.
I secured the MDF to the spoilboard, the sacrificial wooden board that serves as a work surface for the machine. Then I started the ShopBot and it milled out the letters. I love MDF: it’s a good clean base you can start with. It has a smooth, grainless, nondescript texture and you can paint it or change the texture. If I had used plywood, I would have had to align all the letters so the grain would match up. Since I used MDF, I could have the letters any which way with no one being the wiser. Figure 3-6 shows my ShopBot milling the letters.

Figure 3-6. Cutting out letters on the ShopBot
2. Clean up the letters and edges
When I designed the letters, I made sure they had tabs on them. Tabs are much thinner pieces of wood in a CNC project that haven’t been milled through completely, and they’re there to keep cut-out shapes from flying around. After the milling is complete, you simply cut through the tabs with a box cutter, as you see me doing in Figure 3-7. After trimming with the knife I sanded the shapes smooth using a Sandblaster sanding sponge from 3M.

Figure 3-7. Cutting the tabs to remove the letters
3. Glue the edges to the letters
Each letter also has a raised bezel, an outline of the letter, and the two together resemble a shallow channel letter. Figure 3-8 shows me gluing them together with wood glue.

Figure 3-8. Gluing the letter edges to the letters
4. Cut boards for the box
Next I cut the various pieces of MDF for the clock enclosure as well as the decorative pieces for the front. I trimmed the MDF to the right width on my table saw and then cut down the pieces to size on my chop saw.
5. Glue the box together
I made a box shape (seen in Figure 3-9) using more pieces of MDF. First I glued each joint and then secured it with my brad nailer. This box will enclose the digital clock.

Figure 3-9. Gluing and nailing the clock enclosure
6. Cut the front
I cut a window into a panel of quarter-inch MDF, simply by cutting through it with my box cutter. That’s how easy MDF is to work with! This panel is the bezel for the clock, as seen in Figure 3-10. I glued it into the front with clamps securing it.

Figure 3-10. Gluing the front bezel in place
7. Decorate the facade
The facade consists of a smaller box that will attach to the front of the clock, serving both to make it look like an iron I-beam and also to minimize the clock’s profile—having a smaller shape on the front makes the whole thing look smaller. I also included a couple of decorative pieces of wood glued in, with glass beads glued onto them (Figure 3-11). These are the “rivets” in the fake I-beam.

Figure 3-11. When painted, these glass beads will look like rivets
8. Paint the letters
I started off with a base coat of gray spray paint, then added a second layer of Sophisticated Finishes iron metallic paint. This stuff has actual iron filings in it, which is cool and also allows you to make them rusty if you want. Sophisticated Finishes also sells an antiquing solution that is the third layer to apply. I put the solution in a spray bottle and coated the project. The solution rusts the metal dust in the paint, giving it a perfect iron finish.
9. Decorate the letters
The letters themselves have an added decoration: a background of tools like wrenches, a ruler, and a little clamp. You can see it in Figure 3-12. I had a little fun, like having the tools go through the letters, and I had a nice assortment of old tools from my junk drawer.
When I had the tools arranged just right, I mixed up and poured EnviroTex Lite casting resin into the letters; their raised edges kept it from spilling out. EnviroTex is the sort of stuff used for bar tops. It comes in a pair of bottles and is mixed 50-50. A good way to ensure you’re mixing it right is simply to look at the bottles. If you start with the same amount in each bottle, when you’re done the liquid levels should be the same. After I had put the EnviroTex into the letters, I worked them over with the heat gun to force the bubbles out of the resin.

Figure 3-12. The letters are decorated with a variety of tools
10. Attach the letters to the box
As a final step, I attached the letters to the clock enclosure with Loctite epoxy and secured them with L-brackets, as seen in Figure 3-13. The clock is done!

Figure 3-13. Attaching the letters with epoxy and L-brackets
Summary
This project was a great branding piece for Inc. and helped disguise a very functional clock. At the same time it helped build on my CNC skills. I love how it turned out.
Dart Board Cabinet
I am Twitter friends with the actor Eric Stonestreet, and he asked me to make him a dart board cabinet that celebrated his pet dog, Hawkins. It consists of a white oak box with the traditional double-arched doors in front, which flip open to reveal dart holders and a blackboard surface for keeping score. The front of the cabinet features a design of Hawkins (Figure 3-14) that I cut out of red oak on my ShopBot CNC mill.

Figure 3-14. The dart board cabinet features a CNC-milled design on the front
Tools and Materials
I used a surprisingly diverse set of tools to make the cabinet:
§ Chop saw
§ Table saw
§ Cordless drill
§ Drill press
§ Plug cutter
§ Palm sander
§ Router
§ Brad nailer
§ Festool domino joiner
§ Reciprocal sander
§ Planer
§ Oak planks
§ Oak plywood
§ MDF
§ Clamps
§ Wood glue
§ Spray glue
§ Stain
§ Polyurethane varnish
Building the Dart Board Cabinet
I took the following steps to complete the project:
1. Cut and trim the oak planks
I ran white oak planks through my table saw, then cut them down to size on the chop saw. These boards will form the cabinet sides, top, and bottom.
2. Pre-drill the edges
I needed to attach the boards to each other very securely, so I chose to use metal screws. But I also knew the cabinet was decorative, so I wanted to make sure the screws were hidden. So I pre-drilled screw countersinks (Figure 3-15) on the ends of the side boards.

Figure 3-15. Drilling countersinks on the ends of two of the boards
3. Make the box
I glued and clamped the boards into a box shape, tapped the boards into place with a hammer (Figure 3-16), and then screwed them together.

Figure 3-16. Tapping the cabinet sides square
4. Plug the screw holes
Using a special saw called a plug cutter (seen in Figure 3-17), I cut out a bunch of pegs. Then I glued the screw holes and tapped the pegs into place, leaving a little sticking out. When the glue had dried I sawed off the extra wood with a flush cutter and sanded it smooth with a palm sander.

Figure 3-17. Making screw-hole plugs with a plug cutter
5. Cut a recess into the frame
I used my router to cut a groove in the edge of the box so that a piece of plywood will nest in it, forming the back of the cabinet.
6. Make the back
While the glue on the front parts was drying I made the back of the box out of a layer of oak plywood spray-glued to a layer of MDF. When it dried, I put it into the recess I cut with the router, glued it, and nailed it into place with my brad nailer.
7. Assemble the front
This consists of four planks of oak forming two doors. In the next step I’ll cut a lovely curve in the front doors, but for now they’re just cut at an angle. I joined each set of doors with my Festool domino jig, which cuts a slot in the edge of a board that fits a special peg called a domino tenon. You can see them in Figure 3-18. This lets me strongly and securely join boards at the edge. I clamped and glued the two doors.

Figure 3-18. Joining two sets of boards with domino tenons
8. Shape the front
Once the two doors had dried, I needed to give them the customary arched shape. I drew one curve freehand, then taped the two doors on top of each other and cut both at the same time on the band saw. You can see me cutting in Figure 3-19. I sanded the doors on my recipcrocating sander, ran them through the planer, then palm-sanded them smooth. I attached the doors to the cabinet with brass piano hinges.

Figure 3-19. I drew one door’s curve freehand and then cut out both boards simultaneously
9. Cut the wood for the design
Next I switched things up and worked on my CNC. I wanted the design on the front to have kind of a rough-hewn look, so for a material I glued together strips of red oak to form a single sheet.
10. Mill the design
Before I could start milling, I needed a logo for the front. I created the design in Adobe Illustrator, and it features a dog in the center with the family name and dog’s name surrounding it.
I spray-mounted the red oak to a sheet of MDF, and ran it through my ShopBot, cutting out the design. You can see the ShopBot’s spindle at work in Figure 3-20. I milled down to just a millimeter or so, then used a belt sander on the reverse to sand away the tabs, allowing me to remove the letters.

Figure 3-20. Milling the design in red oak
11. Add the design to the doors
After sanding them smooth, I glued the letters and design into place and tacked them down with a brad nailer. You can see me arranging things in Figure 3-21. After it dried I went in with a chisel and shaped some of the details to make them seem more rough-hewn and carved. I wanted to take the design away from a machine-cut look to more of a hand-carved look.

Figure 3-21. Gluing the design into place
12. Add the border
I cut out a border of red-oak strips (Figure 3-22) and glued them into place around the edge of the doors. This will help define the edge and give the cabinet a finished look.

Figure 3-22. Adding the border of red oak strips
13. Finish the wood
All that remained was to stain and varnish the wood. I coated it in Minwax oak stain and a couple coats of polyurethane varnish. It’s done! Figure 3-23 shows the final product with the scoring chalkboards and dart racks on the inside.

Figure 3-23. The interior of the finished dart board enclosure
Summary
The dart board enclosure project was a great test of my CNC skills, and I love how it turned out. This chapter also has come to an end, and I hope it helped you level up your CNC milling skills.